National Aviation Day and a bottle airplane craft
So the Upcycled Plastic Bottle Airplane Craft is to honor those in the aviation professions and for National Aviation Day which is celebrated yearly on August 19th.
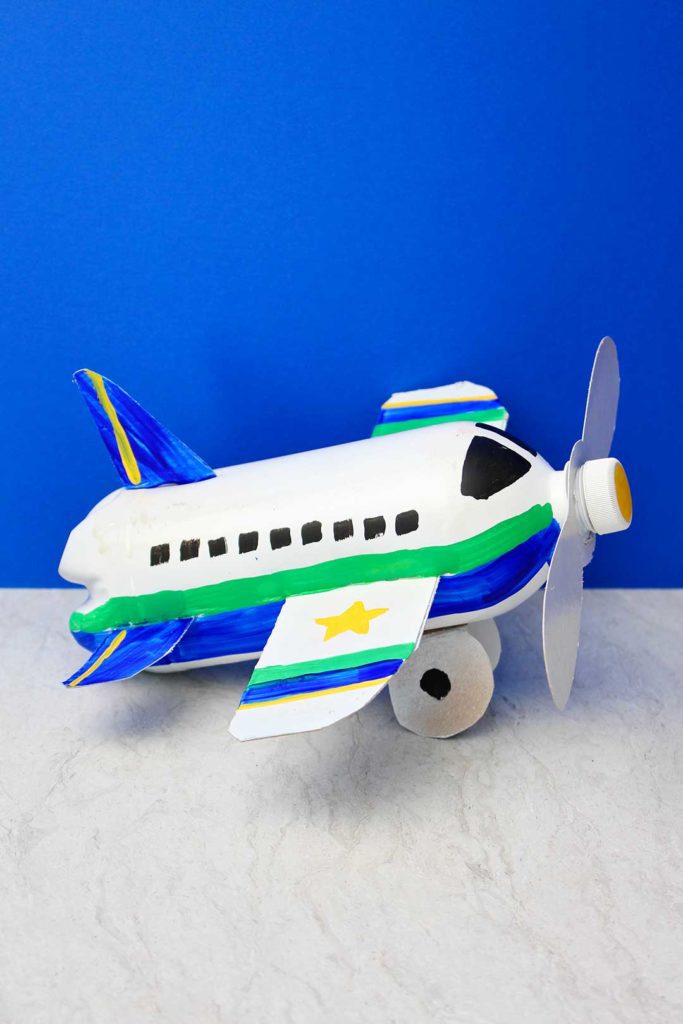
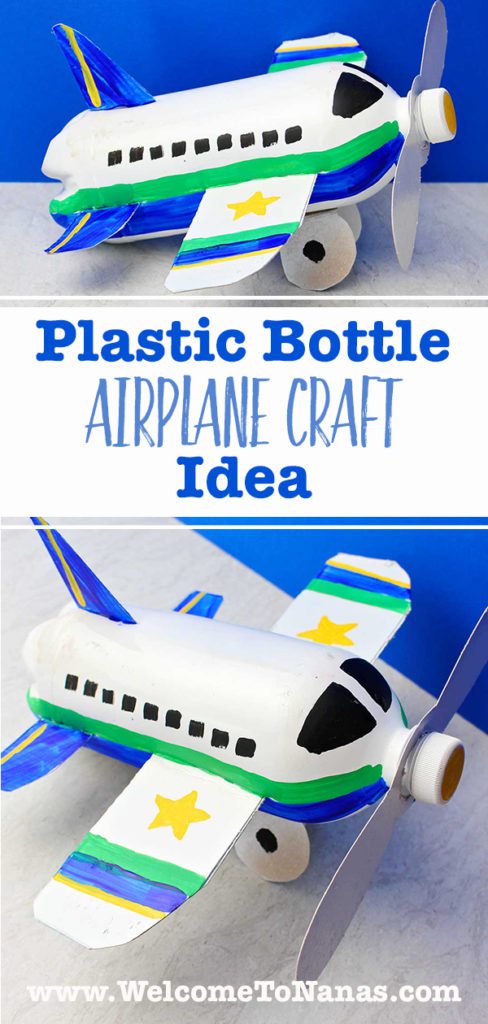
A used plastic bottle, cardboard, and paint are the stars of this airshow craft- I love upcycling! Create your own airplane craft and have some fun in the process.
What is National Aviation Day?
National Aviation Day was created by President Franklin D. Roosevelt in 1939. It was to celebrate the advancements being made in aviation. Think of all the advances that have been made in aviation since that time. Wow!
I’m from a flying family…almost everyone is a pilot or is involved in the air flight business but me. And I mean almost everyone.
So this is for my dad who was a WWII pilot, one brother who is an airplane mechanic extraordinaire, two brothers who were airline pilots (one of which built his own plane- see picture at the end of this post), a brother-in-law/niece and her husband who were missionary pilots (& are still pilots), a brother who flies his own plane, two nephews who are pilots, and a nephew and his wife who are in Space Force.
Whew! I think I’d better make a craft to honor those in aviation and for National Aviation Day, don’t you think??!!
NASA's ideas for National Aviation Day
NASA has a great post on how to celebrate NAD (the link is found below).
One of their suggestions is to build an airplane. Well, I’m not going to be building a real airplane- but how about an airplane craft project? Now you’re talking!
Plastic bottle recycling extraordinaire!
Save the next 1 quart 1.8 oz or 2-liter plastic bottle that you empty (keep the lid). If you don’t purchase items that come in these containers, ask a friend to save you one.
By the way, I used the smaller sized bottle for the airplane that I made. These are great to craft items to keep on hand for things like DIY Piggy Banks, 2-Liter Ecosystems, or even DIY Bookmarks made from plastic.
Wash out the plastic bottle and let it dry. Take off the label by slitting it with your Exacto knife and scraping it off or using a product such as Goof-Off (takes off the glue).
Cardboard reuse too
Also salvage one of those larger cereal boxes you have around (or something similar). The cardboard in cereal boxes is lightweight these days but it worked pretty well. You will need a larger box if using a 2-liter bottle.
If you don’t have a box, ask a friend if they have one saved. Many people have a “good box” (or two) saved back!
Free Printable Airplane Craft Pattern
Here is the Free Printable Airplane Parts Pattern for you. Print it out to make “parts” for your airplane out of cardboard. Click here: Upcycled Plastic Bottle Airplane Craft Free Pattern
How do I make an Upcycled Plastic Bottle Airplane?
I'm offering a step-by-step video to coach you through making this craft if you would like an extended version of the tutorial. Please let me know if this is helpful.
It is found on YouTube at this link: Upcycled Plastic bottle Airplane Craft PlayHouse Demo. While there subscribe to my YouTube Channel!
Here are the detailed written steps to make your diy airplane craft.
Cutting the cardboard pieces for the craft airplane
Measure and Cut a piece of cardboard that is about 2.5 inches wide and 14 inches long. Increase the length of the wings by 4 inches if using a 2-liter bottle. I used the side of my cereal box, it was the perfect size for the smaller bottle size.
Then cut a second piece of cardboard that is 1.5 inches wide and 10 inches long. Increase the length by 2 inches if using the 2-liter bottle.
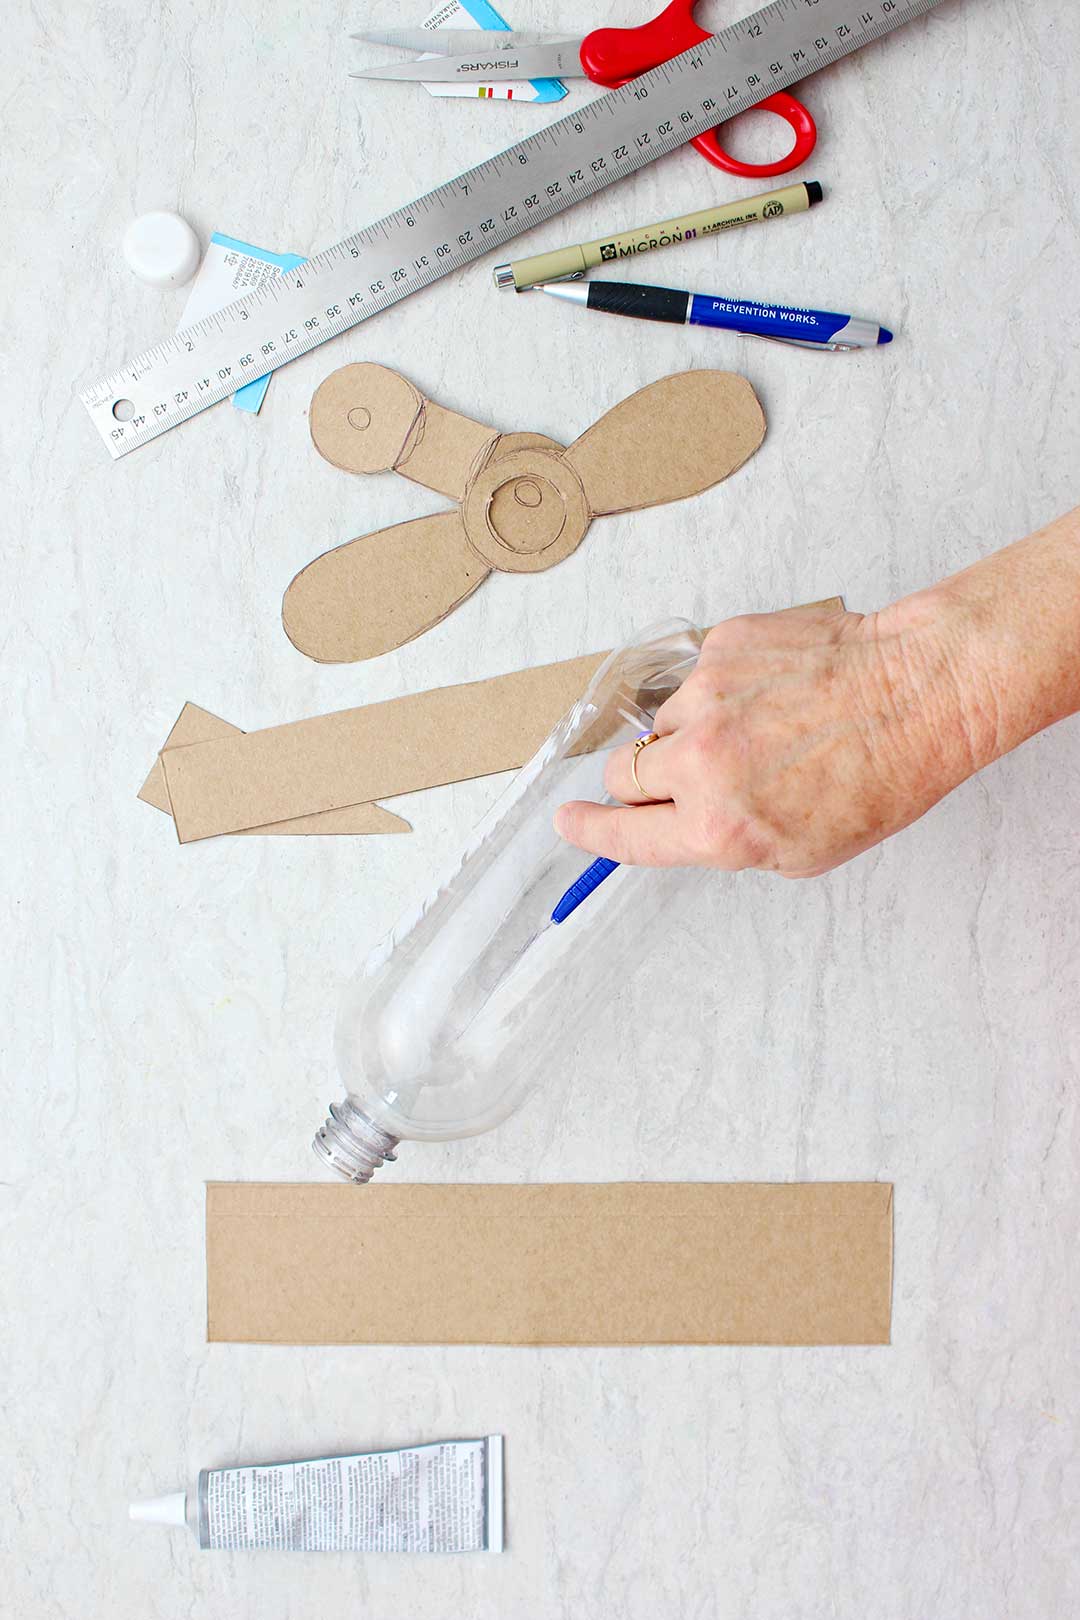
Now grab the copy of your free pattern to draw the final airplane parts on the cardboard (wheels, vertical stabilizer, and propeller).
Cut the copied pieces out and then trace them onto the cardboard.
Cut these cardboard pieces out with a scissors on the outside line.
Use the bottle cap of your bottle to draw a circle in the center of the propeller. Cut that circle piece out.
Assembling the Upcycled Plastic Bottle Airplane Craft
So I need to be honest. The next couple steps are challenging.
Let’s assemble our airplane!!
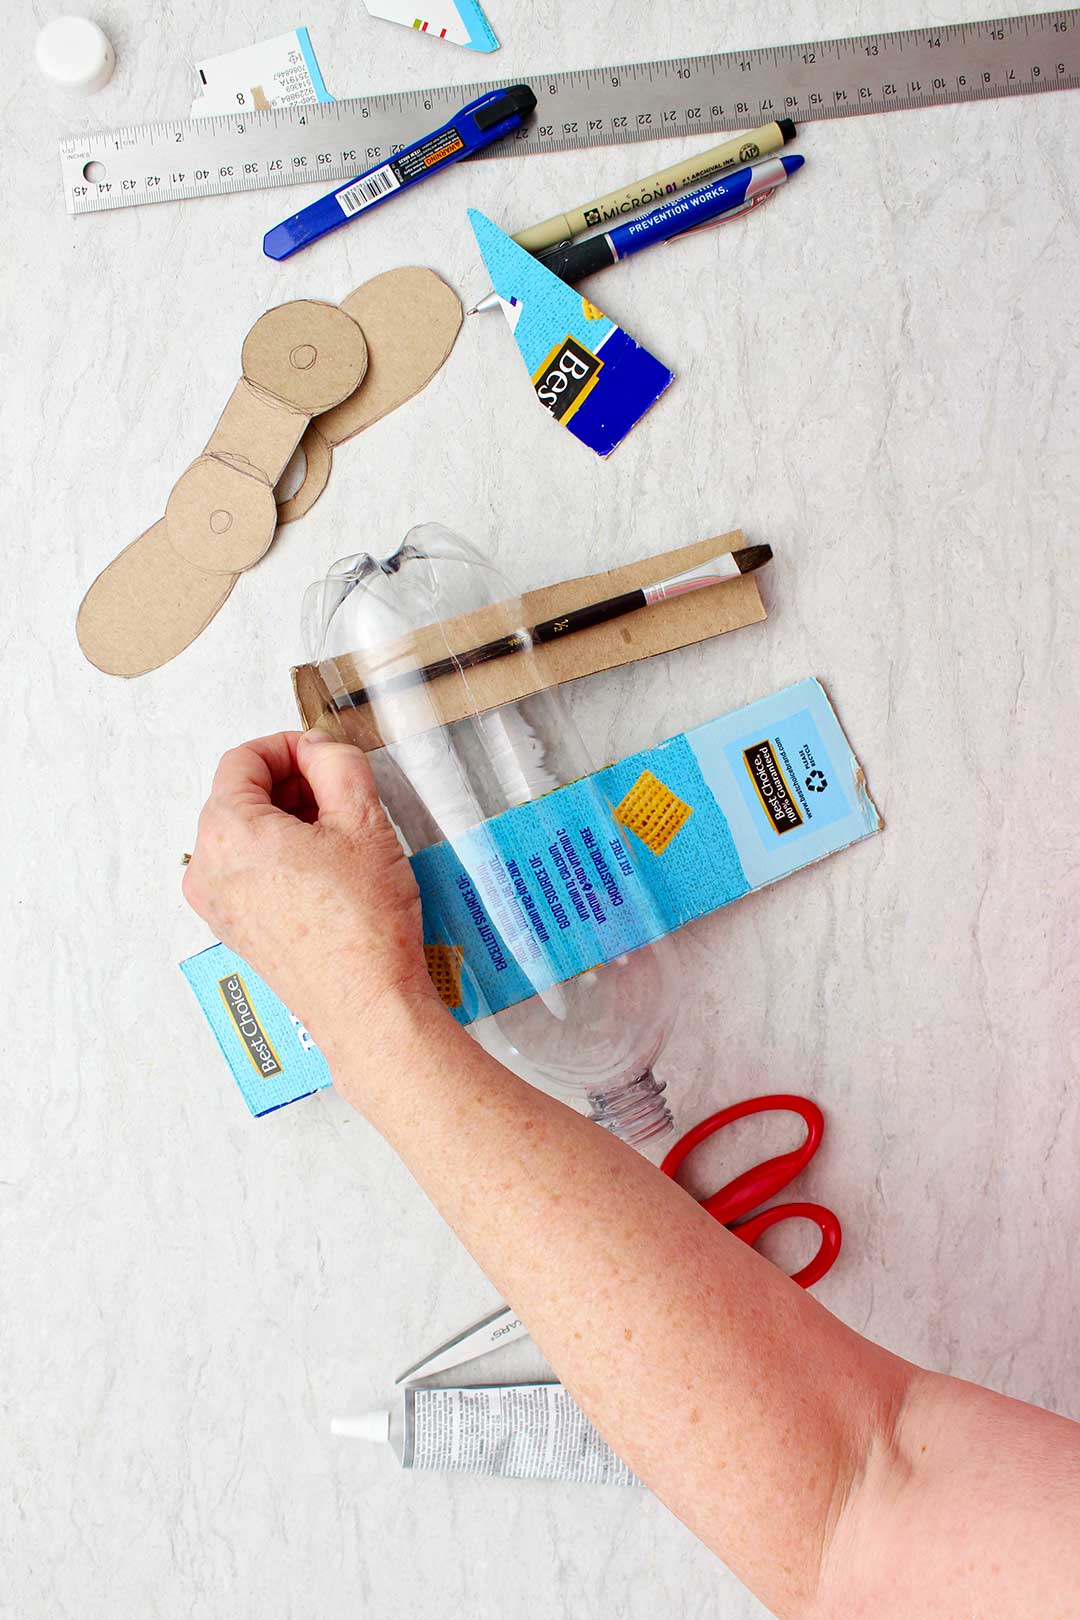
Cut slits in your plastic bottle
Note: Before making the following slits in the bottle, draw them on the bottle with a permanent marker.
Draw and then make a 2.75 inch slit with the Exacto or utility knife on opposite sides of the plastic bottle. They should be about two inches back from the bottle opening. The slits run straight down the side of the bottle for that 2 ¾ inch. This will be for the airplane wings.
Draw and then make 1.75 inch slit with the Exacto knife on opposite sides of the plastic bottle. These should be about an inch from the bottom of the bottle and should run in line with the first slits you made. These are for the back horizontal stabilizer which looks much like the wings piece but is smaller.
Note: Be careful with the Exacto or utility knife to make small pokes into the bottle to make the slits. If you pull hard, it can slit the whole bottle and is not as safe. It also works to start the slit with the Exacto knife and then finish it with the scissors.
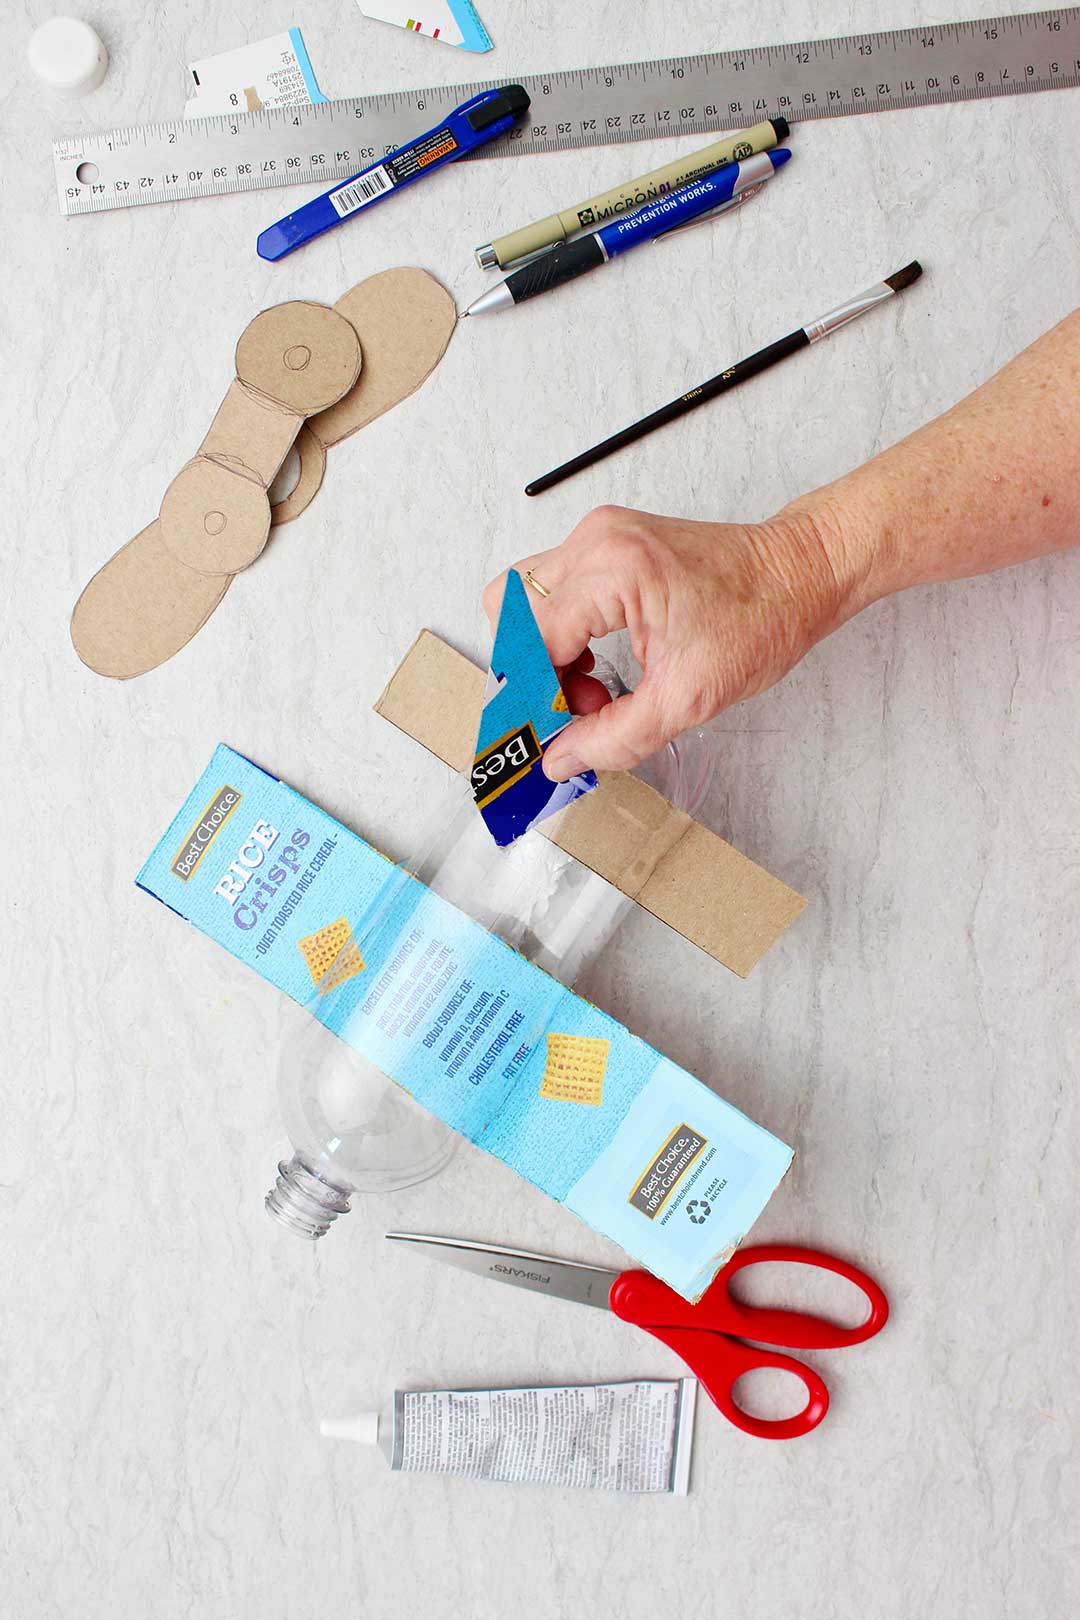
Make a 2-inch slit in the top of the plastic bottle above and parallel to the back stabilizer slits. This will be for the vertical stabilizer piece cut from the pattern.
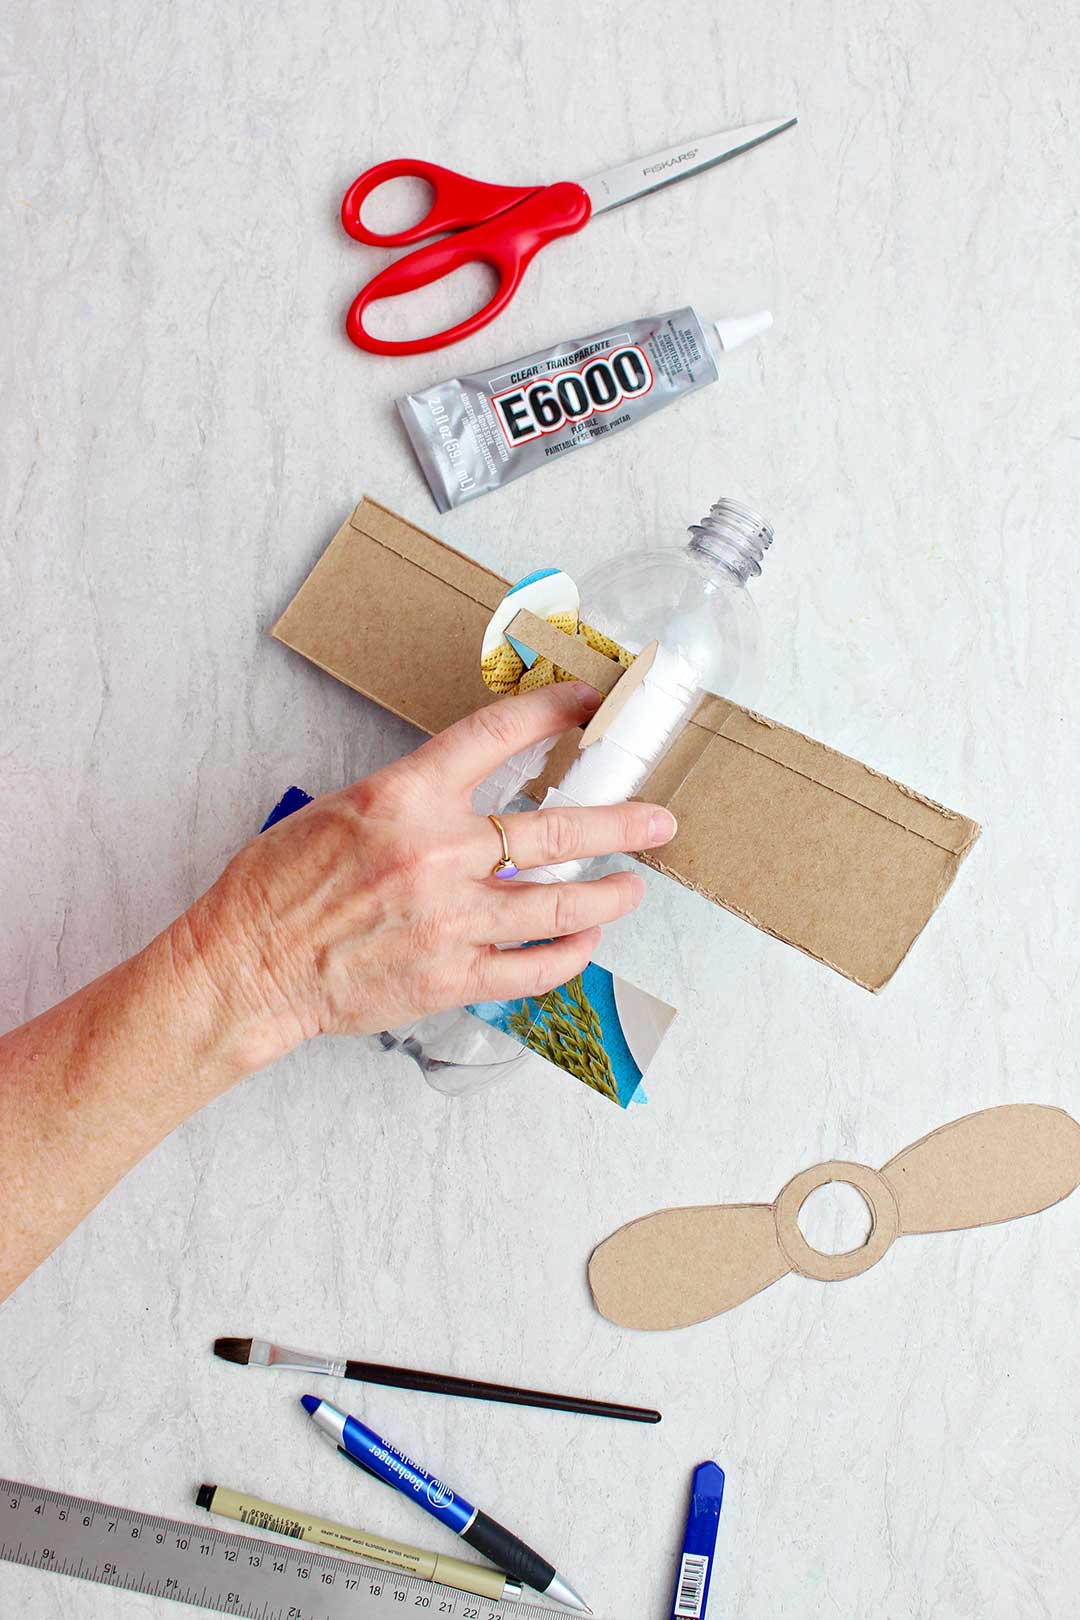
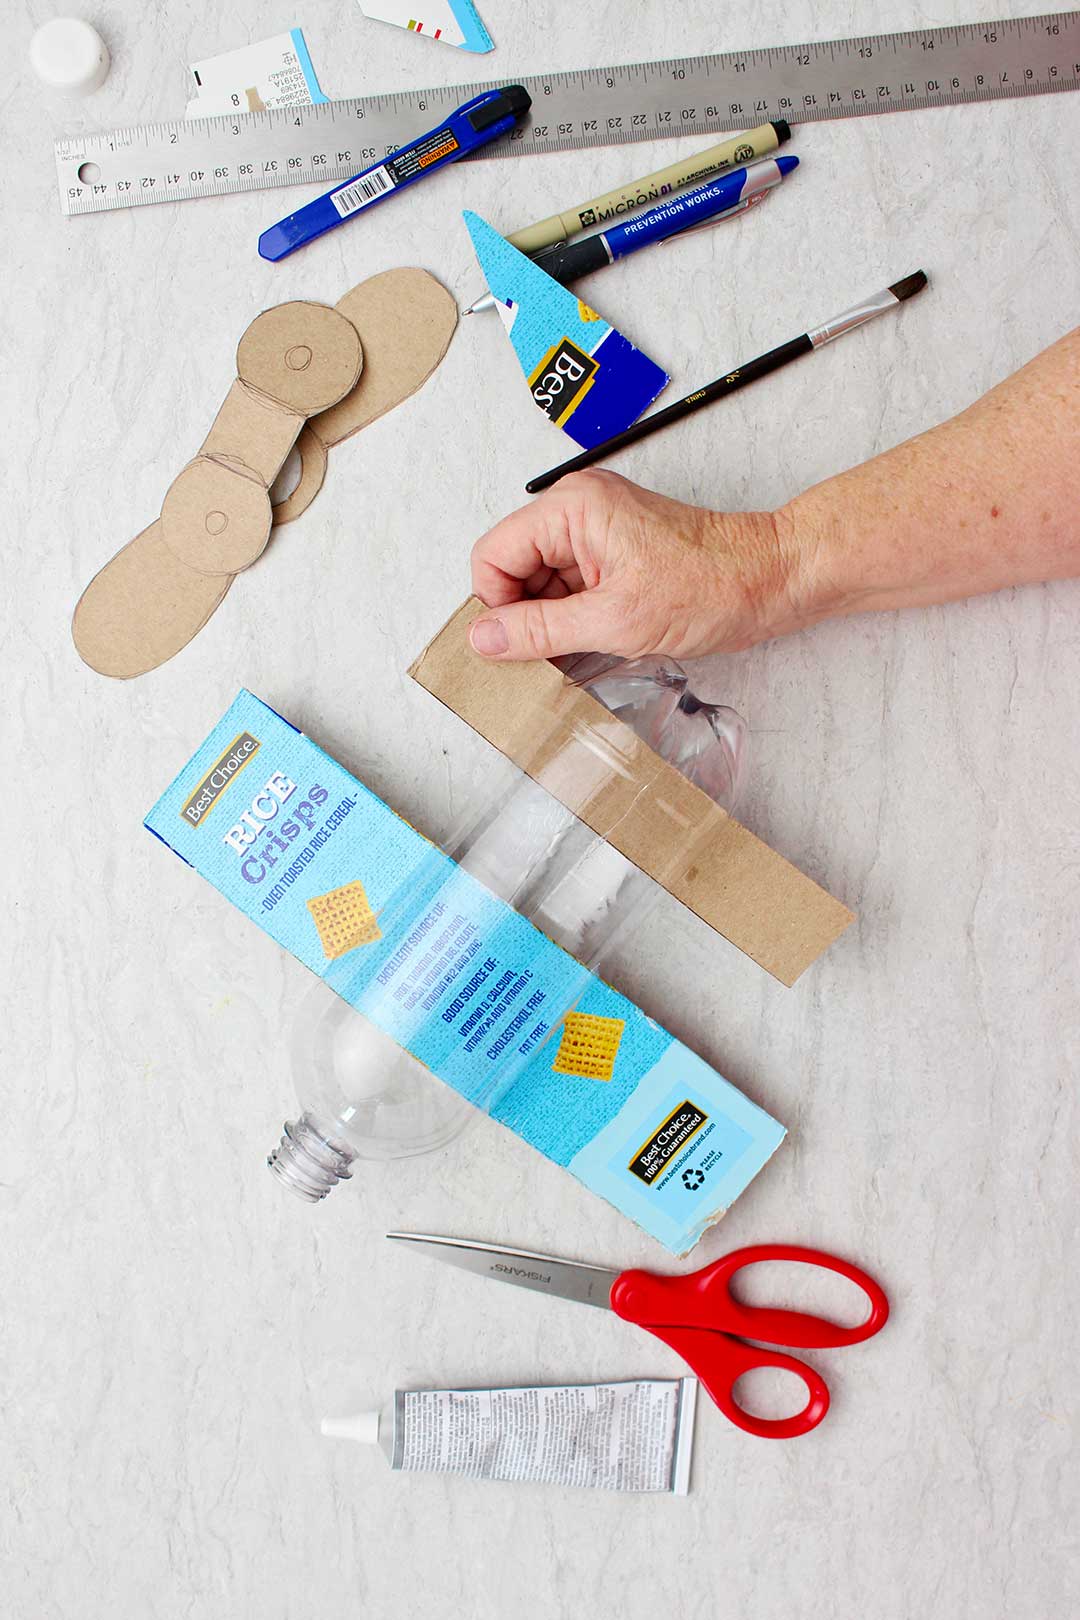
Place cardboard pieces into the slits
Now, stick the edge of the wing piece into a slit on one side of the plane, through the plastic bottle and out through the other side of the bottle. Repeat this with the second piece, the vertical stabilizer piece. (It looks a lot like the wings but smaller.)
Note: I had to stick a paint brush through the bottle to open up the slit on the opposite side of the bottle so I could get the cardboard through.
The wing piece will slip into one slit and then out the other in the front of the plane. The vertical stabilizer does the same in the back of the plane.
The vertical stabilizer piece slips down into the slit in the top of the plane.
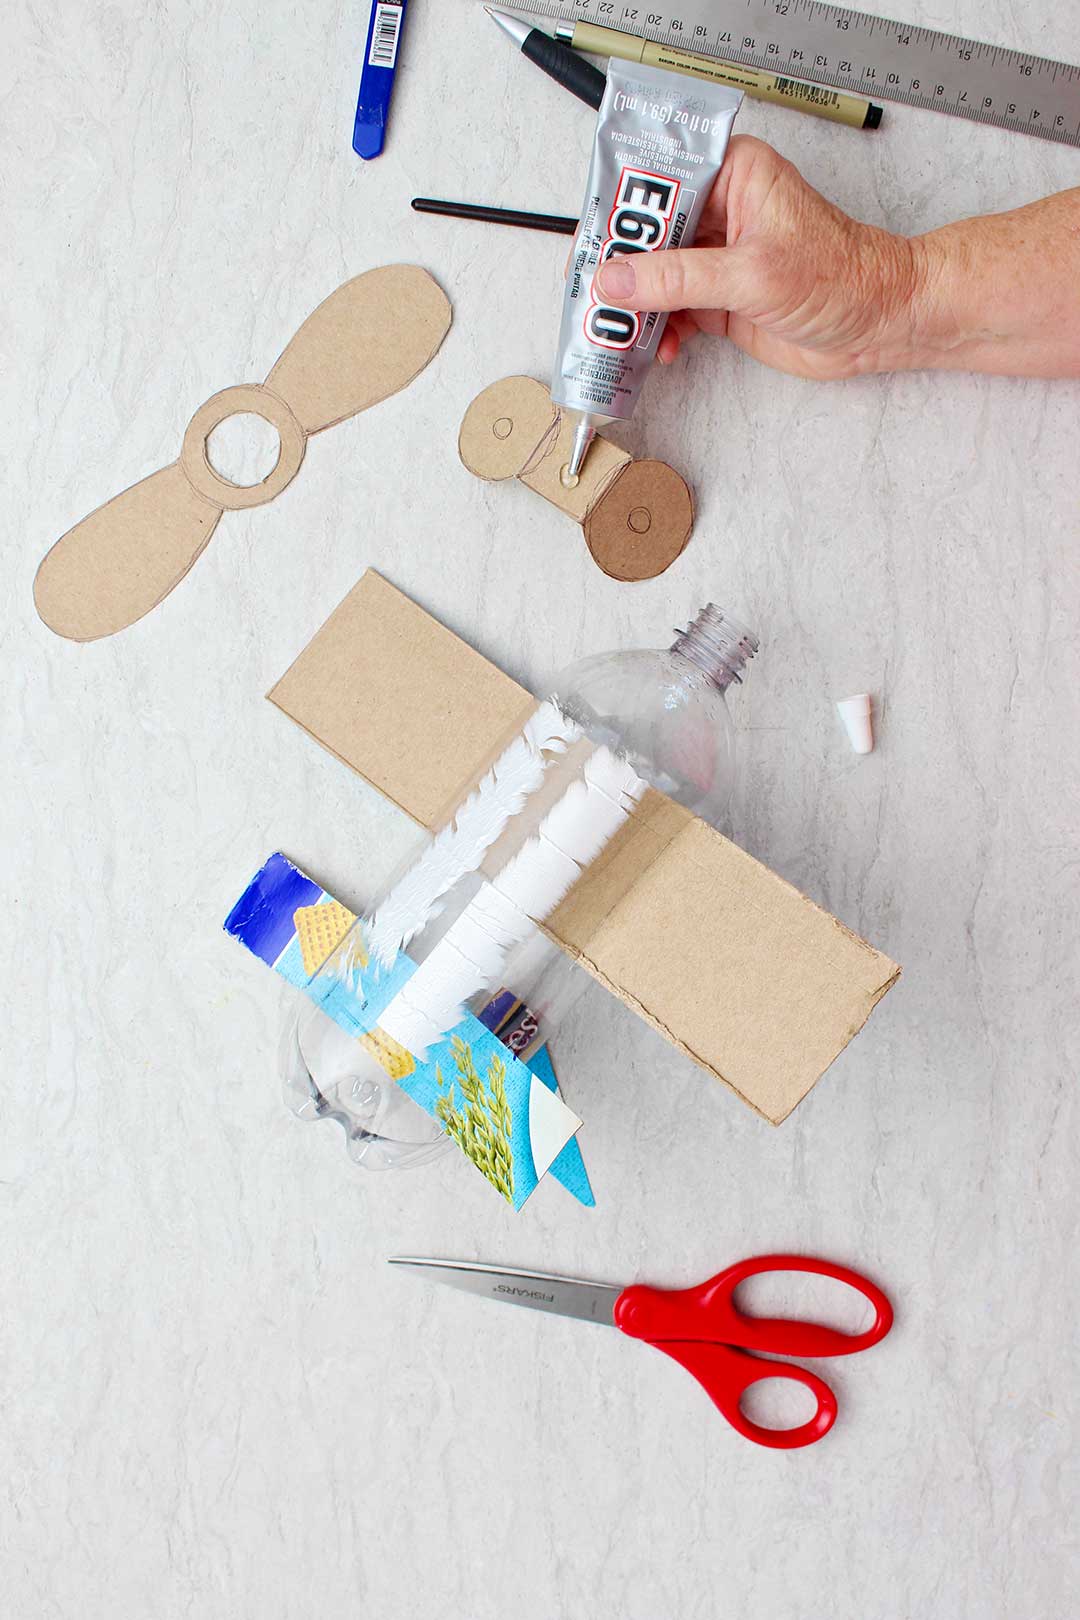
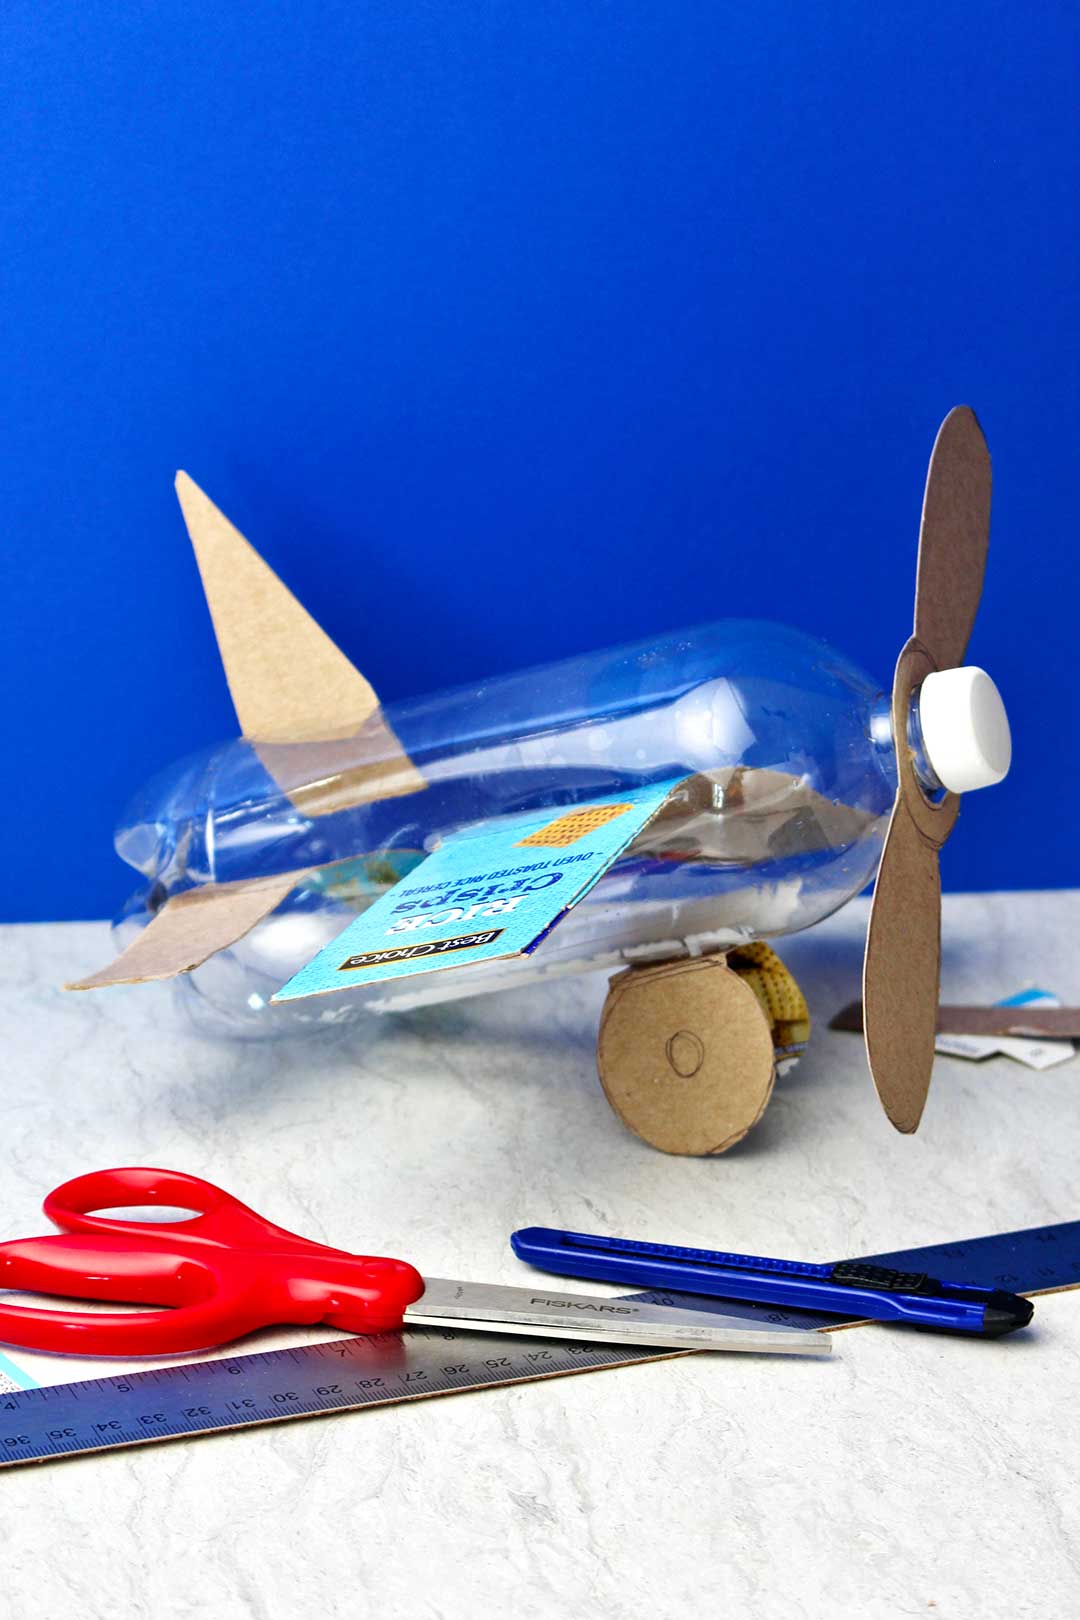
Glue on the wheels
Take the wheel section and bend down on the dotted lines. This will be glued under the front section of the plane, under the wings.
The back end of the plane will sit on the countertop and the front end will sit up on the wheels.
If the cardboard wheels don’t stand up well, use a paper clip or small piece of cardboard and hot glue it between the wheels.
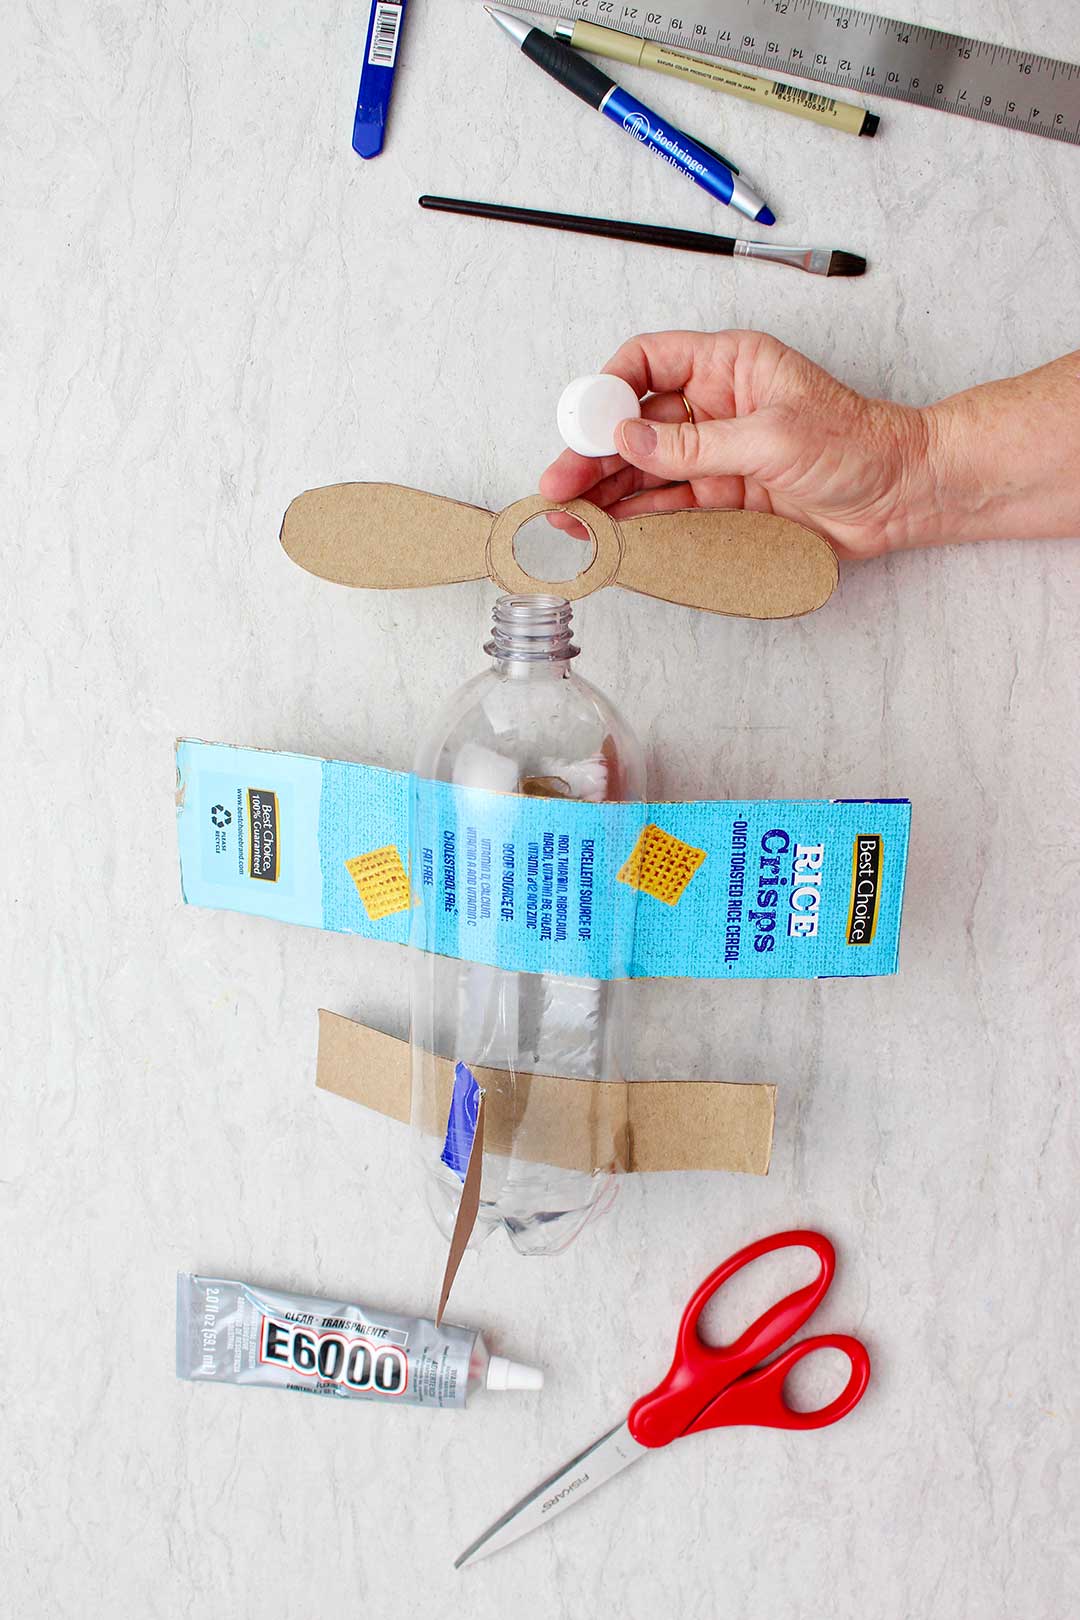
Put on the propeller!
Lastly, unscrew the lid of the plane and put the propeller over/on the mouth of the bottle. Then screw the lid back on.
OK, so the assembly is complete. You can leave it this way if you want or go ahead and paint the Plastic Bottle Airplane Craft Idea. I wanted to paint mine!
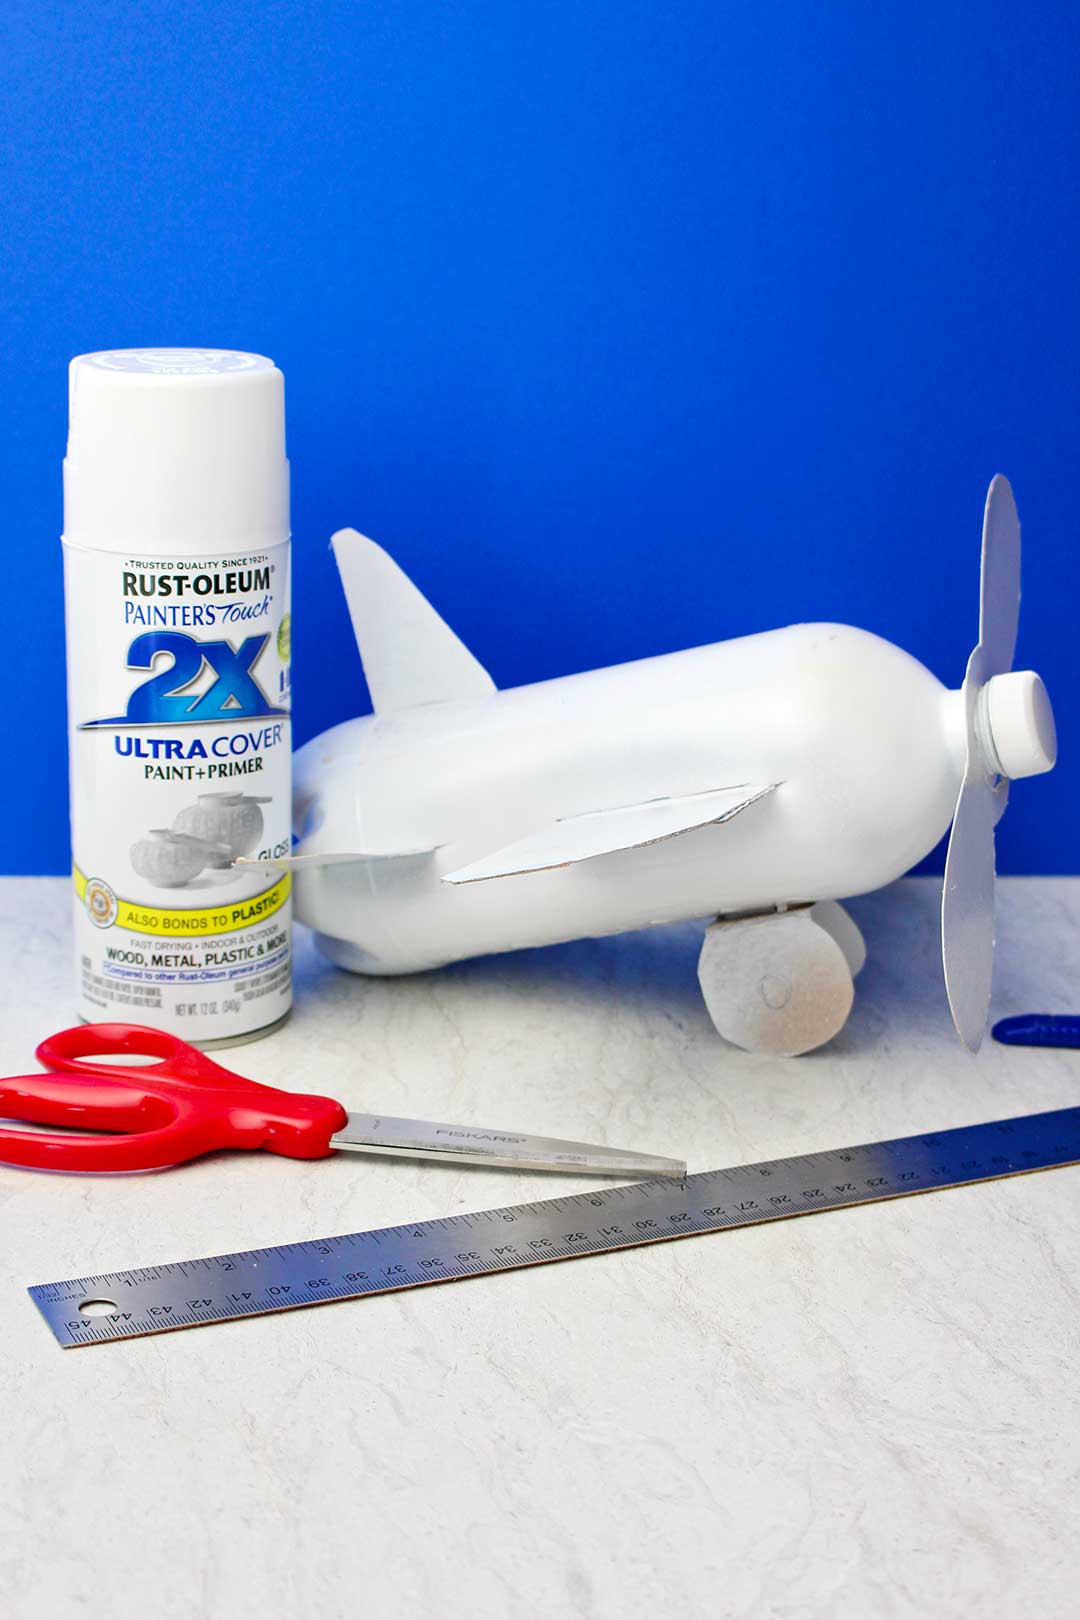
Spray paint your Plastic Bottle Airplane Craft
Go outside, put down some paper to protect the lawn and spray paint the top of the bottle, wings and tail sections. This will be the base color of your airplane. I used white but thought silver would look cool too.
Let the plane dry, then turn it over and spray paint the under side of the plane, wings, and wheels.
After it is completely dry, take it back inside and put it over paper again to do some more painting.
Paint markings on your diy airplane craft
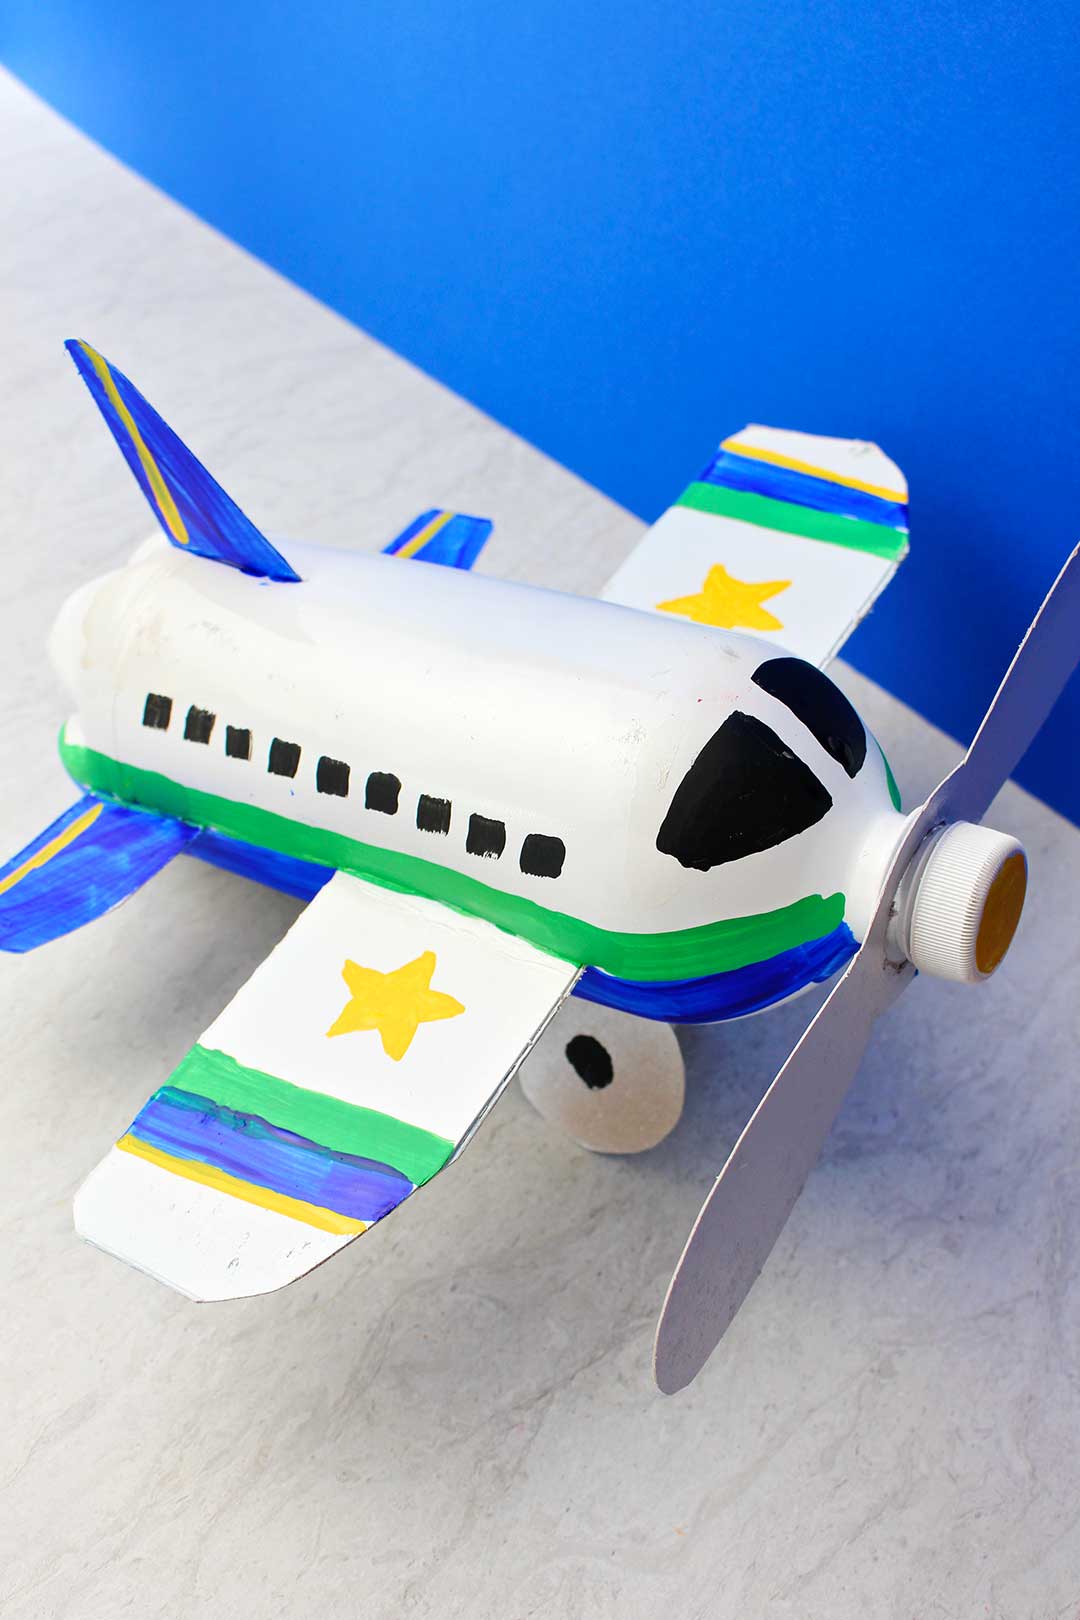
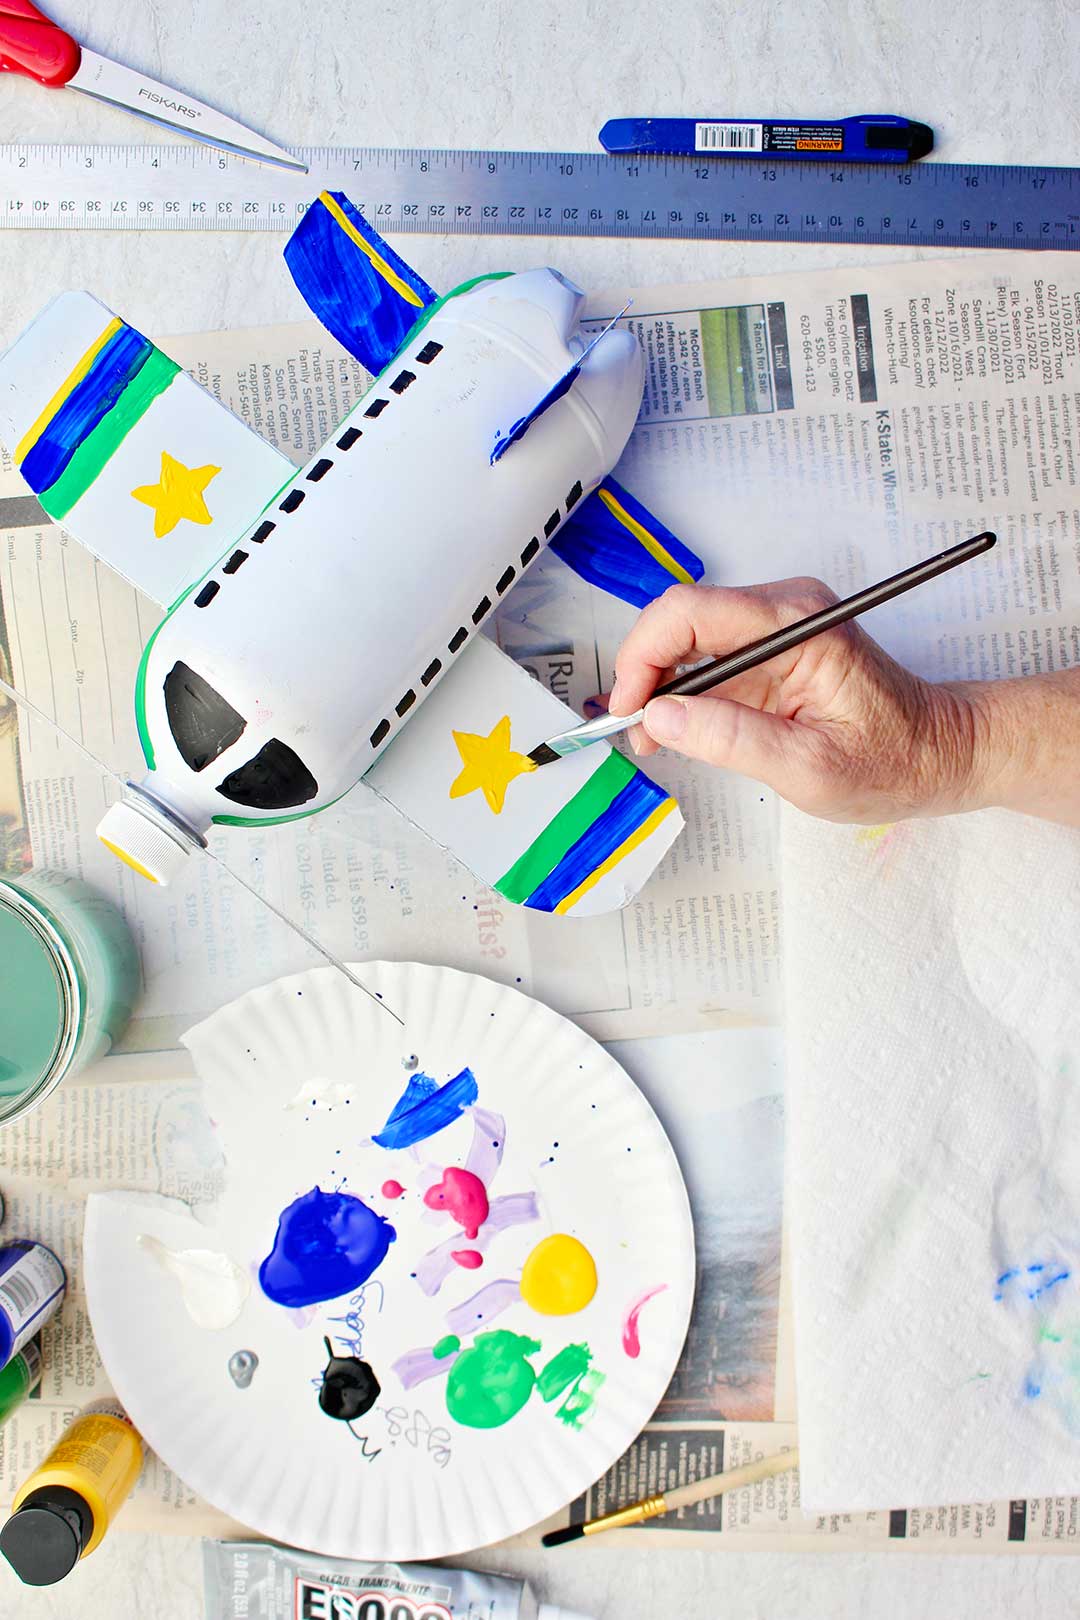
Now, have some fun painting your airplane with it’s own markings using acrylic craft paints and your paint brushes. You can use stripes, stars, or any design you would like.
I used bright blue, green, and yellow and made a couple stars on the wings. Don't forget to put in windows for the pilots in the front!
You can also use stickers and decals on your plane or write your name with a permanent marker.
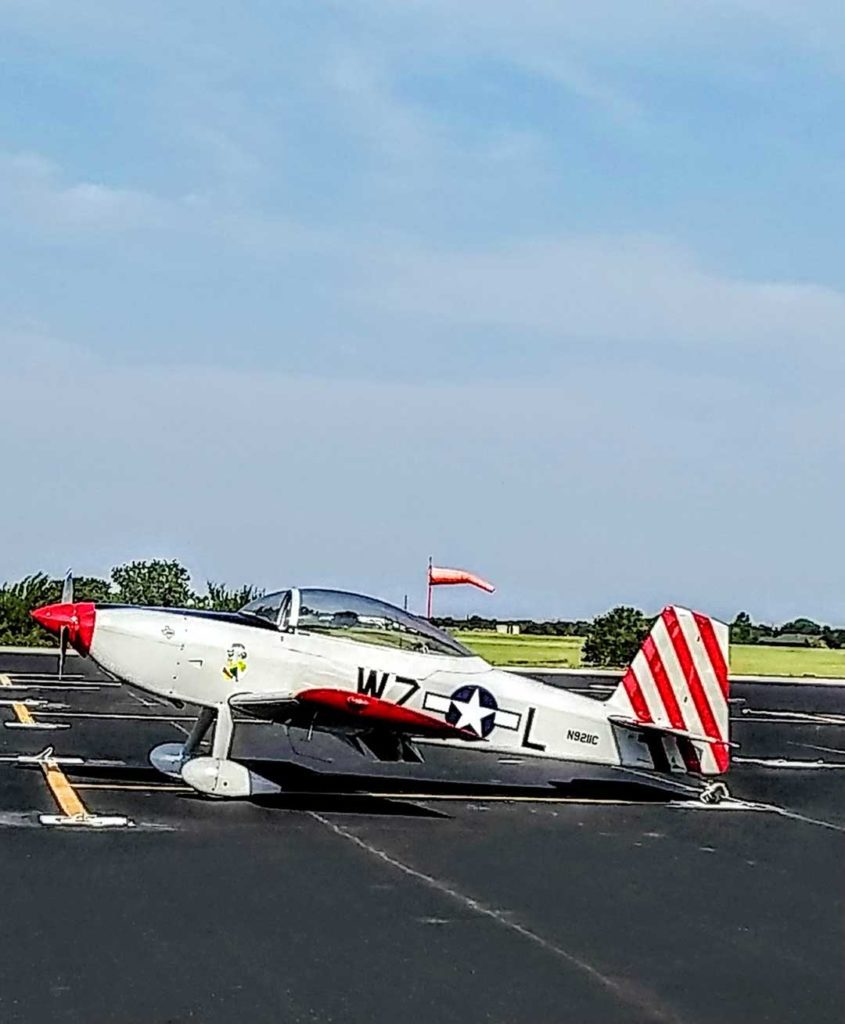
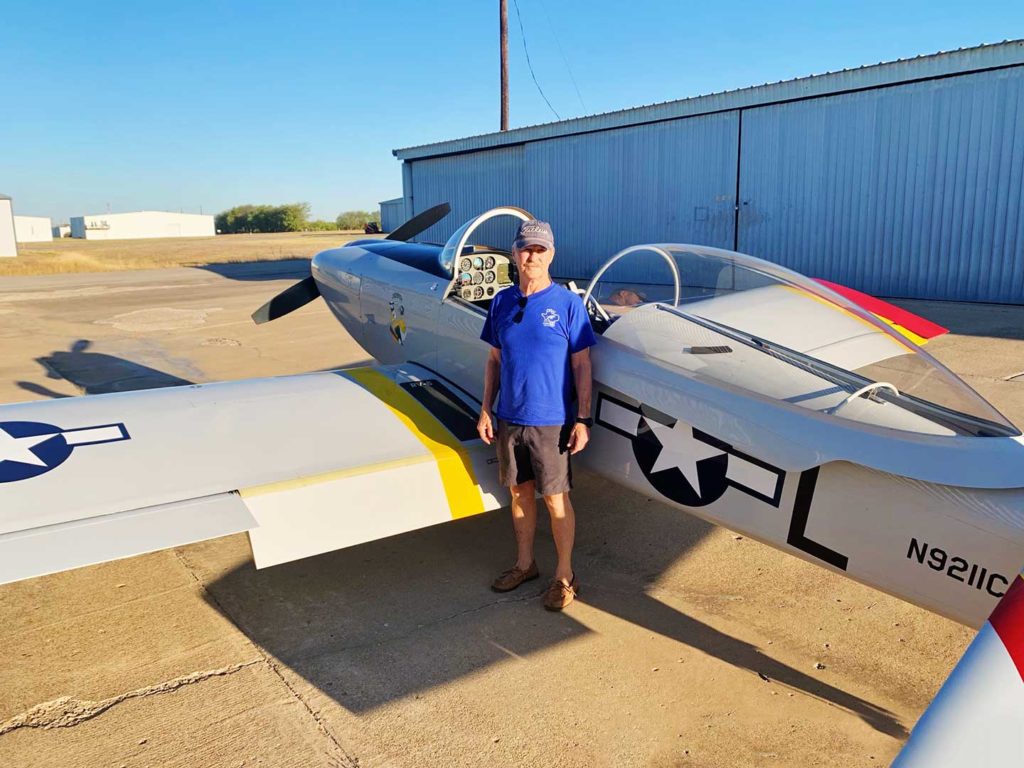
See the markings on my brother's home built airplane!
Check out the cool markings on my brother’s home-built airplane. They are modeled after the markings of our dad’s WWII squadron.
How about a pilot or aviation birthday party?
Wasn’t this a fun project? Maybe you have a special pilot in your life that would like his or her own home-built airplane crafted for a special occasion. The Upcycled Plastic Bottle Airplane would make a great table decoration at a pilot/aviation birthday party!
Take a "Spread Your Wings" picture!
The NASA post also encouraged us to take a “Spread Your Wings” picture. This is where you stick out your arms like an airplane when you take a picture.
Why don’t you take a “Spread Your Wings” picture with the airplane you made! Post it here and honor all those that contribute to the advancement of aeronautics!
Here is the link to that NASA post I mentioned: https://www.nasa.gov/feature/spread-your-wings-on-national-aviation-day.
Sending love to my aviation family-
I’m sending love to all of my flying/aviation relatives. Maybe I can put in an airstrip, and you can taxi in for coffee!
And dad, we all miss you. Thanks for nurturing our love for flying.
Want more 3D recycled craft project ideas?
Check out these fun posts from around the blog!
- Recycled Milk Jug Ghost Luminaries
- Make a Recycled Plastic Bottle Bird Feeder
- How to Make a Bug Box- Recycled or New Materials
- 3D Elephant Craft
- DIY 2-Liter Bottle Ecosystem
Enjoy!
If you try this craft, let me know! Go ahead and leave a comment, rate it, and tag a photo with #WelcometoNanas wherever you post.
Come join the fun at https://welcometonanas.com
More from Welcome To Nana's
Upcycled Plastic Bottle Airplane Craft
Equipment
- Scissors
- Ruler
- Exacto or Utility Knife
- Paint brushes of various sizes
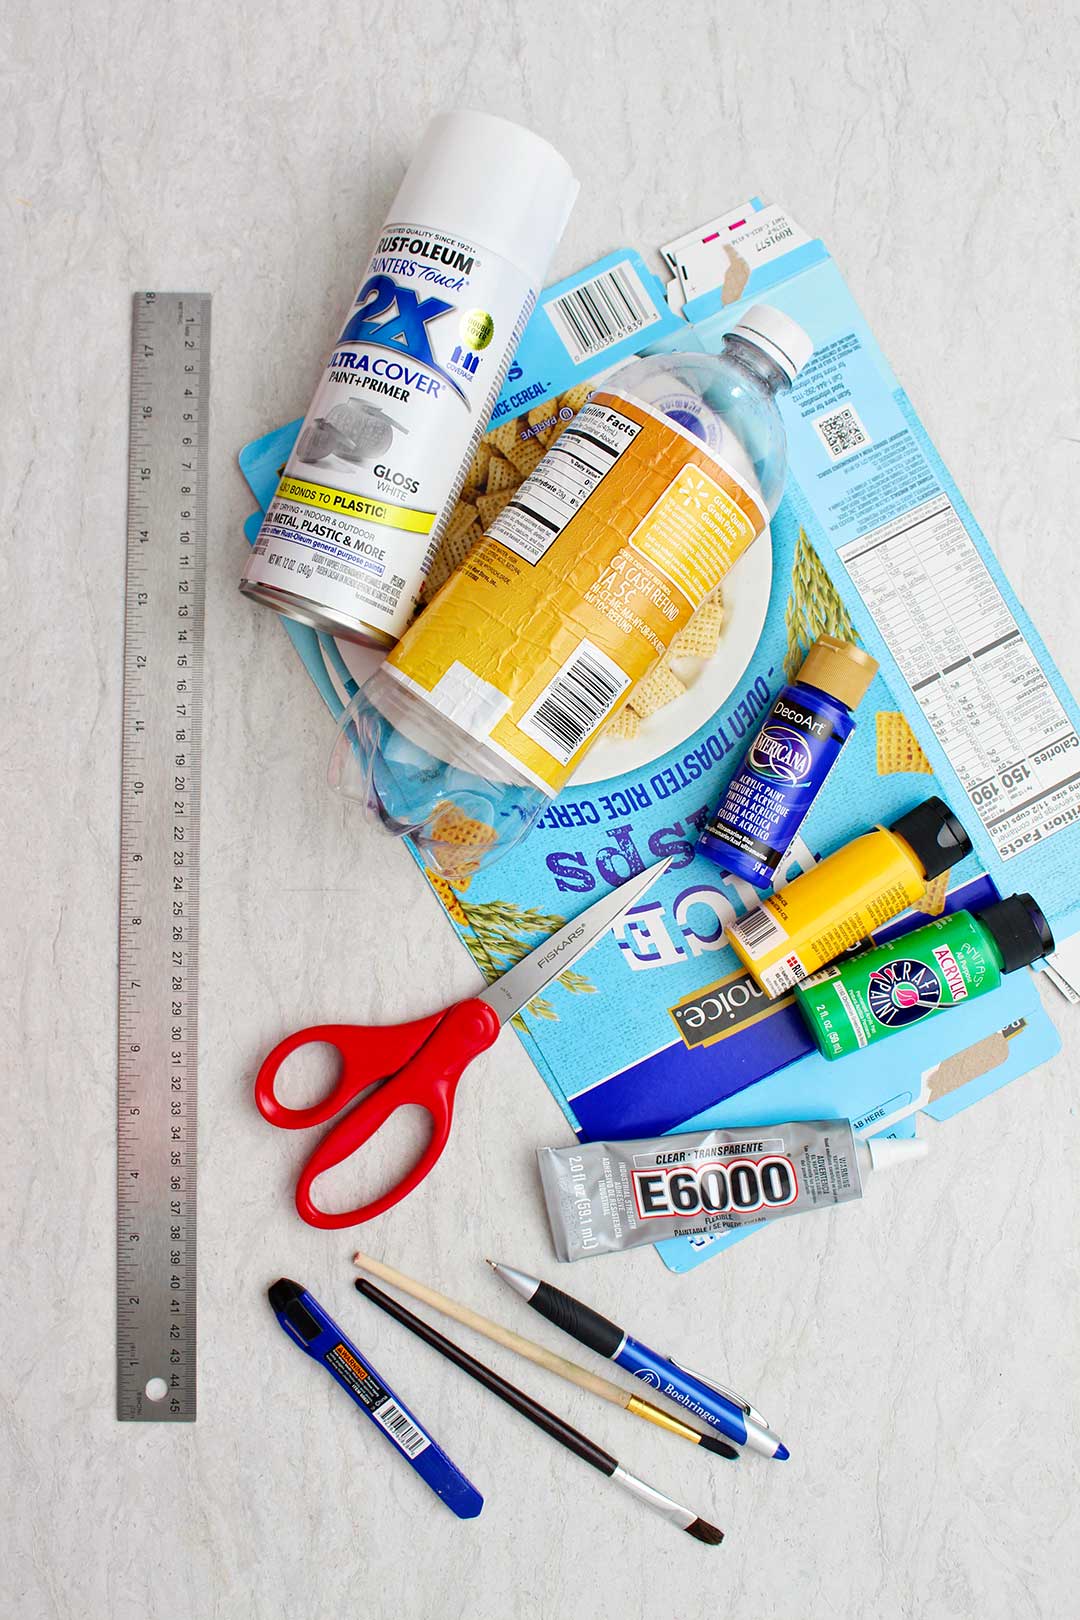
Items Required
- Free printable pattern for Plastic Bottle Airplane Craft Idea
- A 1 qt 1.8 oz plastic bottle with the lid (clean and dry) (You can use a 2 liter bottle or a smaller water bottle if you want but will need to adapt the pattern and plane pieces size if you do.)
- Cardboard- like from a larger cereal box (or old Amazon box)
- Permanent marker
- Spray paint (that also works on plastic) in a color that you like for your airplane base color
- Acrylic craft paints-
- E6000 Glue
- Goof Off- (optional)- or similar product to take label off of the milk jug
Instructions
- Measure and Cut a piece of cardboard that is about 2.5 inches wide and 14 inches long. Increase the length of the wings by 4 inches if using a 2-liter bottle. I used the side of my cereal box, it was the perfect size for the smaller bottle size.Then cut a second piece of cardboard that is 1.5 inches wide and 10 inches long. Increase the length by 2 inches if using the 2-liter bottle.
- Now grab the copy of your free pattern to draw the final airplane parts on the cardboard (wheels, vertical stabilizer, and propeller).Cut the copied pieces out and then trace them onto the cardboard.Cut these cardboard pieces out with a scissors on the outside line. Use the bottle cap of your bottle to draw a circle in the center of the propeller. Cut that circle piece out.
- Cut slits in your plastic bottleNote: Before making the following slits in the bottle, draw them on the bottle with a permanent marker.Draw and then make a 2.75 inch slit with the Exacto or utility knife on opposite sides of the plastic bottle. They should be about two inches back from the bottle opening. The slits run straight down the side of the bottle for that 2 ¾ inch. This will be for the airplane wings.Draw and then make 1.75 inch slit with the Exacto knife on opposite sides of the plastic bottle. These should be about an inch from the bottom of the bottle and should run in line with the first slits you made. These are for the back horizontal stabilizer which looks much like the wings piece but is smaller.Make a 2-inch slit in the top of the plastic bottle above and parallel to the back stabilizer slits. This will be for the vertical stabilizer piece cut from the pattern.
- Now, stick the edge of the wing piece into a slit on one side of the plane, through the plastic bottle and out through the other side of the bottle. Repeat this with the second piece, the vertical stabilizer piece. (It looks a lot like the wings but smaller.)Note: I had to stick a paint brush through the bottle to open up the slit on the opposite side of the bottle so I could get the cardboard through. The wing piece will slip into one slit and then out the other in the front of the plane. The vertical stabilizer does the same in the back of the plane.The vertical stabilizer piece slips down into the slit in the top of the plane.
- Take the wheel section and bend down on the dotted lines. This will be glued under the front section of the plane, under the wings. The back end of the plane will sit on the countertop and the front end will sit up on the wheels. If the cardboard wheels don’t stand up well, use a paper clip or small piece of cardboard and hot glue it between the wheels.
- Lastly, unscrew the lid of the plane and put the propeller over/on the mouth of the bottle. Then screw the lid back on. OK, so the assembly is complete. You can leave it this way if you want or go ahead and paint the Plastic Bottle Airplane Craft Idea. I wanted to paint mine!
- Go outside, put down some paper to protect the lawn and spray paint the top of the bottle, wings and tail sections. This will be the base color of your airplane. I used white but thought silver would look cool too.Let the plane dry, then turn it over and spray paint the under side of the plane, wings, and wheels.After it is completely dry, take it back inside and put it over paper again to do some more painting.
- Now, have some fun painting your airplane with it’s own markings using acrylic craft paints and your paint brushes. You can use stripes, stars, or any design you would like. I used bright blue, green, and yellow and made a couple stars on the wings. Don't forget to put in windows for the pilots in the front! You can also use stickers and decals on your plane or write your name with a permanent marker.
Video
Notes
Supplies for Plastic Bottle Airplane Craft Idea:
- Free printable pattern for Plastic Bottle Airplane Craft Idea
- A 1 qt 1.8 oz plastic bottle with the lid (clean and dry) (You can use a 2 liter bottle or a smaller water bottle if you want but will need to adapt the pattern and plane pieces size if you do.)
- Cardboard- like from a larger cereal box (or old Amazon box)
- Permanent marker
- Scissors
- Ruler
- Exacto or Utility Knife
- Spray paint (that also works on plastic) in a color that you like for your airplane base color
- Acrylic craft paints-
- Paint brushes of various sizes
- E6000 Glue
- Goof Off- (optional)- or similar product to take label off of the milk jug


Salome says
this aeroplane is so creative and nice
yes I am going to make it