Learn how to make quick and easy Tissue Paper Flowers using just pipe cleaners and tissue paper! This craft for kids is the perfect DIY decoration for birthday parties, classrooms, baby showers, or just for fun.

Jump to:
- Easy DIY Tissue Paper Flowers
- Kleenex Flowers and Tissue Paper Flowers
- What Colors to Use for a Tissue Paper Flower
- Tissue Paper Flower Sizes
- How to Make Tissue Paper Flowers, Step-by-Step
- Making Tissue Paper Pom Poms
- Tissue Paper Flower Variations
- How to Use these Tissue Paper Flowers for Kids
- YouTube Fan? Check Out the Video!
- Tissue Paper Flower FAQs
- More Flower Crafts for Kids
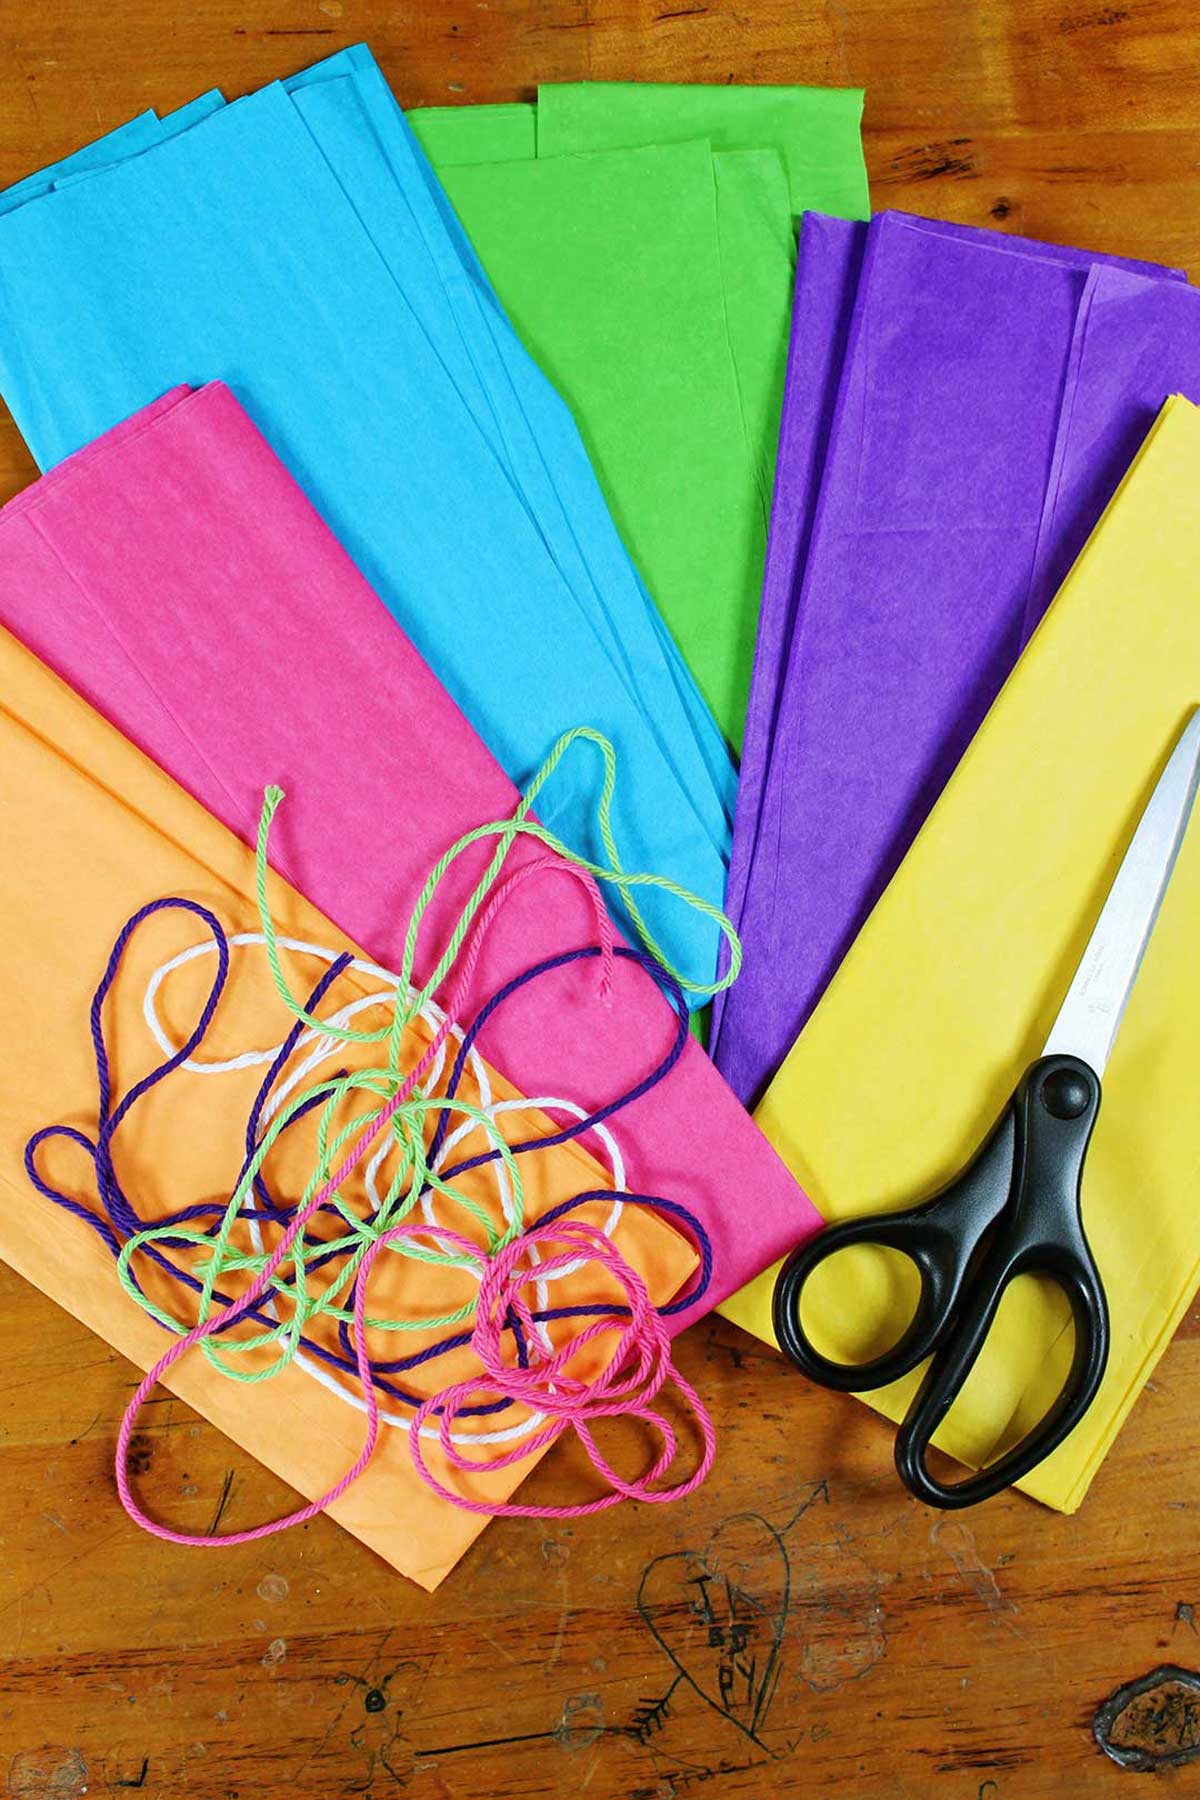
- Tissue Paper Flowers DIY Supplies
- More from Welcome To Nana's
- Easy Tissue Paper Flowers DIY
Easy DIY Tissue Paper Flowers
It is no exaggeration to say that I have made hundreds of tissue paper flowers over the years. Now I gathered all my expertise into this easy-to-follow craft tutorial for kids that results in perfectly full and fluffy, frustration-free flowers every time!
Creating these awesome flowers is easy for any age if you know the right tricks to follow, starting with the first fold. So let my countless hours of tissue paper fluffing help you make the perfect flower shape right from the start. Once kids have mastered the technique, they can try the variations of flower shape as well!
Kleenex Flowers and Tissue Paper Flowers
We used this technique to make flowers out of Kleenex and bobby pins when I was young. They came out looking much like white carnations.
Don't knock it till you try it! Ha!
I thought it was like magic and loved pulling apart the Kleenex layers and seeing the flower appear in 3-D. We would even spray them with perfume, so they smelled good.
I’m a 60’s child, and the tissue paper flowers were pretty popular in the 70’s, so I started making them from different colors of tissue paper when I was a bit older.
Even though it's been a long time, I’m excited to make them again now, and share this easy craft for kids of all ages.
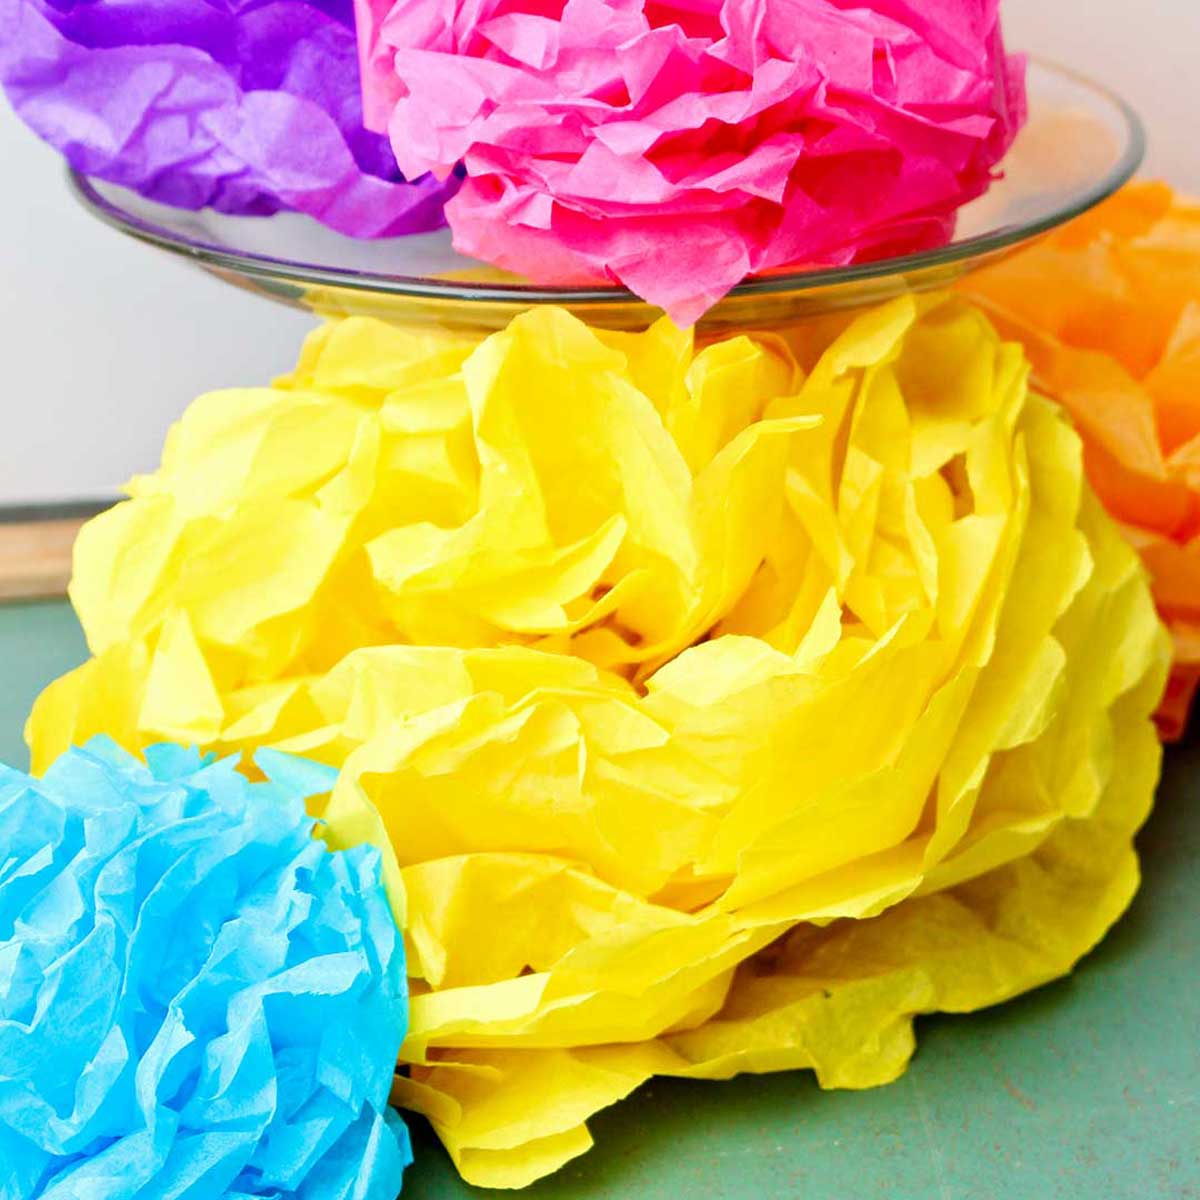
My grands and I made the beautiful paper flowers in these pictures for a birthday party. It was a fun project to do together!
These would also make a great way to make easy party decorations for bridal showers, valentine's day, a new classroom, or any special occasion.
What Colors to Use for a Tissue Paper Flower
Let's start by choosing what color(s) of tissue paper you would like for your flower. There are various ways to go about this.
I made mine with tissue paper sheets of all the same color to take the photos. But you could use 2-3 shades of one color tissue paper for a different look, or do a rainbow selection of tissue paper colors. The best part is that there is no wrong way to do it. 🙂
I thought it would be cool to do the top layer yellow to look like a yellow center in the flower. That’s what I did in the video.
You could even try adding a piece of green tissue paper to the bottom layer to make a layer of "leaves".
Try one of each!! Use your favorite color! I promise you; it is addictive.
You can use any tissue paper you'd like, purchased from any craft store, dollar tree or online. The one important thing is that each piece of tissue paper is all the same size.
Tissue Paper Flower Sizes
You can make your own tissue paper flowers various sizes in diameter. Most of the ones in the pictures and those in the paper flower tutorial video are about 8-9 inches wide.
Pick your size (you could even make mini tissue paper flowers!), then use a pair of scissors to cut the width of your pieces of tissue paper to the diameter size that you'd like for your flower.
For the 8-inch flowers I used 12 layers of tissue paper. In the video, the multicolored flower is 2 layers yellow (flower center), 8 layers red (flower petal color), and 2 layers of green (leaves).
But again, you could make every layer of tissue paper a different color if you'd like!
Note: If you make them even larger in diameter use a few more layers of tissue paper. If they are smaller in diameter use a couple less layers. This is not an exact science; you can experiment with different sizes and number of tissue paper layers.
How to Make Tissue Paper Flowers, Step-by-Step
Once you've chosen your tissue paper and cut it to size, it's time to start creating the flower!
Folding the tissue paper
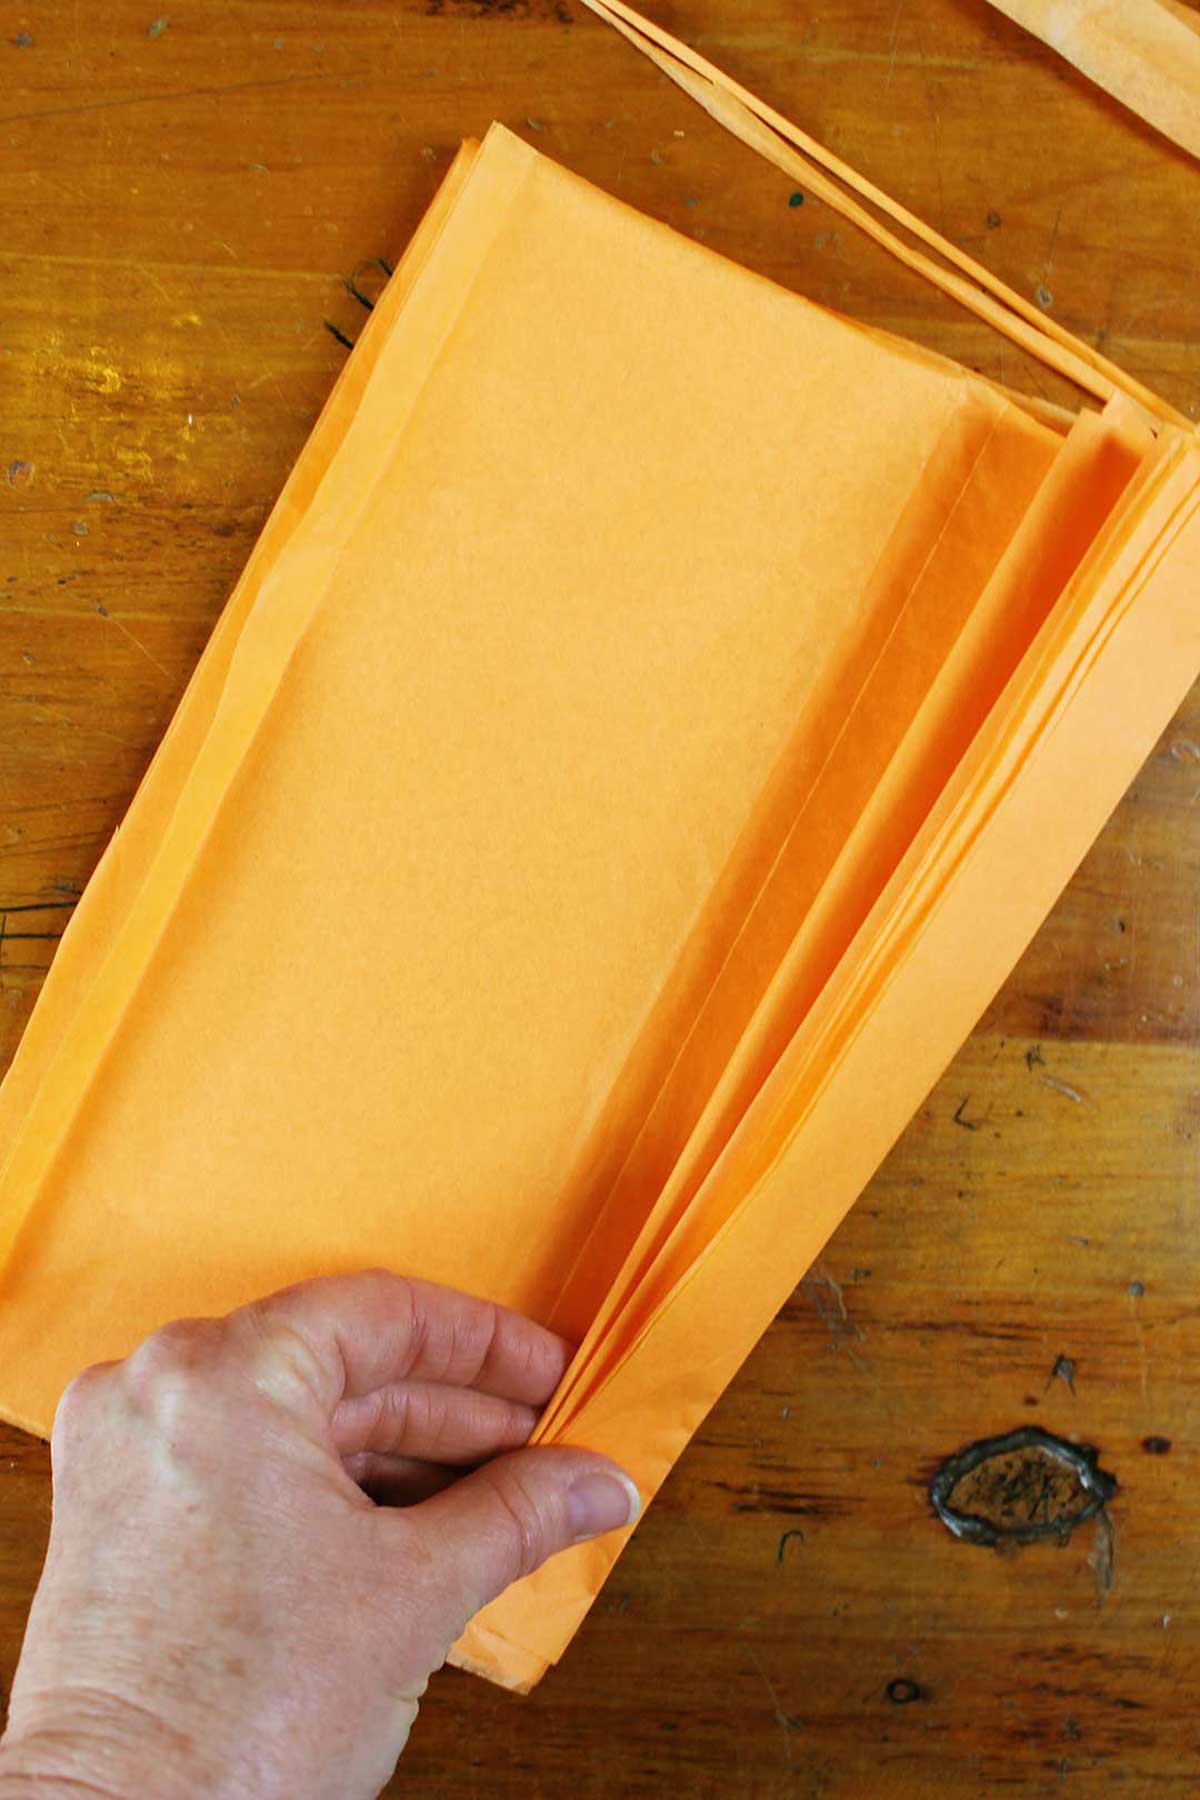
Let's start the first step of these beautiful tissue paper flowers by folding the pieces of paper accordion style, with about 1 inch folds.
Stack the pieces in your desired order, then fold from the short end (more narrow end) of the tissue paper down the longer length. Fold all the way from one end of the paper to the other.
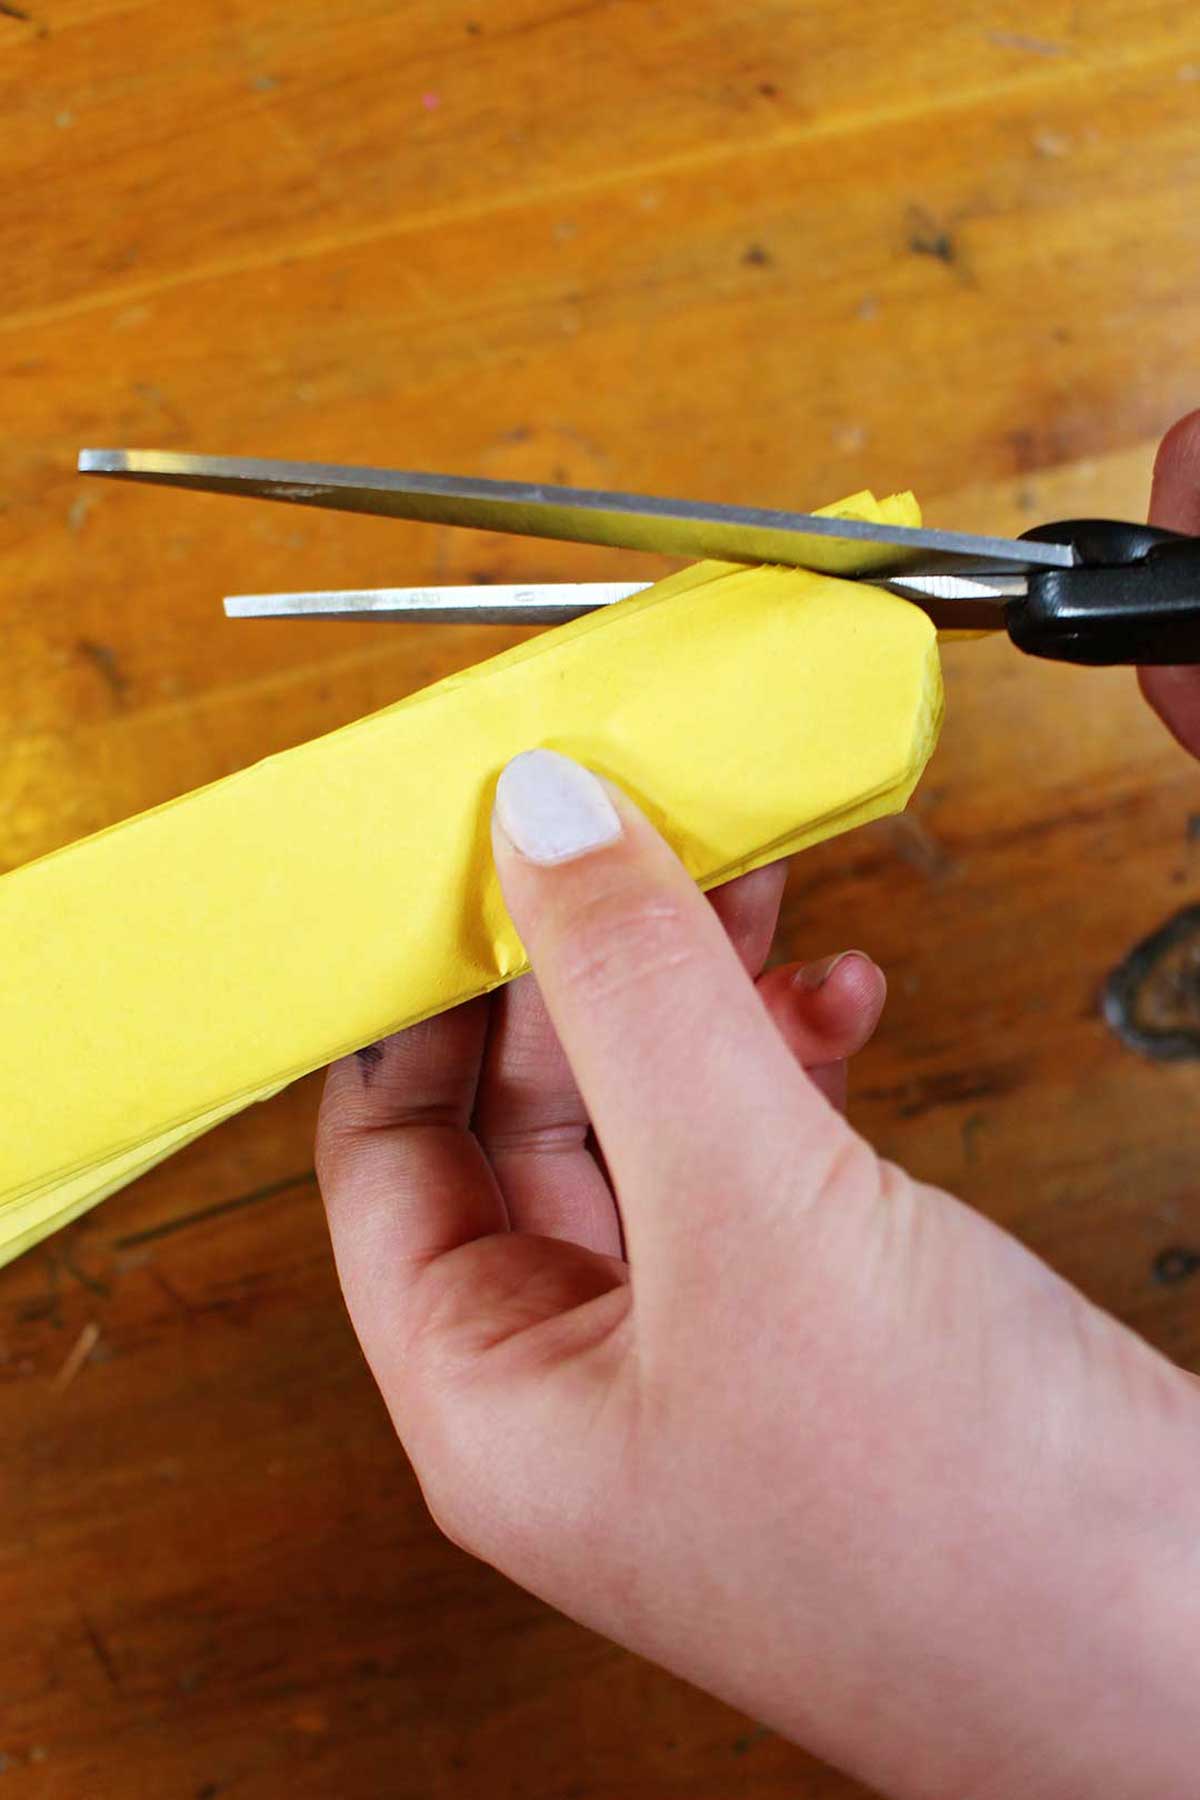
Cut notches on each side of the folded tissue paper at the center point. This makes the next step easier and makes fluffing up the flower easier.
At this point, you can also trim the outer edges of paper to add some texture to the petals. I'd suggest trying rounded edges, or cutting to a point!
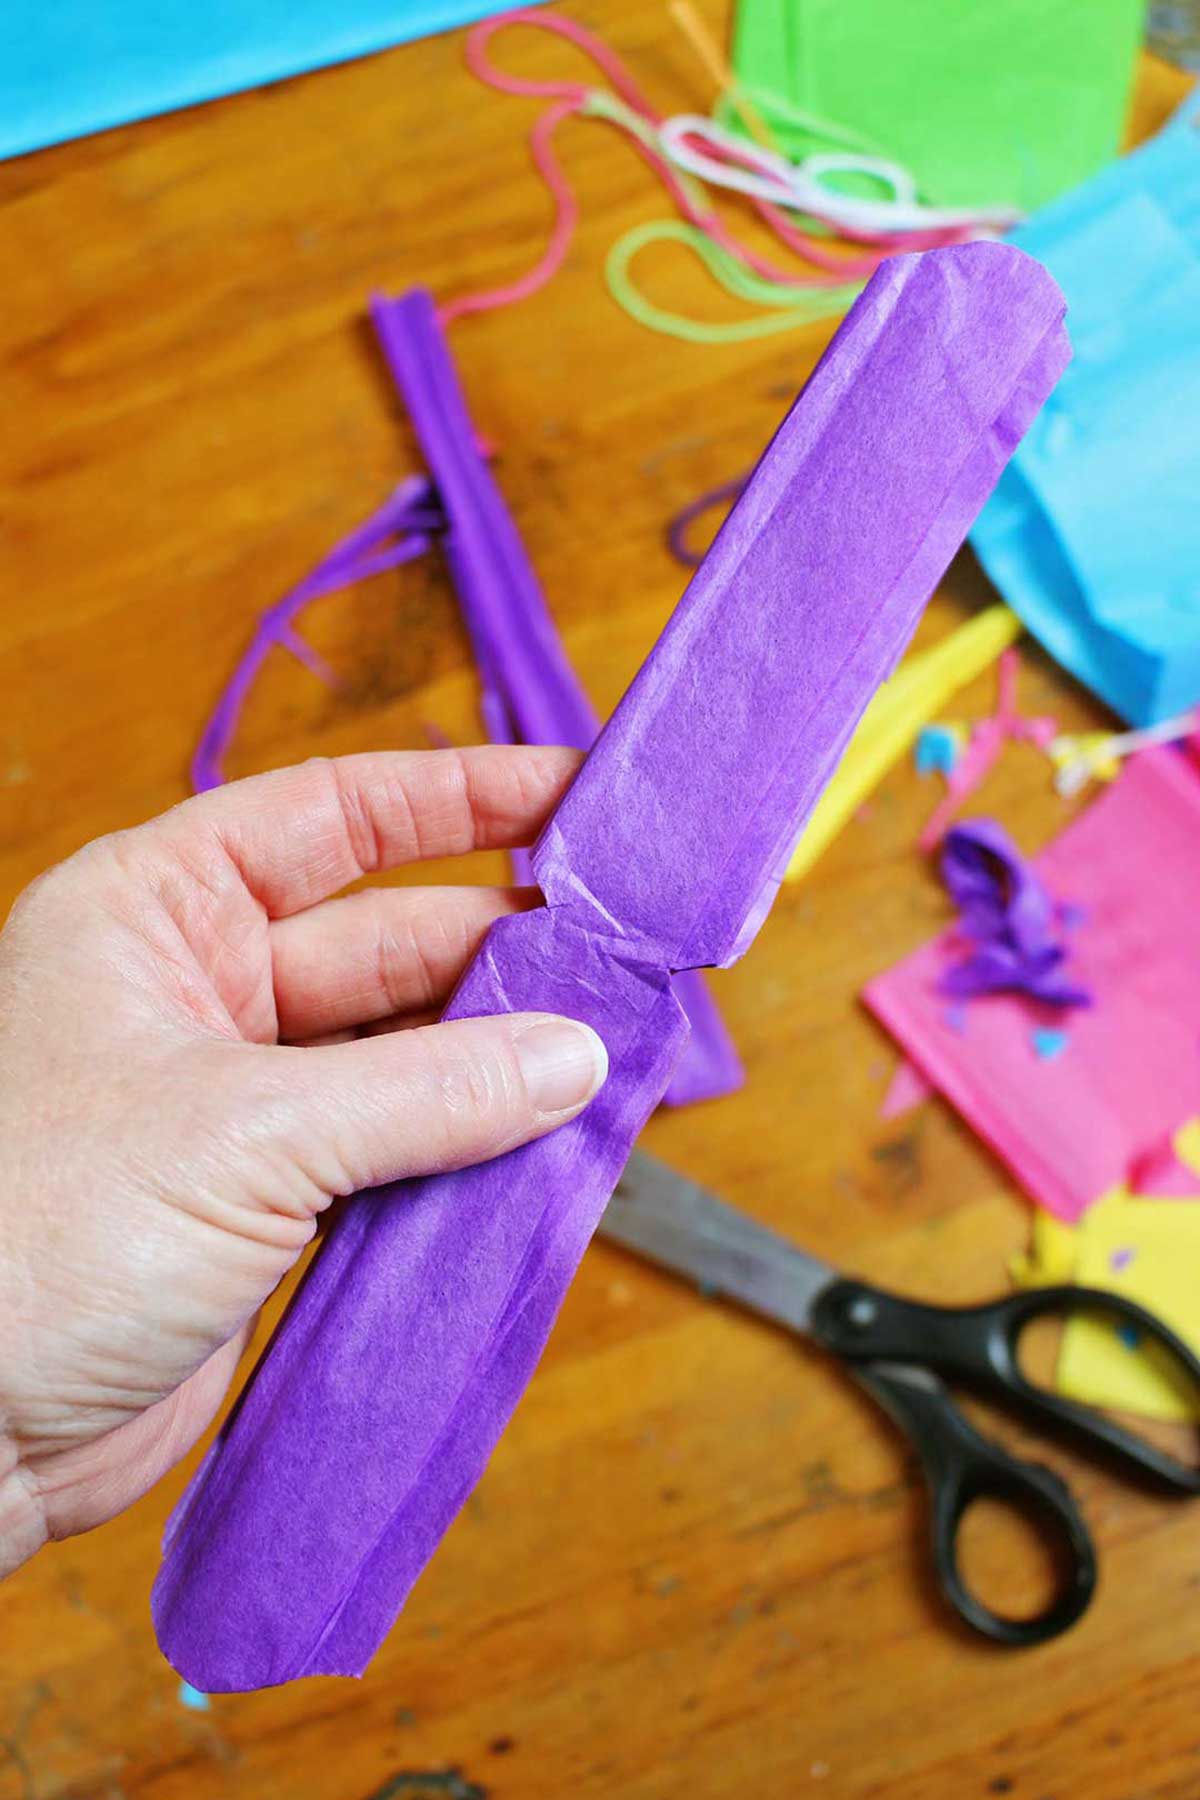
Adding the pipe cleaner
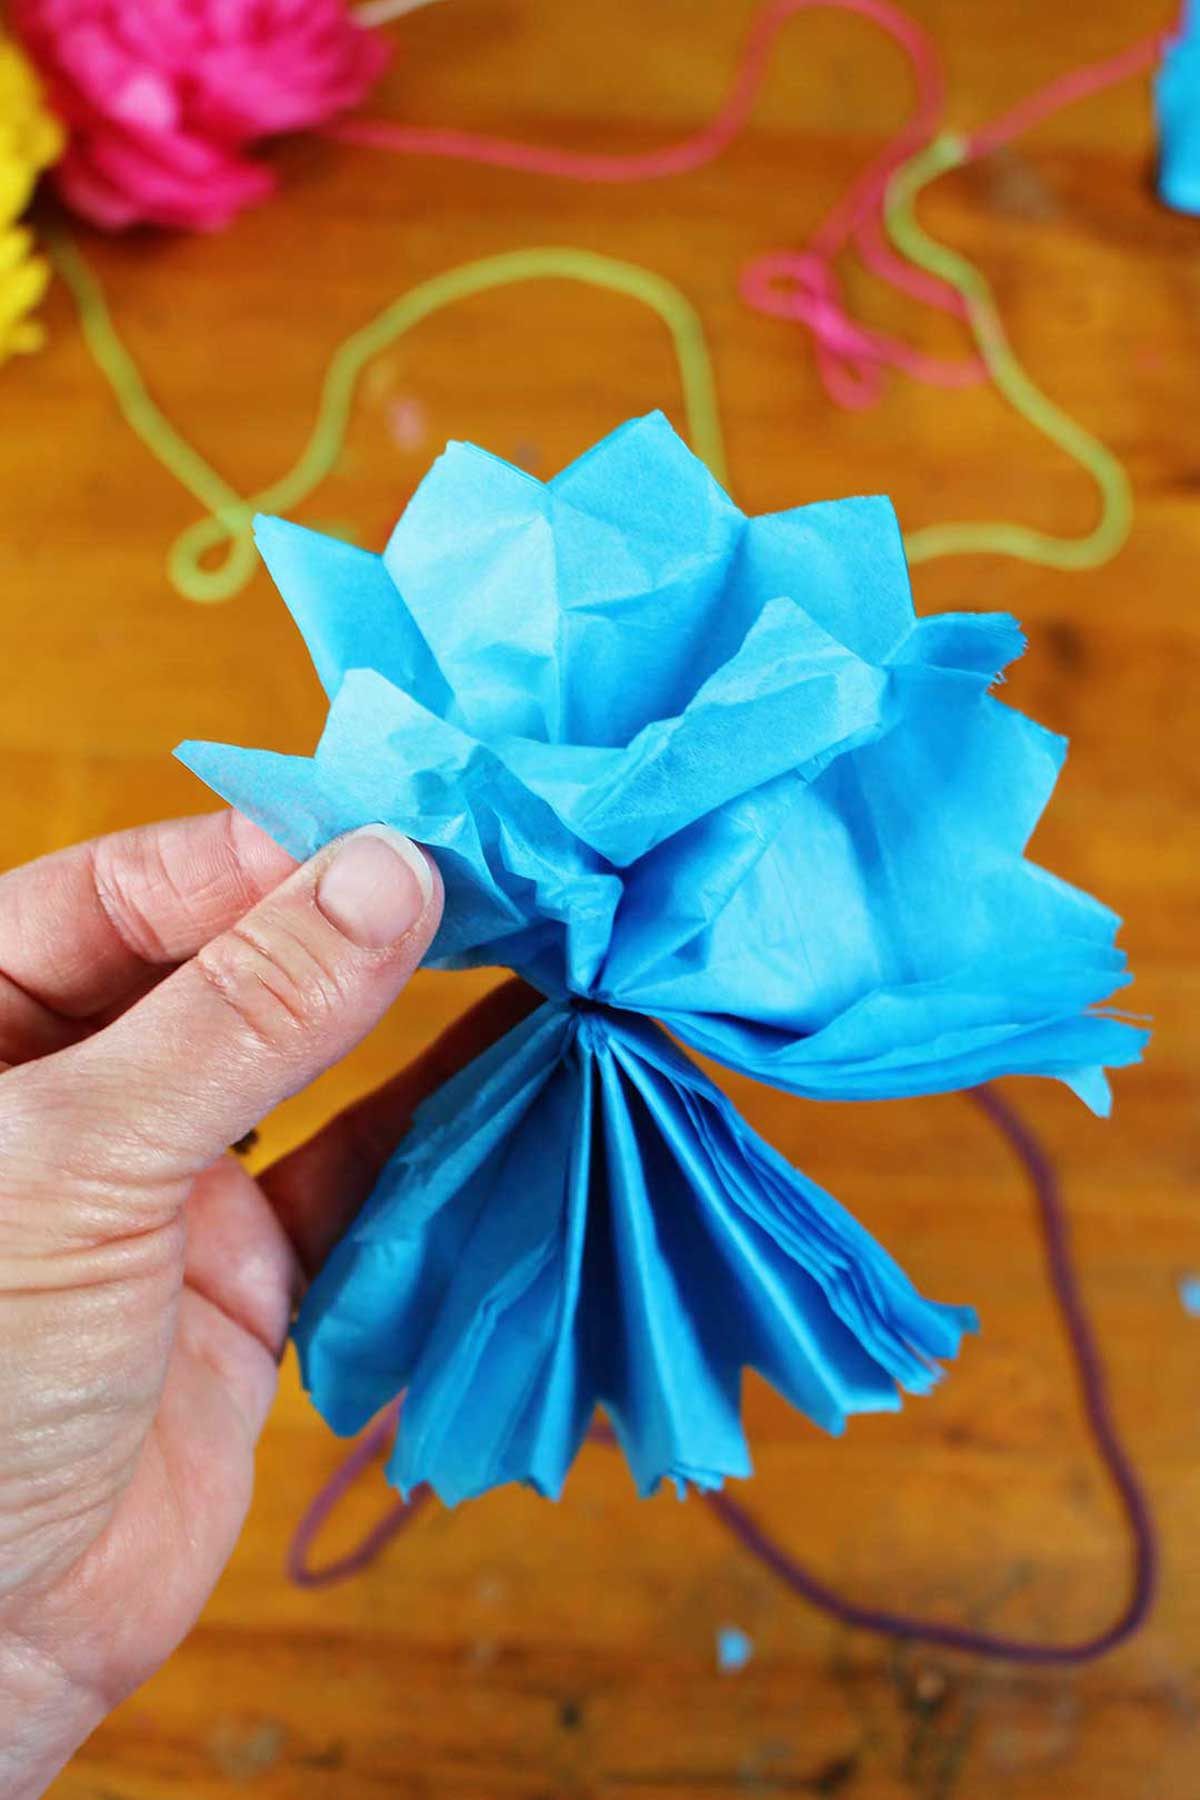
Twist a pipe cleaner around the notched area and twist tightly. The pipe cleaners work as flower stems for the flower.
Note: In the pictures I tied the flowers with string. That works as well!

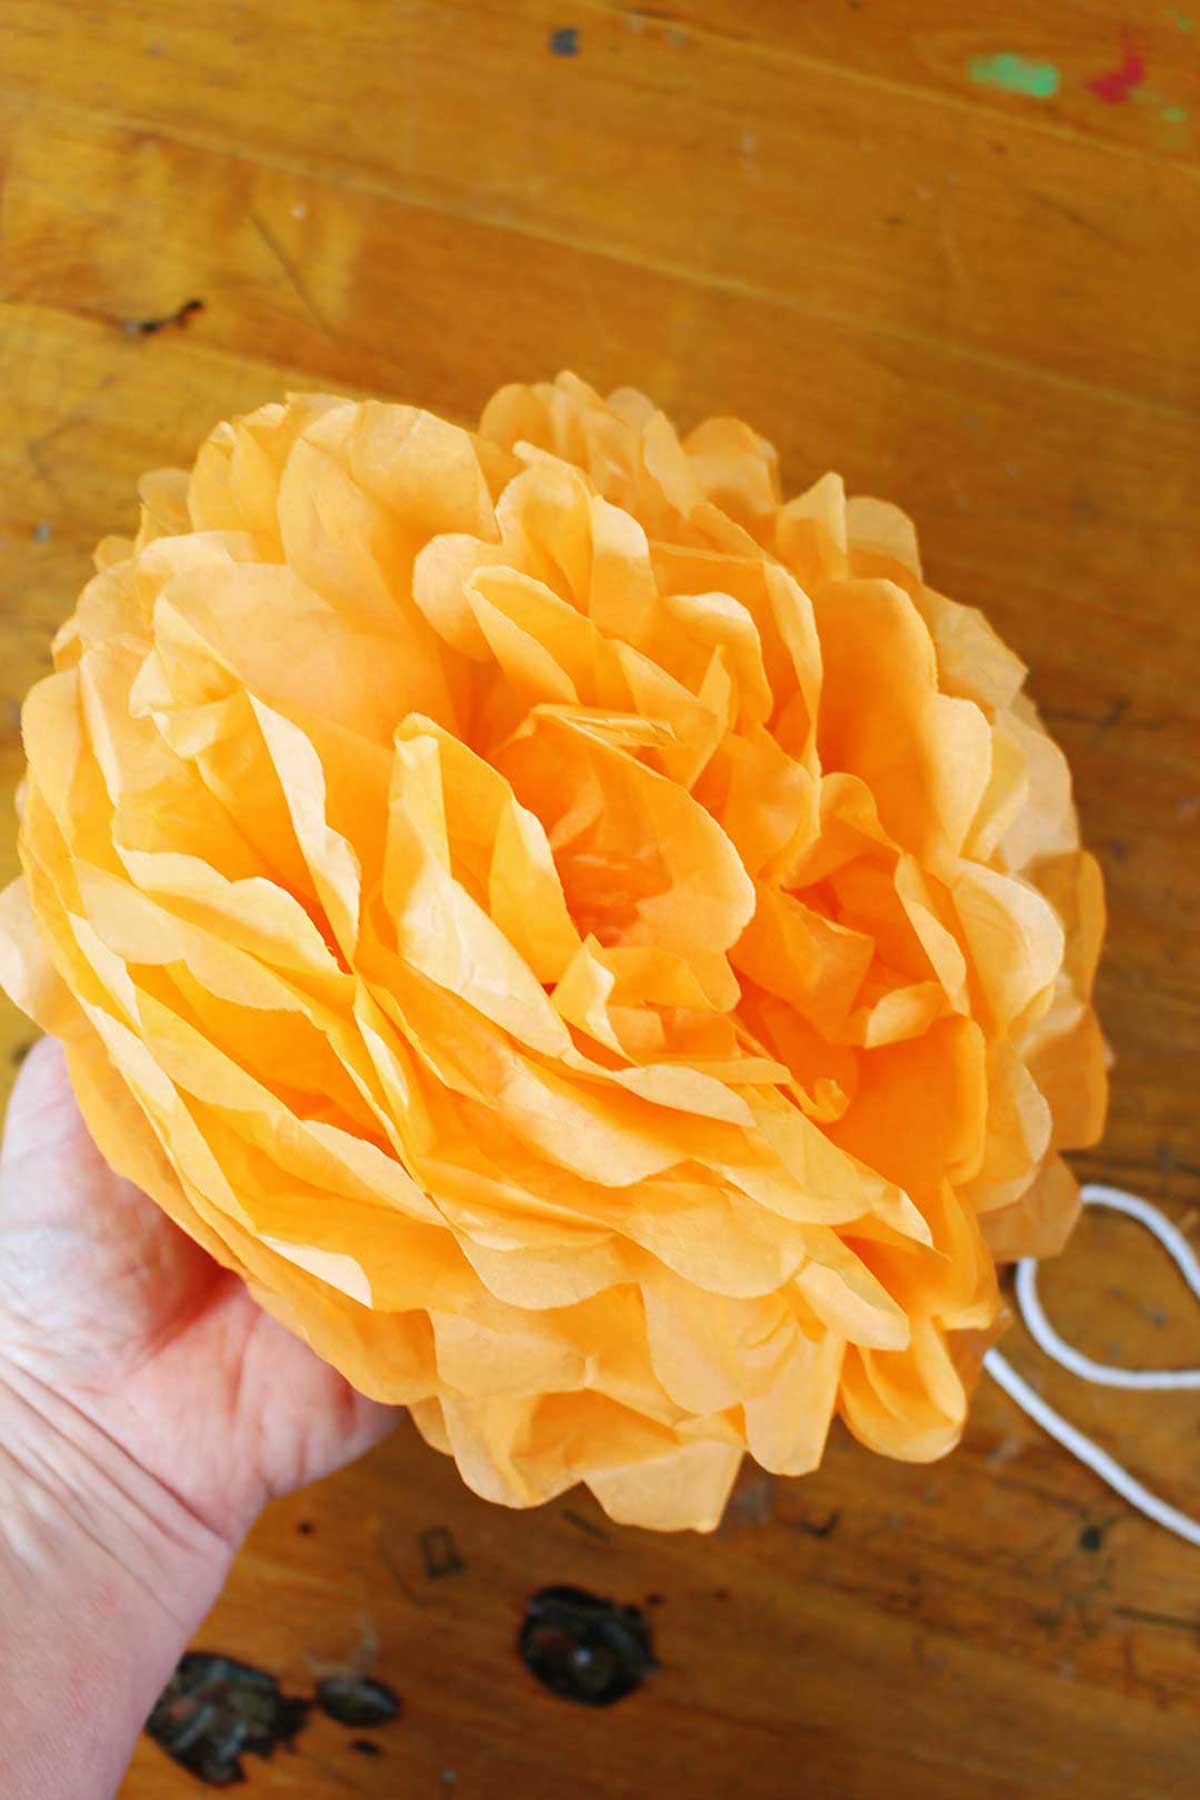
Now for the fun part, fluffing the flowers!
Fan the tissue paper layers out and begin gently pulling the first layer upwards toward the center of the flower (away from the stem). These are the flower petals!
Do this on both sides of the flower. Repeat this step until all the layers of tissue paper squares have been fluffed up at different angles.
Continue to fluff the resulting flower to even out the petal shape. If you used a green layer of tissue, pull that layer of paper to one side of the flower to create a "leaf".
Isn’t that so cute? I love making these.

Making Tissue Paper Pom Poms
In the video I repeat the exact same process with a change up on the top two layers of the tissue paper flower. I wanted to try making a pom-pom center that kind of dips down a bit lower in the flower, giving the flowers slightly different shapes. Let’s give it a try.
Arrange the tissue paper with two layers of yellow on top to make a yellow center for your flower. Accordion fold from the bottom edge to the top and crease well.
Gently pull the two yellow layers out separately- accordion fold again and trim off 1.5 inches on each end.
Cut the ends like fringe by making small snips in about one inch.
Replace the yellow layers in the center top of the stack of tissue paper and refold it again.
Continue in the same manner as the first flower.
The center two layers of the flower will fluff up into a pom-pom!! They are shorter than the other layers so they make a really cool center to the flower.
Tissue Paper Flower Variations
There are so many different ways to try making colorful tissue paper flowers - feel free to experiment! It can be fun to look at real flowers and use them as inspiration.
Here are a couple ideas you could try to make different styles of flowers:
- Make all the layers fringed to make a pom-pom flower.
- Make a full round fluffed ball instead of a flower
- Attach the flowers or pom poms to a garland
- Use paint markers to decorate the tissue paper before folding
- Hot glue some pom poms, ribbon loops, or other fun decorations into the center of the flower
What are you going to try?

How to Use these Tissue Paper Flowers for Kids
These tissue flowers look so nice at parties as table decorations (they'd make an an eye-catching centerpiece!) or strung on a garland. Wouldn’t they make a great addition to a May basket, or the perfect gift for Mother’s Day, a birthday, or a baby shower?
You could also use these for simple home decor, decorating a child's bedroom or adding a fun temporary spring decoration to your living room or front window.
Since they can be made in minutes and the materials are inexpensive and available in most discount or craft stores, it's time to try all different types of flowers and different color combinations!
Did I mention that these are another of Nana’s favorites!! How many favorites can I have? 😉
YouTube Fan? Check Out the Video!
If you want to watch the step-by-step tutorial video on YouTube here is the link: YouTube Easy Tissue Paper Flowers DIY
While you are there, subscribe and be the first to see new craft videos each week!
Tissue Paper Flower FAQs
Stack your tissue paper (10-12 layers). Accordion fold down the paper with a ½ to 1 inch fold width. Measure to the center of the folded paper and cut notches on either side. Twist a pipe cleaner around the notched area. Fan the tissue paper layers out one at a time, pulling them up to the center of the flower. Repeat with all layers of the tissue on both sides of the flower. Fluff the tissue into a nice flower shape. Variations are found on the post.
I used 10-12 layers of tissue paper. They will be about the same diameter as the width of the tissue paper you choose.
You can create easy homemade paper flowers with pipe cleaners and a few tissue paper folds! Simply choose your colors, layer and fold the paper, and secure in the center.
More Flower Crafts for Kids
Looking for another fun flower craft to try? You've come to the right place! From fresh flowers to paper flowers, you'll find all kinds of creative ideas around the blog.
Here are a few:
- How to Press Flowers (4 Ways!)
- DIY Watercolor Flower Card
- Hammered Flower Prints on Fabric
- Easy Book Page Roses
- DIY Wedding or Midsummer Flower Crown
Tissue Paper Flowers DIY Supplies
- Multi-colored tissue paper
- Pipe cleaners or string
- Scissors
- Ruler (optional)
More from Welcome To Nana's
Easy Tissue Paper Flowers DIY
Equipment
- Scissors
- Ruler (optional)
Items Required
Instructions
- OK, so choose what color(s) of tissue paper you would like for your flower.I made mine all out of the same color to take the photos. But you could use 2-3 colors of pink tissue or do a rainbow selection of tissue paper colors.
- You can make your flowers various sizes in diameter. Most of the ones in the pictures and those in the video are about 8-9 inches wide. Cut your tissue paper width to the diameter size you want for your flower.For the 8-inch tissue paper flowers I used 12 layers of tissue paper. In the video multicolored flower that is 2 layers yellow (flower center), 8 layers red (flower petal color), and 2 layers of green (leaves).
- Stack the pieces in your desired order, then accordion fold the tissue paper with about 1 inch folds. Fold from the more narrow end of the tissue paper down the longer length.
- Cut notches on each side of the folded tissue paper at the center point. This makes the next step easier and makes fluffing up the flower easier. Trim the ends of the paper to shape the edges of the "petals" - I like to round them or trim them to a point.
- Twist a pipe cleaner around the notched area and twist tightly. The pipe cleaner works as a stem for the flower.Note: In the pictures I tied the flowers with string. That works as well!
- Fan the tissue paper layers out and begin gently pulling the first layer upwards toward the center of the flower (away from the stem). Do this on both sides of the flower.Repeat this step until all the layers of tissue paper have been fluffed up.Fluff and shape to even out the flower.
- Instructions for the second flower are found on the website.
Video
Notes
This post was originally published April 2023 and has been updated to add more relevant and detailed content


Laura says
These would make a great decoration for a birthday party! Thanks for the tutorial!
Shelly says
For sure!! And fun to make as a group before the party!! Enjoy!