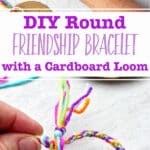
Learn how to make a Round Friendship Bracelet using a DIY cardboard loom with this step-by-step tutorial! This braided round bracelet is an easy craft for kids and makes for a perfect friendship gift.
Jump to:
- Craft Supplies
- The Best String for a Friendship Bracelet
- How to Make a Bracelet Loom
- Steps to Make a Round Friendship Bracelet
- How to Tie a Friendship Bracelet
- A Bracelet for Your Besties
- Craft Tips
- Craft Variations
- FAQ
- More String and Yarn Crafts for Kids
- Come Join the Fun!
- More Crafts!
- Easy Round Friendship Bracelet Pattern with a Cardboard Loom
This round friendship bracelet is the bomb!
Using some cut cardboard as a loom, this step-by-step tutorial walks your kids through an easy round weave. It feels a bit like magic to criss cross the strings and end up with a colorful braided bracelet!
If your kids are anything like mine, they won't want to stop once they start making friendship bracelets! You'll find all sorts of patterns for woven bracelets and this round braid bracelet is an especially fun one.
With the help of the loom, this simple weaving pattern is easy even for young ages. This is exactly the kind of craft I would’ve flipped over when I was little. I hope your kids enjoy it as much as I did!
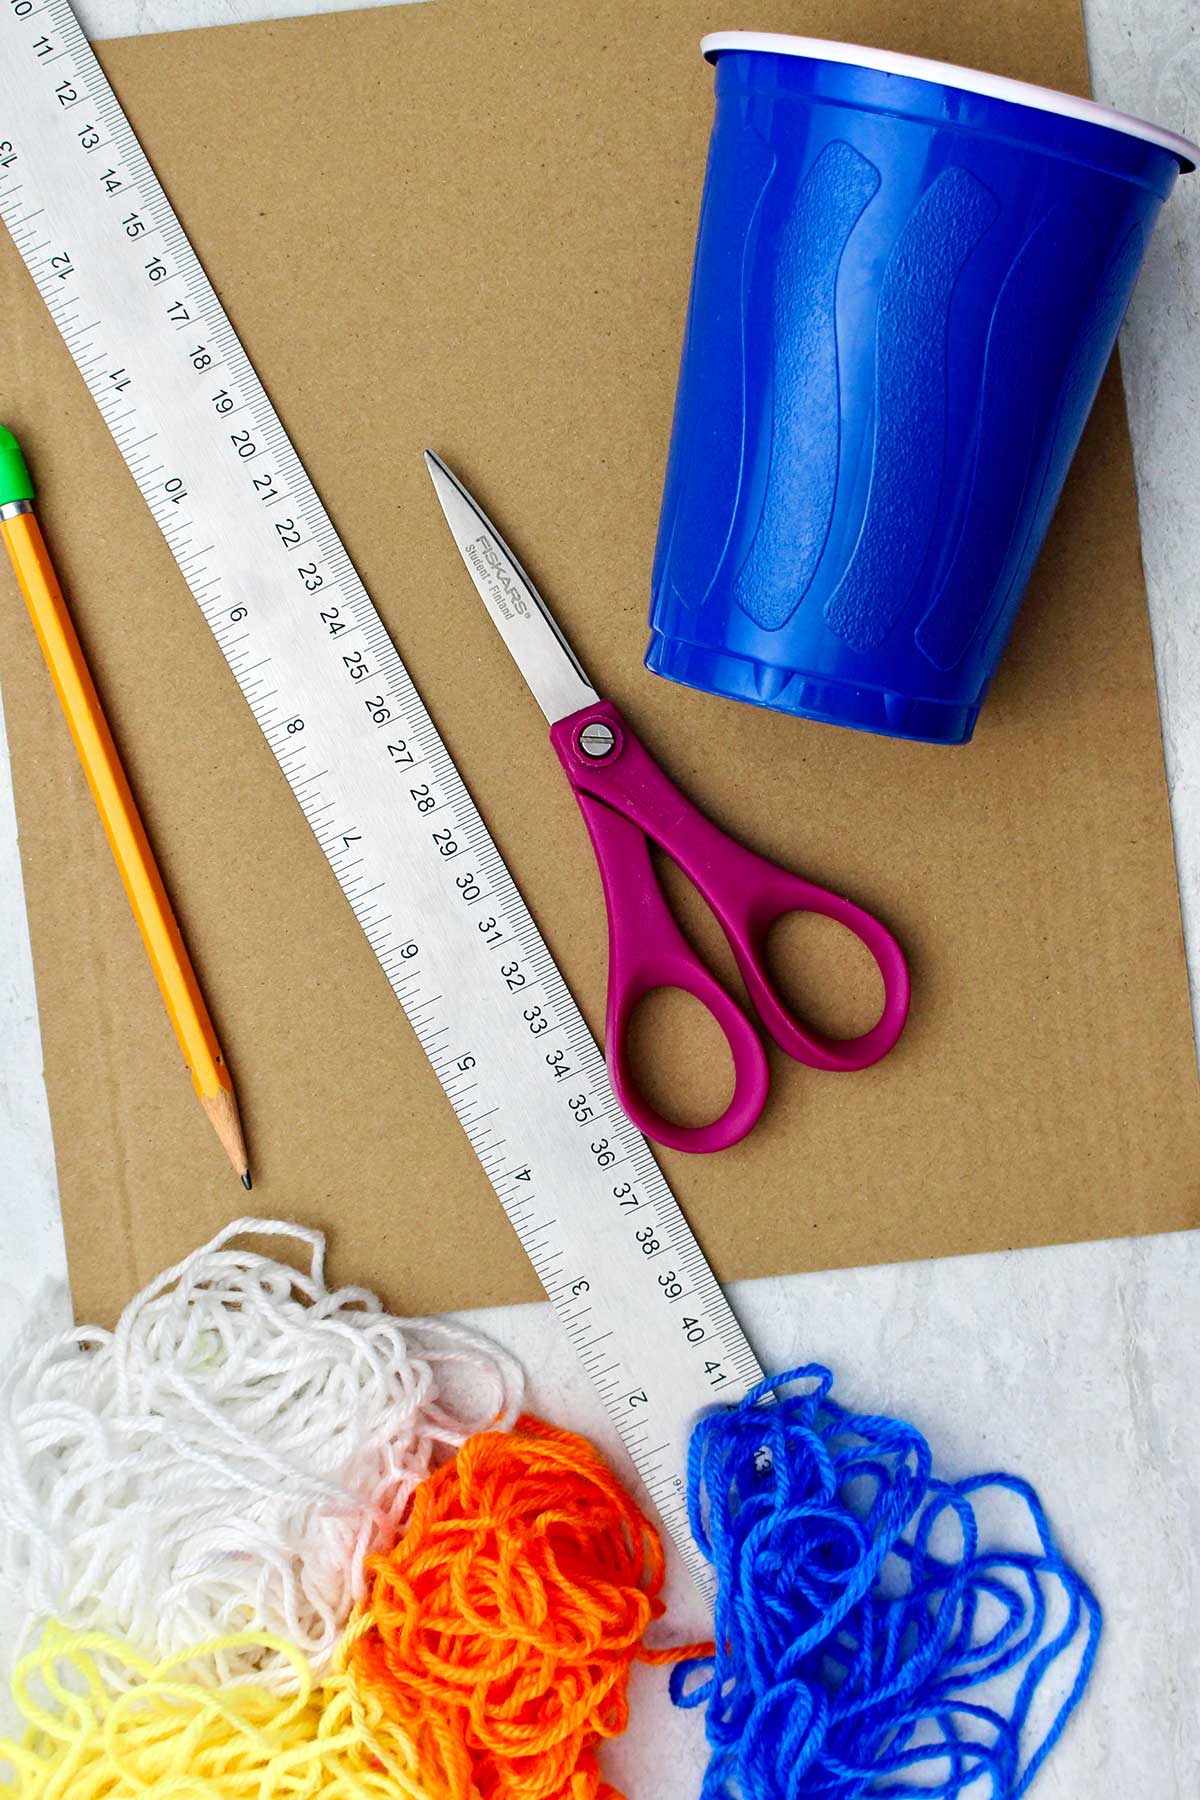
Craft Supplies
You don't need much to make these cute bracelets:
- String- Use yarn, embroidery floss, or thicker crochet thread. You'll need seven strands, 30" each.
- Cardboard- To make the round pattern loom. Use thicker cardboard for a firm loom structure.
- Drinking glass- A plastic Solo cup size is great for making the loom pattern.
- Other Items- Pencil, scissors, ruler
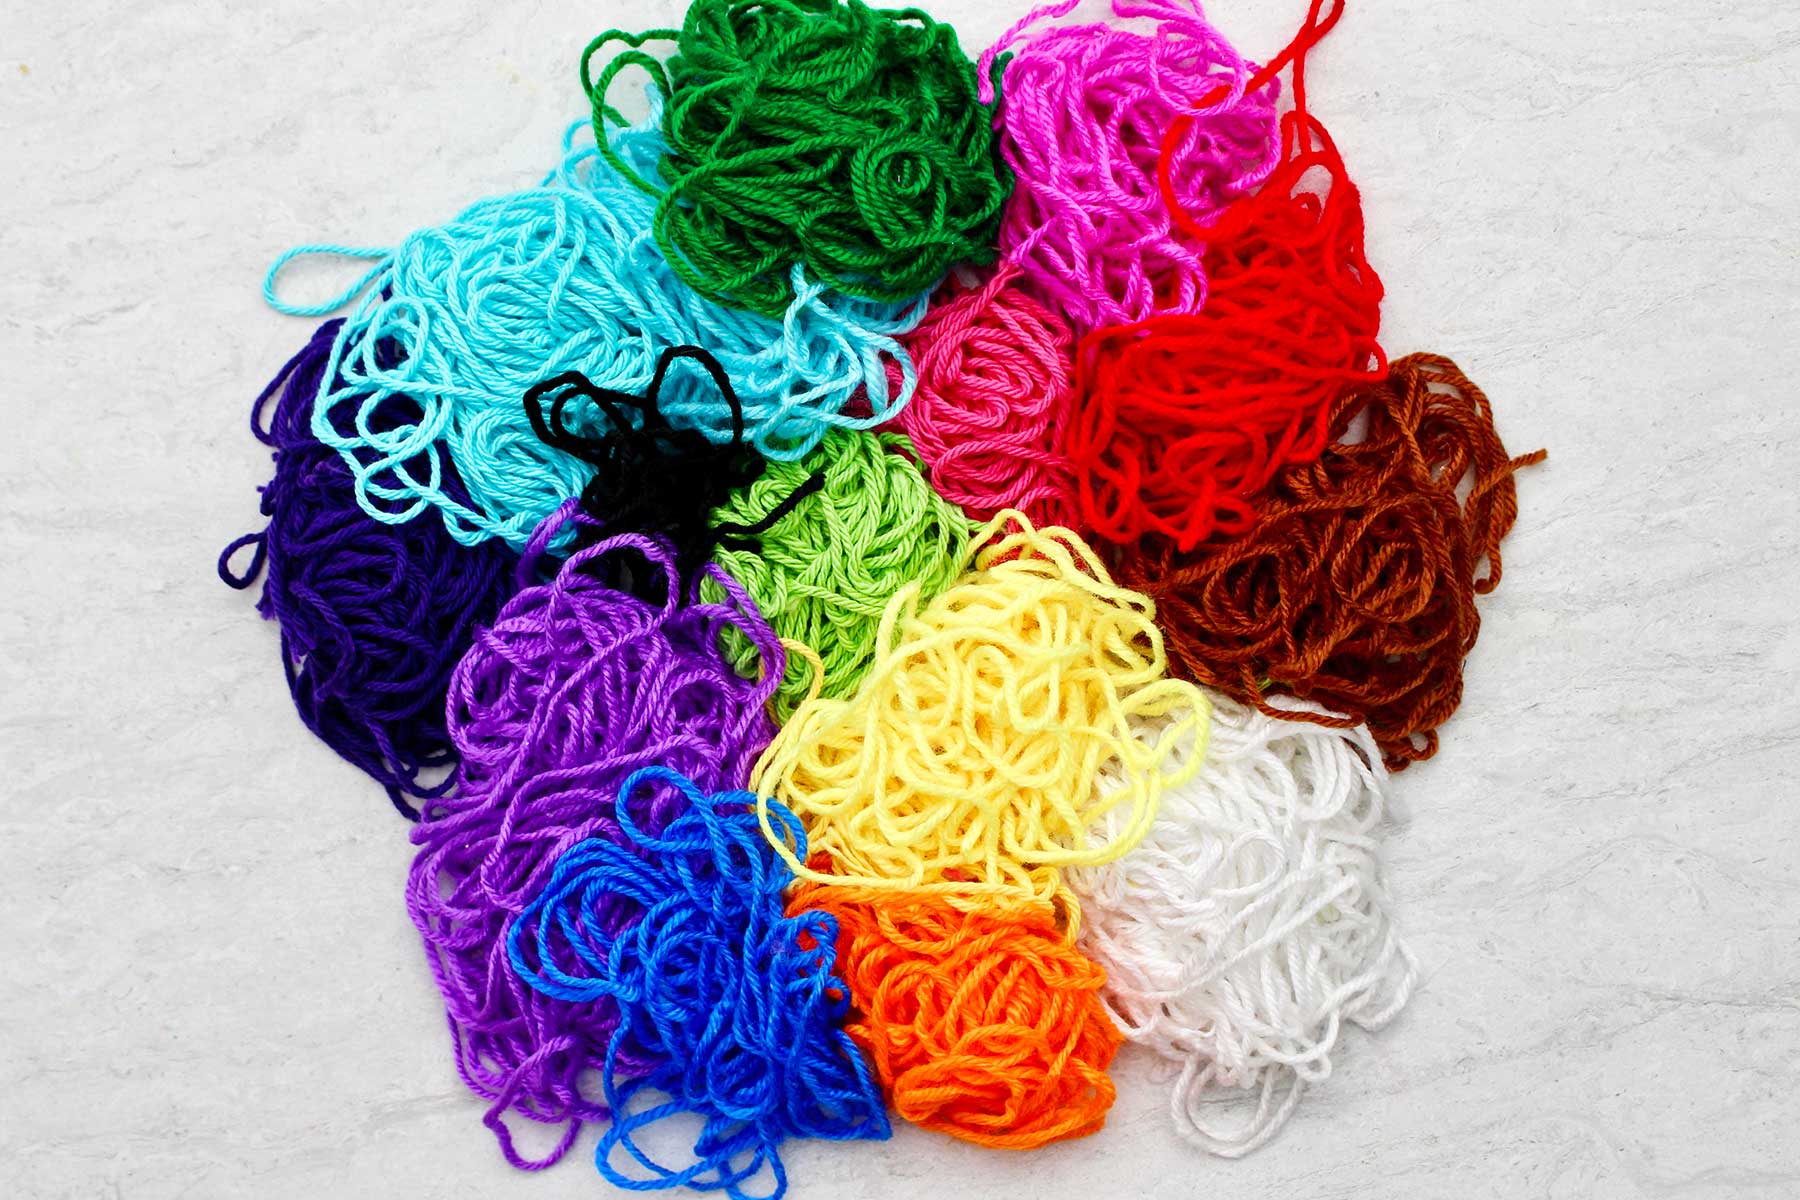
The Best String for a Friendship Bracelet
I had something special happen lately. My five year old friend, Claire, sent me some yarn to use in my house for a decoration. So sweet and thoughtful!
I separated the yarn into colors and thought this bracelet would be the perfect way to use the colored yarn. Of course, one of the bracelets I make will be for Claire!
You can use the same string as for any other woven bracelet, like this Chevron Macrame Friendship Bracelet. But with this loom you'll turn them into a wonderful round braid instead of a flat one.
You could use yarn like I did, embroidery thread, or a thicker crochet thread.
The round braided bracelet uses seven strings to do the weaving. Because of Claire I have seven different colors of yarn to use!
You don’t have to use seven different colors of thread. You could use a combination of any colors you would like to create your own color scheme. Just be sure you end up with seven total strings.
How to Make a Bracelet Loom
First, we'll make our bracelet loom from cardboard.
Cut a circle shape
Use the top of a drinking cup to draw a circle on a piece of cardboard to make your circle cardboard loom for this craft.
The cup that I used to trace around was a plastic Solo drinking cup. The size of the circle worked well. If the cardboard disc gets too small, it may be more challenging for younger kids.
Use a pencil or pen to draw the circle around the top of your drinking cup onto the cardboard. Then cut out the circle with scissors.
Cut slits in the loom
Take a ruler and find the center or midpoint of your circle. Use the ruler to draw lines across the cardboard circle. Draw one line that goes across your circle, through the center.
Draw a second vertical line that goes through the center point and intersects the first one. It is perpendicular to your first line.
These two lines divide your circle into four equal sections.Use the ruler to draw two more lines that divide the four sections into halves. Or, two diagonal lines that also go through the center of your circle.
Now you've divided your cardboard circle into eight sections.
The next step is to cut slits from the outside edge inward for about ¾ of an inch. Do this on each of your eight lines.
Poke a center hole
To finish your cardboard loom, use your pencil to poke a hole in the center. Don't push the pencil all the way through, just part way up the lead.
Push the lead of the pencil down and through carefully so you don’t hurt your hand underneath. Sharpen the pencil so it goes through more easily if necessary.
This completes your cardboard loom that you’ll use to make your bracelet!
Easy Peazy!
Steps to Make a Round Friendship Bracelet
With our loom finished, we're ready to start the bracelet pattern!
To follow along with the full length video, find the tutorial on YouTube: DIY Round Friendship Bracelet With a Cardboard Loom.
Cut and tie the string
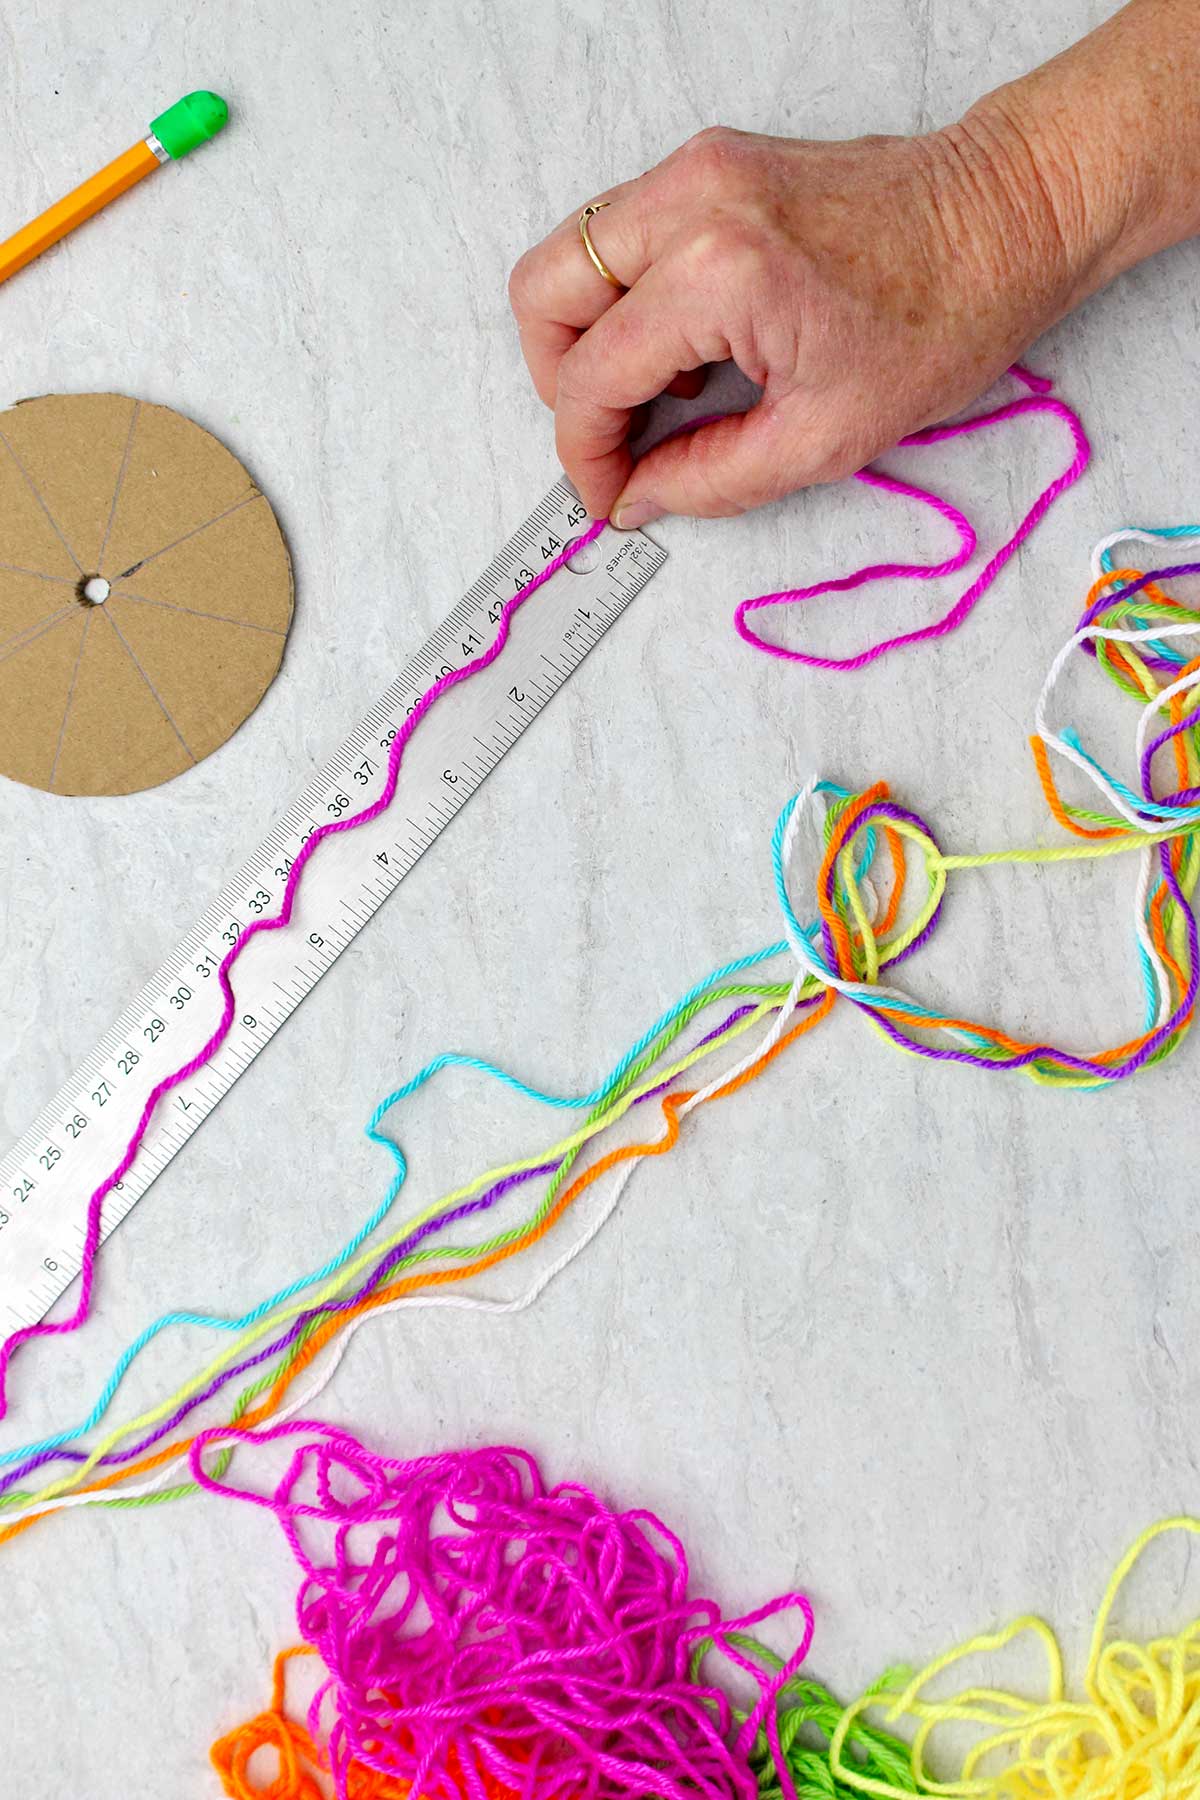
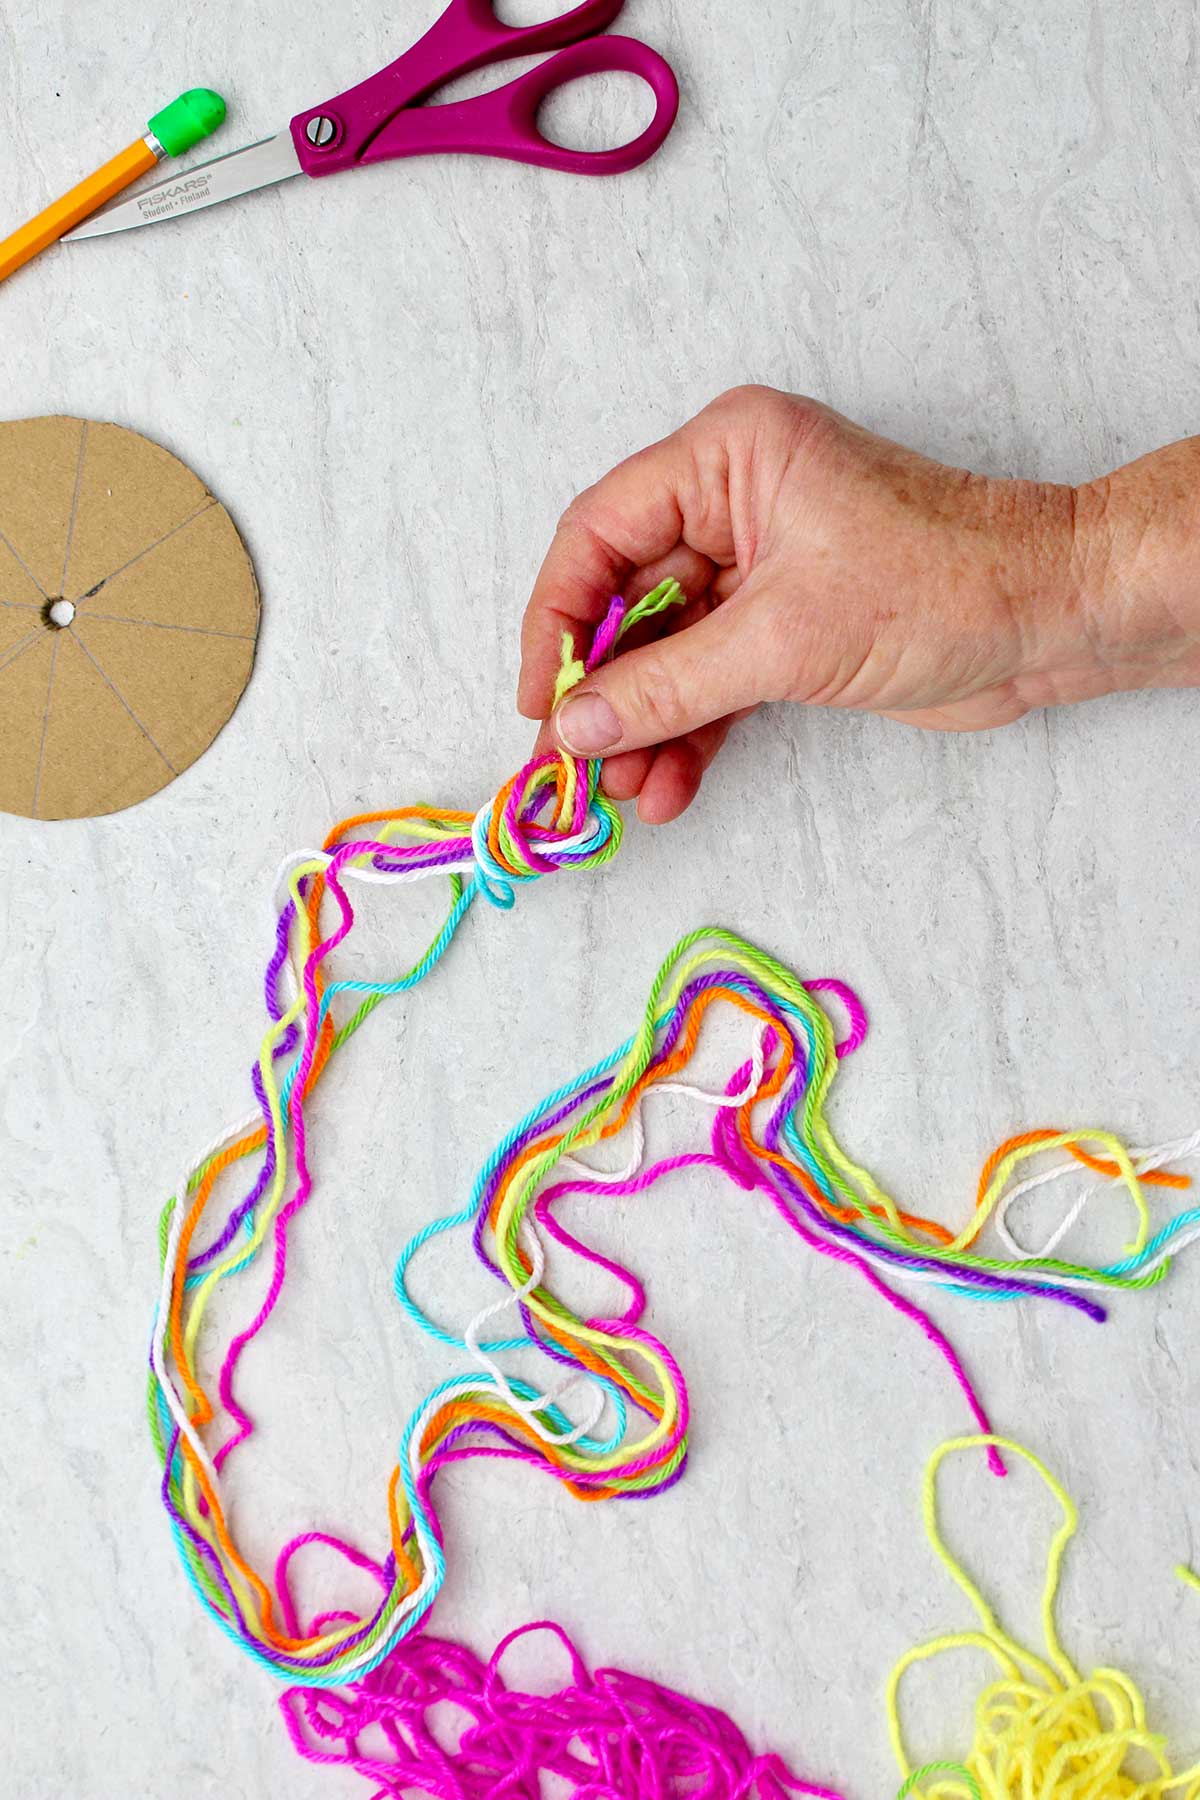
Now we’re going to cut the yarn or embroidery floss into pieces to use for weaving.
We need seven strings, each cut to about 30 inches long. If you don't have a ruler handy, that's about the length from your nose to the end of your outstretched arm.
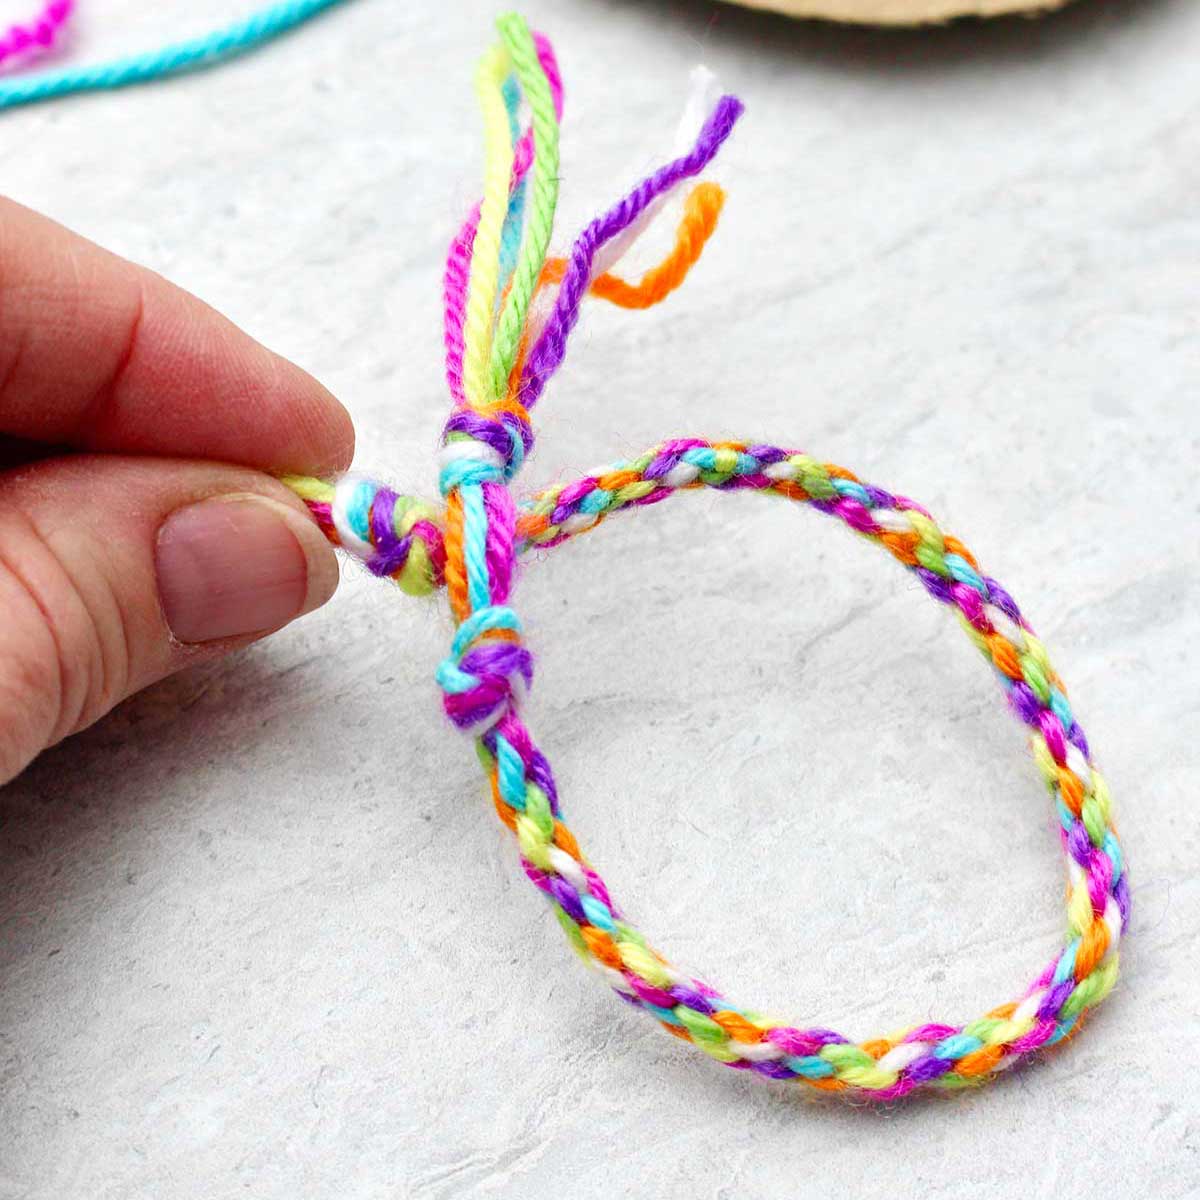
Gather the seven strings up into your hand by one end of each string. Tie a simple knot about 2 inches from the end of your seven strings to hold them all together.
This knot is an overhand knot (learn how to make overhand knot!) like you see in the photos and video. Pull your knot up tight. This basic knot is one end of your bracelet.


Add string to the loom
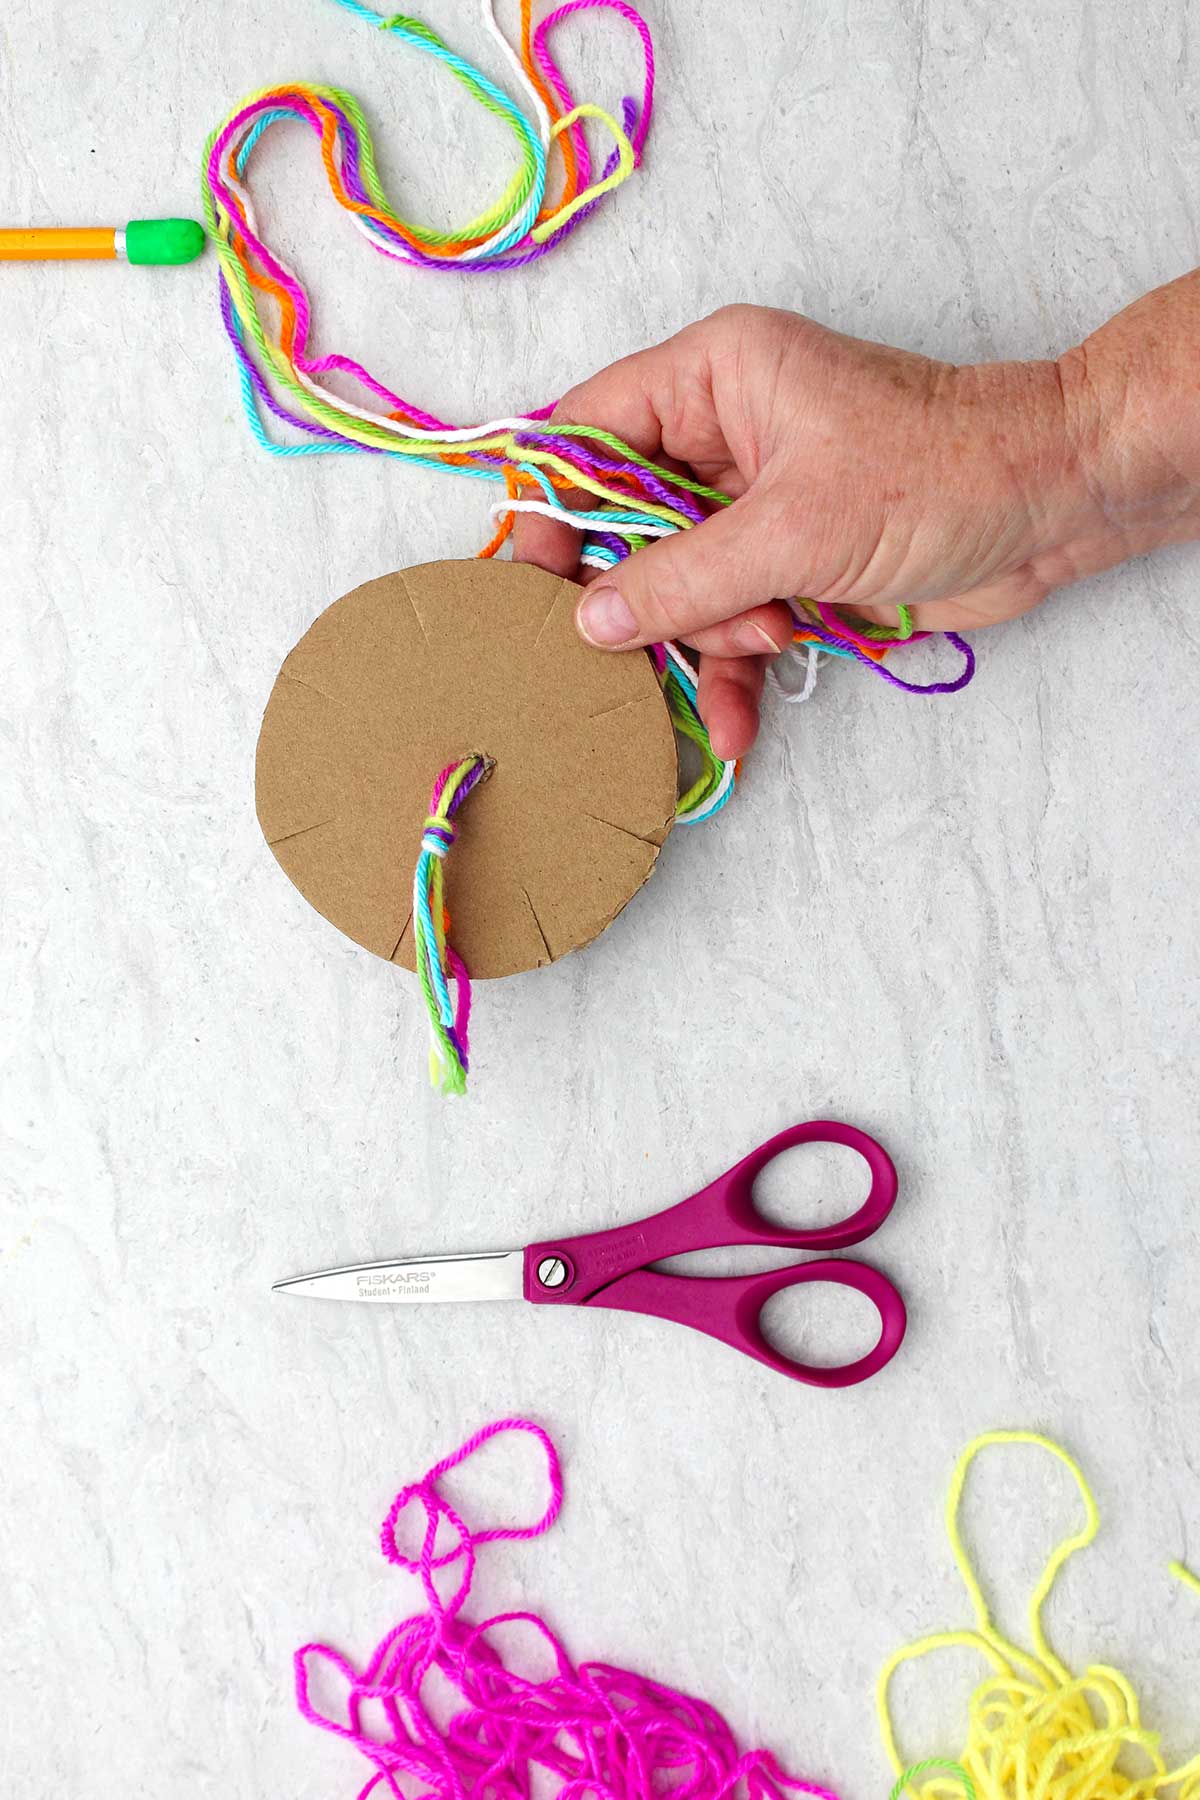
Draw the seven pieces of string up through the hole in the center of your cardboard loom.
I used the points in my scissors to help get the threads through the hole, but you could also use the point of your pencil.
Draw the strings all the way through the hole. The knot will be next to the loom and the loose string will be coming out of the other side of the loom.
Take one of the strings and pull it out to a slit on the edge of the cardboard loom- pull it down through that slit.


Take the second thread and pull it out and down through the next slit. The third thread goes through the third slit and so forth until all seven strings go out from the center and down through a slit.
The extra string will fall down underneath the cardboard loom. With all the threads coming up through the center and fanning out and down through the slips, it looks kind of like a flower.
This is now the top of the weaving. The knot and extra string are on the back of the cardboard loom.
You will notice that there’s one empty slit left because there’s seven strings and eight slits. This is on purpose, don't worry.

Learn the weaving pattern
Now we will begin the weaving or braiding, whichever you want to call it. This is where the magic begins!
It may be helpful to watch it on the video as well as seeing it in the photos here. Especially for a younger child.
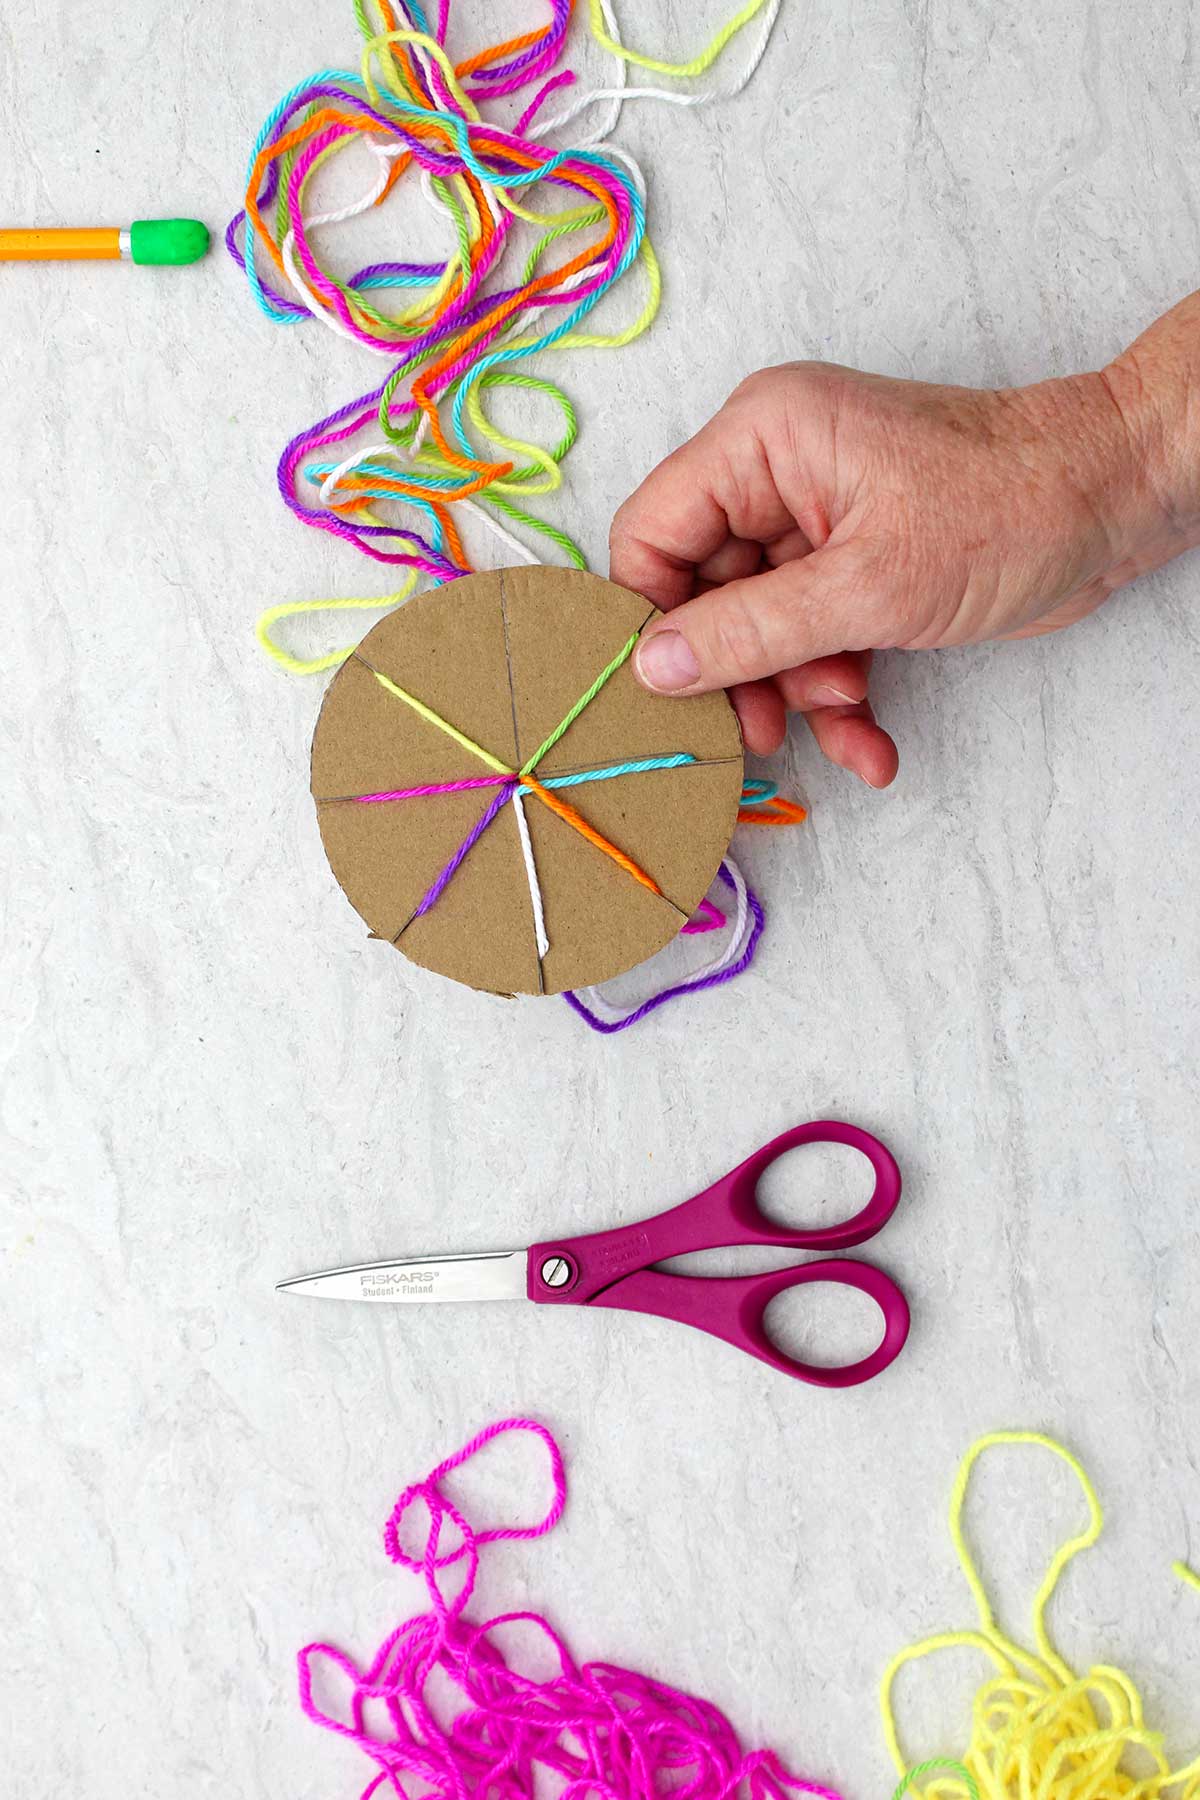
Hold the loom in your left hand with the flower looking part up and the rest of the threads dangling below. Turn until the empty slit is towards you.
Take your right hand and count three strings to the right of the empty slit. Remove the third string out of the slit and bring it towards you. Put it down into the empty split.
Turn the loom so that the empty slit is in front of you again. This turns the cardboard loom in a clockwise directions for a right handed person.
Now again, hold the loom in your left hand, empty slit in front of you. With your right hand count up three threads.
Pick up that third thread, take it out of its slit, bring it down into the empty slit right in front of you. Turn the loom clockwise till the empty slot is in front of you.
Continue weaving
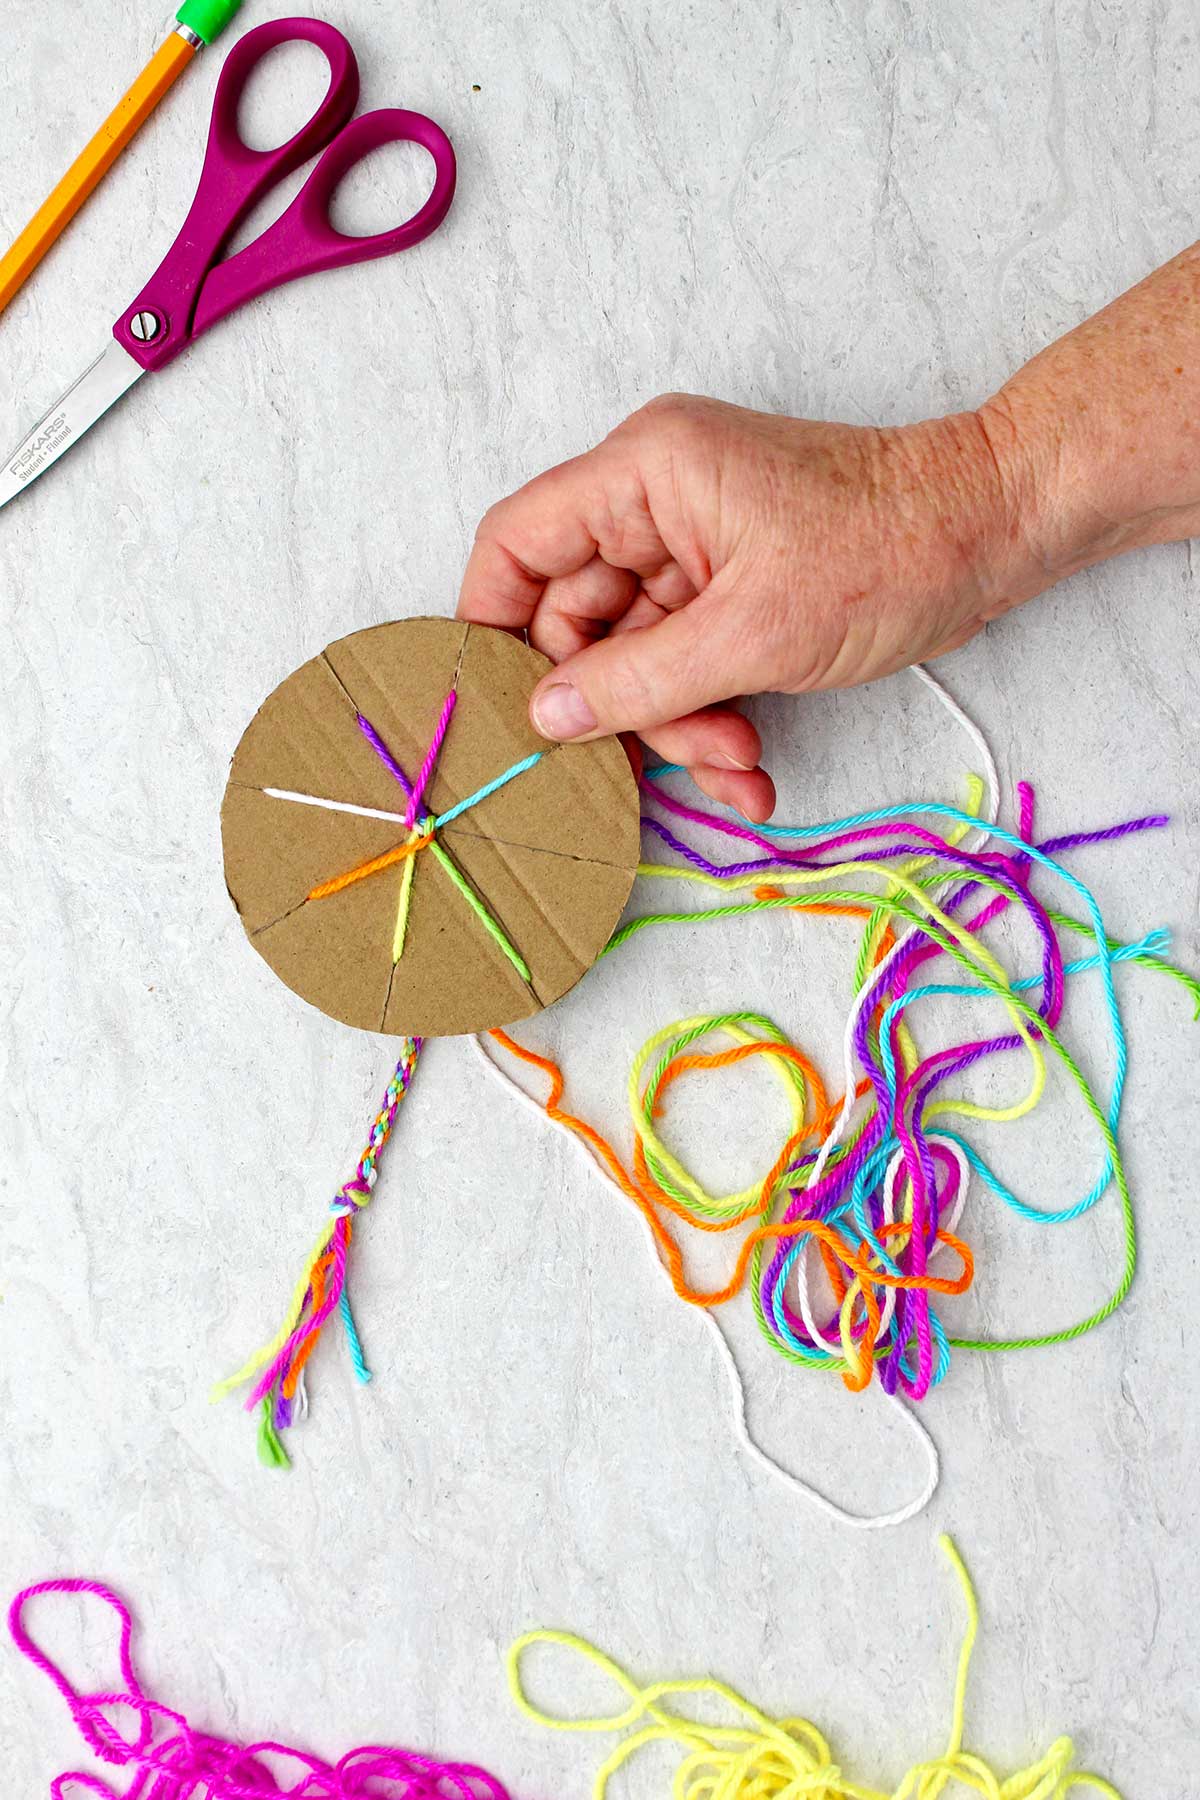
And that’s all there is to the weaving pattern! Repeat counting and turning to continue the weave.
At first, it looks like nothing is happening. But after few turns, reach underneath the loom and gently tug the little knotted section in the center of the loom. The round friendship bracelet is beginning to form!
Continue weaving and turning in the same pattern, tugging the bracelet through the loom every several weaves. It doesn’t take long for you to start noticing a half inch, an inch, 2 inches of bracelet forming underneath the loom!
Watch the length of the bracelet grow until it is the length that you would like. The bracelet needs to be long enough to go around your wrist or your friends' wrist of course.
How to Tie a Friendship Bracelet
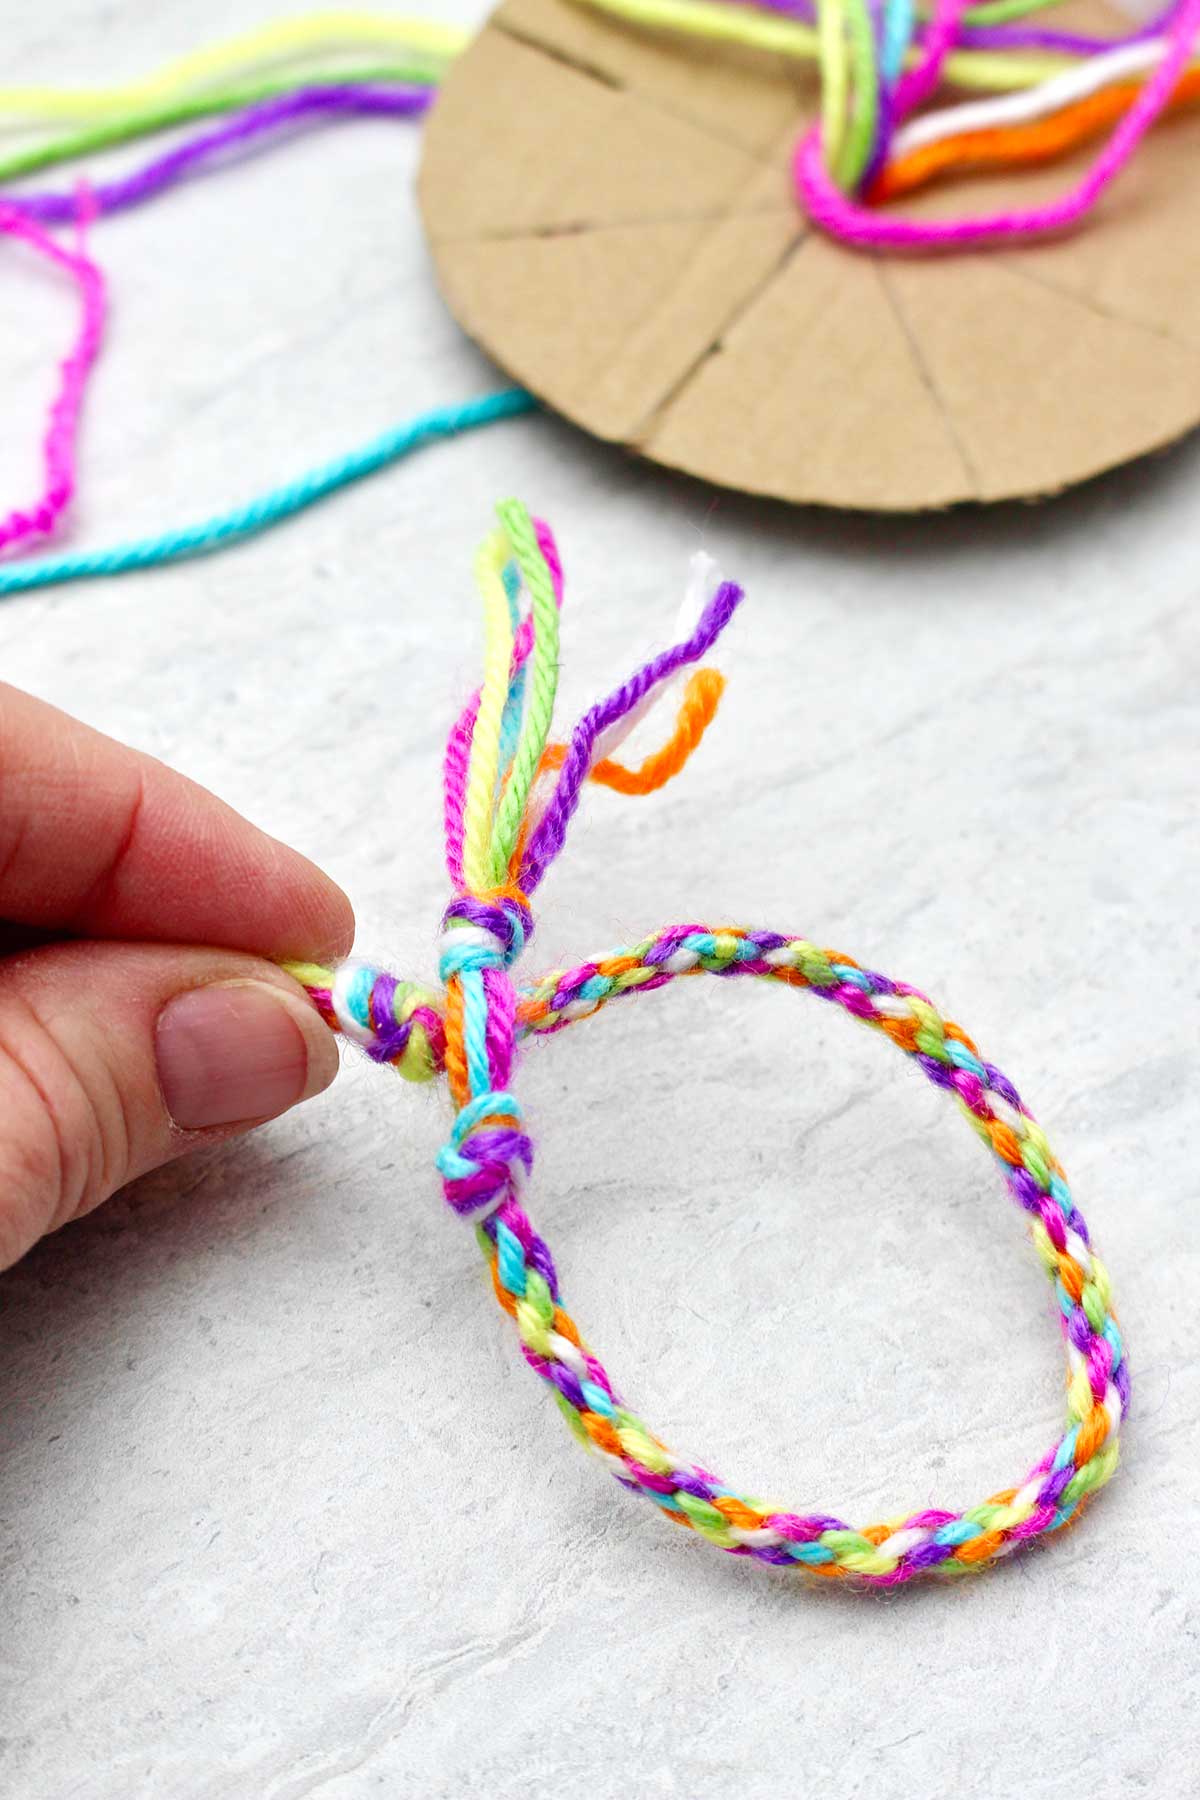
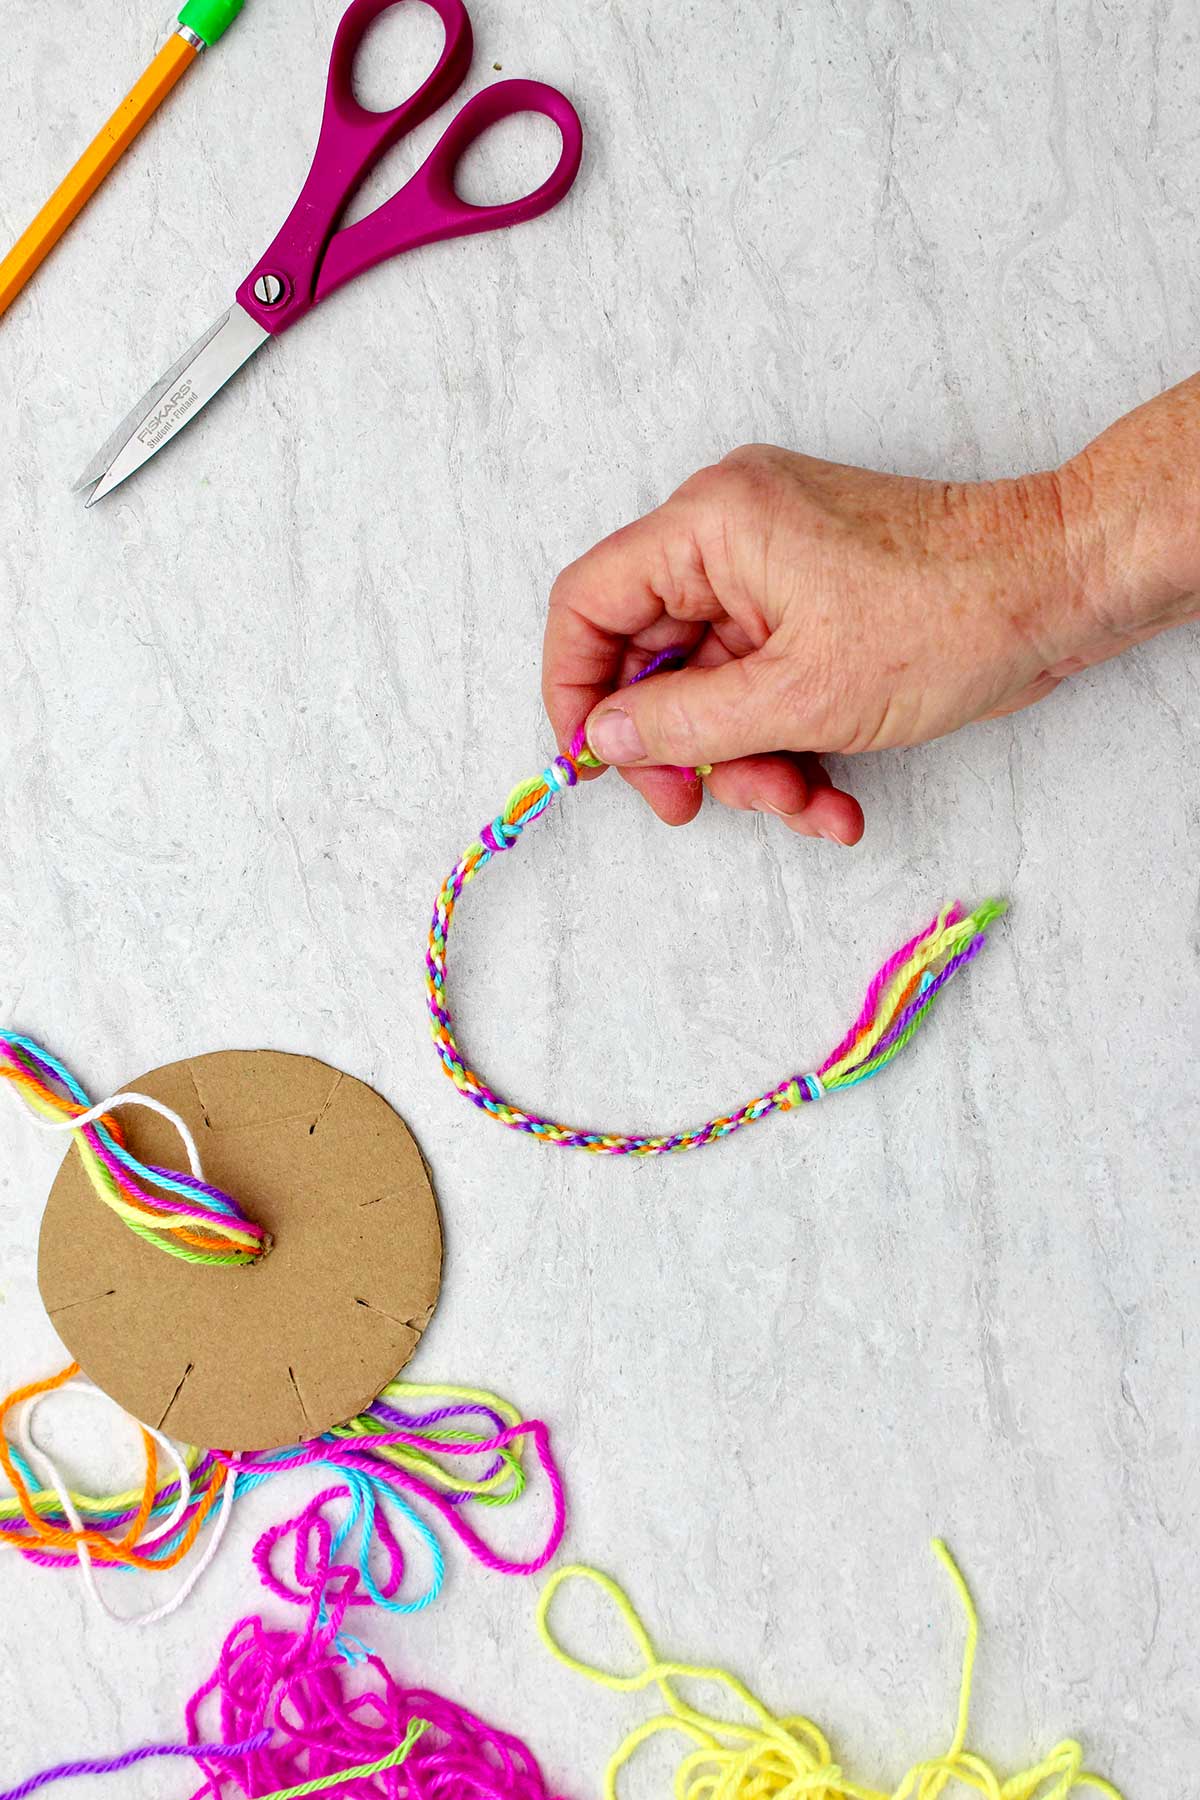
Once you've reached the desired length, it's time to tie it off.
Gently pull each of the strings out of the slits on the loom. Pull the bracelet downwards so that the extra thread comes down through the center of the loom and off the loom.
Set the cardboard loom to the side for now. You can use it again later for another round bracelet if it's in good shape.
Tie an overhand knot on the end of the bracelet in the location right where the weaving stops. Now you have the same knot starting and finishing the bracelet. Pull the knot tight.
Tie Closure
To use the thread ends to tie a knot in your bracelet, leave 2-3 inches of thread on the end of the bracelet and cut off the rest.
Use the two sets of threads to tie your bracelet onto your wrist or onto your friend's wrist.
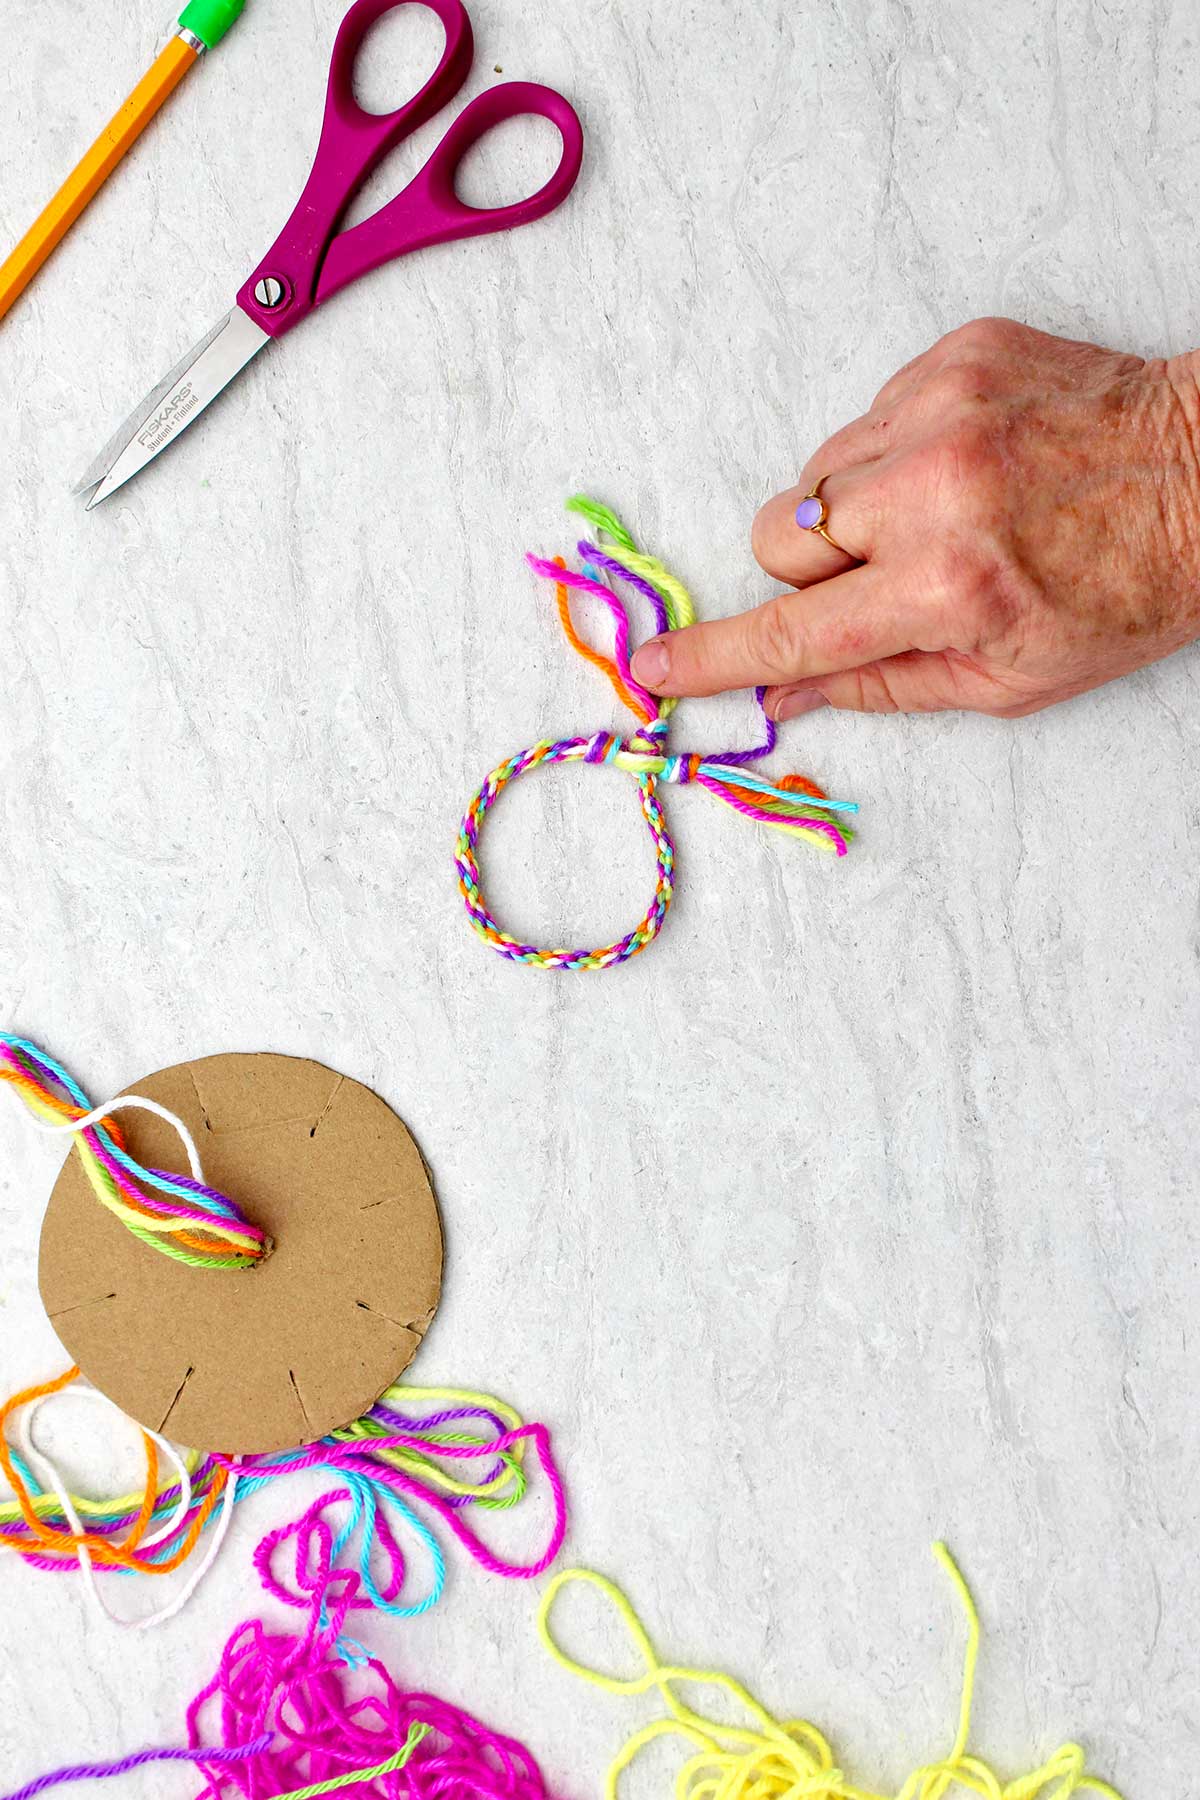
Knot Closure
Or you can try making a little closure for your bracelet.
To do so, tie a second overhand knot about ⅜ of an inch from the one that you just made. This leaves a small amount of space between the 2 knots.
Pull the knot from the other end of the bracelet through this small space and use this as a closure for your bracelet.
Trim the threads from both end of the bracelet to be about a half an inch from the knots.
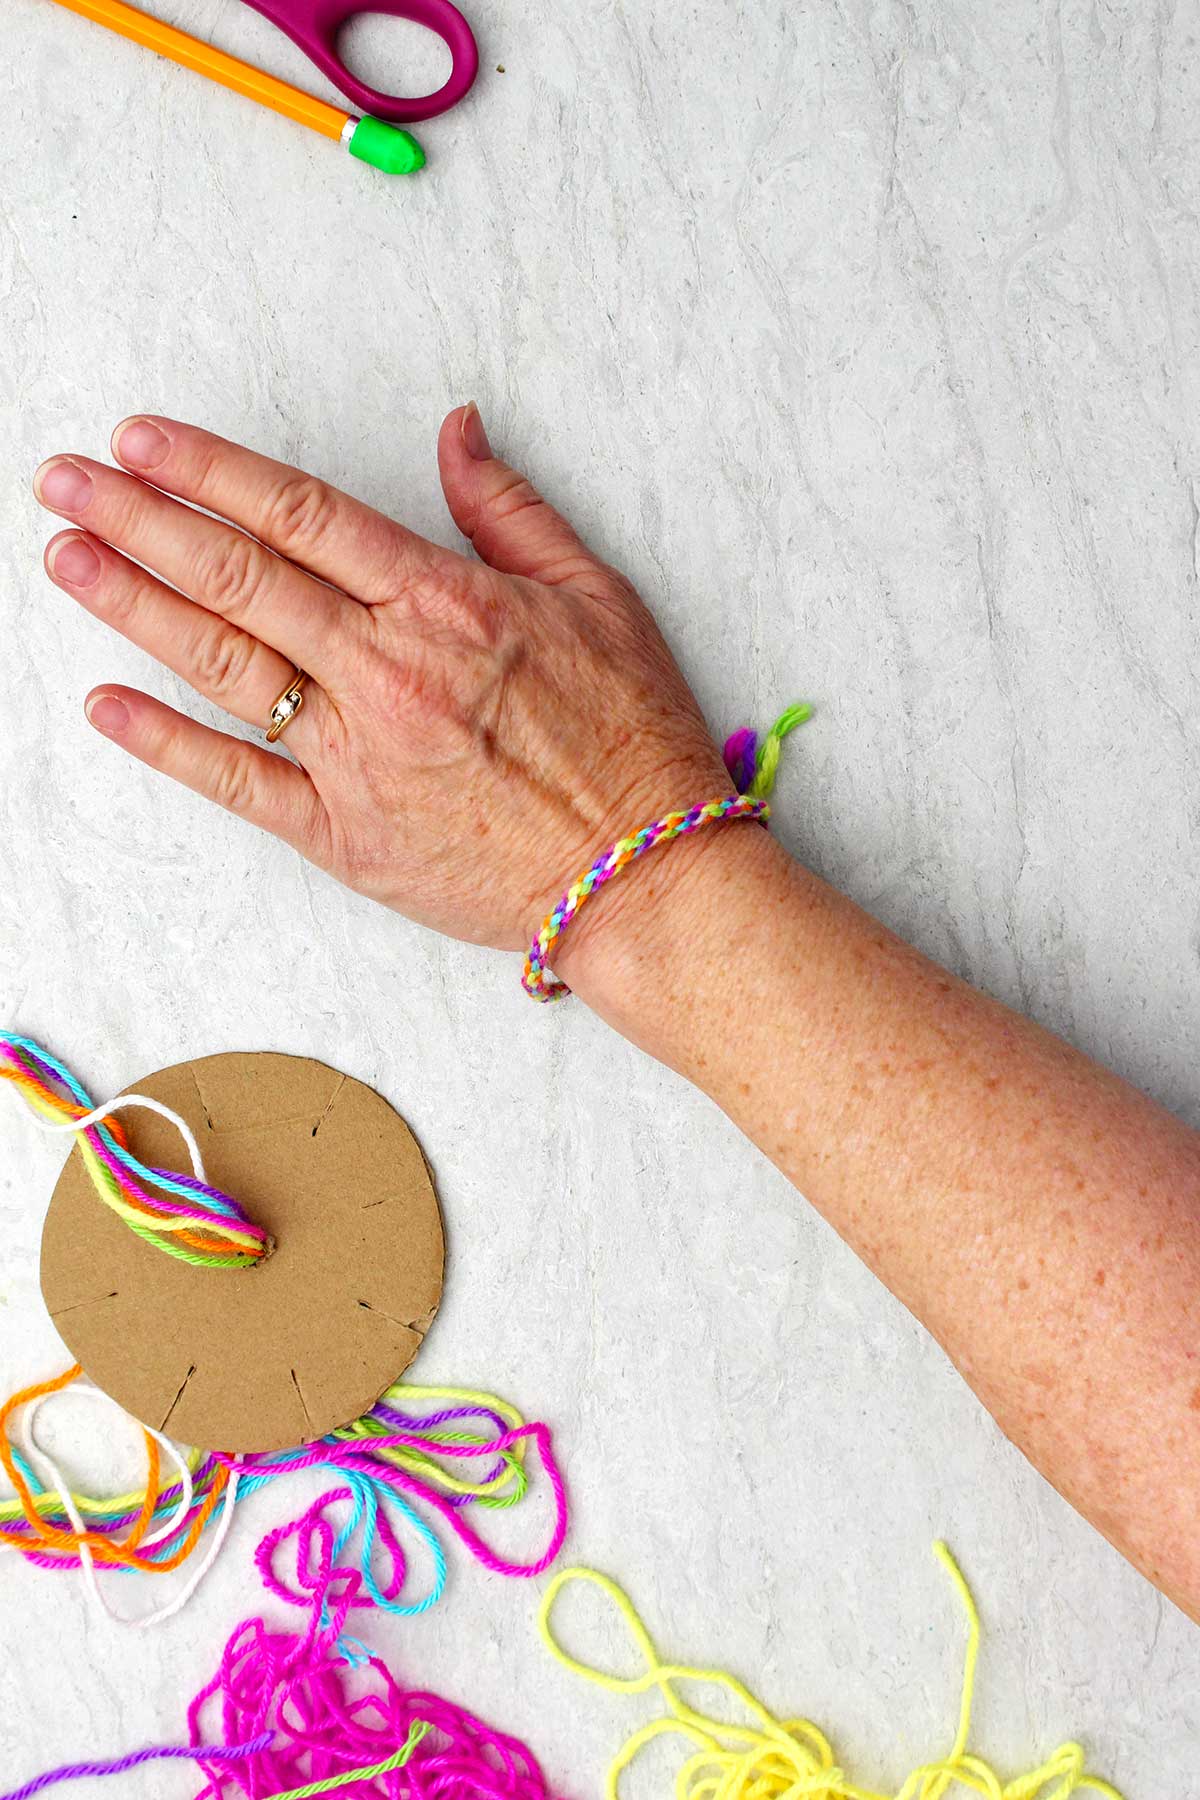
A Bracelet for Your Besties
I had enough string left over to make a second bracelet. My first bracelet is for Claire, the second is for me! Claire, thank you so much for your thoughtfulness.
I hope all of you have fun weaving bracelets that you can wear or give to your best friends. This could be a fun variation to make as a Taylor Swift friendship bracelet pattern!
Thanks for being my friend at Welcome To Nana’s!
Craft Tips
Here are a few tips and tricks to help you with this craft:
- Use heavy cardboard- While you can use cereal box cardboard, it can get a bit floppy. This is more frustrating while you weave, but it's still possible if that is what you have available to use.
- Adjust the string length- The string length I provided is longer than what is needed for one bracelet. Longer string is easier to work with for beginners, but you can adjust as desired. The length of yarn I used is enough to make two short bracelets.
- Loom direction- It doesn’t matter which side of the loom is the top or the bottom. It works the same way from either direction.
- Left handed weaving- If you are left-handed, hold the loom in your right hand if that's easier. Simply reverse the instruction directions and go the opposite direction. For example, count three strings to the left of the open slit, then turn the loom counter clockwise to get the empty slit in front of you.
Craft Variations
Want to switch things up? Try a few of these bracelet ideas:
- Add beads- The round braided pattern is perfect for using as a string for beads! Use beads that have a large enough center hole so that the bracelet can fit through. Add beads before finishing the last knot.
- Color combination patterns- No matter what colors you choose, your bracelet shape will be the same but will have different patterns. The pattern depends on what color combination you choose. Try a different color order to create new patterns!
FAQ
Once you've made your circle loom, it's time to create some friendship bracelets! Follow the steps to weave the round bracelet pattern with your yarn. It's easy once you get the hang of it. Simply weave until your bracelet has reached the length you'd like, then remove and tie it off.
Leave 2-3 inches of thread on the end of the bracelet for a tie, then tie your friendship bracelet onto your wrist or onto your friend's wrist. You can also try making a little closure for your bracelet. Tie a second overhand knot about ⅜ of an inch from the one that you just made. This leaves a small amount of space between the 2 knots. Pull the knot from the other end of the bracelet through this small space and use this as a closure for your bracelet.
More String and Yarn Crafts for Kids
If you would like more crafts using yarn and string, check out these ideas:
Come Join the Fun!
Try this craft, leave a comment, rate it, and tag a photo with #WelcometoNanas wherever you post.
More Crafts!
Get a free artsy craft and a weekly email with the newest crafts from Welcome To Nana's for signing up!

Easy Round Friendship Bracelet Pattern with a Cardboard Loom
Equipment
- Scissors
- Ruler
- Pencil
Items Required
- Yarn, Embroidery floss, or Crochet thread. (Seven strands 30 inches each)
- Cardboard
- Drinking glass like a plastic Solo cup
Instructions
To Make the Cardboard Loom
- Use the top of a drinking cup to draw a circle on a piece of cardboard to make your circle cardboard loom for this craft.Use a pencil or pen to draw the circle around the top of your drinking cup onto the cardboard. Then cut out the circle with scissors.
- Take a ruler and find the center or midpoint of your circle. Use the ruler to draw lines across the cardboard circle. Draw one line that goes across your circle, through the center.Draw a second vertical line that goes through the center point and intersects the first one. It is perpendicular to your first line. These two lines divide your circle into four equal sections. Use the ruler to draw two more lines that divide the four sections into halves. Now you've divided your cardboard circle into eight sections.
- Cut slits from the outside edge inward for about ¾ of an inch. Do this on each of your eight lines.
- To finish your cardboard loom, use your pencil to poke a hole in the center. Don't push the pencil all the way through, just part way up the lead.
To Make a Round Friendship Bracelet
- Cut the yarn or embroidery floss into pieces into pieces 30 inches long. Gather the seven strings up into your hand by one end of each string. Tie a simple overhand knot about 2 inches from the end of your seven strings to hold them all together.
- Draw the seven pieces of string up through the hole in the center of your cardboard loom.Draw the strings all the way through the hole. The knot will be next to the loom and the loose string will be coming out of the other side of the loom.Take one of the strings and pull it out to a slit on the edge of the cardboard loom- pull it down through that slit.Take the second thread and pull it out and down through the next slit. The third thread goes through the third slit and so forth until all seven strings go out from the center and down through a slit. This is now the top of the weaving. The knot and extra string are on the back of the cardboard loom.You will notice that there’s one empty slit left because there’s seven strings and eight slits. This is on purpose, don't worry.
- Hold the loom in your left hand with the flower looking part up and the rest of the threads dangling below. Turn until the empty slit is towards you.Take your right hand and count three strings to the right of the empty slit. Remove the third string out of the slit and bring it towards you. Put it down into the empty split.Turn the loom so that the empty slit is in front of you again. This turns the cardboard loom in a clockwise directions for a right handed person.Now again, hold the loom in your left hand, empty slit in front of you. With your right hand count up three threads. Pick up that third thread, take it out of its slit, bring it down into the empty slit right in front of you. Turn the loom clockwise till the empty slot is in front of you.
- Repeat counting and turning to continue the weave.After few turns, reach underneath the loom and gently tug the little knotted section in the center of the loom. The round friendship bracelet is beginning to form!Continue weaving and turning in the same pattern, tugging the bracelet through the loom every several weaves.
- Watch the length of the bracelet grow until it is the length that you would like. The bracelet needs to be long enough to go around your wrist or your friends' wrist.
- Once you've reached the desired length, gently pull each of the strings out of the slits on the loom. Pull the bracelet downwards so that the extra thread comes down through the center of the loom and off the loom.Tie an overhand knot on the end of the bracelet in the location right where the weaving stops. Pull the knot tight.
Tie Closure
- To use the thread ends to tie your bracelet, leave 2-3 inches of thread on the end of the bracelet and cut off the rest.Use the two sets of threads to tie your friendship bracelet onto your wrist or onto your friend's wrist.
Knot Closure
- To make a little closure for the bracelet, tie a second overhand knot about ⅜ of an inch from the one that you just made. This leaves a small amount of space between the 2 knots.Pull the knot from the other end of the bracelet through this small space and use this as a closure for your bracelet.Trim the threads from both end of the bracelet to be about a half an inch from the knots.
Video
Notes
This post was originally published in July 2024 and has been updated to add more relevant and detailed content.


Shelly says
Little ones can do this too! 4 year old granddaughter made a bracelet with us!!
Laura says
I've made SO many friendship bracelets over the years 🙂 The loom is a great help!