This quick and easy Paper Plate String Art Craft is an easy DIY for Kids. Make it for any holiday or for a fun activity to gain eye-hand coordination and fine motor skills!
Jump to:
- Paper Plate String Art
- What designs can I use for string art?
- Paper Plate Crafts
- Draw your design
- Cut out the design
- Punch holes
- Now it’s time to get the yarn or string ready.
- Simple string art
- Colors of yarn for string art
- Edging the plate
- Other fun alternatives to try on this craft.
- Putting the paper plate string art craft to good use
- Want more craft ideas for paper plates?
- Enjoy!
- Supply list for Paper Plate String Art
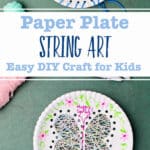
- Paper Plate String Art (Easy DIY Craft for Kids)
Paper Plate String Art
This Paper Plate String Art is going to be a great one to do with all of the kids or grandkids. I think that kids of all ages would like it. The older kids would also be able to help the younger children learn the needed skills.
It is such an easy and flexible idea that can be used for any season or any holiday.
What designs can I use for string art?
I chose to do cutout designs and string art of a fish and a butterfly for spring. But there’s so many different shapes that you could choose. How about a:
- Heart for Valentine’s Day
- Cross or Easter egg for Easter
- Three leaf clover for St. Patrick’s Day
- Flower for spring
- Sunshine for summer
- Leaf for fall
- Christmas tree for Christmas.
The list could go on, and on! I'm sure you will have lots of your own great ideas.

Paper Plate Crafts
All the materials needed were already in our house or easy to pick up nearby. That is certainly a plus- extra points when you get to use up things from the craft stash!!
If you would like to follow along on the full length tutorial video, here is the link: Paper Plate String Art Full Length Video Tutorial.
The lowly paper plate-
You have to love the lowly paper plate as the base of a craft! There are so many crafts that can be made from a paper plate. This is no exception.
I keep a stack of paper plates in my craft stash to have on hand for things such as this. I choose the type that has kind of a wax coating on it so that it’s a bit heavier than the real flimsy plain paper ones. But they are also not as heavy as the cardboard Chinet type of plates. It makes it easier to cut and bend.

Yarn options
You can purchase yarn or use whatever you have on hand. Crochet thread, embroidery floss or other colored strings could work as well.
Other needed supplies for string art on paper plates
The other thing that is handy to have is a yarn needle. It would work well to purchase some of the plastic type that have the large eyes. They are not sharp on the end. Then you could use them with your Littles and not worry about them poking themselves. My needle is shaped like that but is made out of metal. I already had it on hand.
Lastly, a wonderful paper punch. I end up pulling this out all the time! It is an optional item because you could poke holes in the paper plate with the yarn needle, but having the holes punched to put the yarn through makes paper plate string art so much easier.
Draw your design
Turn your paper plate over and draw a design on the middle part of the plate, I did go over onto the fluted edge a couple times, but mostly drew in the flat area in the center of the plate
You could look online for a design and then print it off to use as a template. Or just freehand the design. Don’t get uptight about it being perfect.
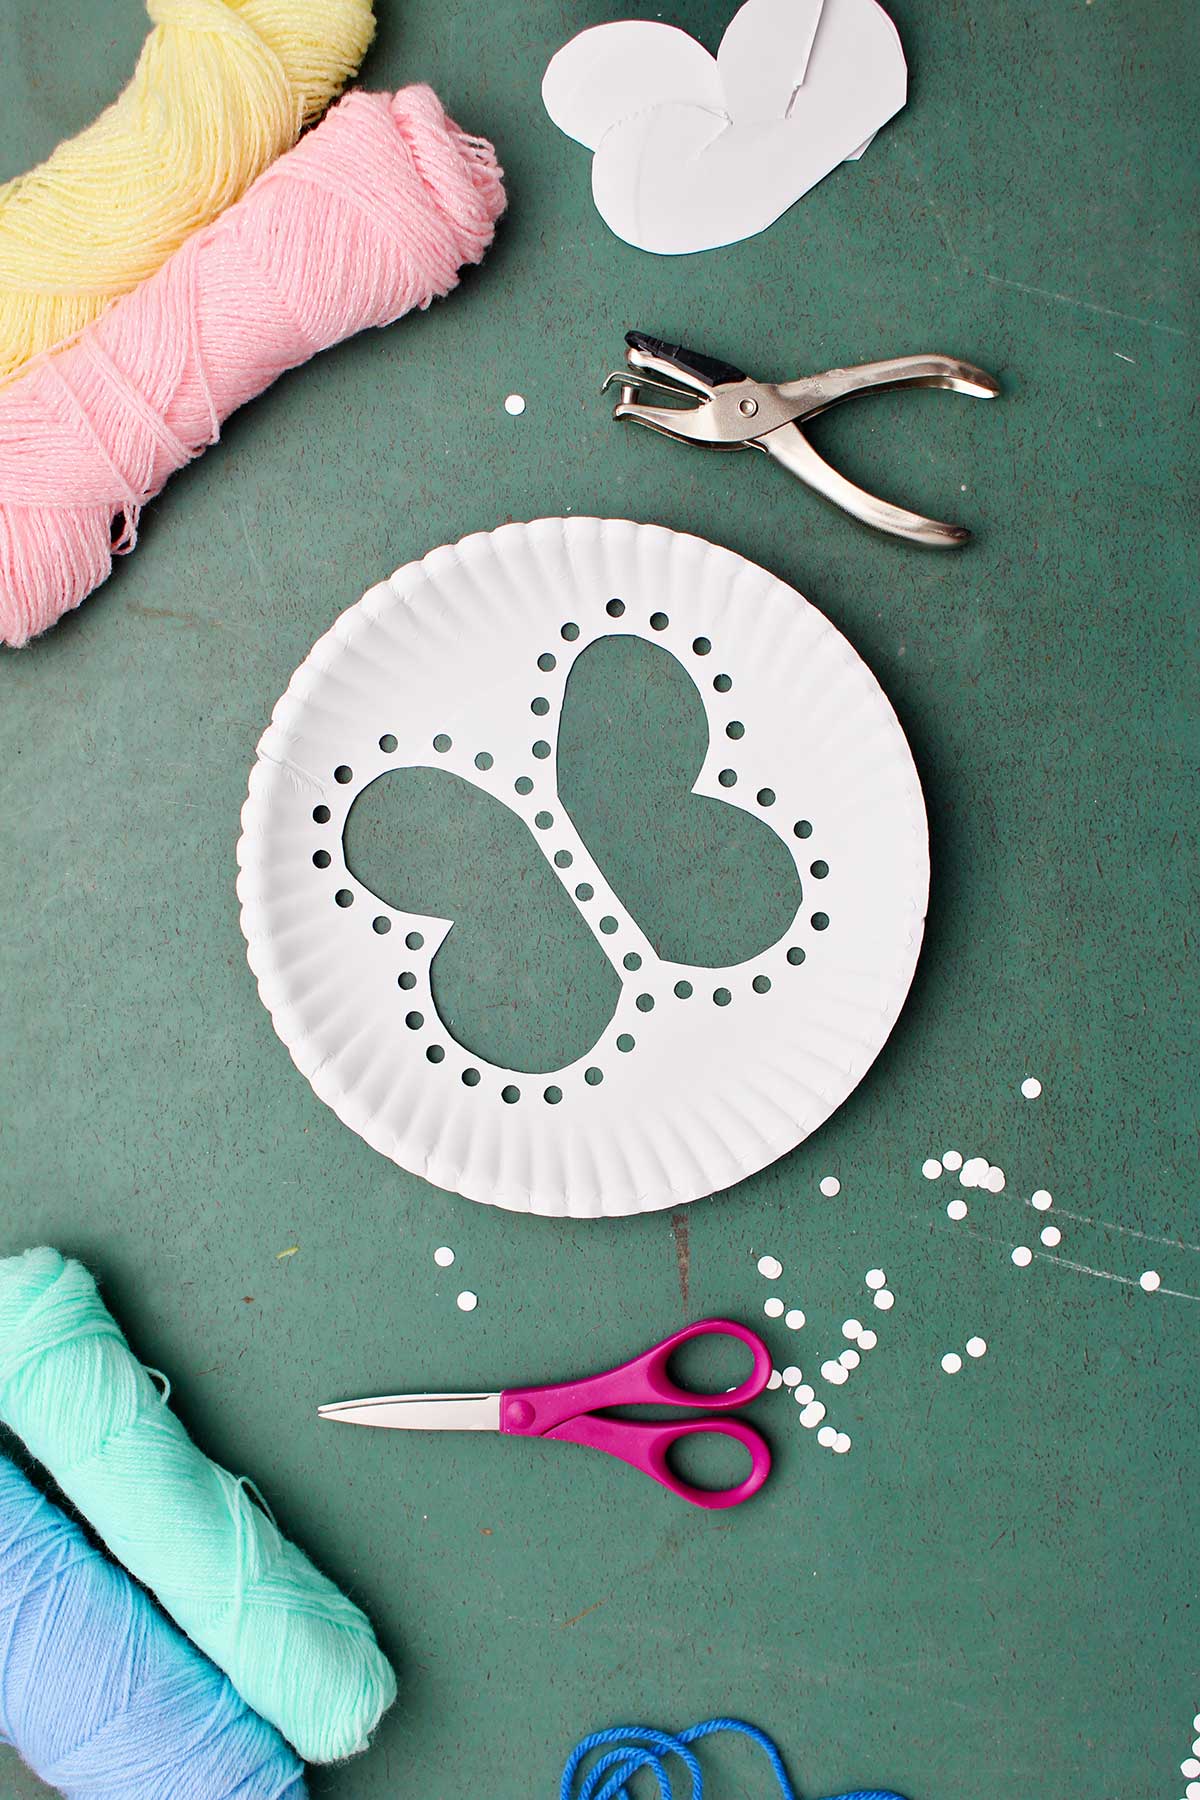
Cut out the design
Use scissors to poke a hole in the center of that design, and then proceeded to cut it out on the line that you’ve drawn.
You want to help young children with this step. Be sure not to get fingers behind the plate where the scissors will poke through.
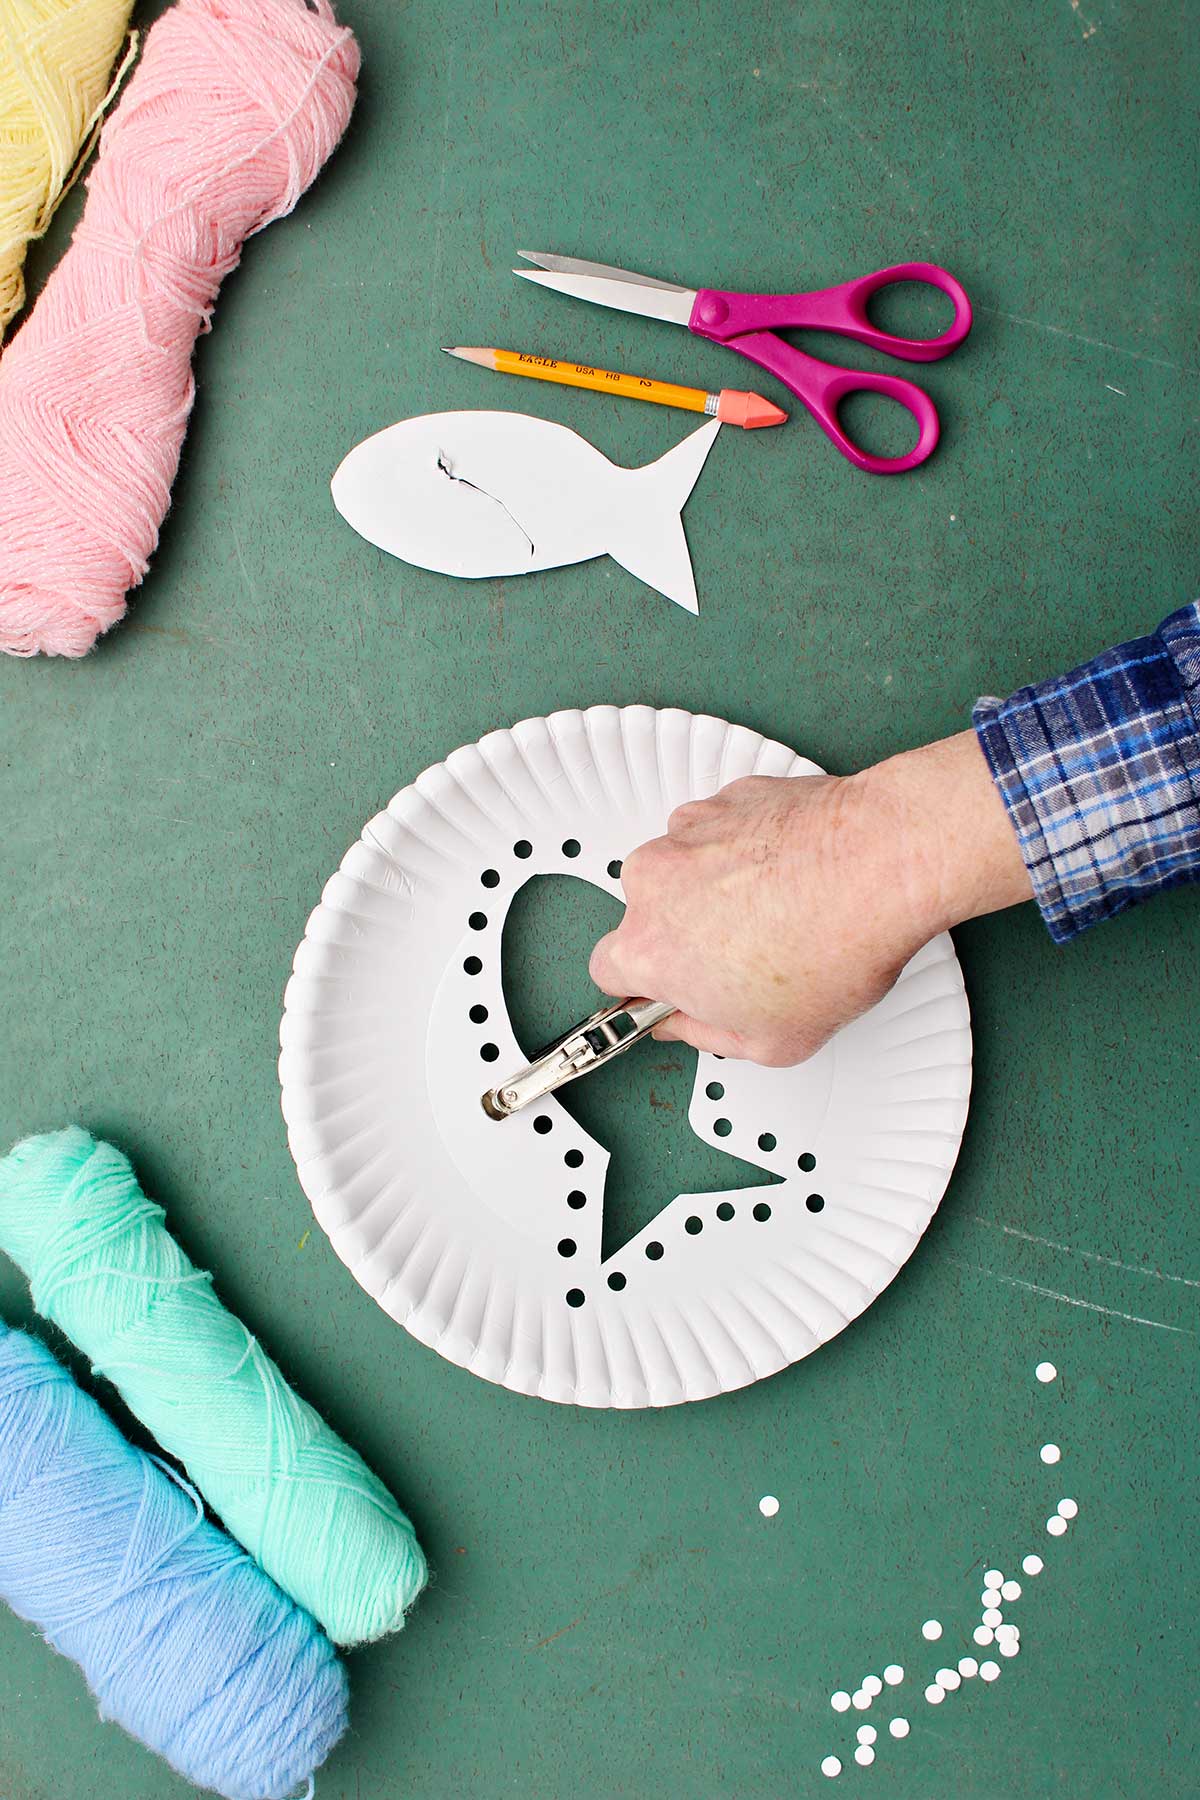
Punch holes
After the design is cut out of the middle of the plate, take your hole punch and punch holes through the plate all the way around the perimeter of the shape.
The holes should be about a quarter inch from the edge of the cutout design and be about a half inch apart. A half inch is about the width of your finger if that helps you place the holes.
Again, they don’t have to be perfectly spaced so there’s not a need to use a ruler to measure unless you’re a serious type A person. 🙂
Now it’s time to get the yarn or string ready.
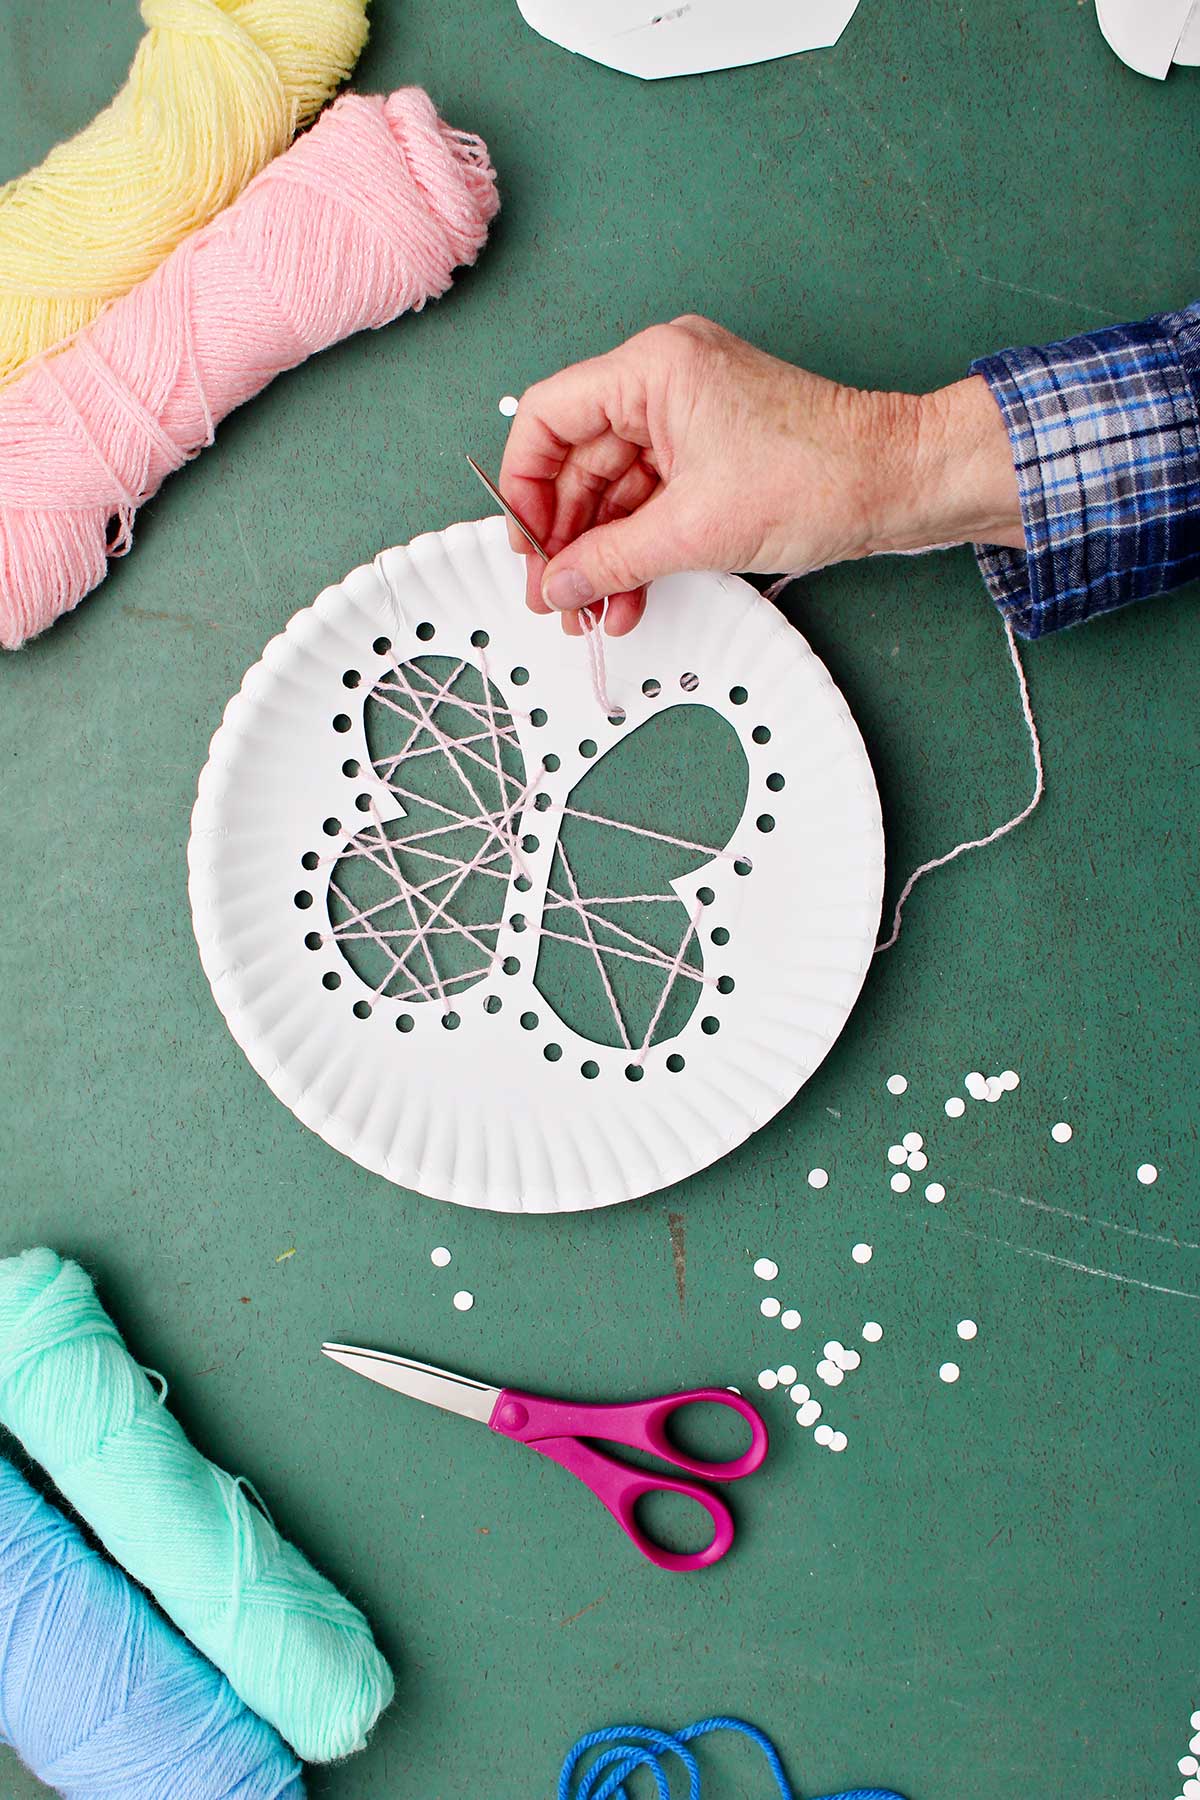
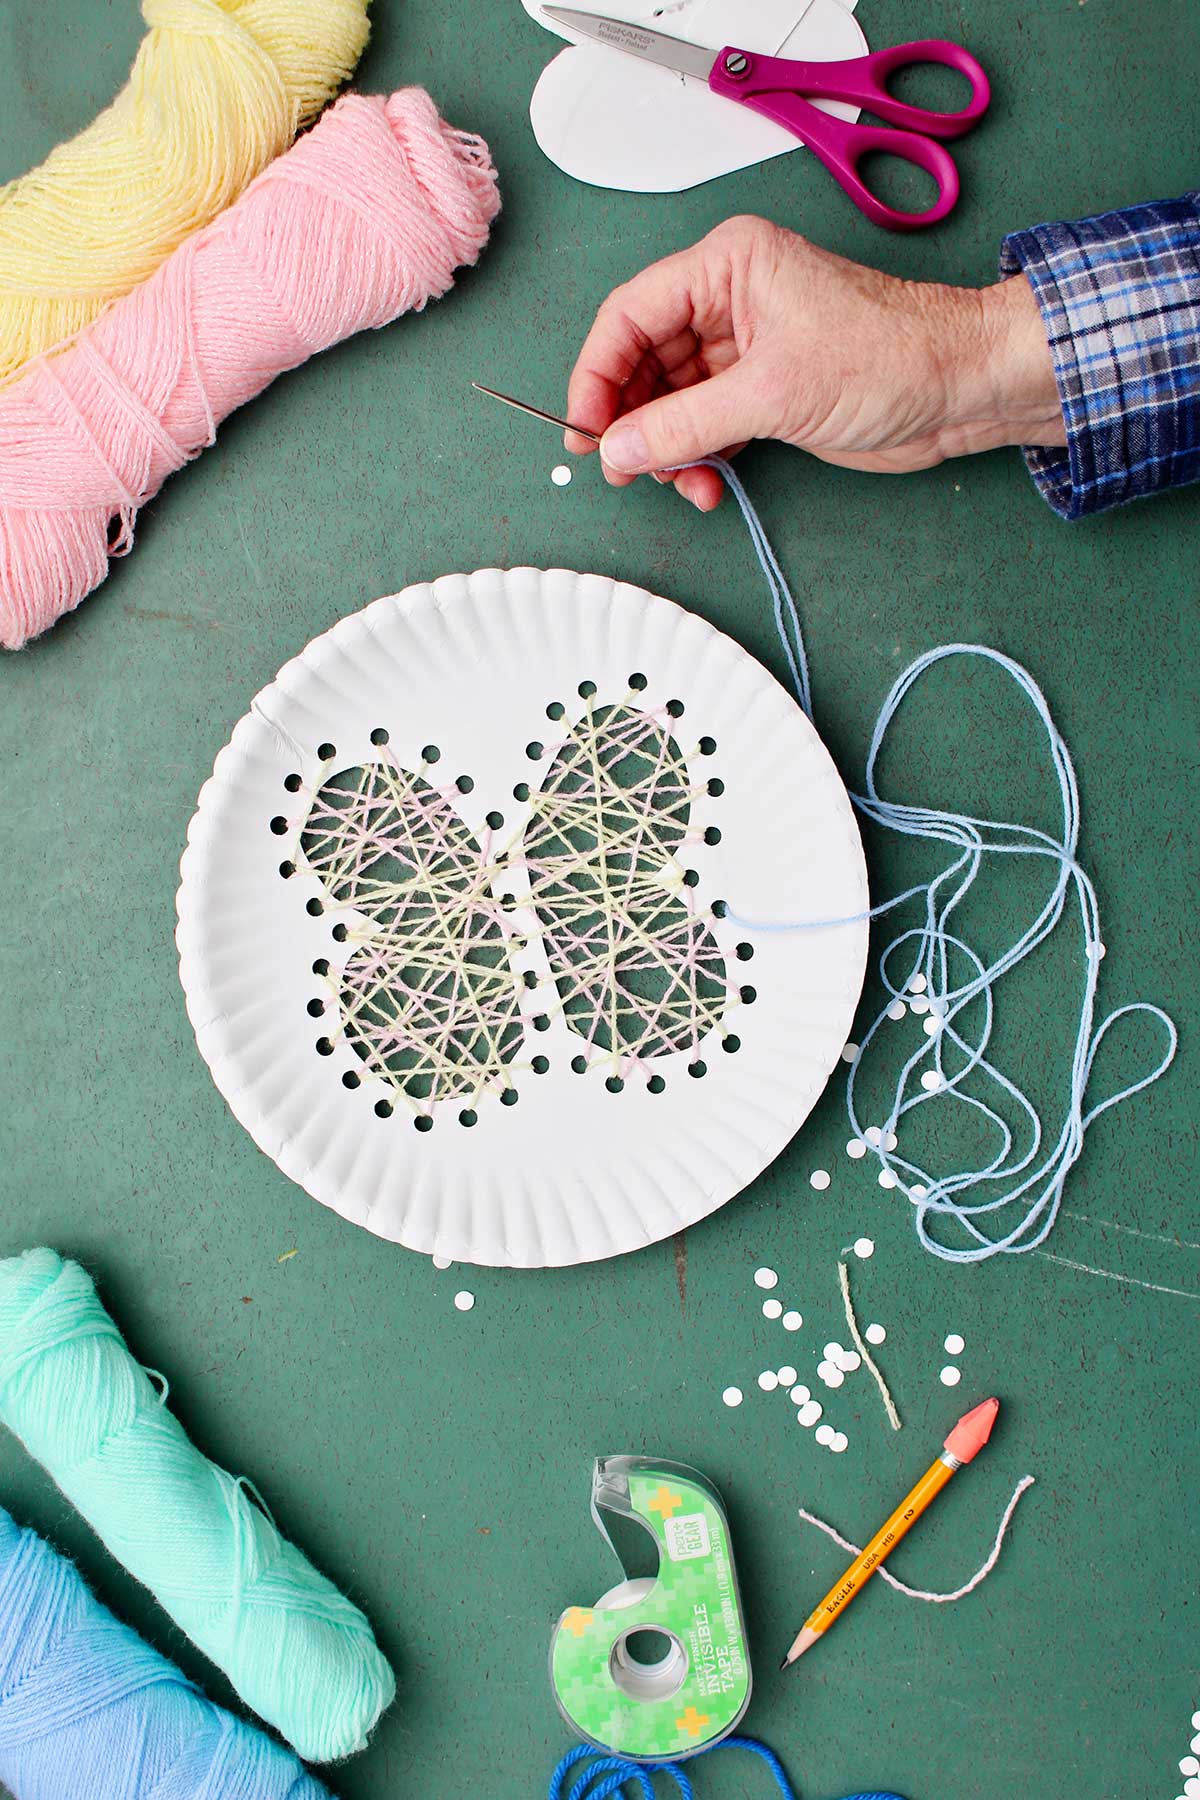
Cut off a piece of yarn that’s about 4 feet long. Thread it onto your needle by either using a needle threader or you can twist your yarn tightly and bend it in half and then slip that twisted part through the hole in the needle. That always works for me.
Bring the yarn up through one of the holes from the back of the plate to the front. Turn the plate over and tape the end of the yarn to the back of the plate.
Simple string art
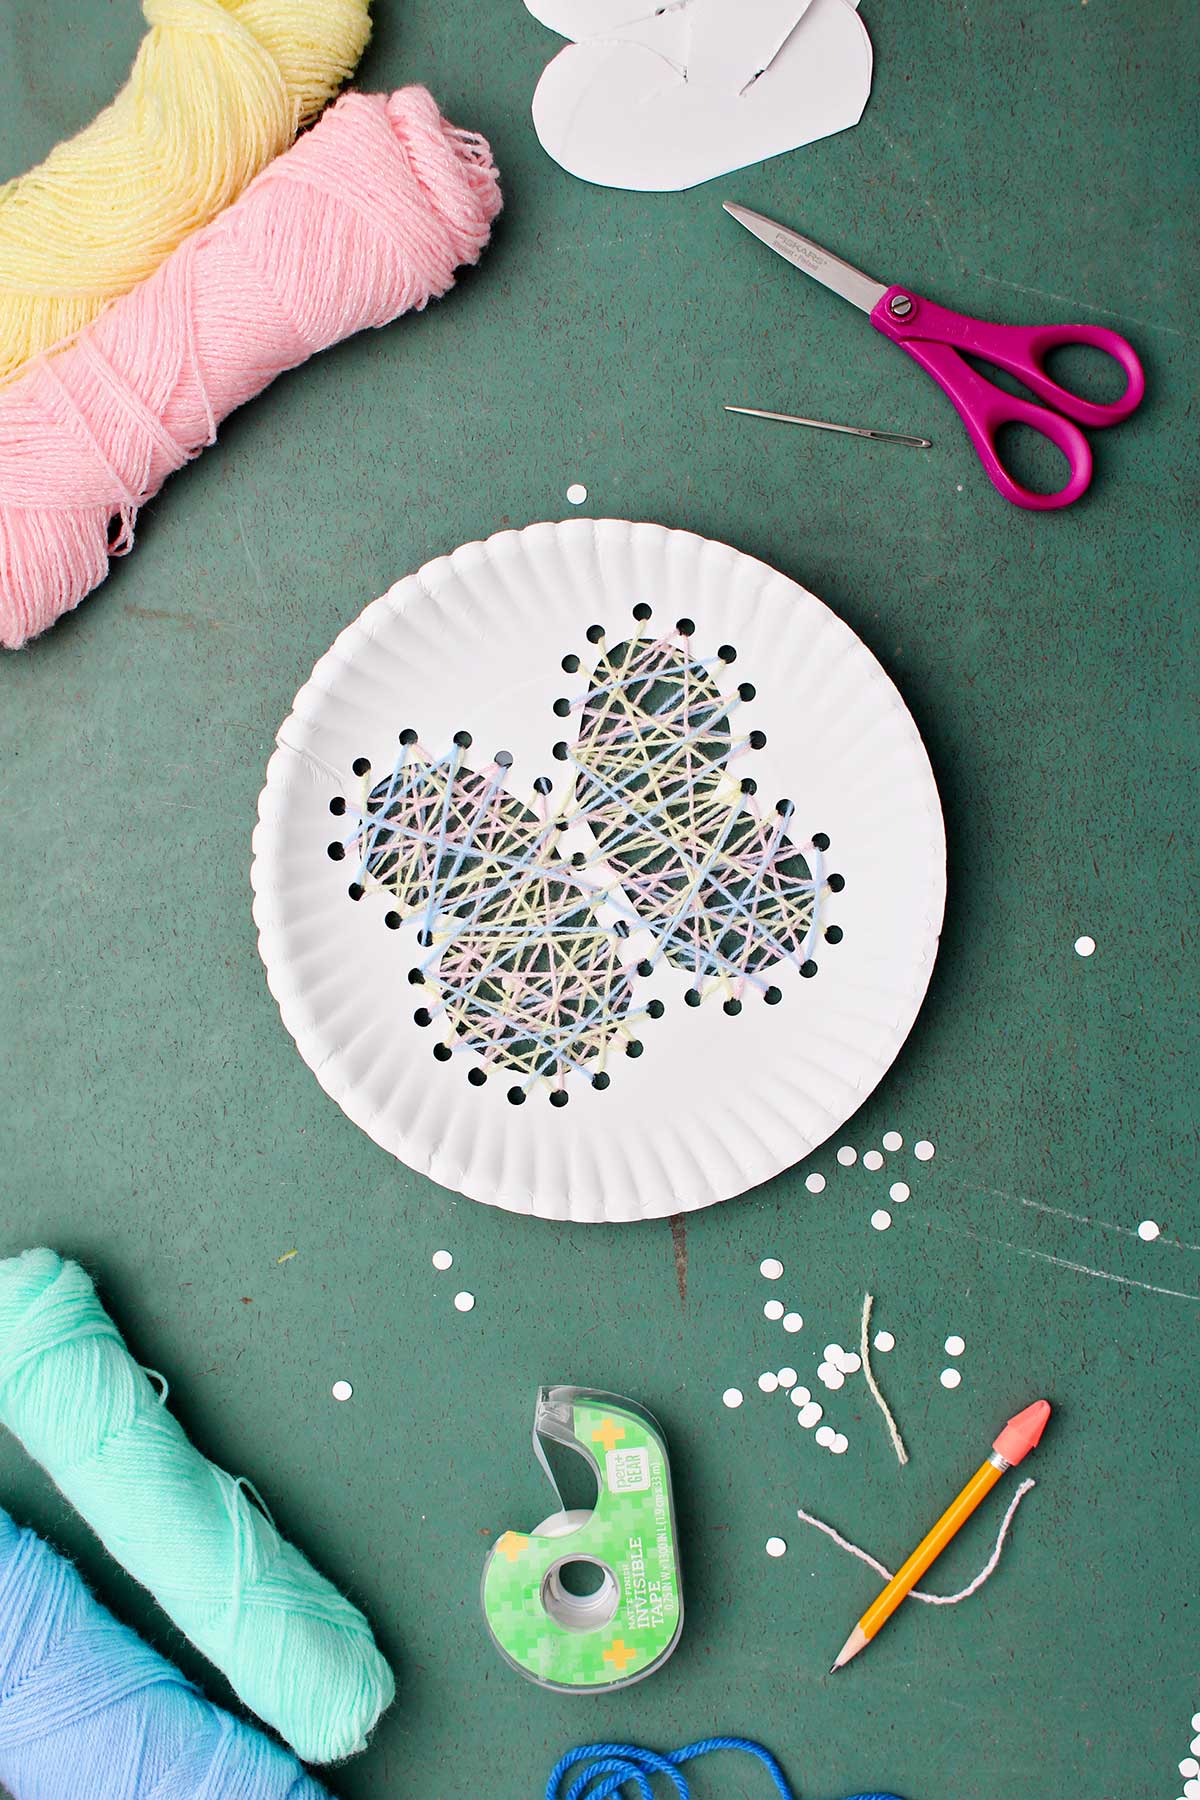
Now proceed to use the needle to go down through a hole that is on the opposite side of the design. Then come up through a different hole and go down through another hole crisscrossing across the cutout design area.
There is not an exact pattern for this process. You are just wanting to cover the open area with a nice crisscrossing of yarn to make it look well covered.
Colors of yarn for string art
If you run out of yarn, just bring the needle through a hole to the back of the plate. Tape the end of the yarn to the back of the plate and clip off the extra.
Then start again with a new piece of yarn. At this time you can also change colors of yarn if you would like to.
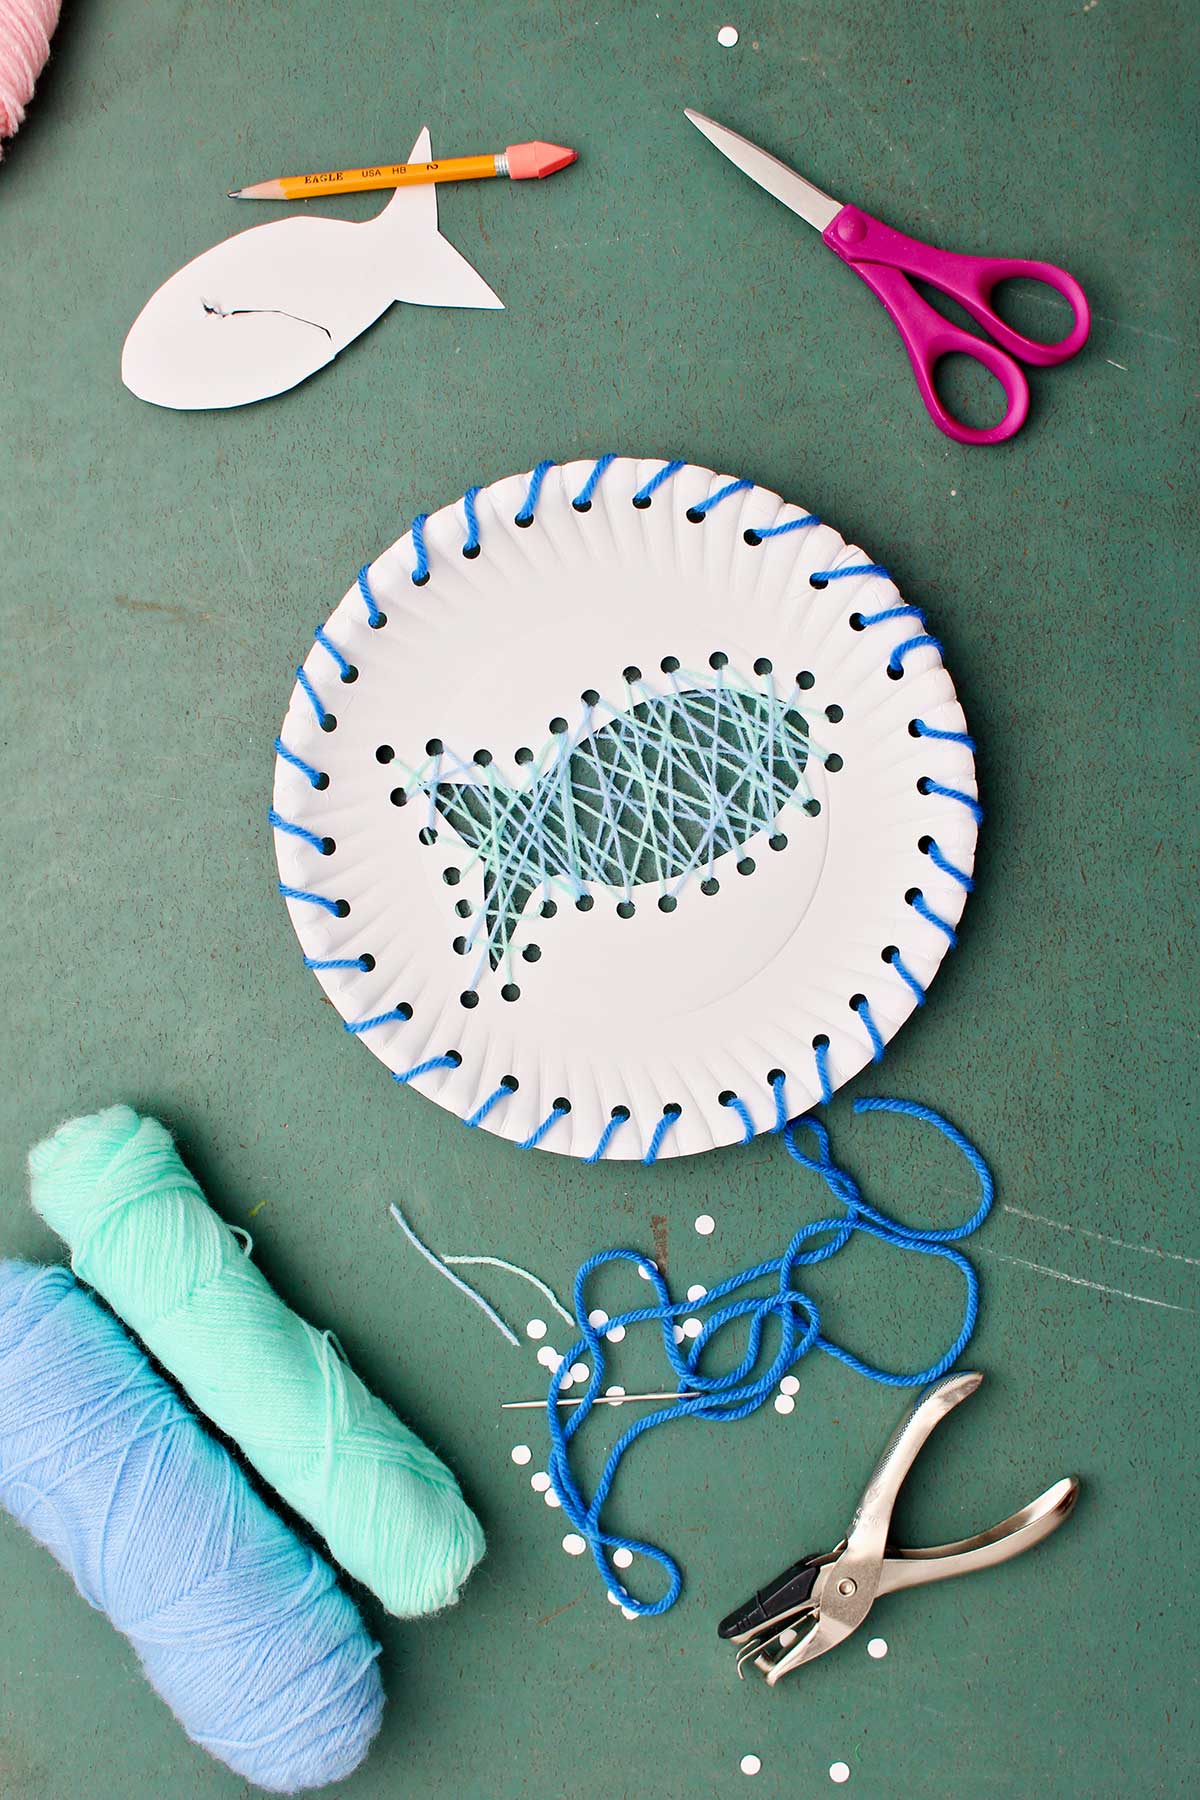
A combination of blue and green yarn was used to make the fish.
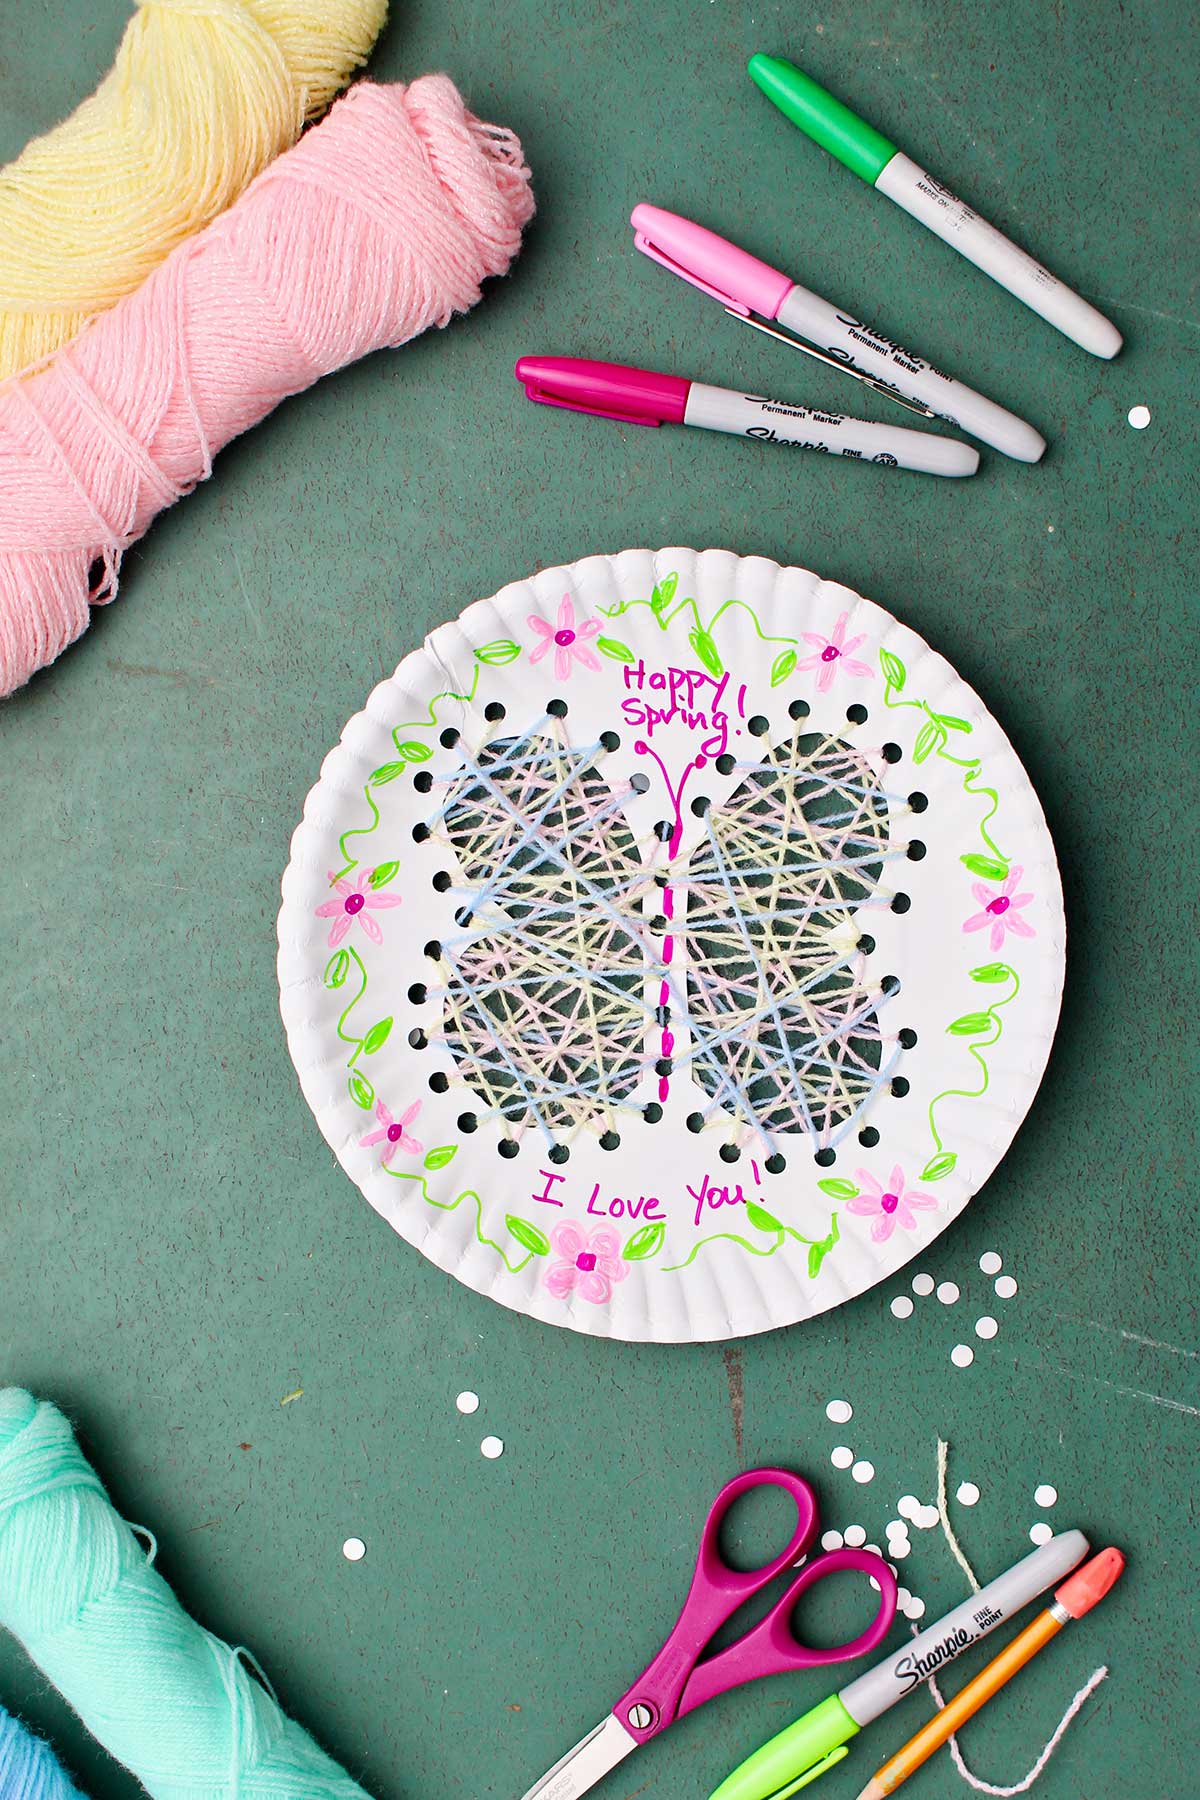
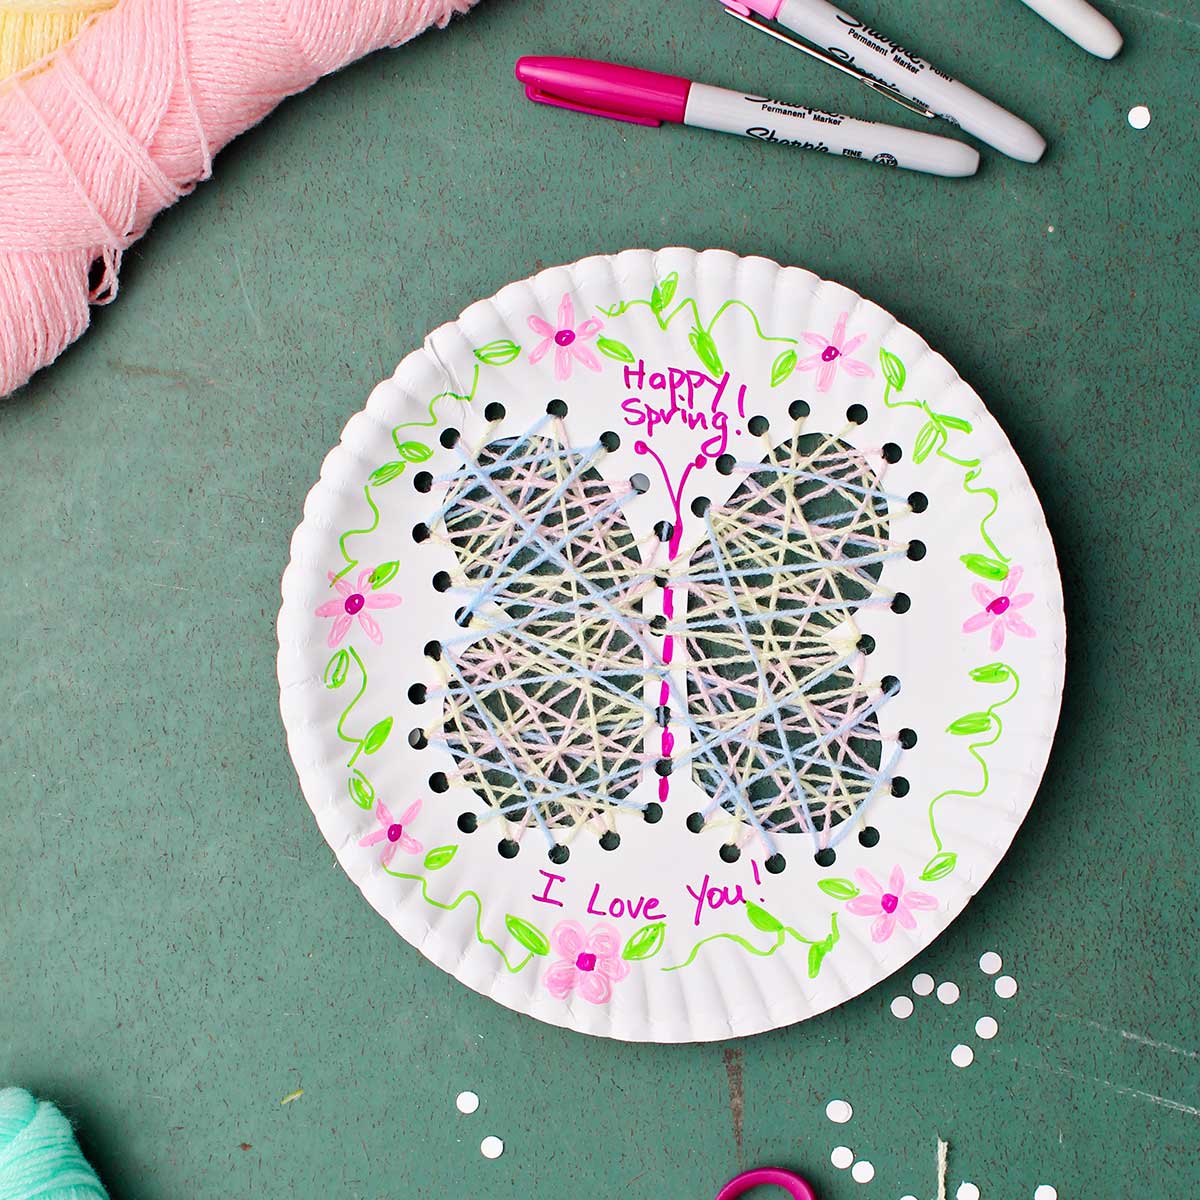
On the butterfly three colors of yarn were used- yellow, pink, and blue.
These yarns were all used in a little baby blanket that I made sometime ago. A yarn craft is great way to be using them up.
Edging the plate
For fun, I punched holes around the edge of the paper plate for the fish. A darker blue yarn was used in a circular design to go all the way around the edge of the plate.
This is done by taking the needle up through a hole in the edge of the plate, taking the needle around the back of the plate and then coming up through the next hole. You’re always going up through each hole with the needle.
Of course the ends are taped to the back of the plate where they are not seen.
Other fun alternatives to try on this craft.
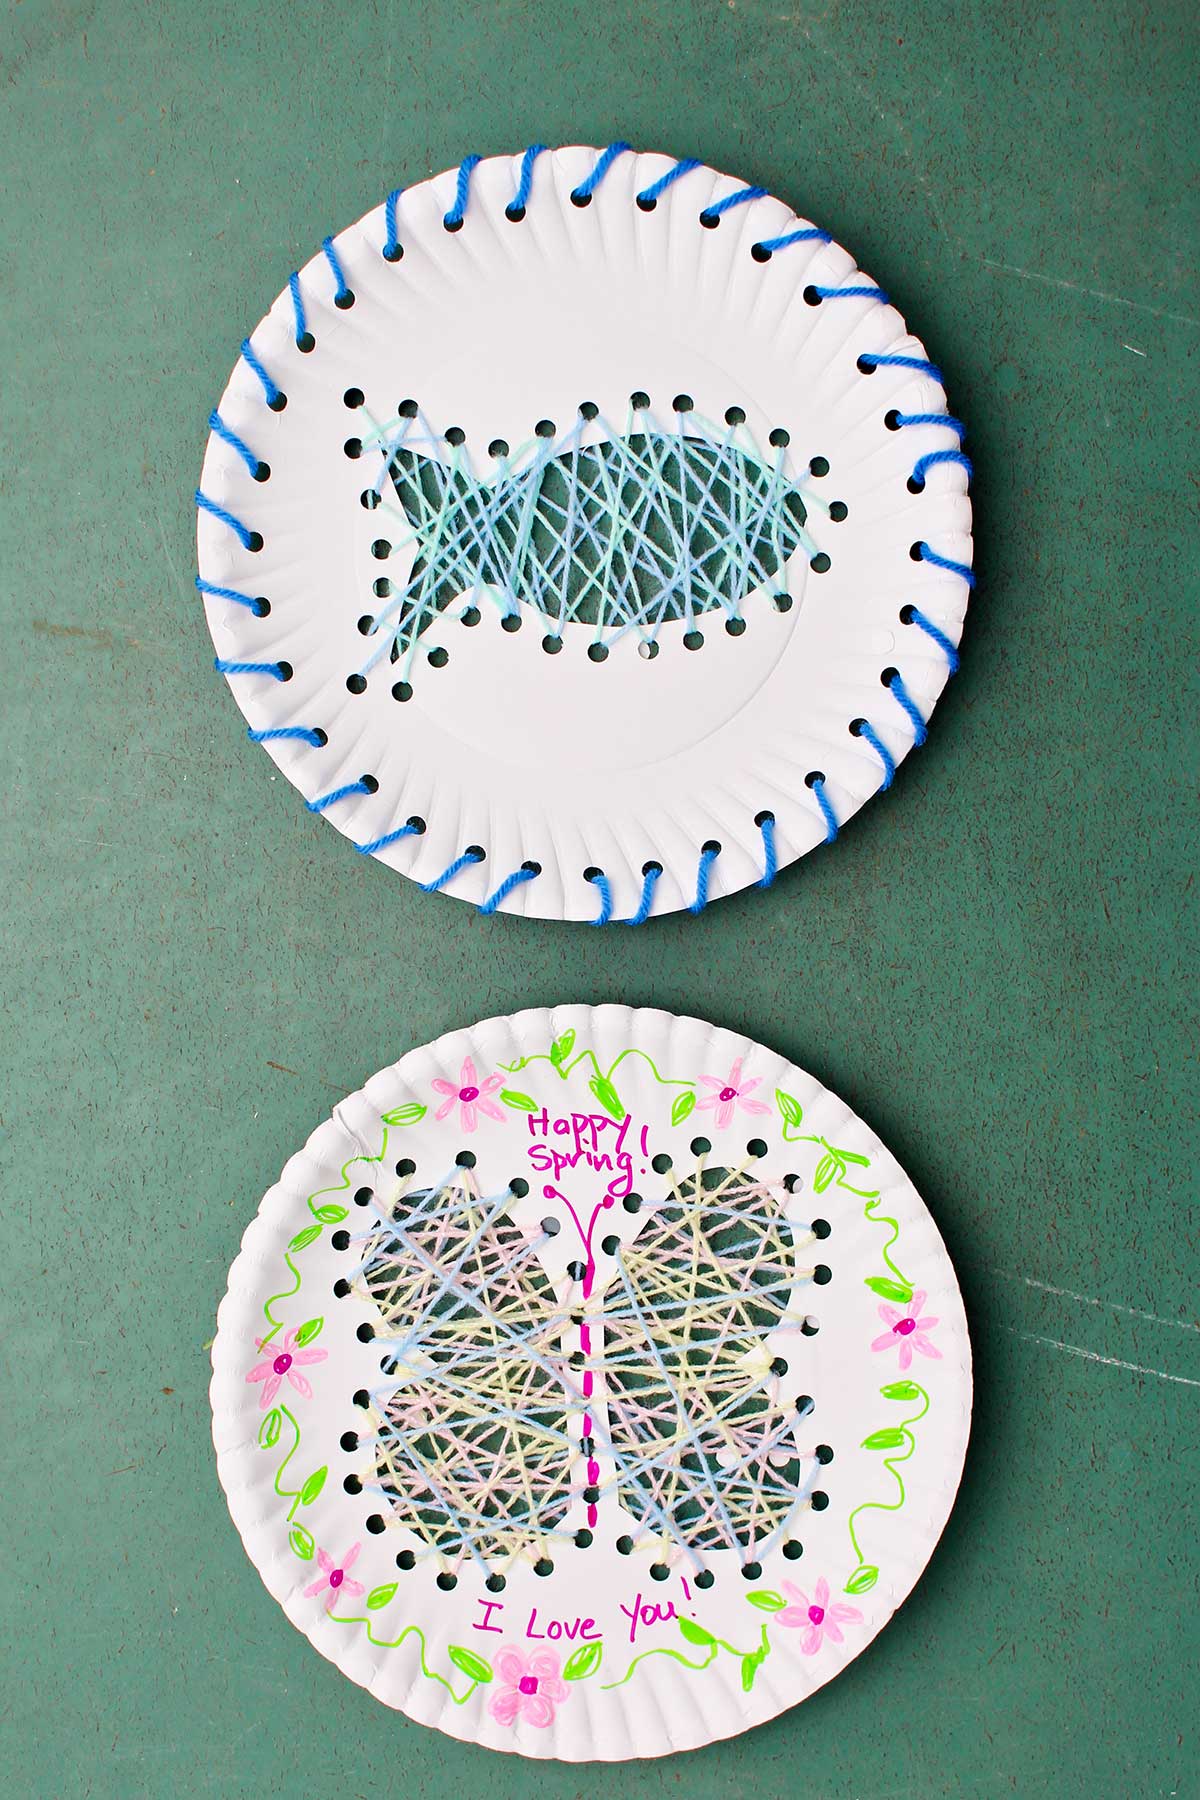
Watercolor or marker color the plate before you begin. That would have looked nice with the fish design- to have the plate background be a blue color. If the plate was blue, I probably would’ve chosen different colors of yarn to make the fish (maybe orange).
You can also use markers or colored pencils to colored designs around the edge of the plate after the stitching of the design. That was what was done on the butterfly plate.
Of course, you can write special messages on your paper plate and use them as cards or gifts.
Do you have other ideas that could be done with this Paper Plate String Art craft?
I’m thinking this paper plate string art would make a great classroom activity. The design could be adapted to the subject matter of the class that day or a holiday theme. You could make a pattern to trace around to make it go quickly for the children. Or you could just have the designs cut out of the plate before the class begins.

Putting the paper plate string art craft to good use
I’m excited to use yarn crafts when the grands come this weekend. I’m going to let them choose whatever design they would like to make. It is such a good activity for eye hand coordination and developing fine motor skills.
It’s also a good learn to sew project before starting embroidery. Spoiler alert, we’re going to be doing an embroidery craft in the next few weeks. Stay tuned!
Making your own paper or paper plate thread art is super easy! Simply cut out your desired shape from the paper, then punch holes evenly around the edge of the shape. Tape one end of a long piece of thread or yarn to the back of the paper plate, then begin threading through the holes in any pattern you'd like.
A paper plate yarn weaving is a great quick and easy craft for kids! Cut your shape out of the paper plate, then punch holes around the edge with even spacing. Next, thread a long piece of yarn through one of the holes, taping the end on the back of the plate. Begin weaving your thread back and forth through the holes to create a fun pattern!
You can use all kinds of material to create string art, from wood and nails to paper plates! This tutorial uses a paper plate, hole puncher, and some yarn or thread to create a fun and simple weaving.
Want more craft ideas for paper plates?
Would you like some more easy projects to do with paper plates? Here are a few good ideas from around the blog:
- Fun & fast paper plate crafts (bird in nest, fish, watermelon)
- Paper plate May basket
- Paper plate snowman
Enjoy!
If you try this craft, let me know! Go ahead and leave a comment, rate it, and tag a photo with #WelcometoNanas wherever you post.
Come join the fun at https://welcometonanas.com
Supply list for Paper Plate String Art
- Paper plates, preferably the wax coated type
- Scissors
- Cookie cutter, or printed design outline (optional)
- Hole punch
- Yarn in colors of your choice (other types of thread or string could work, such as crochet, thread, or embroidery floss)
- Yarn needle
- Tape
- Colored markers
Paper Plate String Art (Easy DIY Craft for Kids)
Equipment
- Scissors
- Cookie cutter, or printed design outline (optional)
- Hole punch
- Yarn needle
Items Required
- Paper plates, preferably the wax coated type
- Scissors
- Cookie cutter, or printed design outline (optional)
- Hole punch
- Yarn in colors of your choice (other types of thread or string could work, such as crochet, thread, or embroidery floss)
- Yarn needle
- Tape
- Colored markers
Instructions
- Turn your paper plate over and draw a design on the middle part of the plate, I did go over onto the fluted edge a couple times, but mostly drew in the flat area in the center of the plate
- Use scissors to poke a hole in the center of that design, and then proceeded to cut it out on the line that you’ve drawn.You want to help young children with this step. Be sure not to get fingers behind the plate where the scissors will poke through.
- After the design is cut out of the middle of the plate, take your hole punch and punch holes through the plate all the way around the perimeter of the shape.The holes should be about a quarter inch from the edge of the cutout design and be about a half inch apart. A half inch is about the width of your finger if that helps you place the holes.
- Cut off a piece of yarn that’s about 4 feet long. Thread it onto your needle by either using a needle threader or you can twist your yarn tightly and bend it in half and then slip that twisted part through the hole in the needle. That always works for me.Bring the yarn up through one of the holes from the back of the plate to the front. Turn the plate over and tape the end of the yarn to the back of the plate.Now proceed to use the needle to go down through a hole that is on the opposite side of the design. Then come up through a different hole and go down through another hole crisscrossing across the cutout design area.
- If you run out of yarn, just bring the needle through a hole to the back of the plate. Tape the end of the yarn to the back of the plate and clip off the extra. Then start again with a new piece of yarn. At this time you can also change colors of yarn if you would like to.
- For fun, I punched holes around the edge of the paper plate for the fish. A darker blue yarn was used in a circular design to go all the way around the edge of the plate. This is done by taking the needle up through a hole in the edge of the plate, taking the needle around the back of the plate and then coming up through the next hole. You’re always going up through each hole with the needle.
- You can also use markers or colored pencils to colored designs around the edge of the plate after the stitching of the design. That was what was done on the butterfly plate.


Leave a Reply