What a great project!!
So this How to Sew a Hooded Towel in 15 minutes for Kids is going on my Nana’s favorites list. You can make one of these as a gift for a birthday or Christmas in just a few minutes and you I'm sure you will get asked to make more next year.
A friend of mine always brings a handmade hooded towel as a baby shower gift and they are admired by all. Handmade gifts are so special and it's fun to imagine how cute the baby will be after bath time wrapped in his or her new hooded baby towel. I’ve heard people rave about these great gifts even years later.
I thought you would enjoy learning how to sew a hooded towel for your own kids or the kids you love.
Note: Since these are made from a large towel they work best for children that are toddlers or older. I give suggestions for a baby sized version at the end of the tutorial.
What towels do I buy to make a hooded towel?
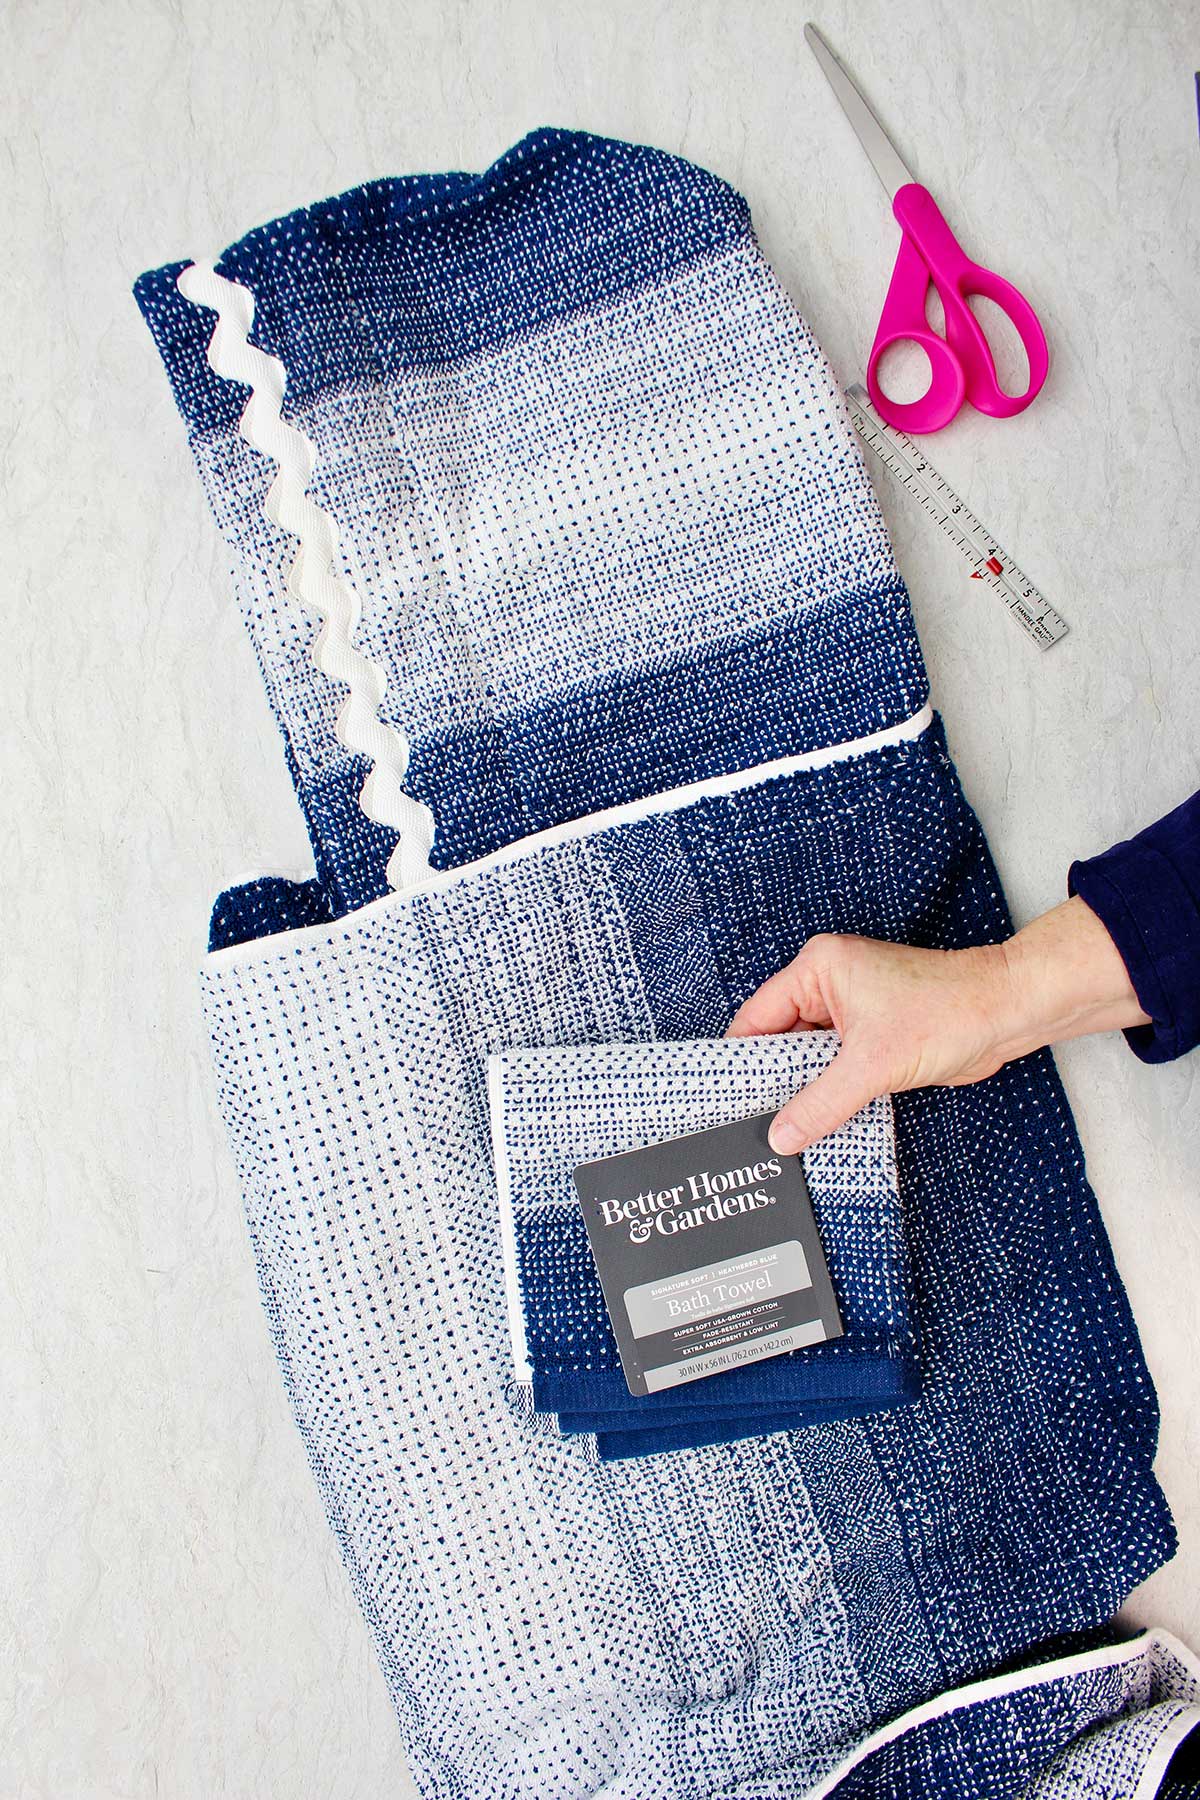
This hooded towel tutorial uses a full size bath towel and a matching hand towel. I go ahead and purchase a wash cloth at the same time and just add it to the gift. There are a ton of colors and patterns to choose from so each child could have a new towel in their favorite color.
It’s nice to have a good quality bath towel with a high percentage of cotton because those are the most absorbent and last a long time.
I might mention that you may consider using a slightly less thick towel if you do not have a sewing machine that is heavy duty. My towel in this tutorial was very plush, and my machine struggled to do the sewing because it was so thick. Next time I make this, I will not use as thick a towel.
Regardless, it turned out lovely and I can't wait to give it as a gift. I may go ahead and make one for each of my grandkids.
Shoot, I’m thinking about making my own big hooded towel! Maybe you need your own hooded towel too? Ha!
Hooded towel pattern
If you want to follow along with me as I sew my hooded towel, here is the link to the full length video on YouTube! How to Sew a Hooded Towel in 15 Minutes for Kids Full Length Tutorial.
Making the hood
So the first step of this how to sew a hooded towel project is to make the hood from the hand towel.
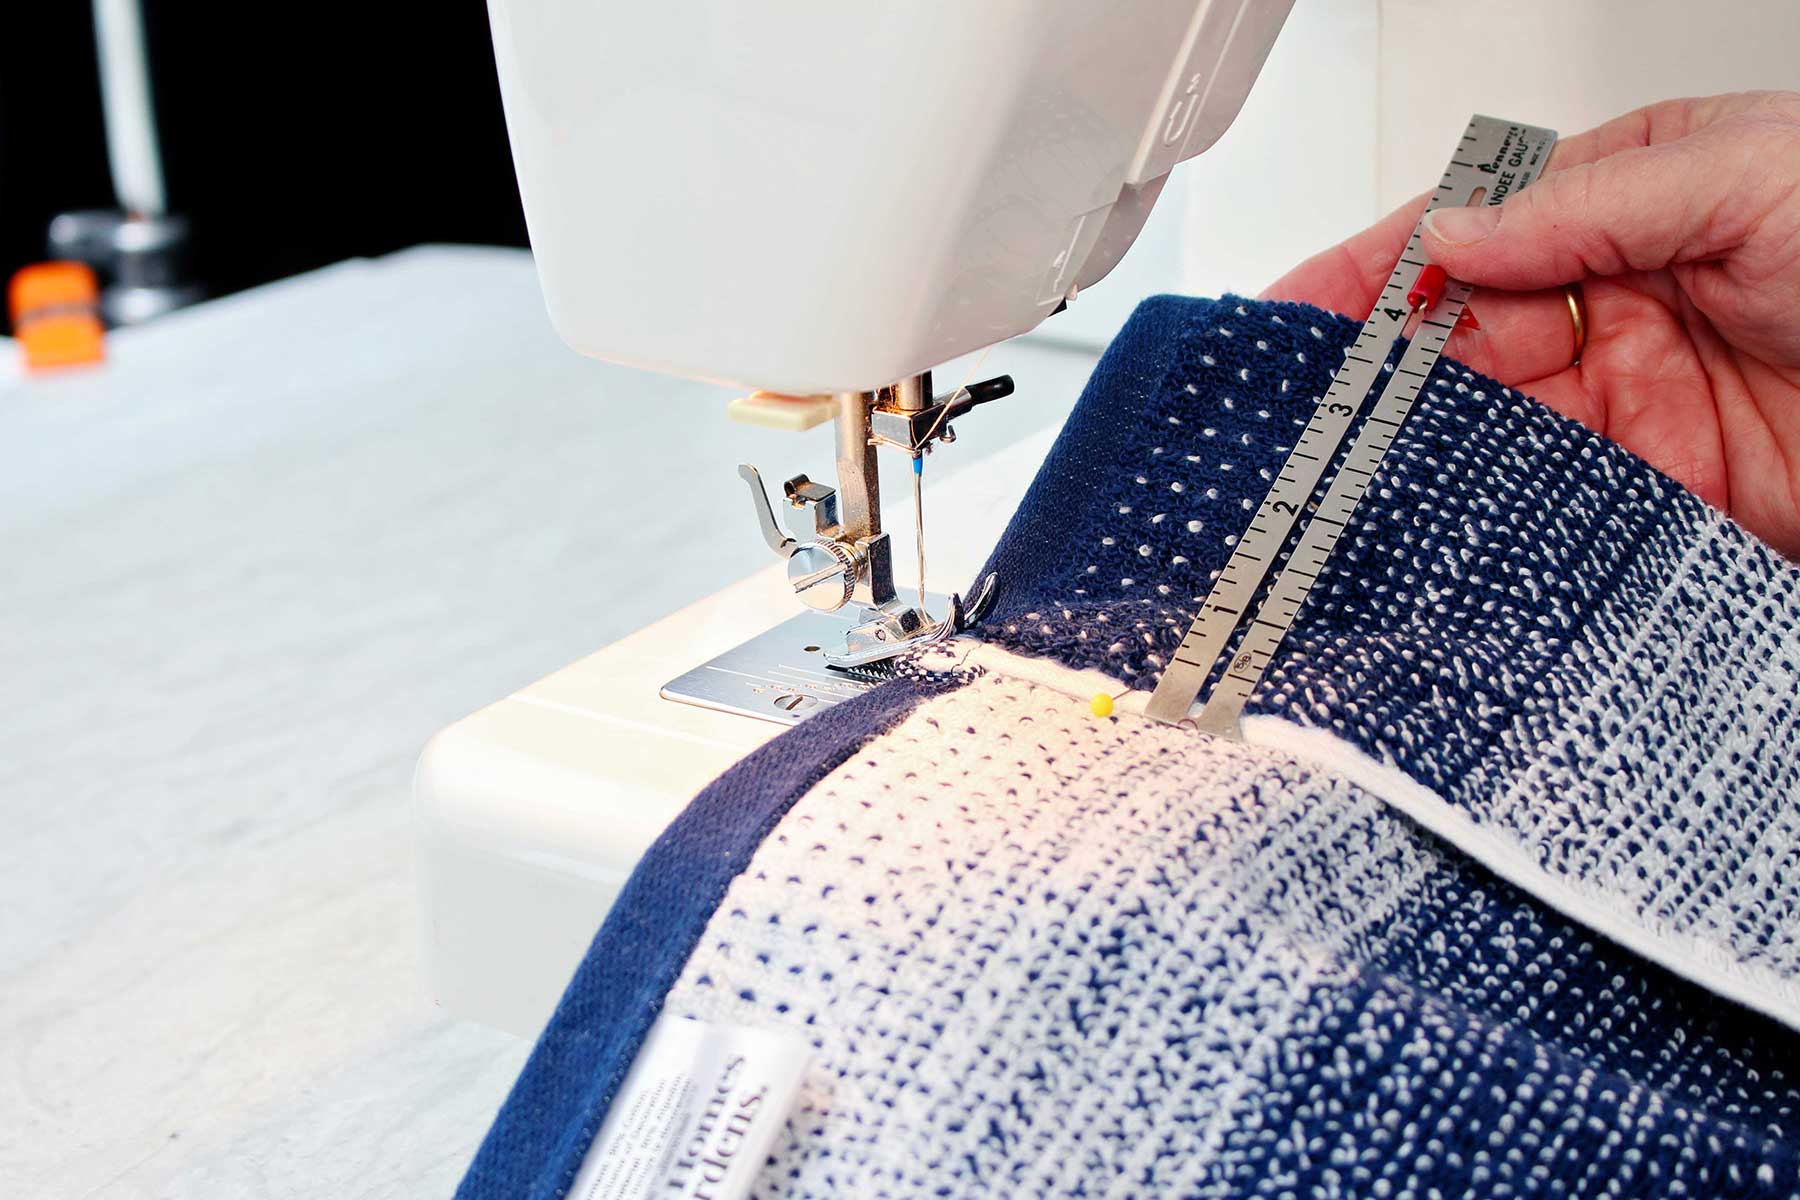
Take the hand towel and turn down one long edge 4 inches (this side will become the wrong side of the towel). Use 2 to 3 pins to hold it this folded edge in place.
Go to your sewing machine and stitch one long seam along the finished edge of that folded edge to hold it in place. Set your machine on a straight stitch and be sure to backstitch at both ends of your seam so that it doesn’t come undone.
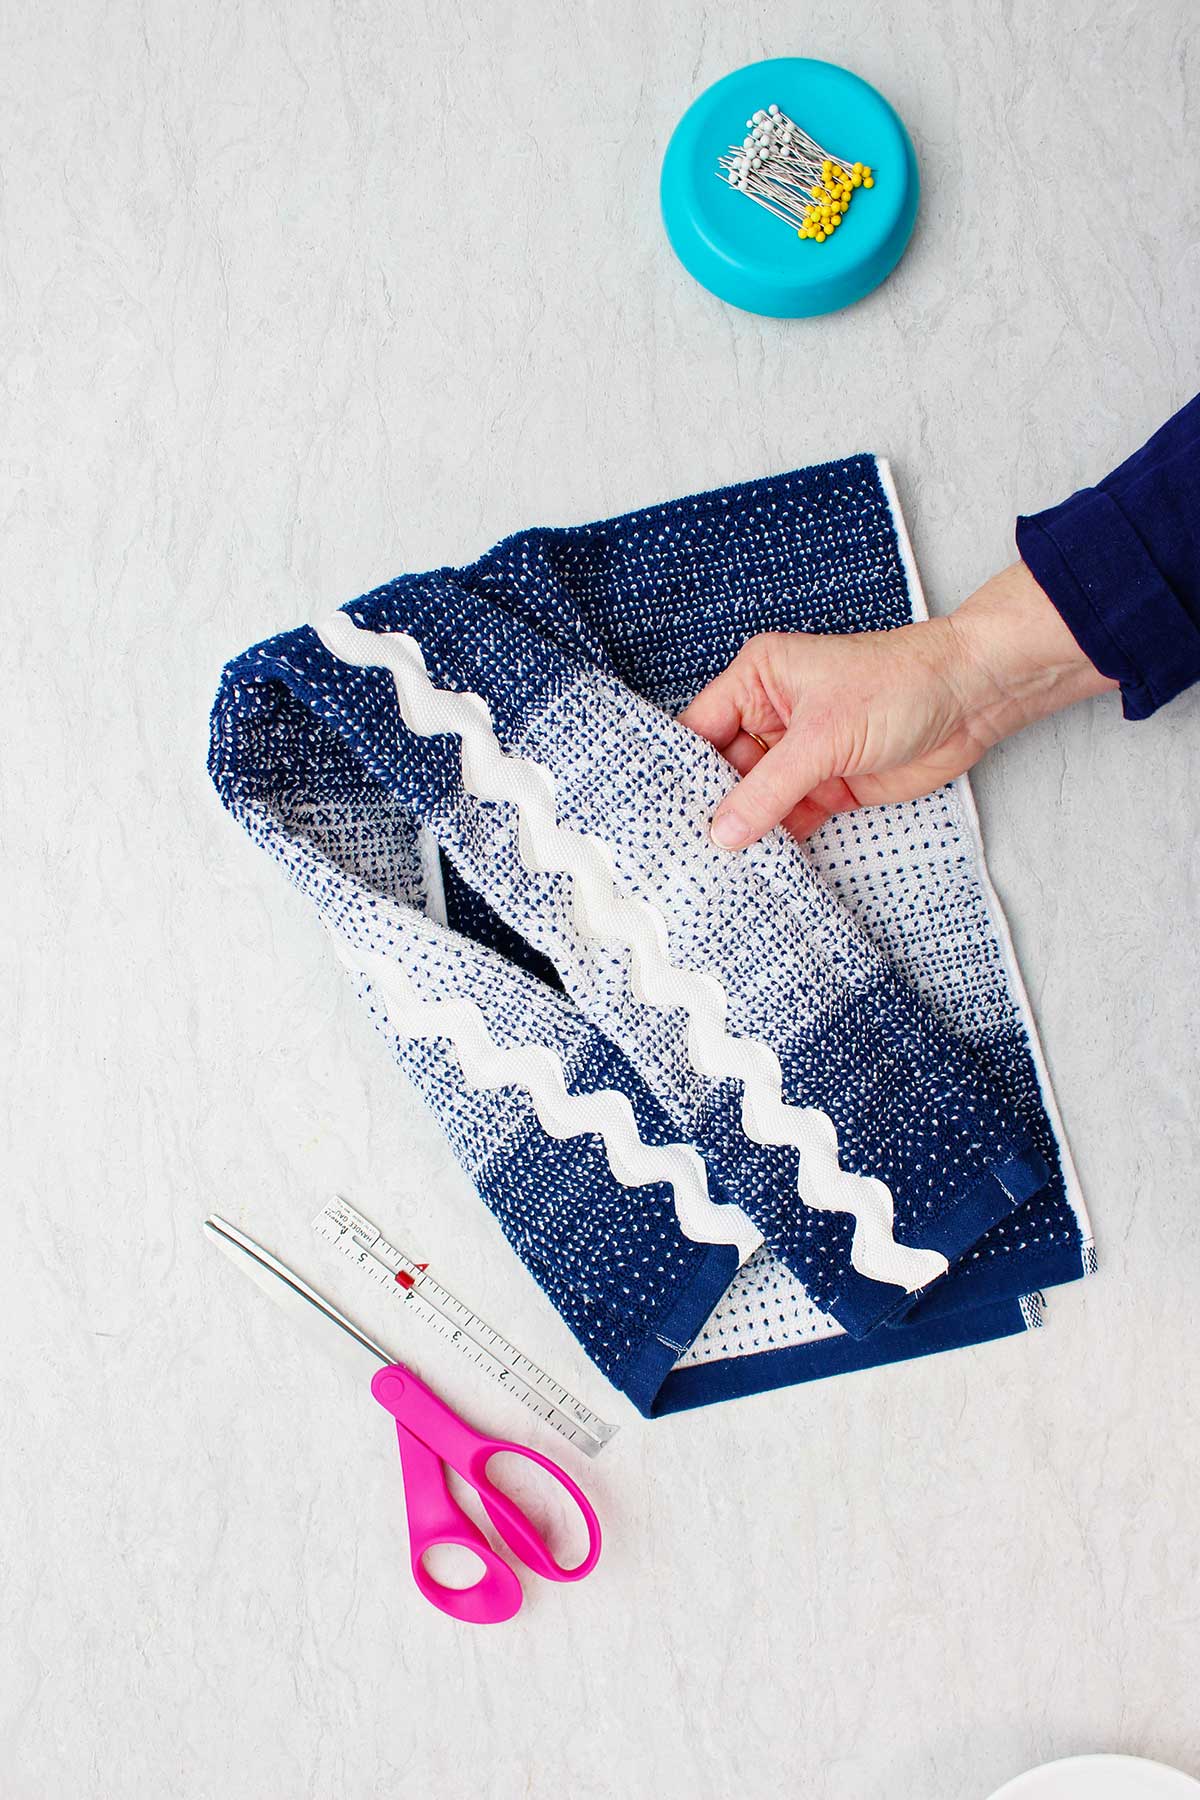
Add decorative trim- optional
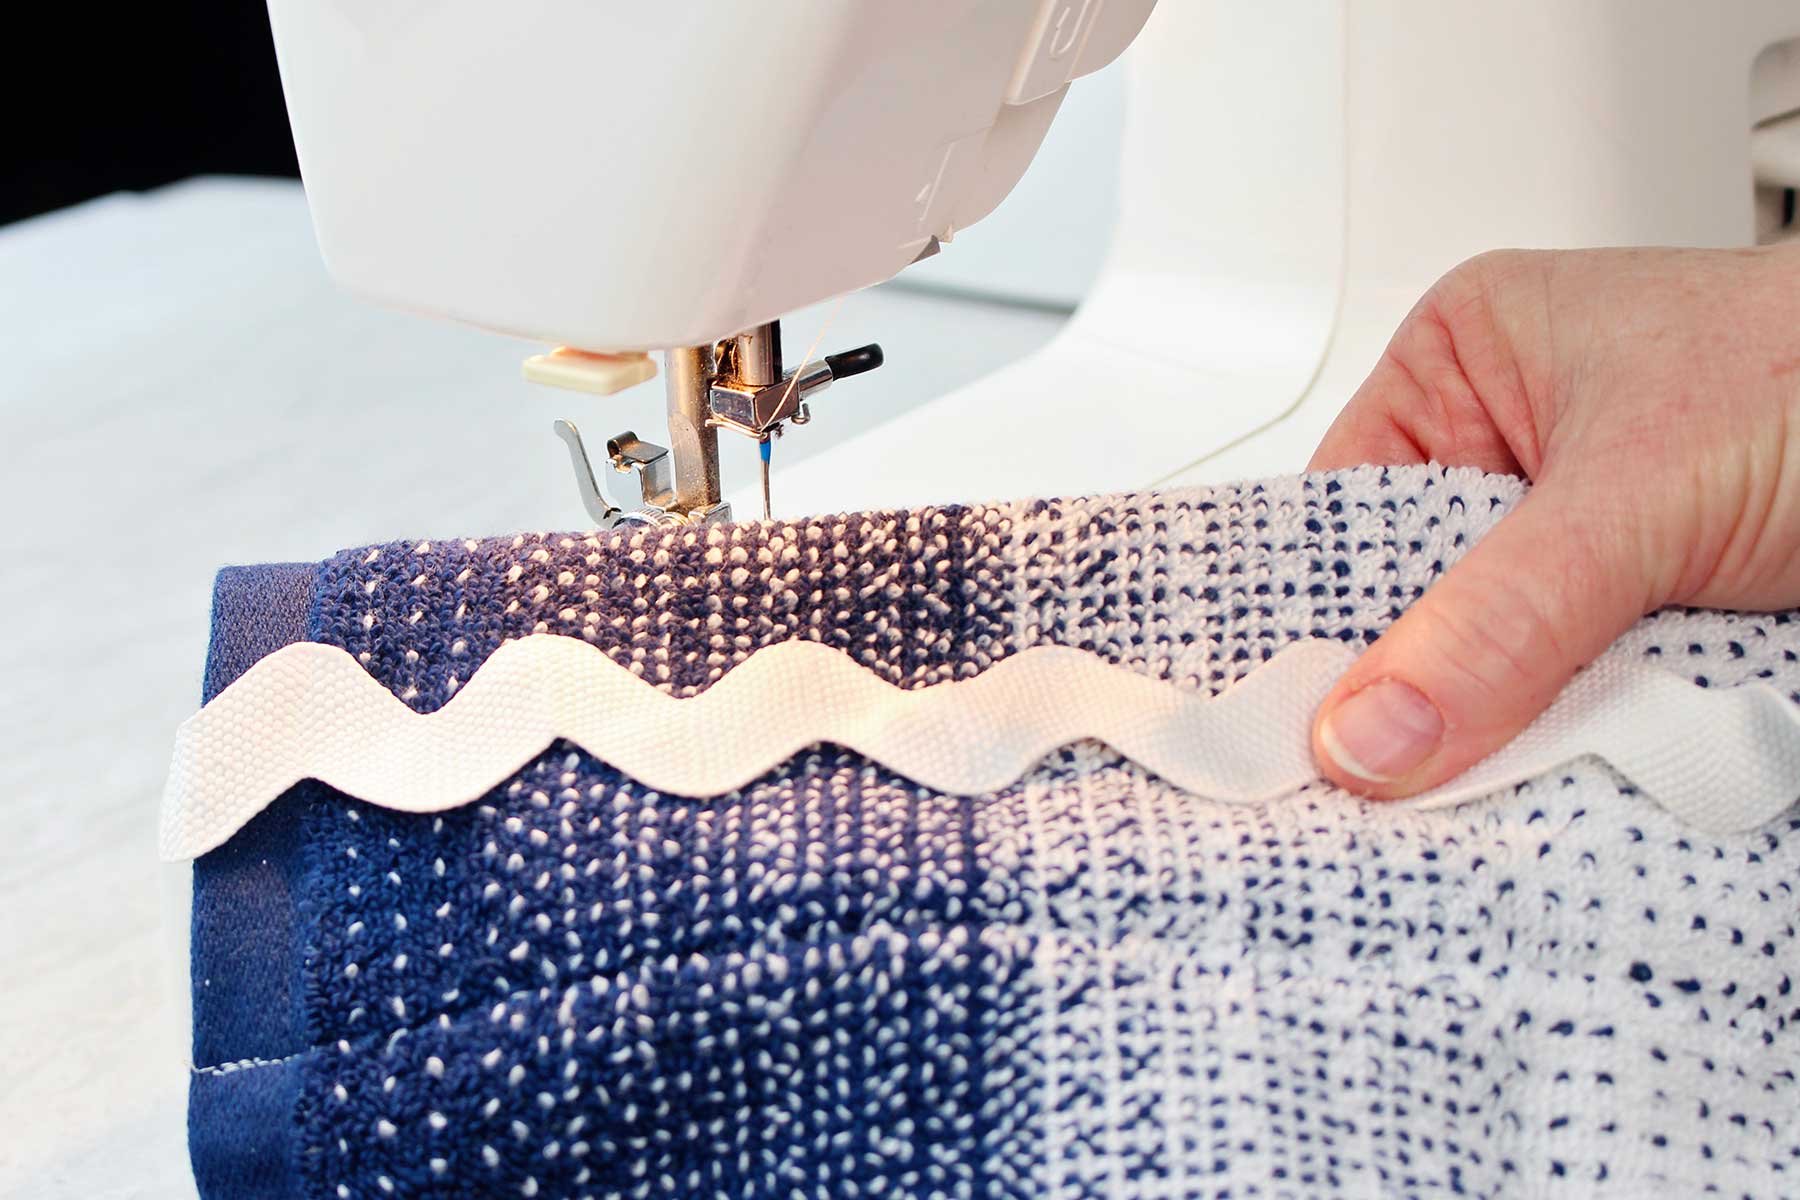
If you would like to use some decorative trim on the front of the hood, now is the time to add it. This is optional as it’s just for decoration.
You can use rick rick, braid trim, or a piece of ribbon. Purchase a piece of trim that is the length of your hand towel plus 2 to 3 inches (about one yard).
I had a piece of jumbo white rick rack that I decided to use on my hooded bath towel. It is a cute addition to the navy blue and white towel, don't you think?
Lay the trim about 1 inch from the folded long edge on the right side of the hand towel. Tuck the end of the trim into the folded open end of the towel, and then stitch it down.
Because the jumbo rick rack is so wide, I sewed down one side of the trim, tucked the other end of the trim into the other folded open end of the towel, stitched across that end, and then stitched back along the other side of my trim. I finished by stitching over the other end of the trim to hold it in place.
If your trim is wider you may need to stitch down the trim on both sides. But if you are just using regular rick rack, you could just sew one seam down the center of it and it would be just fine.
Finishing the hood- the back seam
We are going to sew the back of the hood. The seam will be down the side of the towel opposite of the side that we folded down.
Take the hand towel and fold it, so that the right sides are together, that is so that the side that you want to show with the trim is on the inside.
Note- you will leave the bottom edges of the hand towel unsewn. Those edges will be sewn to the towel in the next step.
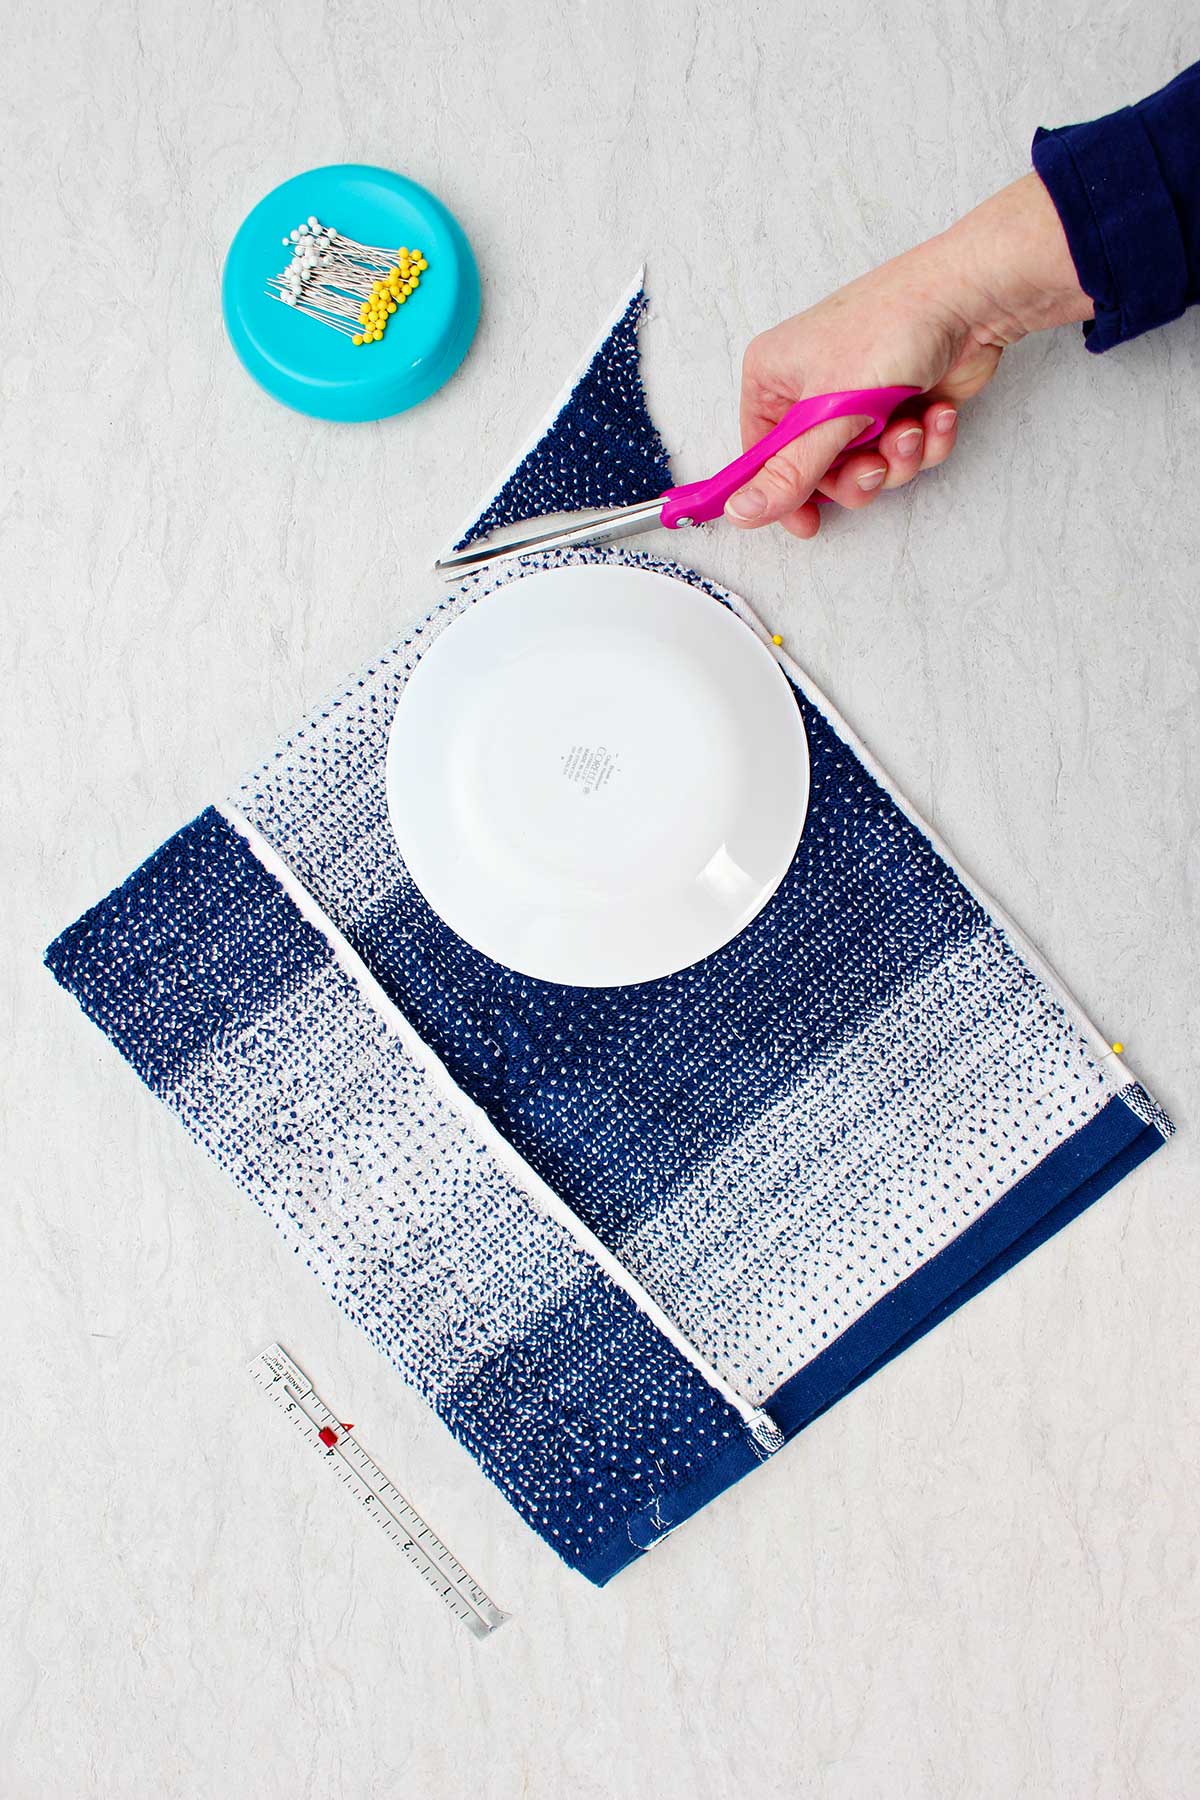
A pointy or rounded hood? That is the question!
Now if we sew this seam the way that it is, it will make kind of a pointy hood. You may want that on your hood and that is just fine. A point is quite cute- especially on younger kids.
But I didn’t want the real pointy hood, I wanted a more rounded shape on the back of the hood.
To do that, use a plate as you pattern piece (a saucer, or a dinner plate will work). I love using items from the kitchen when I sew! Ha.
Place the plate along the top part of the hood in the corner where you will be sewing (where the folded edge meets the top of the finished edge of the hood).
I cut off the corner of the towel around the curved edge of the plate. I didn’t even mark it first. The picture or video really makes this visually easier to understand.
This is the only place where you are going to make a cut in the towel itself. So we are going to have to zigzag the raw edges so that they don’t unravel later. Terry cloth is kind of messy and does unravel easily if you cut it.
Sewing the back hood seam
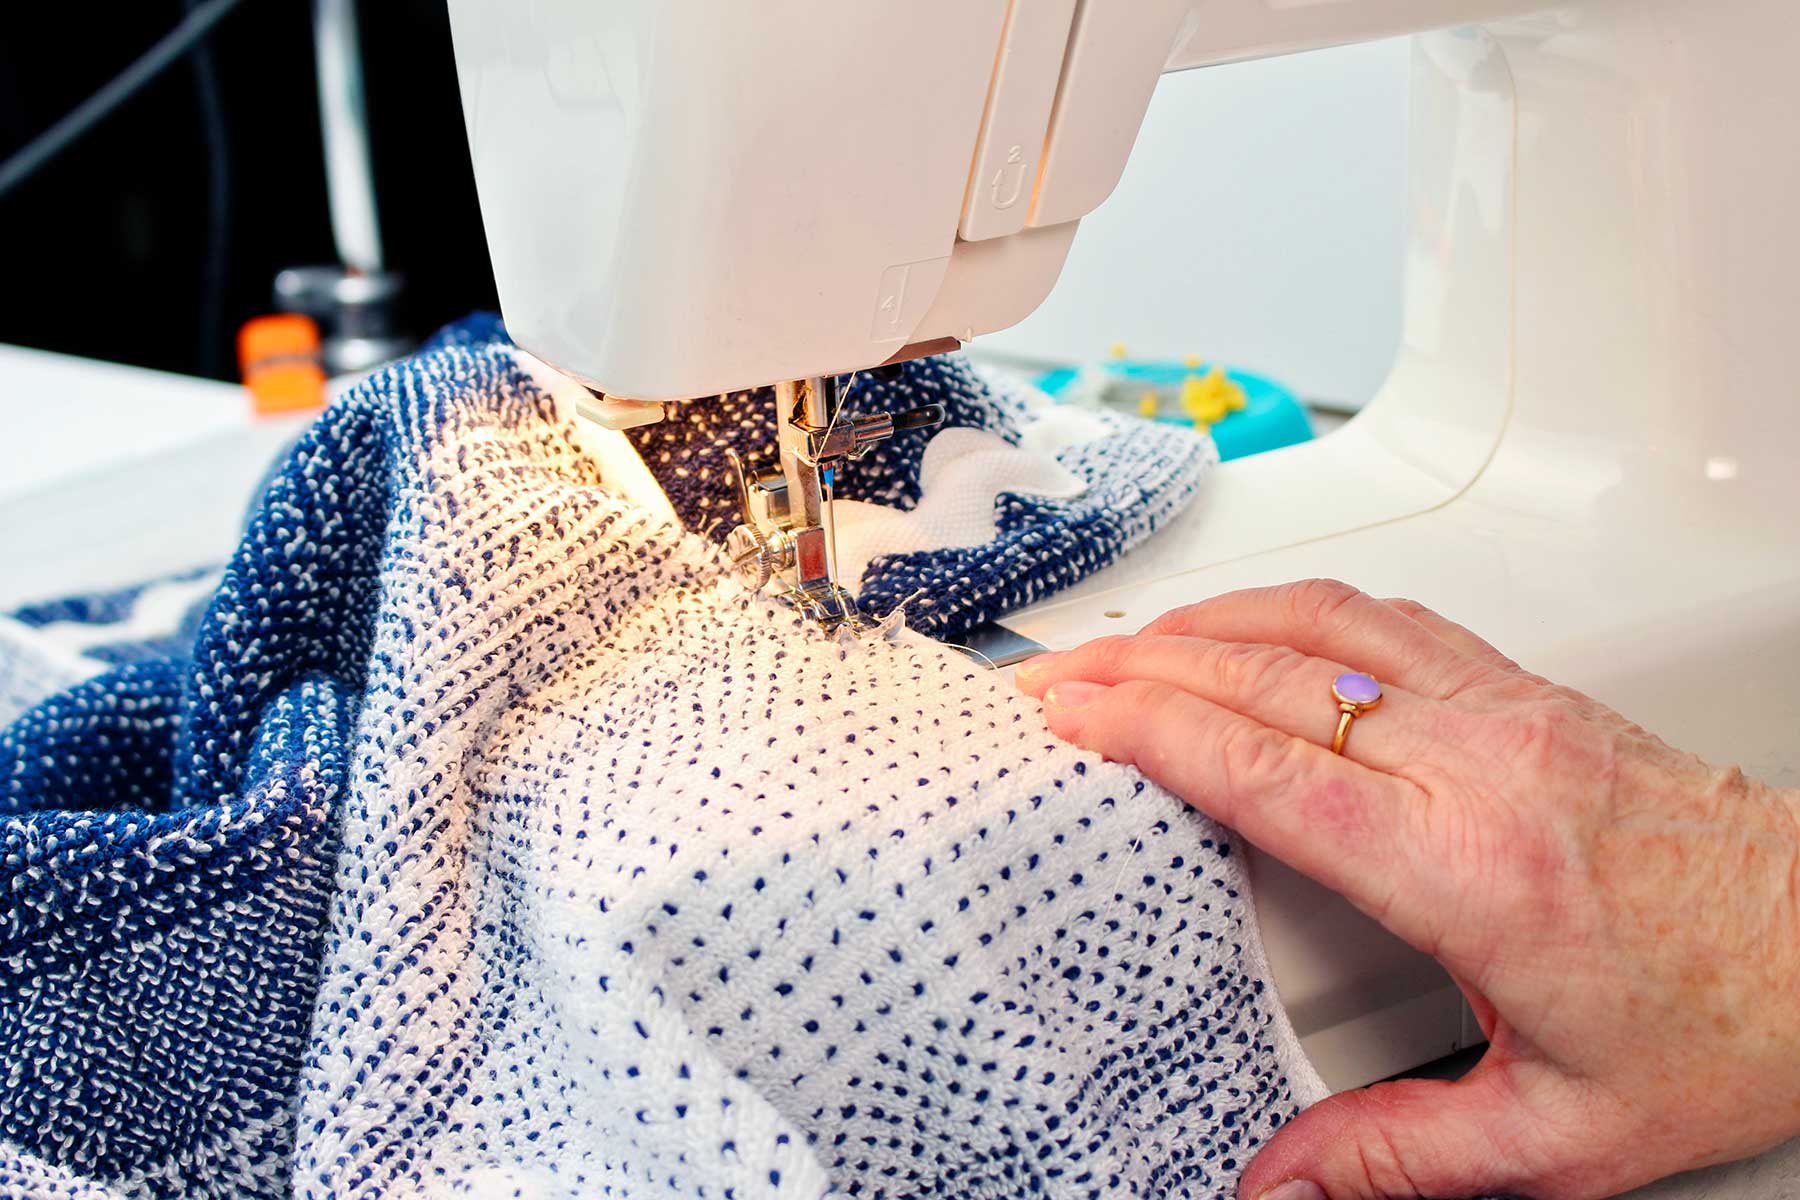
Now pin along the back of the hood three or four times to hold it in place. You want the binding edges of the towel to be even and it needs to be matching at the bottom as well.
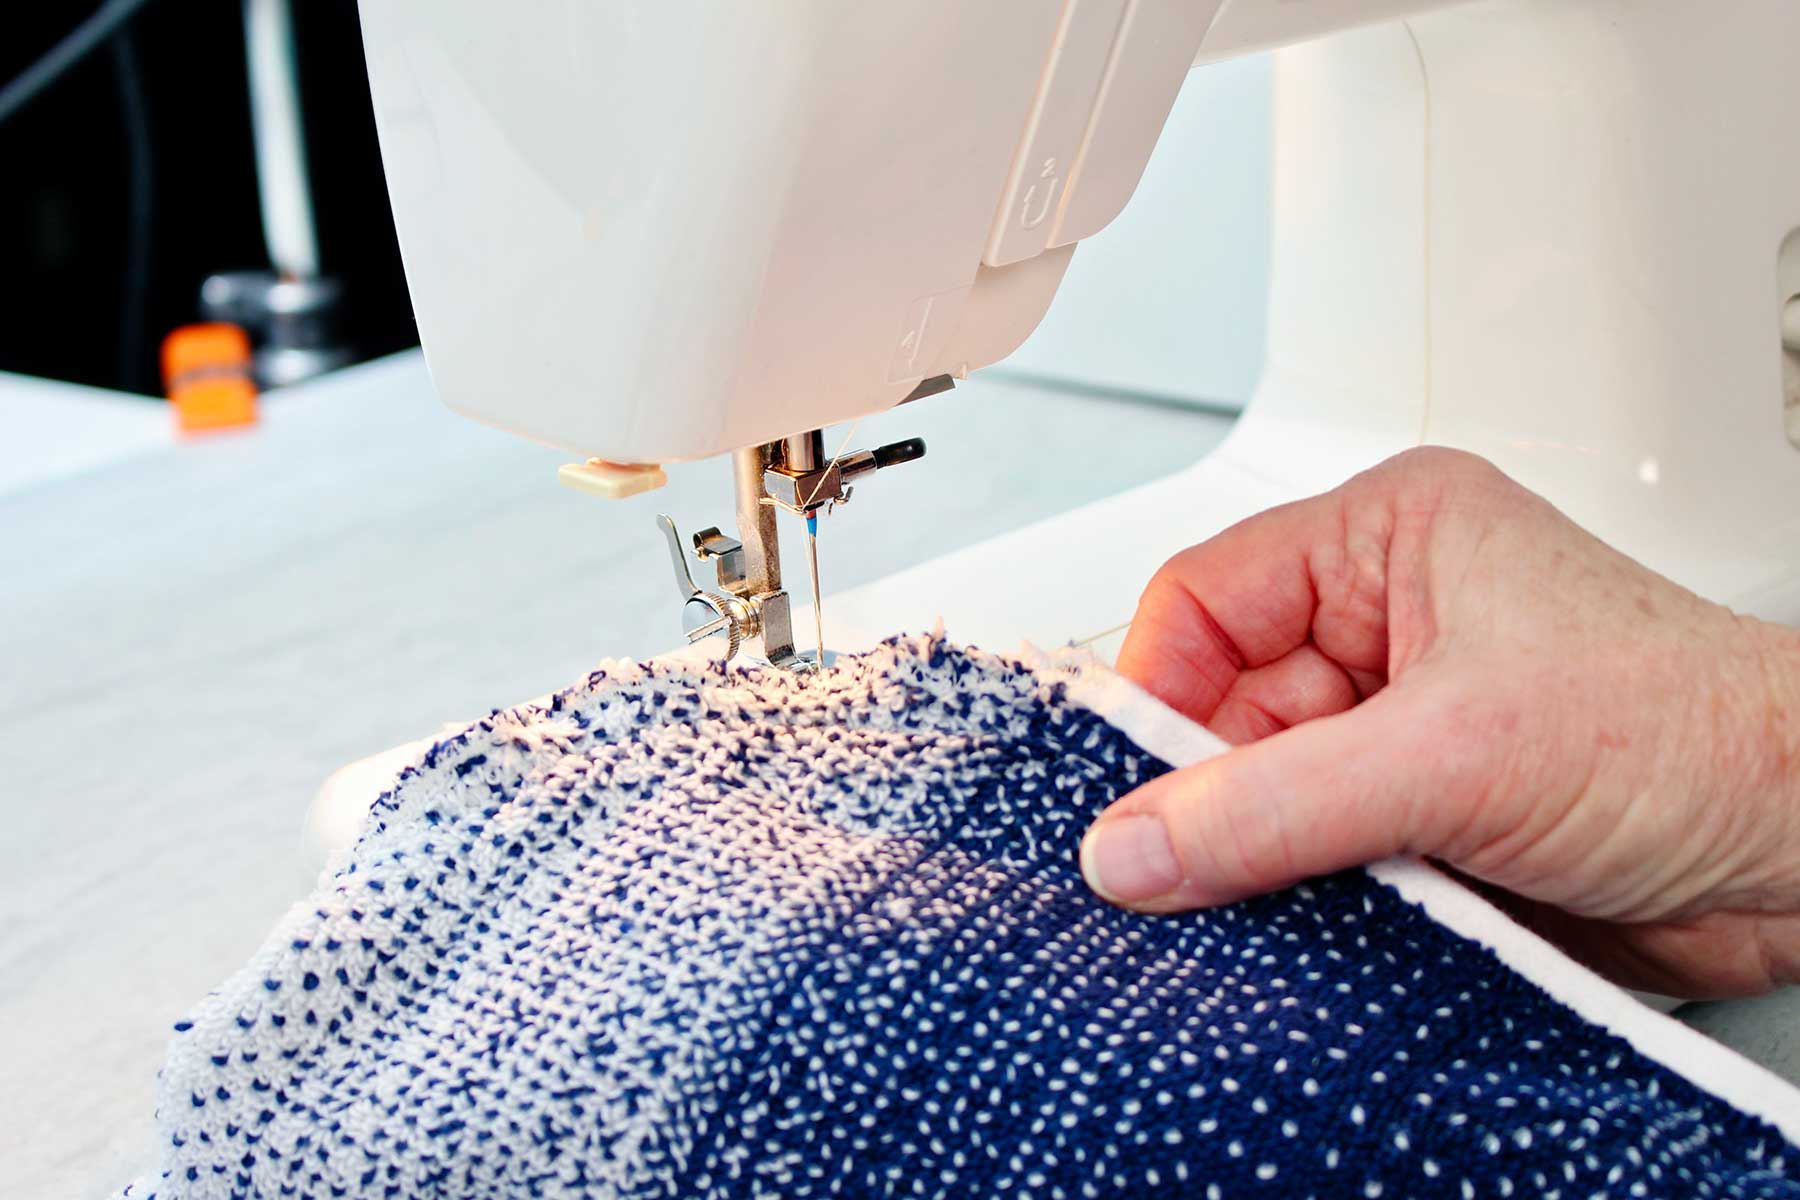
Go to your sewing machine and sew this seam. Sew about a half inch seam allowance from the edge around that rounded corner that you just clipped. Then merge the seam to be along the bound edges of the towel and stitch clear to the bottom. Be sure to backstitch at the top and the bottom so it the seam does not come Undone.
When you’re done with that, put your machine on a zigzag stitch, and zig zag well along the cut edges where you clipped the towel. That will make sure that the towel fabric does not unravel. You do not need to zigzag down the part of the seam that has the bound edges. It will not unravel.
Of course, if you do not cut off the upper edge of the seam, you just sew a straight line seam from the top of the towel to the bottom, close to the bound straight edge of the hand towel.
I chose to clip out the tag that is along the finished edge of the hood. I thought it would poke the kids when the hood was on their heads.
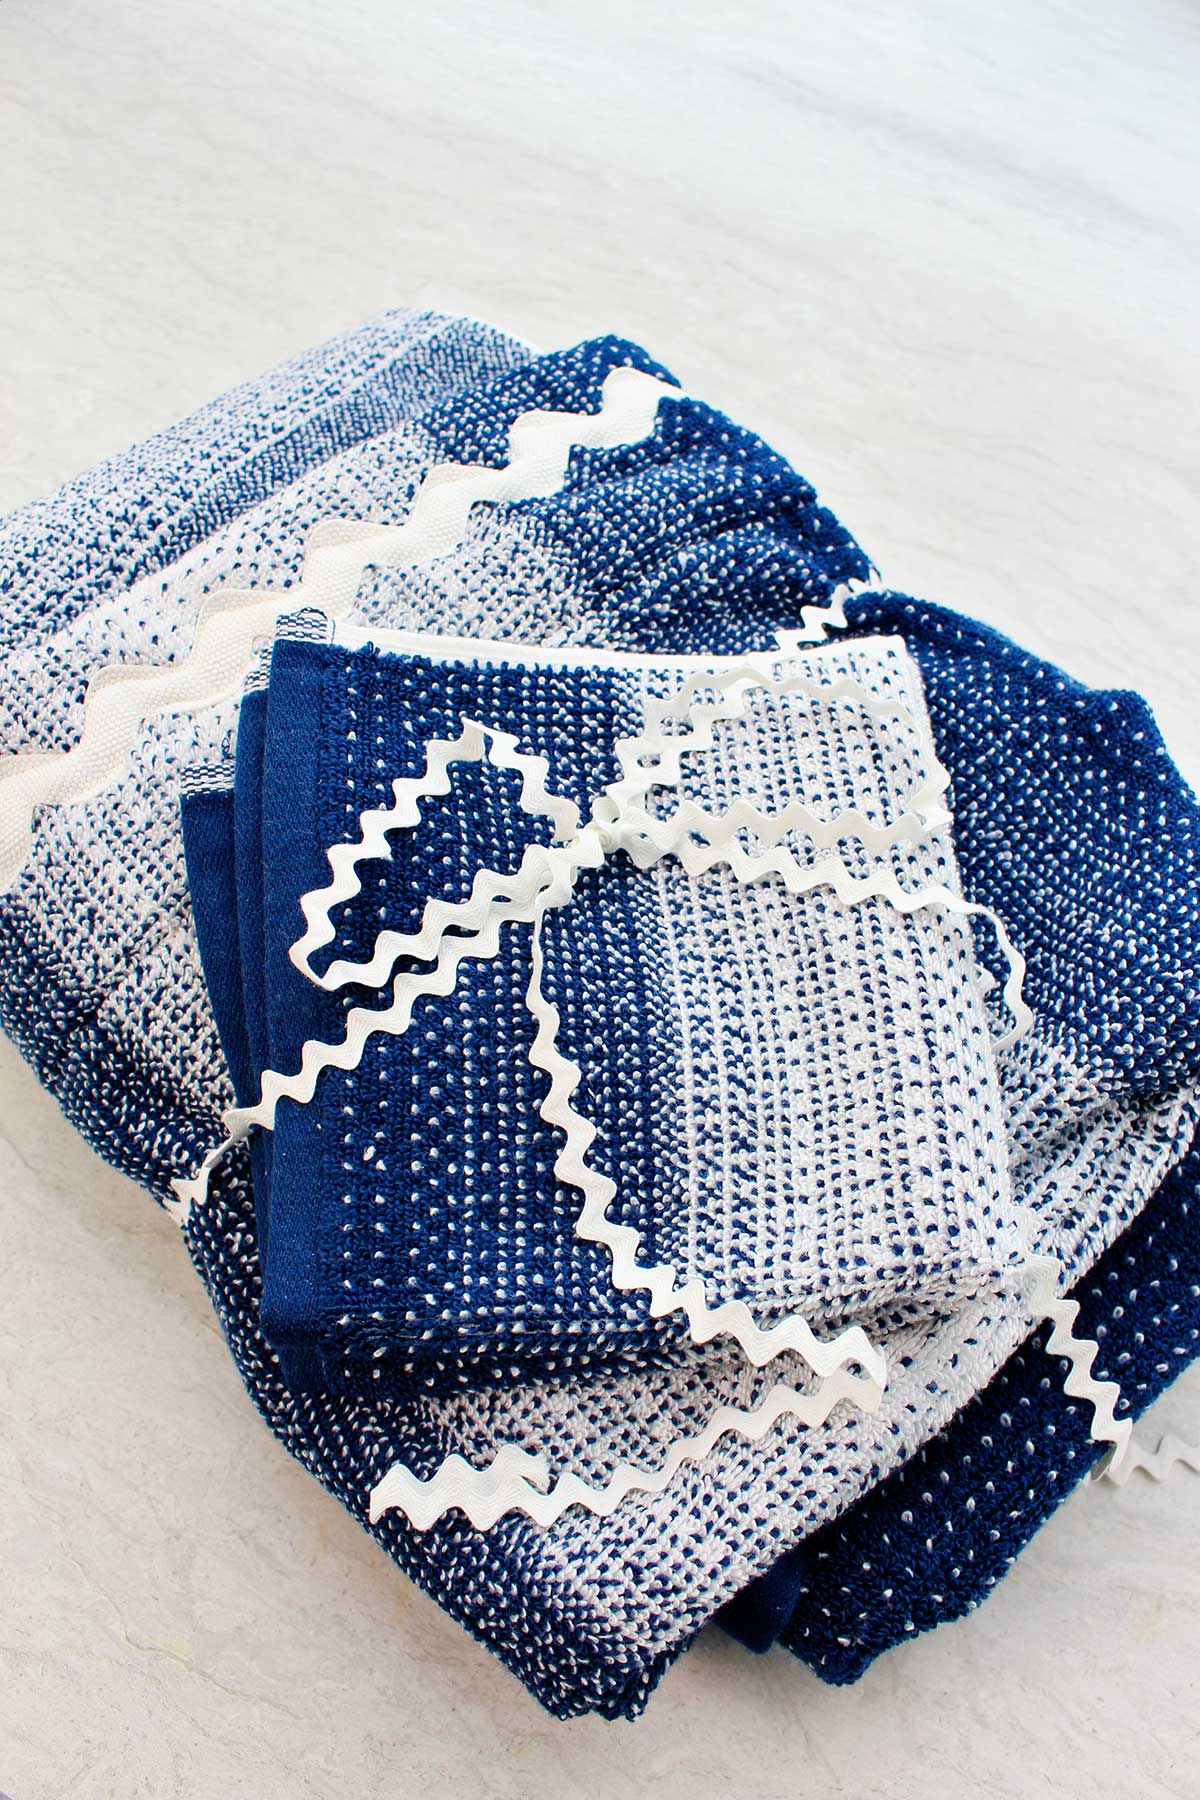
This completes the hood piece for this project!
Attaching the hood to the bath towel
The next step in your how to sew a hooded towel project is to sew the hood to one long side of the bath towel. Set the hood to the side for just a moment and get out your large bath towel.
Finding the center of the towel
Spread the bath towel out on a flat surface.
First we are looking to find the center of one long top of the bath towel.
Fold your towel in half hamburger style matching the two short edges. When you find the middle of the towel, put a pin along the top edge at that halfway mark to keep track of it. Lay the towel out flat again.
Center the hood on the towel
Now take the hood and lay it on top of the towel with the inside of the hood up (right side of the hood down). Place it so one inch along the bottom edge of the hood overlaps over the top finished edge of the towel.
Match the center of the hood with the placement of the pin that you put in the center of the bath towel. Pin the hood in place.
Note: Be sure to take the pin out of the bath towel as you do this step so you don't forget about it and hit it as you sew the next seam!
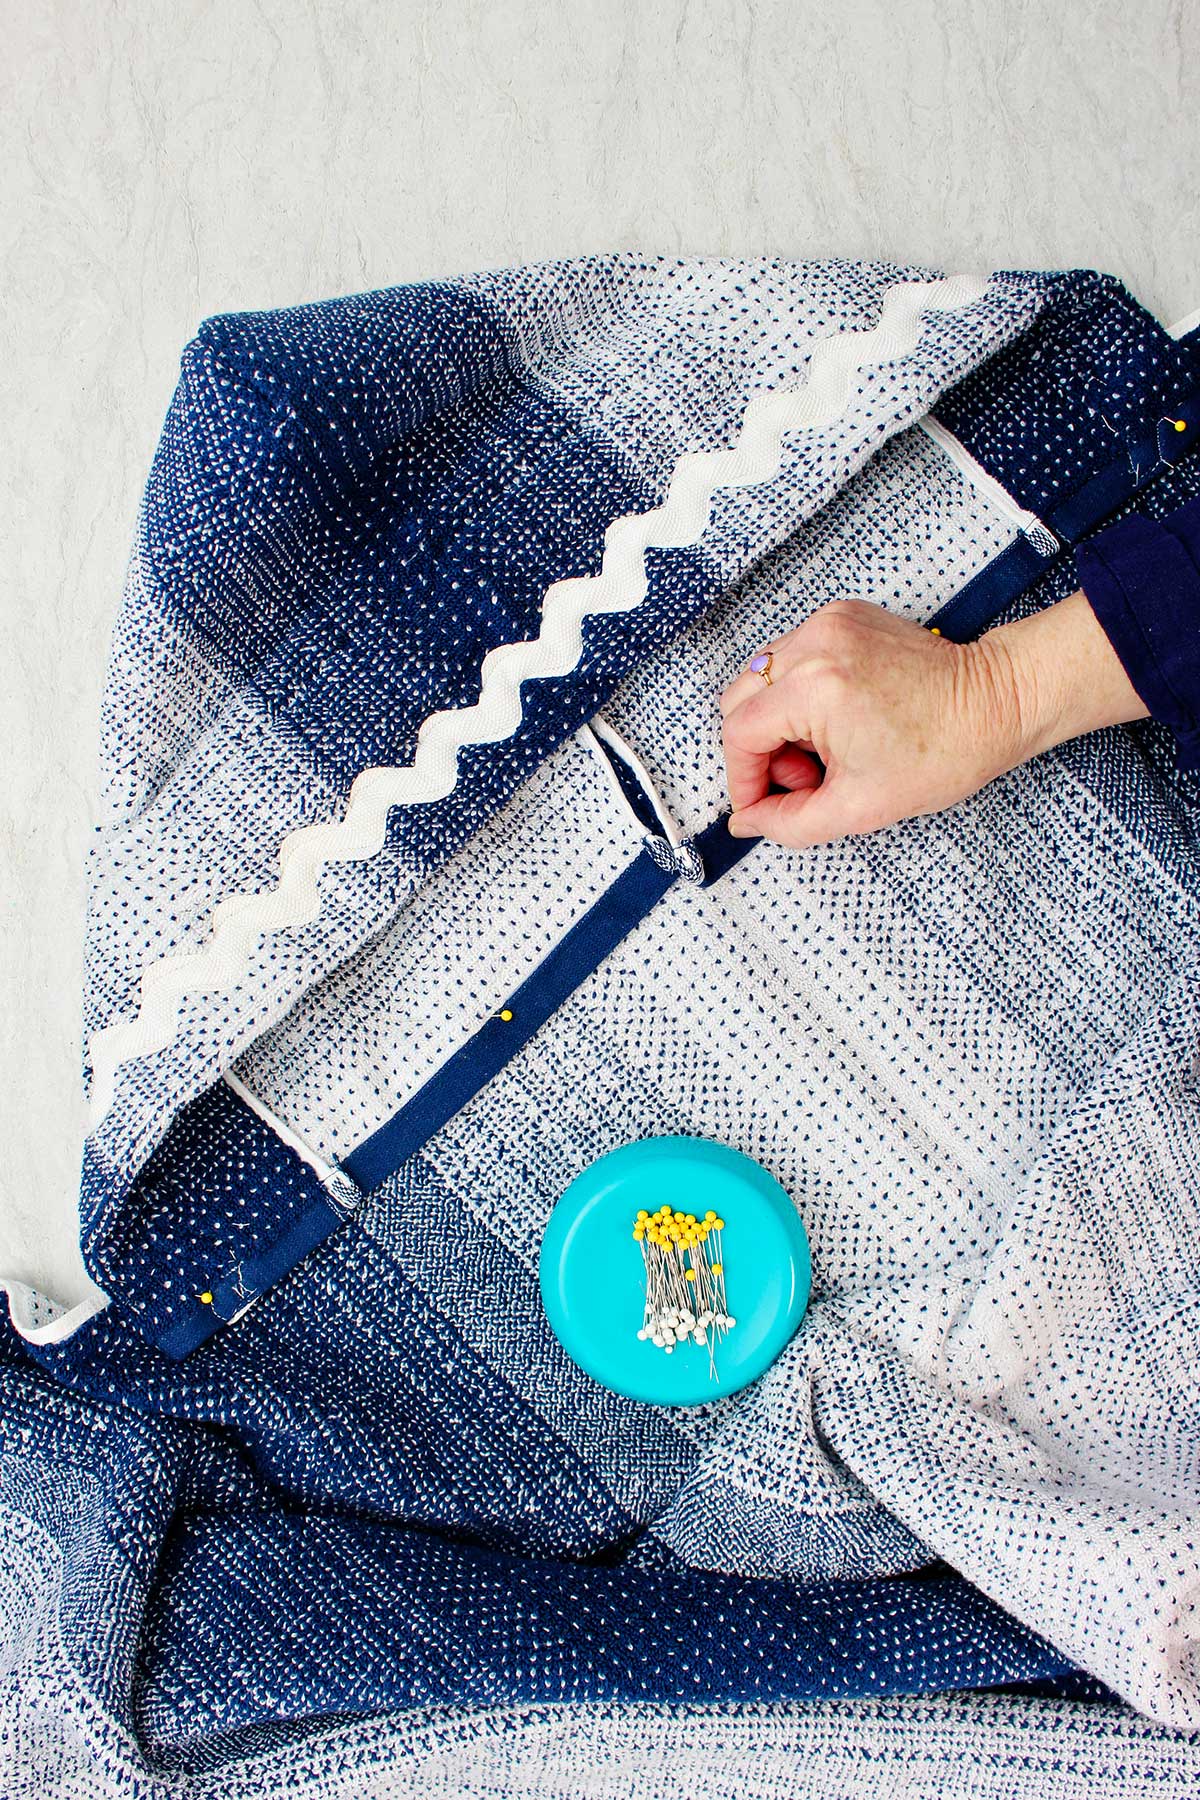
Sewing the hood onto the towel
With the middle of the hood in place along the top edge of the towel you can stitch a seam along this edge. Again, there is an overlap of about one inch (or a little bit more than an inch) of the hood over the bath towel.
Now take this to your sewing machine and stitch along the bound bottom edge of the hand towel. Take your pins out as you go and sew slowly because this is thick for your machine to sew. And again, backstitch both ends to secure the seam.
After you’ve sewn the seam, turn your project over and now sew the same way you did before, but on the right side of the towels. You will be stitching the top part of the towel (along the finished edge) down to the hood. This keeps that overlapped fabric from being a little loose flap. Backstitch at both ends.
You're done- finishing touches
Clip all the extra loose threads that you’ve left behind on the end of your seam and you are done with your how to sew a hooded towel project!
If you don’t put trim on, this project is done basically with only four seams. That’s why you can make it in 15 minutes!
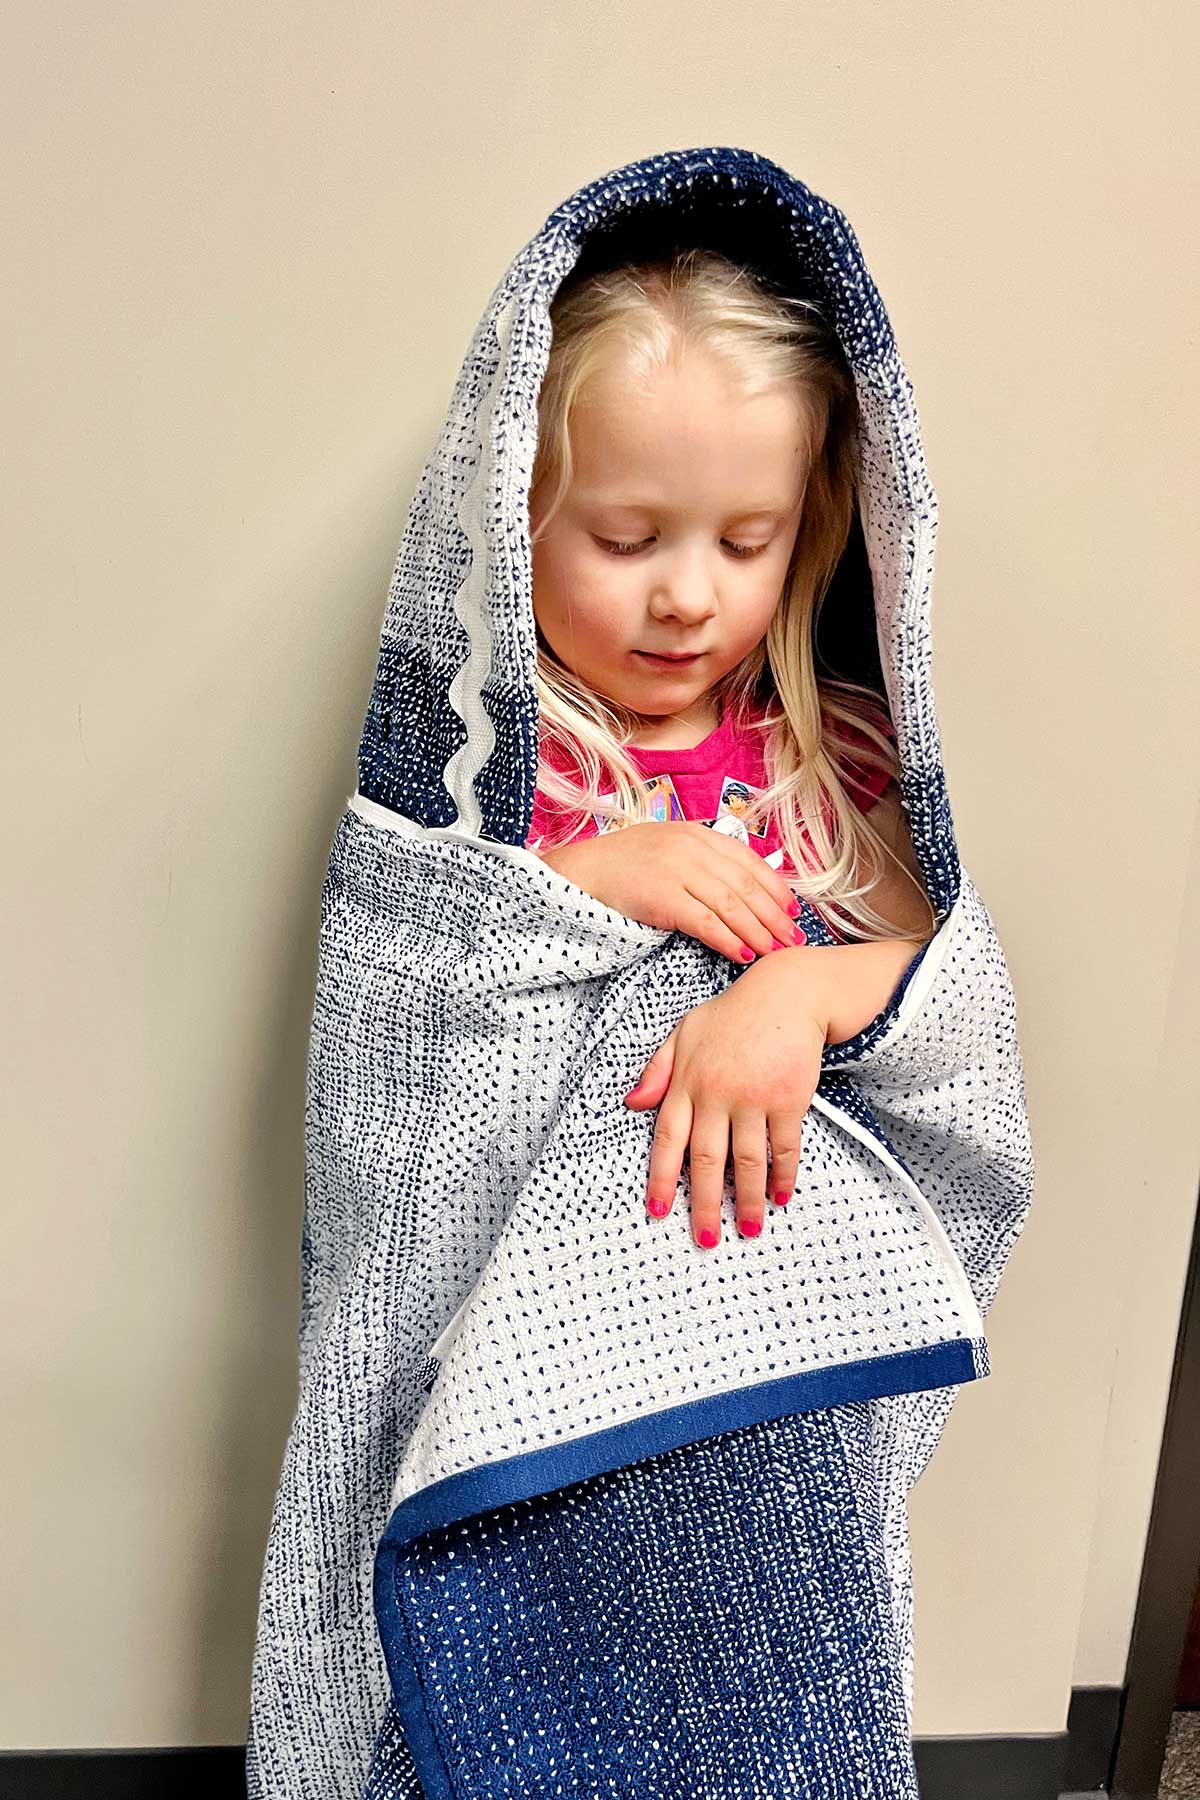
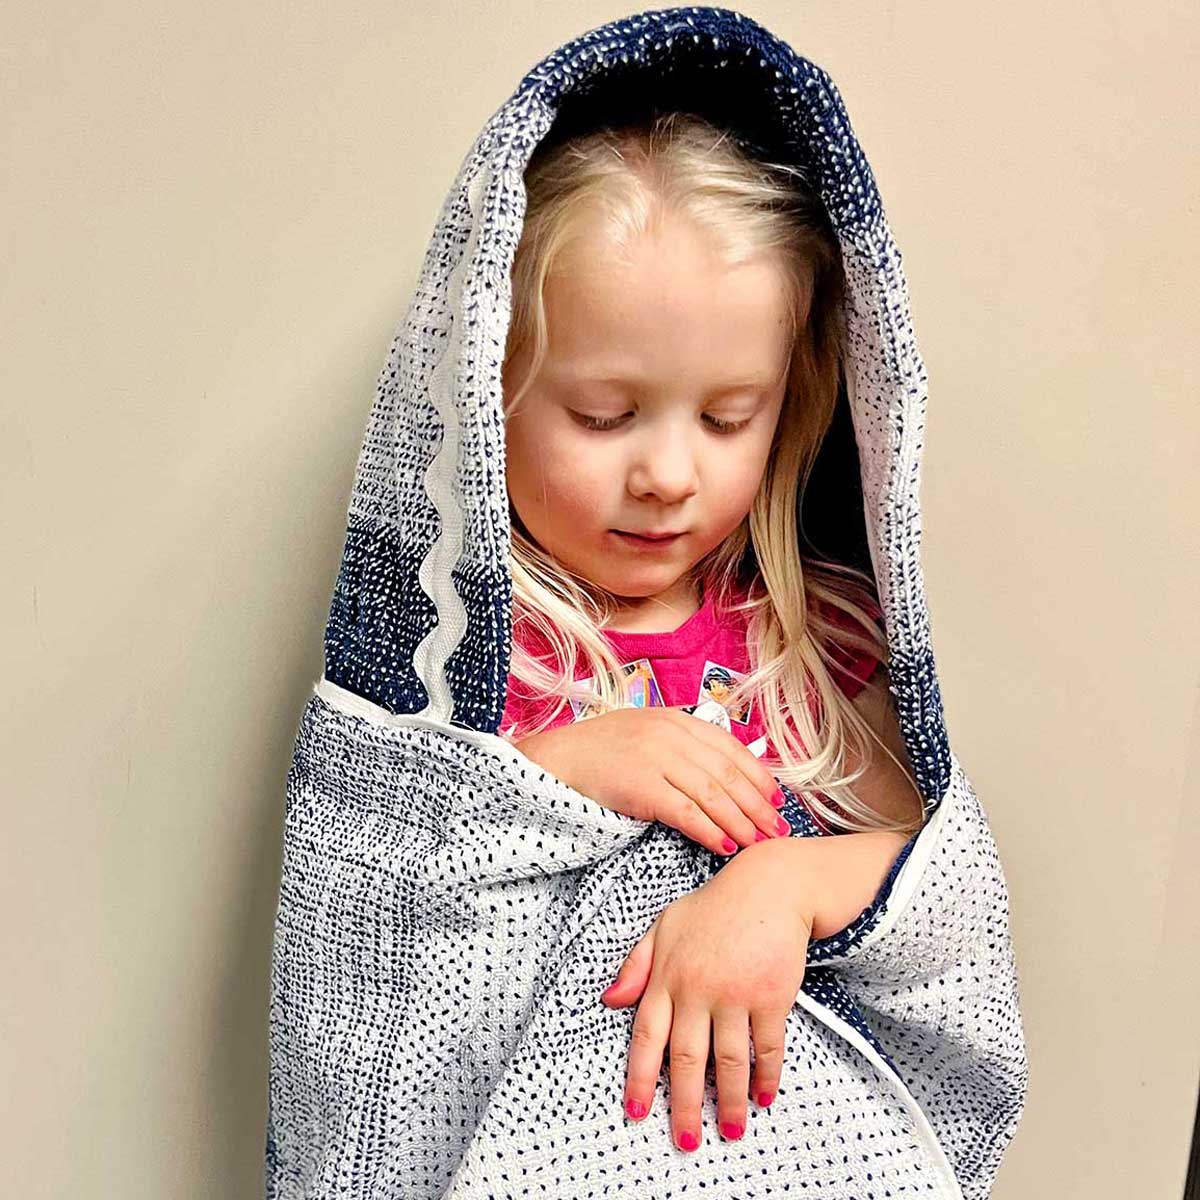
Doesn’t my little model look cute in our hooded towel? She thought it was pretty awesome. Her mother told me that she’s outgrown the little one that she was given when she was a baby. So I need to make her one too!
I’m really excited to see what you create and what cute towels you use for your hooded towel! Attach a picture and let us cheer you on!
Seriously, I'm wanting one of these myself! Made from an extra large towel sheet!! I don’t think we’re ever too old for a hooded towel or footed pajamas. Do you?
Want to make a baby gift size?
If you would like to make a smaller version for baby gifts, it is about adjusting the size of the bath towel. Purchase smaller towels or baby towels and two washcloths for each hood (instead of a hand towel).
To make the hood, stack the two wash cloths on top of one another and sew two adjoining sides. Use small straight seams, sewing close to the bound edges.
Then follow the same steps in adding trim (optional) and attaching the hood to the towel as described in the tutorial above. It's that easy.
Another thought... Halloween?
So I just had a thought- the hood or the entire hooded towel would make the base to a great and simple Halloween costume! Stay tuned and I will come up with some ways to use it for that purpose. How fun!!

Learn to sew project
This Hooded Towel for Kids would also be a perfect sewing project for someone you’d like to teach a few sewing skills to. Again, use a lighter weight towel so it is easier to sew, especially for a beginner.
More learn to sew projects
If you would like more ideas for simple sewing projects, have we got some fun for you! Here’s a few ideas for that perfect project you're looking for:
- Homemade Baby Burp Cloths
- DIY Easy-to-Sew Microwavable Rice Bag
- Simple to Sew DIY Apron DIY Gift
- How to Make a Fabric Book Pattern
- Easy Sew DIY Fleece Hat
- How to Make a Scrunchy
- Easy How to Sew a Pillowcase Tutorial
- How to Sew a Fall Pillow
Enjoy!
If you try this craft, let me know! Go ahead and leave a comment, rate it, and tag a photo with #WelcometoNanas wherever you post.
Come join the fun at https://welcometonanas.com
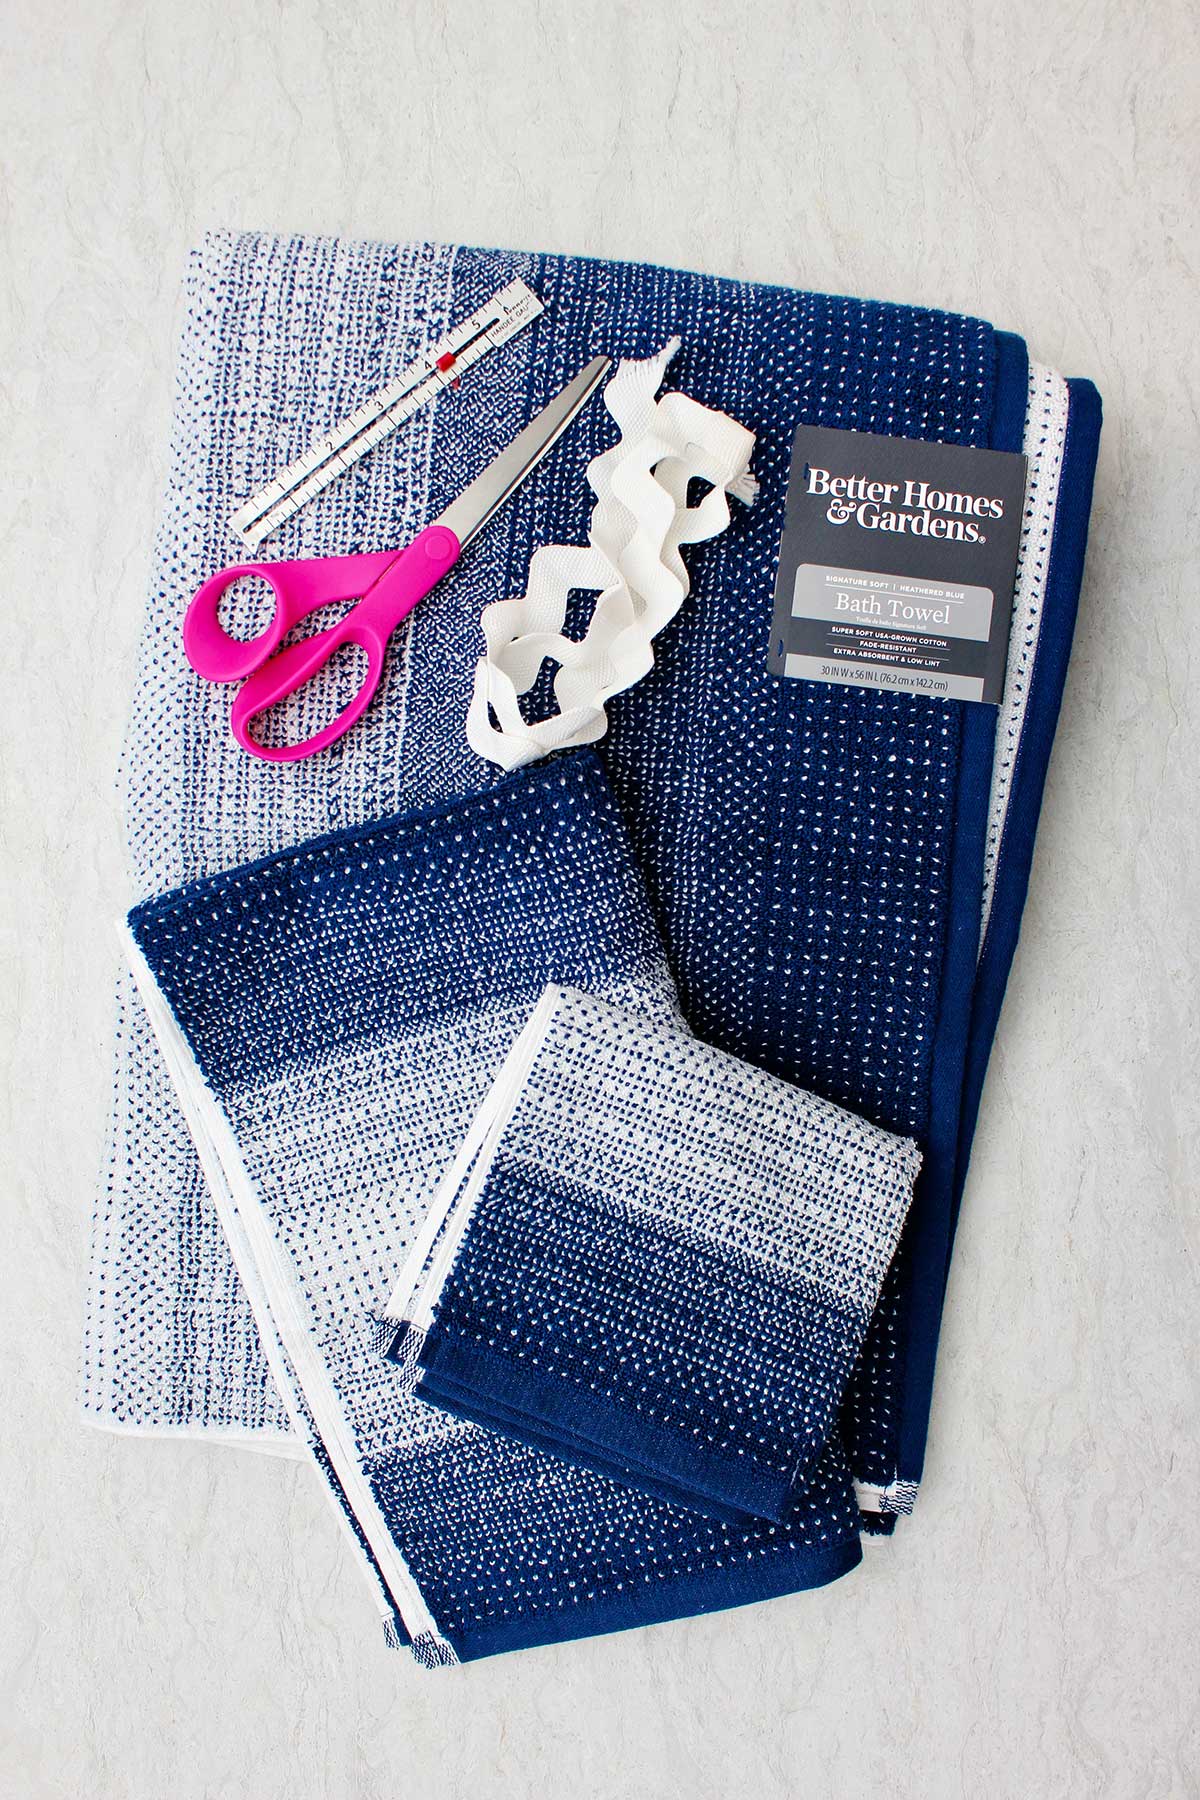
Supplies for How to Sew a Hooded Towel
- Bath towel, hand towel, optional washcloth
- Trim- 1 yard matching trim (optional)
- Sewing machine
- Thread
- Scissors
How to Sew a Hooded Towel in 15 Minutes for Kids
Equipment
- Sewing machine
Items Required
Instructions
- Take the hand towel and turn down one long edge 4 inches (this side will become the wrong side of the towel). Use 2 to 3 pins to hold it this folded edge in place. Go to your sewing machine and stitch one long seam along the finished edge of that folded edge to hold it in place. Set your machine on a straight stitch and be sure to backstitch at both ends of your seam so that it doesn’t come undone.
- If you would like to use some decorative trim on the front of the hood, now is the time to add it. This is optional as it’s just for decoration.Lay the trim about 1 inch from the folded long edge on the right side of the hand towel. Tuck the end of the trim into the folded open end of the towel, and then stitch it down.
- Take the hand towel and fold it, so that the right sides are together, that is so that the side that you want to show with the trim is on the inside.Now if we sew this seam the way that it is, it will make kind of a pointy hood. You may want that on your hood and that is just fine. A point is quite cute- especially on younger kids. But I didn’t want the real pointy hood, I wanted a more rounded shape on the back of the hood.To do that, use a plate as you pattern piece (a saucer, or a dinner plate will work). I love using items from the kitchen when I sew! Ha.Place the plate along the top part of the hood in the corner where you will be sewing (where the folded edge meets the top of the finished edge of the hood). I cut off the corner of the towel around the curved edge of the plate. I didn’t even mark it first. The picture or video really makes this visually easier to understand.
- Now pin along the back of the hood three or four times to hold it in place. You want the binding edges of the towel to be even and it needs to be matching at the bottom as well.Go to your sewing machine and sew this seam. Sew about a half inch seam allowance from the edge around that rounded corner that you just clipped. Then merge the seam to be along the bound edges of the towel and stitch clear to the bottom. Be sure to backstitch at the top and the bottom so it the seam does not come undone.
- Fold your towel in half hamburger style matching the two short edges. When you find the middle of the towel, put a pin along the top edge at that halfway mark to keep track of it. Lay the towel out flat again.Now take the hood and lay it on top of the towel with the inside of the hood up (right side of the hood down). Place it so one inch along the bottom edge of the hood overlaps over the top finished edge of the towel. Match the center of the hood with the placement of the pin that you put in the center of the bath towel. Pin the hood in place.
- With the middle of the hood in place along the top edge of the towel you can stitch a seam along this edge. Again, there is an overlap of about one inch (or a little bit more than an inch) of the hood over the bath towel.Now take this to your sewing machine and stitch along the bound bottom edge of the hand towel. Take your pins out as you go and sew slowly because this is thick for your machine to sew. And again, backstitch both ends to secure the seam.After you’ve sewn the seam, turn your project over and now sew the same way you did before, but on the right side of the towels. You will be stitching the top part of the towel (along the finished edge) down to the hood. This keeps that overlapped fabric from being a little loose flap. Backstitch at both ends.


nana carla says
From one Nana to another, Thank you for these directions!! My 14 year old granddaughter and I enjoyed making a hooded towel for her 5 year old brother last week!! Then this week she came this week to make one for herself!
Blessings and many thanks for putting the directions in an easy to follow(recipe)!!
nana
Shelly says
Hello there fellow Nana!! I am thrilled that this sewing project worked well for you. Thank you for your feedback and encouragement in how the post was written. I so want the instructions to be helpful and easy to follow. Hooded towels are a great learn to sew project and a great gift. Blessings!!