Beautiful Chinese Paper Lanterns DIY
If you are looking for an easy paper craft, this Simple Chinese Paper Lanterns DIY Craft is for you! The Chinese New Year is coming up, and this would be a perfect craft project for that occasion.
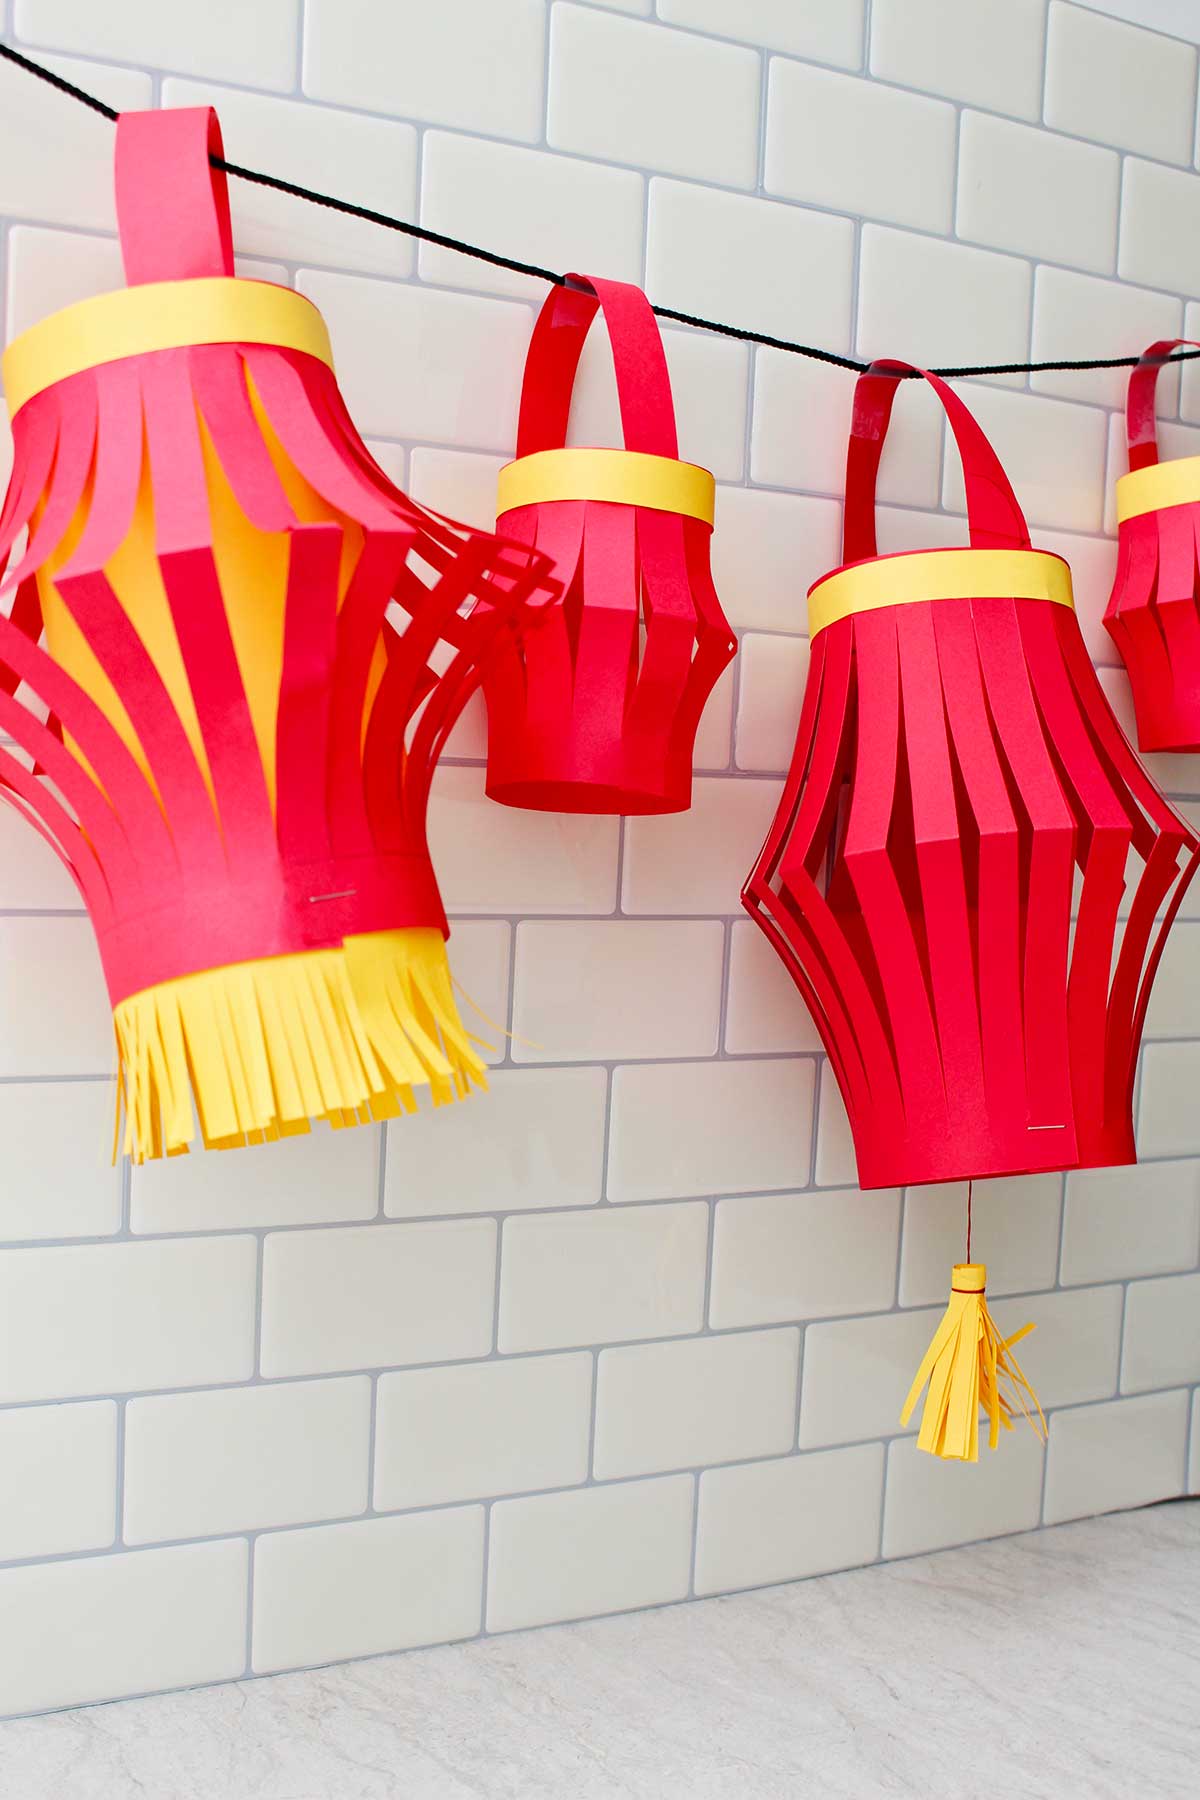
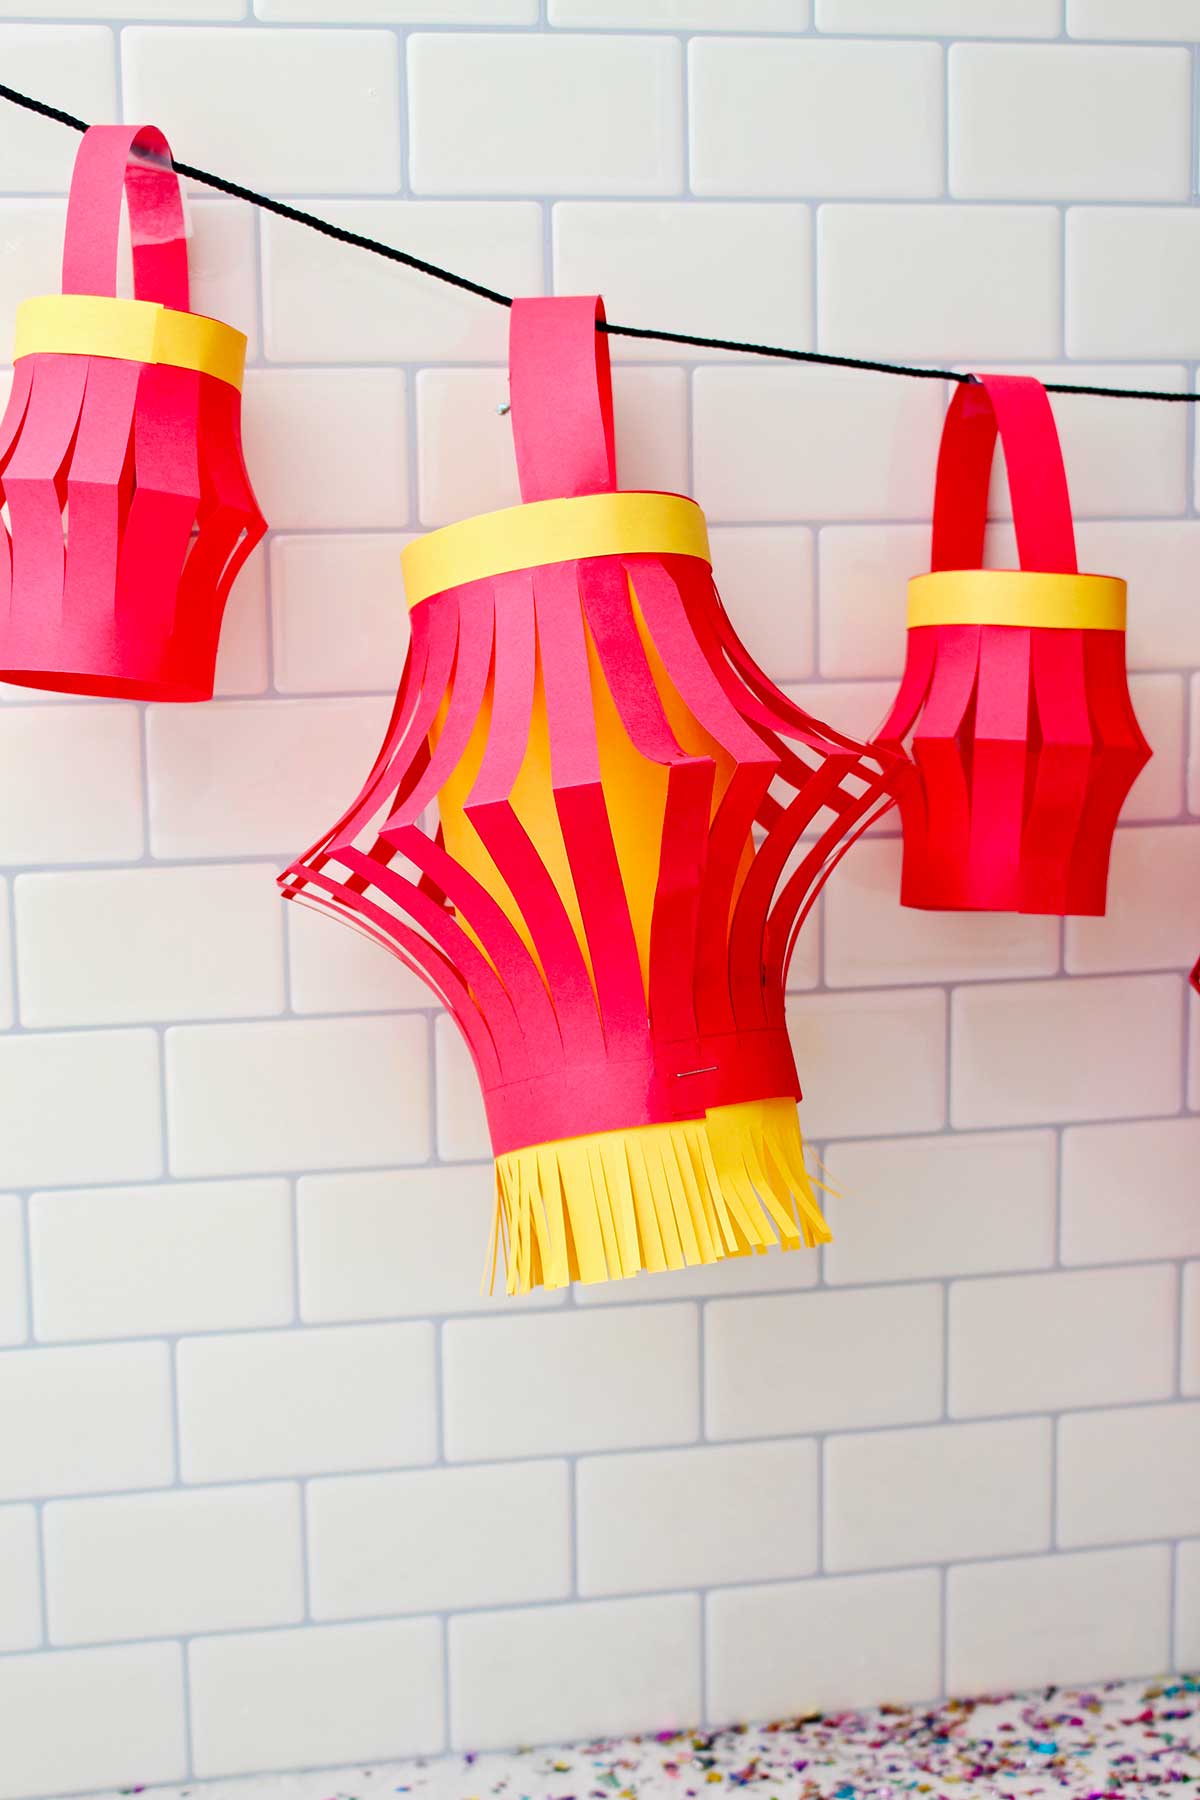
Make several of them and hang them up in a garland for your very own New Years celebration!
I remember making Chinese paper lanterns when I was in grade school. We would make red lanterns from construction paper and hang them in a garland across the room. I always thought they were so pretty.
You can make your Chinese lanterns from construction paper, copy paper, or cardstock. The card stock has more body, and the lantern tends to hold its shape better, but all of them work.
What are Chinese Paper Lanterns?
Chinese lanterns have a long history. There are written records that the tradition of making lanterns began during the eastern Han dynasty in 25-220 AD! That's a long time ago!
At one time the lanterns were made and then carried to the palace (a palace lantern), later they were made to be released and float up into the night sky.
How to Make Paper Lanterns
Option #1 for Paper Chinese Lanterns
The first Chinese lantern we will make will be from red copy paper and yellow copy paper (you can use other papers as well). We will use a ruler to draw out our lines to cut them and make them very accurate.
Simple instructions for classic paper lanterns can also be found on a full length video if you want that option, click here: Full Length Tutorial for How to Make Simple Chinese Paper Lanterns DIY Craft.
1. Drawing lines as cutting guides
Fold your red piece of 8 ½ x 11 inch copy paper in half hotdog style.
Take your ruler and draw pencil marks down the entire length of the folded edge of the paper at half inch increments.
Draw a pencil line the length of the paper on the unfolded side that is about ¾ to 1 inch from the edge.
Then, along that line, make marks that are in half inch increments all the way down the paper.
Turn your paper so that you can use the ruler to draw straight lines that connect the marks that you’ve made at the half inch increments. You will draw the lines from the unfolded edge to the line that you drew down the unfolded edge.

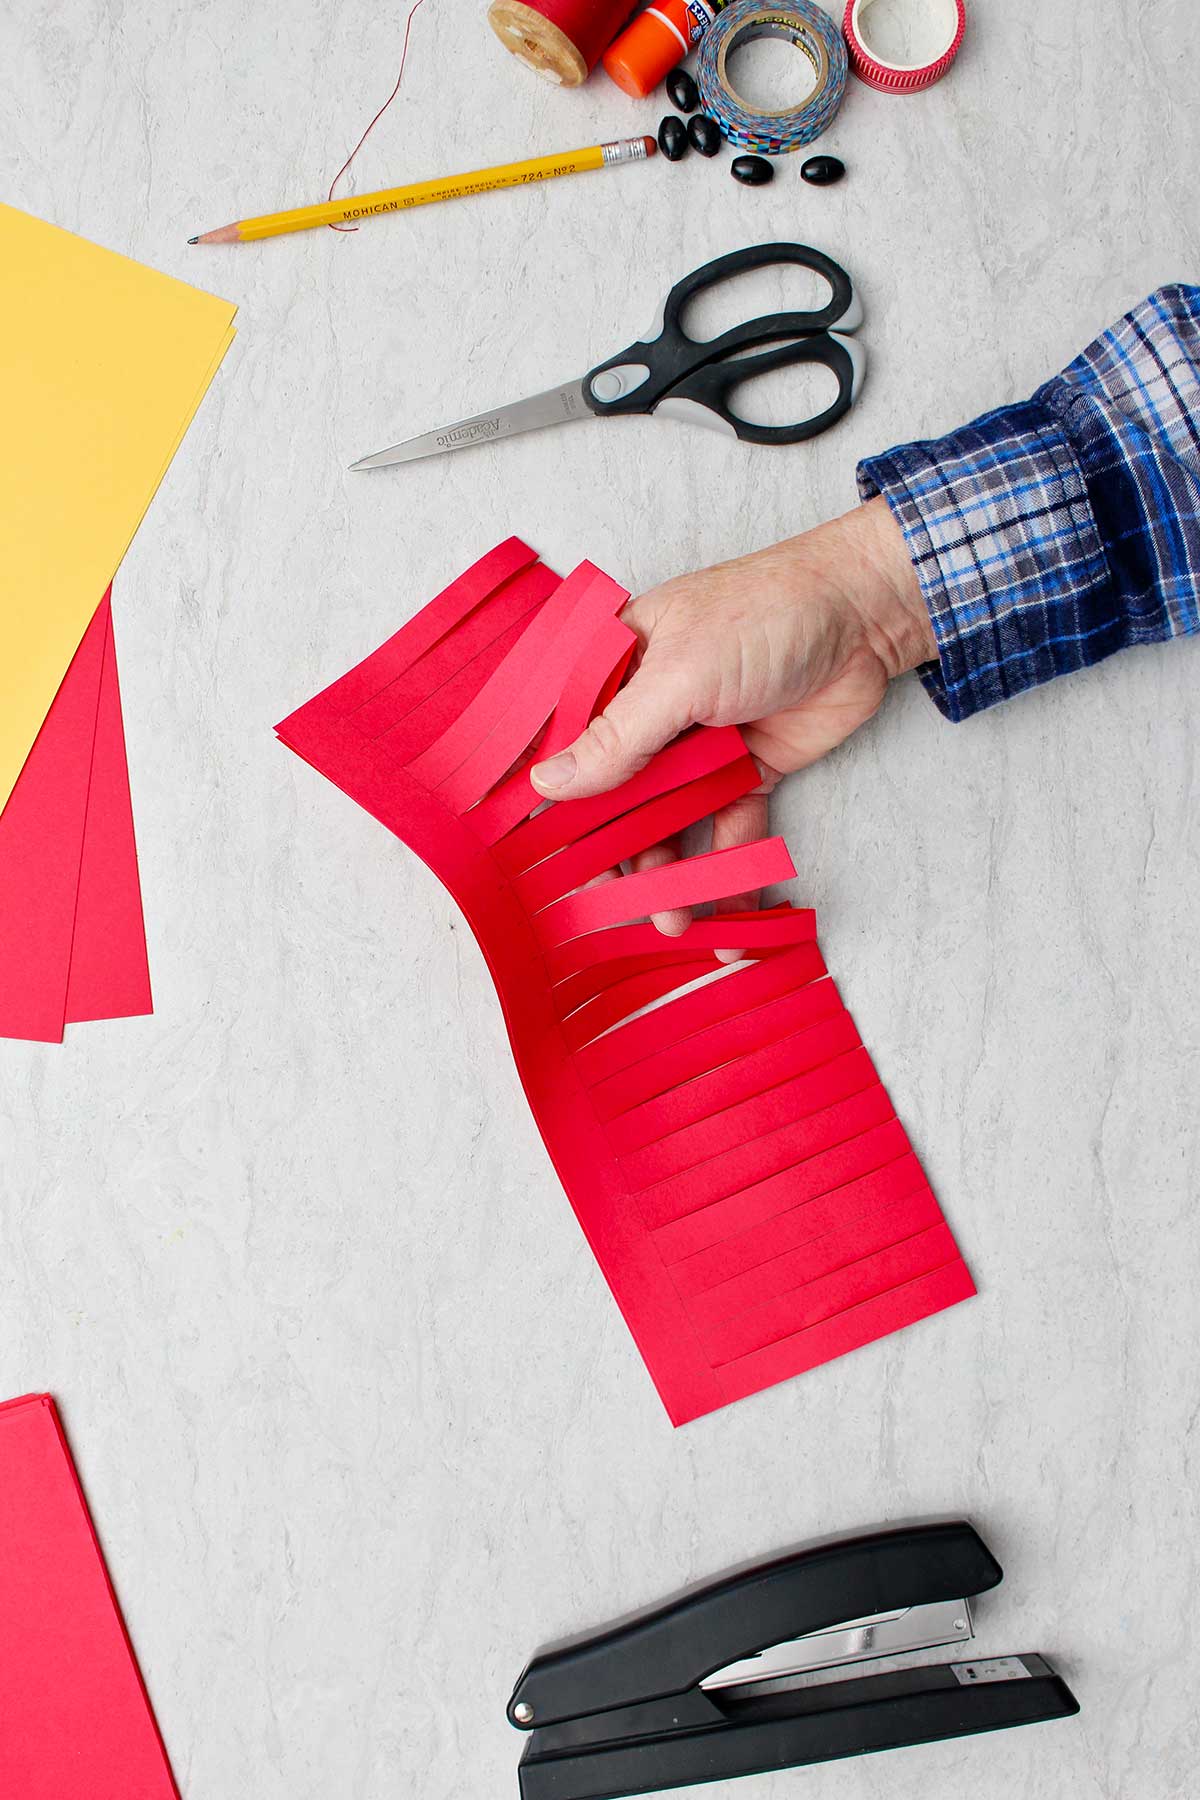
2. Cut along the pencil lines
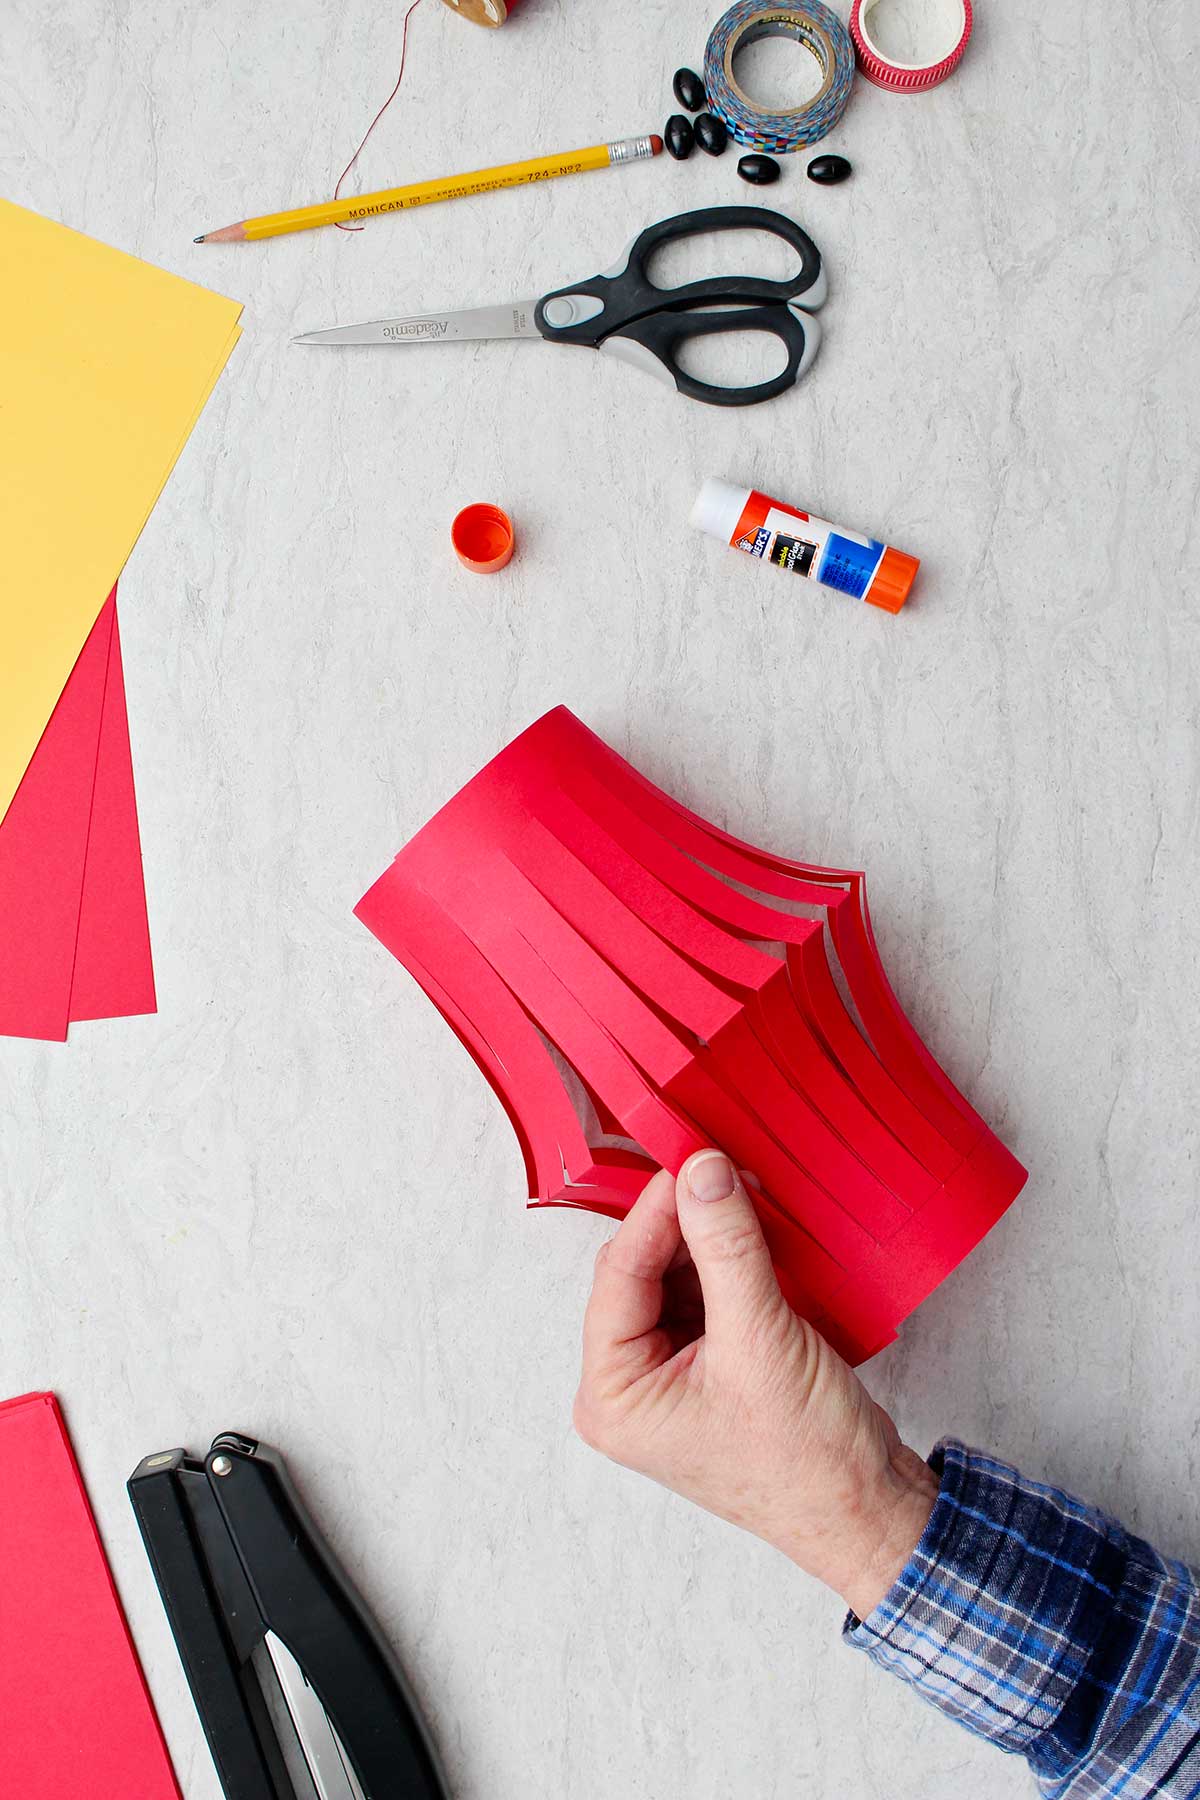
Now take your scissors and cut along those lines through both layers of your paper. You will cut strips from the unfolded edge just to the line that you drew on the opposite side of the paper. Because you measured the lines they will be very accurate and even.
When you open your paper, you’re going to roll it, so that the two short edges come together.
Using a glue stick, put glue along the last strip on one edge. Then overlap the last strip of the other edge and glue them together.
The shape is so simple, but I always think it is so pretty.
3. The lantern's handle
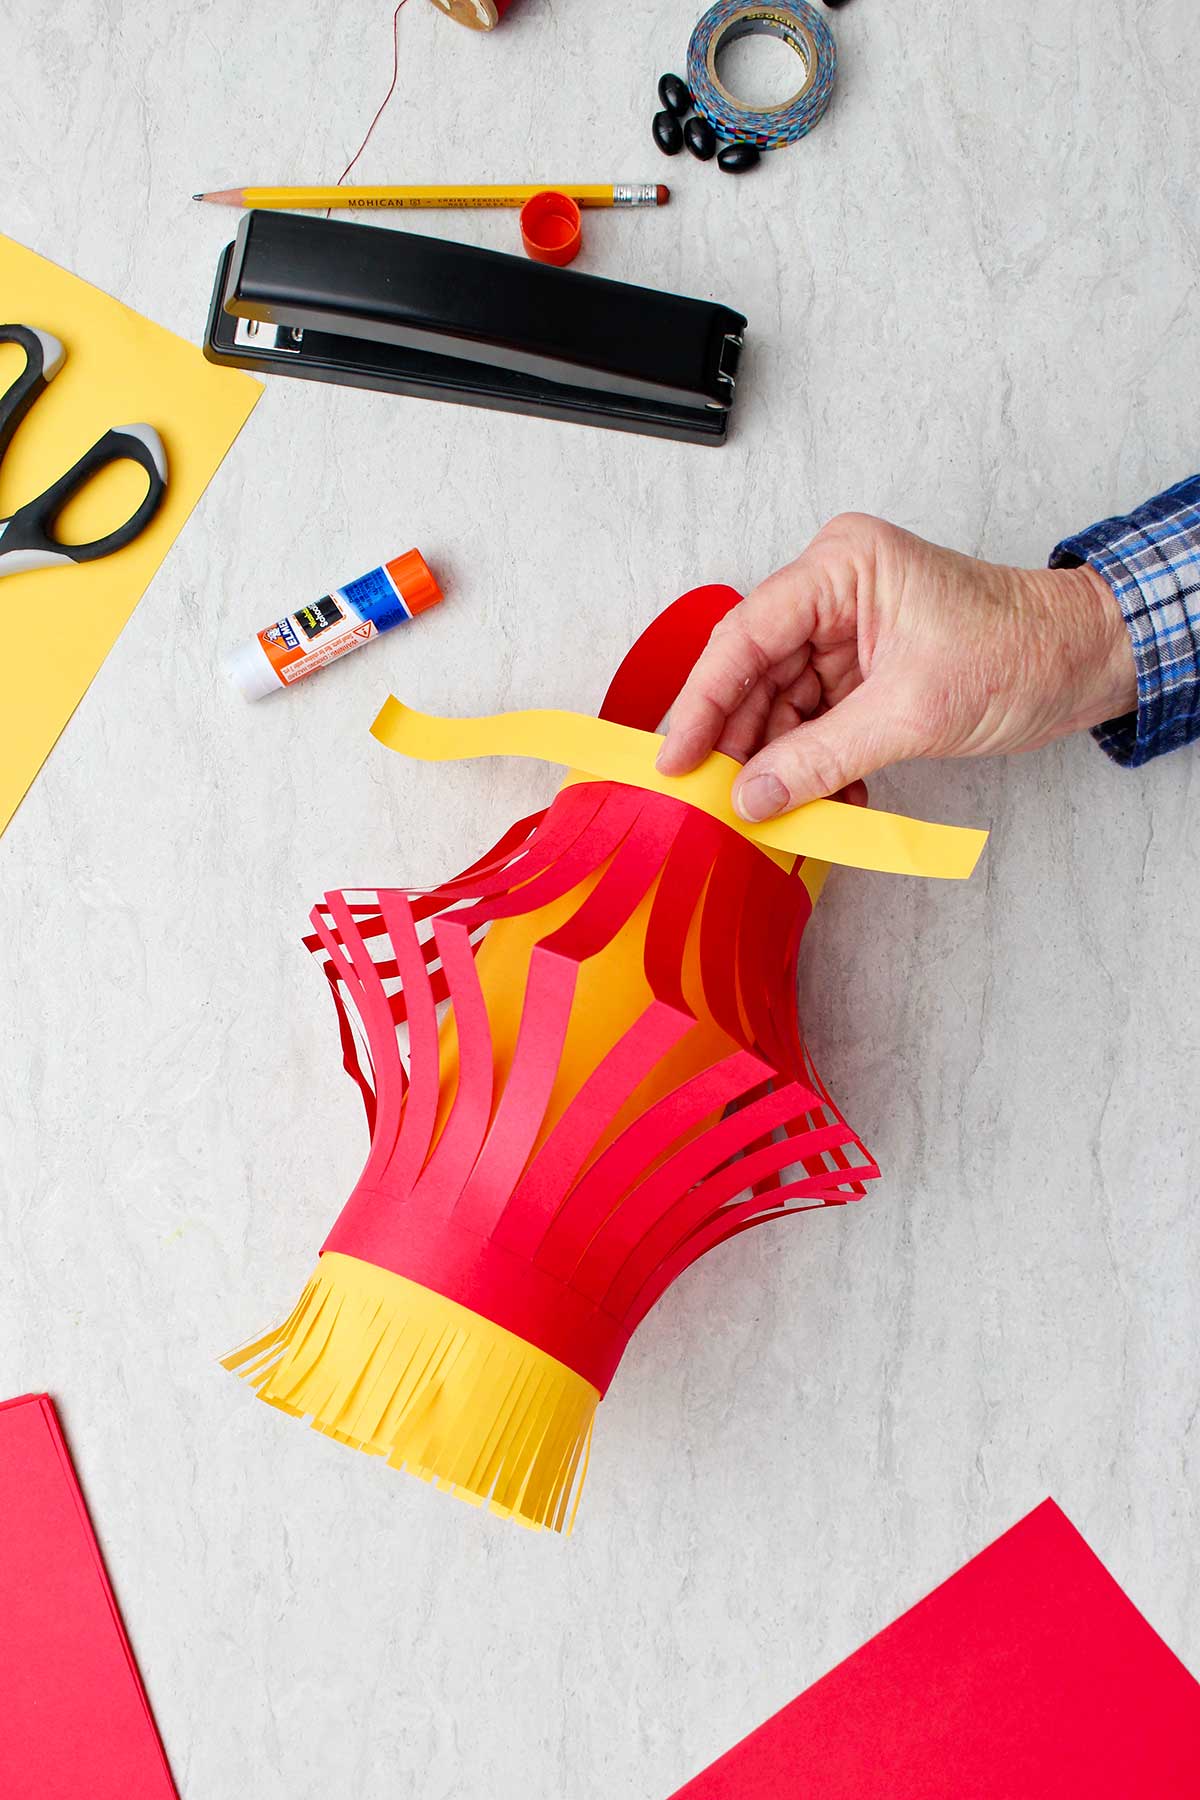
Next, you’re going to cut a handle for your lantern.
Cut a strip of paper from the red paper along one short side that’s about 1 inch wide.
Use a glue stick, double-sided tape, or staple the two ends of that handle to the top of your lantern, making them as evenly across from one another as possible.
4. Making a paper lantern liner
We are going to add an extra step to the lantern and make a liner that goes inside.
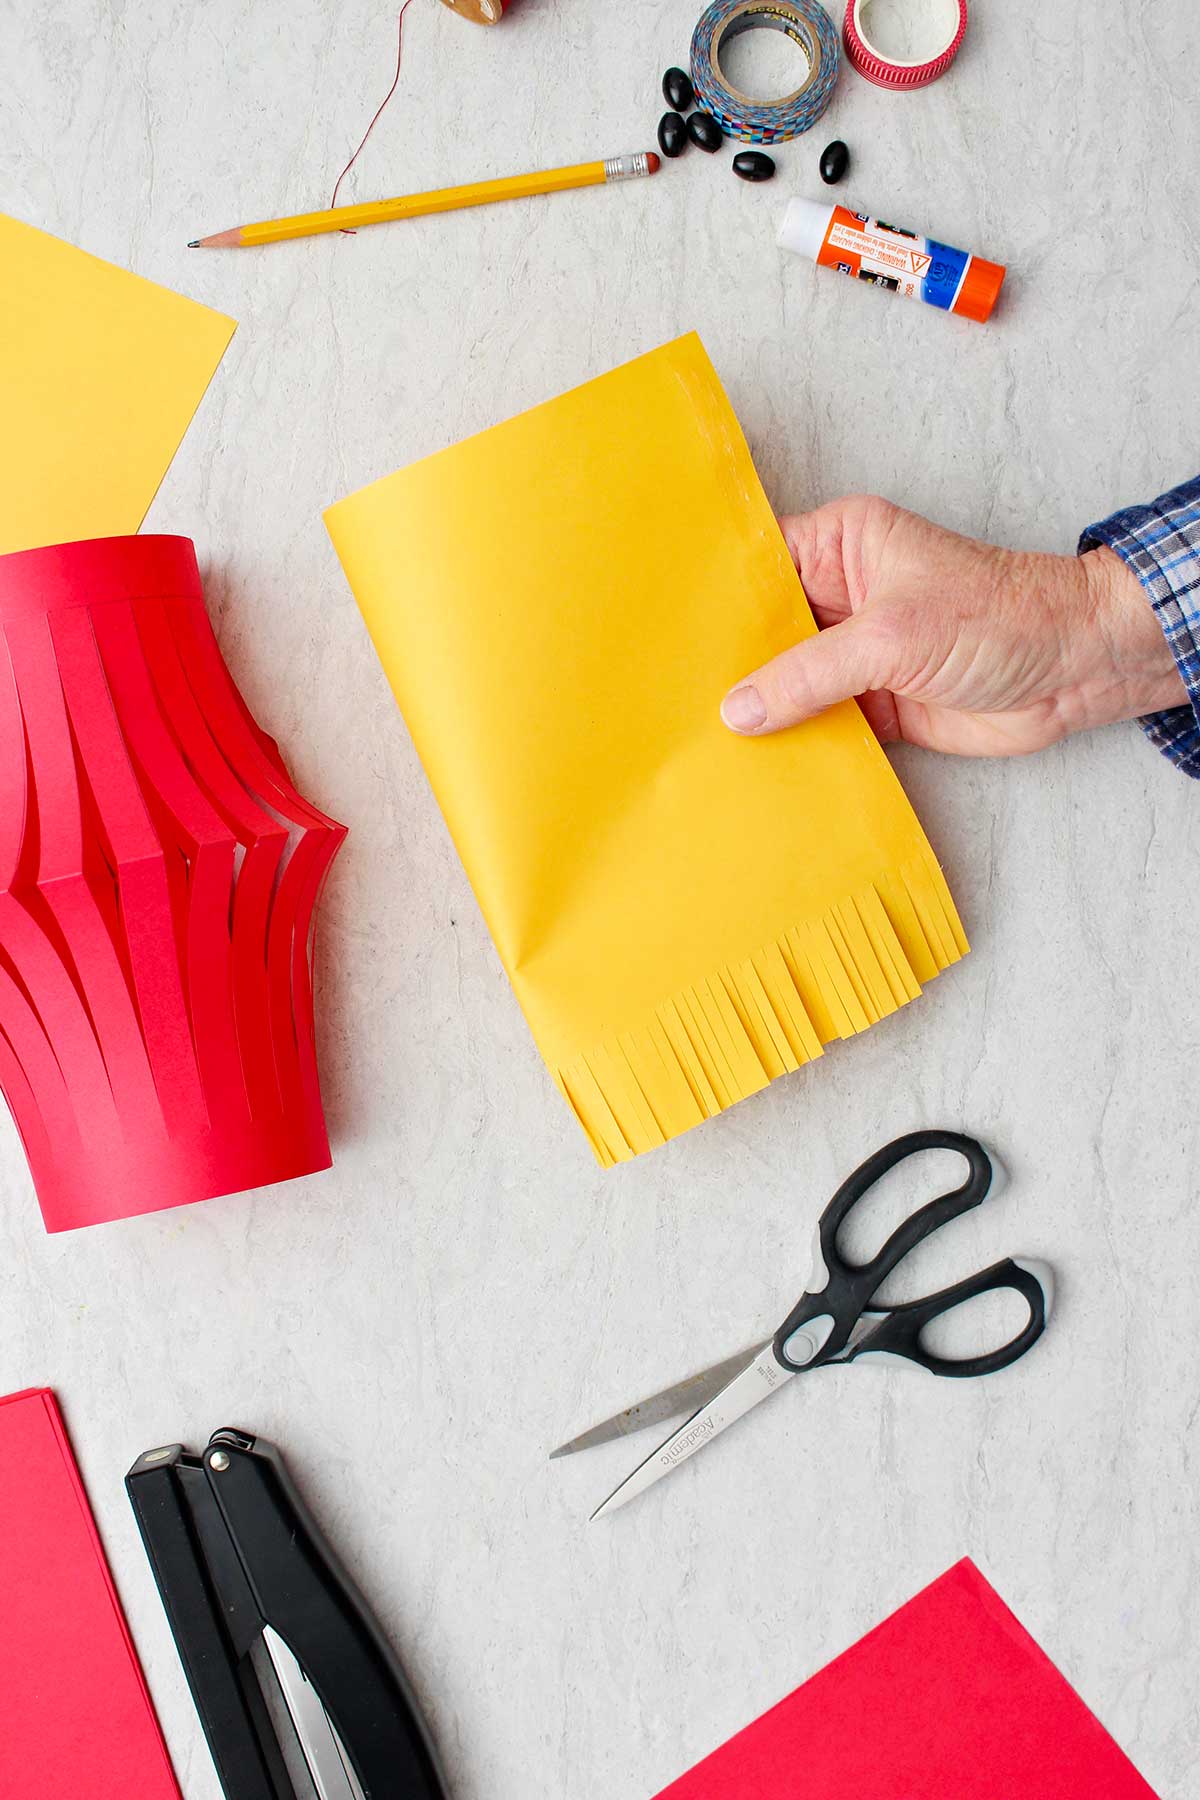
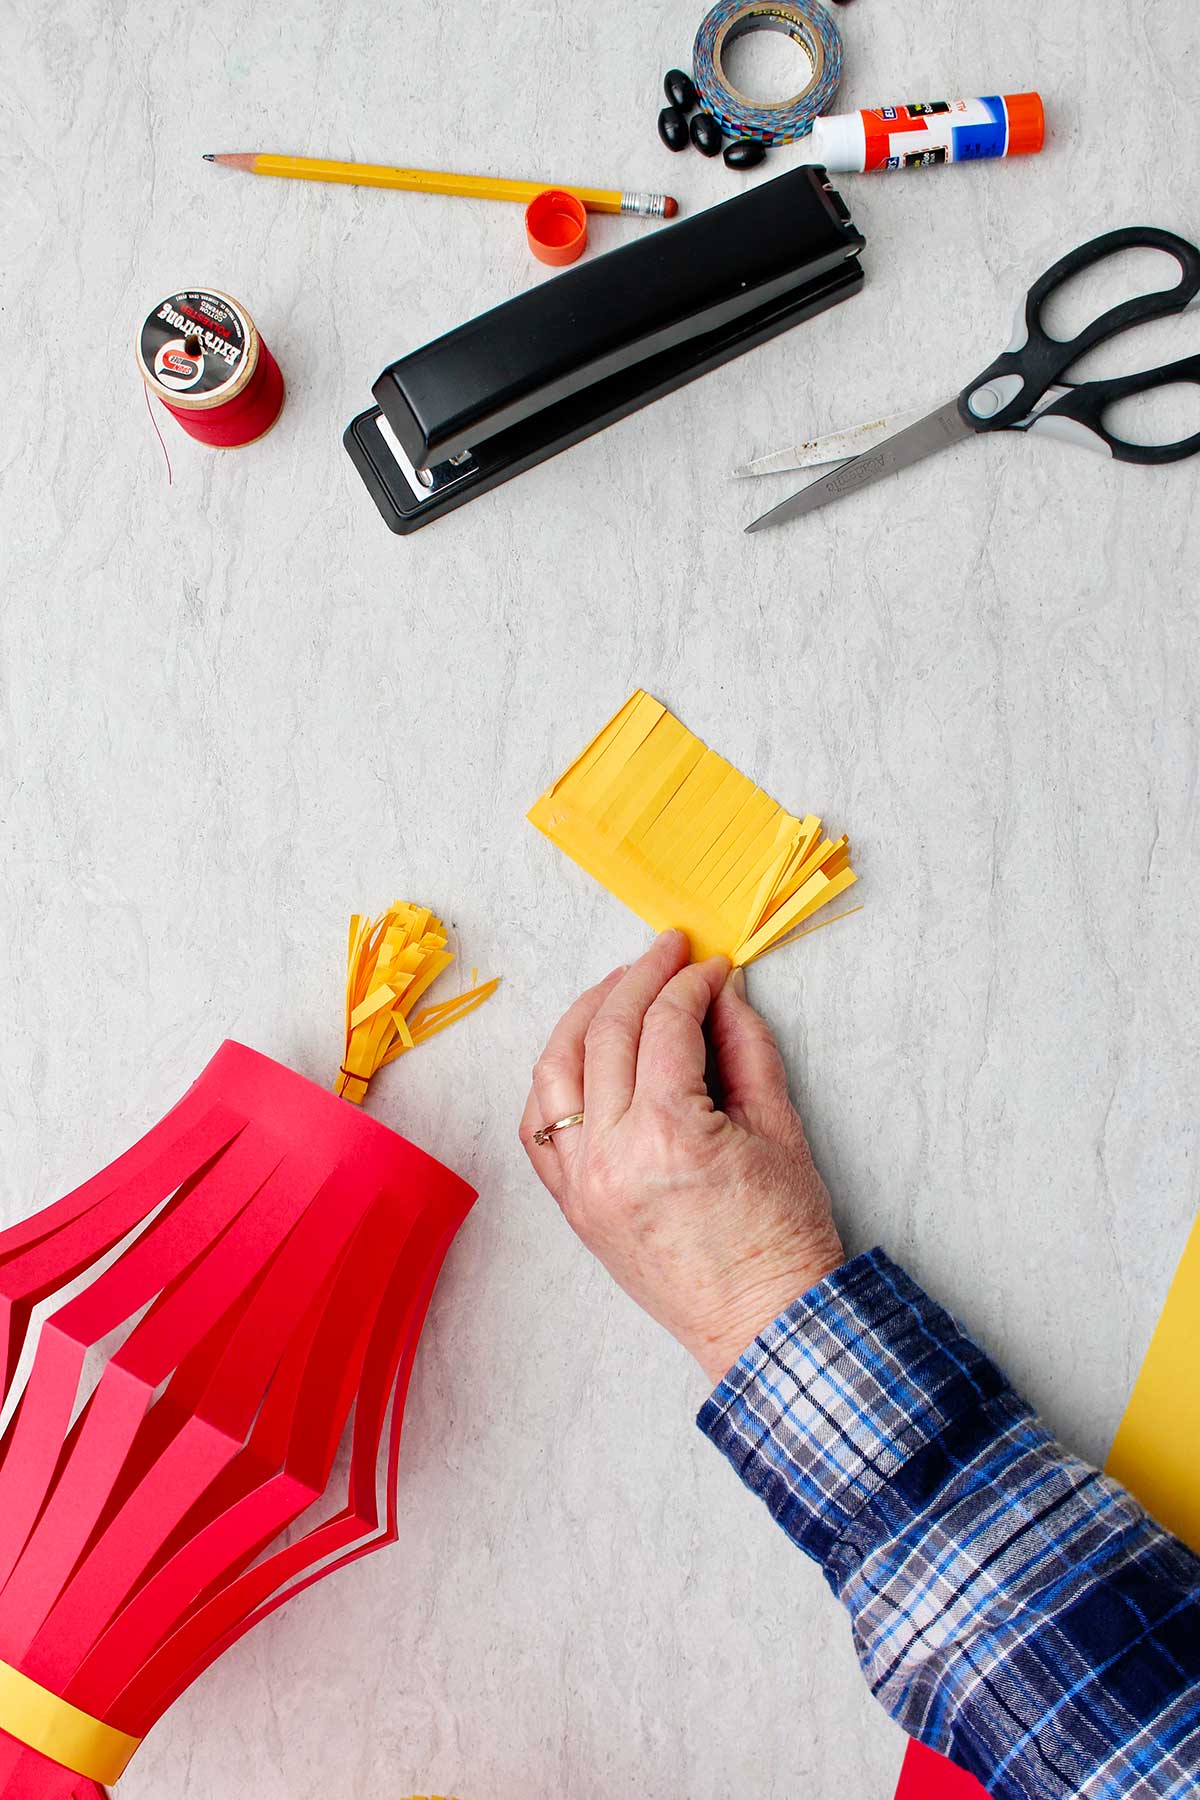
Take a piece of your yellow copy paper folded in half hamburger style.
Place the folded edge to the right, and then cut fringe all along the bottom edges of your paper through both layers. These will be small clips that you cut in the paper that are about 2 inches deep and as close together as you can make them- about an eighth of an inch or a quarter inch apart.
After doing this, open your paper up and roll it so that the fringe is on the bottom. You’re going to glue this into a tube. You want to glue it so that you have about ¾ of an inch overlap. We’re going to be slipping this tube inside of the lantern, so it needs to be able to fit through the bottom of the lantern.
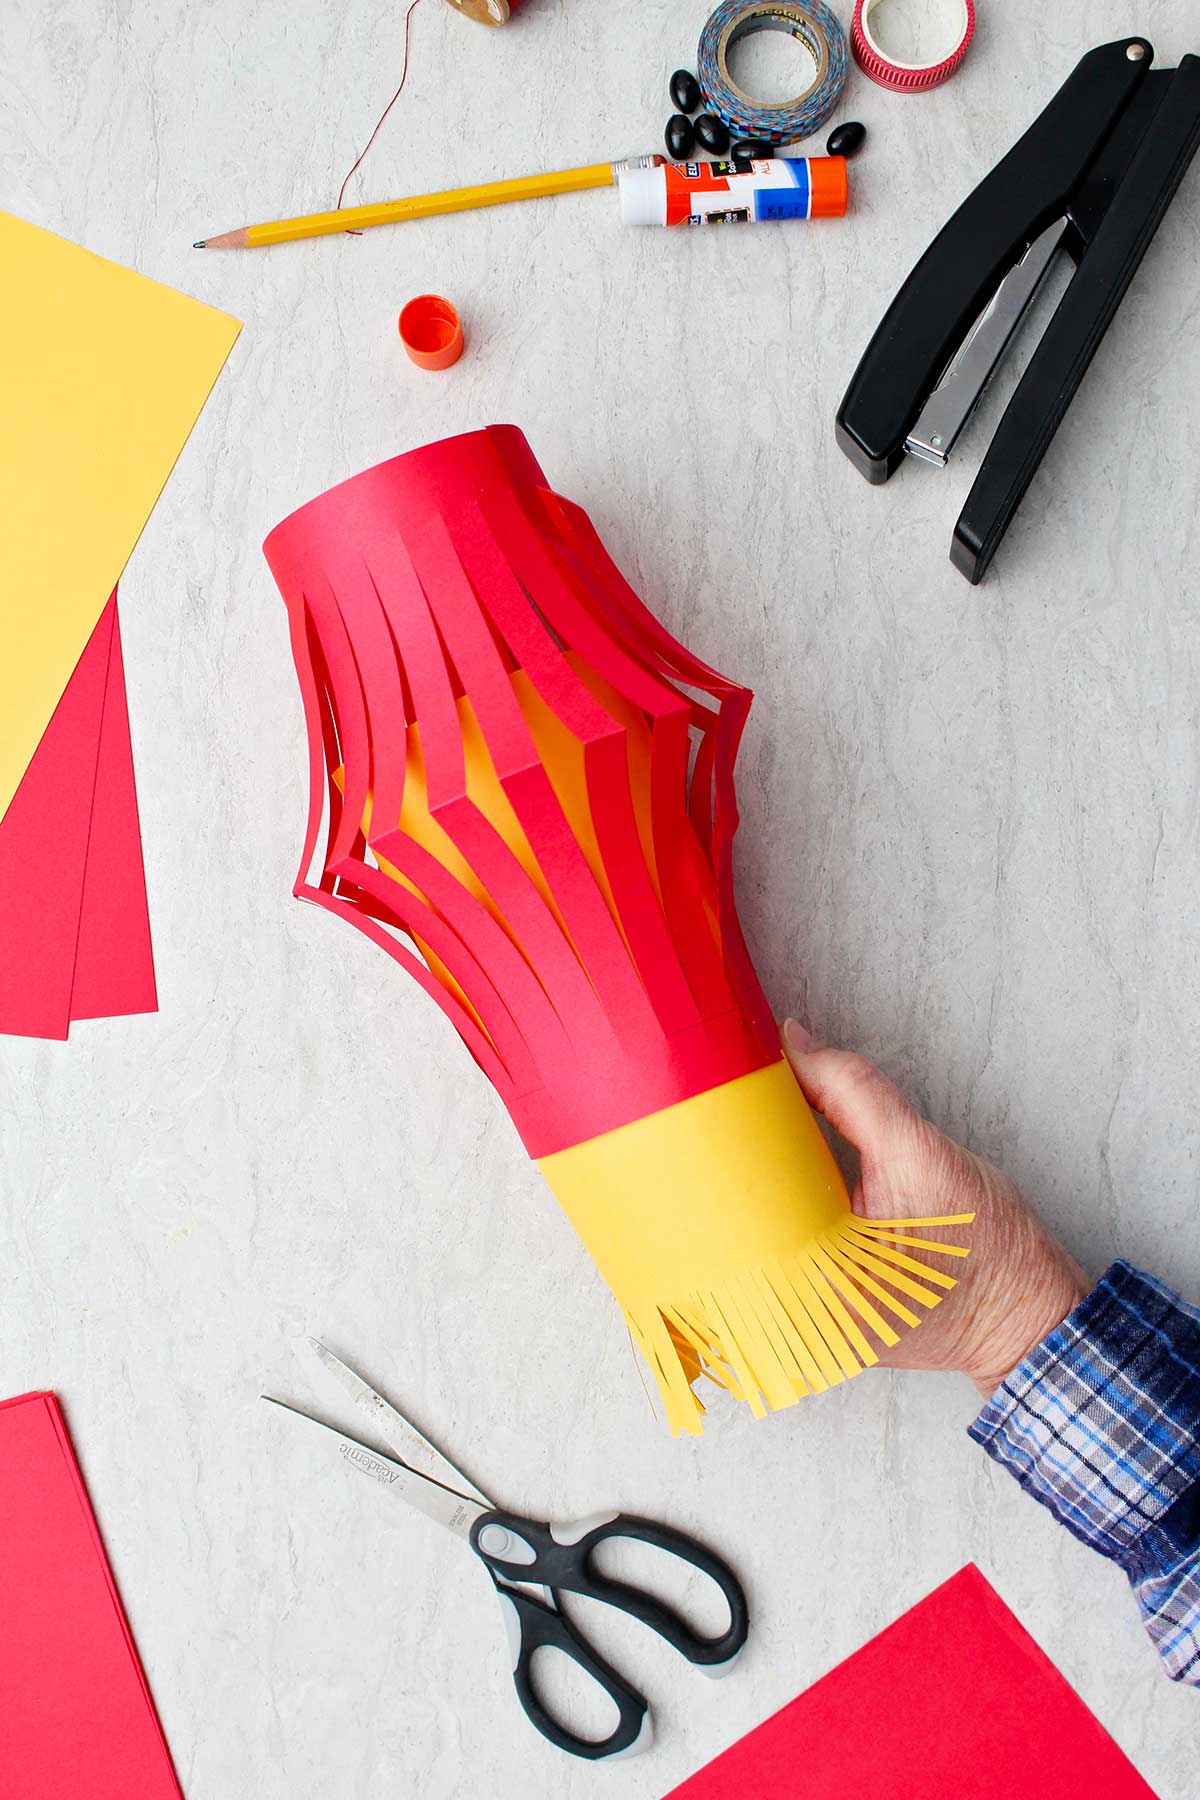
With that done, the next step is to slip the yellow tube into your lantern so that the fringe is at the bottom of the lantern.
Line up the top edge of the tube with the top of the lantern, and then staple it once to hold it in place.
Push the lantern upwards so that the fringe shows out of the bottom of the lantern. Staple it once so that it stays in place.
I love the way this looks! It makes the lantern look as if it’s lighted on the inside!
5. Extra decorations for your lanterns (optional)
Our last step is to decorate the lantern however you would like.
I cut a half inch strip along the long edge of a yellow sheet of copy paper. Glue the strip on the outside of the lantern, around the top of the paper, right below the handle.
You can decorate the lantern in other ways- you could use washi tape, a gold paint pen, gold ribbon, or glitter glue for example! Use your imagination!
You’re done with your own Chinese lantern craft!
Option #2 for Paper Chinese Lanterns
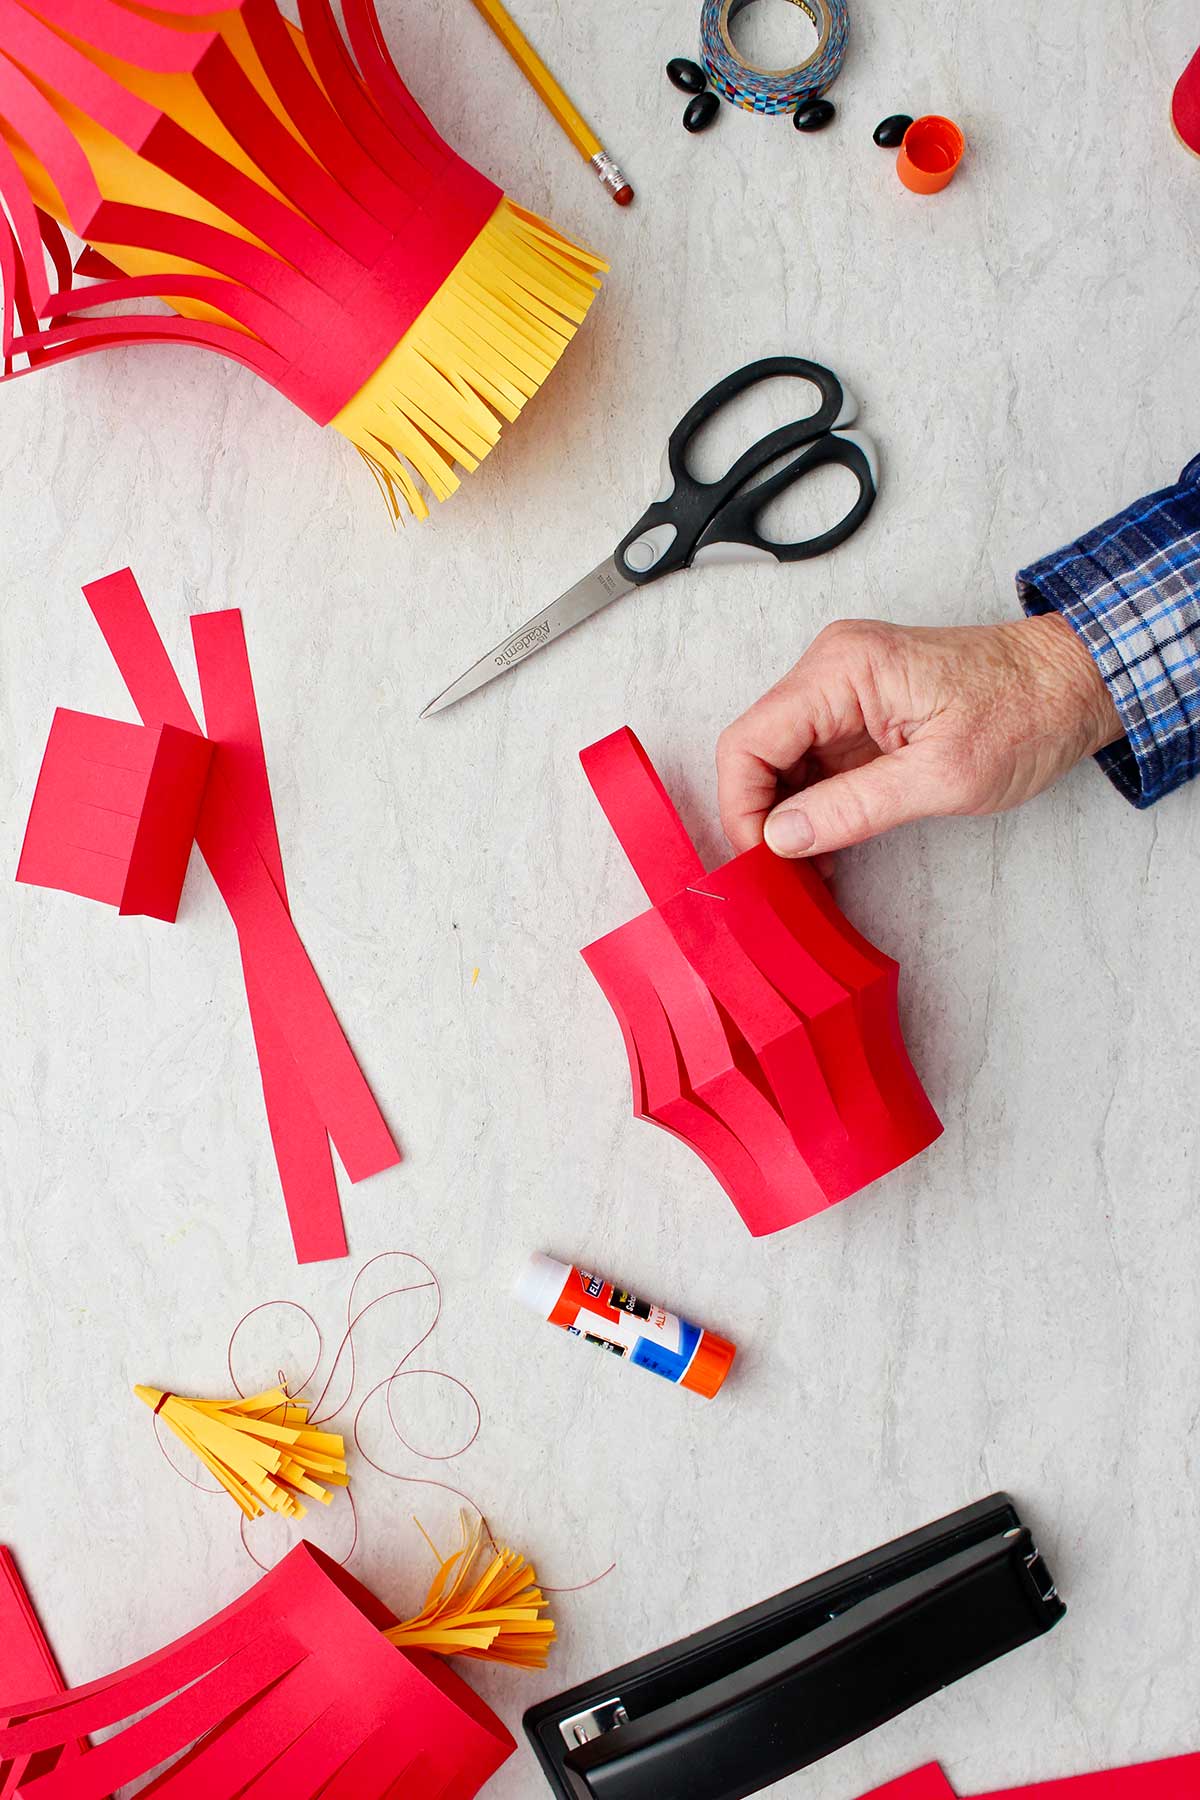
If you would like, you can also make your lantern without the inside tube. In the video I show making these traditional lanterns. In this option I use red card stock paper.
Also, I do not measure and draw the lines to use to cut the strips. Just fold the piece of card stock in half hotdog style and then make snips, cutting the strips until you get about an inch from the unfolded edge. Keep cutting the strips the full width of the paper
Without measurement lines, do your best at making the cuts as straight and even as possible.
If you would like for younger children, you can cut wide strips- even up to a 1-inch strip. This craft is a good learning experience for them in cutting and is a fun way to develop fine motor skills. But I must say that the narrow strips make for a more delicate looking paper lantern.
Assemble the lantern as we did earlier. I stapled mine this time.
Go ahead and add the handle and decorate as you’d like. This is the way we made them in grade school, we just left them without a liner.
Making a paper tassel (optional)
It is fun to make a paper tassel to hang from your lantern.
Cut a 2 ½ inch strip of yellow paper down the long side of the paper.
Fold this in half and cut small snips into the paper close together- cutting from one edge to about ½ inch from the other edge of the paper. This will be the fringe.
Place glue along the ½ inch side that is not clipped.
Tightly roll the fringe up into a tassel. Isn't that cool?
Cut a piece of thread, string, or embroidery floss that is about 2 feet long. Tie the thread to the top of the tassel so there are two equal lengths of thread on either side of the tassel.
Tie the ends of the threads to to the handles of the lantern, one to each handle. The thread needs to be long enough so that the tassel hangs down underneath the lantern.
This adds a great finishing touch!
Option #3 for Paper Chinese Lanterns
I can make a paper lantern in miniature too? What?
Up for another option? How about some miniature Chinese paper lanterns? Who can resist a miniature?
Fold another red rectangular sheet of paper in half hotdog style and cut down the fold so that you have two pieces of paper.
Fold one piece in half hotdog style and clip your strips down into the paper cutting from the folded edge to about a half inch from the unfolded edge.
I cut off about 2 ½ inches from one end of the paper to make it a little smaller in length.
Assemble your lantern just the way we did the larger ones.
I loved the way the miniatures turned out. I think they would look so neat on a garland. Perhaps you will come up with ideas for your own design for a lantern!

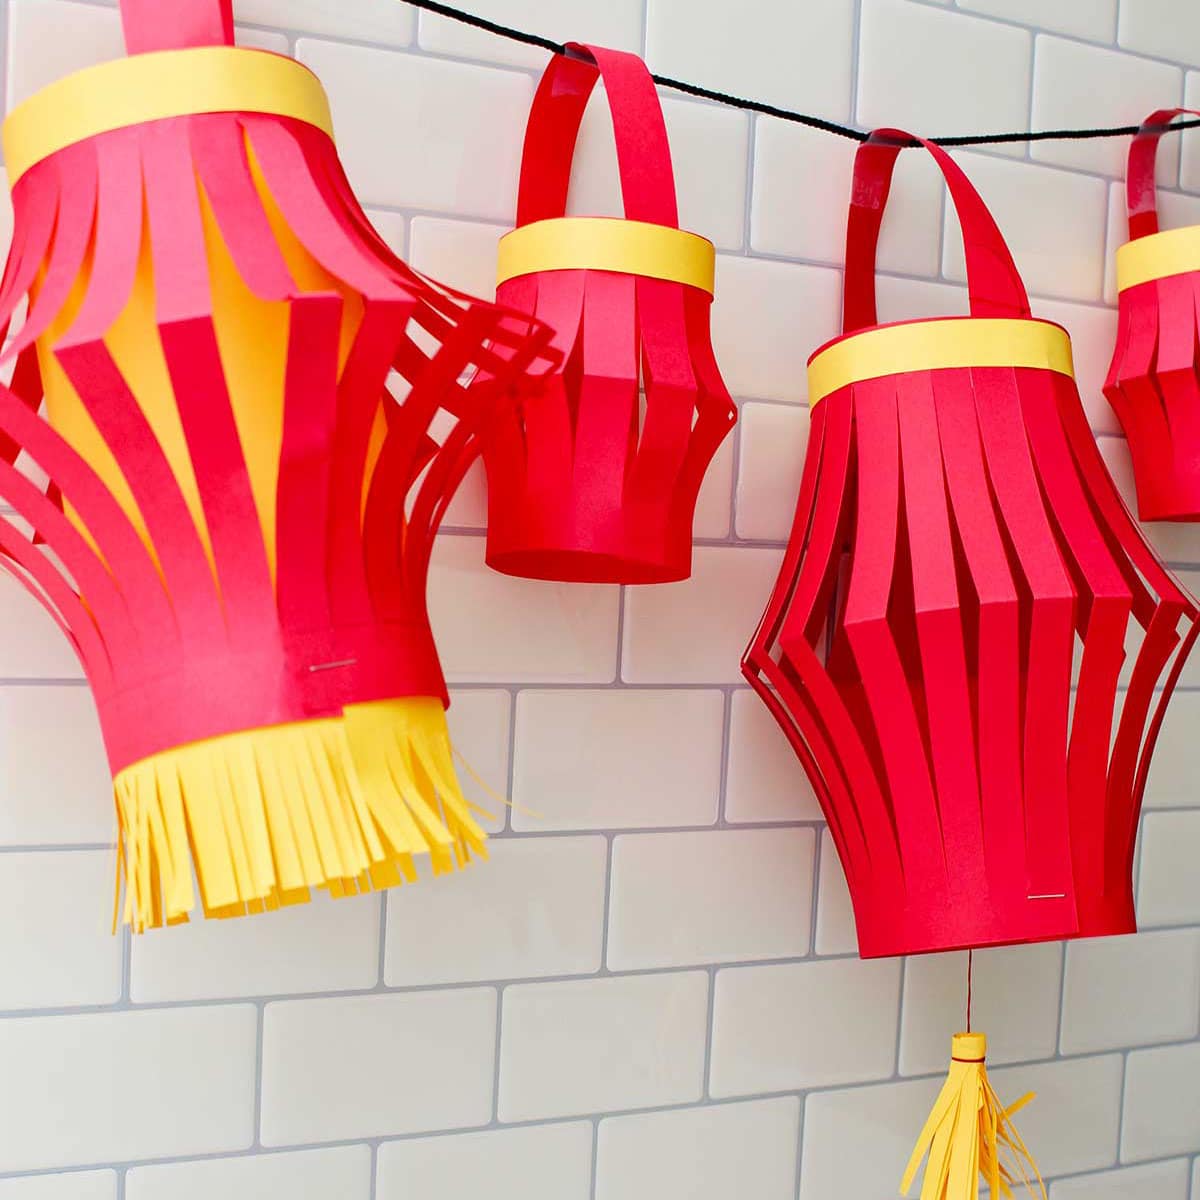
Make a paper lantern garland- so cool!
I actually went ahead and strung all of my finished lanterns together into a garland by putting a string through the handle of the lantern.
The smaller and larger lanterns were alternated and I liked the different shapes and sizes. What do you think?
The lantern craft is a great one, for any ages of kids, even you!
Different Colors of Lanterns Have Different Meanings
- blue paper is for sadness when things are not going well, perhaps someone is sick
- white paper is for mourning and lets others know that someone has died
- yellow paper is for good luck and some times students will hang them as help for their schooling and tests
- red paper is for celebration and stands for prosperity, wealth, and fame.
Lanterns are made in various kinds of shapes and sizes. They can be made to hang from a cord, float into the night sky like a hot air balloon, or float on the water.
What is Chinese New Year and the Chinese Lantern Festival?
Since red symbolize prosperity, a red traditional Chinese paper lantern (or one made from silk) is hung for weddings, the birth of a baby, or special festival days.
But the practice caught on and over time evolved into a big celebration called the Chinese lantern festival.
The lantern festival falls on the last day of the celebration of the Chinese lunar new year. Lunar means that the date is set by the phases of the moon. So the new year begins with the new moon in January or February and the celebration ends 14 days later at the time of the full moon.
Red colorful lanterns are used during the entire Chinese New Year activities. Homes, streets, and cities are decorated with beautifully decorated Chinese lanterns.
People return home to celebrate with family and exchange red envelopes of money as gifts. There are wonderful Chinese meals together and parties with firecrackers and dragon dances.
The lanterns are featured in the Chinese lantern festival.
A cool tradition is writing "lantern riddles" on them for others to figure out and solve! Doesn't that sound fun? Maybe you should add a riddle to your Chinese New Year craft lantern!!
I liked the information on this site about Chinese lanterns and Chinese New Year: Lunar New Year- National Geographic
Don't forget there is a full length video on YouTube if you want to follow along step-by-step with Nana! Full Length Video Tutorial on YouTube for How to Make Simple Chinese Paper Lanterns DIY Craft.
Want more easy paper crafts for kids?
Check out these fun and easy paper crafts for all seasons and occasions!
- Handmade Paper Envelopes 3 Ways
- How to Make Paper Pinwheels
- How to Make a Paper Strip Pumpkin
- 4 Adorable & Easy Paper Penguin Crafts
- Easy Paper Fan Scene Craft
Enjoy!
If you try this craft, let me know! Go ahead and leave a comment, rate it, and tag a photo with #WelcometoNanas wherever you post.
Come join the fun at https://welcometonanas.com
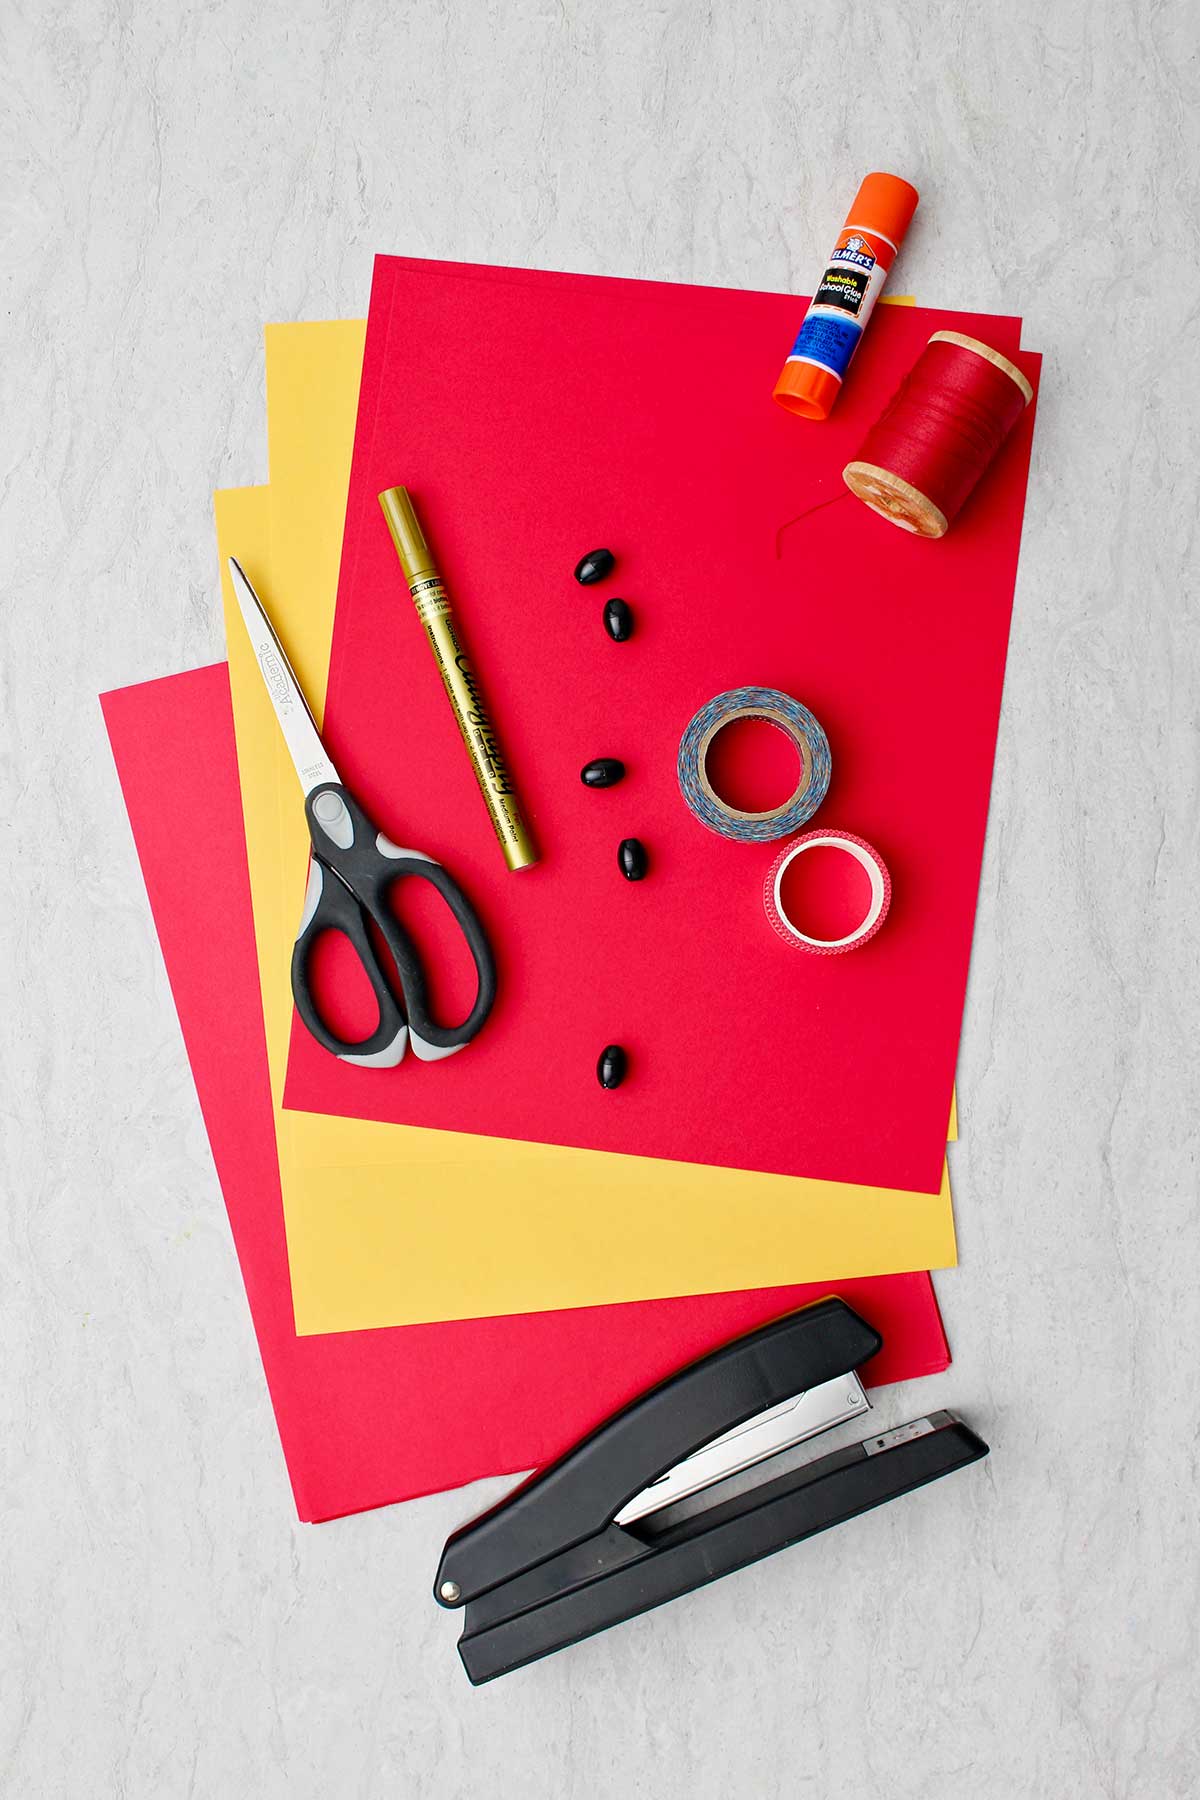
Supplies for Simple Chinese Paper Lanterns DIY Craft
- Paper- card stock, construction paper, copy paper (red and yellow, or colors of your choice
- Ruler
- Scissors
- Pencil
- Glue stick
- Stapler
- Thread, string, or embroidery floss (optional)
More from Welcome To Nana's
How to Make Simple Chinese Lanterns DIY Craft
Equipment
- Scissors
Items Required
- Paper- card stock, construction paper, copy paper red and yellow, or colors of your choice
- Ruler optional
- Scissors
- Pencil
- Glue stick
- Thread, string, or embroidery floss optional
Instructions
First paper lanterns DIY
- The first Chinese lantern we will make will be from red copy paper and yellow copy paper (you can use other papers as well). We will use a ruler to draw out our lines to cut them and make them very accurate.Simple instructions for classic paper lanterns can also be found on a full length video if you want that option, click here: Full Length Tutorial for How to Make Simple Chinese Paper Lanterns DIY Craft.Fold your red piece of 8 ½ x 11 inch copy paper in half hotdog style.Take your ruler and draw pencil marks down the entire length of the folded edge of the paper at half inch increments. Draw a pencil line the length of the paper on the unfolded side that is about ¾ to 1 inch from the edge.Then, along that line, make marks that are in half inch increments all the way down the paper.Turn your paper so that you can use the ruler to draw straight lines that connect the marks that you’ve made at the half inch increments. You will draw the lines from the unfolded edge to the line that you drew down the unfolded edge.
- Now take your scissors and cut along those lines through both layers of your paper. You will cut strips from the unfolded edge just to the line that you drew on the opposite side of the paper. Because you measured the lines they will be very accurate and even. When you open your paper, you’re going to roll it, so that the two short edges come together. Using a glue stick, put glue along the last strip on one edge. Then overlap the last strip of the other edge and glue them together.
- Next, you’re going to cut a handle for your lantern.Cut a strip of paper from the red paper along one short side that’s about 1 inch wide.Use a glue stick, double-sided tape, or staple the two ends of that handle to the top of your lantern, making them as evenly across from one another as possible.
- We are going to add an extra step to the lantern and make a liner that goes inside.Take a piece of your yellow copy paper folded in half hamburger style.Place the folded edge to the right, and then cut fringe all along the bottom edges of your paper through both layers. These will be small clips that you cut in the paper that are about 2 inches deep and as close together as you can make them- about an eighth of an inch or a quarter inch apart.After doing this, open your paper up and roll it so that the fringe is on the bottom. You’re going to glue this into a tube. You want to glue it so that you have about ¾ of an inch overlap. We’re going to be slipping this tube inside of the lantern, so it needs to be able to fit through the bottom of the lantern.With that done, the next step is to slip the yellow tube into your lantern so that the fringe is at the bottom of the lantern.Line up the top edge of the tube with the top of the lantern, and then staple it once to hold it in place.Push the lantern upwards so that the fringe shows out of the bottom of the lantern. Staple it once so that it stays in place.I love the way this looks! It makes the lantern look as if it’s lighted on the inside!
- You can decorate the lantern in other ways- you could use washi tape, a gold paint pen, gold ribbon, or glitter glue for example! Use your imagination!
Second paper lanterns DIY
- If you would like, you can also make your lantern without the inside tube. In the video I show making these traditional lanterns. In this option I use red card stock paper.Also, I do not measure and draw the lines to use to cut the strips. Just fold the piece of card stock in half hotdog style and then make snips, cutting the strips until you get about an inch from the unfolded edge. Keep cutting the strips the full width of the paperWithout measurement lines, do your best at making the cuts as straight and even as possible. Assemble the lantern as we did earlier. I stapled mine this time.Go ahead and add the handle and decorate as you’d like. This is the way we made them in grade school, we just left them without a liner.
- It is fun to make a paper tassel to hang from your lantern.Cut a 2 ½ inch strip of yellow paper down the long side of the paper.Fold this in half and cut small snips into the paper close together- cutting from one edge to about ½ inch from the other edge of the paper. This will be the fringe.Place glue along the ½ inch side that is not clipped.Tightly roll the fringe up into a tassel. Isn't that cool?Cut a piece of thread, string, or embroidery floss that is about 2 feet long. Tie the thread to the top of the tassel so there are two equal lengths of thread on either side of the tassel.Tie the ends of the threads to to the handles of the lantern, one to each handle. The thread needs to be long enough so that the tassel hangs down underneath the lantern.This adds a great finishing touch!
Third paper lanterns DIY
- Up for another option? How about some miniature Chinese paper lanterns? Who can resist a miniature?Fold another red rectangular sheet of paper in half hotdog style and cut down the fold so that you have two pieces of paper.Fold one piece in half hotdog style and clip your strips down into the paper cutting from the folded edge to about a half inch from the unfolded edge. I cut off about 2 ½ inches from one end of the paper to make it a little smaller in length.Assemble your lantern just the way we did the larger ones.


Cheryl says
Cute Craft. Thank you for the great Ideas!
Blessings,
Cheryl
painting lantern says
Hahaha, seeing Chinese paper lanterns here makes me feel like I've traveled back to ancient times. It's a very interesting handicraft, and I'd like to showcase our Chinese lanterns here as well.
https://www.paintinglantern.com/chinese-lantern-a-chinese-heart/