Learn how to make a DIY Boondoggle Keychain with this step-by-step tutorial! It's a great craft for kids that makes a perfect gift, give one for Father's Day, a birthday, or to a friend just for fun!
Jump to:
- I've been making Boondoggles since childhood.
- What is a Boondoggle?
- Make a DIY Boondoggle Keychain for Father's Day!
- Boondoggle is for every age kid
- Supplies for DIY Boondoggle Keychain
- How to Boondoggle
- You can't weave just one Boondoggle Lanyard Keychain!
- Boondoggle Patterns
- Boondoggle FAQs
- How about making Dad a Father's Day card?
- Enjoy!
- DIY Boondoggle Lanyard Keychain
I've been making Boondoggles since childhood.
We used to have a little park about a block from where I grew up in a neighborhood full of kids. There was a tiny swimming pool that the city would fill up with water on certain days of the week.
But what I loved even more as a little girl was that they had a craft person who would bring boondoggle as a craft option.
If we had a quarter with us, we could buy a couple pieces of boondoggle plastic lacing cord and they’d get us started making a keychain. I loved it! I don’t know how many of those things we probably had around the house.
What is a Boondoggle?
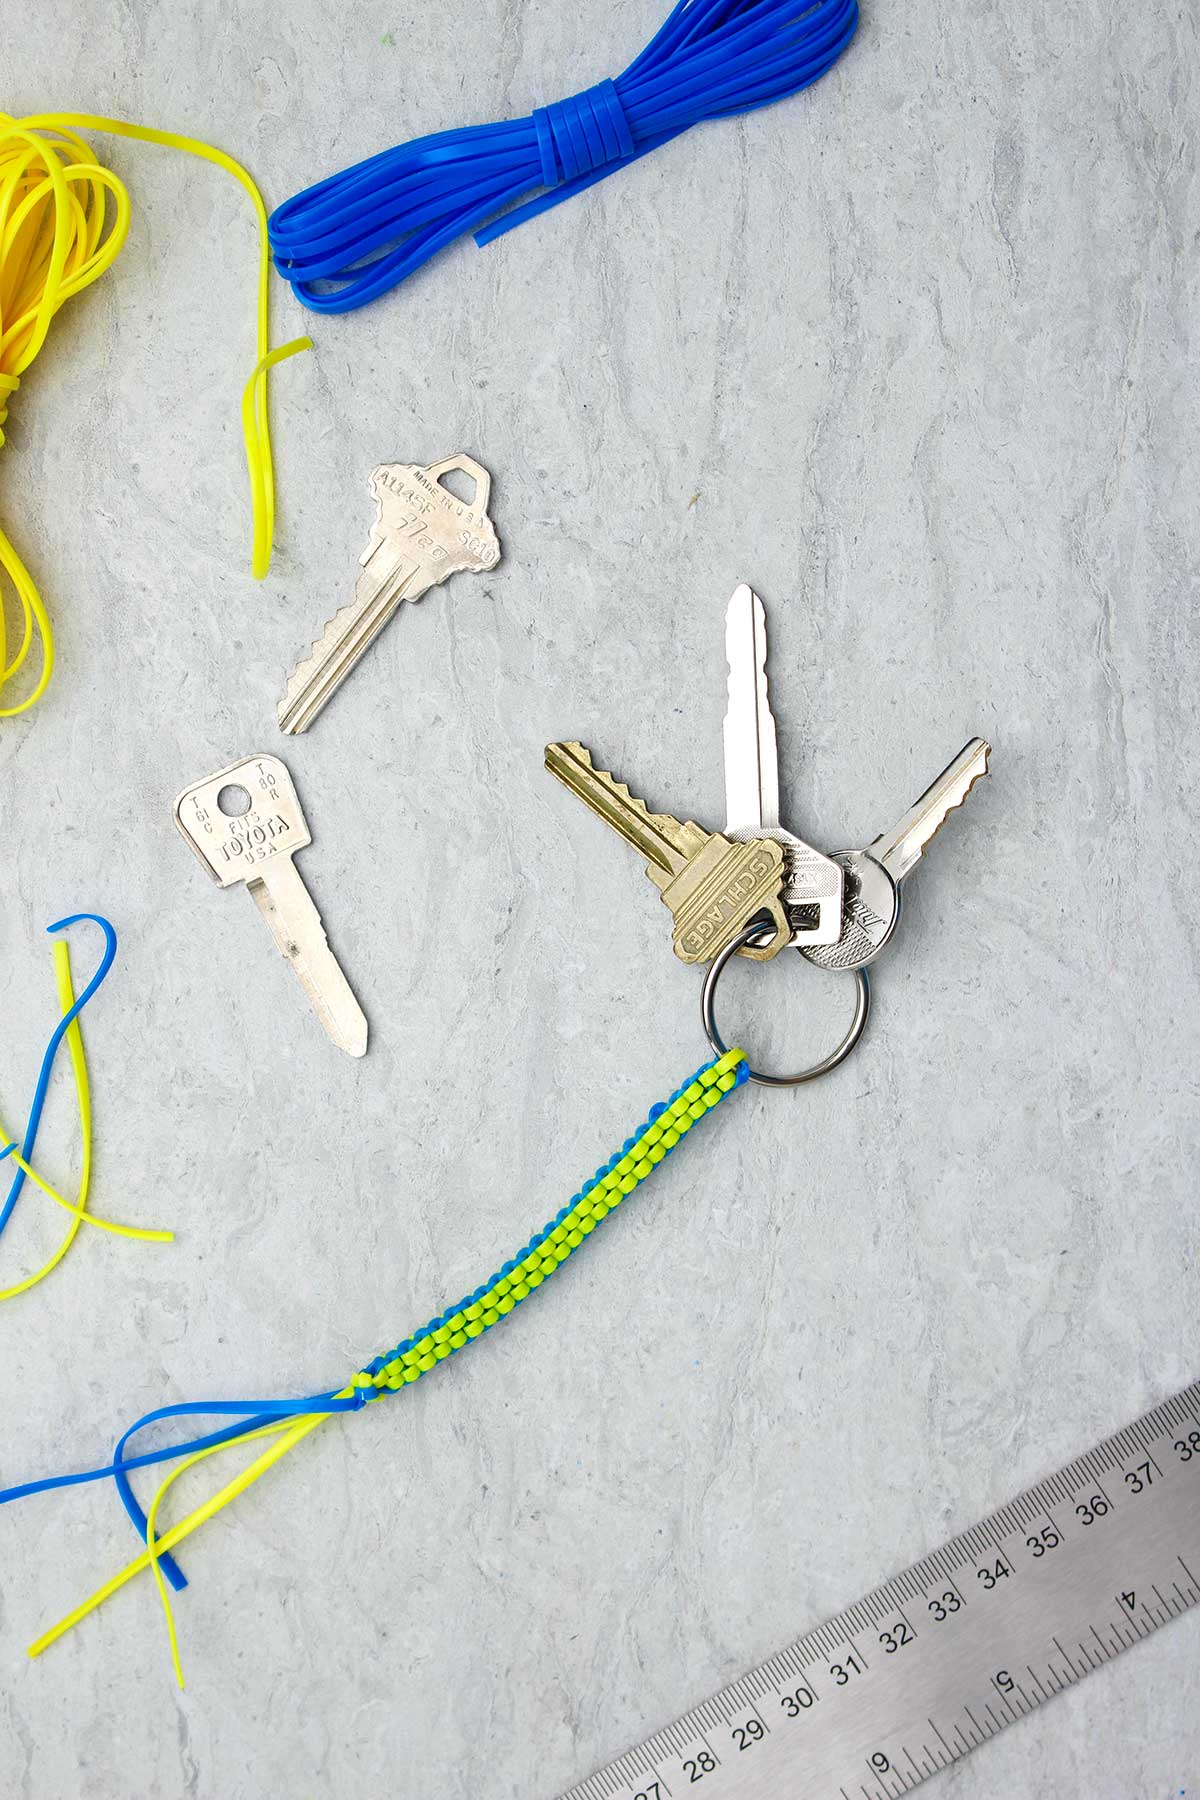
A Boondoggle is a type of weaving done with plastic lacing. It is often used to make a Boondoggle keychain which is very durable, water resistant, colorful, and attractive. The beginners boxstitch creates a square woven pattern of two colors. There are other patterns that can be learned when the boxstitch is mastered. The term “boondoggle” is also used to refer to the plastic lacing that is used in this craft.
Make a DIY Boondoggle Keychain for Father's Day!
Let’s learn how to make a DIY Boondoggle Keychain for Father’s Day. You’ll weave a gift anyone would love!! You’ll probably want one for yourself too!
Boondoggle weaving with plastic lacing has been a hit with kids for decades. I think it started like in the 50s and it’s been a craft at about every camp since then. :-).
Boondoggle is for every age kid
I will say that even though it seems to be known as a kid’s craft, many adults like to do it too. There are increasingly difficult patterns, and you can make different shapes and such with the boondoggle weaving.
Kids love making simple square keychains. But older kids and adults can make all types of twisting shapes and form them into crosses, hearts, animals, and such. Pretty amazing for a little camp craft.
Boondoggle weaving is good for hand-eye coordination and dexterity which is great for kids of every age. Younger grands will need help in the weaving process, but the older grands will catch on and run with it!!
Supplies for DIY Boondoggle Keychain
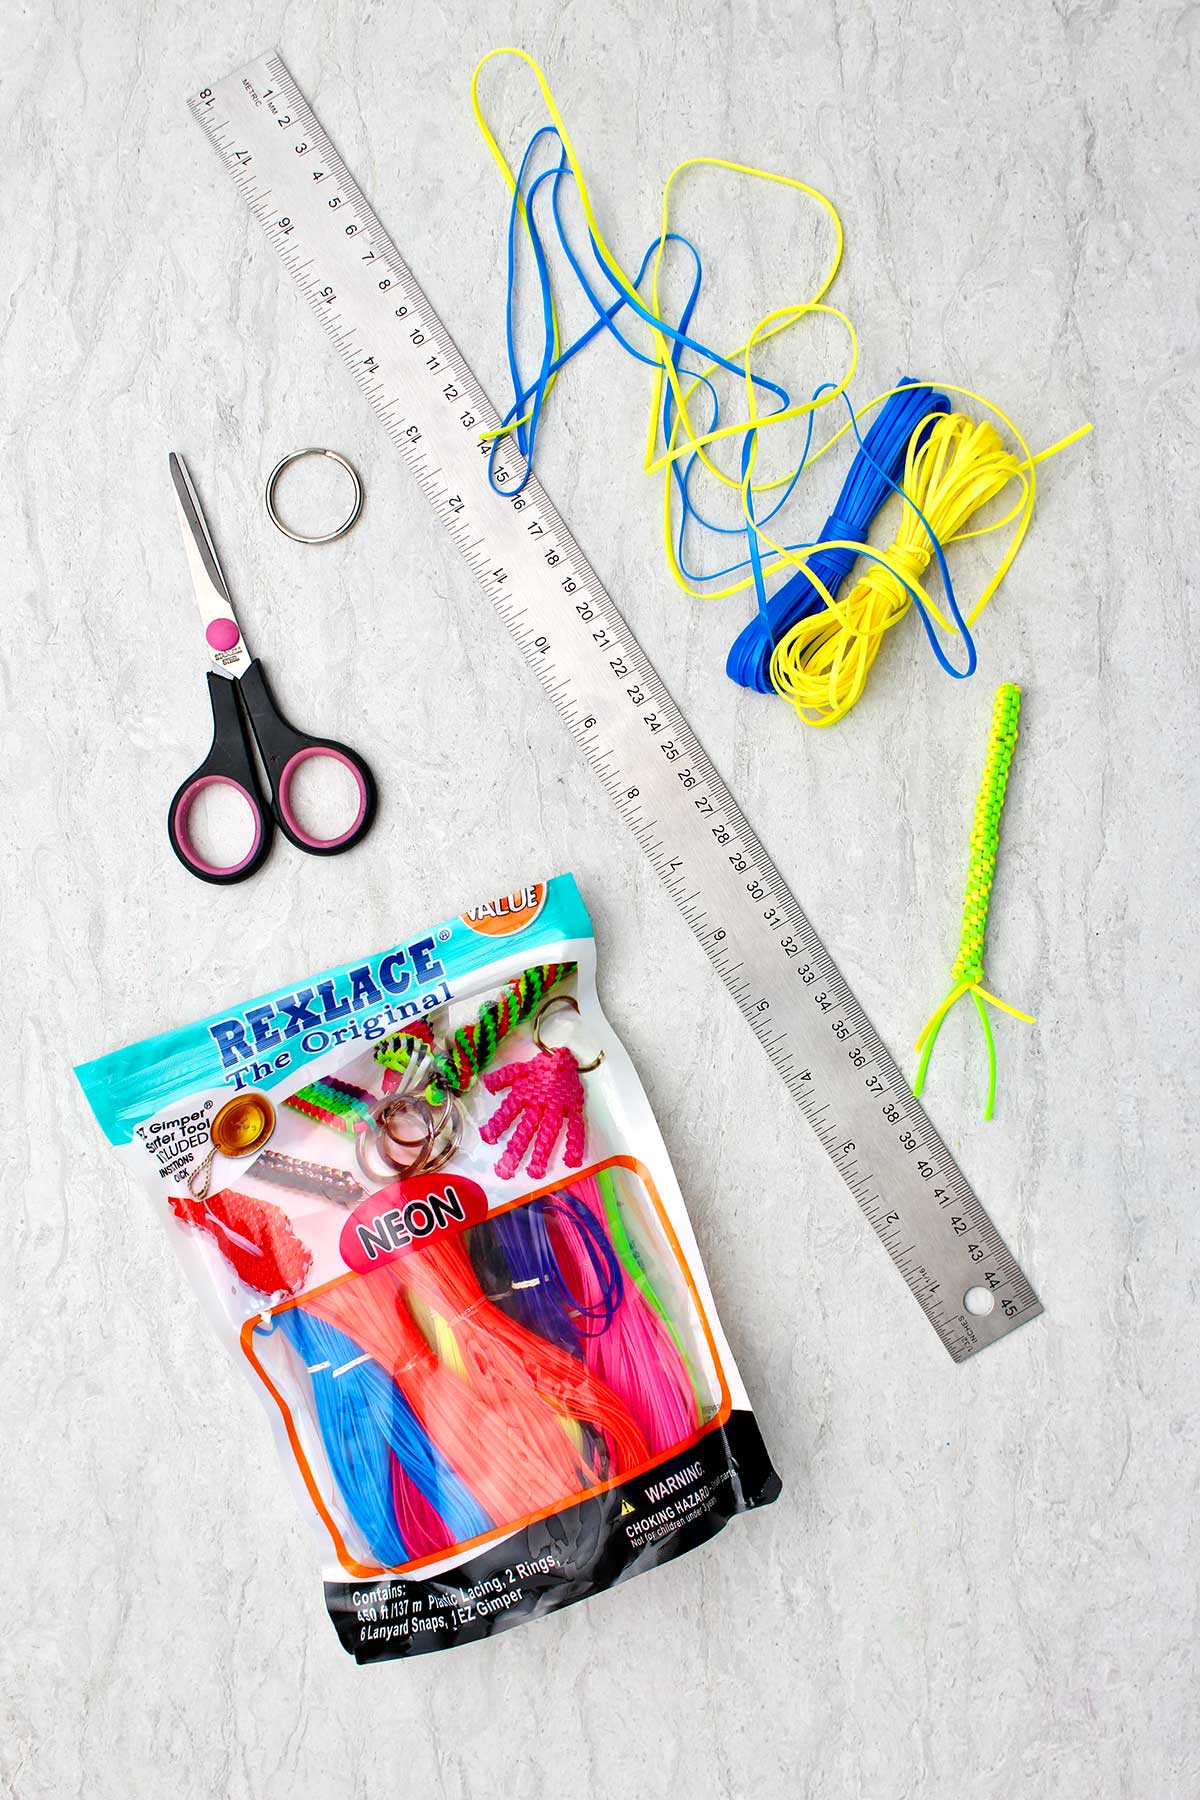
Buy supplies separately or in a boondoggle string kit with several yards of string and keychain rings included.
- Plastic lacing
- Keychain ring or lanyard hooks
- Ruler
- Scissors
Plastic lacing is the star of the show
The star of the show is the plastic lacing. I’ve heard it called other things as well- like gimp and scoubidou. You can find it at a local craft store or online.
Plastic lacing comes in a variety of bright rainbow colors and can also be used on the ends of the handlebars of your little banana seat bicycle!
It's a smooth plastic lace with a flat shape.
We will start with an easy square pattern for our DIY Boondoggle Keychain! It’s called the basic box stitch.
Boondoggle is held in the hand and is very compact. I’ll try to take good pictures so you can get a good idea of how to do this yourself!
How to Boondoggle
1. How to start a Boondoggle.
I think getting the keychain started is the most challenging part of this project.
I’m going to try to describe it with words, but I think it would be very helpful to also watch the full-length video to see how that is done. Here's the link: Make a DIY Boondoggle Keychain Full Length Tutorial Video.
Both reading the directions and seeing it on video will make it easier for you to follow!
2. Cut the plastic lacing to length.
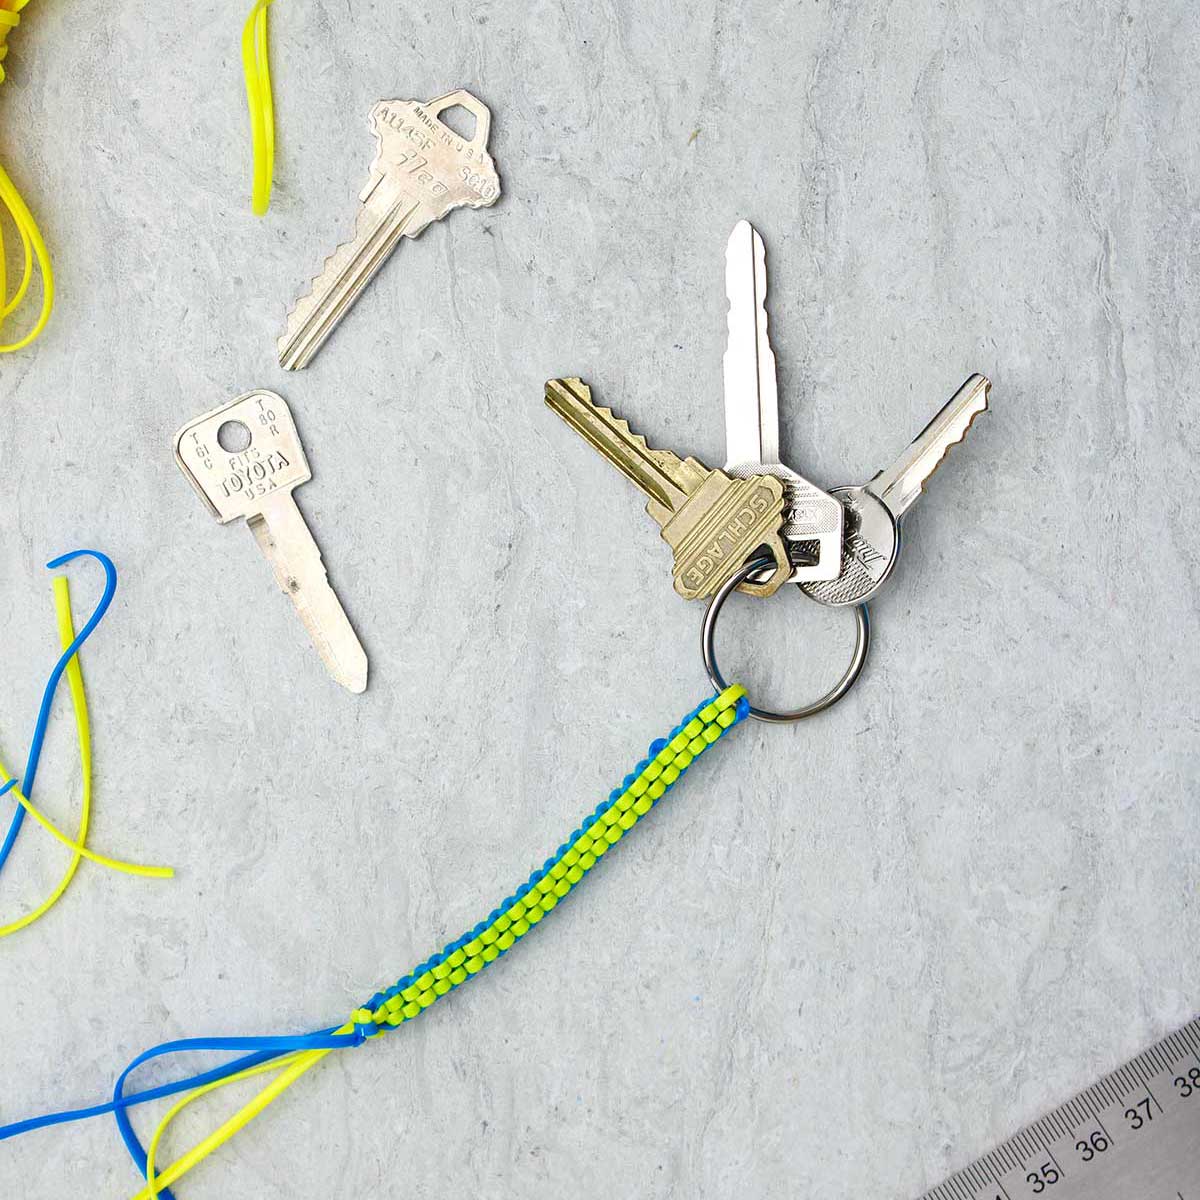
To start your weaving, cut two strands of your boondoggle plastic lacing. Cut each strand 36 inches long in total length.
It’s helpful to use two very different colors of plastic lacing, like yellow and blue or pink and blue. This makes it easy to see the weaving pattern as you are learning.
I’ll be using blue and yellow so that you can tell the strings apart easily in the pictures.
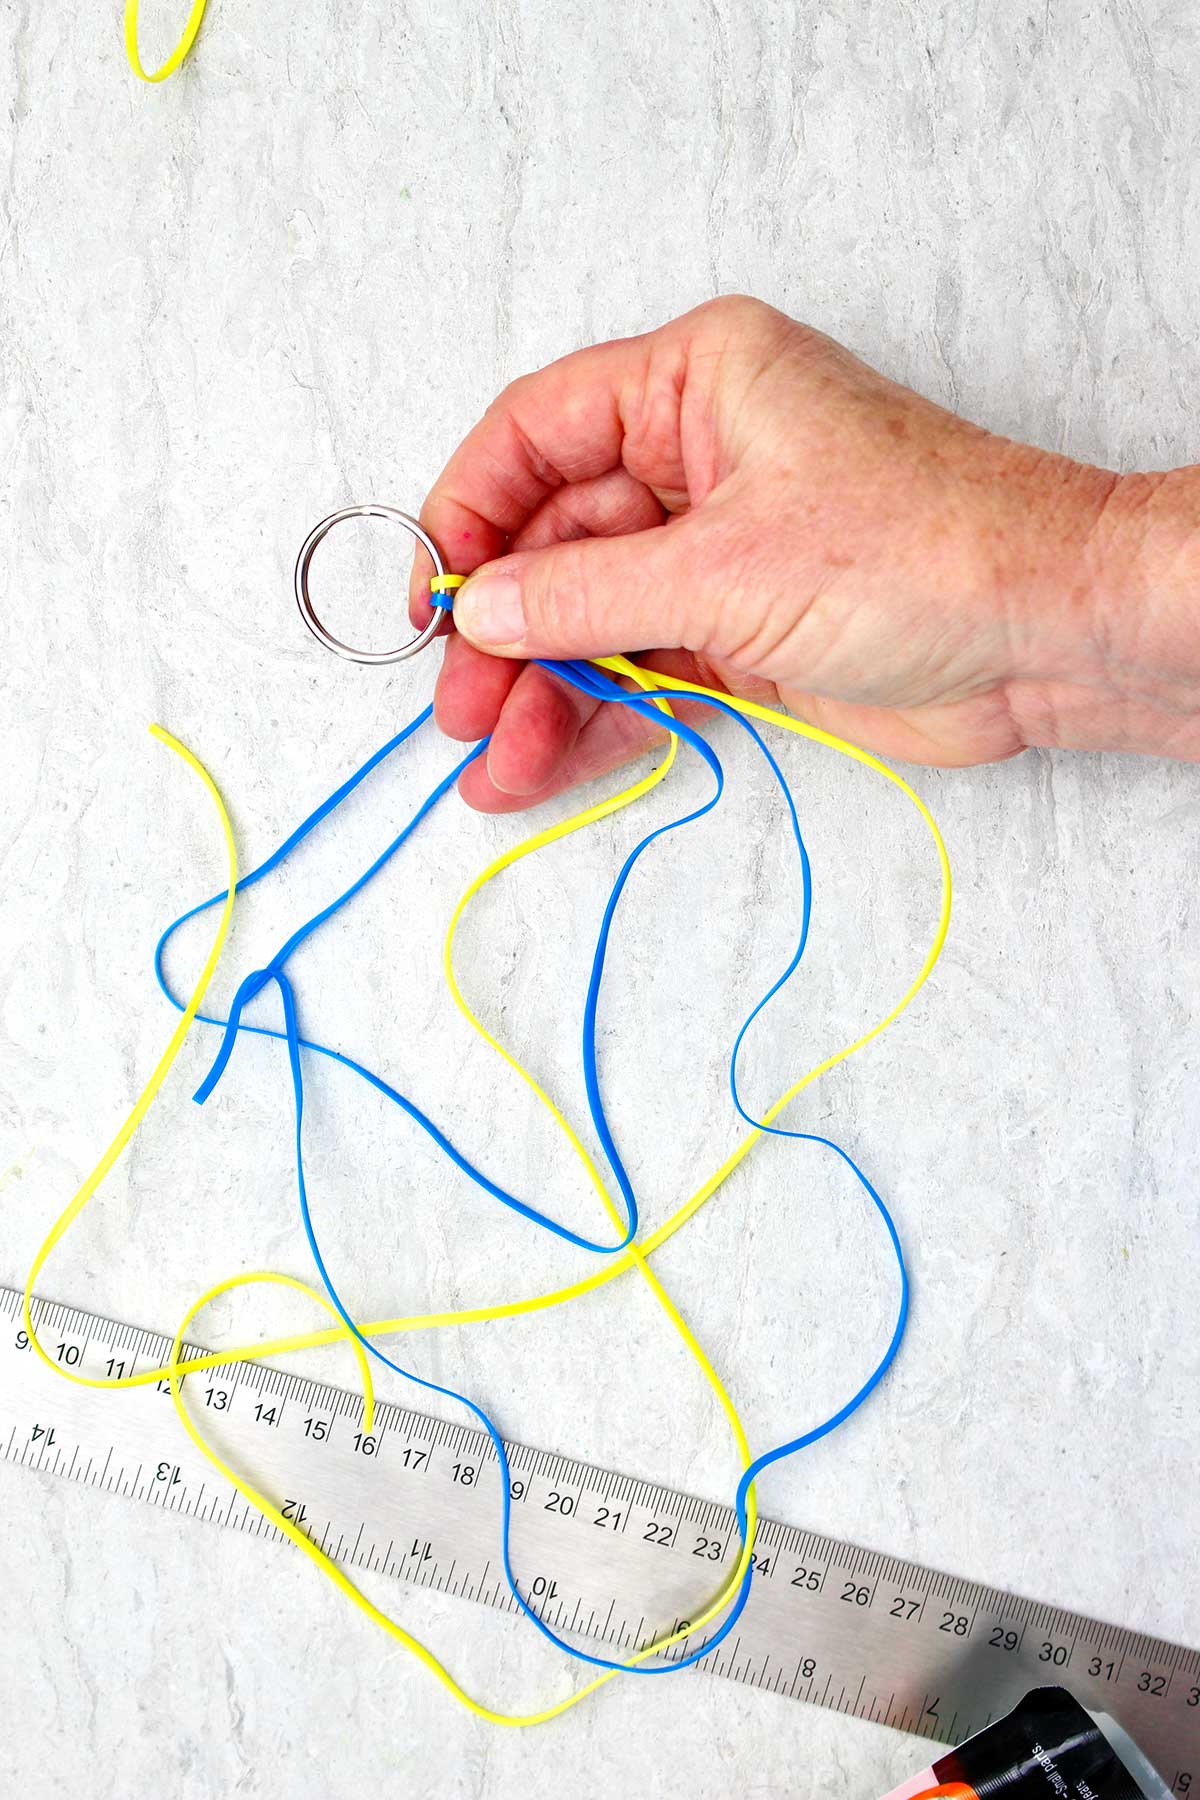
Fold the two plastic laces in half.
3. Position the two laces.
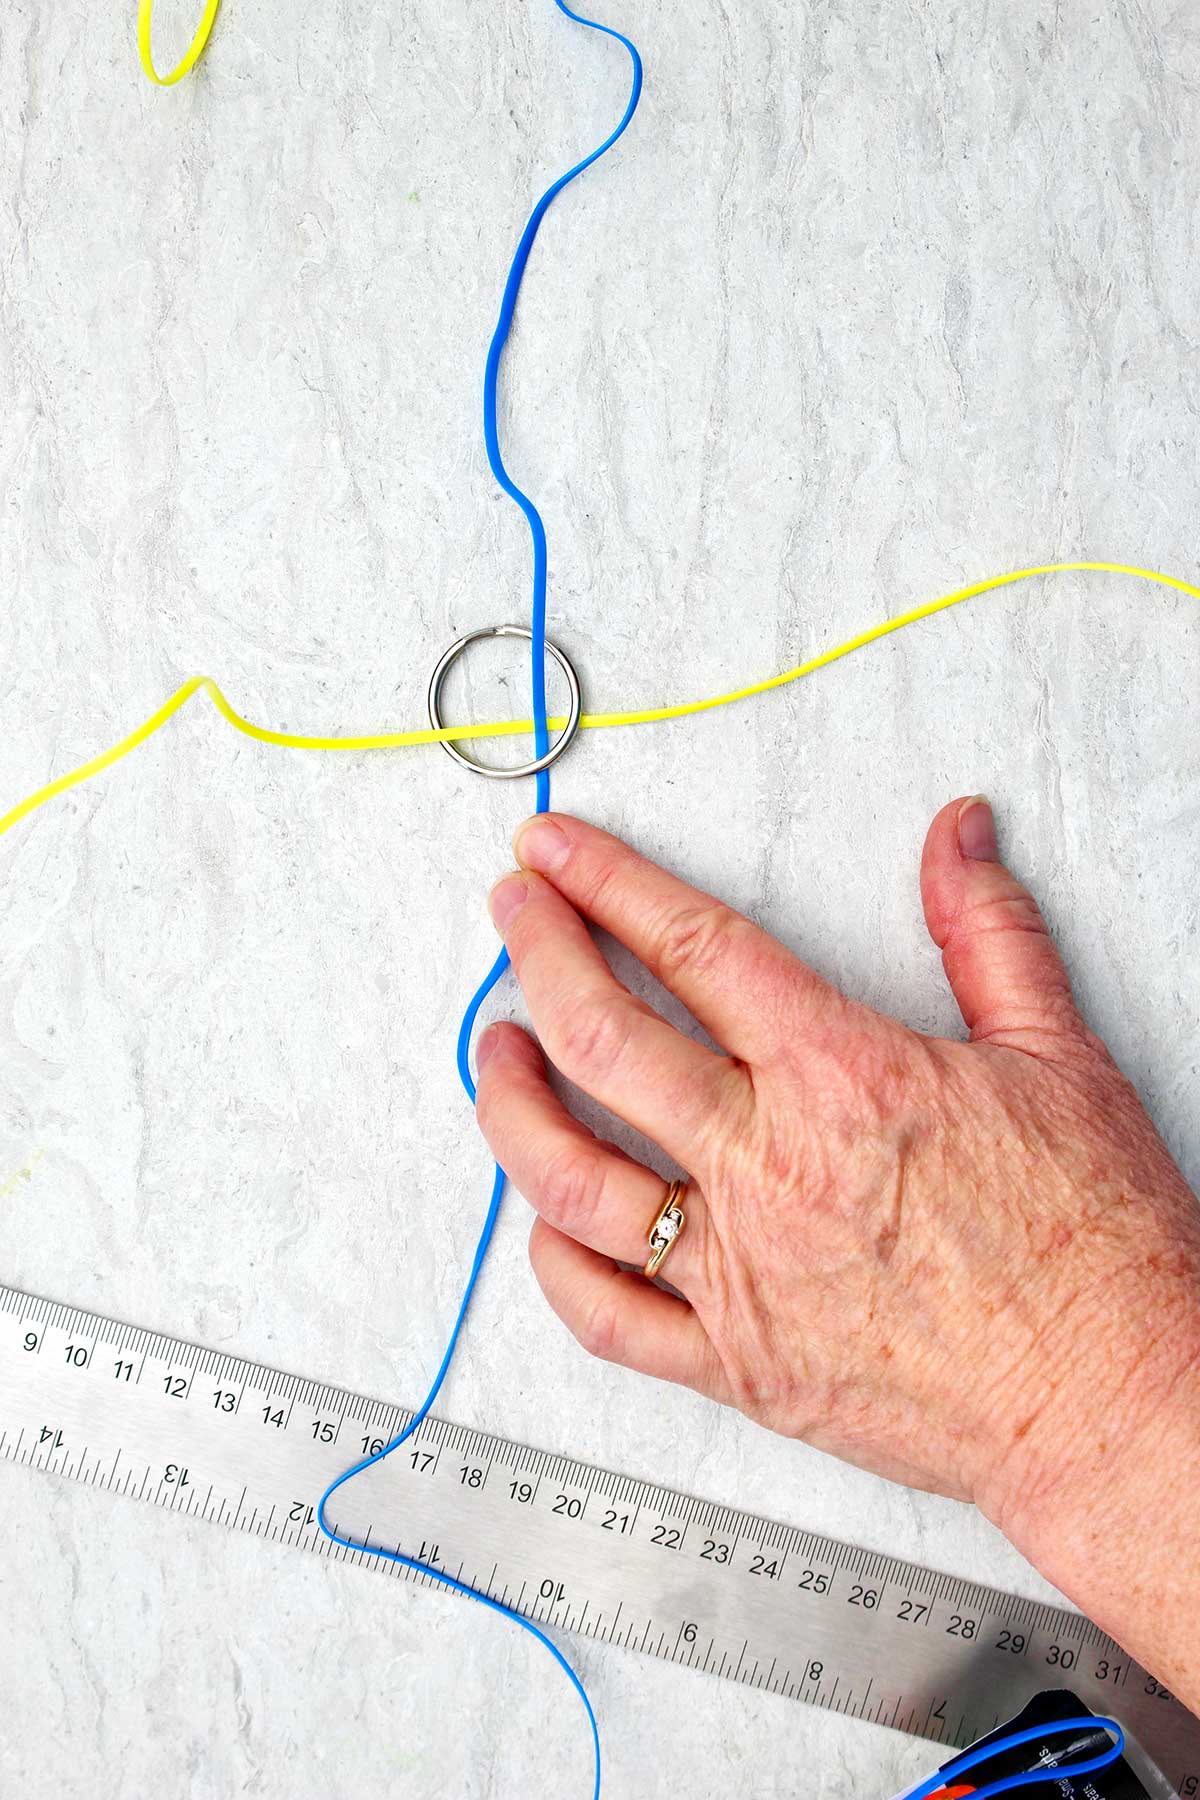
String a keychain loop onto the laces at the halfway point.
Lay the two laces so that they cross one another at that halfway point.
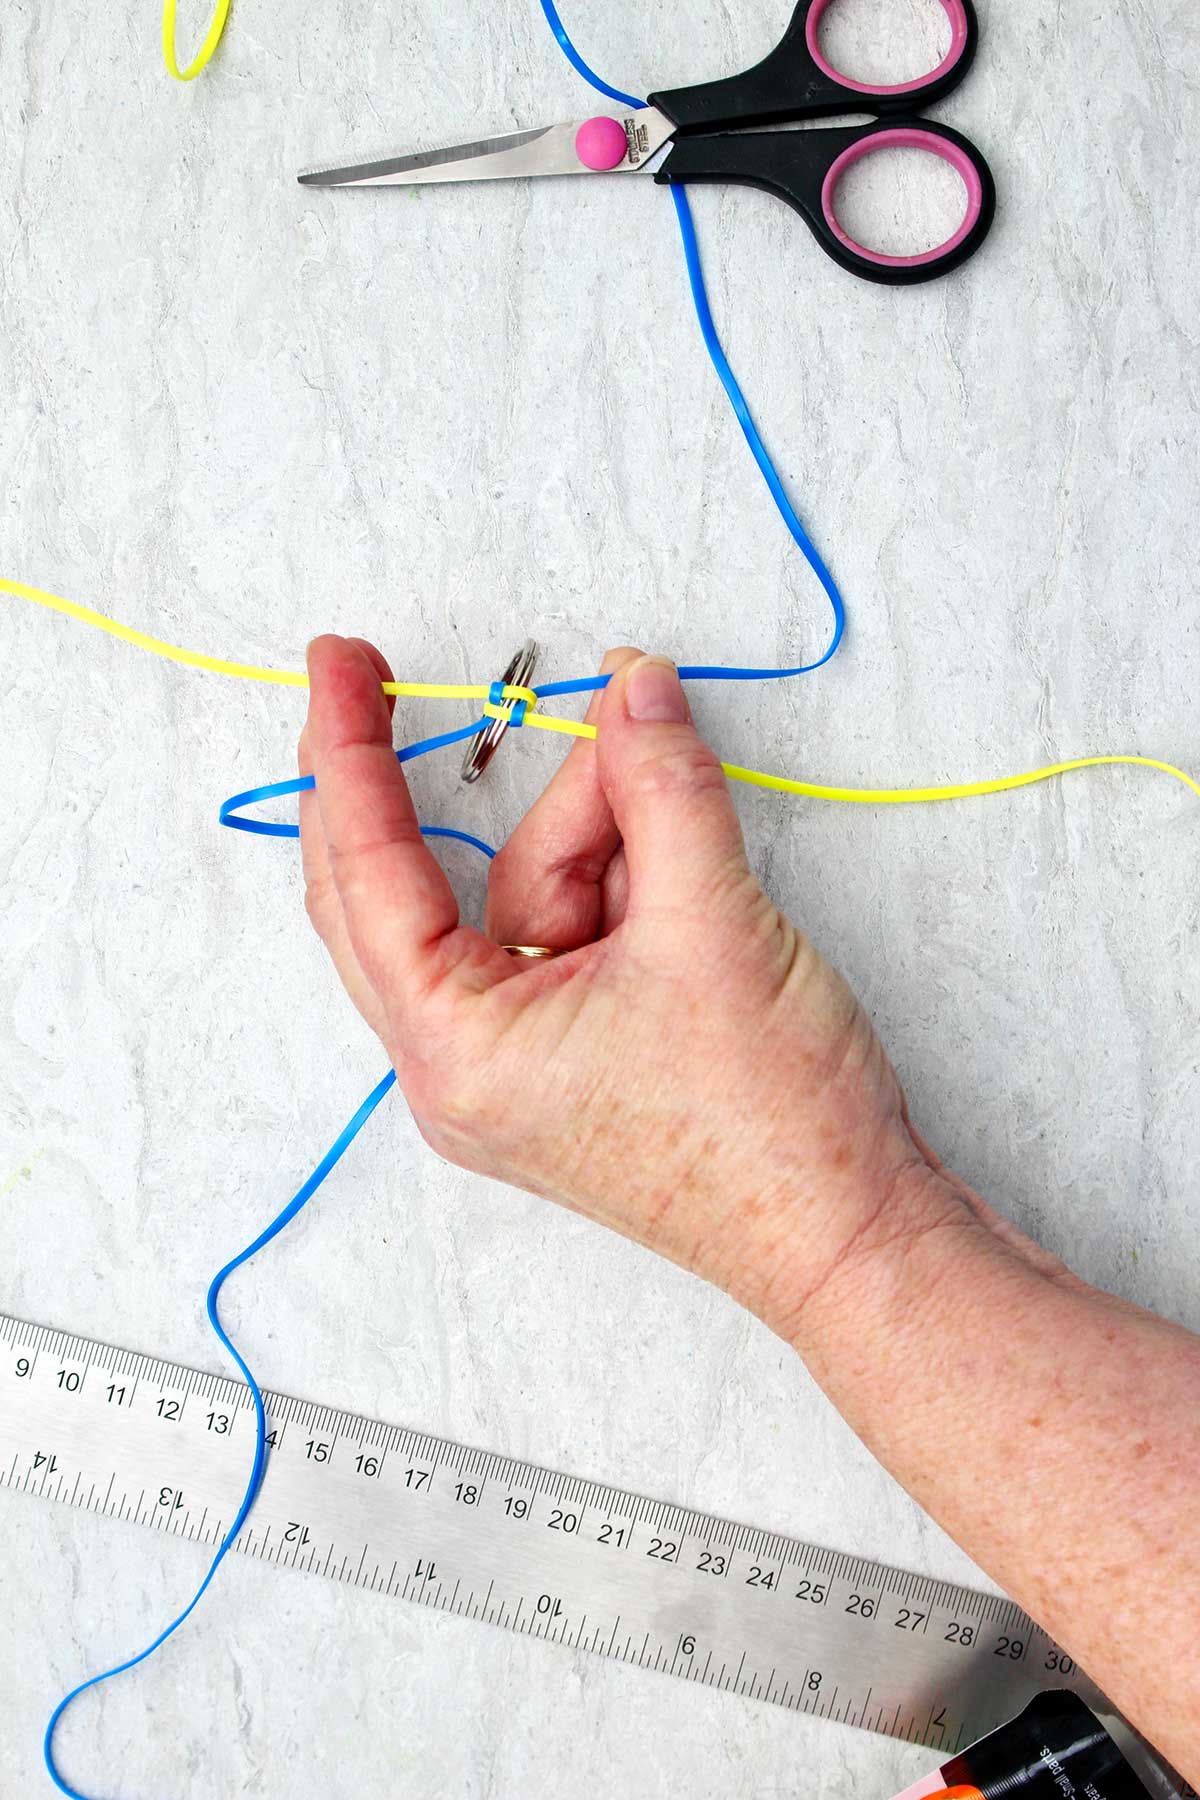
Pick up the two crossed strings with the attached key ring. Make sure to keep the two strings crossed and perpendicular. See the pictures.
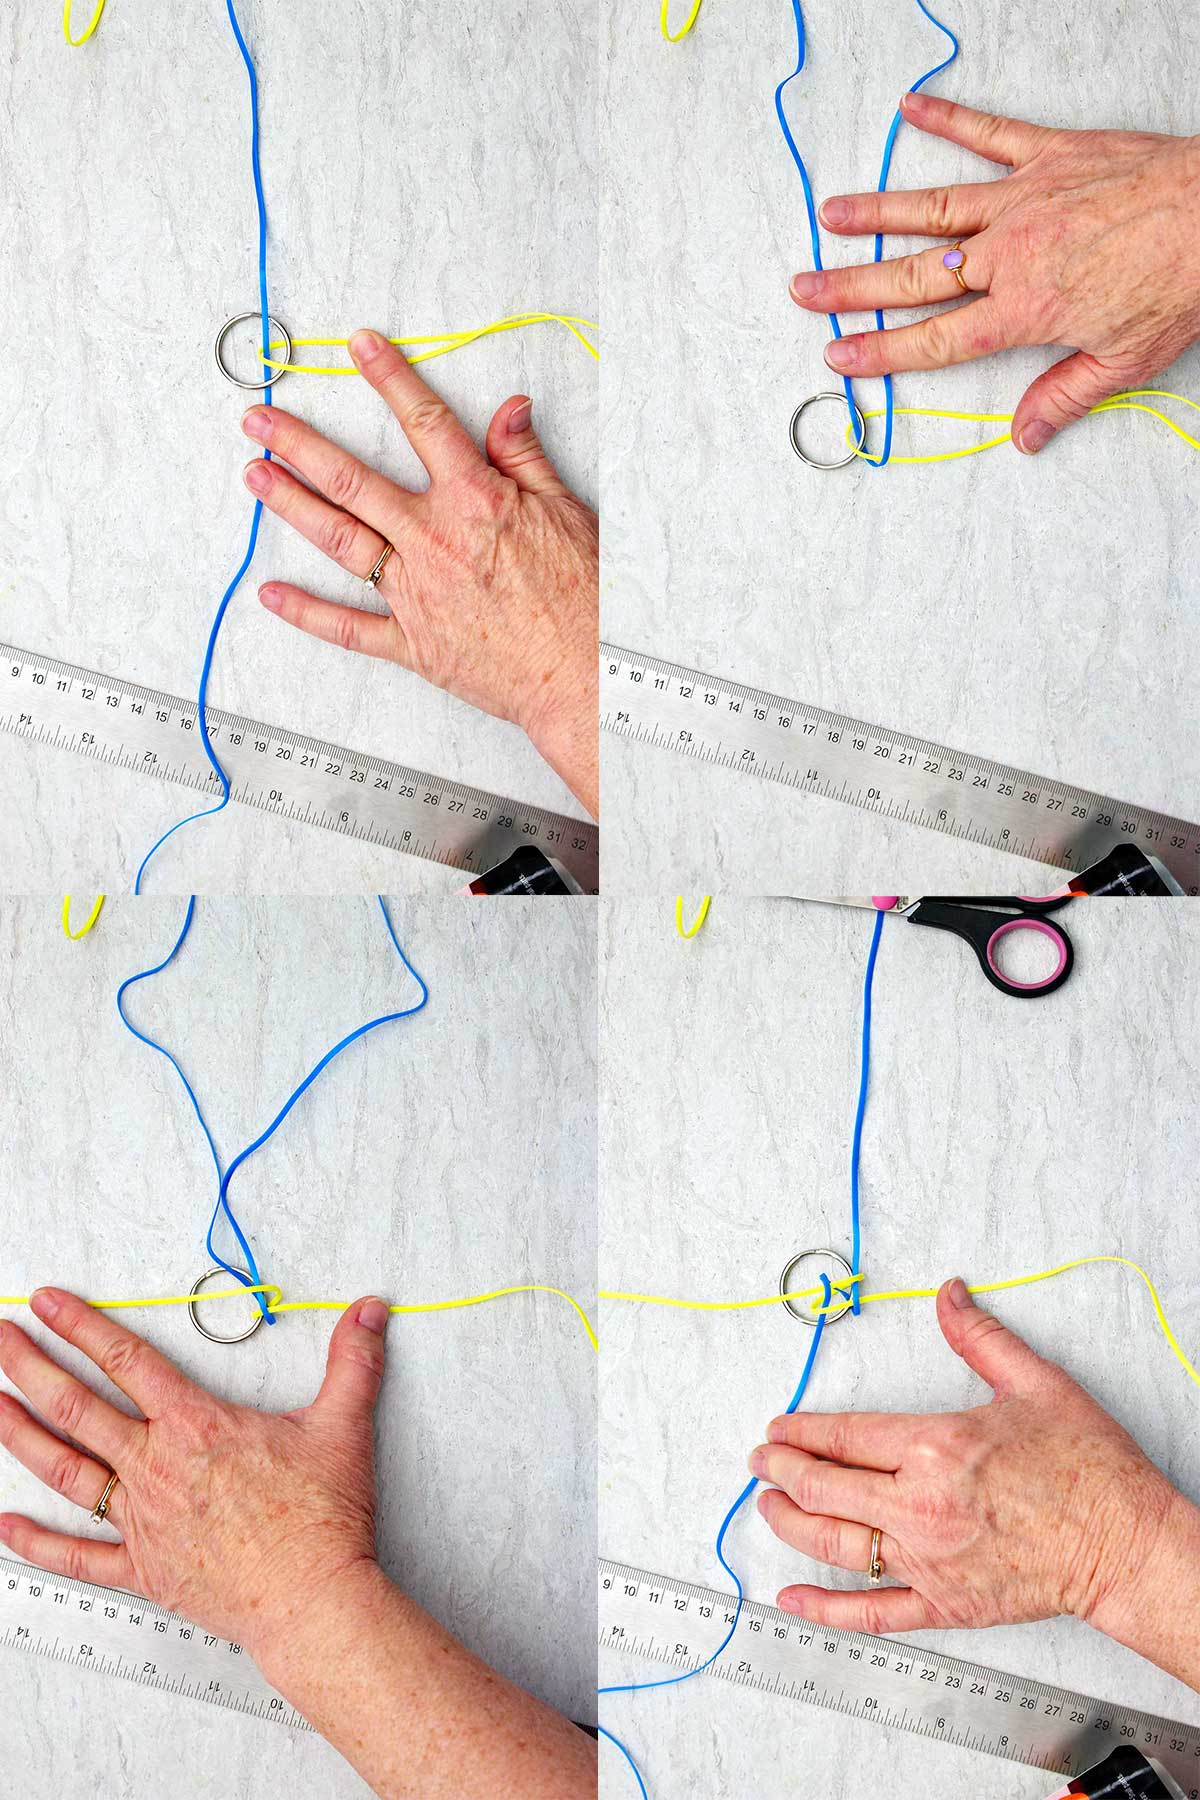
4. First boondoggle square box stitch.
Take the lacing to the left and fold it directly over the top of the other lacing so that the two lacings of the same two color are side-by-side.
Then pick up the lacing on the bottom and bring it straight up so that it is side-by-side by the other lacing of the same color.
Be sure to keep everything straight as you do, which is kind of hard as you get started. It’ll get easier I promise!
Take the lacing on your right-hand side (that hasn’t been folded yet) and fold it directly over. Now both ends of this color of lacing are going the opposite direction than they did before.
Lastly, take the top lacing (that hasn’t been folded yet) and bring it down over the other lacings. But as you do, weave it by going over the first lacing and under the second lacing to bring it across.
5. Tighten up your first box square.
Take all of the lacings that are in their new positions (two in each hand) and pull so that they get tighter and tighter. You will see a little weaving cross form.
As you pull the plastic lacings, they will kind of lock in place into almost a permanent fold position and stay tight. You don’t want the weaving to be loose. It’s going to be a tightly woven square that’s about a half an inch by a half an inch in size.
The lacings up and down and side to side will be the same color as they were when you started.
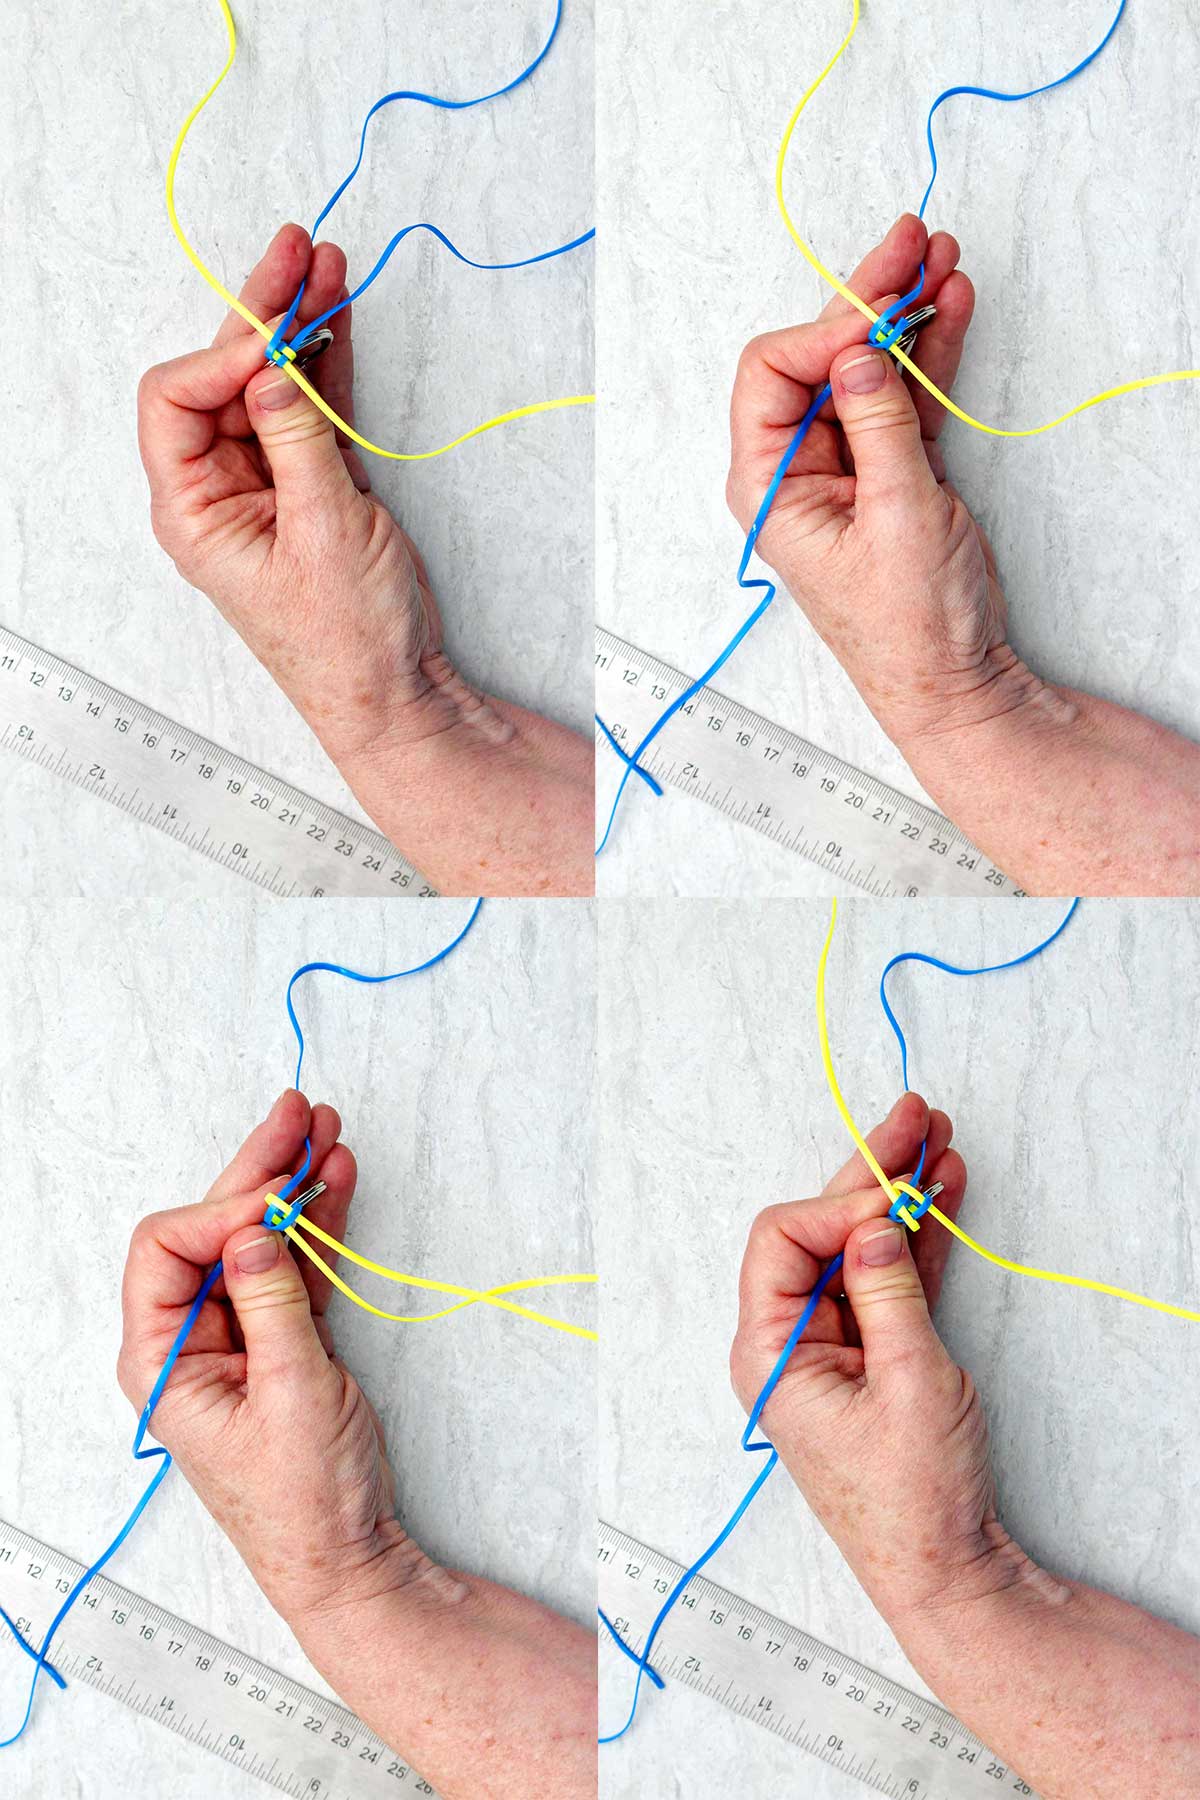
6. Boondoggle square box stitch pattern.
The next set of steps will become the pattern of doing the rest of the DIY Boondoggle Keychain weaving.
Take the lacing on the right and the lacing on the left and fold them up and over the first woven square so now they are going the opposite direction they were before.
Now fold the top lacing down- but as you do so, go over the first lacing and then under the second and bring it into its new position.
Then take the lacing from the bottom and fold it up- but as you do so, go over the first lacing and under the second lacing to bring it up to its new position.
You will have woven another little square.
Pull the lacings tight until they lock into place into a small woven square!

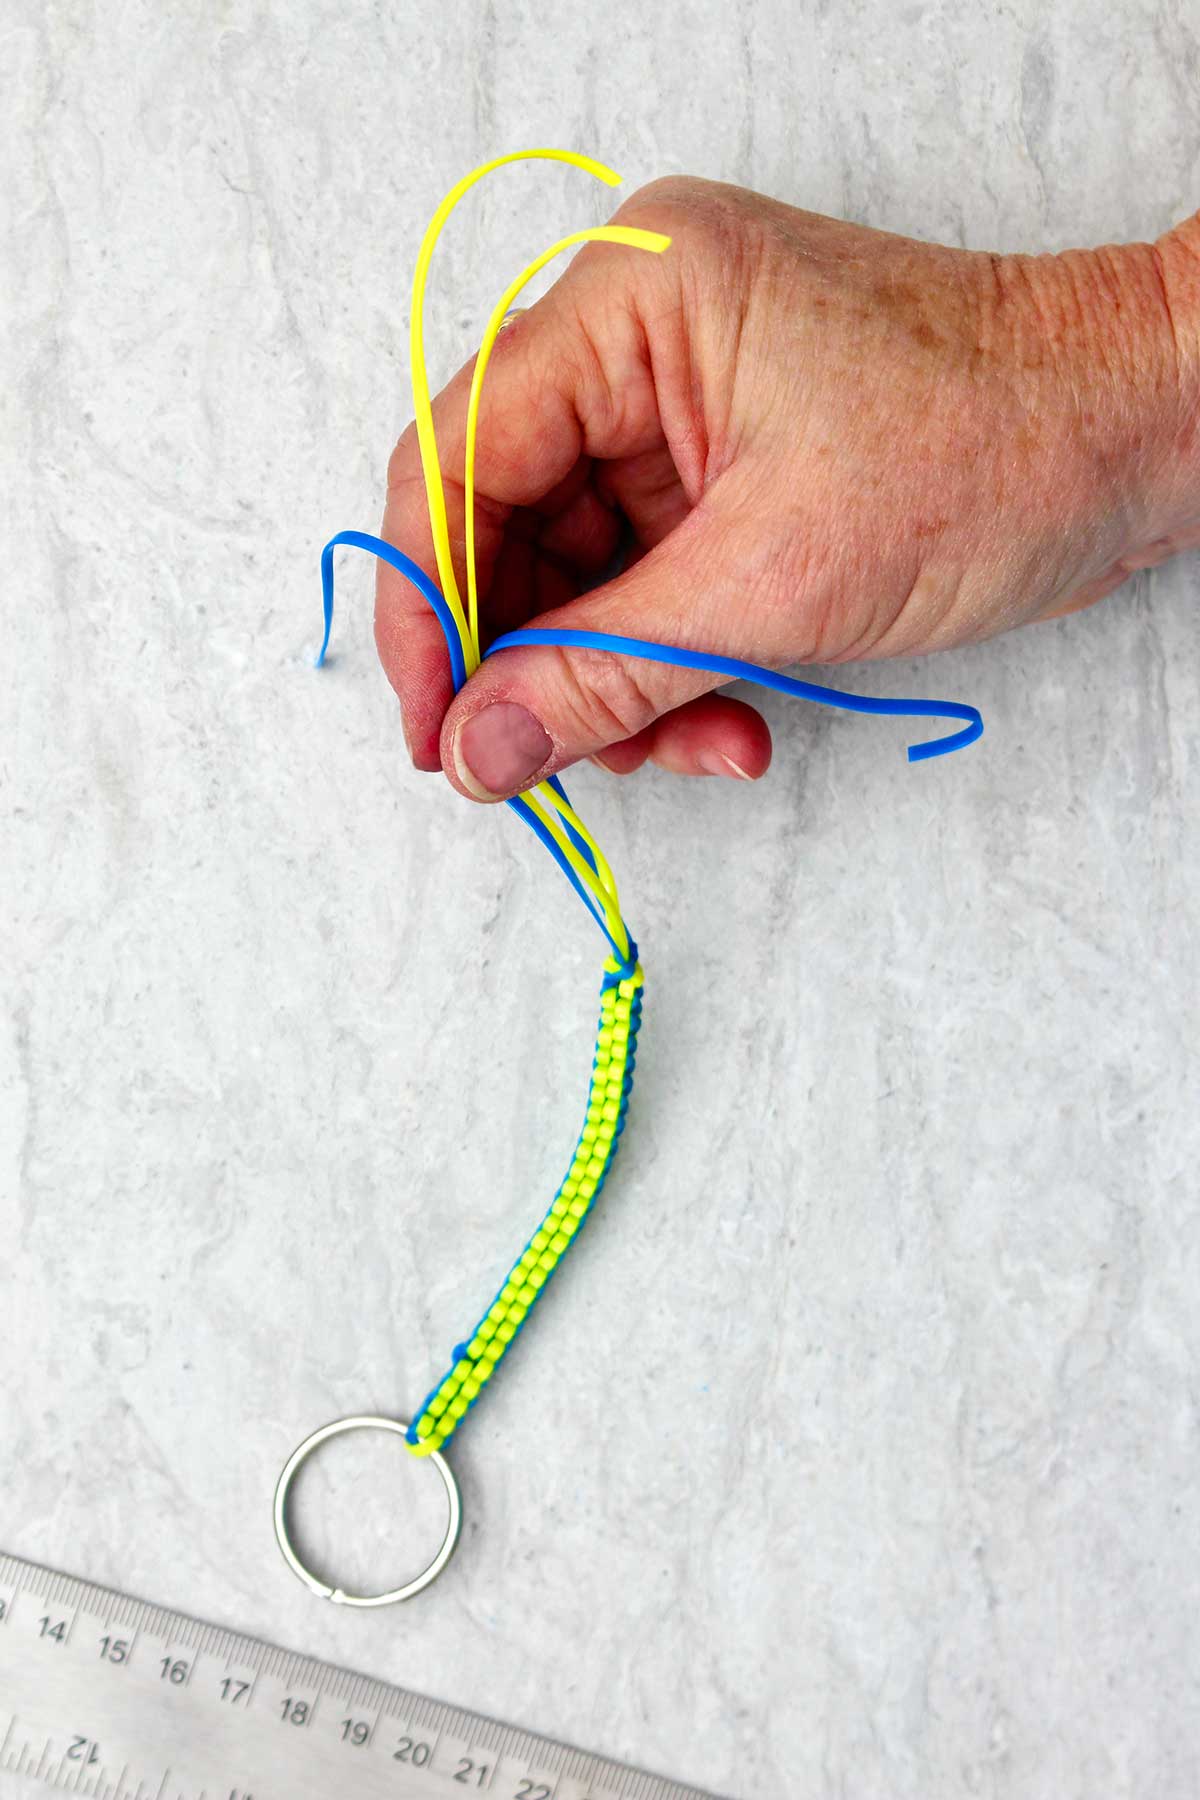
7. Weave to length desired.
Repeat this pattern until your keychain is the length that you want it to be. The 36 inch plastic lacings you cut should be long enough to make a 3 to 4 inch long keychain.
Weave until you get to the length that you want. But leave at least 3 inches of lacing loose on the end when you stop weaving.
8. Finishing the DIY Boondoggle
To finish a DIY Boondoggle Keychain, there are several different techniques. Some people just tie the lacings together with knots. I’ll show you the way that I was taught way back in the day.
Make one more of the box weaving pattern, but leave it loose.
Take one lacing and bring it over the lacing next to it on the right. Then pull it up into the center of the woven square.
Turn your keychain and do this with the next lacing to the right. Bring it up over the next lacing to the right and then pull it up into the center of the square.
Repeat that with the last two lacings. Now all of your plastic lacings are coming out of the center of your woven square.
This looks very messy! I know, but it will work.
Here's the link to the full length video if you would like to watch this step there (towards the end of the video of course): Make a DIY Boondoggle Keychain Full Length Tutorial Video.
9. Pull the end tight and clip the laces.
Pull the end of one lacing after another to tighten up this last finishing boondoggle knot.
This takes a little bit of time and it doesn’t fit the exact same square pattern as before.
It will stick out just slightly wider than your square boondoggle squares did previously.
A good thing about this plastic lacing is that it does kind of stick to itself so as you pull on the lacing ends it will lock into place.
Some people put a drop of glue into the center section in order to make it permanent and feel like it’s going to stay. I’ve never had any trouble with them coming loose so I don’t show that step.
Finally, trim your lacings to be about 2 inches long and you’re finished!
I think Dad is going to love this as a gift, don’t you??
You can't weave just one Boondoggle Lanyard Keychain!
Your next DIY Boondoggle Keychain will be easier and faster to do because you’ve learned the basic box stitch pattern. And you understand better how to hold it in your hand. Well done!
Your boondoggle weaving could also be used as a zipper pull or colorful friendship bracelets!
What colors of plastic lacing will you choose for your custom creations?
Boondoggle Patterns
The place to begin learning Boondoggle is the Box Stitch or Square Stitch. You will learn the basics to build on what other Boonoggle Patterns.
The Twist Stitch is a variation of the Box stitch. The plastic laces are woven in a diagonal square pattern instead of a straight square pattern. This small difference makes the Boondoggle twist as it is woven.
Once you’ve mastered the Square and Twist stitch there are many designs that can be made that create shapes (i.e. hearts) by bending the cords and weaving/attaching sections together. Or use more cords and make a more complex pattern. You will be surprised how easy it is to build on the two basic patterns.
Boondoggle FAQs
Starting a boondoggle weave on a keychain is as easy as a few loops and one type of stitch! First you will arrange your plastic lacing at their halfway point - be sure to reference the photos for the correct overlap! Now start with a square box stitch to get your weaving started.
Once you are finished weaving your plastic lacing, there are several different techniques to finish your boondoggle keychain. Some people just tie the lacings together with knots, but I like to finish it off with a final weave. Start with a loose box weaving pattern, then wrap your lacings up and around the next lacing through the center of the square. Repeat, then tighten up the knot!
I’ve always used the term Boondoggle keychains or weaving. But I’ve learned it’s also called Scoubidou which reminds me of the Scooby Doo cartoon! Some also call it scoobie, plastic weaving or plastic lanyard making.
The plastic string used for Boondoggle is called craft lacing, plastic string or cord, or gimp (or gymp) string as well as Boondoggle cord or string.
I’m sure I’ve missed other names as well. An almost hundred year old craft is sure to have a lot of names!
Interestingly, the word “boondoggle” actually means a worthless project that has no value. But this craft is far from worthless! It is fun to do and makes a useful keychain in the end!
How about making Dad a Father's Day card?
You may also want to make Dad a Father’s Day card.
Check out the Watercolor Doodle Card Ideas for Father’s Day. It is a perfect match for the keychain gift!
Here are a couple more ideas for cards that you can adapt for Father’s Day.
- DIY Alphabet Photography Cards
- DIY Craft Foam Stamps- use to make a card
- Easy How to Paint Aspen Trees in Watercolor- use to make a card
Enjoy!
If you try this craft, let me know! Go ahead and leave a comment, rate it, and tag a photo with #WelcometoNanas wherever you post.
Come join the fun at https://welcometonanas.com
DIY Boondoggle Lanyard Keychain
Equipment
- Ruler
- Scissors
Items Required
- Plastic lacing
- Keychain ring or lanyard hooks
- Ruler
- Scissors
- OR a boondoggle string kit has plastic lacing and keychain rings in kit
Instructions
- To start your weaving, cut two strands of your boondoggle plastic lacing. Cut each strand 36 inches long in total length.It’s helpful to use two very different colors of plastic lacing, like yellow and blue or pink and blue. This makes it easy to see the weaving pattern as you are learning.
- String a keychain loop onto the laces at the halfway point.Lay the two laces so that they cross one another at that halfway point.Pick up the two crossed strings with the attached key ring. Make sure to keep the two strings crossed and perpendicular. See the pictures.
- First boondoggle square box stitchTake the lacing to the left and fold it directly over the top of the other lacing so that the two lacings of the same two color are side-by-side. Then pick up the lacing on the bottom and bring it straight up so that it is side-by-side by the other lacing of the same color.Be sure to keep everything straight as you do, which is kind of hard as you get started. It’ll get easier I promise!Take the lacing on your right-hand side (that hasn’t been folded yet) and fold it directly over. Now both ends of this color of lacing are going the opposite direction than they did before.Lastly, take the top lacing (that hasn’t been folded yet) and bring it down over the other lacings. But as you do, weave it by going over the first lacing and under the second lacing to bring it across.Take all of the lacings that are in their new positions (two in each hand) and pull so that they get tighter and tighter. You will see a little weaving cross form.As you pull the plastic lacings, they will kind of lock in place into almost a permanent fold position and stay tight. You don’t want the weaving to be loose. It’s going to be a tightly woven square that’s about a half an inch by a half an inch in size.The lacings up and down and side to side will be the same color as they were when you started.Tighten up your first box square
- Boondoggle square box stitch patternThe next set of steps will become the pattern of doing the rest of the DIY Boondoggle Keychain weaving.Take the lacing on the right and the lacing on the left and fold them up and over the first woven square so now they are going the opposite direction they were before.Now fold the top lacing down- but as you do so, go over the first lacing and then under the second and bring it into its new position.Then take the lacing from the bottom and fold it up- but as you do so, go over the first lacing and under the second lacing to bring it up to its new position.You will have woven another little square.Pull the lacings tight until they lock into place into a small woven square!
- Repeat the basic box pattern until your keychain is the length that you want it to be. The 36 inch plastic lacings you cut should be long enough to make a 3 to 4 inch long keychain. Weave until you get to the length that you want. But leave at least 3 inches of lacing loose on the end when you stop weaving.
- Finishing the DIY Boondoggle KeychainTo finish a DIY Boondoggle Keychain, there are several different techniques. Some people just tie the lacings together with knots. I’ll show you the way that I was taught way back in the day.Make one more of the box weaving pattern, but leave it loose.Take one lacing and bring it over the lacing next to it on the right. Then pull it up into the center of the woven square.Turn your keychain and do this with the next lacing to the right. Bring it up over the next lacing to the right and then pull it up into the center of the square.Repeat that with the last two lacings. Now all of your plastic lacings are coming out of the center of your woven square.This looks very messy! I know, but it will work.Pull the end of one lacing after another to tighten up this last finishing boondoggle knot.Pull the end tight and clip the laces about 2-3 inches long.


Leave a Reply