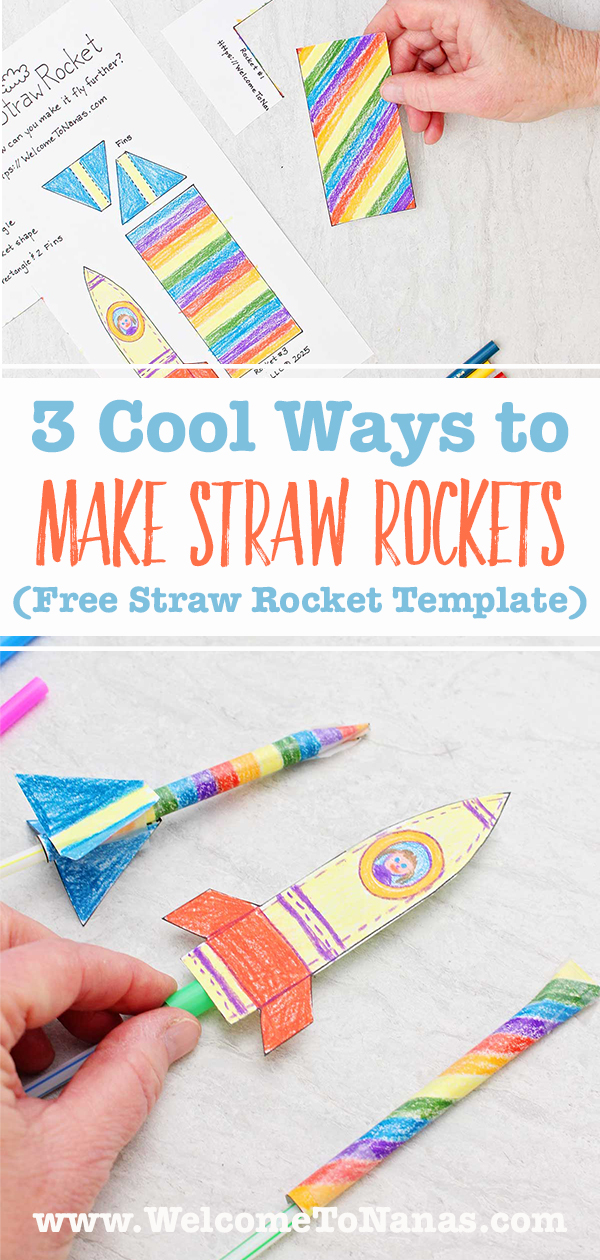
Science AND a craft? Yes please! Try all 3 Cool Ways to Make Straw Rockets with this free straw rocket template, then see how far they fly! Wouldn't this make a great science fair project?

Jump to:
Craft + Science = Fun for Kids
I was in a restaurant lately and saw someone blow the paper off their straw. Soon everyone at the table did the same thing and they all had a laugh. That set me to thinking about how to recreate that fun.
We could make a small tube of paper, close one end and put it on a straw! That is how the idea for Rocket #1 came about. They look like little rockets, so I drew a little rocket and that became Rocket #2.
Rocket #3 was the more advanced rocket idea with fins and a pointed nose cone. I’m hopeful that you will build on this and come up with more rocket models yourself. What a good starting place to learn about rocket science.
Once you've made them fly, encourage the kids to ask some questions. What could help them fly further? Are there other designs that would work better?

Straw Rocket Challenge
This straw rocket craft begs for some sort of a contest or challenge. The three rocket designs on the free straw rocket template are a good starting point in making paper rockets. But you could challenge yourself or a group of friends to create the best straw rocket design.
How can you change the design of your rocket to make it travel farther or straighter? You could try using card stock or creating your own DIY straw rocket launcher!
Draw a chart to use as a straw rocket data log. This is a way to record your information as you try out the rocket designs you create. You’ll need to mark off where to stand and mark off the distance the rocket travels using a measuring tape.
Write your data on the log. Write the name of the straw rocket and record the distance it travels.
You could also make a target like the one we created in our paper airplane competition. Set points for each circle then see how many points you can each get!


Supplies
You don’t need much to bring these great paper rockets with straws to life!
- Free template- The Free Straw Rocket Template has the three rocket patterns on it.
- Paper- Plain copy paper (white or colored) works well for this craft.
- Markers, colored pencils, or crayons- Use Markers, Colored Pencils, or Crayons to color the parts of the paper rocket.
- Scissors- You’ll need scissors to cut out the rockets from the template.
- Straw- The first type of straw is the typical drinking straw that’s about ¼ inch in diameter.
- Larger straw- The second type of straw is larger smoothie straw and more like ⅜ inch in diameter.
- Tape- You’ll use clear tape to tape the rocket together and the fins onto the rocket.
- Pencil- Rocket #1 and #3 require a pencil to wrap the paper around to make a rocket body.


Steps for How to Make a Straw Rocket (3 Ways!)
Make a copy of the Straw Rocket Template on plain copy paper.
Color the three DIY straw rockets with markers, colored pencils, or crayons in a design of your choice. The rectangles roll the long direction- in case your design needs to go a certain way.
Cut the pieces out noting which is rocket straw #1, #2, and #3 (#3 has three parts). You can cut them out one at a time if you prefer.


Rocket #1
Take the rectangle piece of paper and roll it (long direction) onto a pencil. Tape the paper along the edge to keep it in a tube shape but don’t tape it to the pencil.
Slide it off the pencil. Fold one end about ¼ inch and tape it in place to keep air from escaping. Put the tube on a straw to use as a straw rocket launcher. Blow through the end of the straw to launch and watch the rocket fly.
Note: Do not blow the straw rockets at people.
Rocket #2
Cut a larger smoothie straw to about 4 inches long. This larger straw should be about ⅜ inches in diameter. Tape the rocket shape lengthwise onto the larger straw.
Place a smaller drinking straw into the larger straw as a straw rocket launcher. Blow through this straw and watch the paper rocket straw “blast off”!

Rocket #3
Rocket #3 has three parts on the rocket straw template- a rectangle piece and two fins. Wrap the paper rectangle piece around a pencil and tape it in this tube shape. Don’t tape the tube to the pencil.
Slip the tube to the end of the pencil point. Twist the point of the paper tube around the pencil point to make a nose cone for the rocket. Use a small piece of tape to keep the cone in place.
Bend each of the fins along the two dotted lines. Tape them onto the open end, the bottom of the rocket. Place one on each side of the tube with the wide end of the fins at the bottom.
Slide the rocket off the pencil. Place a straw in the straw rocket tube as a launcher. Blow and launch the rocket! This rocket has a pointed end so I remind you again not to blow it towards people.


Crafts That Fly
Now that the kids have a taste for flight...how about trying some more crafts that can get airborne?
There are two from the blog that I think you'll especially like. The first are these fun paper airplanes! Learn how to make the kind that I like best, then try some of your own variations! Who can fly the farthest?
Next, let's try making some plastic bag toy parachutes! These are easy to create with just a few items. Simply create the parachute, attach a little toy, then send them flying!

Craft Tips
These tips can help straw rockets craft making even easier!
- Pencil- Use a pencil with a sharp point for rolling straw rocket #3 and making the nose cone.
- Rocket fins- Turn the straw rocket template over and color the back of the fins too. You can see the fin outlines through the copy paper. If you are using heavier paper, color the back of the fins after you cut them out.
- Party game idea- This would make a good game for a party. The theme could be "Outer Space" or "Star Wars". Have a competition on who can make the rocket that flies the furthest distance!
Craft Variations
Here are a few variations you’re welcome to try with this straw rocket craft.
- Cardstock paper- Cardstock paper is an option for a different weight paper for your straw rocket.
- Best straw rocket- Have a contest to make the best straw rocket. The intro section to this post has some ideas to offer.
FAQ
This rocket straw craft uses a free straw rocket template to make it even easier. Make a tube from a rectangle piece of paper rolled around a pencil. Or use a larger straw. Either way, seal one end of the tube. Place a smaller straw in the tube and blow. You will see the straw rocket “take off” and fly! Add fins or other features
Three or four are a minimum number of fins for a straw rocket. I’ve not tried more than four.
Straw rockets fly farther with less drag. Drag is the things that resist the rocket going forward, things like weight and rough or blunt surfaces. So a lightweight, smooth surface with a pointed tip would be good.
More Science Crafts for Kids
Looking for more great DIY Crafts for kids? Here are a few favorites for you to try:

Come Join the Fun at WTN!
Try this craft, leave a comment, rate it, and tag a photo with #WelcometoNanas wherever you post.
Crafts Straight to You!
Love getting crafts straight to your inbox? Sign up to receive a weekly email and get a free gift!

3 Cool Ways to Make Straw Rockets (Free Straw Rocket Template)
Equipment
- Scissors scissors
Items Required
Instructions
- Make a copy of the Straw Rocket Template on plain copy paper. Color the three DIY straw rockets with markers, colored pencils, or crayons in a design of your choice. The rectangles roll the long direction- in case your design needs to go a certain way. Cut the pieces out noting which is rocket straw #1, #2, and #3 (#3 has three parts). You can cut them out one at a time if you prefer.
Rocket #1
- Take the rectangle piece of paper and roll it (long direction) onto a pencil. Tape the paper along the edge to keep it in a tube shape but don’t tape it to the pencil.Slide it off the pencil. Fold one end about ¼ inch and tape it in place to keep air from escaping. Put the tube on a straw to use as a straw rocket launcher. Blow through the end of the straw to launch and watch the rocket fly.Note: Do not blow the straw rockets at people.
Rocket #2
- Cut a larger smoothie straw to about 4 inches long. This larger straw should be about ⅜ inches in diameter. Tape the rocket shape lengthwise onto the larger straw.Place a smaller drinking straw into the larger straw as a straw rocket launcher. Blow through this straw and watch the paper rocket straw “blast off”!
Rocket #3
- Rocket #3 has three parts on the rocket straw template- a rectangle piece and two fins. Wrap the paper rectangle piece around a pencil and tape it in this tube shape. Don’t tape the tube to the pencil.Slip the tube to the end of the pencil point. Twist the point of the paper tube around the pencil point to make a nose cone for the rocket. Use a small piece of tape to keep the cone in place. Bend each of the fins along the two dotted lines. Tape them onto the open end, the bottom of the rocket. Place one on each side of the tube with the wide end of the fins at the bottom. Slide the rocket off the pencil. Place a straw in the straw rocket tube as a launcher. Blow and launch the rocket! This rocket has a pointed end so I remind you again not to blow it towards people.


Lynn says
Thank you! I have my grandsons' this week and they are all for competition!!
Abbey says
I work at a local Children's Museum and we're using this as part of our summer camp rocket day! Thank you so much for such a good idea and such great templates/instructions!
Shelly says
Oh I'm so thrilled to hear that! Thank you for sharing. Hope you and the kids have a great time with them!