DIY Easy Paper Fan Craft
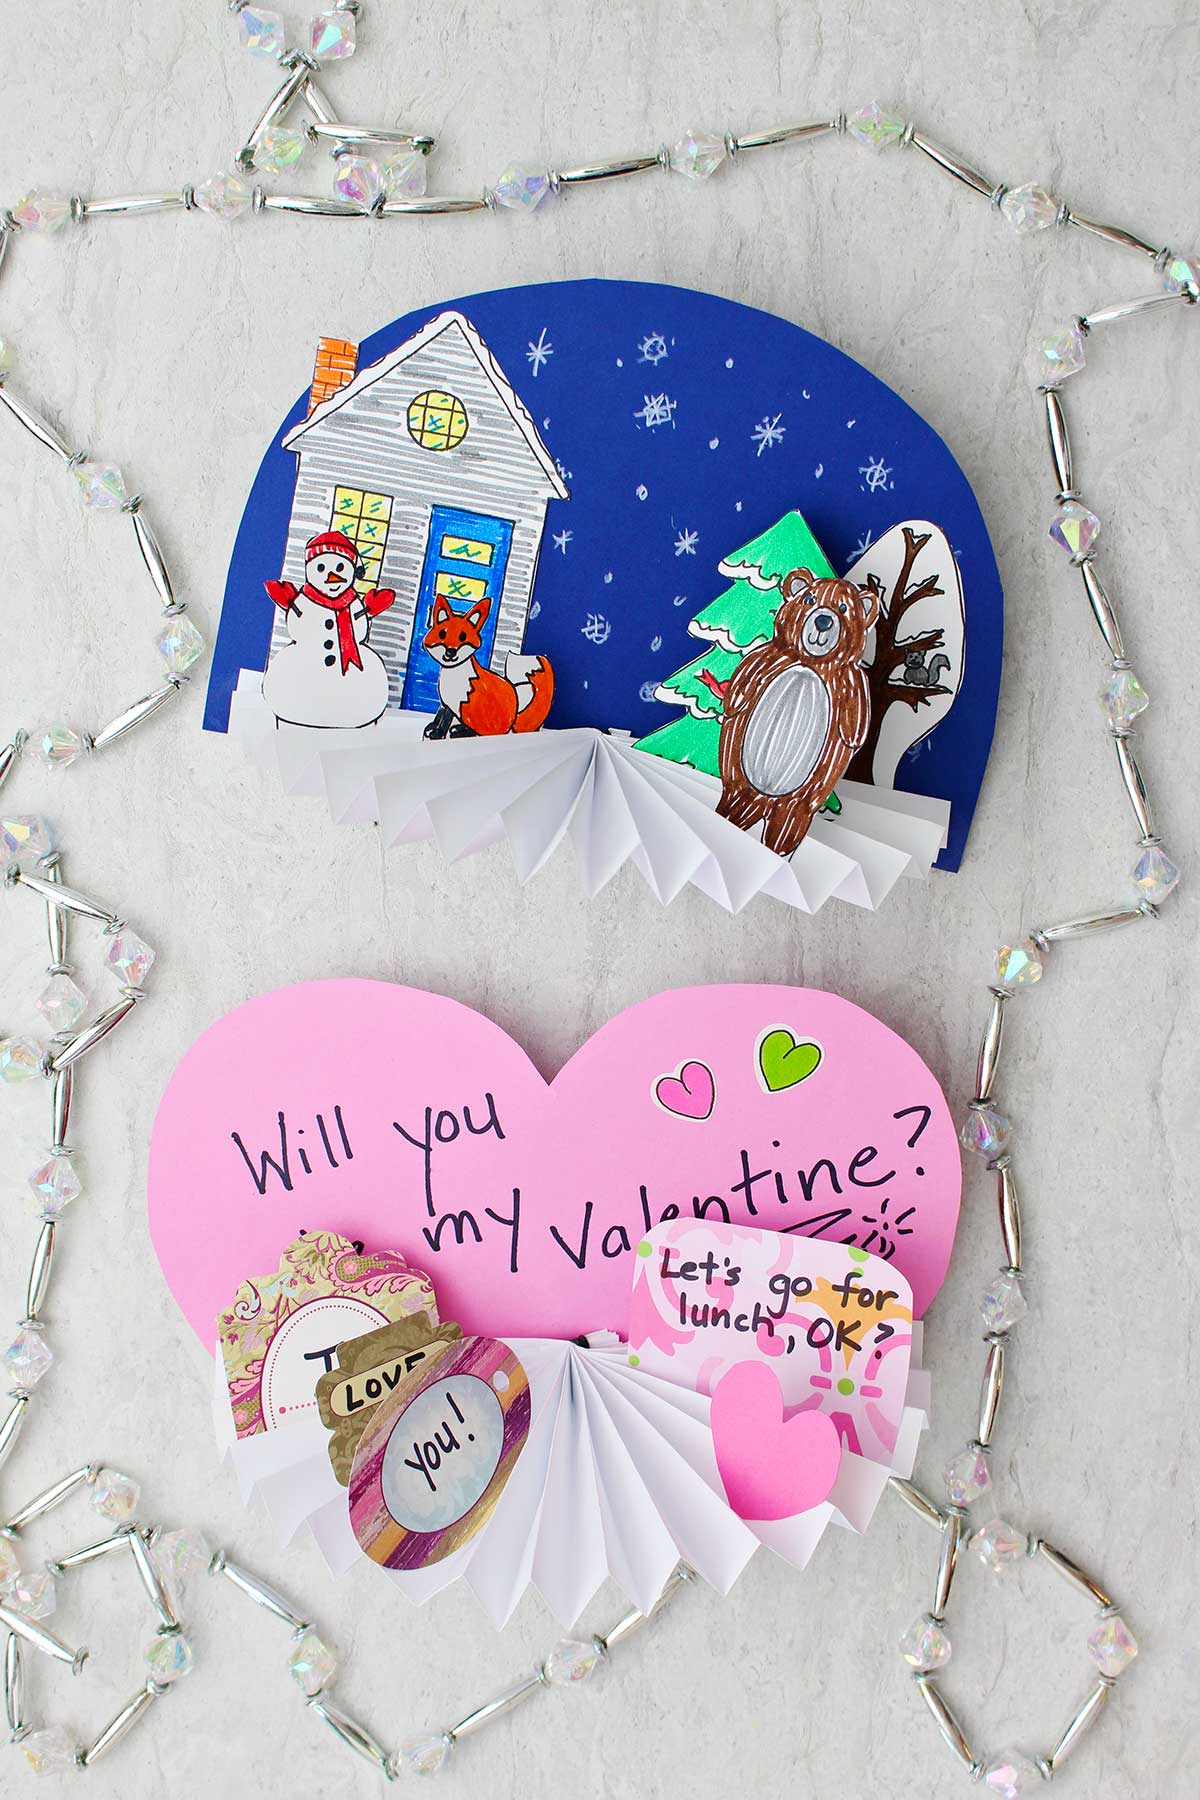
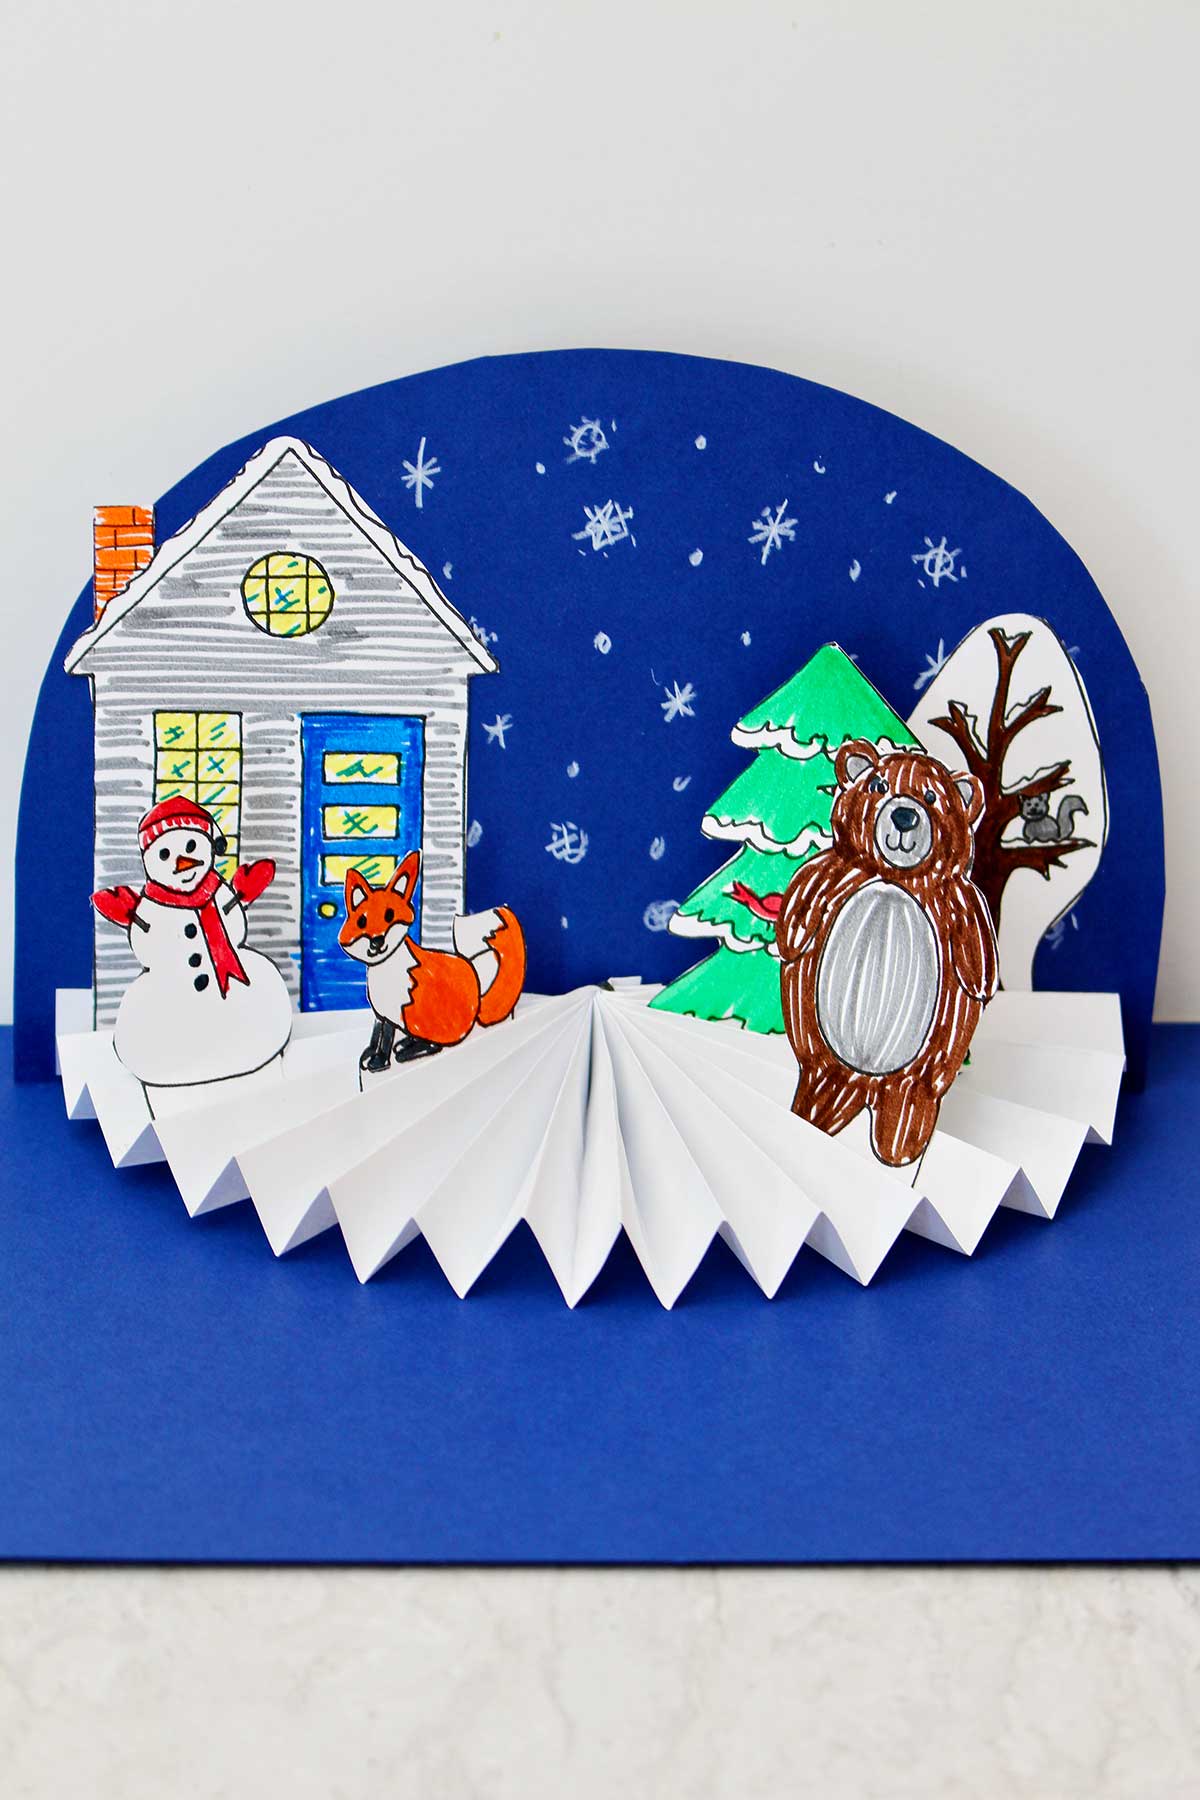
The DIY Easy Paper Fan Craft puts the old accordion folded paper fan to a whole new use. A paper fan made from white paper becomes the snowy base of a cute winter scene. You can use it as a decoration or as a card to give away.
When I was young, we made paper fans out of almost any loose piece of paper- homework, church bulletins, or gum wrappers. We even used the paper hand fans to create a bit of breeze on hot summer days.
DIY Fans Craft Supplies
You will put your paper fan folding skills to good use on this craft.
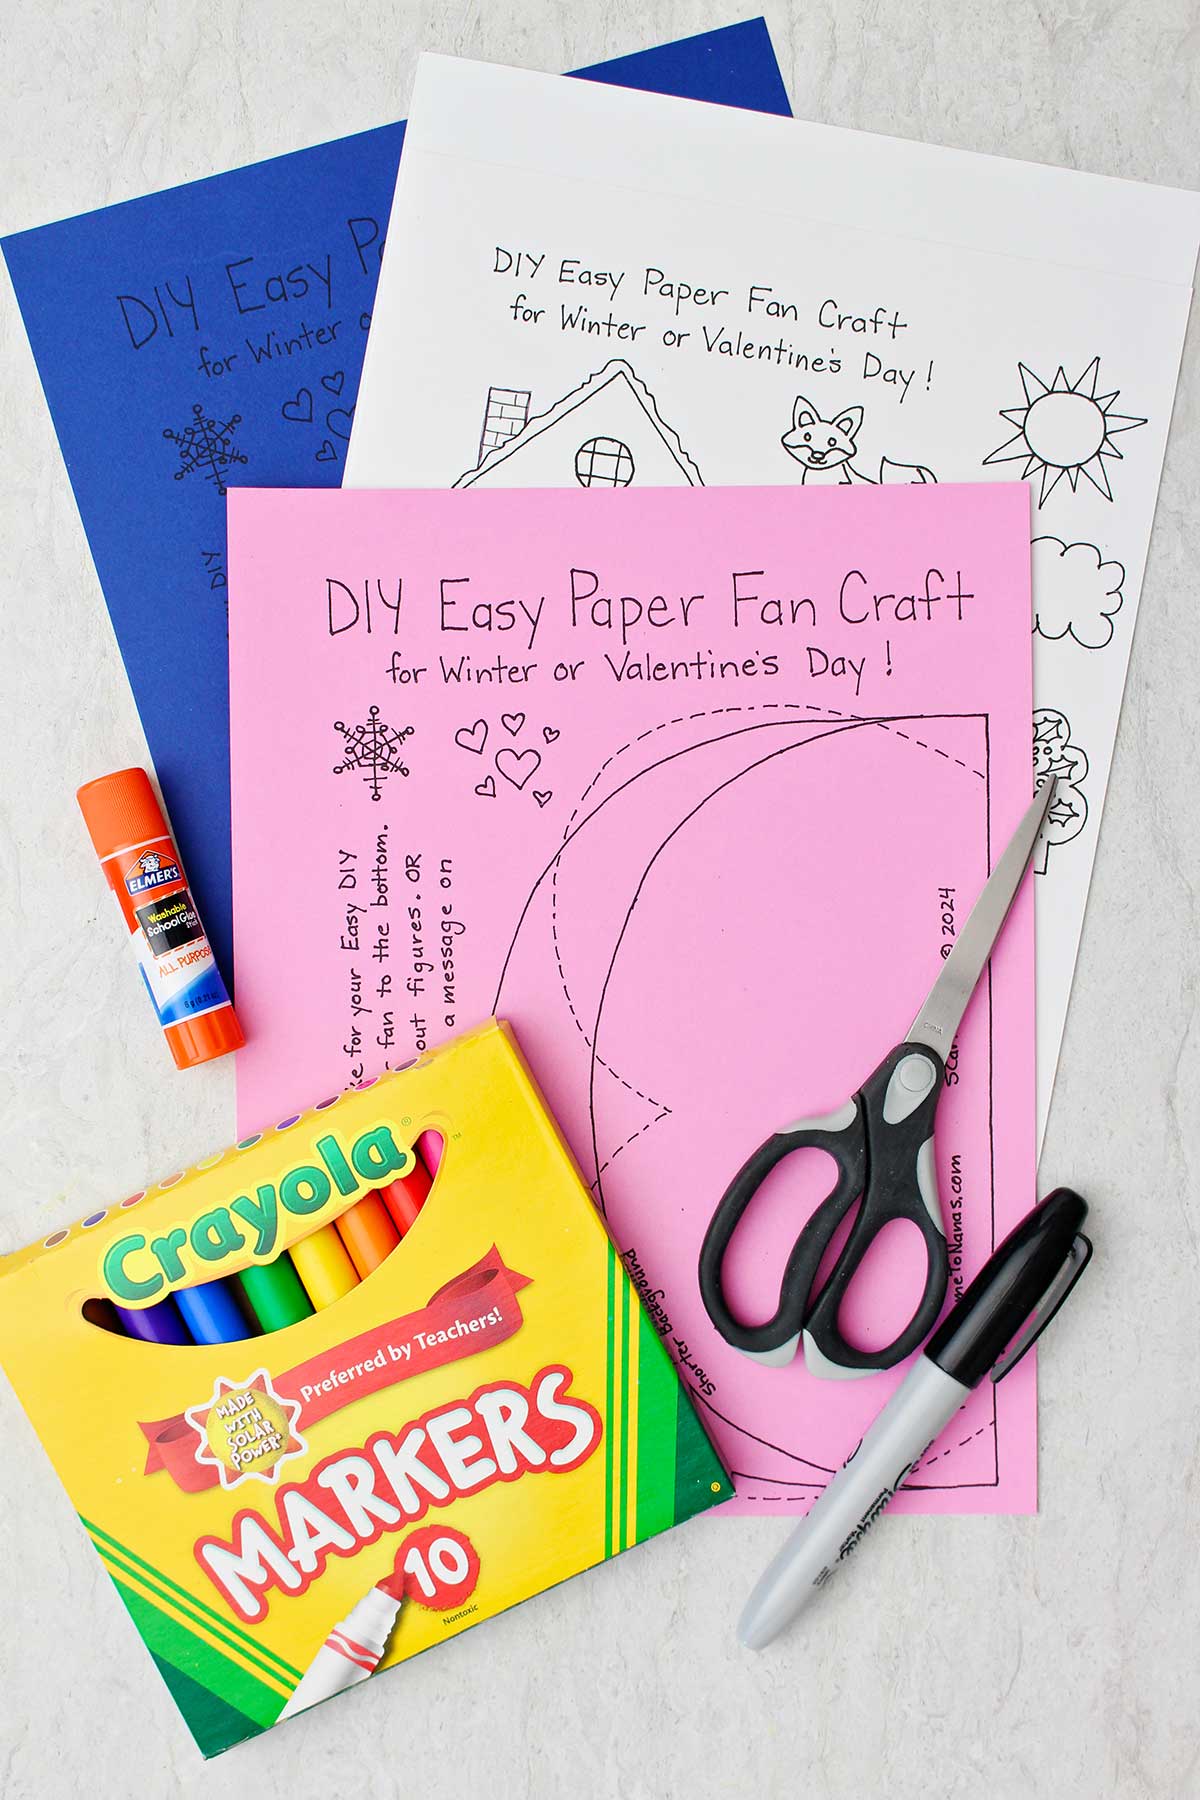
Something I love about this craft is that you may already have all you need to make it. You need white copy paper, card stock paper in white or colors, a glue stick, Scissors, Colored markers. You will also need a copy of the Free printable I created for you for this DIY Easy Paper Fan Craft (copied on the cardstock paper- see following instructions). Cool, huh?
I’m excited for you to see how this looks when you are done! I think kids of any age group will love it- little kids and big kids too.
The step-by-step photo instruction that follows will be helpful, but if you want to do this craft alongside me, check out the full length tutorial that is found on YouTube at the following link: YouTube Full Length Tutorial for DIY Easy Paper Fan Craft.
DIY Paper Fans
Let’s start with making a plain paper fan, folded accordion style. Some call this a Chinese fan.
Our white paper fan is going to be made out of copy paper. Take one 8 ½ x 11 inch sheet of white paper and fold it in half, hotdog style. Cut it in half using your fold mark as your guide.
Accordian fold tip...
I’ll give you a great fan folding tip that makes accordion folding even easier to do. This tip makes it easy to show the paper fan folding skill to kids that may join you for this craft.
Take one of your long pieces of copy paper and fold it in half so that it becomes shorter, I hope that makes sense :-). Fold it in half the same way again and then fold it in half again two more times. You end up with a piece of paper that is about ¾ inch wide and 4 ¼ inches long.
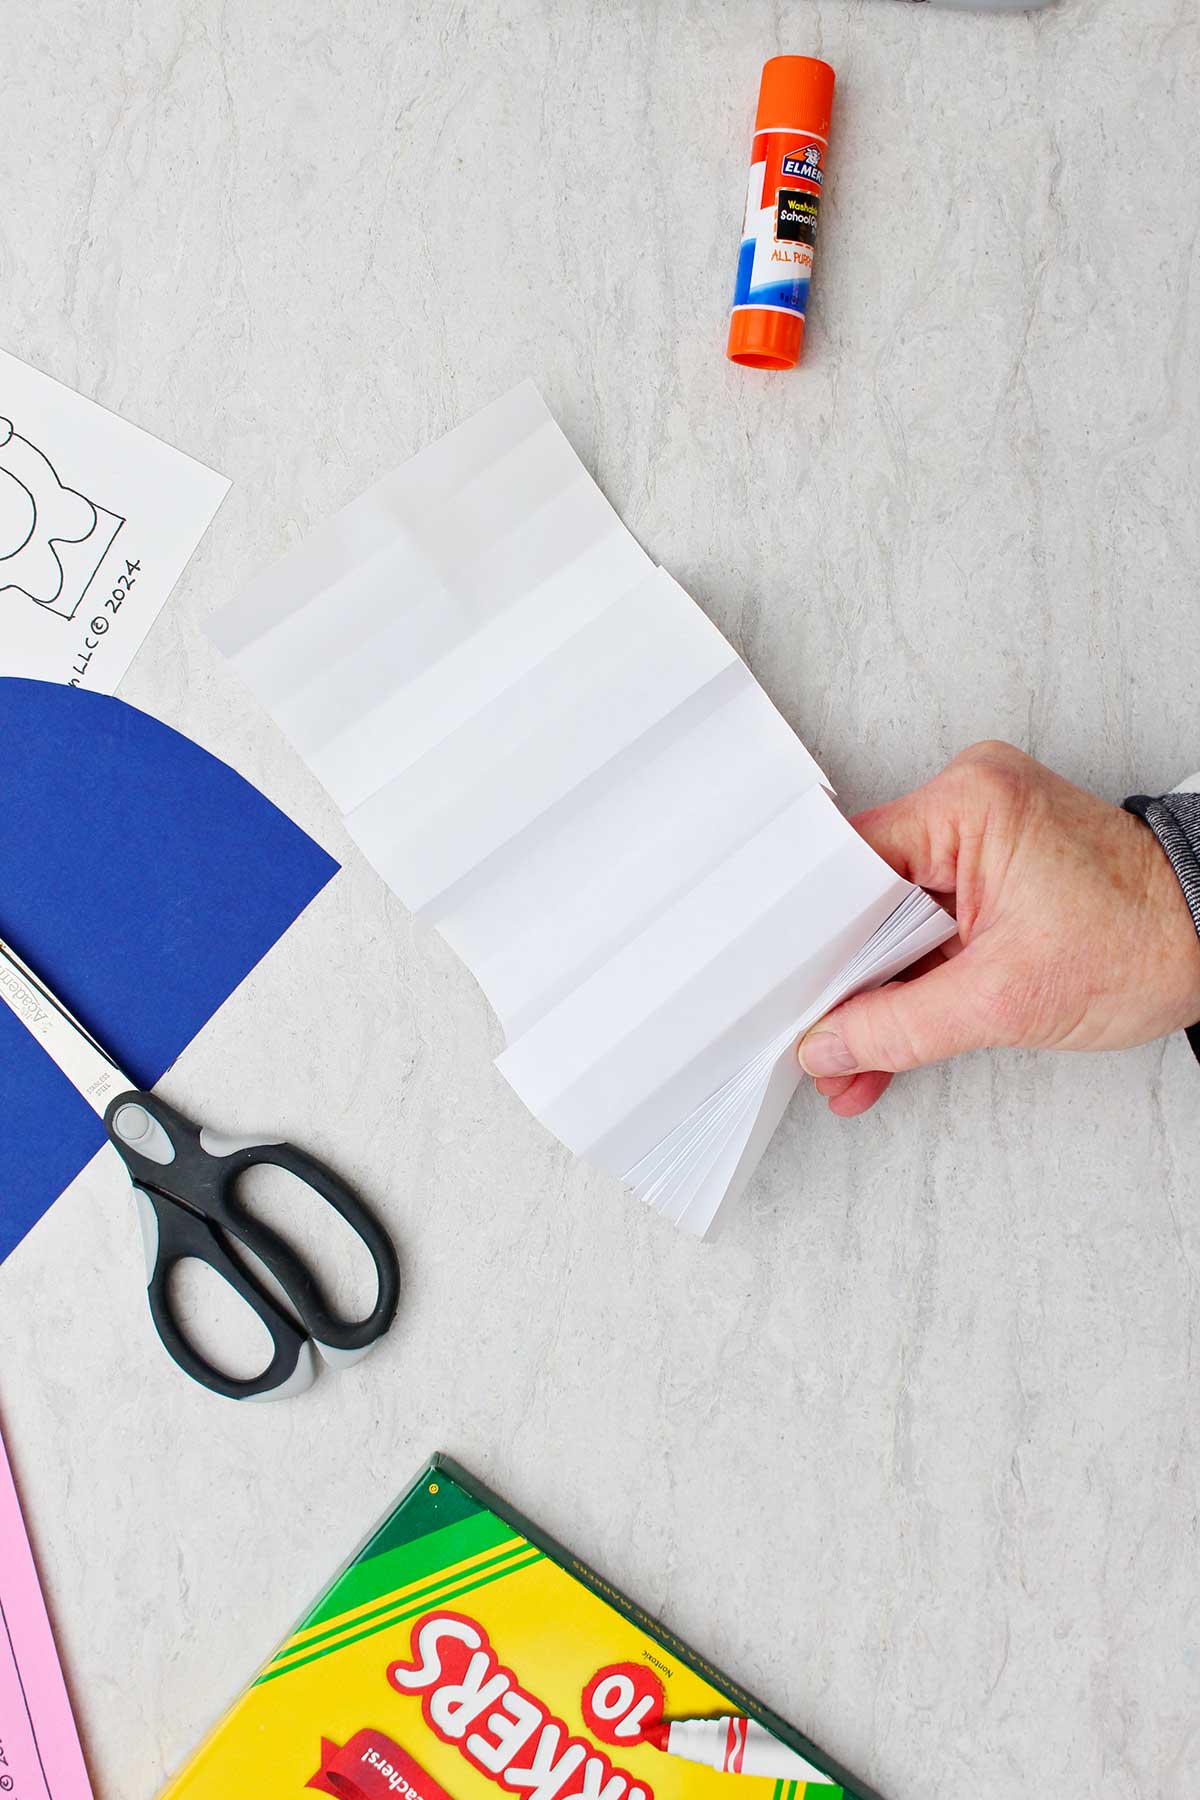
Do this to both long halves of your copy paper.
Then unfold them, see the folds? Each ¾ inch crease will be your guide to accordion fold your piece of paper in a bit.
Folding a long paper...
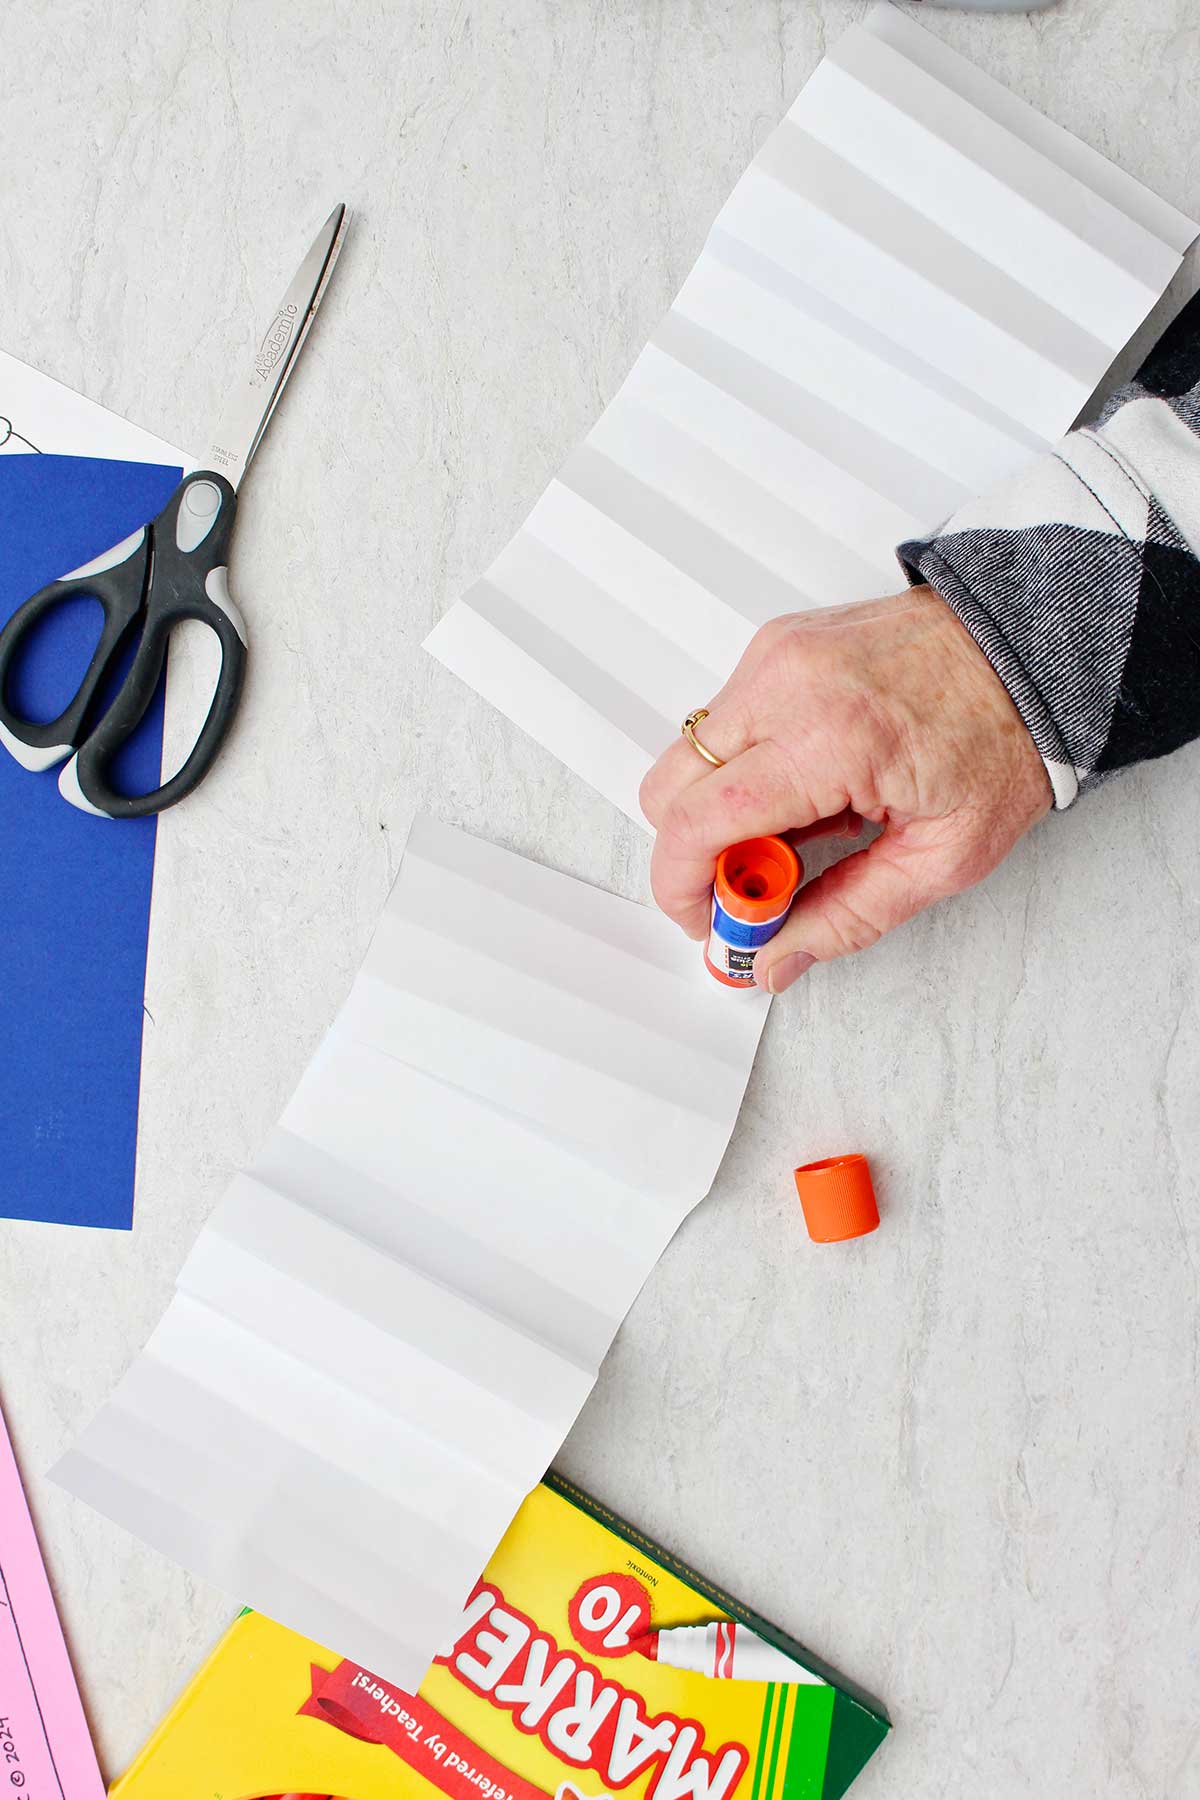
But before you do that, use a glue stick and glue the two sheets of paper so they become one very long piece of paper. Just glue one folded fan piece on the end of one paper to one folded fan piece on the next piece of paper so it overlaps just by one of those small folded areas.
Gluing the last flaps of the two papers together makes a very long skinny piece of paper with fold lines!! This will make a large fan...or I guess I mean a very full accordion fan that could make a fan wheel if we wanted.
When the glue is set, you can begin accordion folding from one end. Accordion fold back-and-forth, back-and-forth, back-and-forth- until you have accordion folded the entire sheet of paper. If this is unfamiliar to you it really helps to watch the video!
Secure the end of the fan...
We don’t want our fans to unfold so one end of the fan needs to be secured to hold it in the fan shape.
I used a small little rubber band like is used on girls’ pigtails or ponytails. If you have any other form of small rubber bands, they will also work on the end of your folded paper to hold your fan in its’ fan shape.
You can also cut another very narrow strip of paper about a quarter inch wide. Glue it so that you can wrap it around and around the end of your fan and hold it in place that way if you would like. The rubber band worked well for me.
If you were going to use this for a fan, the end that you just put a rubber band around would be the end that you would hold. Then you would fan out the other end and fan your face with it to get a breeze :-). But instead we’re going to use it for our craft of course.
Fold the end of the paper fan...
So take the end of the paper fan that has the rubber band and fold it down about a half an inch or so. We will be able to glue that end to a flat piece of paper in a bit. Again, if this sounds confusing, please watch the video.
For now, set the paper fan to the side.
Make the background of the paper fan craft
Next we are going to get the background of our little winter scene ready.
Here is the link to the free pattern for this craft: Free Pattern for DIY Easy Paper Fan Craft for Winter or Valentine's Day.
Copy the first page of the free pattern for this craft on the color of Cardstock paper that you would like as your background. I chose a piece of blue paper, dark blue, in fact, because I wanted it to look like nighttime. But you can choose any color of paper you would like.
While you are at your printer, copy your second page of the free pattern onto white Cardstock paper. These are little figures and such that we can use on the scene that we will make in a little bit. I’ll tell you more about them then. For now, set them to the side.
Cut out the background and color it
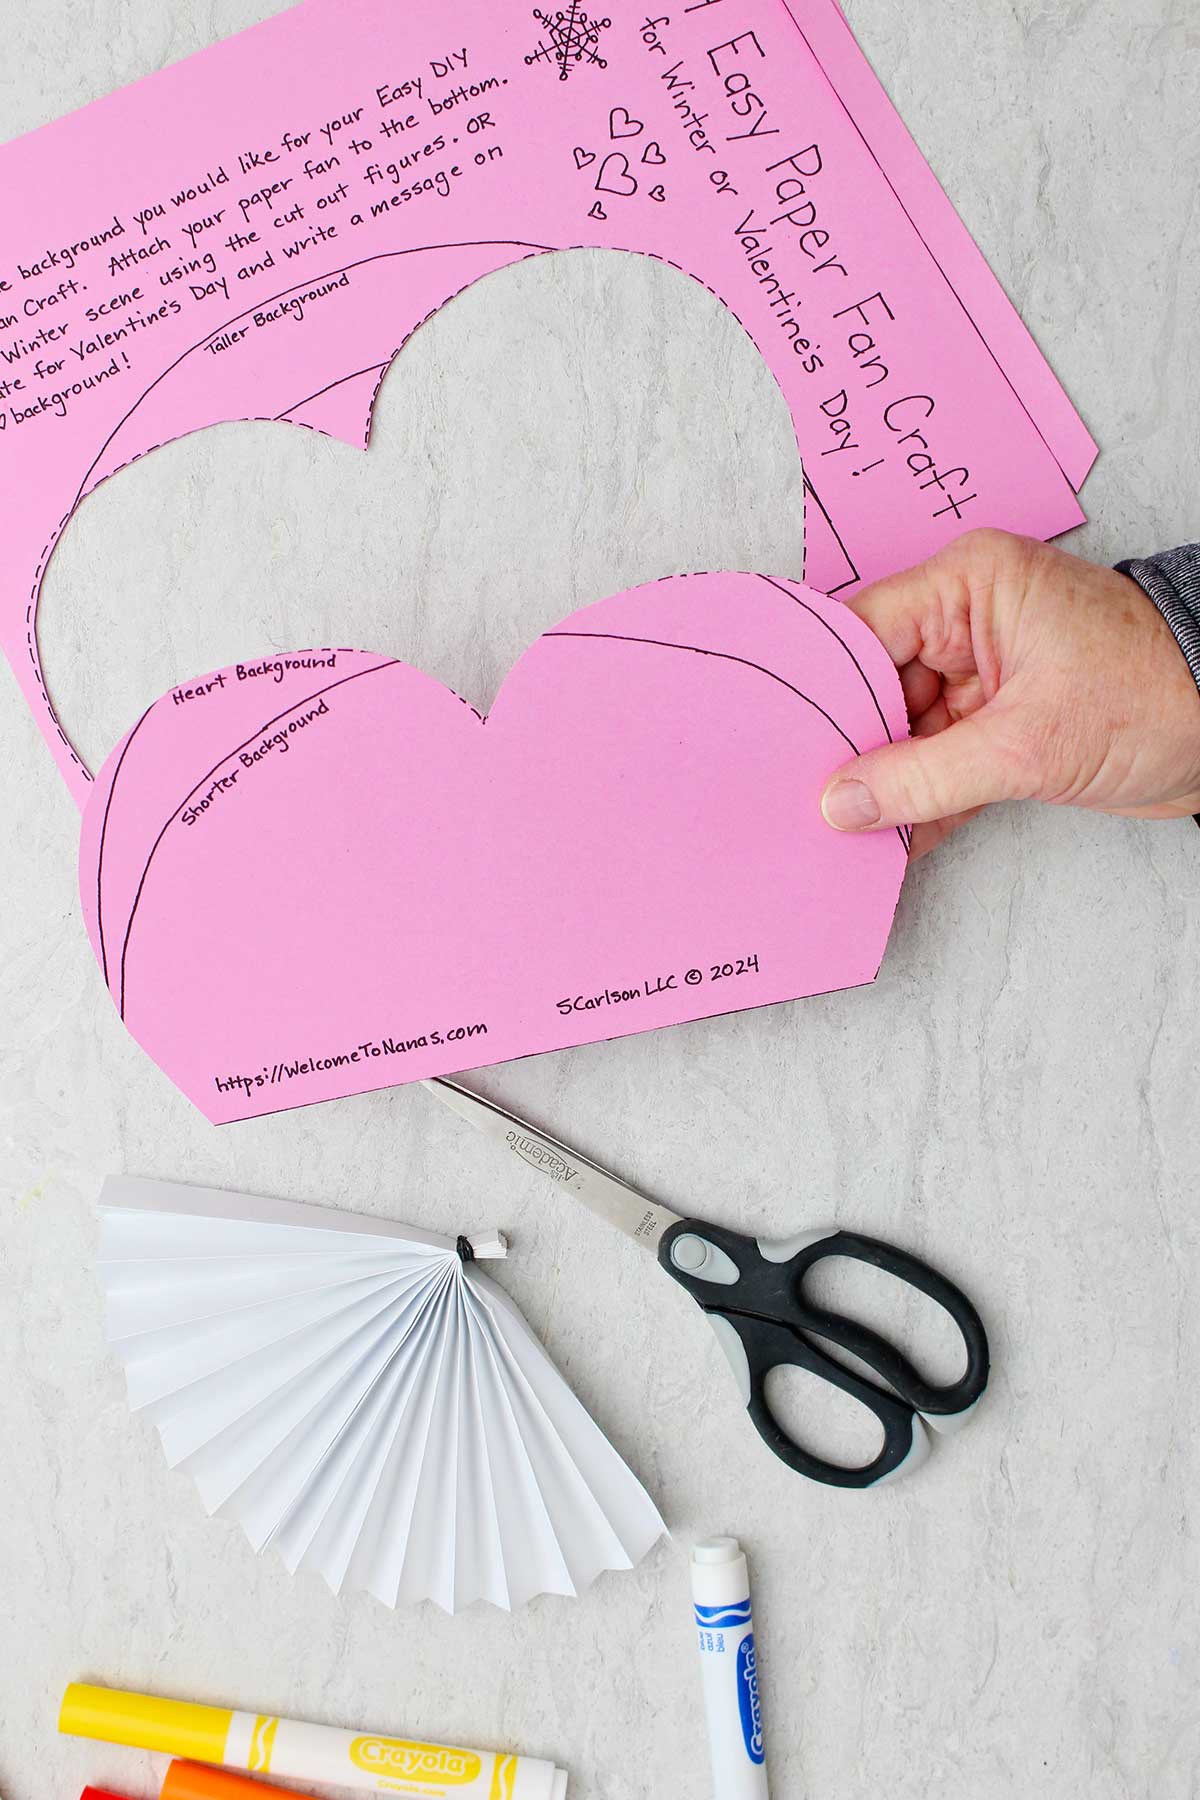
The pattern shows that there are three different sizes and shapes that you can cut your background. There is a larger dome shape, a shorter dome shape, and then there is the top of a heart shape.
Go ahead and cut out the shape that you want for the background of your winter scene. The taller dome is what I’m using in the pictures and in the video if you are watching it.
Once that’s cut out, if you want to draw anything on it now is the time to do so- while it’s still lying flat. Turn the background over so you draw on the side with no printing.
I drew snowflakes with a white colored pencil. The snowflakes are just little crosses and dots to make it look like it’s snowing on the dark blue background.
There are some little cut outs of a sun and cloud for daytime or stars if you would like nighttime. So you choose what you would like to do!
When you’re done with your background, we’re going to attach the fan to it next.
Put together the paper fan craft
So your fan is all ready to go, folded with one end secured with a rubber band and folded over about a half of an inch.
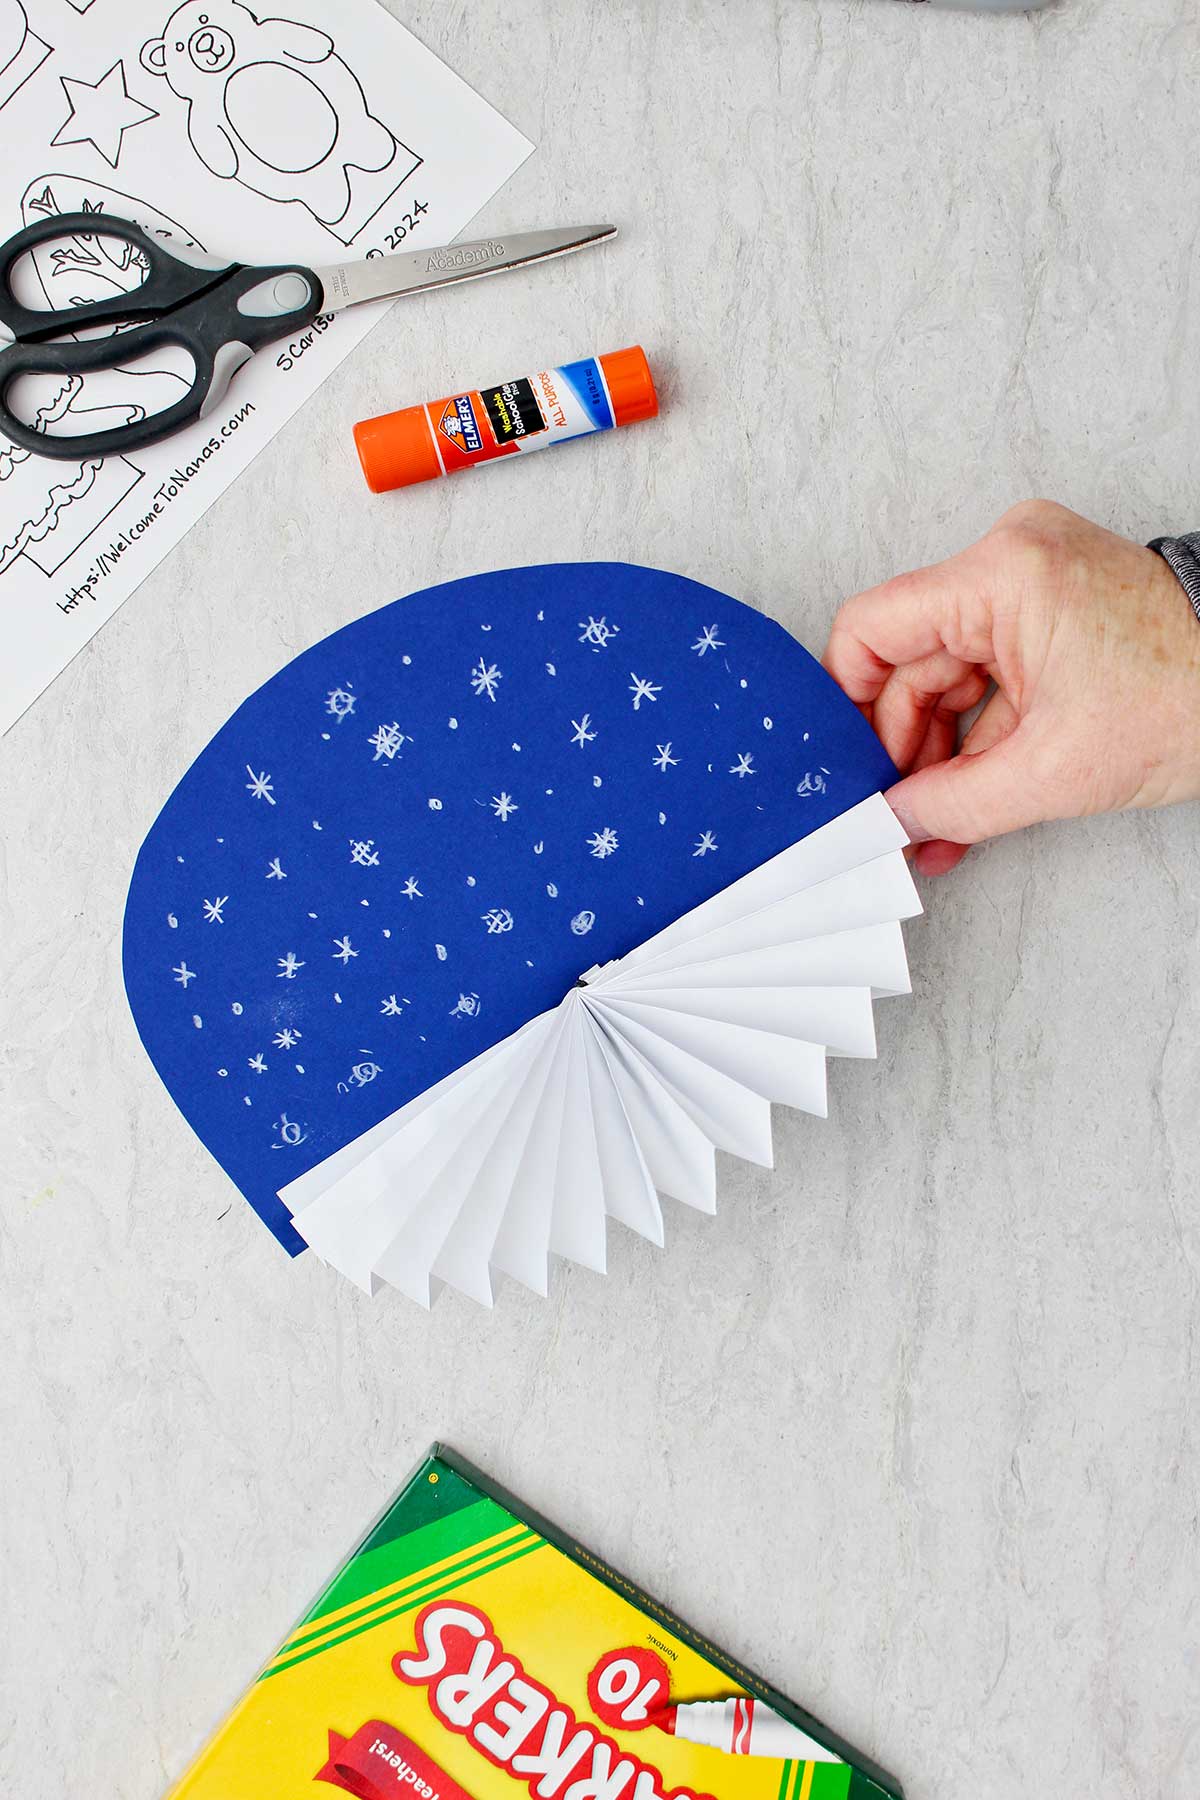
With a glue stick, run a strip of glue along the bottom edge of your background piece. Then place your fan on top of that strip of glue and fan it open so that both ends of the fan attach to the background evenly across the bottom.
Hold the fan in place until the glue sets (binder clips may be helpful if you want to move on to the next step). The glue stick worked well for me but you can use craft glue or a hot glue gun if you prefer.
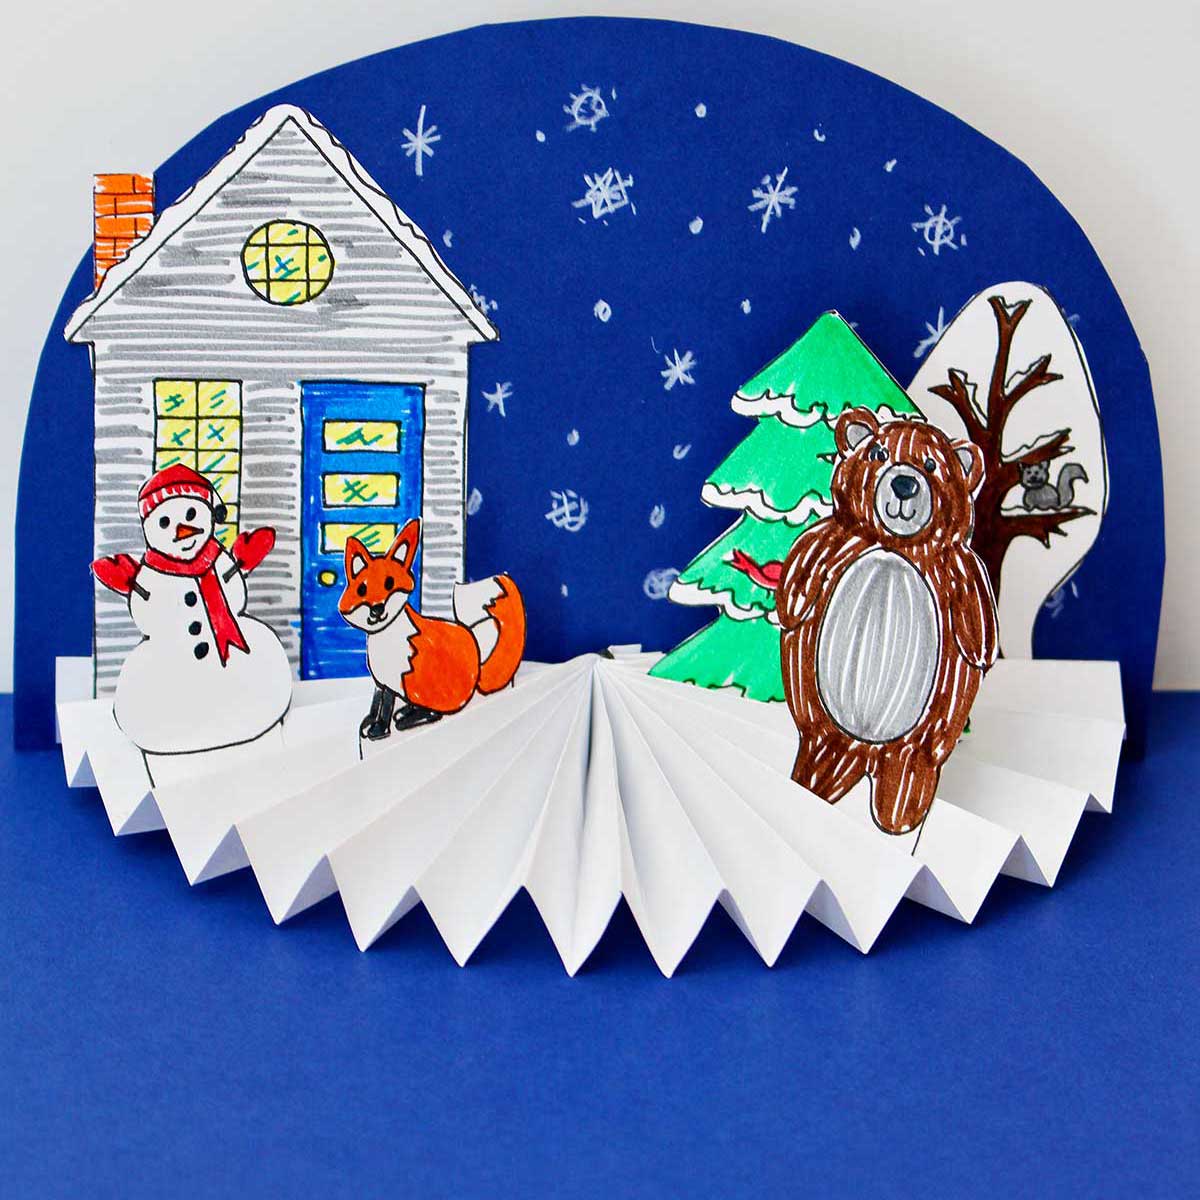
You now have a 3-D background for your little scene that you’re making. The fan is the white snowy landscape that sits on the table and your background will then stand straight up from the fan.
I just love simple paper crafts like this that have so many possibilities!
Figurines for your winter scene!
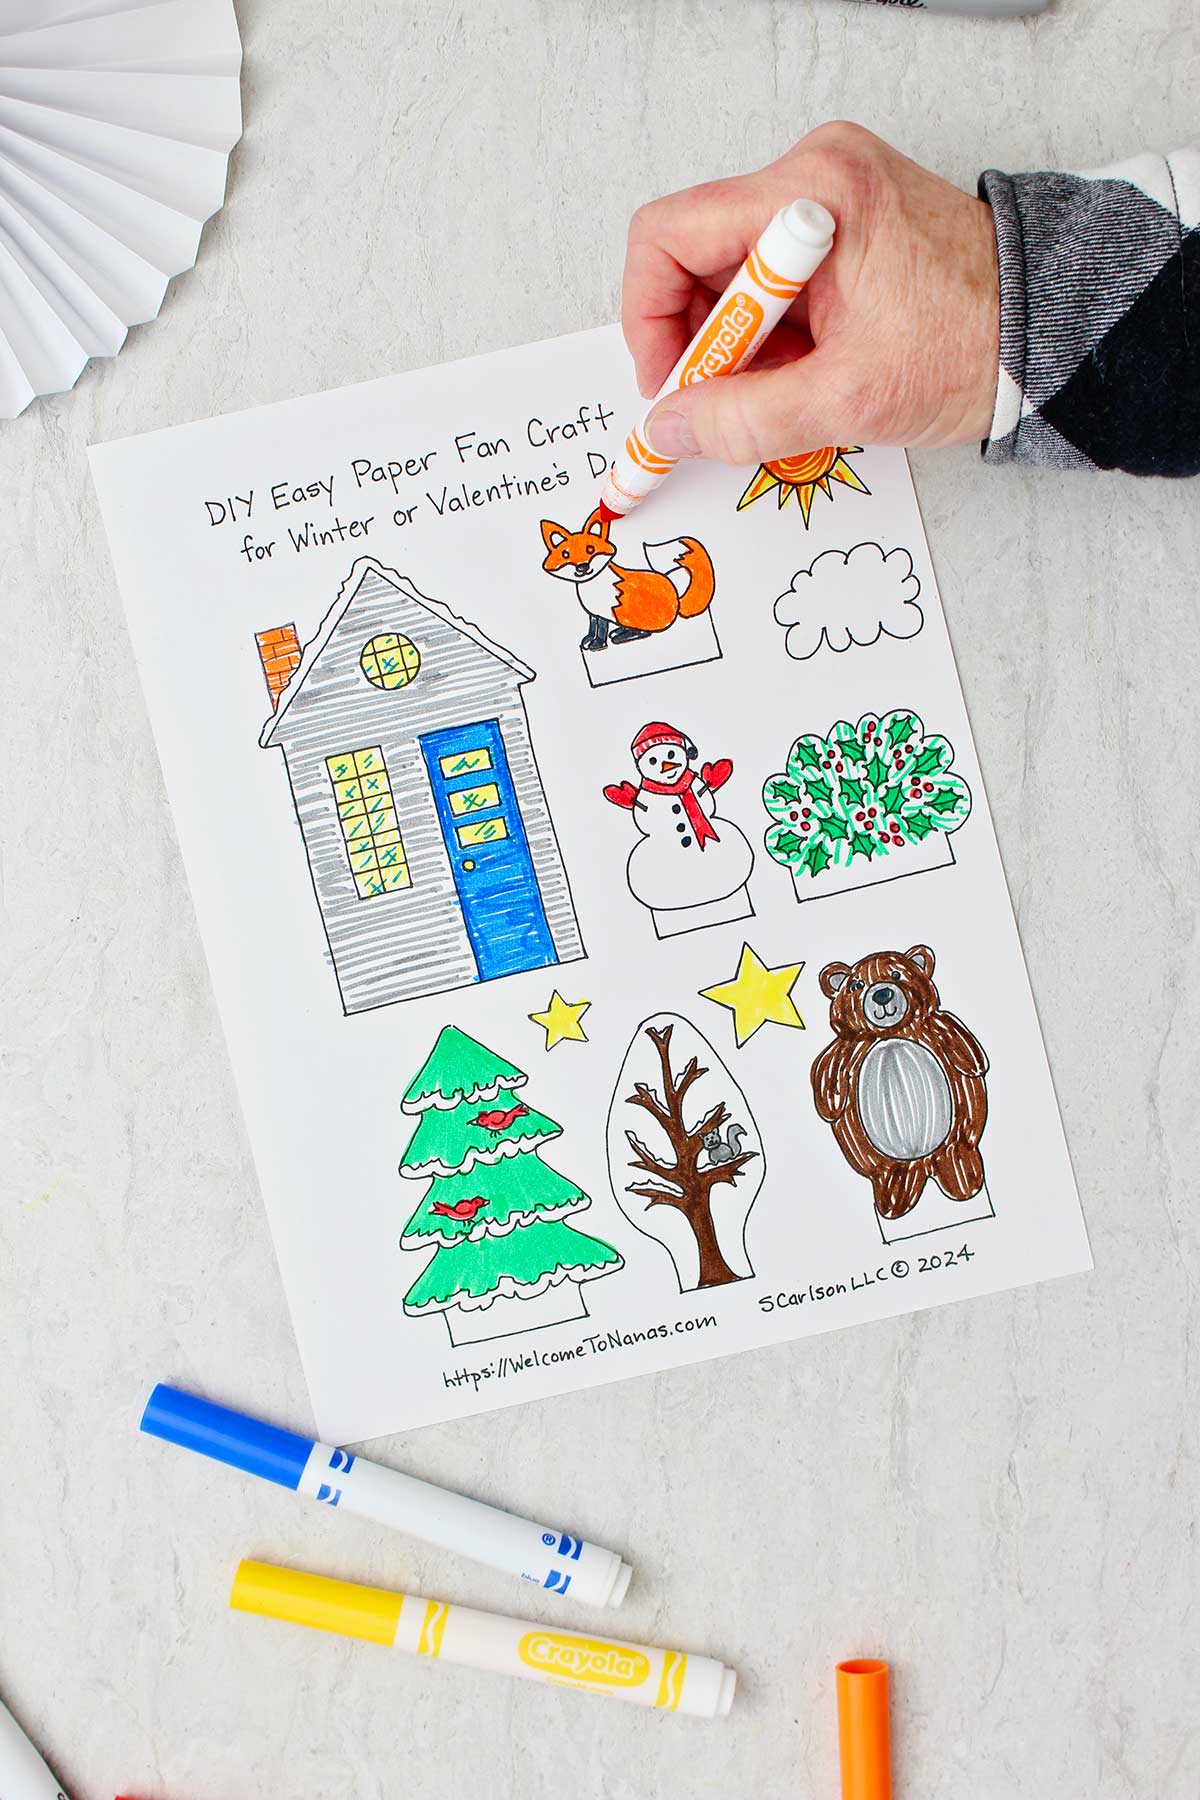
Next, you’re going to make the little figurines to glue into your winter scene. Check out all the choices you have on the free template you printed earlier.
Color and choose the ones that you would like to use for your scene. You certainly don’t need to use them all. Use colored markers, colored pencils, or crayons.
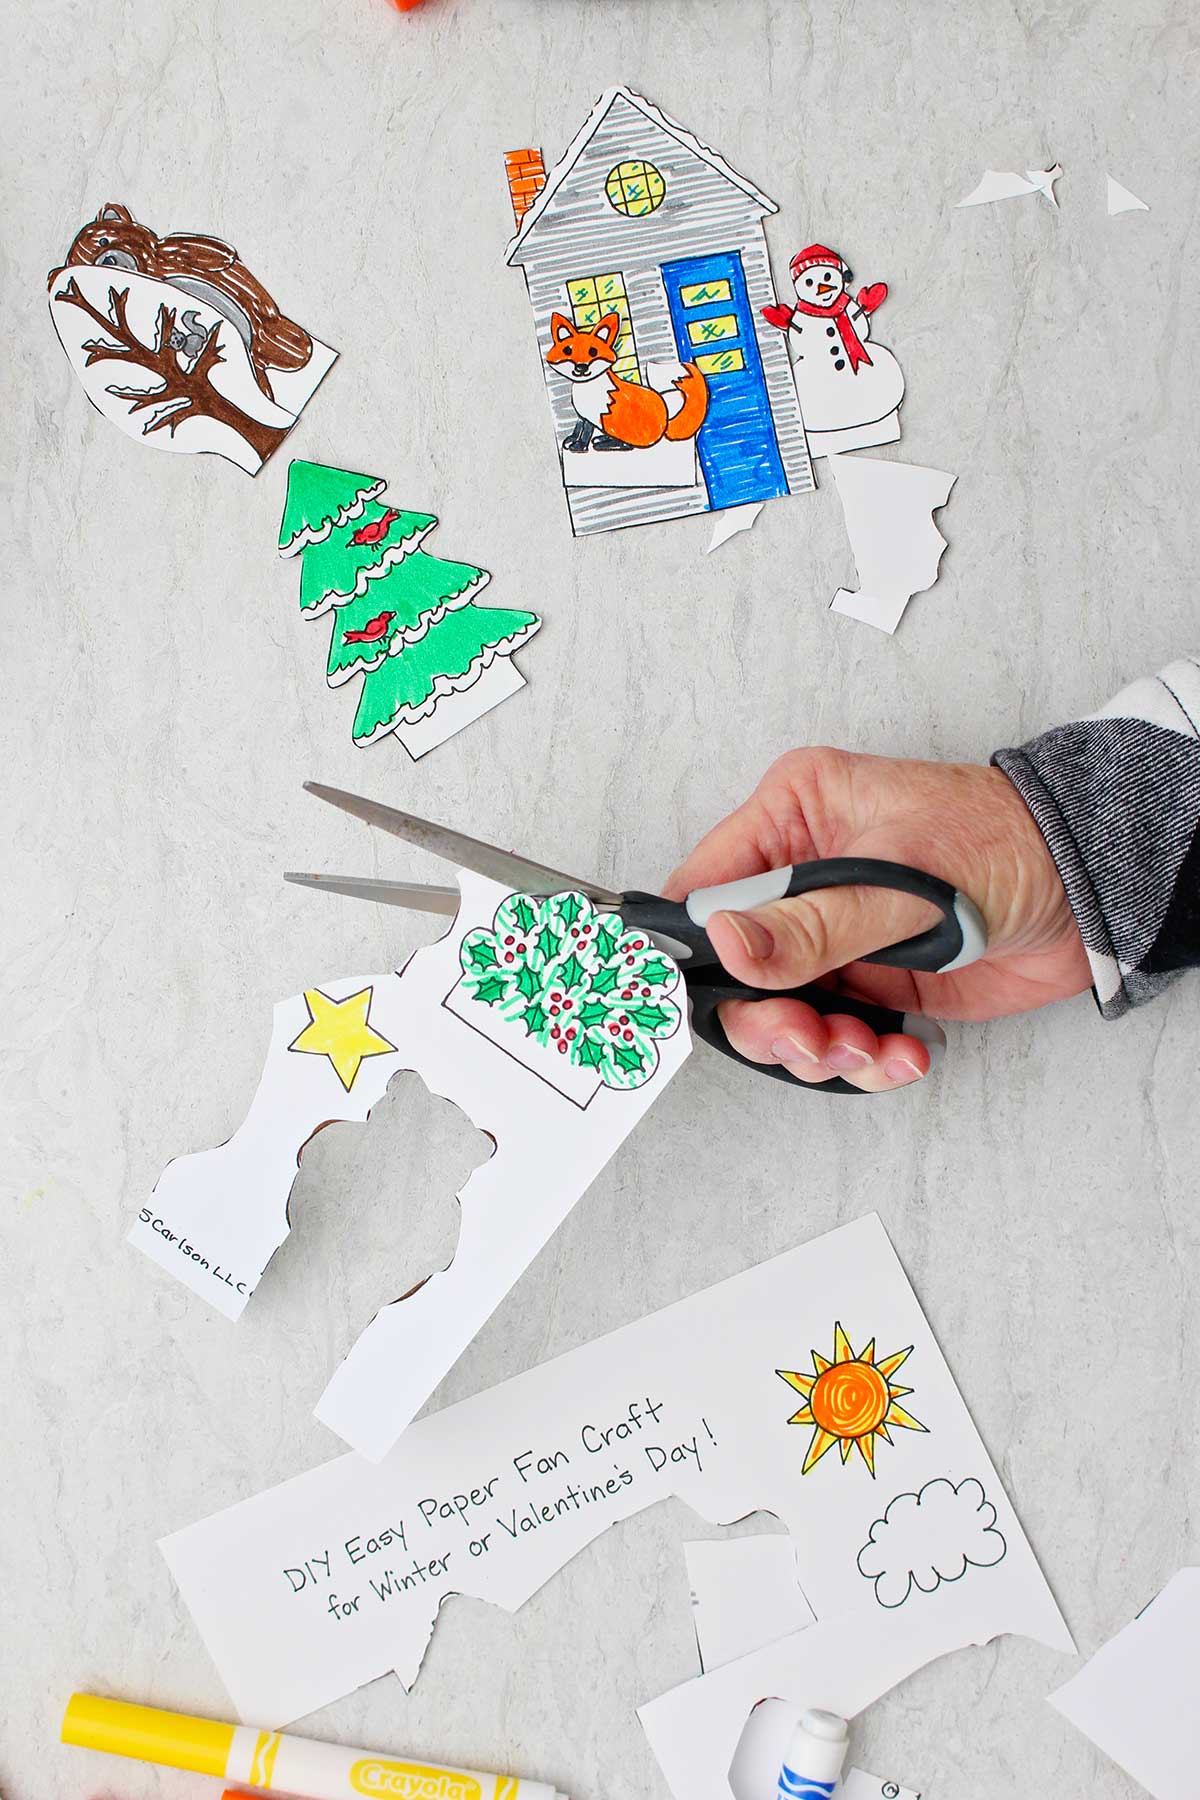
When you’re done coloring, cut them out on the solid outside black lines. In my scene, I chose to use the two trees, the house, the snowman, the fox, and the bear!
You’re welcome to make your own little figurines if you would like as well. If you do this, remember to add a little tab on the bottom that’s about a half an inch wide. That is used to glue them into the folds of the fan.
Glue the figurines onto the paper fan craft
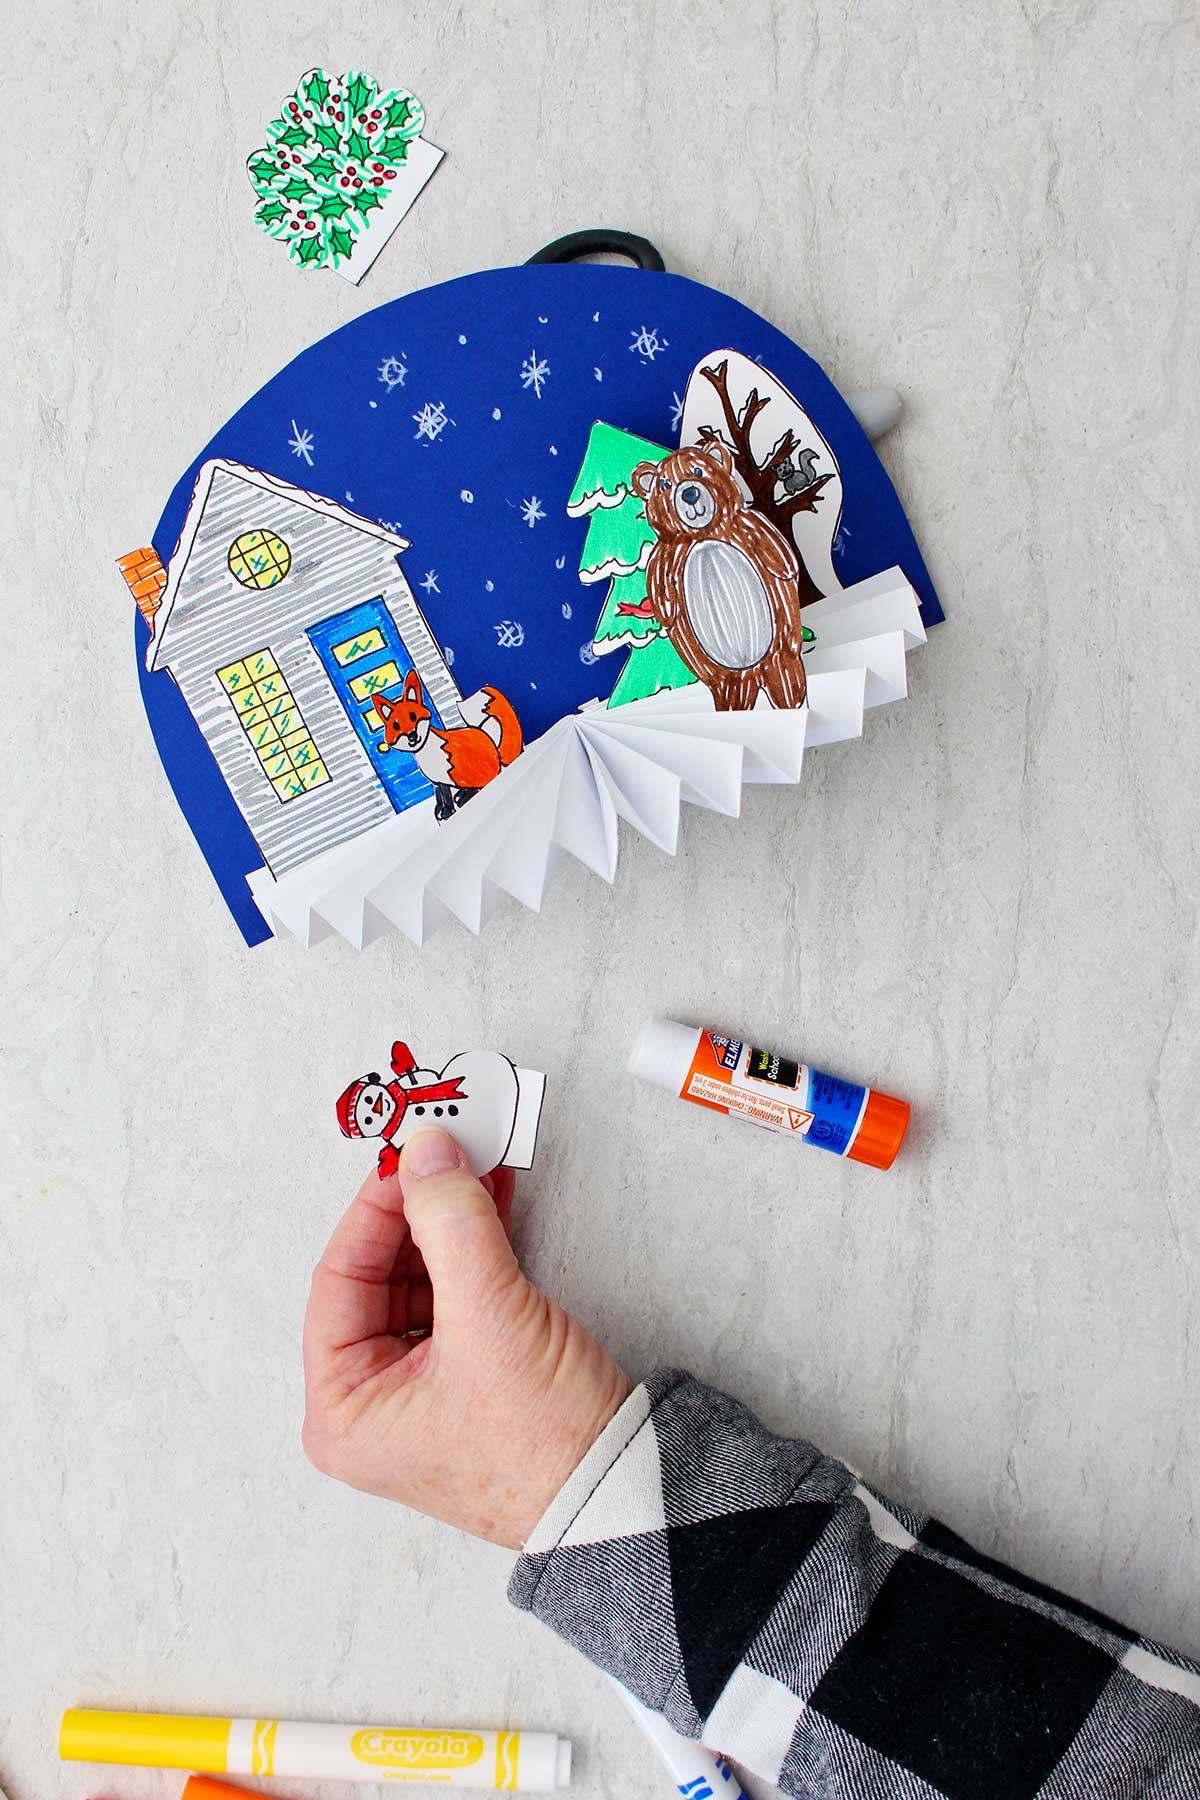
When you have your figurines cut out, have some fun choosing where you’re going to glue them into your scene. I chose to glue my house and one of the trees directly onto the background.
Then the others I glued to the folds of the fan so that they would face me as I was looking at the little Winter scene. Do this by putting a bit of glue on the back of the tabs on the bottom of the figurines. Slip the tab down into an accordion fold and press it against the fold.
The figurine will stand up! Bend them slightly if they are leaning backwards more than you want.
I’m glad that the bear is a friendly one because he’s pretty close to my house!.
Didn’t this DIY Easy Paper Fan Craft for Winter turn out cute? I’m sure yours is too!
DIY Easy Paper Fan Craft- so many options!!
There’s all kinds of things that you can do with this craft.
- You can make the background different colors for daytime, nighttime, or color it like a sunset.
- You can make the fan color green so it’s a grass scene for spring and summer.
- You can create different trees to have green leaves or fall colored leaves.
- You can leave the house off and make a forest of trees with forest animals.
- You can use it as a card
Have fun with this! Be sure to attach pictures of what you create. I’d love to see them.
But wait, there’s more!!
What? A Valentine card?
Before we’re done, let’s look at how we can make this a Valentine scene!
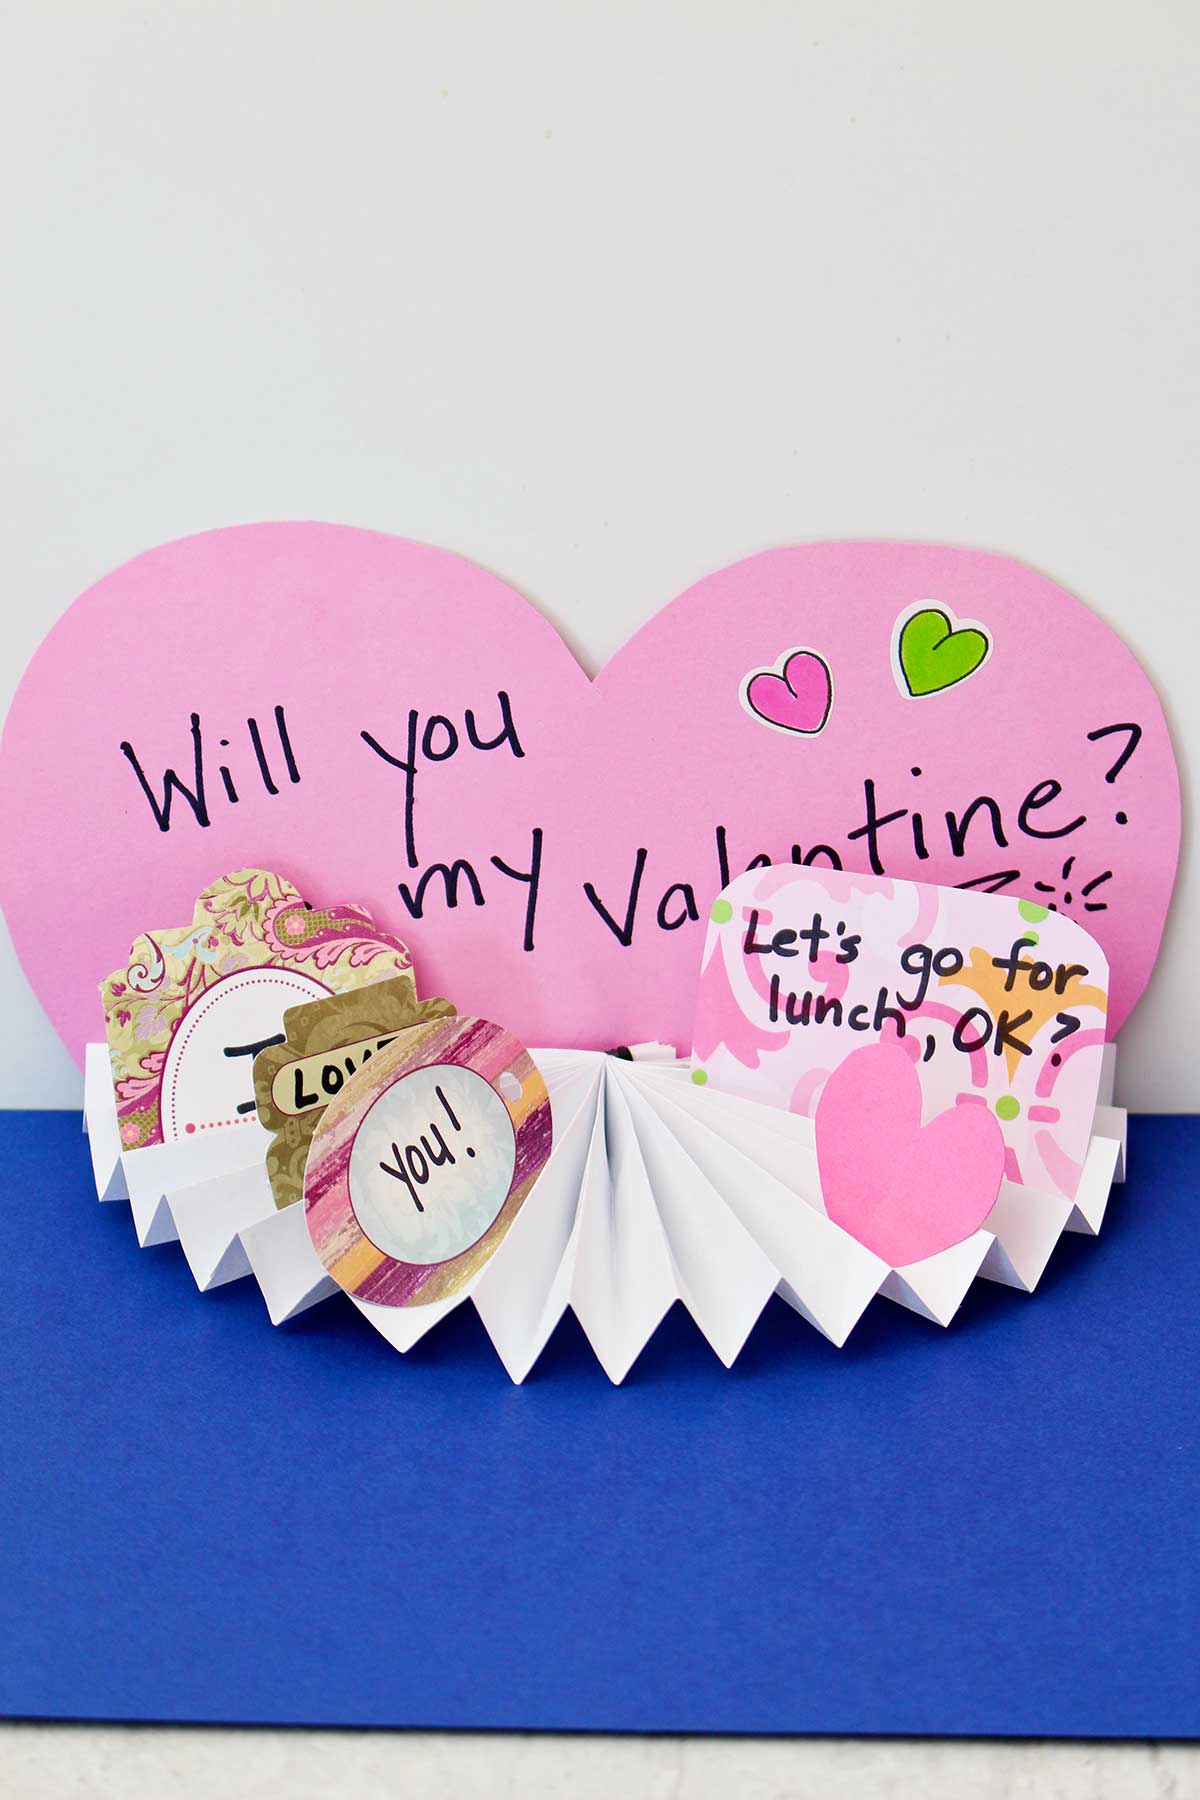
Print off the first page of the pattern on pink cardstock paper this time. When you cut it out, use the Heart lines which are dotted lines.
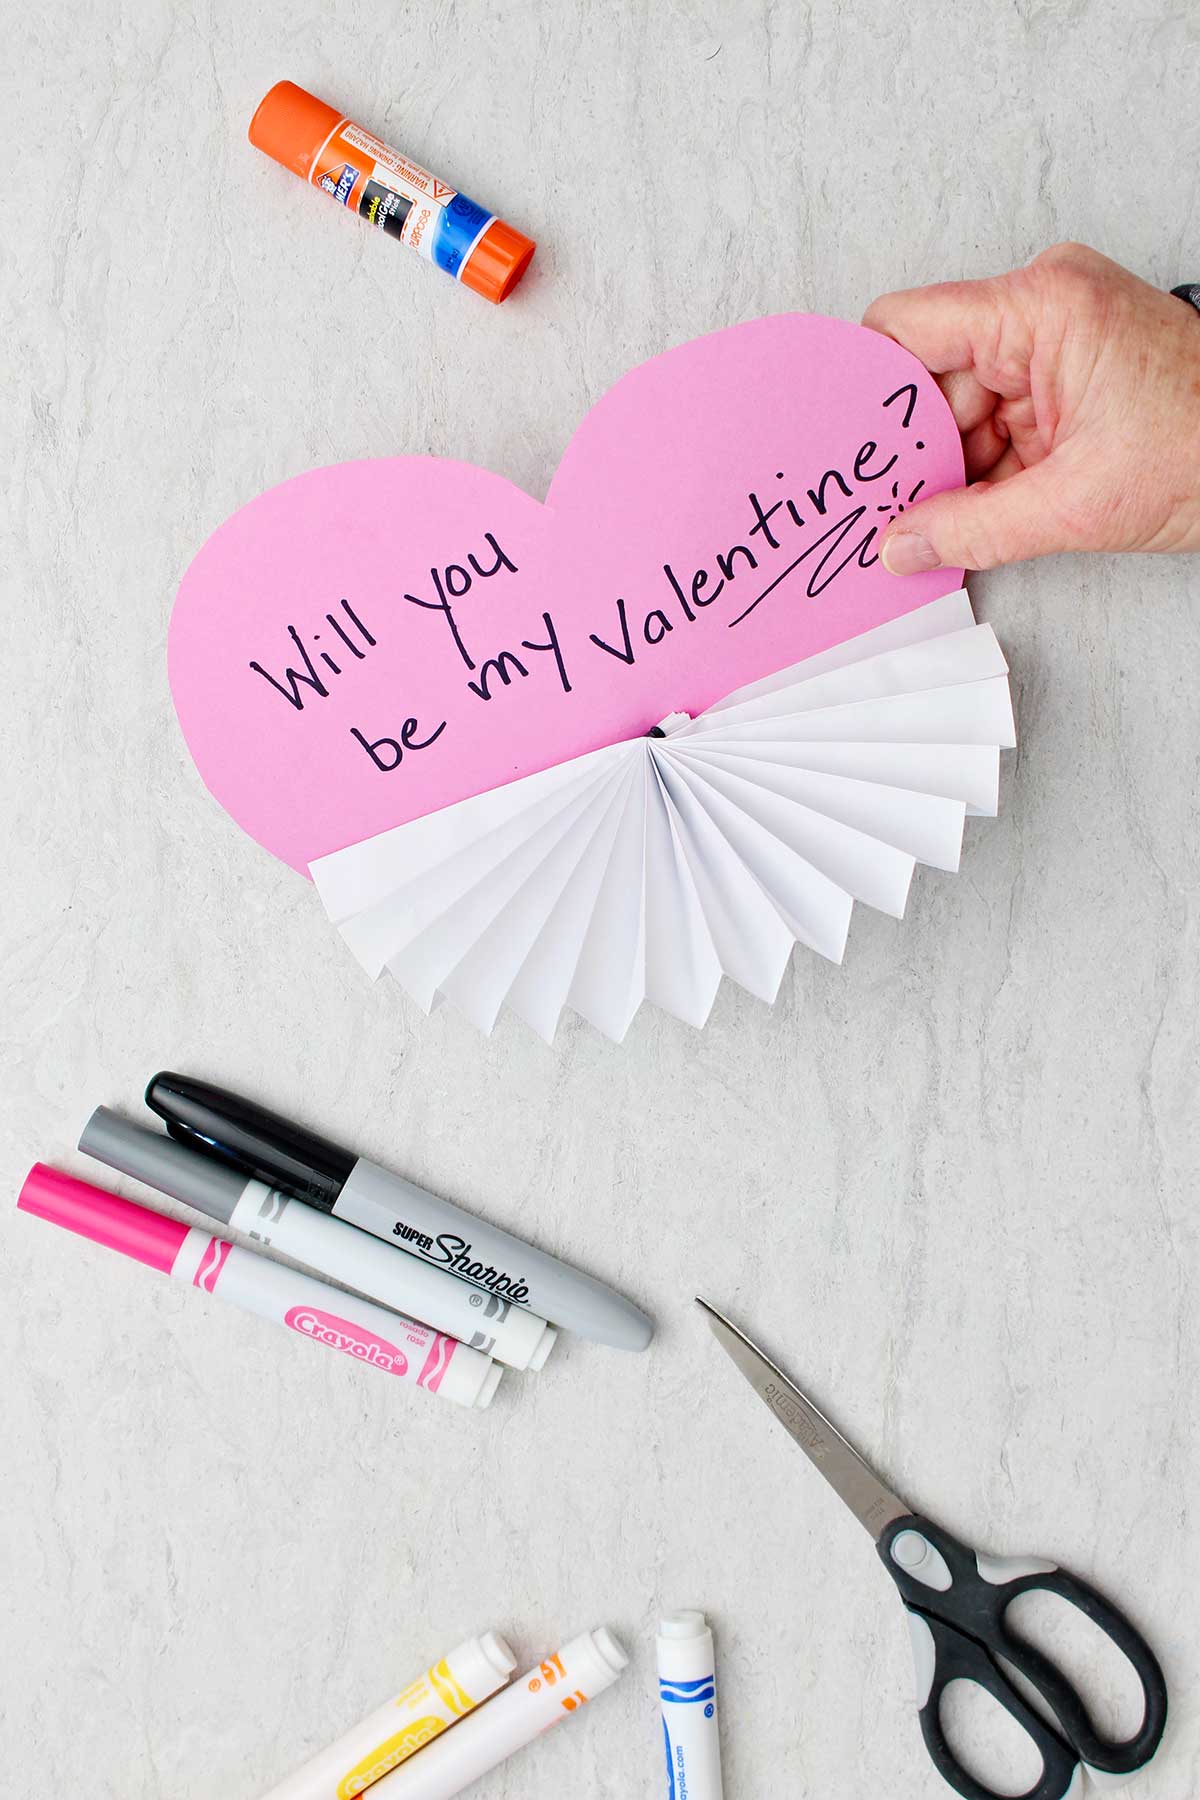
Go ahead and make a white paper fan as you did before and attach it to the bottom of your heart shape.
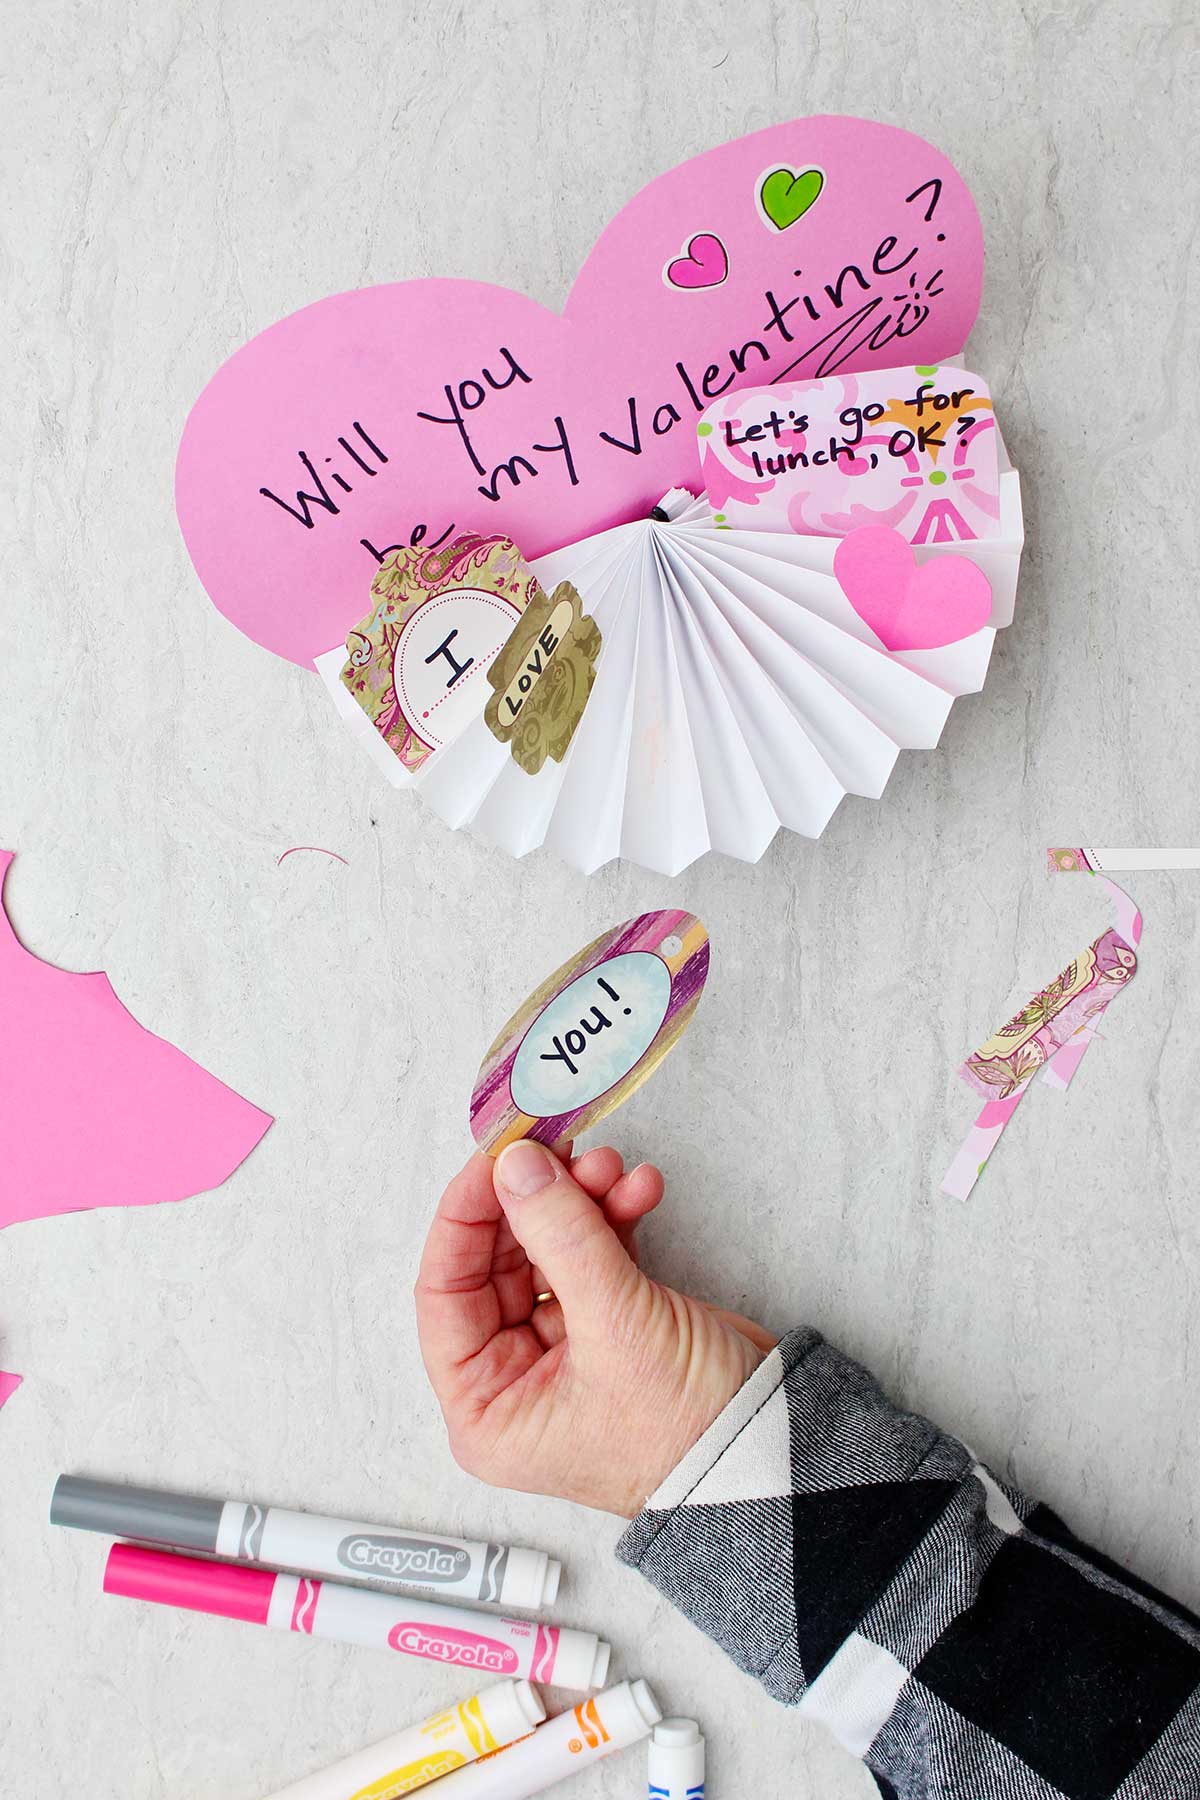
I don’t have any cutout figurines for you for the Valentine’s Day option of your scene. Cut small hearts or shapes out of various pieces of paper- like scrapbook paper, cardstock paper, construction paper, and stickers.
Use your imagination to make figurines yourself like you saw on the free pattern. Arrange and then glue them onto the fan.
Write your valentine message on the background or on the little hearts that you glued into your fan. I’m sure you’re going to think of lots of other ideas as well!
Will you be my Valentine? Make a card
I made one for Papa and I added a little invitation to lunch :-). These could be made for friends at school, parents, or for grandparents.
Something cool about your DIY Easy Paper Fan Craft for Winter is that they can be made into cards. If you gently fold them in half, all of your little figurines will fold up inside the card as the fan folds flat.
The card can be put into an envelope and given to someone. If you would like to make your own envelope (it's easy) check this out: How to Make Envelopes 3 Ways.
If you choose to make them for cards, I do recommend gluing a second piece of paper on the back of the background piece and trimming it to the same shape. This will covers up the printed lines of the cutting instructions.
This easy paper fan craft really is easy!
This winter scenes or Valentine scenes are very quick to make after you’ve done a couple of them and there are so many things you can do with them! I am going to use this idea again in future post, so be watching! 🙂
More easy paper crafts
Looking for more easy DIY crafts made from just a few simple pieces of paper? Give these fun ideas a try:
- Heart Waterfall Card for Valentine’s Day
- DIY Hand Embroidered Cards
- DIY Pop Up Card
- DIY Paper Fortune Teller- Cootie Catcher
- Free Printable Paper Dolls and Clothes to Color
Enjoy!
If you try this craft, let me know! Go ahead and leave a comment, rate it, and tag a photo with #WelcometoNanas wherever you post.
Come join the fun at https://welcometonanas.com
Supplies for DIY Easy Paper Fan Craft
Pattern for DIY Easy Paper Fan Craft- one copy for each person (type of paper explained in instructions)
- Free Pattern for DIY Easy Paper Fan Craft for Winter or Valentine's Day- one copy per person on cardstock
- Cardstock paper in color of your choice
- White copy paper
- Small rubber bands
- Colored markers, colored pencils, or crayons
- Scissors
- Glue stick
- Other papers of choice- for making your own figurines
DIY Easy Paper Fan Craft for Winter or Valentine's Day
Equipment
- Scissors
Items Required
- Free Pattern for DIY Easy Paper Fan Craft for Winter or Valentine's Day
- Cardstock paper in color of your choice
- White copy paper
- Small rubber bands
- Colored markers, colored pencils, or crayons
- Scissors
- Glue stick
- Other papers of choice- for making your own figurines
Instructions
- Let’s start with making a plain paper fan, folded accordion style. Some call this a Chinese fan.Our white paper fan is going to be made out of copy paper. Take one 8 ½ x 11 inch sheet of white paper and fold it in half, hotdog style. Cut it in half using your fold mark as your guide. Take one of your long pieces of copy paper and fold it in half so that it becomes shorter, I hope that makes sense :-). Fold it in half the same way again and then fold it in half again two more times. You end up with a piece of paper that is about ¾ inch wide and 4 ¼ inches long. Do this to both long halves of your copy paper. Then unfold them, see the folds? Each ¾ inch crease will be your guide to accordion fold your piece of paper in a bit. But before you do that, use a glue stick and glue the two sheets of paper so they become one very long piece of paper. Just glue one folded fan piece on the end of one paper to one folded fan piece on the next piece of paper so it overlaps just by one of those small folded areas. Gluing the last flaps of the two papers together makes a very long skinny piece of paper with fold lines!! This will make a large fan...or I guess I mean a very full accordion fan that could make a fan wheel if we wanted. When the glue is set, you can begin accordion folding from one end. Accordion fold back-and-forth, back-and-forth, back-and-forth- until you have accordion folded the entire sheet of paper. If this is unfamiliar to you it really helps to watch the video! We don’t want our fans to unfold so one end of the fan needs to be secured to hold it in the fan shape.I used a small little rubber band like is used on girls’ pigtails or ponytails. If you have any other form of small rubber bands, they will also work on the end of your folded paper to hold your fan in its’ fan shape. So take the end of the paper fan that has the rubber band and fold it down about a half an inch or so. We will be able to glue that end to a flat piece of paper in a bit. Again, if this sounds confusing, please watch the video. For now, set the paper fan to the side.
- Next we are going to get the background of our little winter scene ready. Here is the link to the free pattern for this craft: Free Pattern for DIY Easy Paper Fan Craft for Winter or Valentine's Day. Copy the first page of the free pattern for this craft on the color of Cardstock paper that you would like as your background. I chose a piece of blue paper, dark blue, in fact, because I wanted it to look like nighttime. But you can choose any color of paper you would like. While you are at your printer, copy your second page of the free pattern onto white Cardstock paper. These are little figures and such that we can use on the scene that we will make in a little bit. I’ll tell you more about them then. For now, set them to the side.
- The pattern shows that there are three different sizes and shapes that you can cut your background. There is a larger dome shape, a shorter dome shape, and then there is the top of a heart shape. Go ahead and cut out the shape that you want for the background of your winter scene. The taller dome is what I’m using in the pictures and in the video if you are watching it.Once that’s cut out, if you want to draw anything on it now is the time to do so- while it’s still lying flat. Turn the background over so you draw on the side with no printing.I drew snowflakes with a white colored pencil. The snowflakes are just little crosses and dots to make it look like it’s snowing on the dark blue background.
- With a glue stick, run a strip of glue along the bottom edge of your background piece. Then place your fan on top of that strip of glue and fan it open so that both ends of the fan attach to the background evenly across the bottom. Hold the fan in place until the glue sets (binder clips may be helpful if you want to move on to the next step). The glue stick worked well for me but you can use craft glue or a hot glue gun if you prefer.You now have a 3-D background for your little scene that you’re making. The fan is the white snowy landscape that sits on the table and your background will then stand straight up from the fan.
- Next, you’re going to make the little figurines to glue into your winter scene. Check out all the choices you have on the free template you printed earlier. Color and choose the ones that you would like to use for your scene. You certainly don’t need to use them all. Use colored markers, colored pencils, or crayons.When you’re done coloring, cut them out on the solid outside black lines. In my scene, I chose to use the two trees, the house, the snowman, the fox, and the bear!
- When you have your figurines cut out, have some fun choosing where you’re going to glue them into your scene. I chose to glue my house and one of the trees directly onto the background. Then the others I glued to the folds of the fan so that they would face me as I was looking at the little Winter scene. Do this by putting a bit of glue on the back of the tabs on the bottom of the figurines. Slip the tab down into an accordion fold and press it against the fold. The figurine will stand up! Bend them slightly if they are leaning backwards more than you want.
- Before we’re done, let’s look at how we can make this a Valentine scene! Print off the first page of the pattern on pink cardstock paper this time. When you cut it out, use the Heart lines which are dotted lines. Go ahead and make a white paper fan as you did before and attach it to the bottom of your heart shape. I don’t have any cutout figurines for you for the Valentine’s Day option of your scene. Cut small hearts or shapes out of various pieces of paper- like scrapbook paper, cardstock paper, construction paper, and stickers. Use your imagination to make figurines yourself like you saw on the free pattern. Arrange and then glue them onto the fan.Write your valentine message on the background or on the little hearts that you glued into your fan. I’m sure you’re going to think of lots of other ideas as well!


Leave a Reply