Learn how to make an easy Macrame Belt with a free tutorial & pattern! Use three simple knots to create a retro belt with beads to tie around your waist or through belt loops.
How to Make an Easy Macrame Belt
Macramé is in, or for the older people we should say it’s back in! 🙂 I’m seeing macramé wall hangings and plant hangers in many homes.
I thought the groovy, bellbottoms jeans that we made in another post could use a macramé belt. So you might need to make some groovy, bellbottoms jeans and then make yourself or your grandkids a groovy macramé belt to go with them.
How about making a macramé belt with me.
A macramé belt is just the right thing to put through your bellbottom belt loops!
This macramé belt only uses 3 knots altogether. Once you get the hang of those, you will be able to put them together in a series to make this pattern.
Macramé cord suggestions
I recommend purchasing cord that is like a heavy string. The first cord that I tried was kind of shiny, and it would not stay in the knots that I was trying to tie. It would kind of work itself loose and was very difficult to work with.
So I set that cord aside and found in the craft section a more traditional macramé cording that’s like a heavy string.
Macrame cord comes in a lot of colors. Have fun choosing the perfect color for yourself or for the person that will receive the belt as a gift.
I had wanted the cording to be a pure white. I’m making it for one of my grandkids and plan to use these colorful beads. The cording is slightly ivory, but I think it’s worth it in order to have the texture of this type of cording.
- White cording with blue beads could make nautical belts
- Beige with earth colored beads looks the most vintage
- White string with red, white, and blue beads makes a patriotic belt
Macramé belt size
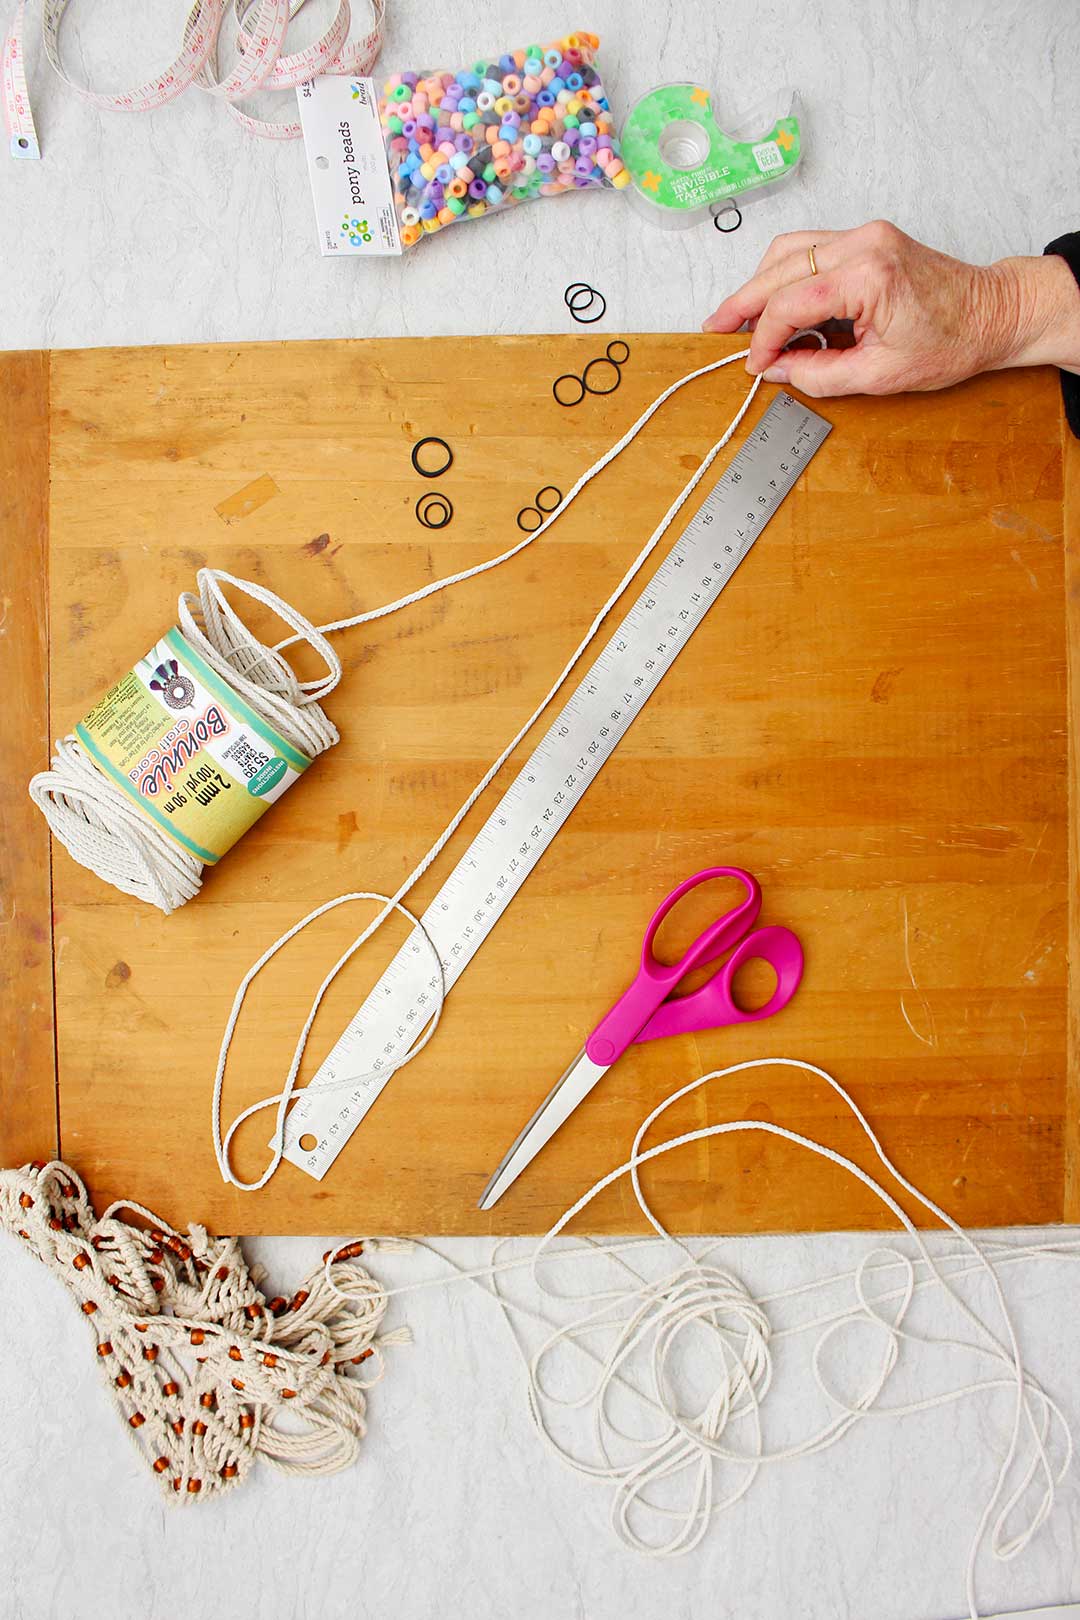
Start out by using a tape measure to take a waist measurement of the person that will be wearing the belt. I recommend going through the belt loops of a pair of jeans to take this measurement. Then you know it will fit right.
A macramé belt, such as the one we’re making, will need to tie in front. So we’ll take two inches off of that measurement which leaves room to tie the knot at the front of the jeans. This measurement will be the macraméd part of the belt.
The belt will also have long sets of dangling cords- one on either end. That’s what we will use to tie the belt in the front.
These ends add 12-inches to both ends of the belt. So add 24” to the previous measurement. Write down this number to use in the next step. (waist measurement – 2 inches + 24 inches = total belt length)
Cutting the macrame cords to length
Measure your strings to be four times as long as the total belt length you just calculated. So the length that you will measure is: the waist measurement – 2 inches +24 extra inches x 4.
In the video, the waste measurement through jeans for the belt is 34 inches. I will take away 2 inches from that to make 32 inches. Then add 24 extra inches (for the tie ends). So that makes 56 inches for the total belt length. Lastly multiply that by four.
Use a yard stick to measure out the cord.
Place a small piece of tape around the macrame cord where you are going to cut it. Wrap it tightly around the cord. Cut in the middle of this wrapped tape so both ends of the string are tape covered.
The end of the string becomes kind of like the end of a shoestring. This makes it easy to string beads later. It also keeps the cord from unraveling.
Cut four cords to the length that you figured.
I have a full length video tutorial if you want to follow along as I make my macrame belt. And here is the link, it is really helpful: Easy Macrame Belt with Beads Full Length Tutorial Video.
Fold the cords in half and tie together
We need eight different strands to make this macramé belt. So lay the cords out on the floor and fold each one in half.
Now gather the folded ends all together in your hand and measure up 12 inches from the folds.
Tie an overhand knot 12 inches from the folded ends to keep all the cords together. This creates one end of the belt with about 11-12 inches for the ties.
You now have 8 cords!
Note: Don’t cut the folded part of the cords yet.
Secure the macrame cords to work surface
Next, we’re going to secure the end of the belt to the work surface in a way that will allow you to do your macramé and hold the belt in place. Use packing tape or clamps to secure the cords.
I’m choosing to secure my macramé belt to an old breadboard I use in my crafting. You can see in the pictures that I used clamps.
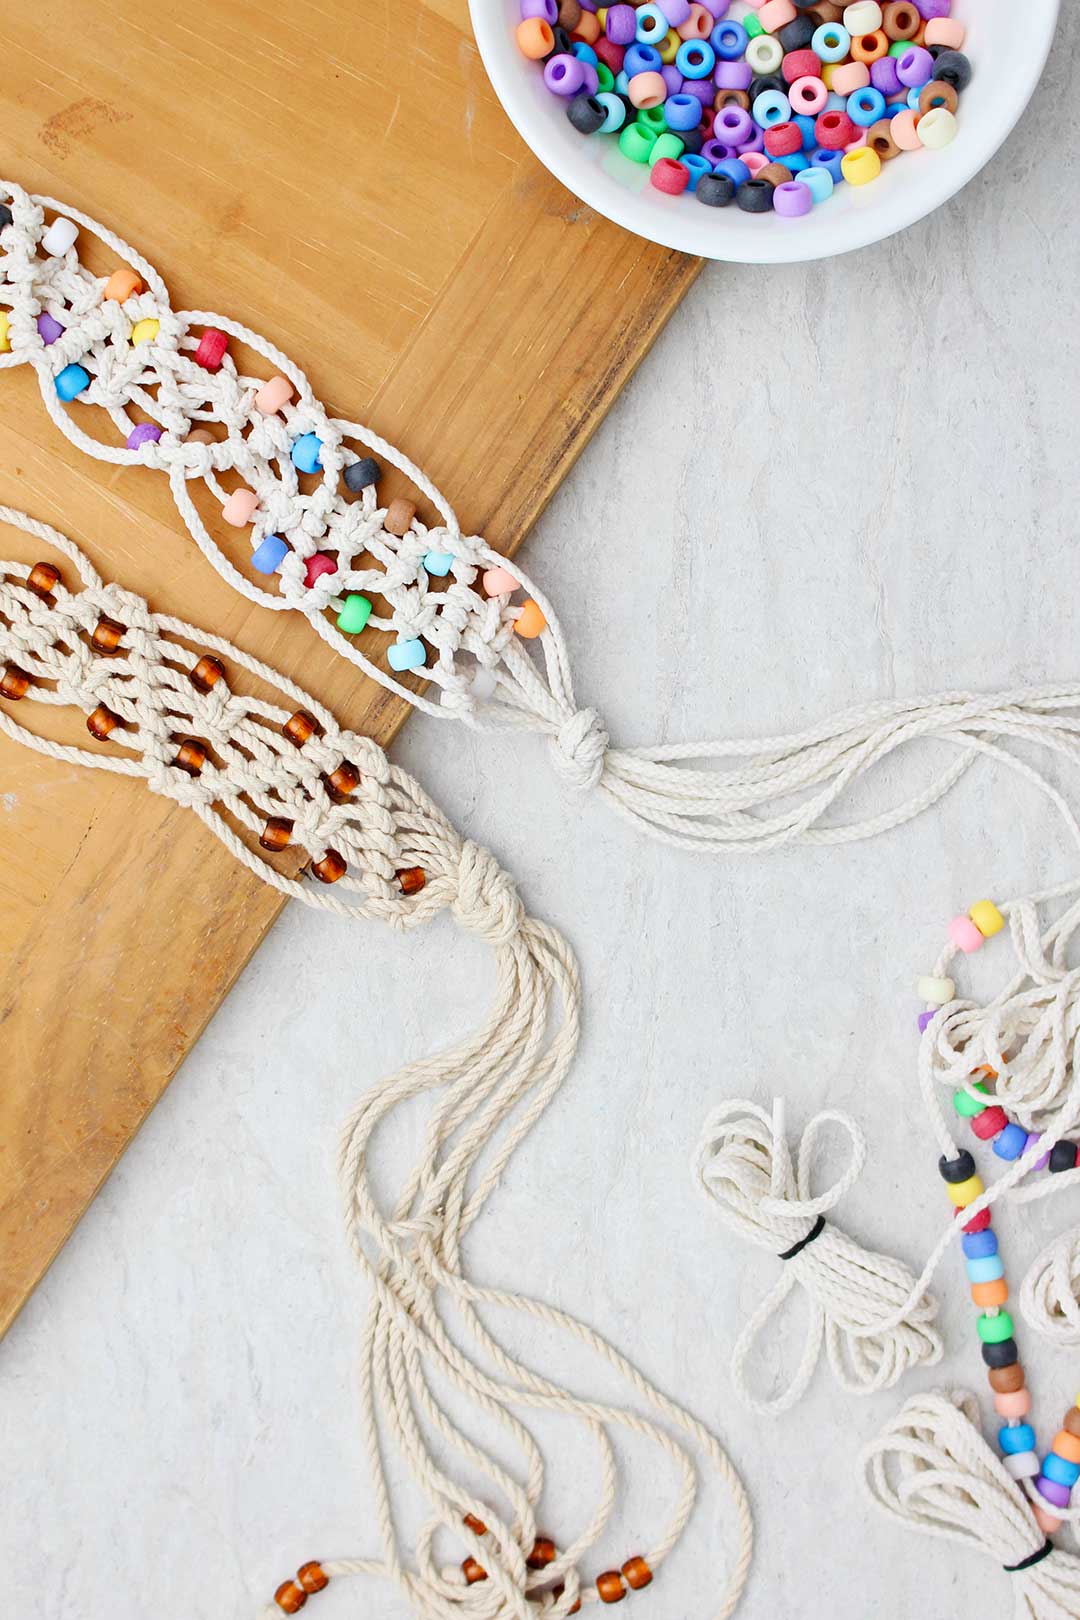
Add beads
String 30 beads on two of the cords. I used multi-colored pony beads for this belt. My first belt was created with brown pony beads. You can also make your own beads at home!
Pony beads work well because the hole in the bead is quite large. I couldn’t find real wooden beads in the right size that had large enough holes for the cord to fit through.
A bonus is that pony beads come in many color options. Have fun deciding what color to use!!
Note: You may need more beads than this, depending on the length of your belt. You can add more later if necessary. And if you have more there than you need, you can take them off later on.

Bundle each cord
So the cords are way too long to work with like this. But no fear! There is a way to manage them.
Note: Take each of your cords and place a small piece of tape around the end of the string if it doesn't have it already. Remember to wind it tightly so it is kind of like the end of a shoestring. This keeps the cord from unraveling and makes it easy to string beads.
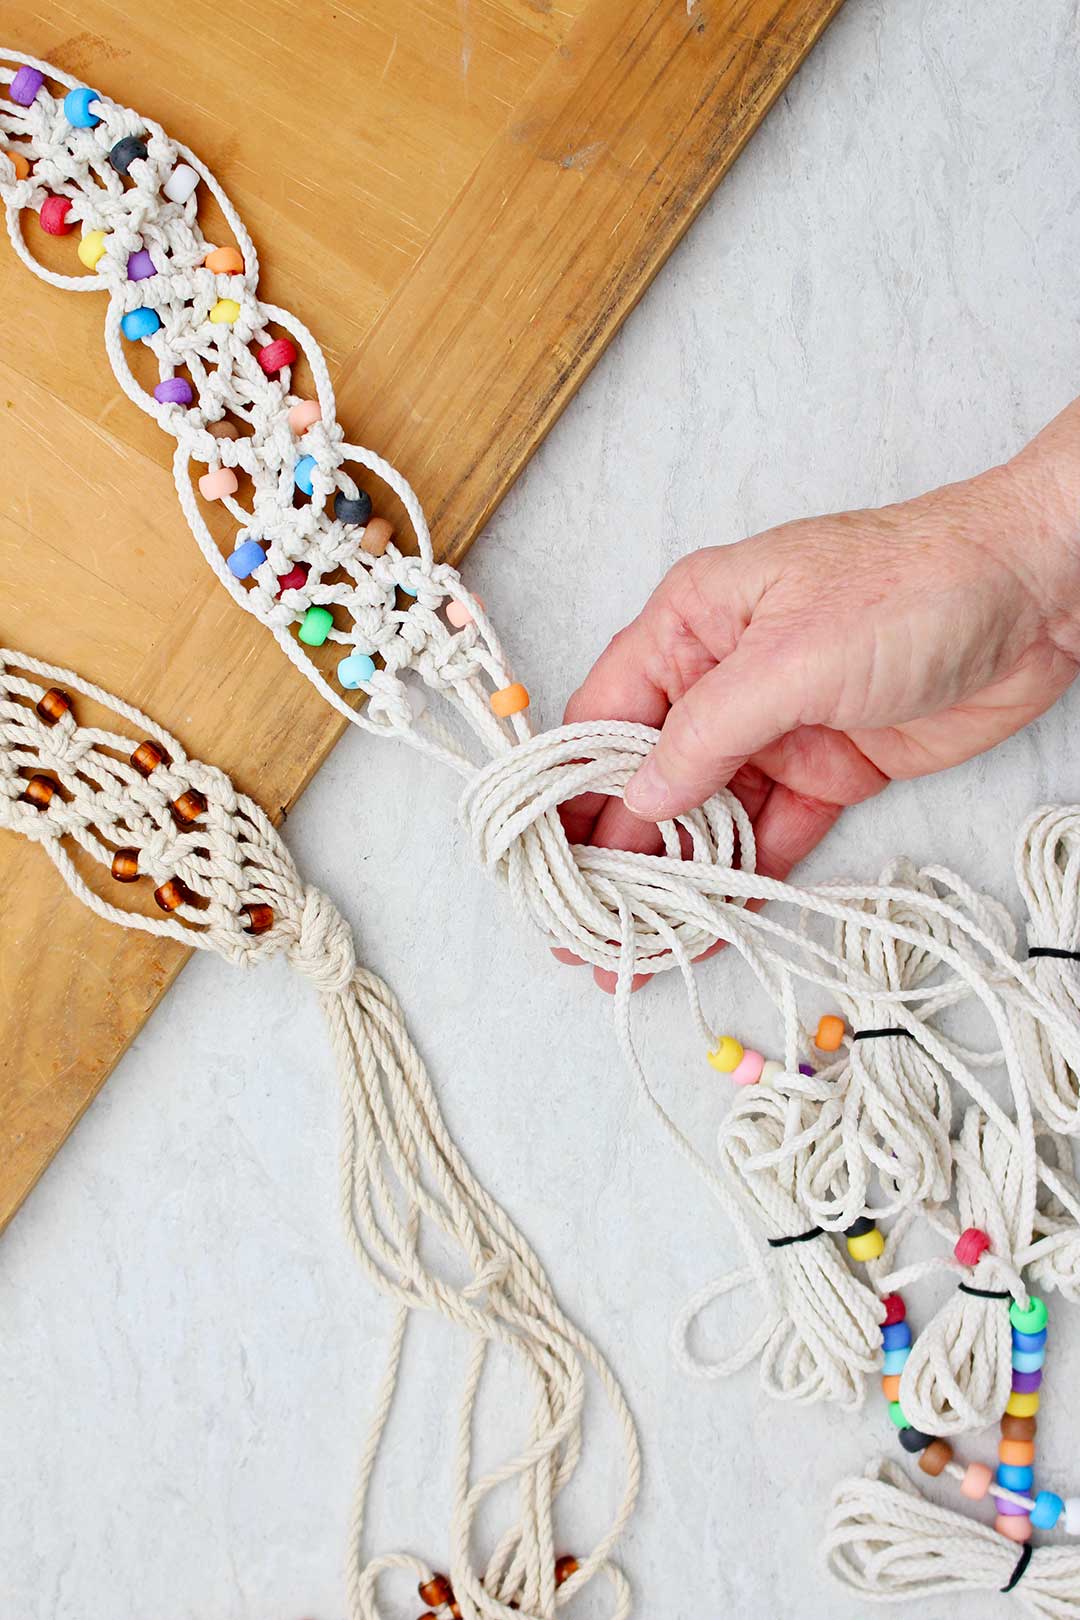
Now take the end of one cord and wind it around the palm of your other hand. Wind until there’s about 2.5-3 feet of cord unwound.
Wrap a small rubber band around the wound-up cord. Small hair rubber bands work well for this.
Repeat this for each of the 8 cords.
This will make it a lot easier to work with as you do your macramé knots. You don't have to move around long loose cords!
You can let out cording as you do the macrame.

Let's make a macrame tie belt!
Now we are ready to start the macrame part of the belt.
I’ve created a pattern for you. This free pattern can be found by clicking on this link: How to Make an Easy Macrame Belt Free Pattern.
Basic knots
You used an overhand knot to tie all of the cords together. A demo of this knot can be found at time marker 31:48 of the Easy Macrame Belt with Beads Full Length Tutorial Video.
The only two other knots you need are the half hitch knot and the square knot. We can do this!
Half hitches- a demo of this knot can be found at time marker 7:18 of the video and the picture shows it as well.
Square knots- a demo of this knot can be found at time marker 8:03 of the video and the picture shows it too.
The pattern shows you which cords to use and which knots to use. It also shows you where to string beads on your cords if necessary.
It is really worth watching the video and walking through the pattern with me. I show it two times, once with a wider camera angle and once with a more close up angle as well.
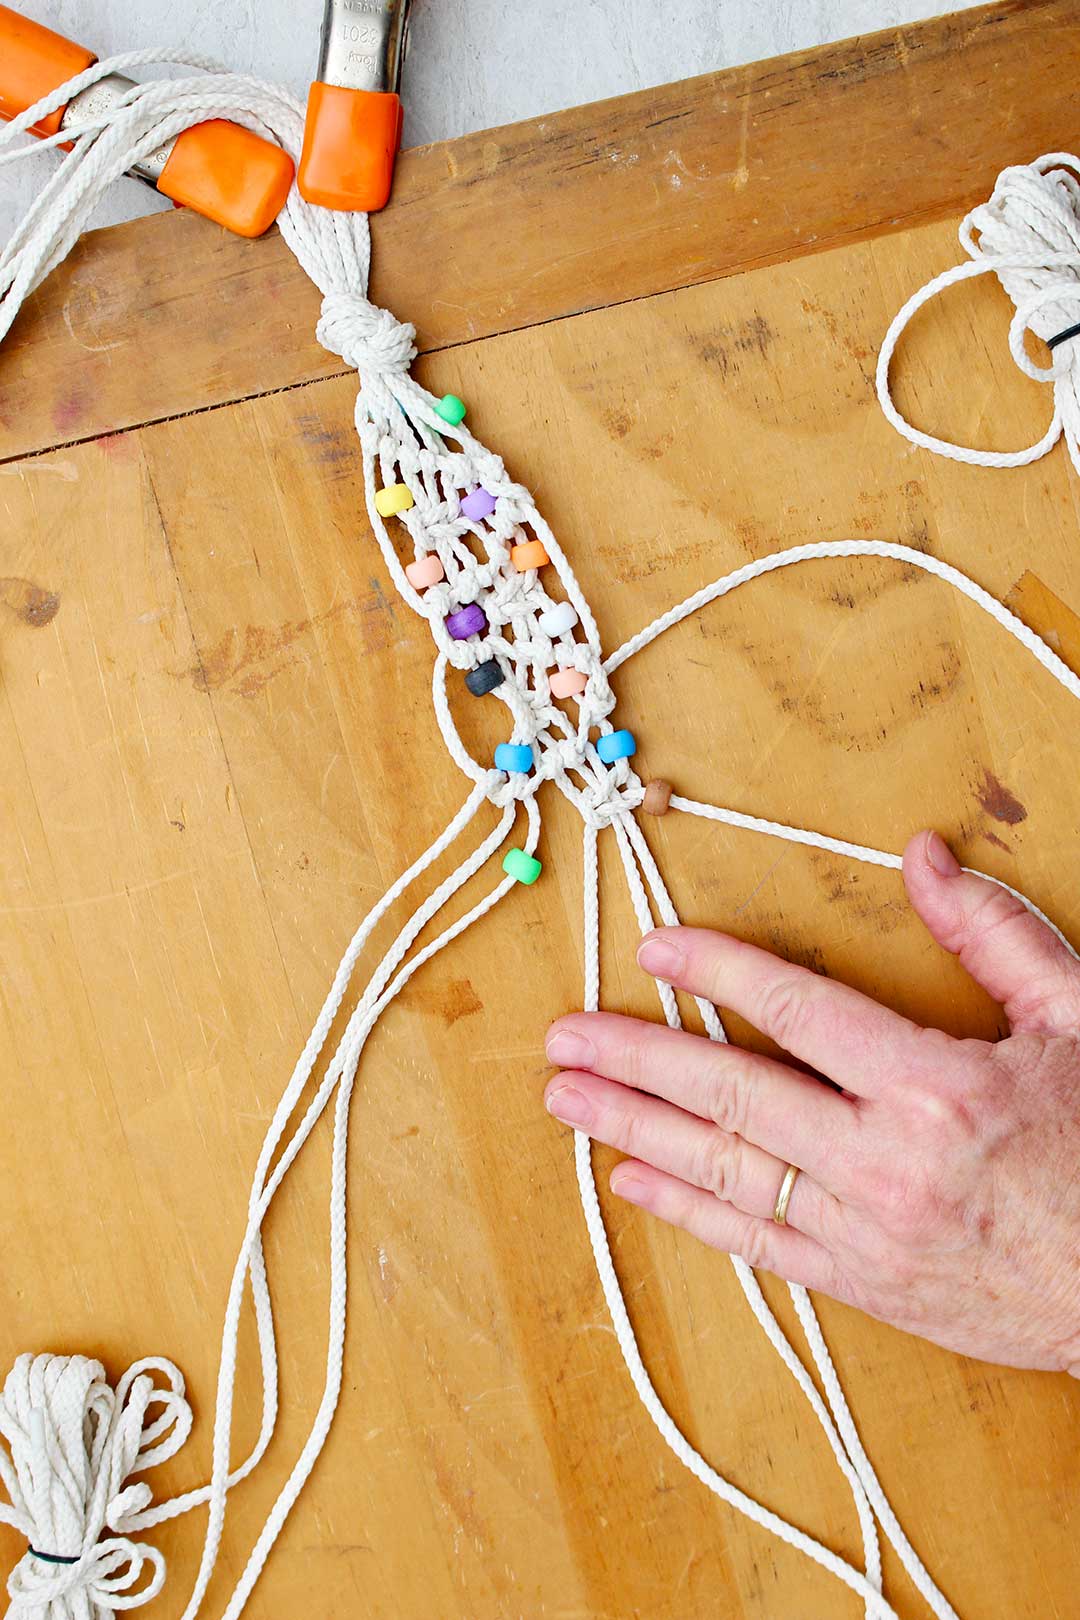
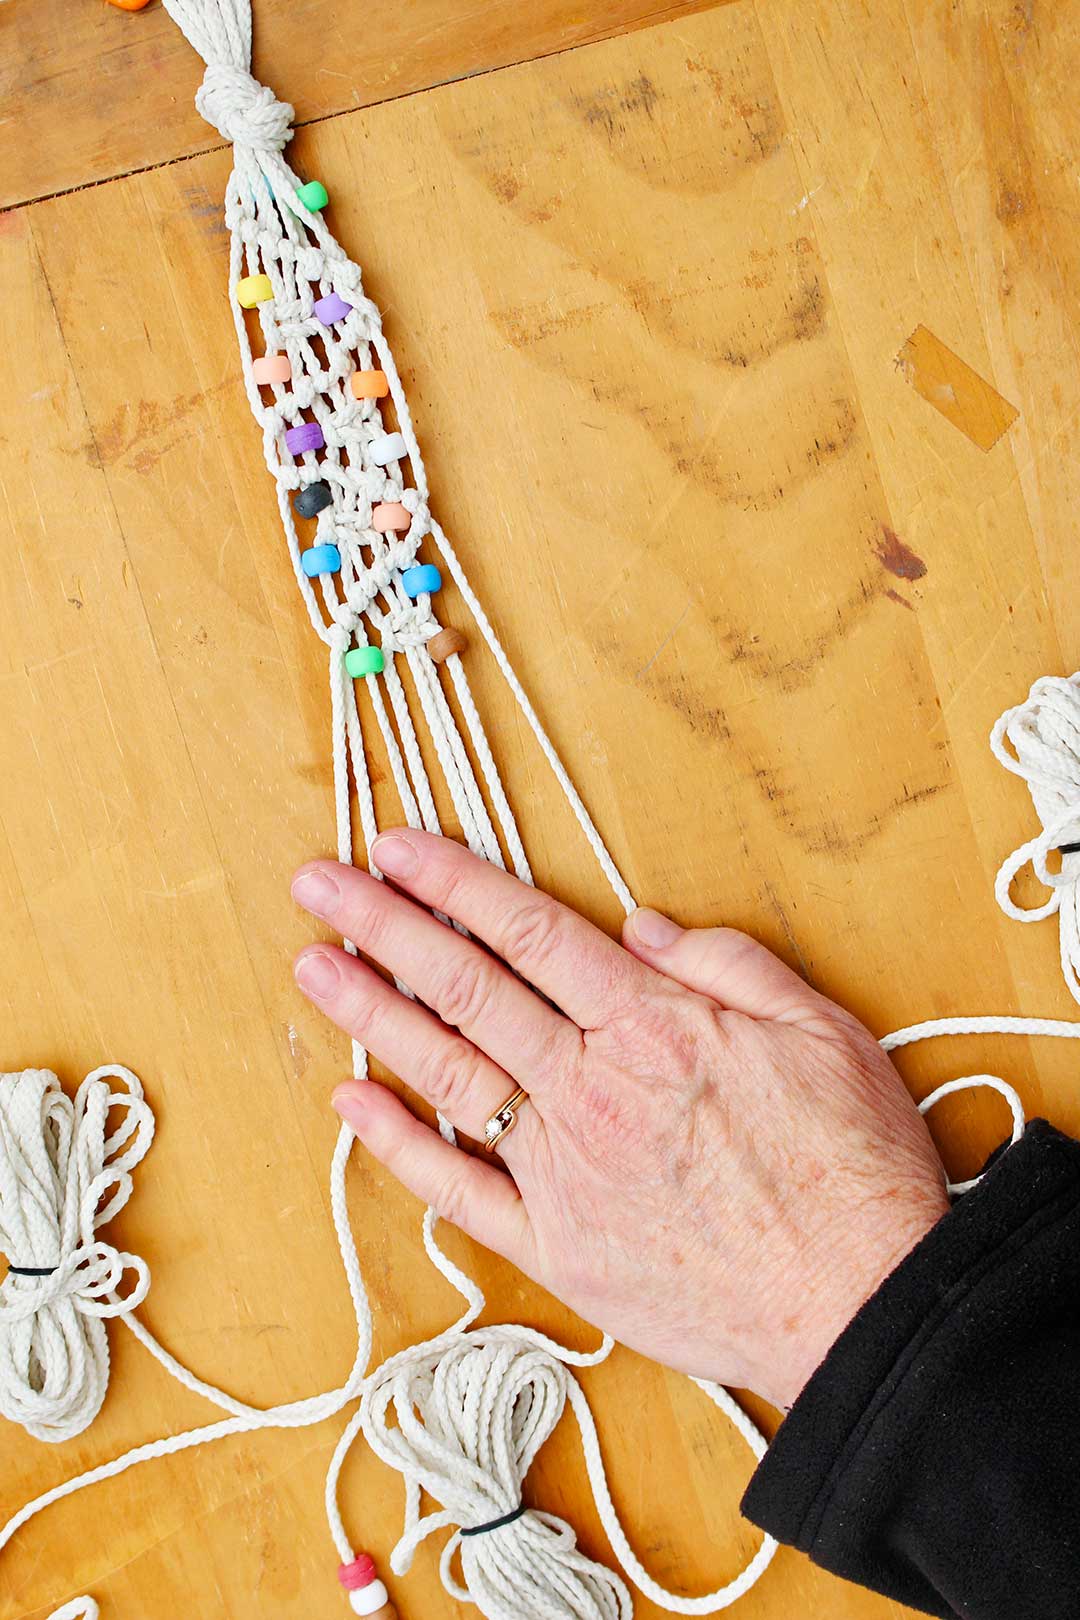
I’ve included a picture of my belt with one series of knots in the pattern. Once you’ve gone through this one macramé series, you will repeat it until you have the length of belt that you need.
On the pattern, I’ve also shown you how to create each of these knots. Again, the only three knots that you need are the overhand knot (that you use to tie the end of the belt), the half hitch knot, and the full square knot.
I must warn you that, after your small learning curve with these knots, macramé gets addictive :-). Basically all macrame is various combinations of these knots.
Macramé pattern
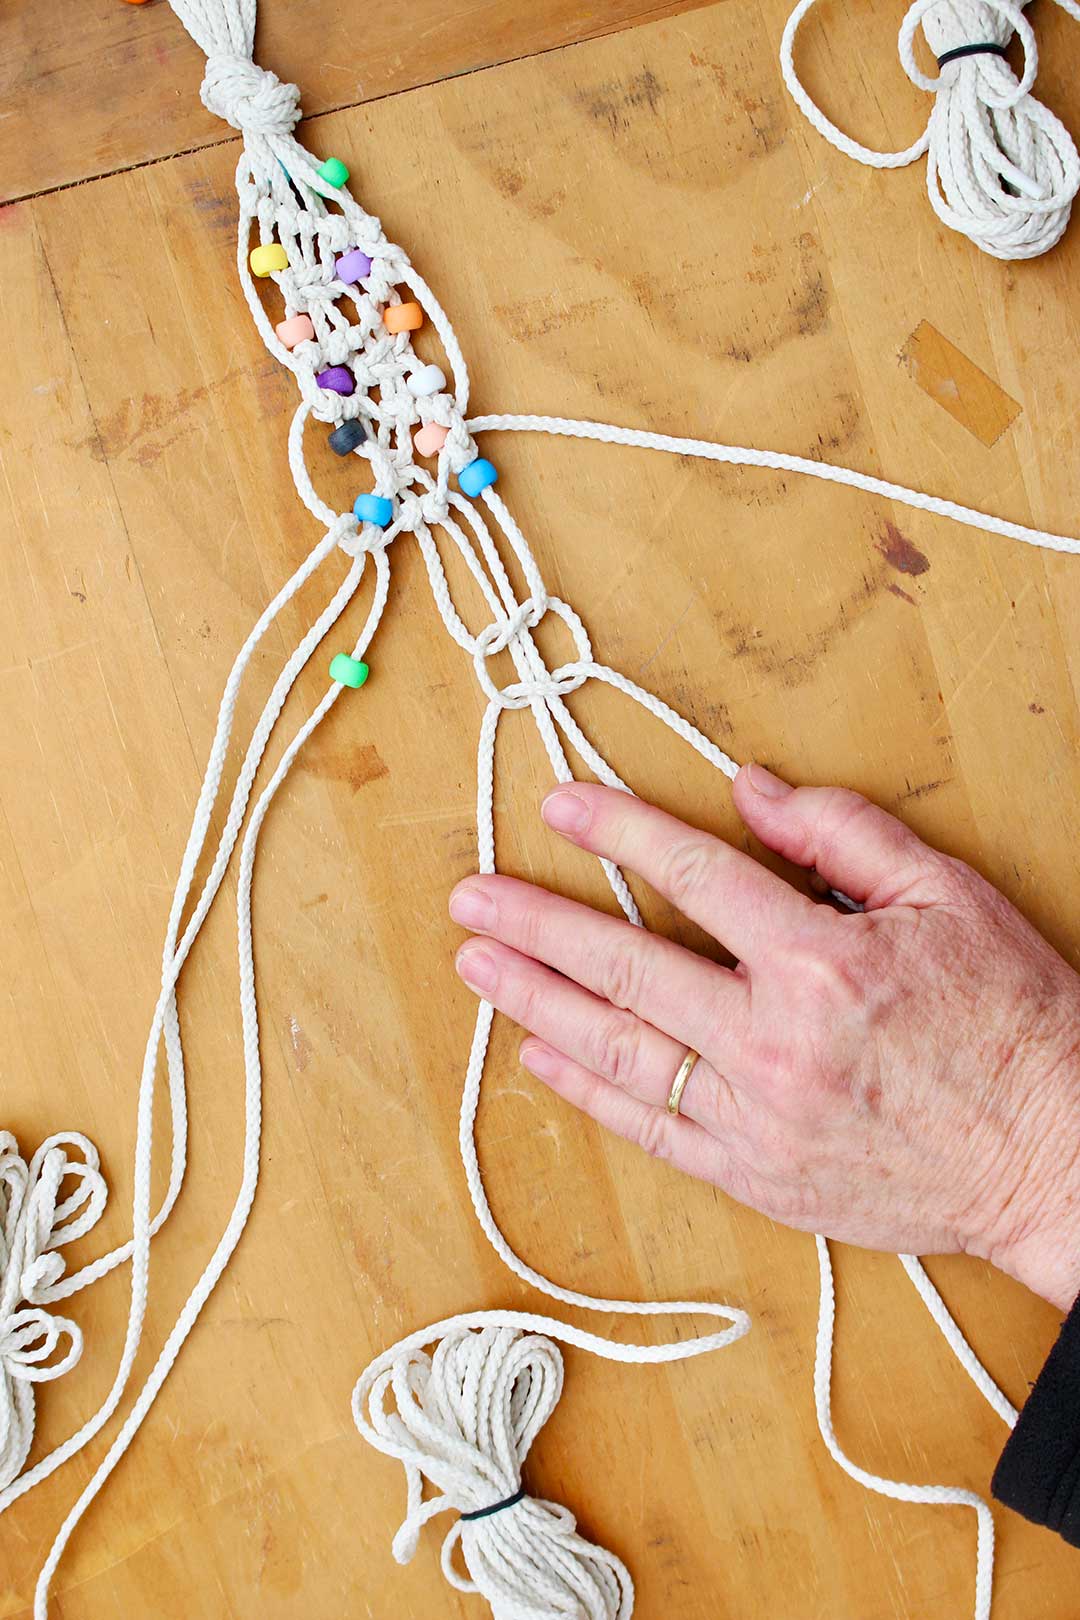
- Begin the macrame pattern, pushing the beads up into the pattern as you go.
- Separate the cords out in front of you. I will count the cords (1-8) from the left hand side.
- Beads should be on cords #3 and #7 to start with.
- Cord #1 “floats” diagonally down across all cords from the left side to the right side- lay it across all the other cords.
- Make half hitch knots with every other cord (7 cords) over the floater cord.
- Push up one bead on each bead cord- which is now cord #2 and #6.
- Tie a square knot in cords #2 and #5 that go around cords #3 and #4.
- Push up one bead on cord #2
- Cord #8 “floats” diagonally back across all the cords from the right side to the left side- so lay it back across all the other cords.
- Make half hitch knots with every other cord (7 cords) over the floater cord.
- Push up one bead on cord #3 and #7 (back in their original order again)
- Tie a second square knot in cords #4 and #7 around cords #5 and #6.
- Push up one bead on cord #7.
Macrame the whole belt by continuing this pattern. Keep measuring the length. Repeat this pattern until your belt is the length needed.
Finishing your DIY macramé belt
Tie an overhand knot in the other end of the belt. The macrame part of the belt between the two overhand knots should be the waist length minus two inches.
Wrap the ends of the cords with tape about 10-11” from the overhand knot. Cut the cord through the middle of the tape. Add 3 beads to each cord and tie an overhand knot so that beads don’t fall off the ends.
Take off the clamps or tape attaching the project to your work surface.
Cut the four folded ends of the cords.
Finish the 8 cords as you did the opposite end of the belt with tape, 3 beads, and an overhand knot as described above.
Remove the tape from the ends of every cord on both ends of the belt.
Woo-hoo, you are done!
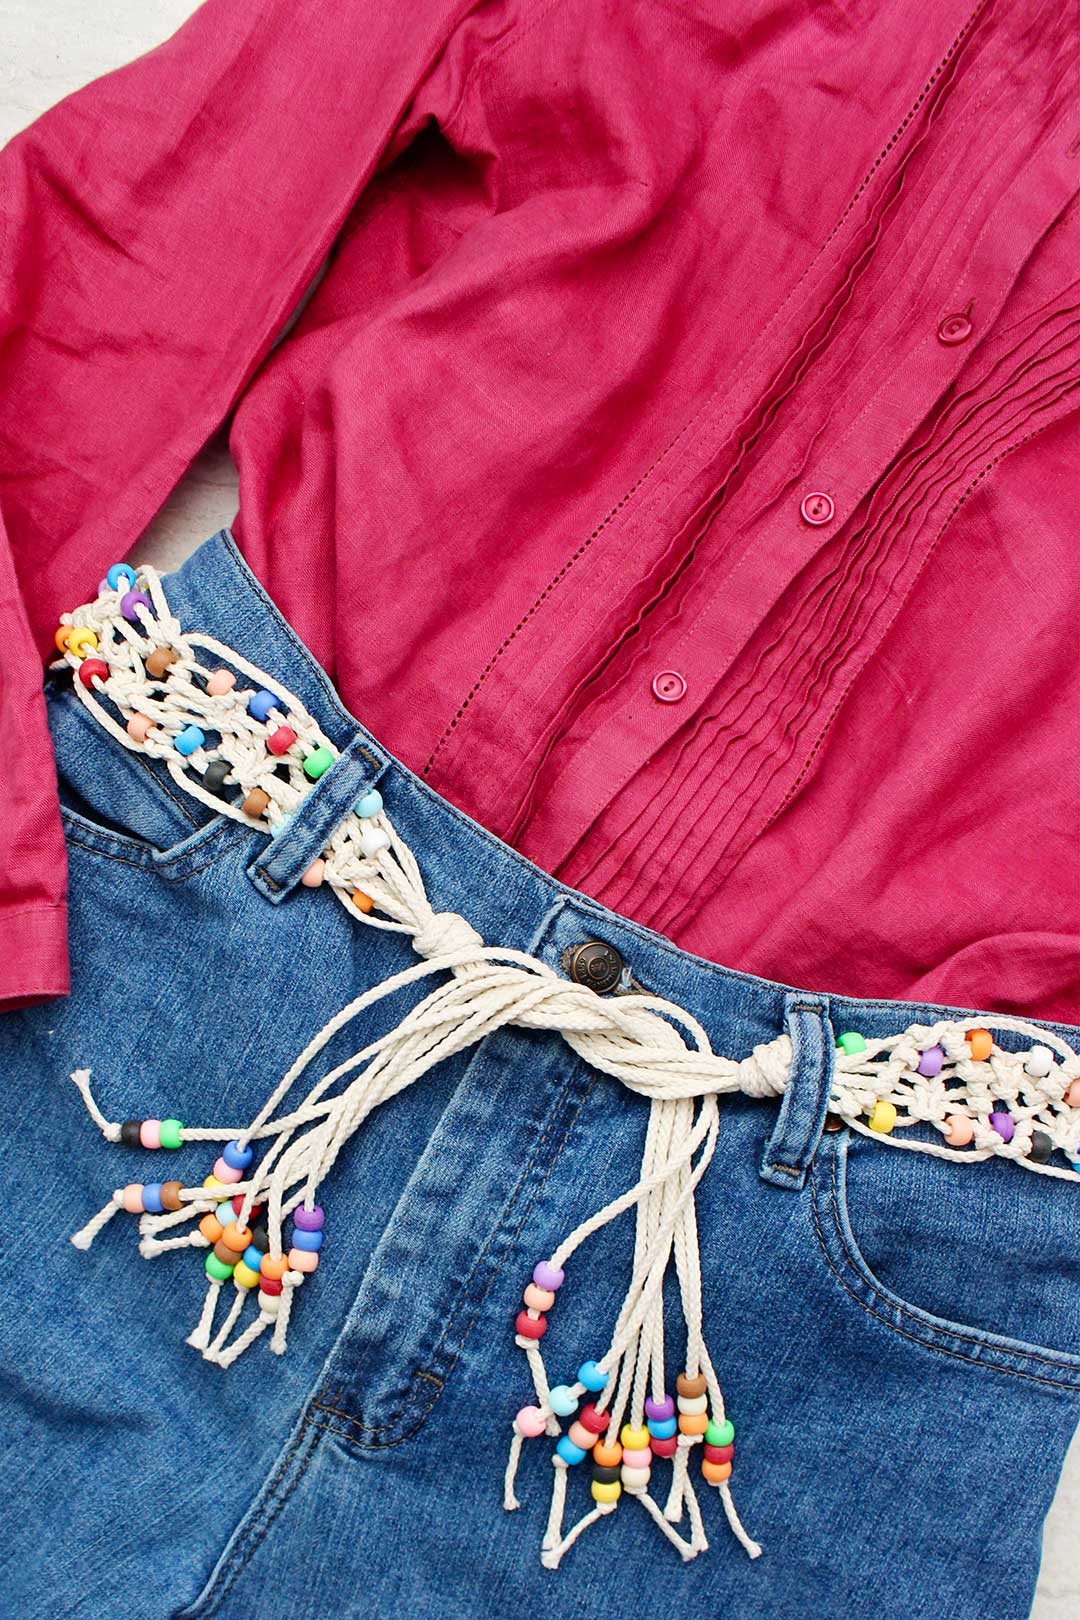
Are you ready to be groovy and wear your macrame belt with beads???
I've gotten a lot of comments about mine. I hope you enjoy yours or enjoy giving it as a gift!
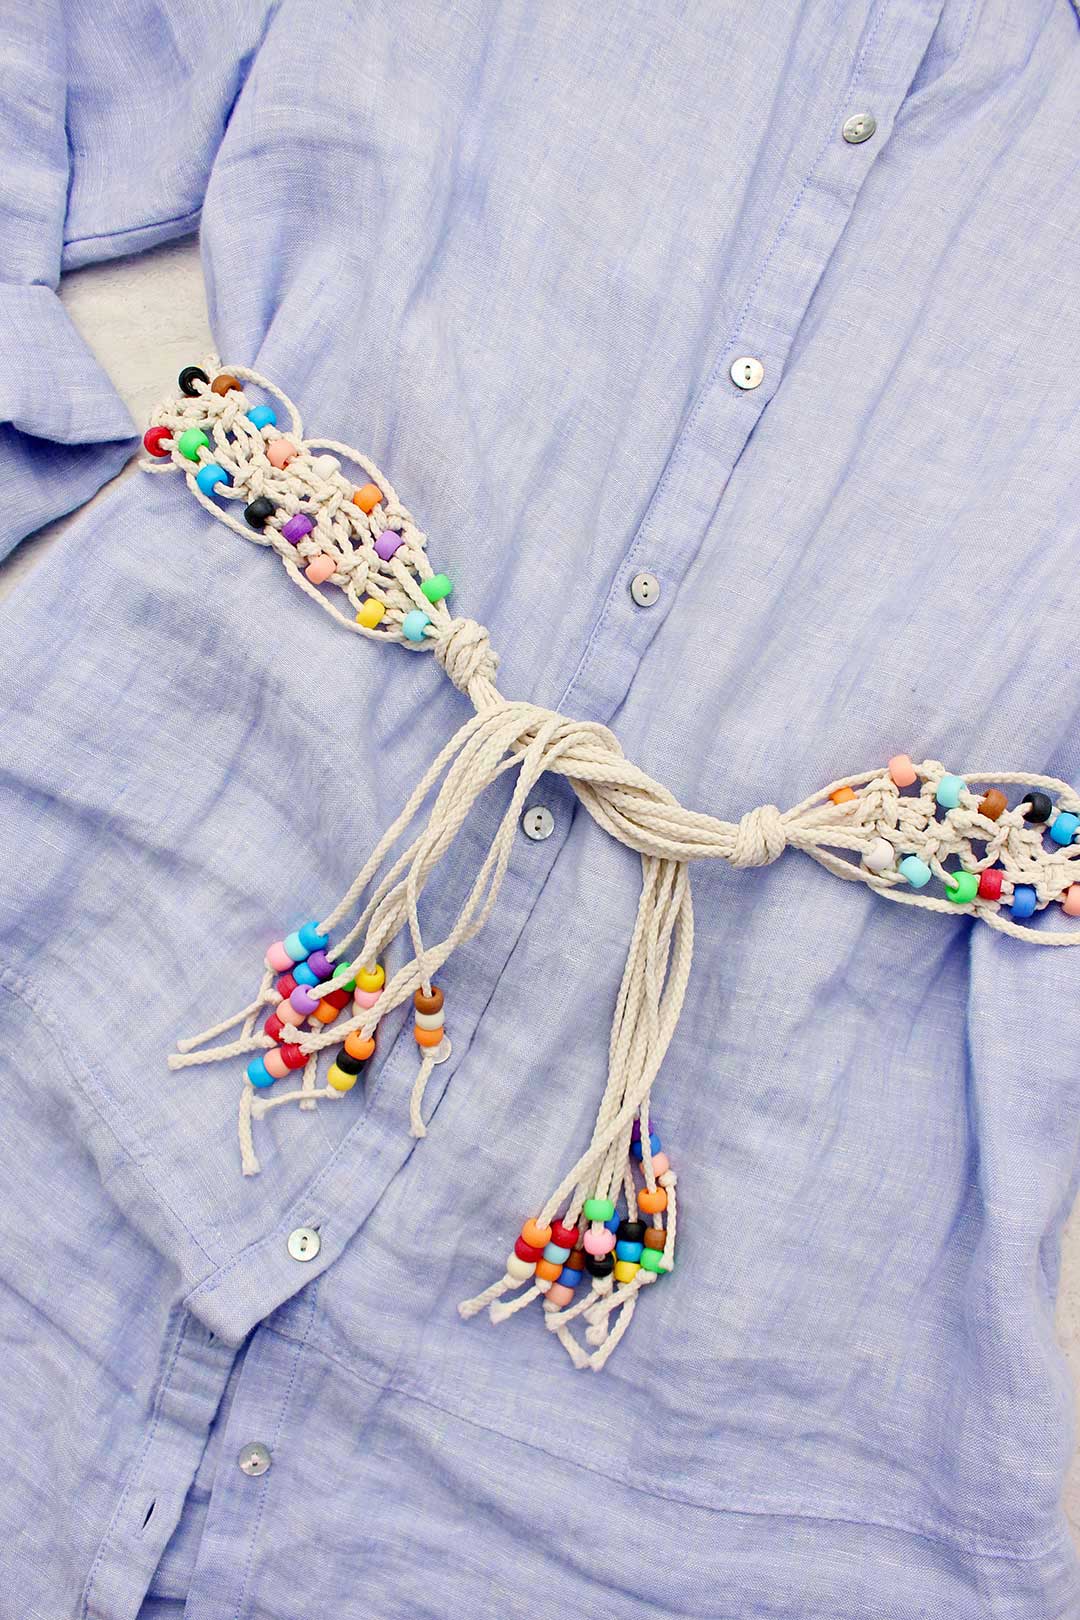
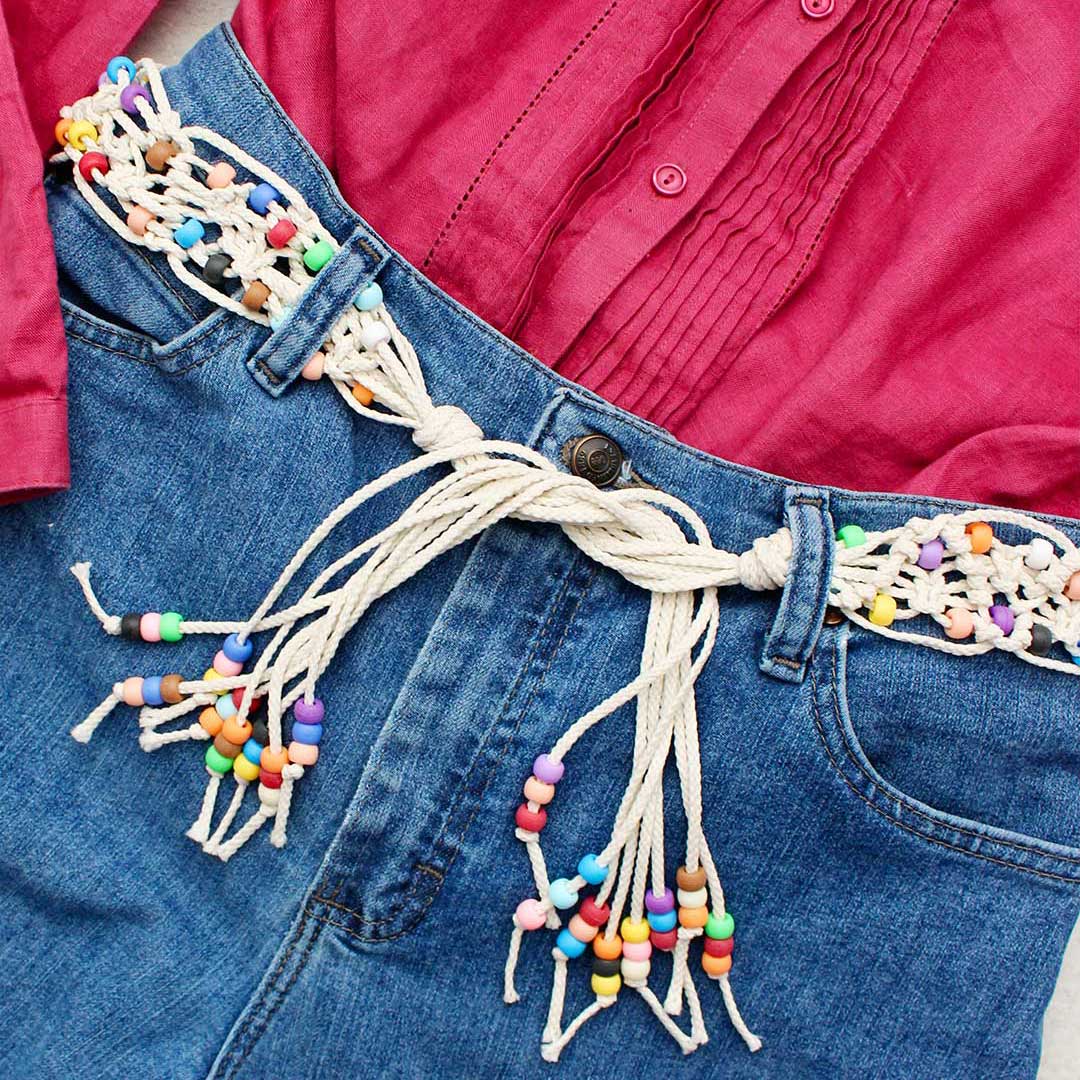
Handmade macrame belt
Go grab a pair of jeans or a tunic top and try them on with the belt. I love using a handmade piece on an outfit.
You can check out how my macrame tie belt looks in a pair of jeans and in around the waist of a longer shirt. It may be called a boho macrame belt these days. Either way, I love them.
Here is the link to that free pattern again. Link: Easy Macrame Belt with Beads Free Pattern.
And here is the link to the full length video tutorial again. It is really helpful: Easy Macrame Belt with Beads Full Length Tutorial Video.
Looking for an easy DIY macramé belt? This easy pattern only uses 3 knots altogether! Once you get the hang of those, you will be able to put them together in a series to make this free pattern.
A macramé belt, such as the one we’re making, will need to tie in front. Calculate the waist measurement – 2 inches + 24 inches = total belt length. Now measure your strings to be four times as long as the total belt length you just calculated.
This macrame belt uses just macrame cords and pony beads to create! Follow the free pattern and learn three easy knots to complete the whole belt. It's a simple DIY project that can be used over and over again!
Want more macrame or weaving?
If you would enjoy making more macrame projects or weaving crafts here are a couple to try!!
- Easy Macramé Plant Hanger
- Chevron Macrame Friendship Bracelet
- How to Make Simple String Art for Beginners
- Two Ways of Nature Weaving with Kids
Enjoy!
If you try this craft, let me know! Go ahead and leave a comment, rate it, and tag a photo with #WelcometoNanas wherever you post.
Come join the fun at https://welcometonanas.com
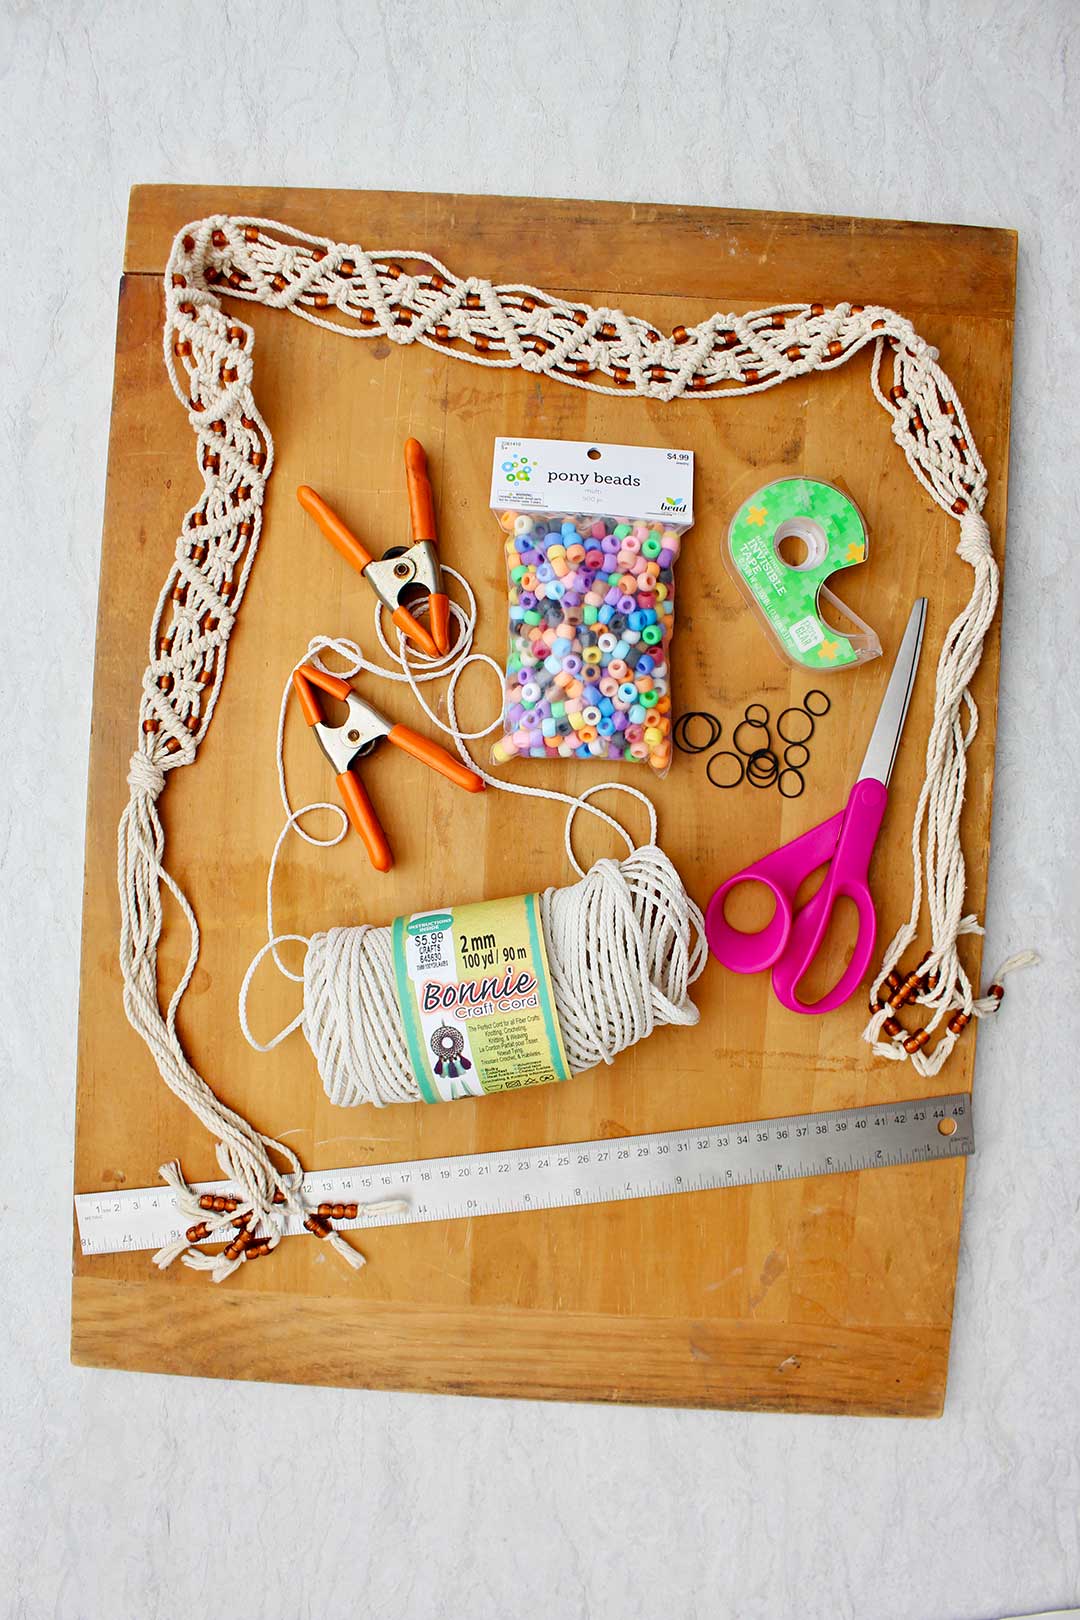
Supplies for Easy Macrame Belt With Beads
- Free Pattern for the Easy Macrame Belt with Beads
- Macrame cord- not a slick type, string like type, in a color of your choice
- Pony beads- in color(s) of your choice
- Clamps or packing tape
- Small rubber bands- the type for hair work well
- Tape
- Tape measure
- Scissors
How to Make an Easy Macrame Belt
Equipment
- Clamps or packing tape
- Tape measure
- Scissors
Items Required
- Free Pattern for the Easy Macrame Belt with Beads
- Macrame cord- not a slick type, string like type, in a color of your choice
- Pony beads- in color(s) of your choice
- Small rubber bands- the type for hair work well
- Tape
- Tape measure
- Scissors
- Clamps or packing tape
Instructions
- Start out by using a tape measure to take a waist measurement of the person that will be wearing the belt. I recommend going through the belt loops of a pair of jeans to take this measurement. Then you know it will fit right.A macramé belt, such as the one we’re making, will need to tie in front. So we’ll take two inches off of that measurement which leaves room to tie the knot at the front of the jeans. This measurement will be the macraméd part of the belt.The belt will also have long sets of dangling cords- one on either end. That’s what we will use to tie the belt in the front.These ends add 12-inches to both ends of the belt. So add 24” to the previous measurement. Write down this number to use in the next step. (waist measurement – 2 inches + 24 inches = total belt length)
- Measure your strings to be four times as long as the total belt length you just calculated. So the length that you will measure is the waist measurement – 2 inches +24 extra inches x 4.Place a small piece of tape around macrame cord where you are going to cut it. Wrap it tightly around the cord. Cut in the middle of this wrapped tape so both ends of the string are tape covered.The end of the string becomes kind of like the end of a shoestring. This makes it easy to string the beads later. It also keeps the cord from unraveling.
- We need eight different strands to make this macramé belt. So lay the cords out on the floor and fold each one in half. Now gather the folded ends all together in your hand and measure up 12 inches from the folds. Tie an overhand knot 12 inches from the folded ends to keep all the cords together. This creates one end of the belt with about 11-12 inches for the ties.
- Next, we’re going to secure the end of the belt to the work surface in a way that will allow you to do your macramé and hold the belt in place. Use packing tape or clamps to secure the cords.I’m choosing to secure my macramé belt to an old breadboard I use in my crafting. You can see in the pictures that I used clamps.
- String 30 beads on two of the cords. I used multi-colored pony beads for this belt. My first belt was created with brown pony beads. Pony beads work well because the hole in the bead is quite large. I couldn’t find real wooden beads in the right size that had large enough holes for the cord to fit through.You do not need to add the beads, this is optional.
- Now take the end of one cord and wind it around the palm of your other hand. Wind until there’s about 2.5-3 feet of cord unwound. Wrap a small rubber band around the wound-up cord. Small hair rubber bands work well for this. Repeat this for each of the 8 cords.
- You used an overhand knot to tie all of the cords together. The only two other knots you need are the half hitch knot and the square knot. We can do this!Half hitches- a demo of this knot can be found at time marker ** of the video and the picture shows it as well.Square knots- a demo of this knot can be found at time marker ** of the video and the picture shows it too.The pattern shows you which chords to use and which knots to use. It also shows you where to string beads on your cords if necessary. It is really worth watching the video and walking through the pattern with me. I show it two times with a wider camera angle and a more close up angle as well.
- Macramé pattern (Free Pattern for the Easy Macrame Belt with Beads)Begin the macrame pattern, pushing the beads up into the pattern as you go.Separate the cords out in front of you. I will count the cords (1-8) from the left hand side.Beads should be on cords #3 and #7 to start with.Cord #1 “floats” diagonally down across all cords from the left side to the right side- lay it across all the other cords.Make half hitch knots with every other cord (7 cords) over the floater cord.Push up one bead on each bead cord- which is now cord #2 and #6.Tie a square knot in cords #2 and #5 that go around cords #3 and #4.Push up one bead on cord #2Cord #8 “floats” diagonally back across all the cords from the right side to the left side- so lay it back across all the other cords.Make half hitch knots with every other cord (7 cords) over the floater cord.Push up one bead on cord #3 and #7 (back in their original order again)Tie a second square knot in cords #4 and #7 around cords #5 and #6.Push up one bead on cord #7.Macrame the whole belt by continuing this pattern. Keep measuring the length. Repeat this pattern until your belt is the length needed.
- Tie an overhand knot in the other end of the belt. The macrame part of the belt between the two overhand knots should be the waist length minus two inches.Wrap the ends of the cords with tape about 10-11” from the overhand knot. Cut the cord through the middle of the tape. Add 3 beads to each cord and tie an overhand knot so that beads don’t fall off the ends.Take off the clamps or tape attaching the project to your work surface. Cut the four folded ends of the cords. Finish the 8 cords as you did the opposite end of the belt with tape, 3 beads, and an overhand knot as described above.Remove the tape from the ends of every cord on both ends of the belt.Woo-hoo, you are done!


Leave a Reply