Make a Flower Press
This spring make a large DIY Flower Press from Wood that holds 10 layers of pressed flowers It’s strong and easy to make- kids will love it.
Way cool! This DIY Flower Press from wood for pressing flowers came out even better than I had hoped. I’m so excited for you to try this and have fun with the grands.
Once the flowers are fully dried, they are perfect to use in pressed flower art, bookmarks, and other crafts!
Prefer watching the video? Here it is!!

I pressed flowers in books when I was young. The wildflowers in our pasture were so beautiful and I found four leaf clovers fairly often, so the pages of our encyclopedias (remember those?) were full of pressed flowers and leaves. The dried flowers were perfect to make bookmarks and other crafts.
We purchased a flower press for our kids when they were young. I gave that press to my granddaughter last year when I couldn’t find one in the craft store.
That day I planned a post about making a homemade flower press both you and I could make!
This is the perfect time of year to make a flower press as many spring flowers are blooming. Can’t you just imagine the craft possibilities with dried flowers? Exciting.
DIY Flower Press from wood
You can press flowers many ways, but I wanted to make a larger flower press that could hold many layers of pressed flowers and thought one made from wood would be strong and easy to make.
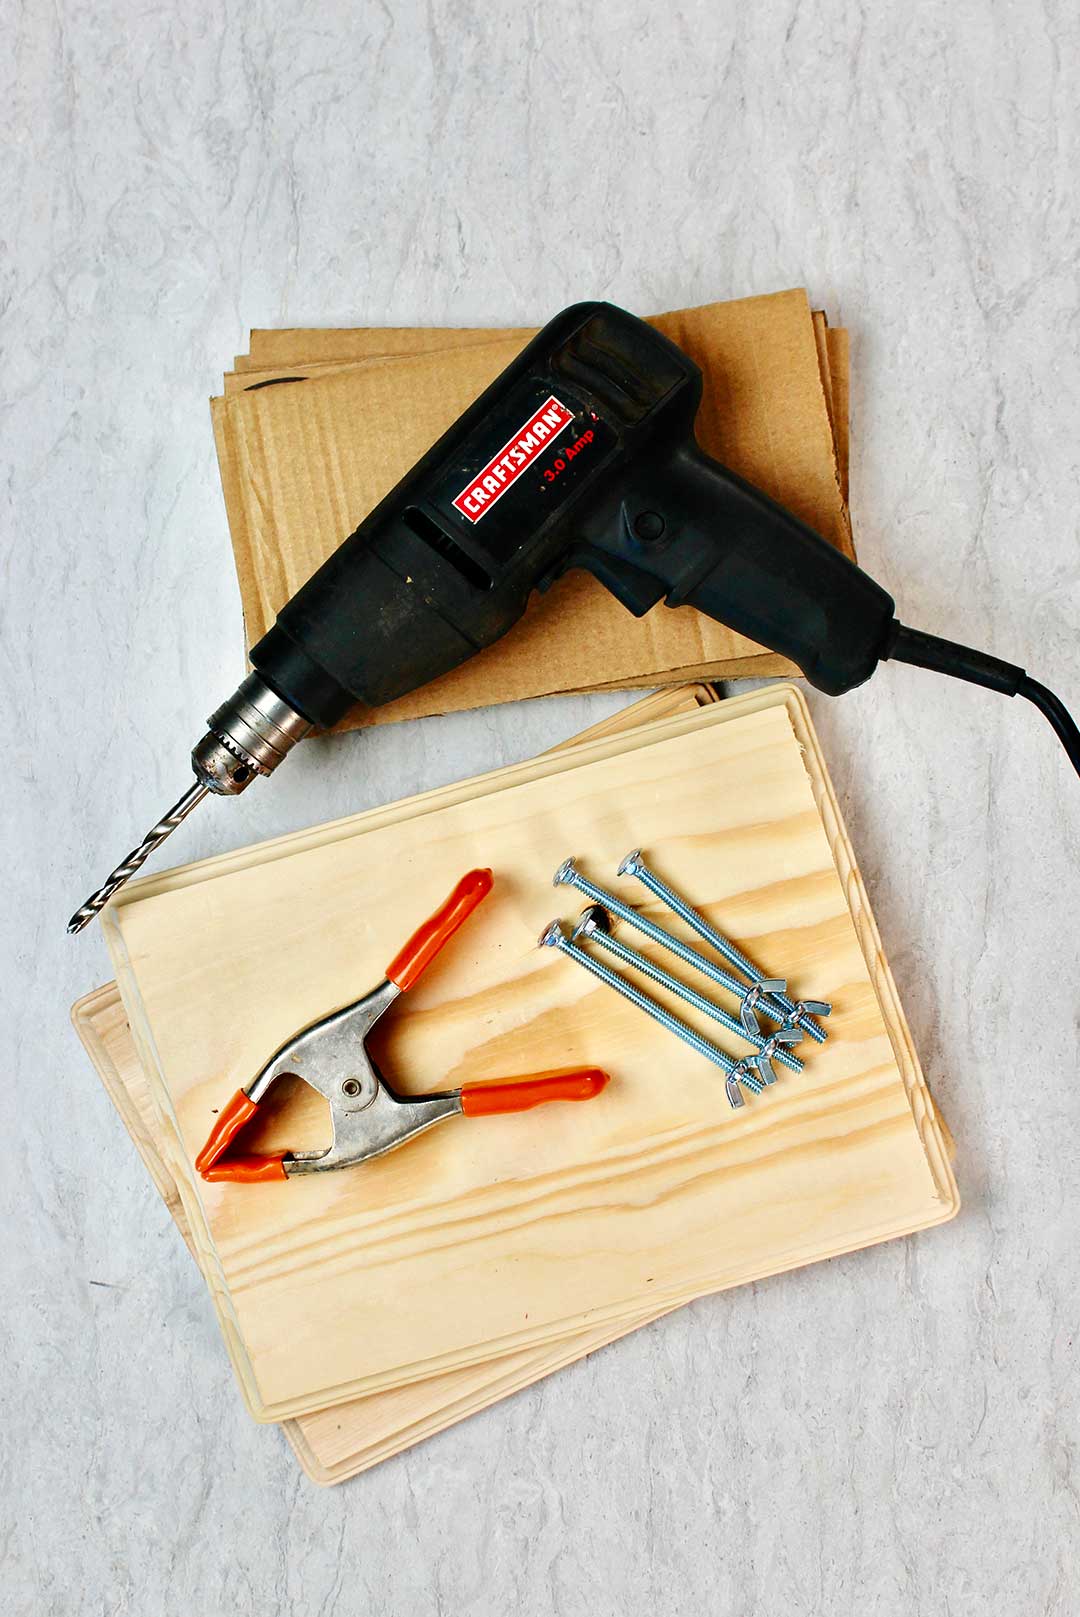
When I went to the craft store, I walked through the aisle where there were wooden craft cut outs. This would be an easy way to get the two pieces of wood needed for the flower press.
I purchased two 8.5 by 11.5-inch rectangular wood plaques with beveled edges. These can be purchased for 40% on sale periodically- good deal.
You could also purchase and cut plain would in a similar size if you would prefer.
The four inch long, ¼-inch diameter carriage bolts and wing nuts came from the hardware store.
How do I make a DIY flower press from wood?
This craft takes a drill with a ¼-inch drill bit to make holes for the carriage bolts. If you don’t have a drill, ask a friend if you could borrow one or ask if they would make the holes in the wooden plaques for you.
Do you like to use power tools? This may be a job for you unless your grands are older and capable of handling a power tool.
Tip: Place a couple boards underneath what you are drilling so you don’t drill into your work surface.
Drill a hole in each of the four corners of one of the plaques.
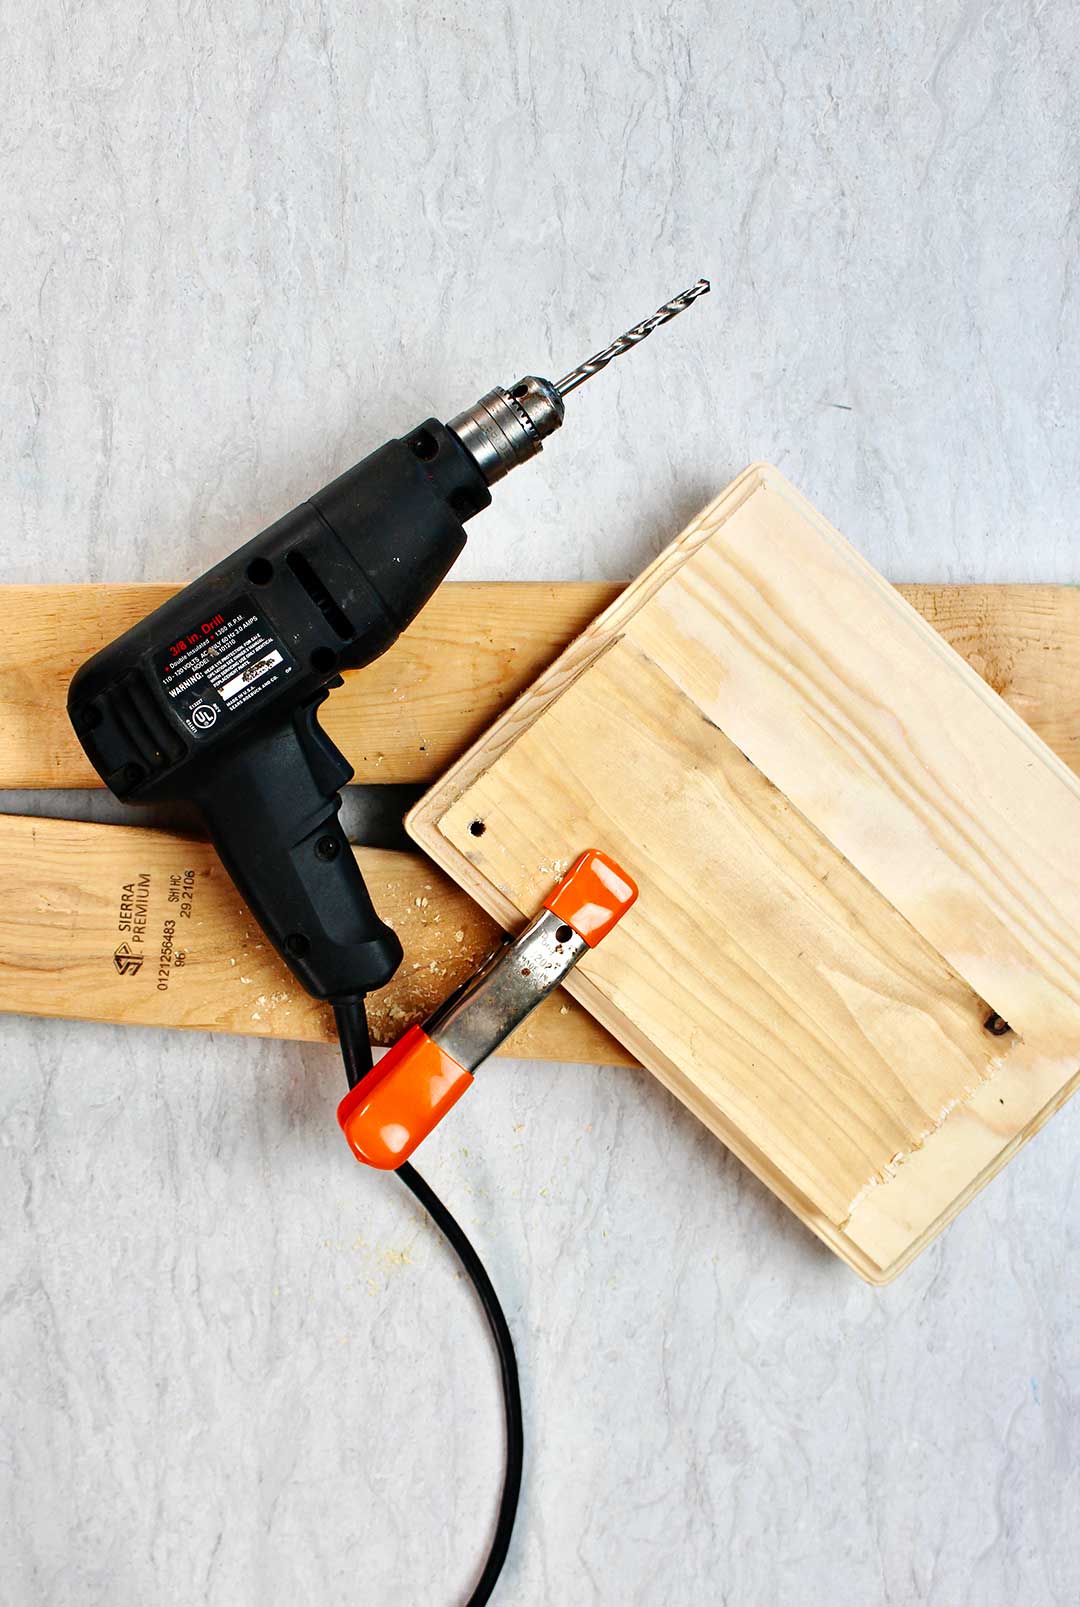
Tip: I used a small piece of scrap wood and drilled a hole in it. Then used a clamp and clamped it onto the plaque. This is what my dad called a “jig”. It helps you to drill the hole straight and in the right place. This is optional but I found it helpful.
Clamp the second plaque onto the first, larger flat sides together. Use the holes in the first plaque as a guide to drill the holes in the second plaque.
Pull the drill bit in and out of each of the holes to make it a bit bigger than ¼ inch. Then the carriage bolts will slide in and out more easily.
Your DIY Flower Press from Wood is done! That wasn’t hard, was it?
Assemble the wooden flower press
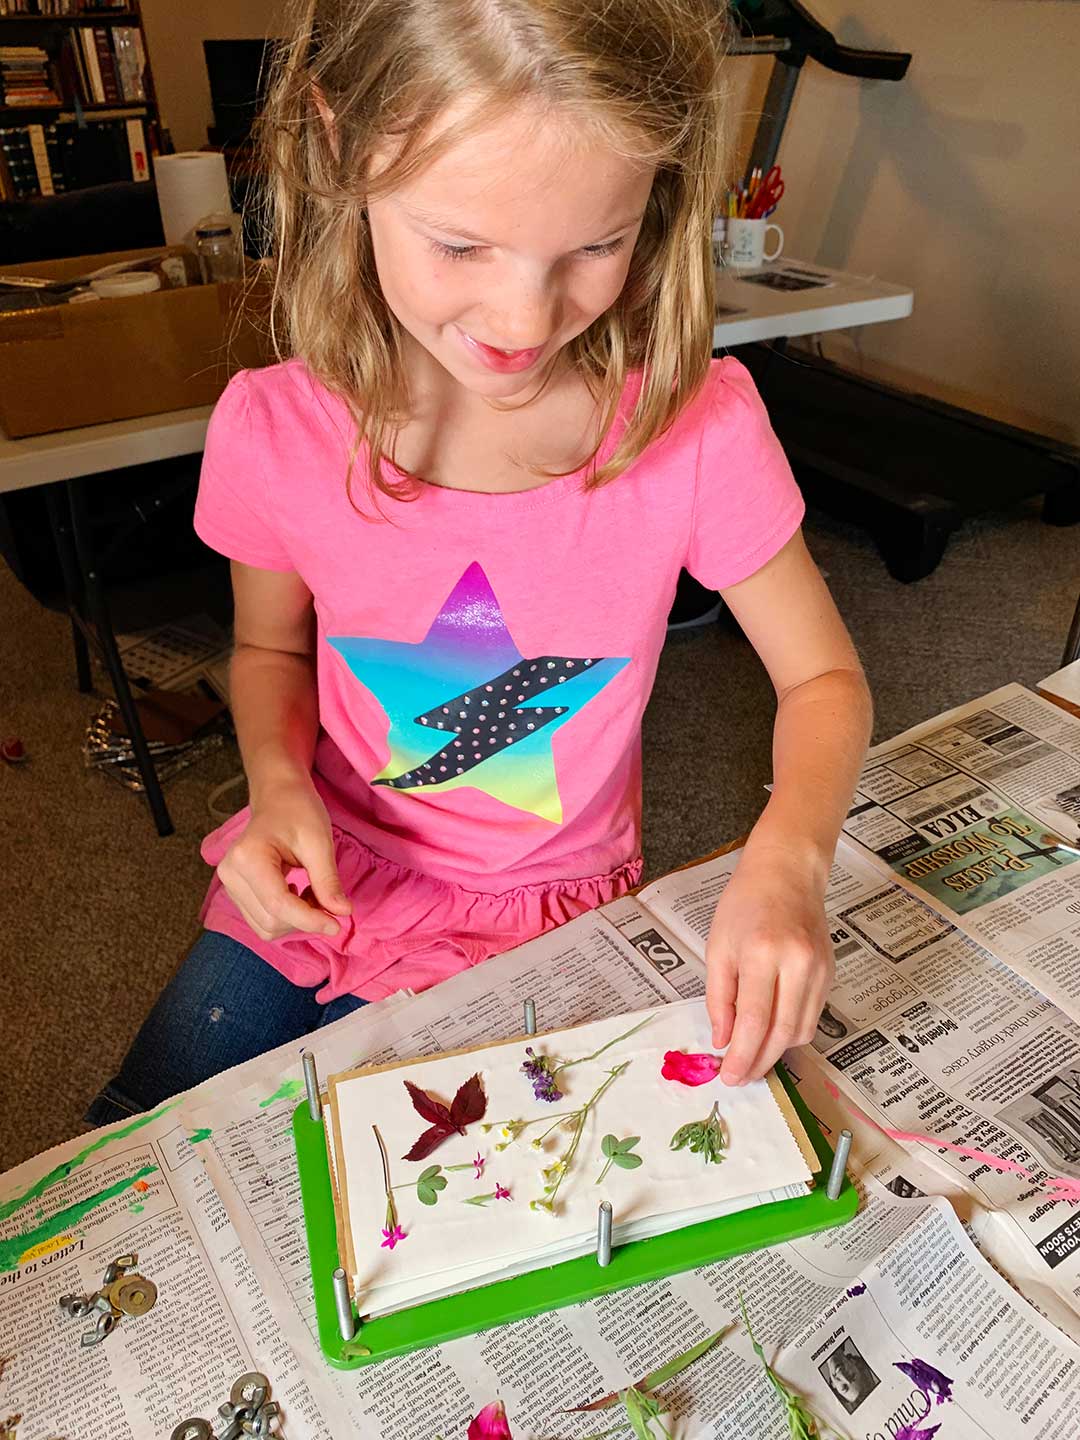
Now let the grands put the flower press together and press flowers!
Slip the carriage bolts into the holes of one plaque from the narrower side. Lay it on the table with the ends of the bolts upward.
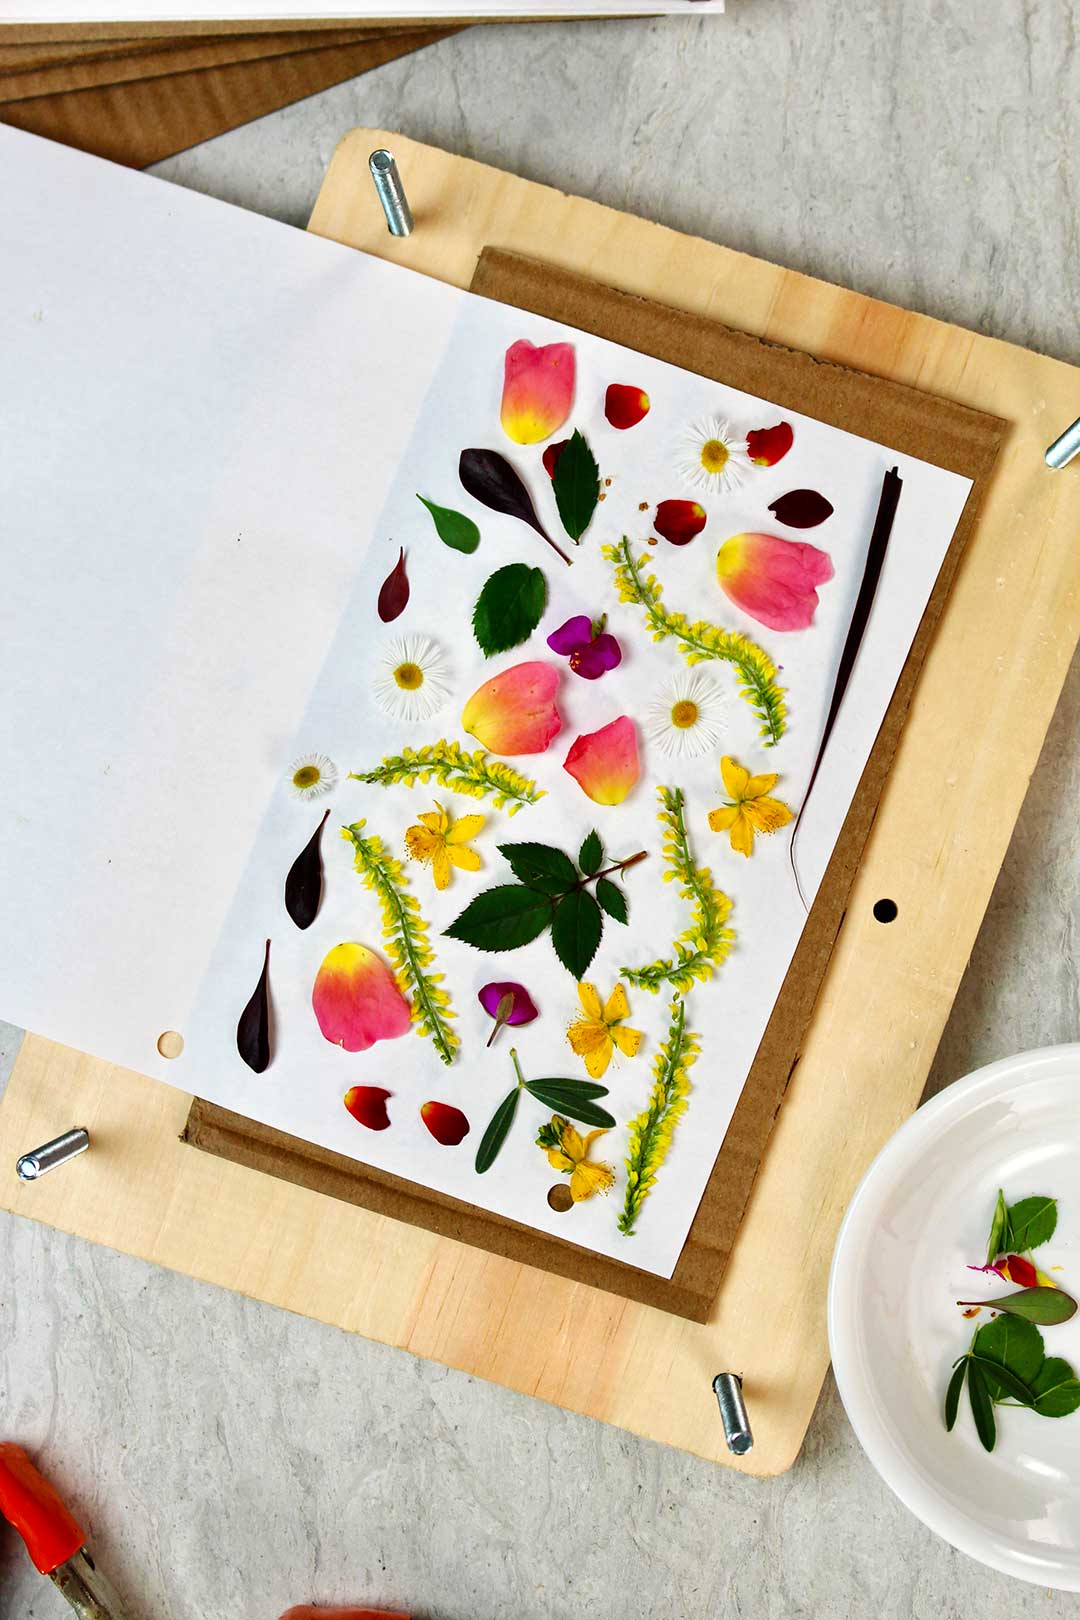
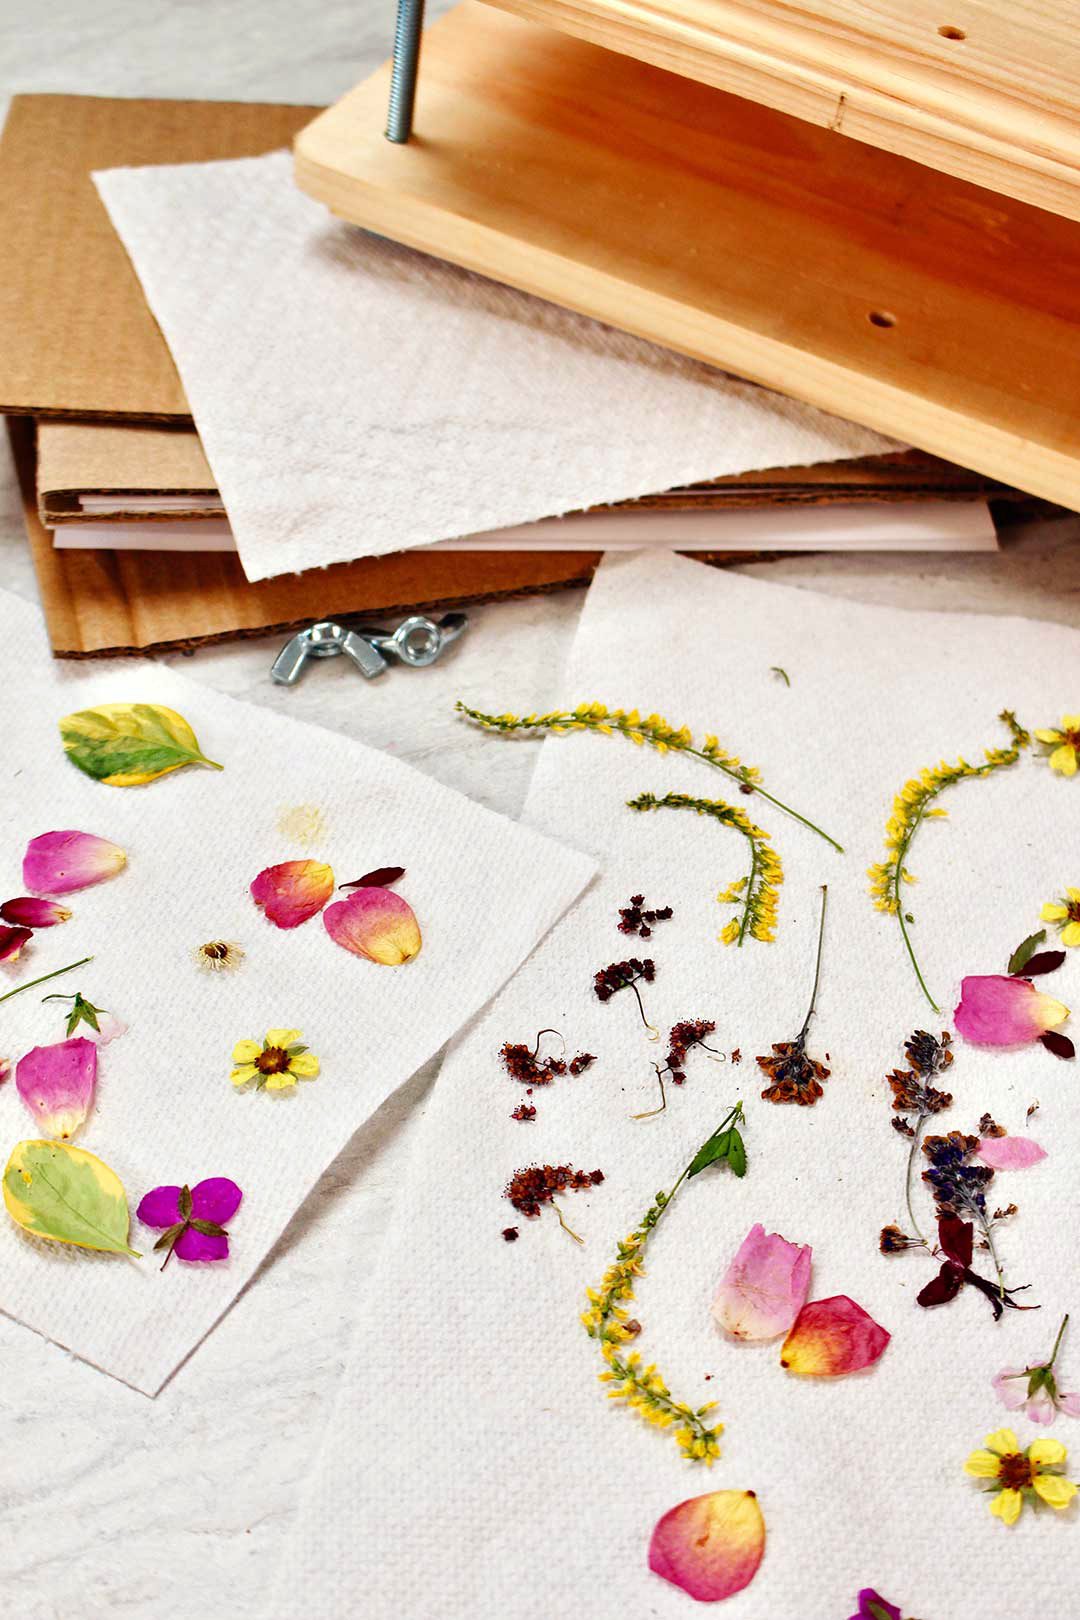
Cut 8-10 pieces of corrugated cardboard to fit inside the four bolts in the corners of the plaque. I cut these cardboard pieces about 6 by 9 inches, and they could have been a bit bigger. This is a great way to use up a couple old Amazon boxes!
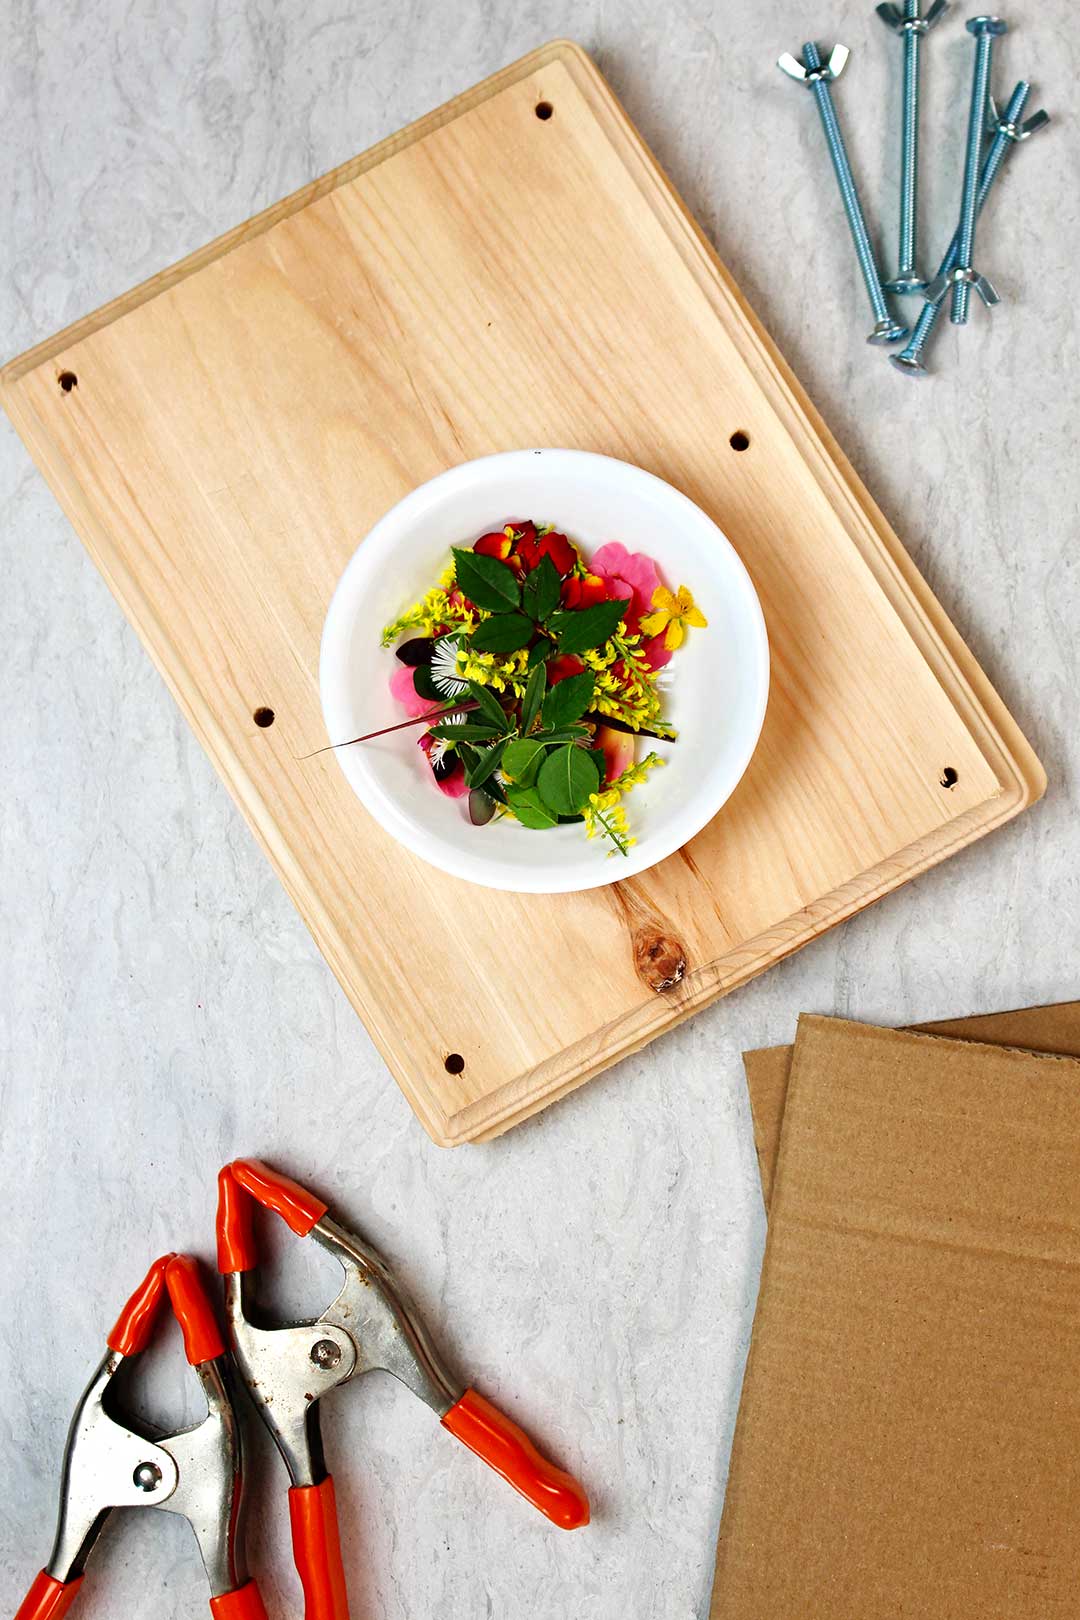
Pressed wildflowers
Take the grands and make a walk around the house and yard for small flowers that would press well. Thick flowers don’t work well so look for smaller flowers.
We had a lot of different wildflowers blooming and they worked well.
You just have to experiment to see what works best, but we found that white flowers didn’t work as well (turned brown).
The Best flowers to press (and greenery)
The best flowers to press:
- Flowers that aren’t thick or are without thick centers
- Garden flowers
- Small wildflowers
- Rose petals
- Clover
- Thinner leaves for greenery
Best paper for pressing flowers
There are a lot of types of paper that will work to press flowers. You can use blotting paper for flower pressing, waxed paper, parchment paper, or paper towels. But I just use plain copy paper. It works well.
Pressing flowers
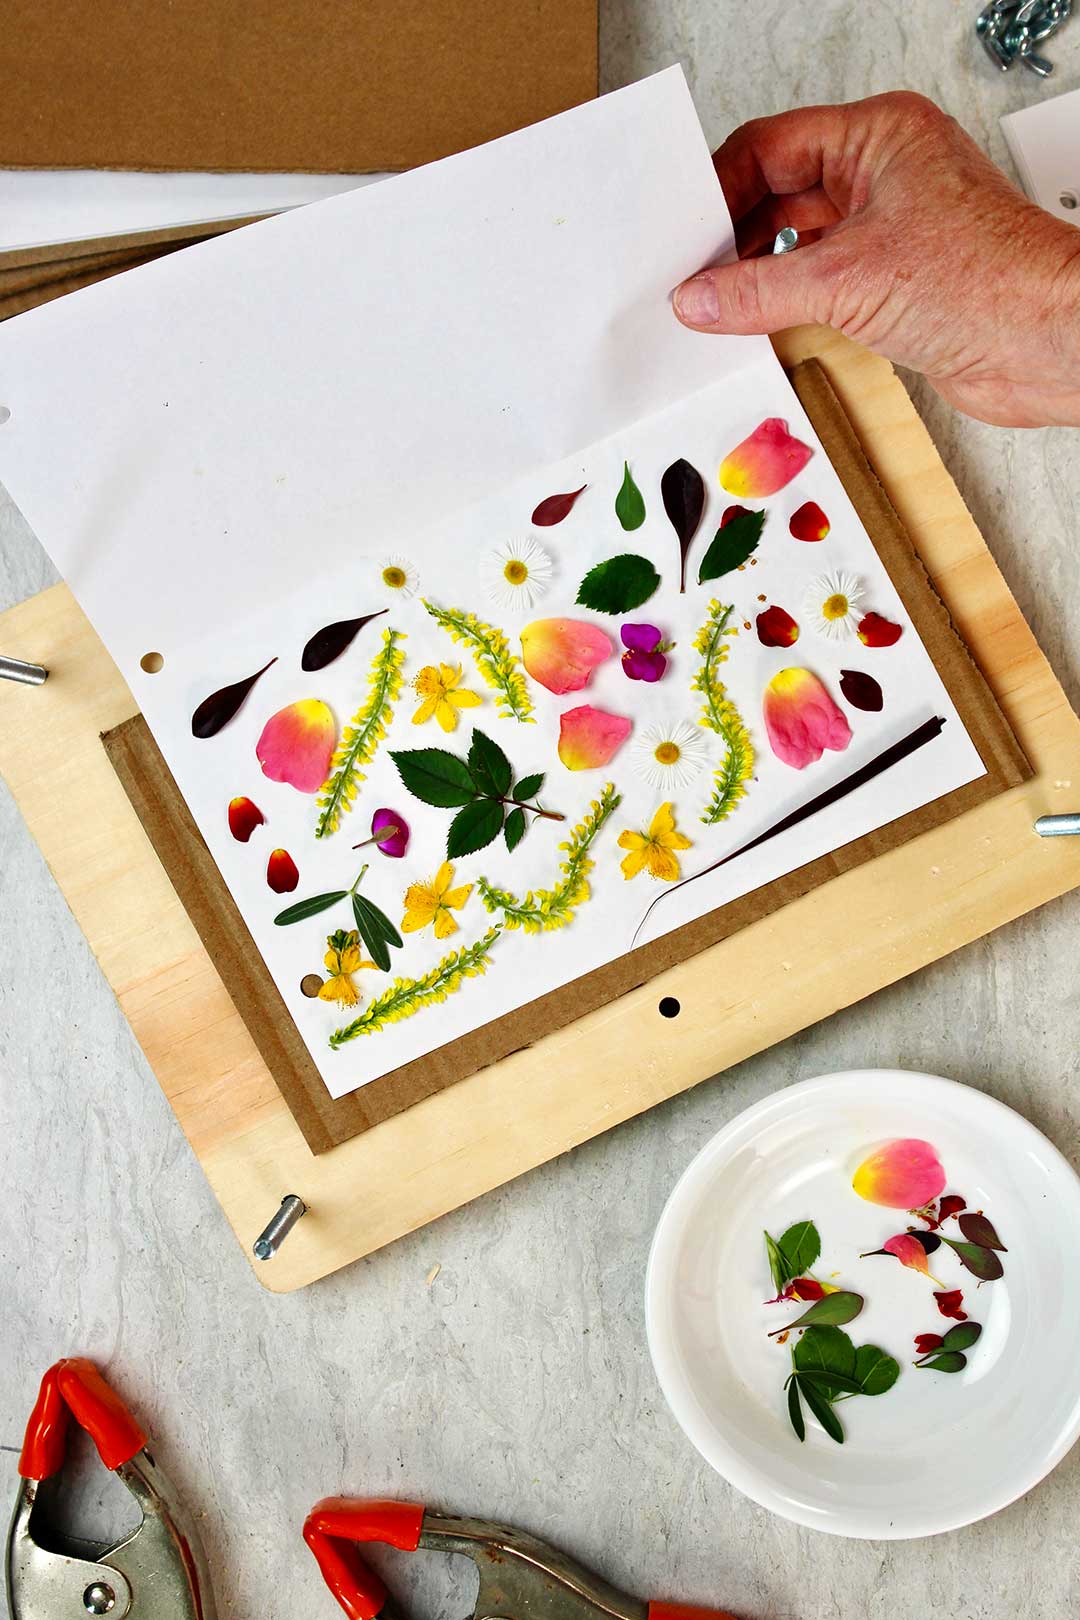
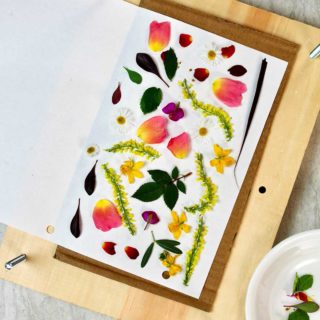
Put down a layer of cardboard, paper, flowers and leaves, and then paper.
Spread the flowers and leaves out so they do not overlap.
Repeat this layering over and over. Always end by placing another layer of cardboard on the top.
This flower press can have 8-10 layers of flowers! You can make a couple layers and then come back and add more layers of flowers you want to press if you are careful not to disturb the other layers.
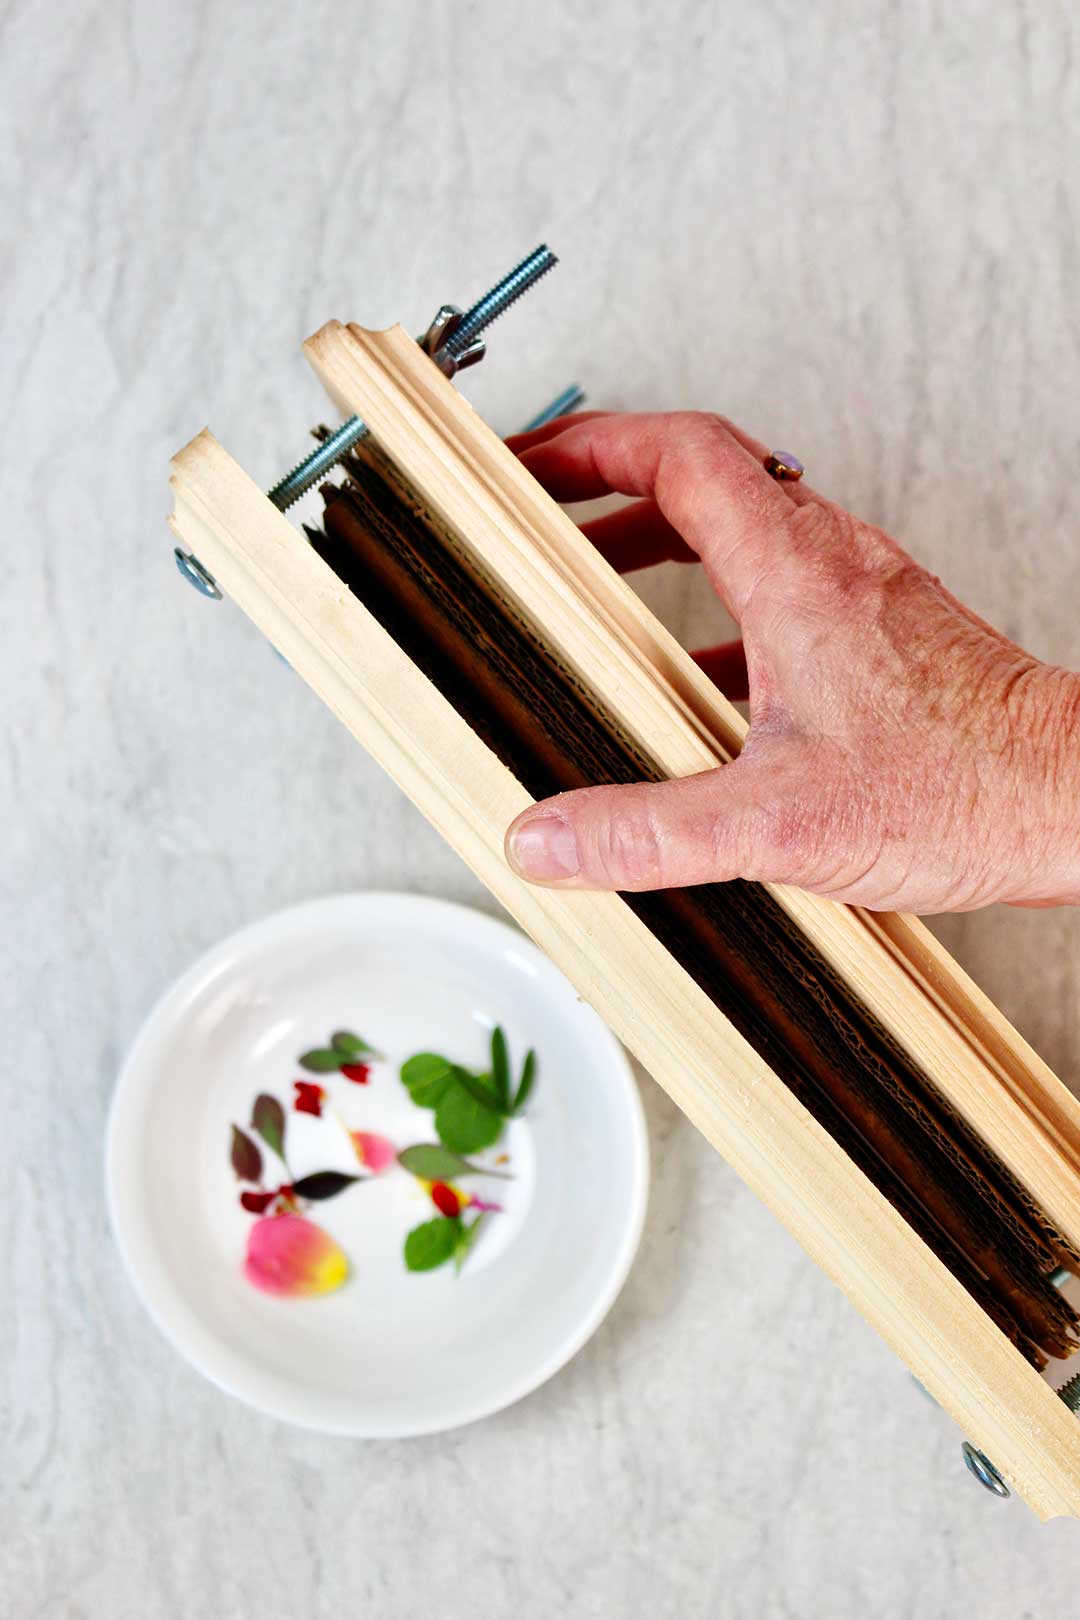
Place the second wooden plaque on top of the last piece of cardboard (larger flat side towards the cardboard). Twist the wing nuts on the carriage bolts and tighten them up.
It looks like a big sandwich, doesn’t it?
Let the flowers stay in the press 2-4 weeks depending on how thick they are.
Storing pressed flowers
When the flowers are dried, you can place them on paper towels and put them in a plastic container with a tight lid until needed for your craft.
They will turn brown over time so don’t wait to long to use them.
Pressed wedding flowers
What a great way to preserve flowers from a special occasion! Wedding, birthday, Mother’s Day. Larger flowers would have to be taken apart to press nicely.
Pressed flower art
Use the flowers to make pressed flower art like the bookmarks I mentioned earlier. I will have another post on how to use these flowers. Stay tuned!
Other fun crafts with flowers and leaves:
- Hammered Flower Prints on Fabric
- How to Grow Spring Flower Bulbs Inside
- Tree Leaf Identification Nature Journal
- Make a Kids Fall Leaf Collage
Enjoy!
If you try this craft, let me know! Go ahead and leave a comment, rate it, and tag a photo with #WelcometoNanas wherever you post.
Come join the fun at https://welcometonanas.com
DIY Flower Press from Wood for Pressing Flowers
Equipment
- Drill with ¼ inch bit
Items Required
- 2 Wooden rectangular plaques (mine were 8.5 by 11.5-inch rectangular wood plaques with beveled edges) These go on sale for 40% off regularly at craft stores
- 4 4 inch long and ¼ inch in diameter carriage bolts
- 4 wing nuts to fit the carriage bolts
- Extra wood to place underneath while drilling
- Corrugated cardboard
- Paper (copier paper will do) Newspaper or scratch paper can be used
Instructions
- Drill a hole in each of the four corners of one of the plaques. Have extra wood underneath so you don't drill into your work surface.
- Clamp the second plaque onto the first, larger flat sides together. Use the holes in the first plaque as a guide to drill the holes in the second plaque.
- Slip the carriage bolts into the holes of one plaque from the narrower side. Lay it on the table with the ends of the bolts upward.
- Cut 8-10 pieces of corrugated cardboard to fit inside the four bolts in the corners of the plaque.
- Take the grands and make a walk around the house and yard for small flowers that would press well. Thick flowers don’t work well so look for smaller flowers.
- Put down a layer of cardboard, paper, flowers and leaves, and then paper. Spread the flowers and leaves out so they do not overlap.
- Repeat this layering over and over. Always end by placing another layer of cardboard on the top.
- Place the second wooden plaque on top of the last piece of cardboard (larger flat side towards the cardboard). Twist the wing nuts on the carriage bolts
- Let the flowers stay in the press 2-4 weeks depending on how thick they are.
Video
Supplies for the DIY Flower Press from Wood for Pressing Flowers
- 2 Wooden rectangular plaques (mine were 8.5 by 11.5-inch rectangular wood plaques with beveled edges)
- 4- 4 inch long and ¼ inch in diameter carriage bolts
- 4 wing nuts to fit the carriage bolts
- Drill with ¼ inch bit
- Extra wood to place underneath while drilling
- Corrugated cardboard
- Paper (copier paper will do)


Leave a Reply