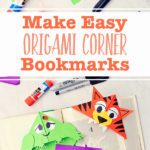
Origami Corner Bookmarks are such a fun and simple craft for kids and the best thing is that it only requires a piece of paper, a bit of glue, and a pen to make! Have fun creating a tiger, frog, or fox from squares of paper following this step by step tutorial, or kids can come up with a cute animal of their own!
Jump to:
- Let's Make Easy Origami Corner Bookmarks
- All you need is a few supplies!
- Best Kind of Paper for Origami Bookmarks
- Origami Bookmark Instructions
- You are done! Now ready to decorate.
- How Do I Decorate my Page Corner Bookmark?
- More Ideas for Cute Origami Bookmarks
- More Origami and Paper Crafts for Kids:
- Supplies to Make Origami Corner Bookmarks
- Enjoy!
- Make Easy Origami Corner Bookmarks
Let's Make Easy Origami Corner Bookmarks
If you've got a little book lover or avid reader in your family or friends, they are going to love this craft! Grab some paper, a glue stick, and a pen and the kids are already on their way to making their favorite furry friends into DIY bookmarks.
I think corner bookmarks are the best way to mark a spot in a book, journal, or textbook. Simply hook the bookmark over the corner of a book page - no more dog-earing a page!
All you need is a few supplies!
Origami Corner Bookmarks are a good beginner origami project. It only takes a few basic folds and you'll have simple bookmarks that can be used as they are, or can be decorated in a million different ways.
And I’m not exaggerating!
I love this craft because it takes so few supplies and just some simple step-by-step instructions. All you need is some paper, scissors, glue stick, and some markers. Check out the suggestions below for the best paper, then let’s get to it!
Best Kind of Paper for Origami Bookmarks
Let's start by talking about the best kind of paper to use for these DIY origami bookmarks. For the animals pictured, I used simple copy paper (8x11.5-inch colorful papers are nice), but you could try almost any kind of paper you have on hand.
As with any origami project, paper that is a little thinner is better. Try origami paper, scrapbook paper, or even simple printer paper is a great way to go!
You can also try construction paper - these bookmark corners only require a few simple folds, so slightly thicker paper would likely work. But if you are having any trouble with the origami folding, go ahead and switch to a thinner paper so you can make nice crisp folds.
If you are going to use your lovely bookmark without decorating, I like to use decorated paper, like scrapbooking paper with fun designs. However if you are going to create an animal face from your bookmark (like the photos), it's so much fun to choose the paper based on your little animal character!
Origami Bookmark Instructions
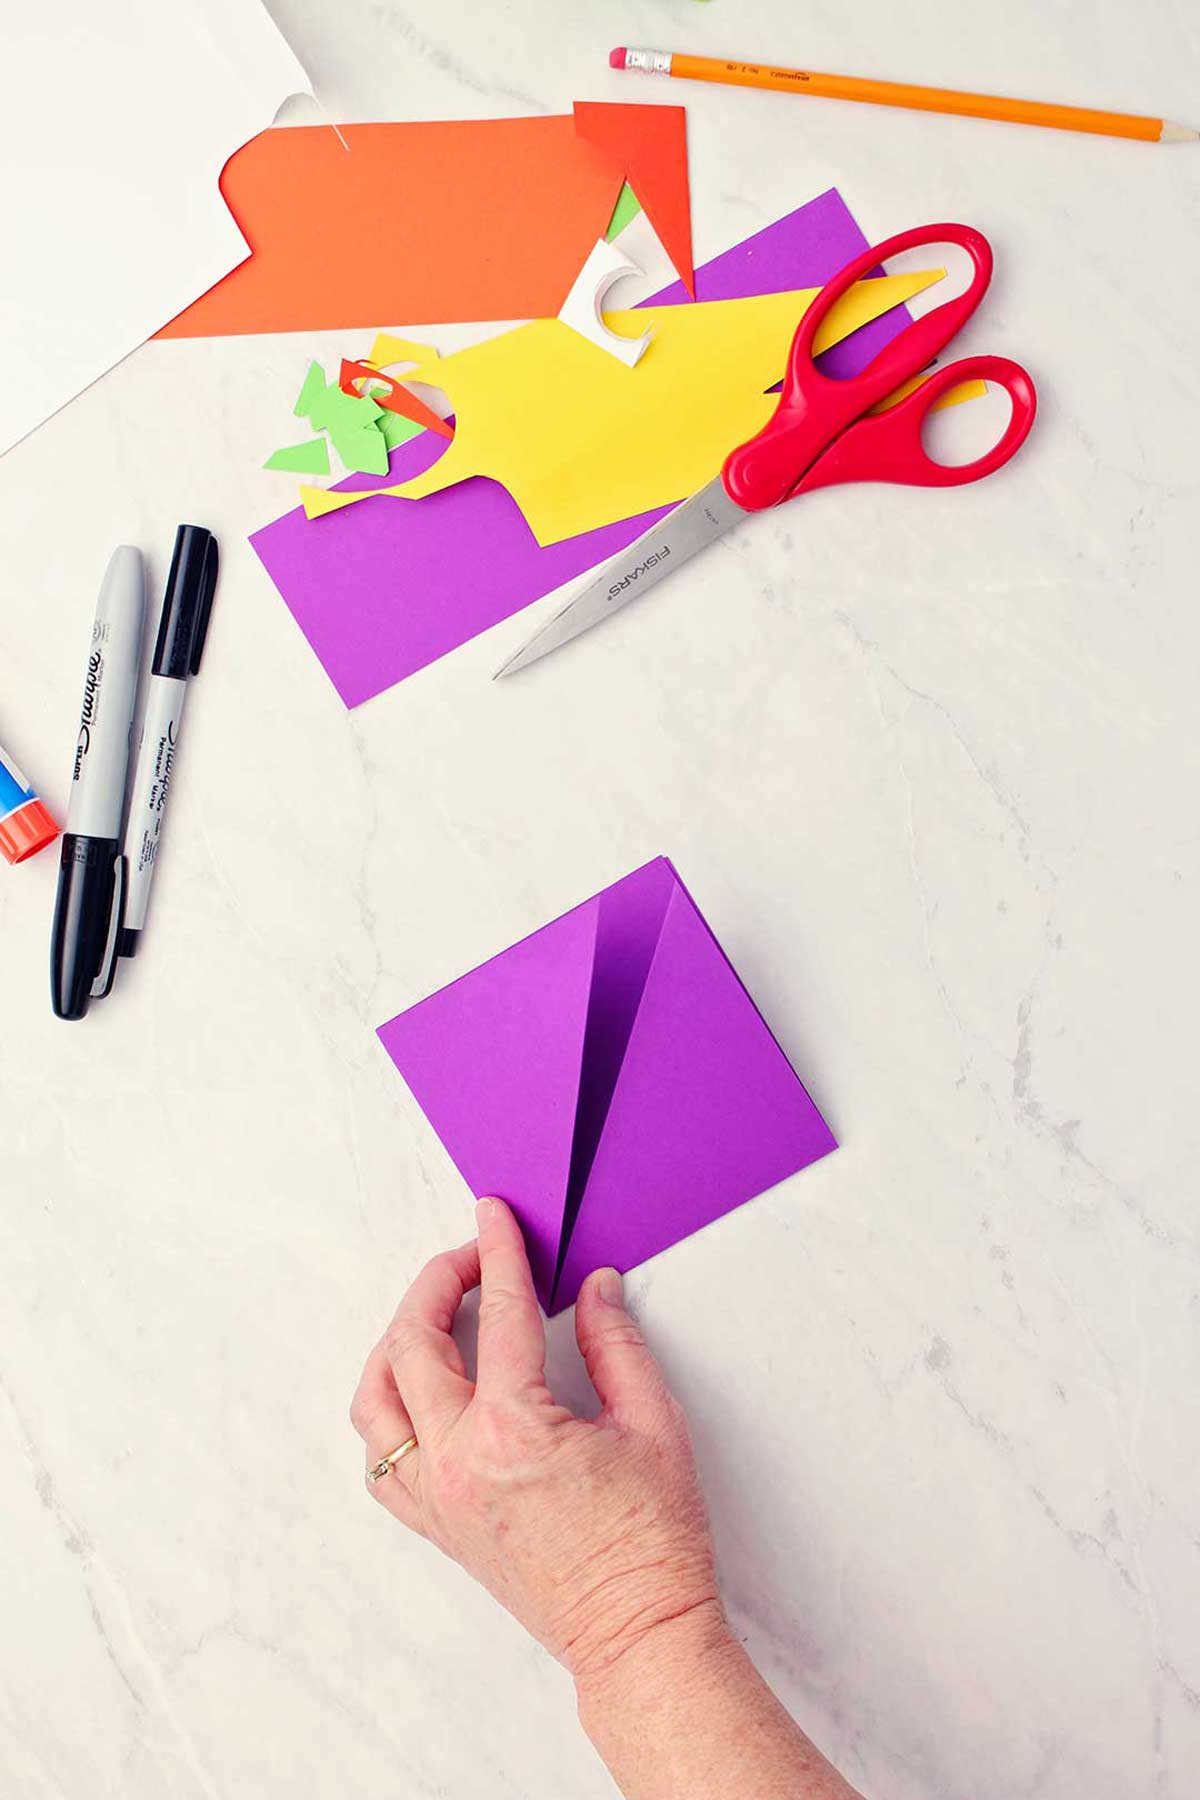
Now that you've chose your paper, we are going to turn it into a perfect square. If at any point you get a little mixed up, remember there are step-by-step photo instructions, as well as a video for help!
Fold the paper to make a triangle by pulling the top corner down to the bottom edge of the paper. Cut off the extra paper, or if you've chosen a square piece of paper (like origami paper), there will be no need to cut off any excess!
This is a nice size to work with and it is a good size for decorating. You can make the triangle smaller if you want a smaller bookmark though.
Place the folded edge of the triangle down. Fold the right and left points of the triangle up to the top angle, or top center point, of the triangle. This top layer of paper now looks like a smaller diamond.
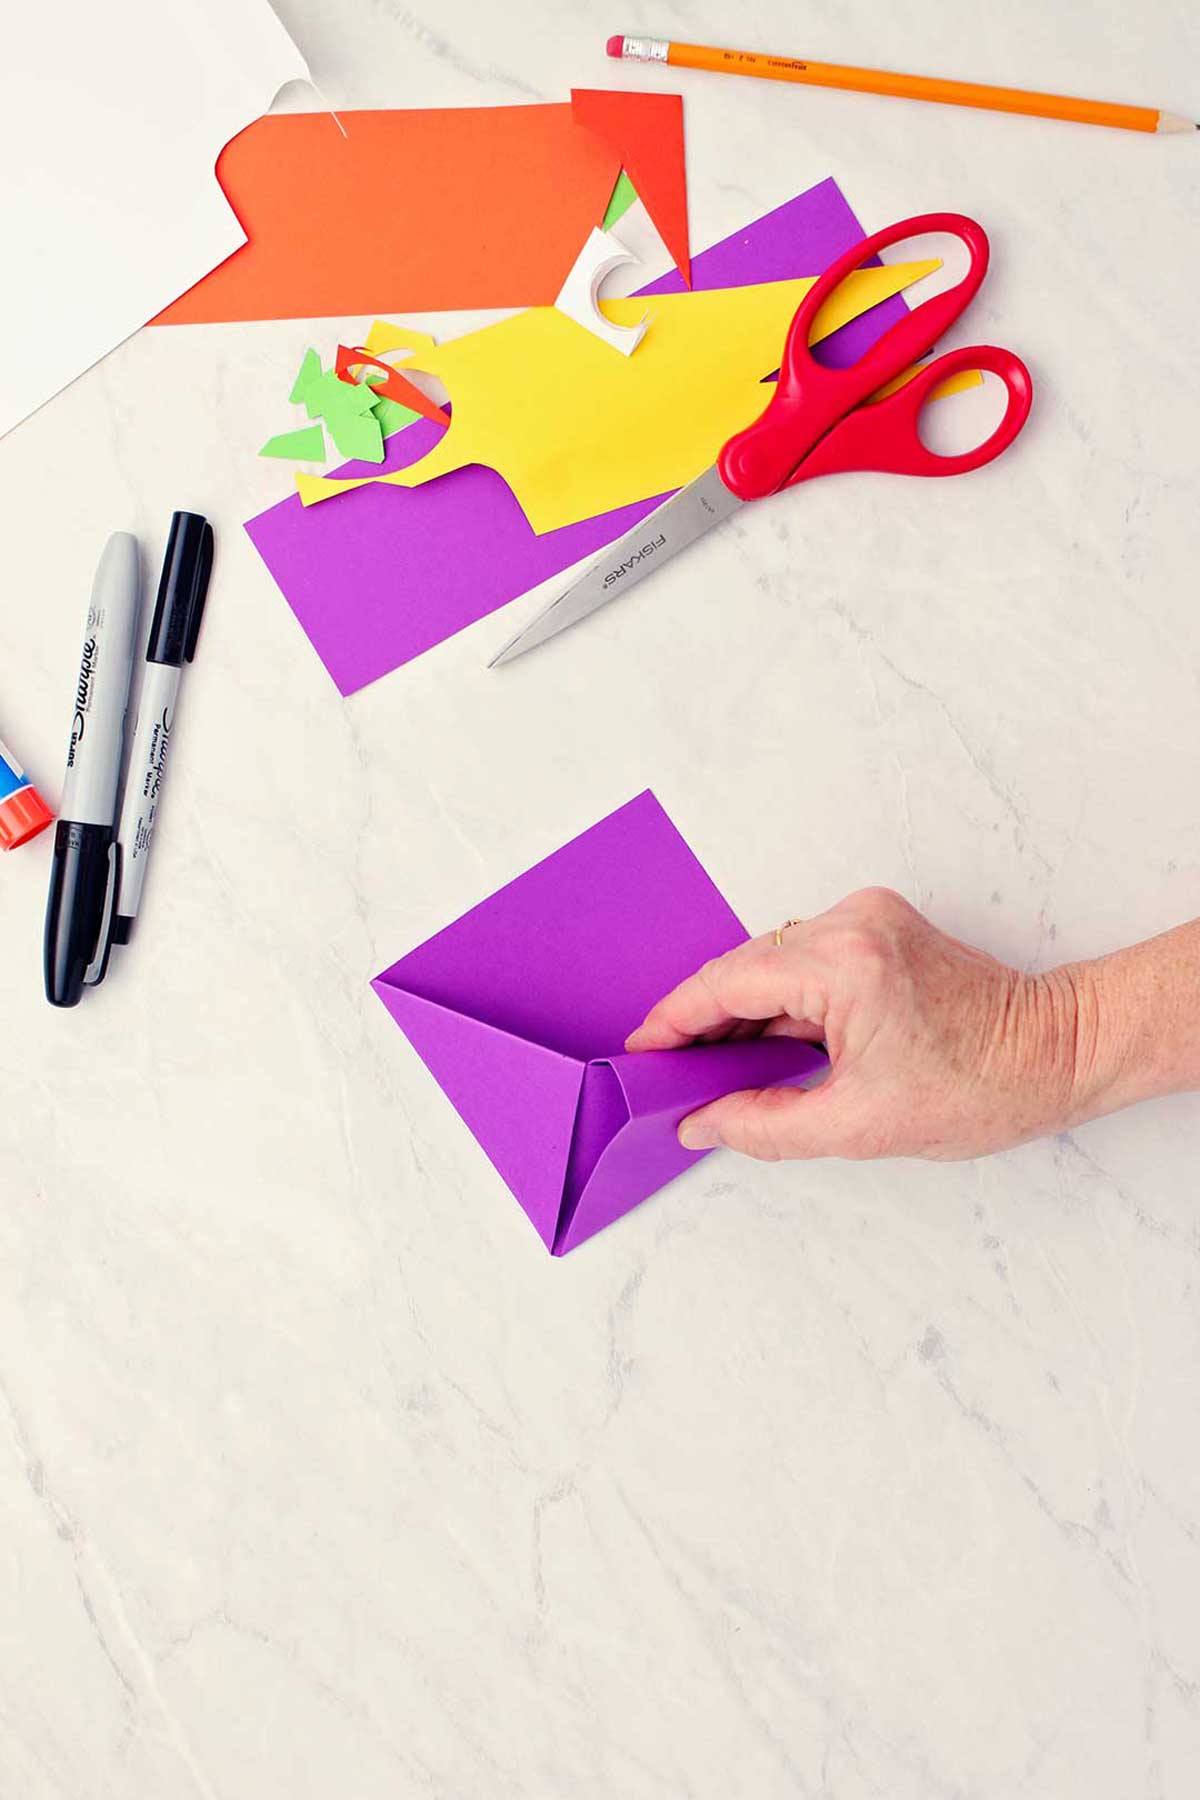
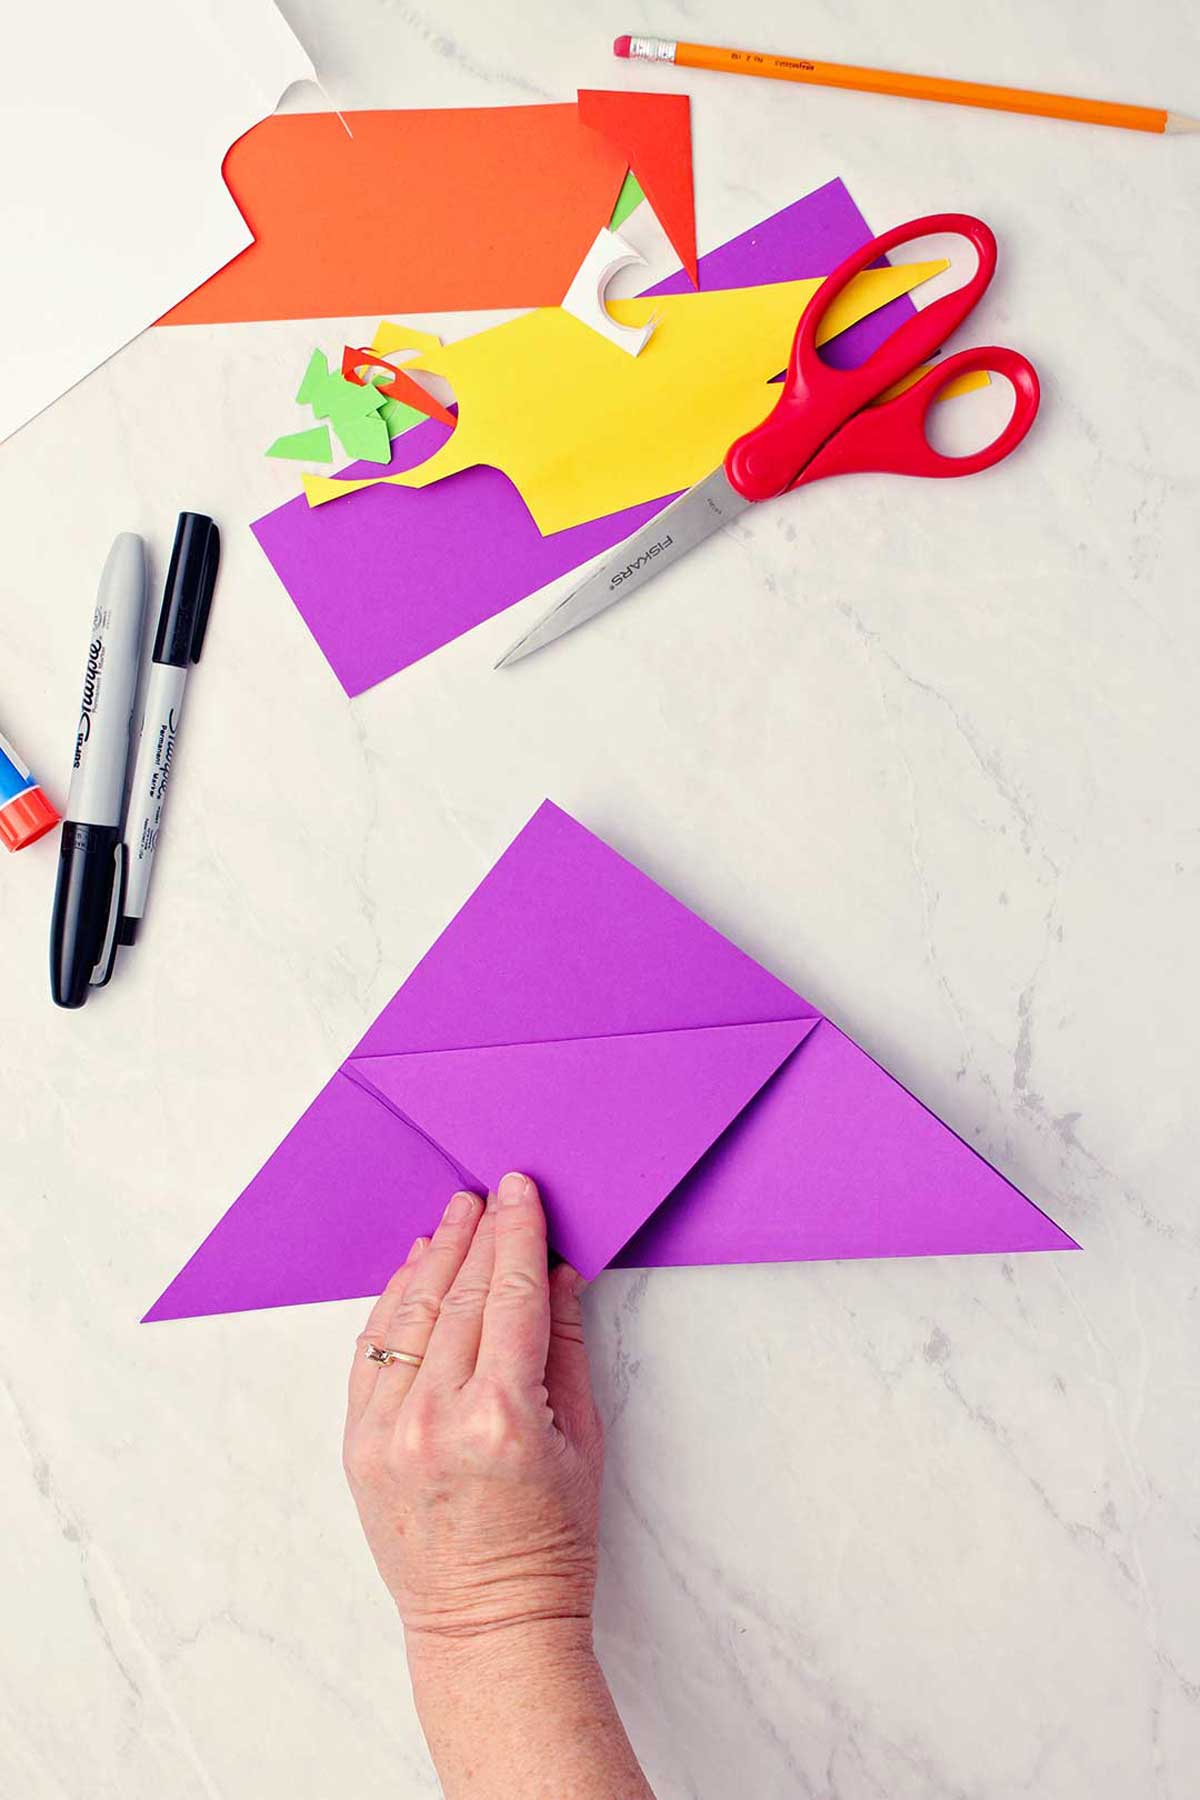
Unfold and then fold one corner of the top of the triangle down to the folded edge and crease well.
The next fold is a bit tricky but once you do it once it makes so much sense. Looking at the picture or video tutorial really helps.
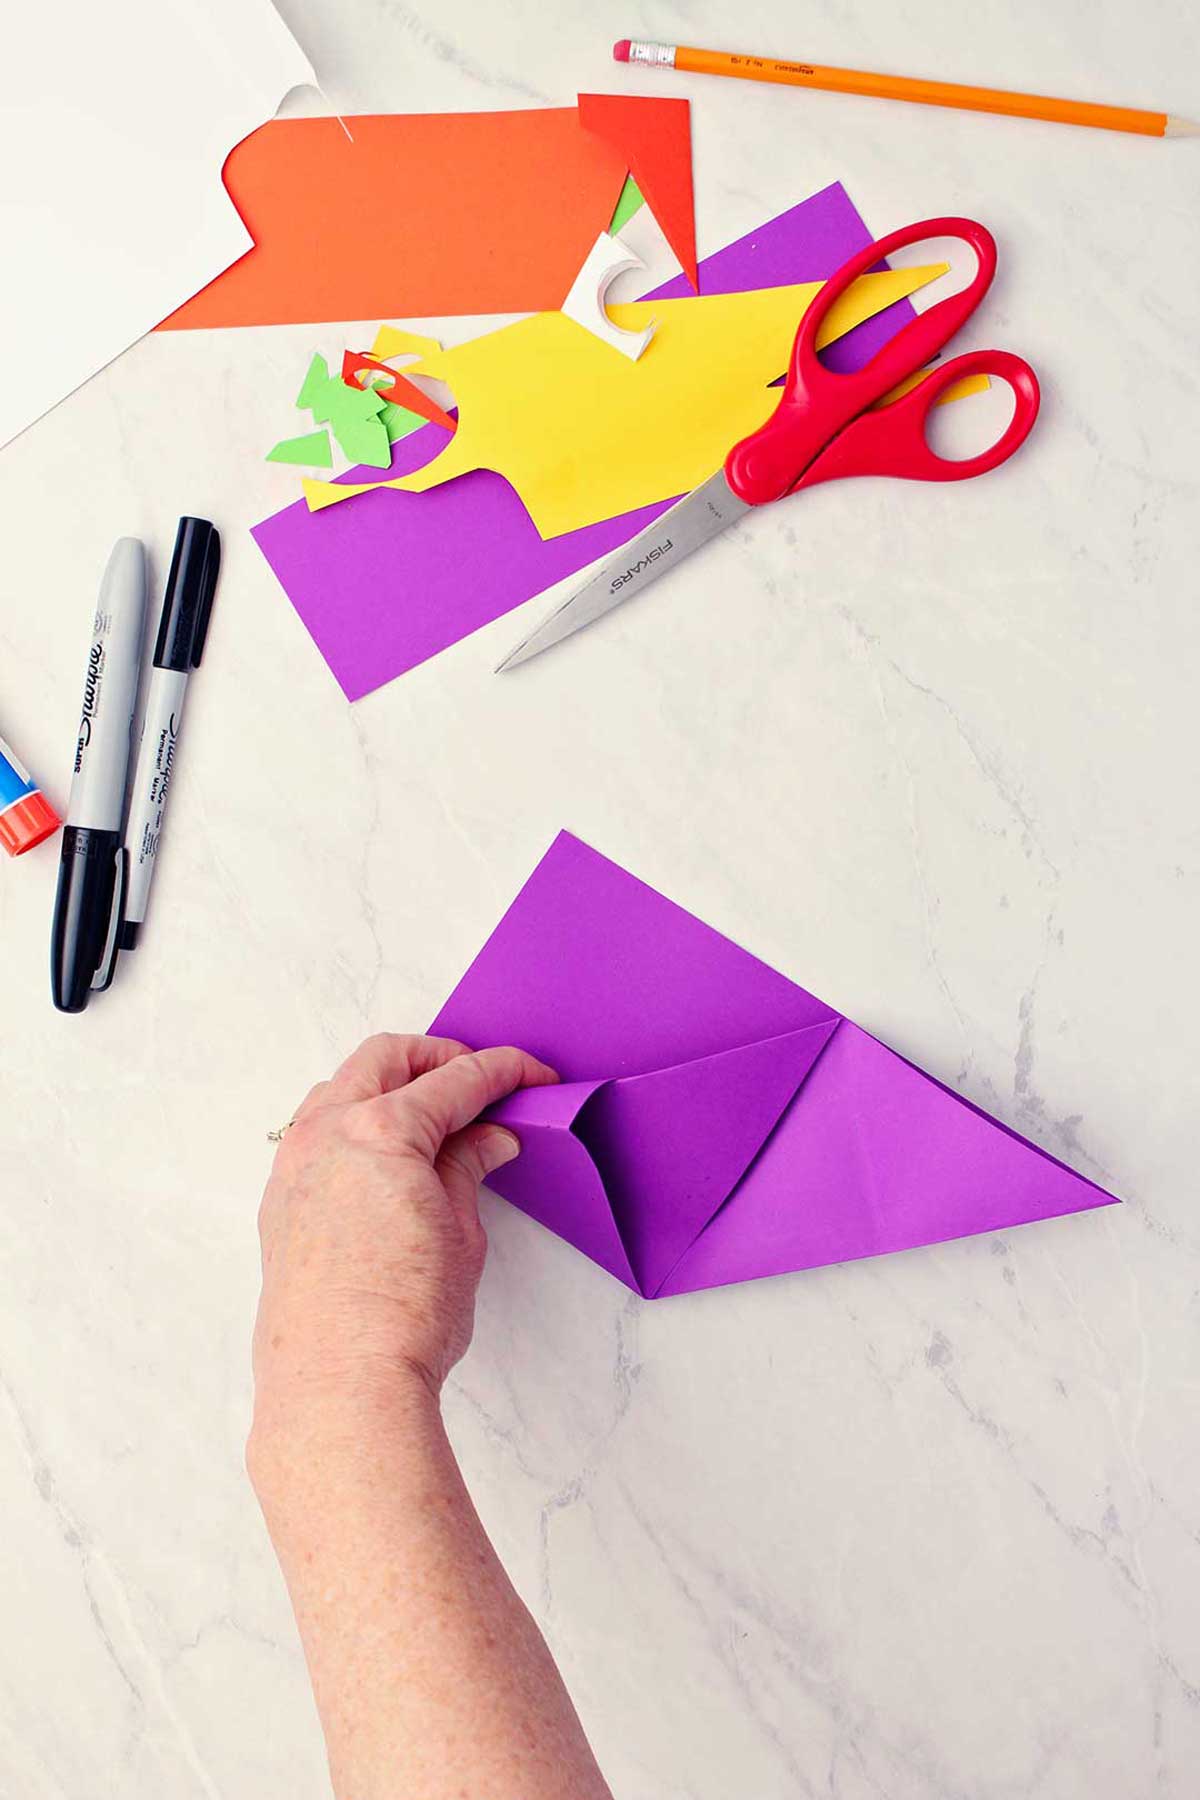
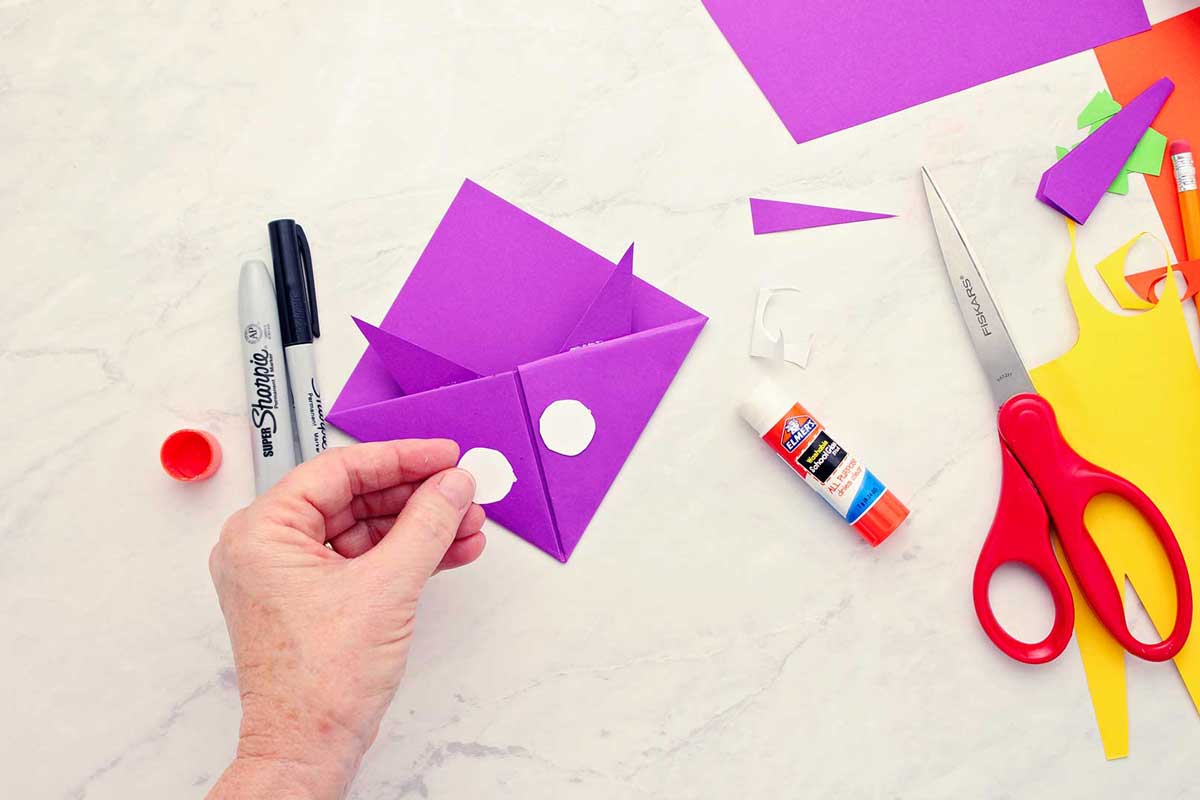
Fold the right point of the triangle up towards the top of your triangle (the top point) and tuck it down inside of the pocket. Crease it well. Then repeat this step with the left point of the triangle so the loose edges are all nice and tucked in.
You are done! Now ready to decorate.
And that's it! I just love simple origami projects, don't you?
So now you can make your own origami bookmark! Good job.
You can use these basic origami bookmarks just as they are, they are an easy way to keep your place in any book. This is my favorite template for a simple design, but if you want to, you can decorate it too!
I say, let’s decorate our corner bookmarks! This is where it really gets fun.
How Do I Decorate my Page Corner Bookmark?
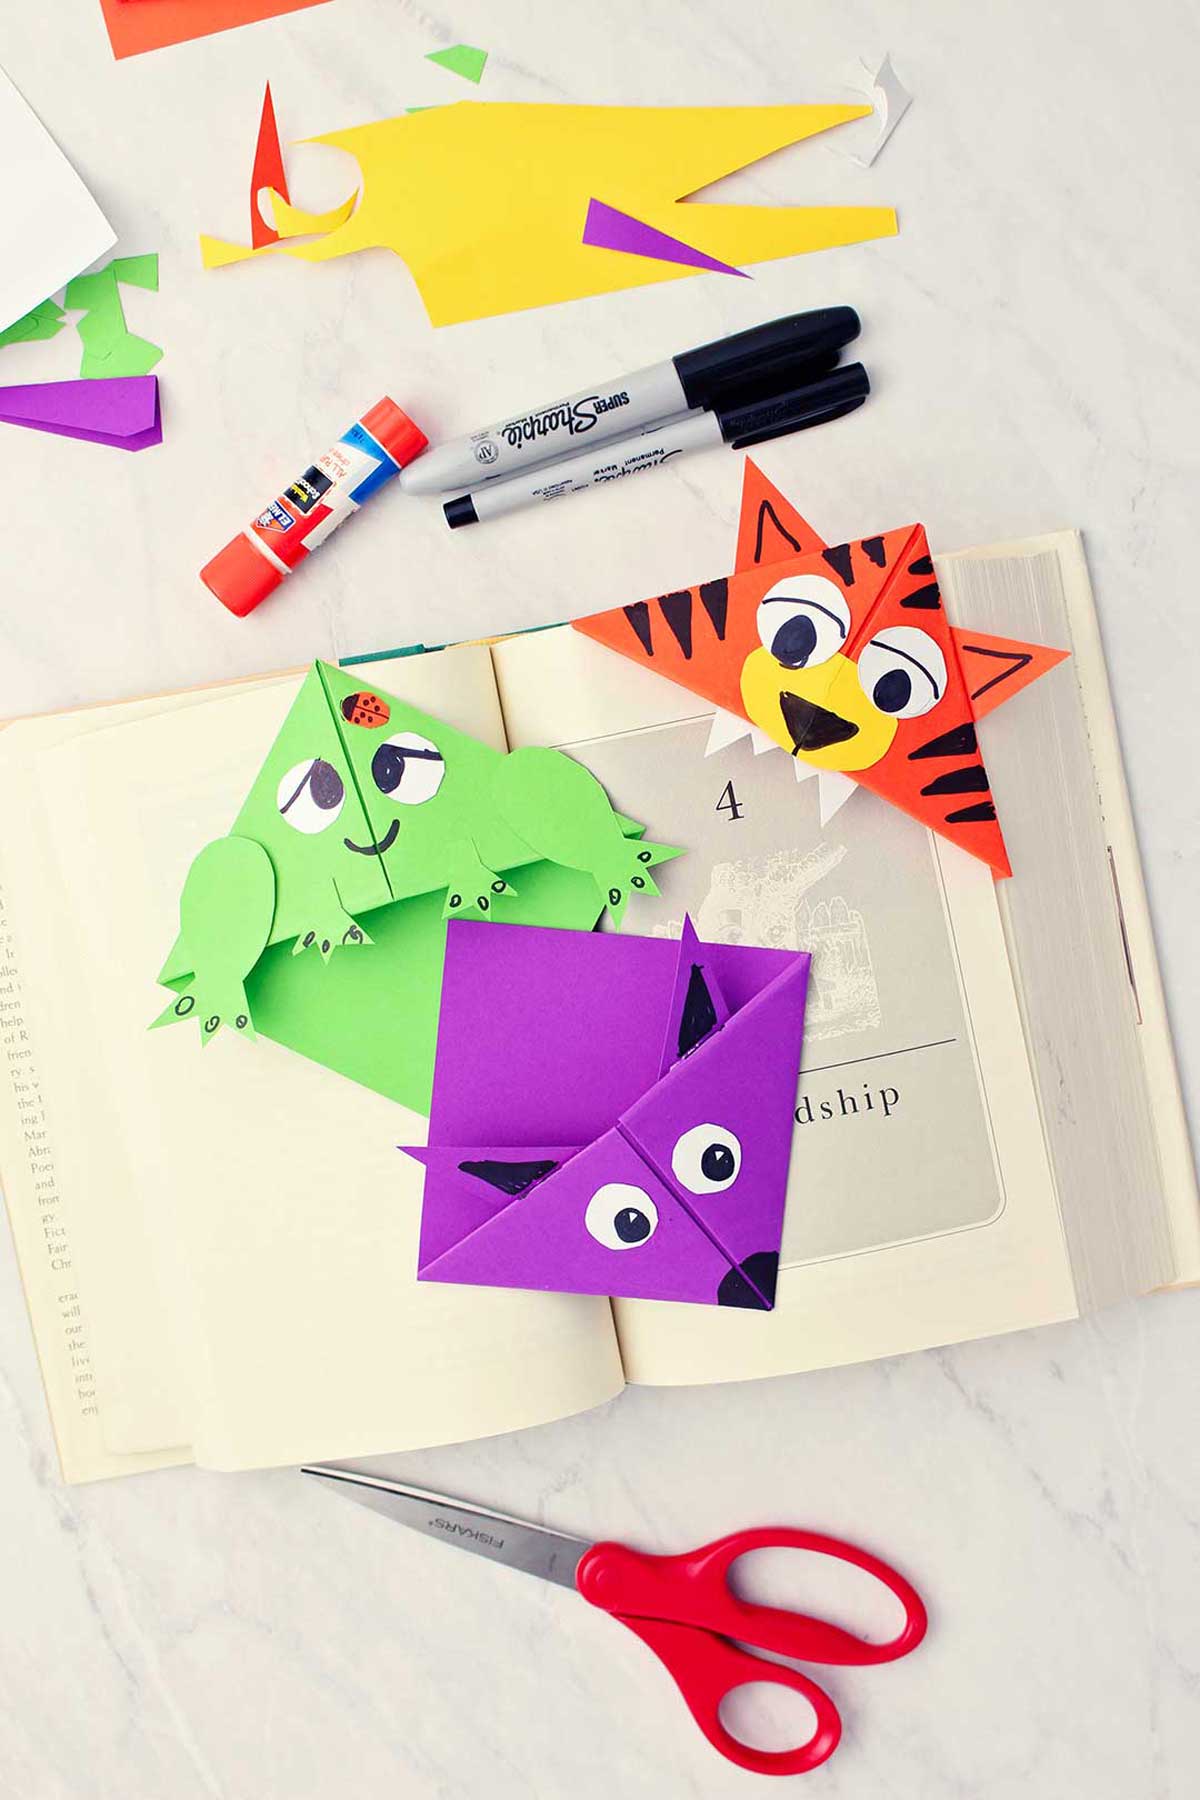
You can turn your cool origami bookmarks into all kinds of creatures and designs, but today we are going to make some adorable little animals!
With all our folding finished, we'll cut out little pieces of paper and other additions to bring the creatures to life. If you used white papers, you may want some additional markers to color your animals along the way.
We'll create a tiger, frog, and a fox in this tutorial, but once you see the easy steps, I bet you'll have ideas for more cute variations.
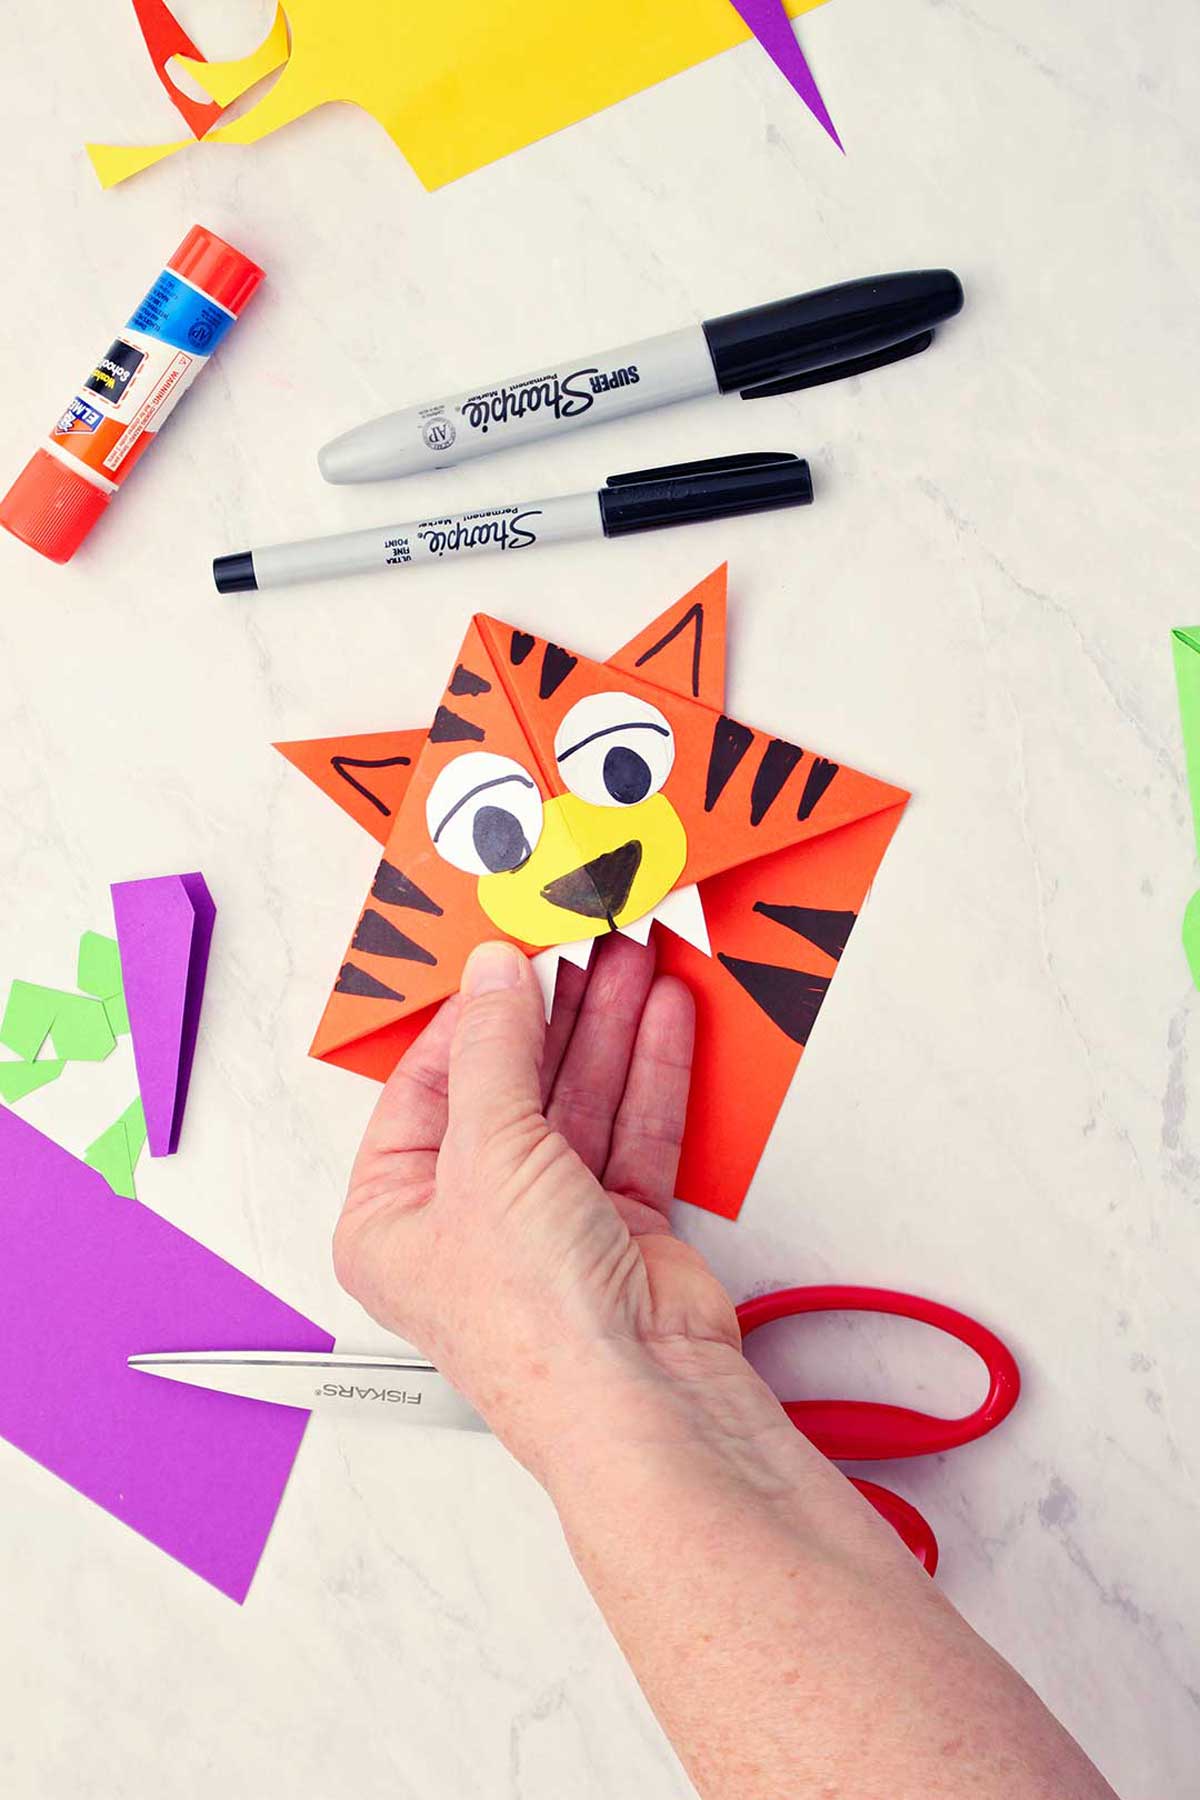
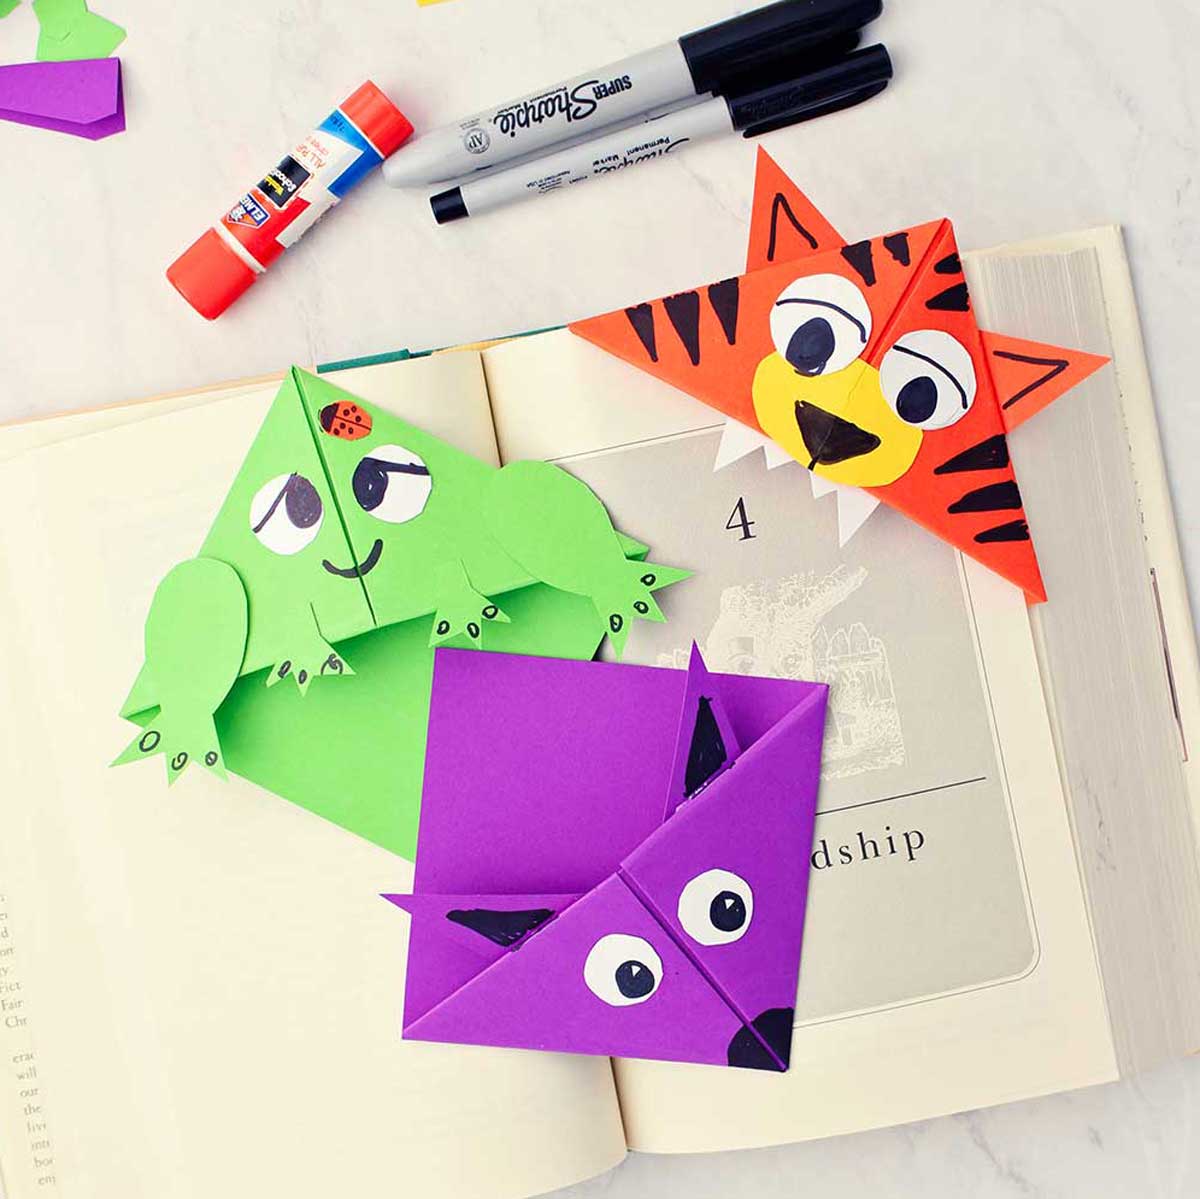
Easy Tiger Origami Corner Bookmarks
First up, we have a tiger! A tiger is made with small triangle ears, round white eyes, an oval nose (mine was yellow), and jagged white teeth.
Go ahead and cut out these decorative pieces, color them as you'd like, then glue these pieces on to the original triangle.
A black marker creates the details of the eyes, nose, ears and stripes. For example, I used a solid colored triangle for each ear, with just a simple marker line to create some dimension.
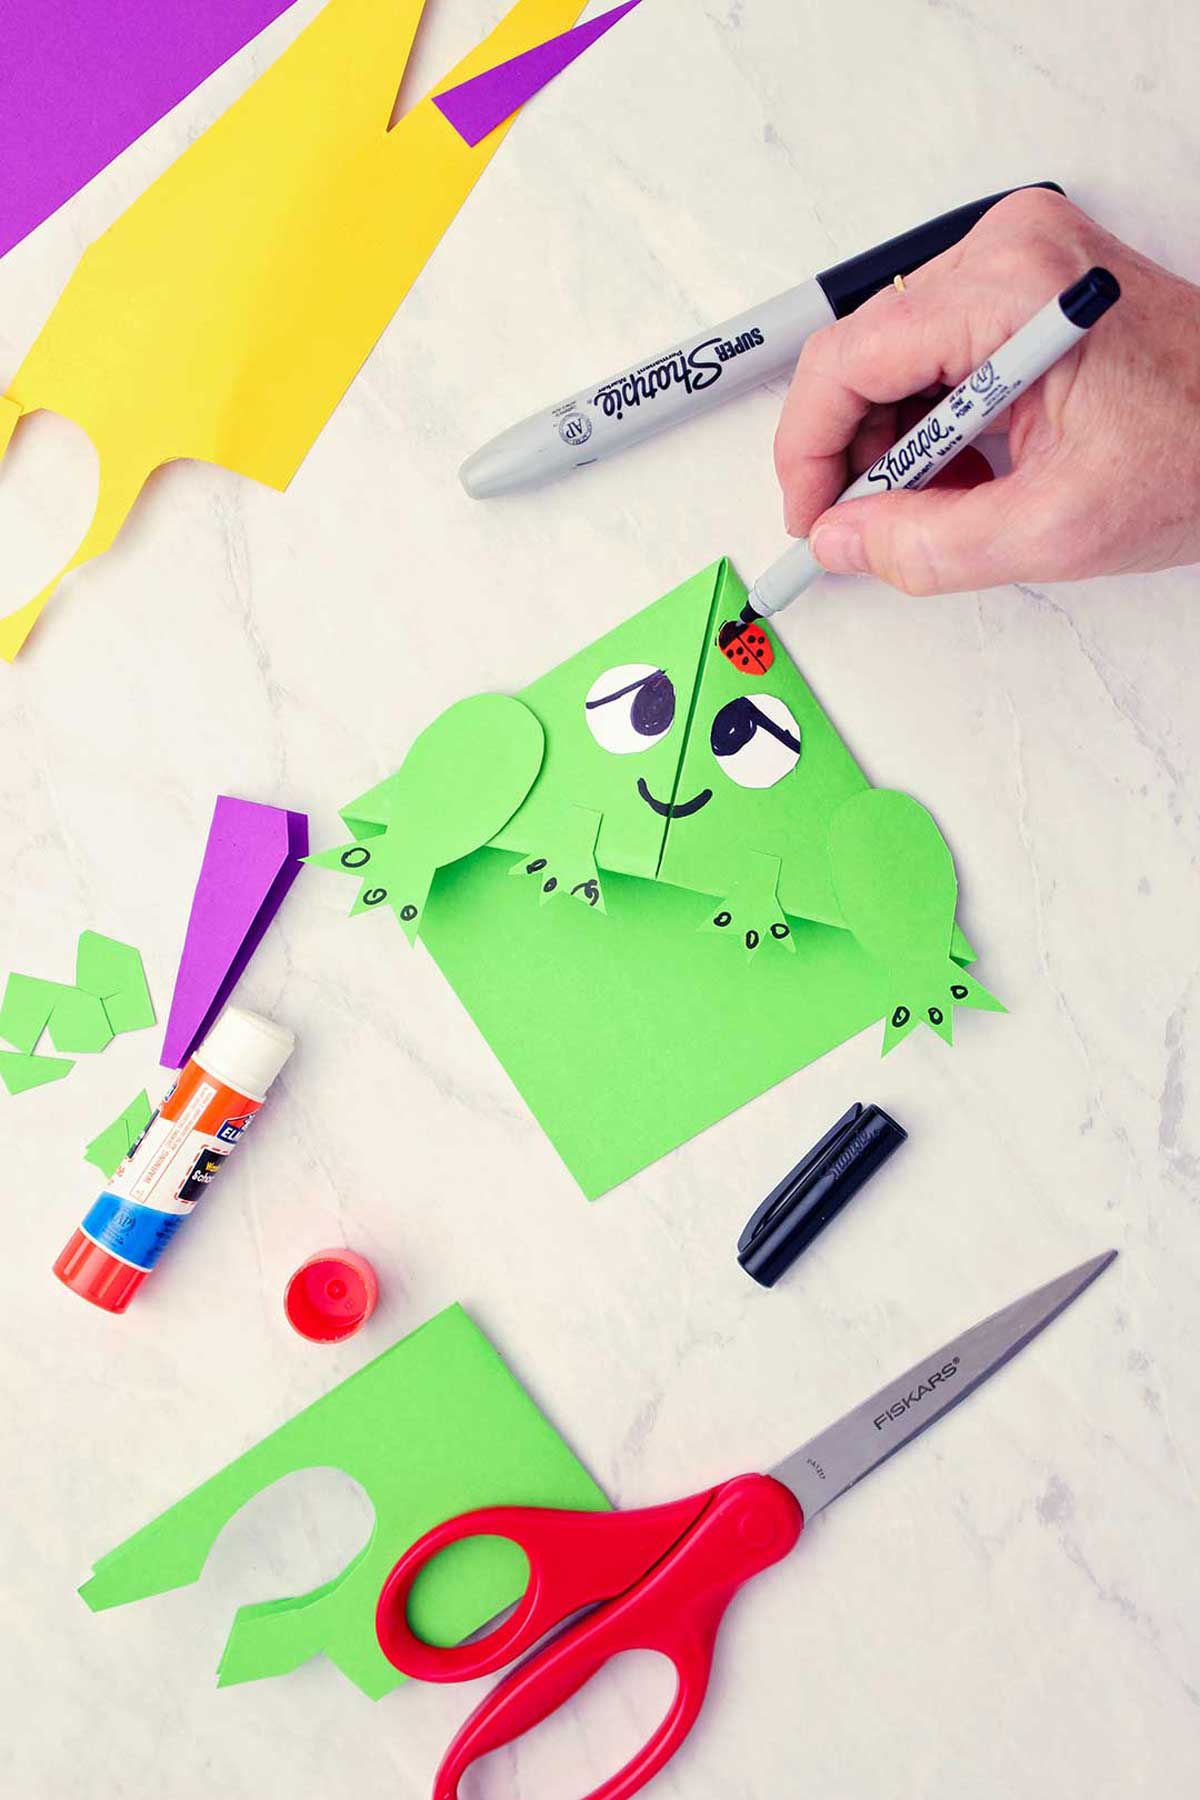
Easy Frog Origami Corner Bookmarks
Now the frog takes a few more cut-out pieces. Cut out some hind legs, some front legs, white circle eyes and glue them onto the bookmark.
The black marker is used to make details on the eyes and a smile.
I added a little red ladybug on top of his head. I should have added a tongue!

Easy Fox Origami Corner Bookmarks
What’s up with a purple fox? I don’t know, I just thought the color was pretty.
This bookmark takes a switch and we turn it upside down to make the fox. That means it will fit on a bottom corner of the page when it is used to mark your place in a book.
The fox needs cut out ears and white round eyes. Glue these pieces on then make the details on the eyes, ears and nose with a black marker.
More Ideas for Cute Origami Bookmarks
Now that you've made these first animals, I bet you have a whole lot of ideas to make more!
Use your imagination and make any animal, or holiday design you want. I’ve seen a penguin, bunny, shark, turtle, cow, dog, and fun Holiday ideas too.
Don't you think monster bookmarks would be the best idea for Halloween? They would make the best gift for classrooms and friends! That may be what I try next time
If you are giving as the perfect gift for another reader, why not write a message on the back of your bookmark? That would make for some fun reading while they are reading 😉
You can make a simple origami bookmark corner with just a few easy folds! Start by folding a square piece of paper into a triangle. From there you will fold in the sides to the top of the triangle, unfold, then fold one corner of the top of the triangle down to the folded edge and crease well. Fold the side points of the triangle up towards the top point and tuck them down inside of the pocket and you are finished!
For the animals pictured, I used simple copy paper (8x11.5-inch colorful papers are nice), but you could try almost any kind of paper you have on hand. As with any origami project, paper that is a little thinner is better. Try origami paper, scrapbook paper, or even simple printer paper is a great way to go!
More Origami and Paper Crafts for Kids:
If you are having fun with paper and want to try a few more craft tutorials, check these fun ideas out!
- Fun Folded Origami Stars
- DIY Origami Paper Fortune Teller
- Origami Shirt Card
- DIY Paper Butterflies
- Easy Paper (Book Page) Roses
Supplies to Make Origami Corner Bookmarks
- Copy paper- colored copy paper or designed paper
- Glue stick
- Scissors
- Markers
Enjoy!
If you try this craft, let me know! Go ahead and leave a comment, rate it, and tag a photo with #WelcometoNanas wherever you post.
Come join the fun at https://welcometonanas.com
Make Easy Origami Corner Bookmarks
Equipment
- Scissors
Items Required
- Copy paper- colored copy paper or designed paper
- Glue stick
- Markers
Instructions
- Place the folded edge of the triangle down. Fold the right and left points of the triangle up to the top angle of the triangle. This looks like a diamond.
- Unfold and then fold one corner of the top of the triangle down to the folded edge and crease well.
- The next fold is a bit tricky but once you do it once it makes so much sense. Looking at the picture or video really helps.Fold the right point of the triangle up towards the top point and tuck it down inside of the pocket. Crease it well. Then repeat this step with the left point of the triangle.
- Easy Tiger Origami Corner Bookmarks
- A tiger is made with triangle ears, round white eyes, an oval nose (mine was yellow), and jagged white teeth. Glue these pieces on. A black marker creates the details of the eyes, nose, ears and stripes.
- Easy Frog Origami Corner Bookmarks
- So, the frog takes a few more cut out pieces. Cut out some hind legs, some front legs, white circle eyes and glue them onto the bookmark. The black marker is used to make details on the eyes and a smile.
- Easy Fox Origami Corner Bookmarks
- This bookmark takes a switch and we turn it upside down to make the fox. That means it will fit on a bottom corner of your book page when it is used to mark your place.The fox needs cut out ears and white round eyes. Glue these pieces on then make the details on the eyes, ears and nose with a black marker.
Video
This post was originally published in September 2022 and has been updated to add more relevant and detailed content.


Laura says
Love origami! This looks like a fun one