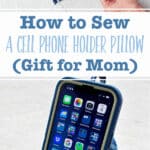
Learn how to make a cute Cell Phone Holder Pillow with just a few simple sewing techniques!
How do you make a homemade phone stand?
Let’s learn how to sew a cell phone holder pillow for your smart phone.
It would make a great gift for Mother’s Day, or you could make a couple of them and keep one for yourself.
I think a mobile phone holder could be a perfect gift for every family member for birthday or Christmas. It would fit in a stocking!
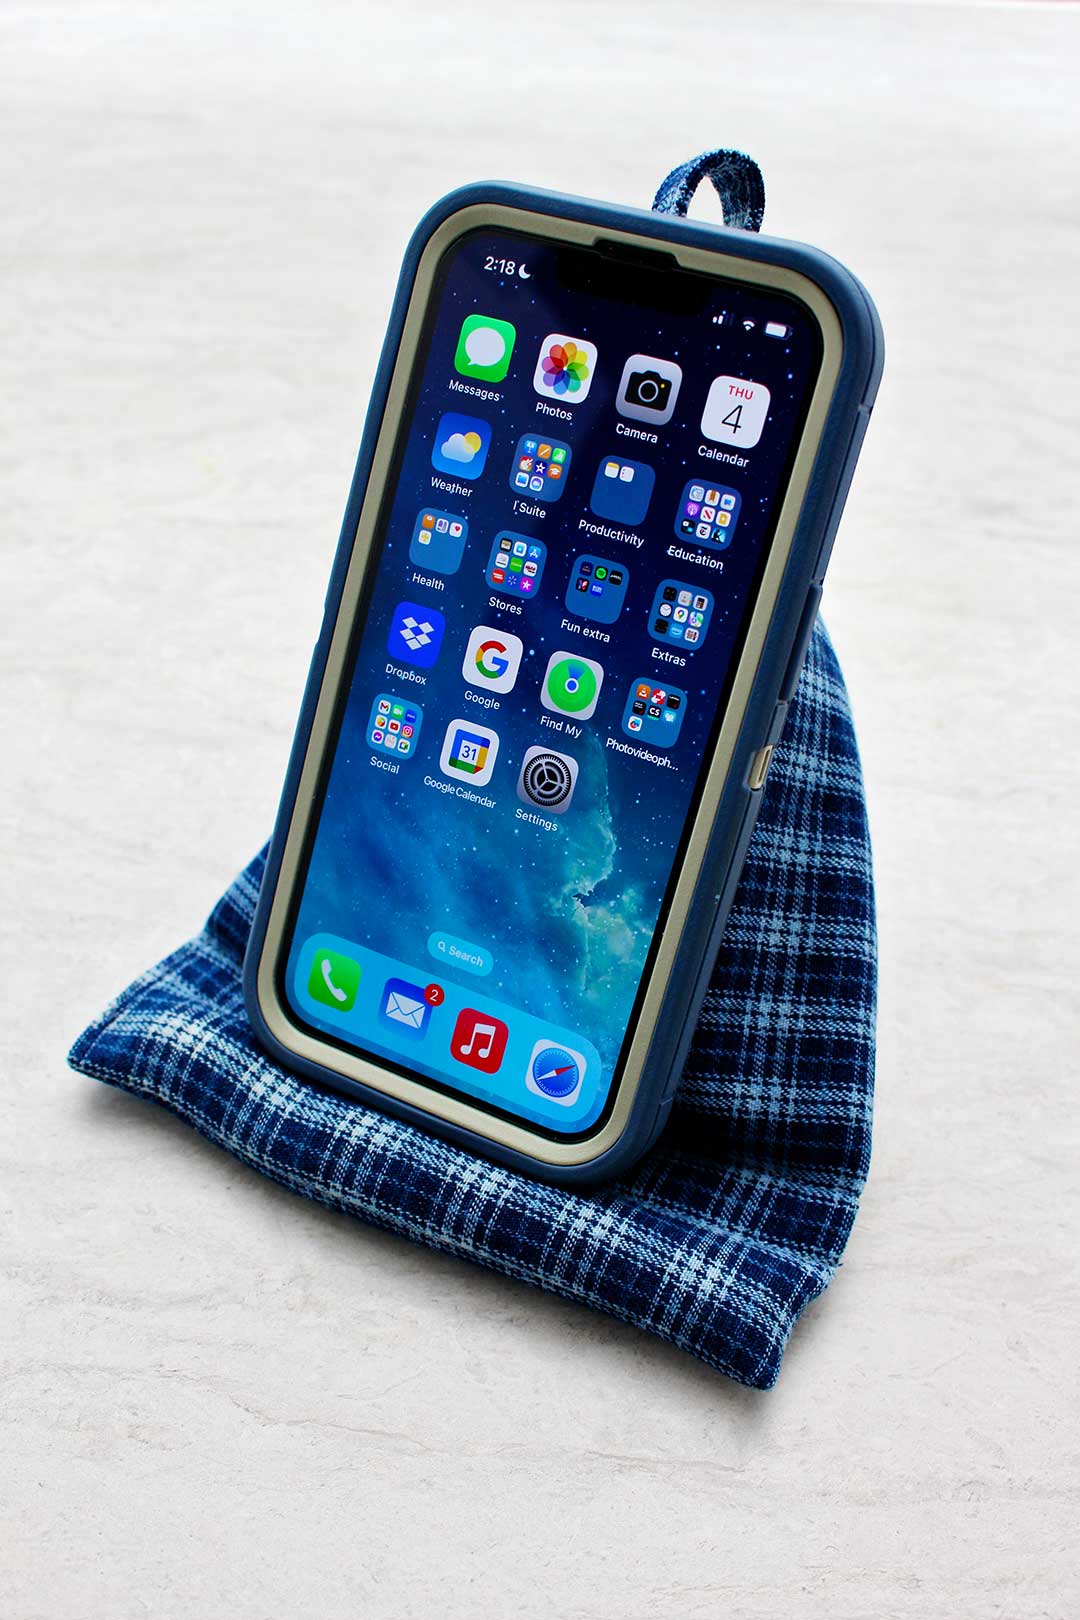
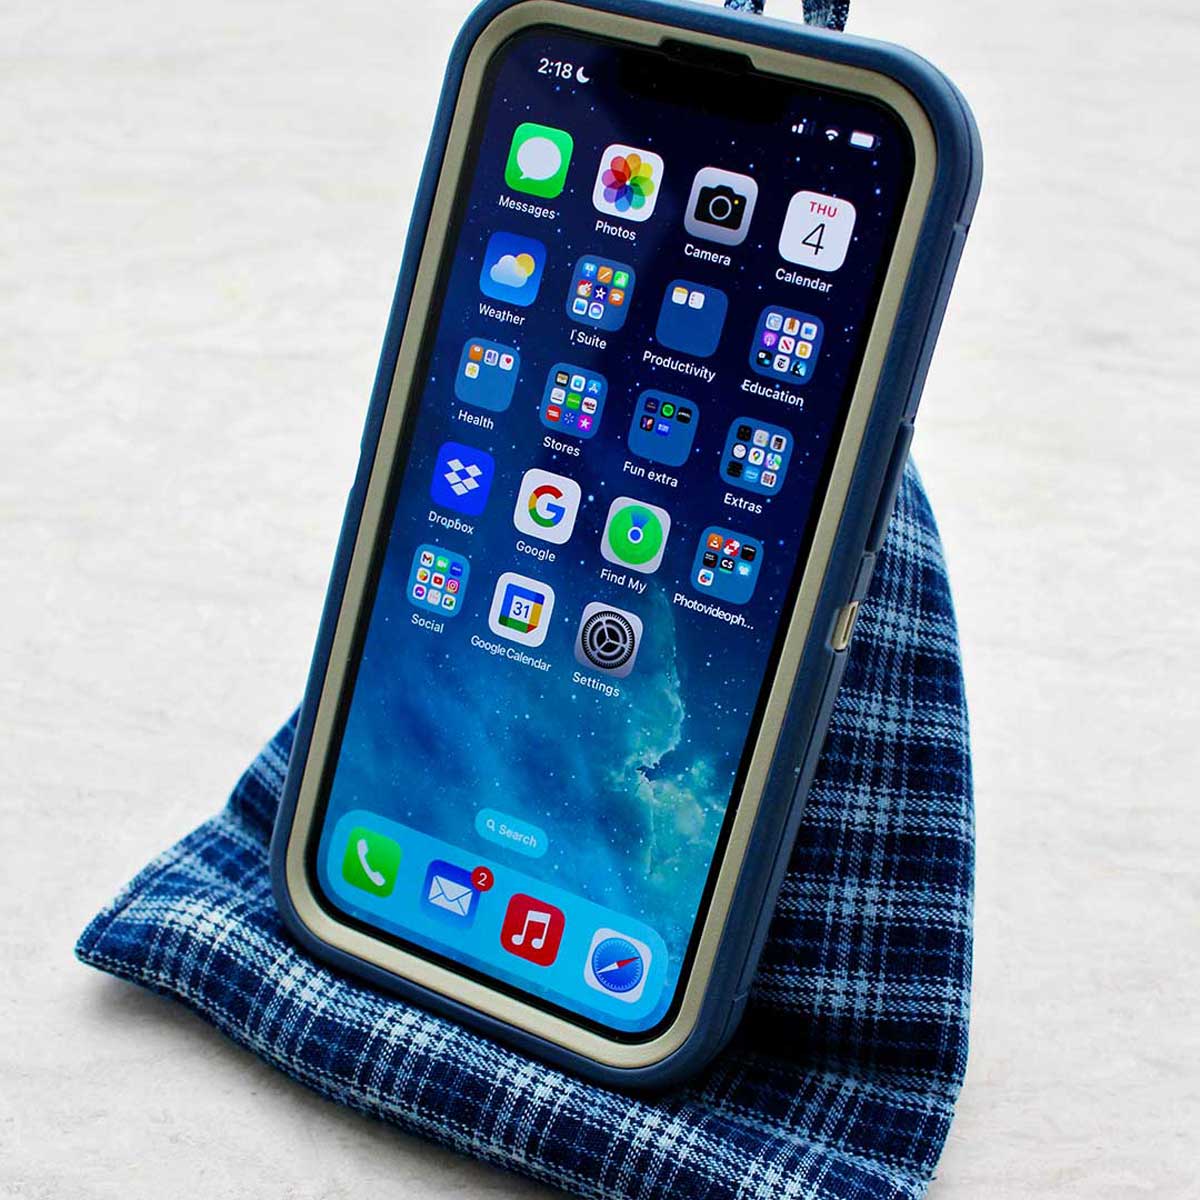
The cell phone holder is a countertop pillow stand for hands-free phone use!
No more looking for your cell phone!
Don’t you ever get tired of searching for your phone? I sure do. Use this as a home base and you’ll always know where you set it down.
This is also a portable and handy little pillow to carry with you various places to use your phone and have it sitting upright while you’re doing other jobs.
The unique design in the way that it sewn causes it to have a little lip on the bottom that will hold your phone up either vertically or horizontally.
Fabric choice for your phone pillow
You can use any fabric you’d like to make it. So you can make a decorative cell phone stand for every person you want to give it to, a personalized cell phone pillow.
The cell phone holder pillow is a perfect project to use up scraps of fabric from other projects.
If you purchase fabric, like some specialty cotton fabric, a fat quarter would be a great amount. You could make two of these cell phone pillows out of one fat quarter.
Note: A woven fabric will work best. A fabric with stretch may not hold its' shape well.

Directions to sew a cell phone holder pillow
This is a wonderful learn how to sew project as it is all straight seam sewing.
There really isn't a need for a pattern if you just want to use a ruler and measure and cut the two pieces of fabric needed yourself. The measurements are below.
But if you prefer a pattern I've got it for you!! Here is your free fabric phone stand pattern. Just click this link- WTN Cell Phone Holder Pillow Free Pattern.
Also, here is a link to a full length tutorial video if you would like to walk through sewing the phone holder pillow together step-by-step: Cell Phone Holder Pillow Full Length Tutorial Video.
How to make a phone pillow
If you have a roller cutter and a mat you can use that. I’m just going to use my scissor and ruler to cut my fabric to size
Cut one piece of fabric that is 8” x 12” and then cut a second piece that is 2” x 4”.
The small piece is going to make a little loop at the top of the bag that you can put your phone charger cord through. Or you can use it to grab a hold of and carry the pillow around.
The large piece will make the actual cell phone pillow.
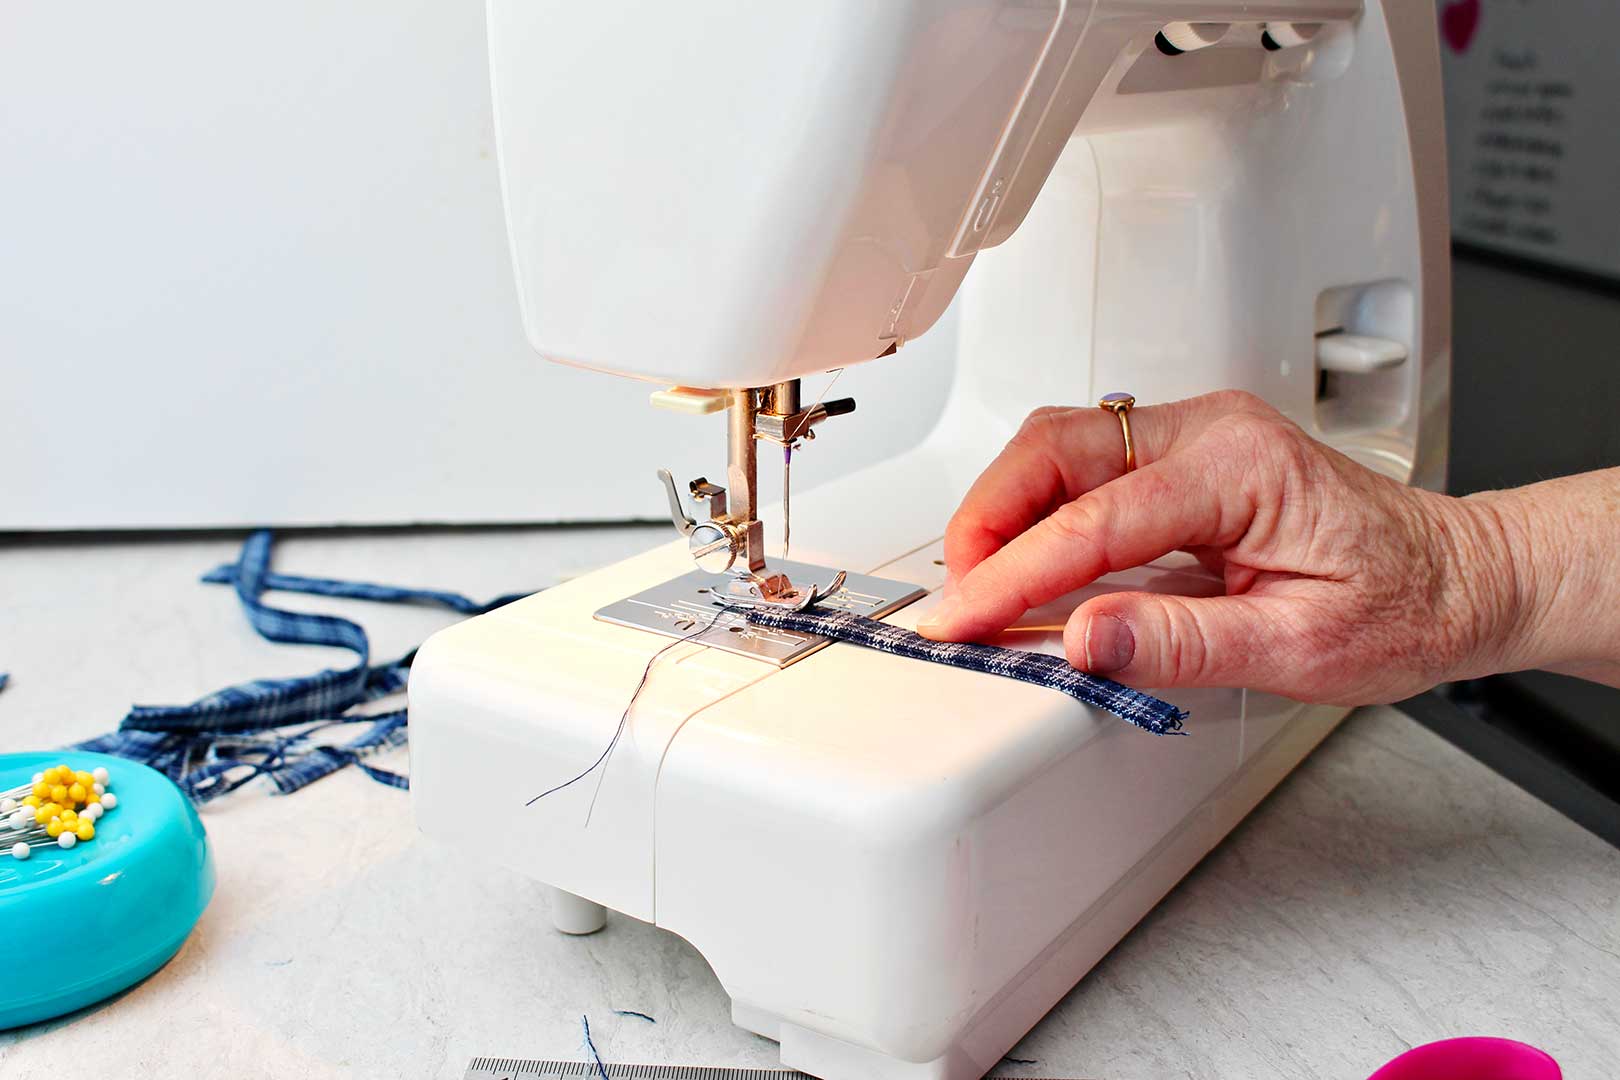
Let’s sew that loop piece first.
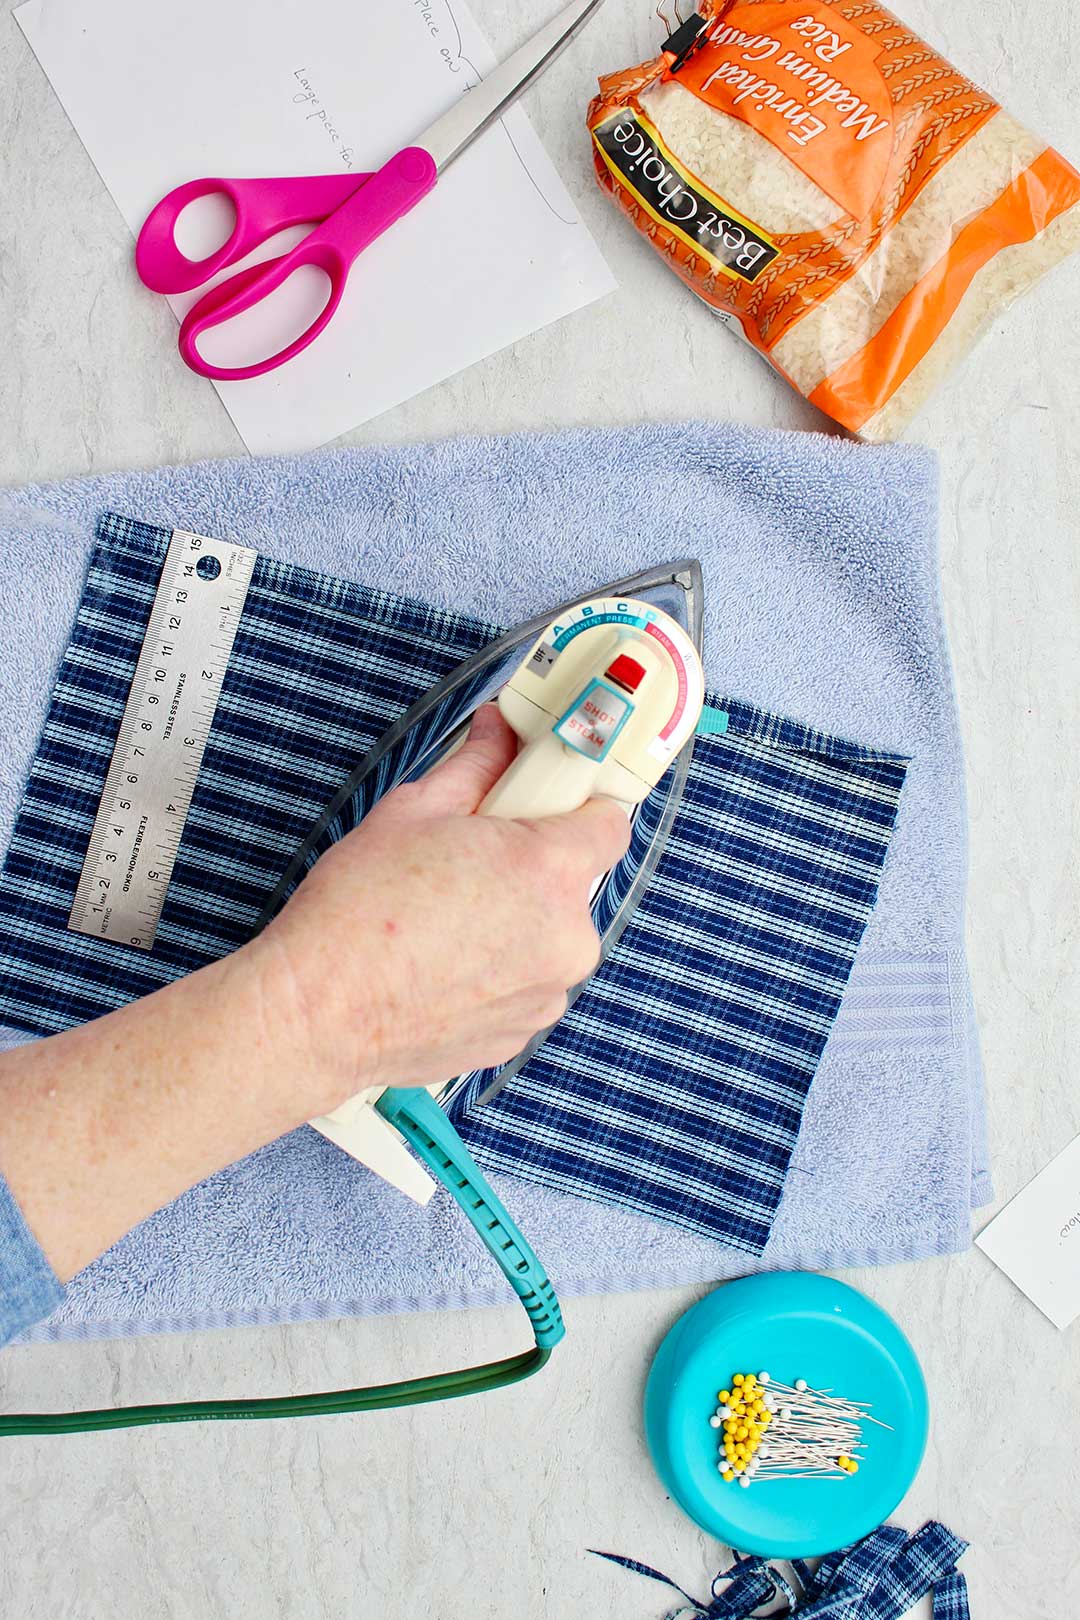
Take the 2 x 4” piece and fold it in half lengthwise, wrong sides together,. Give it a press if you have an iron.
Note: If you don't own an iron (many people don't) at least finger press it well. Any time in these directions that I mention ironing, know that you are to finger press instead.
Open it back up. Fold one long outside edge into the fold with the wrong sides together then fold the other long side into the folded area and press.
Then fold the fabric in half on the first fold again. So that the long cut edges are tucked to the inside.
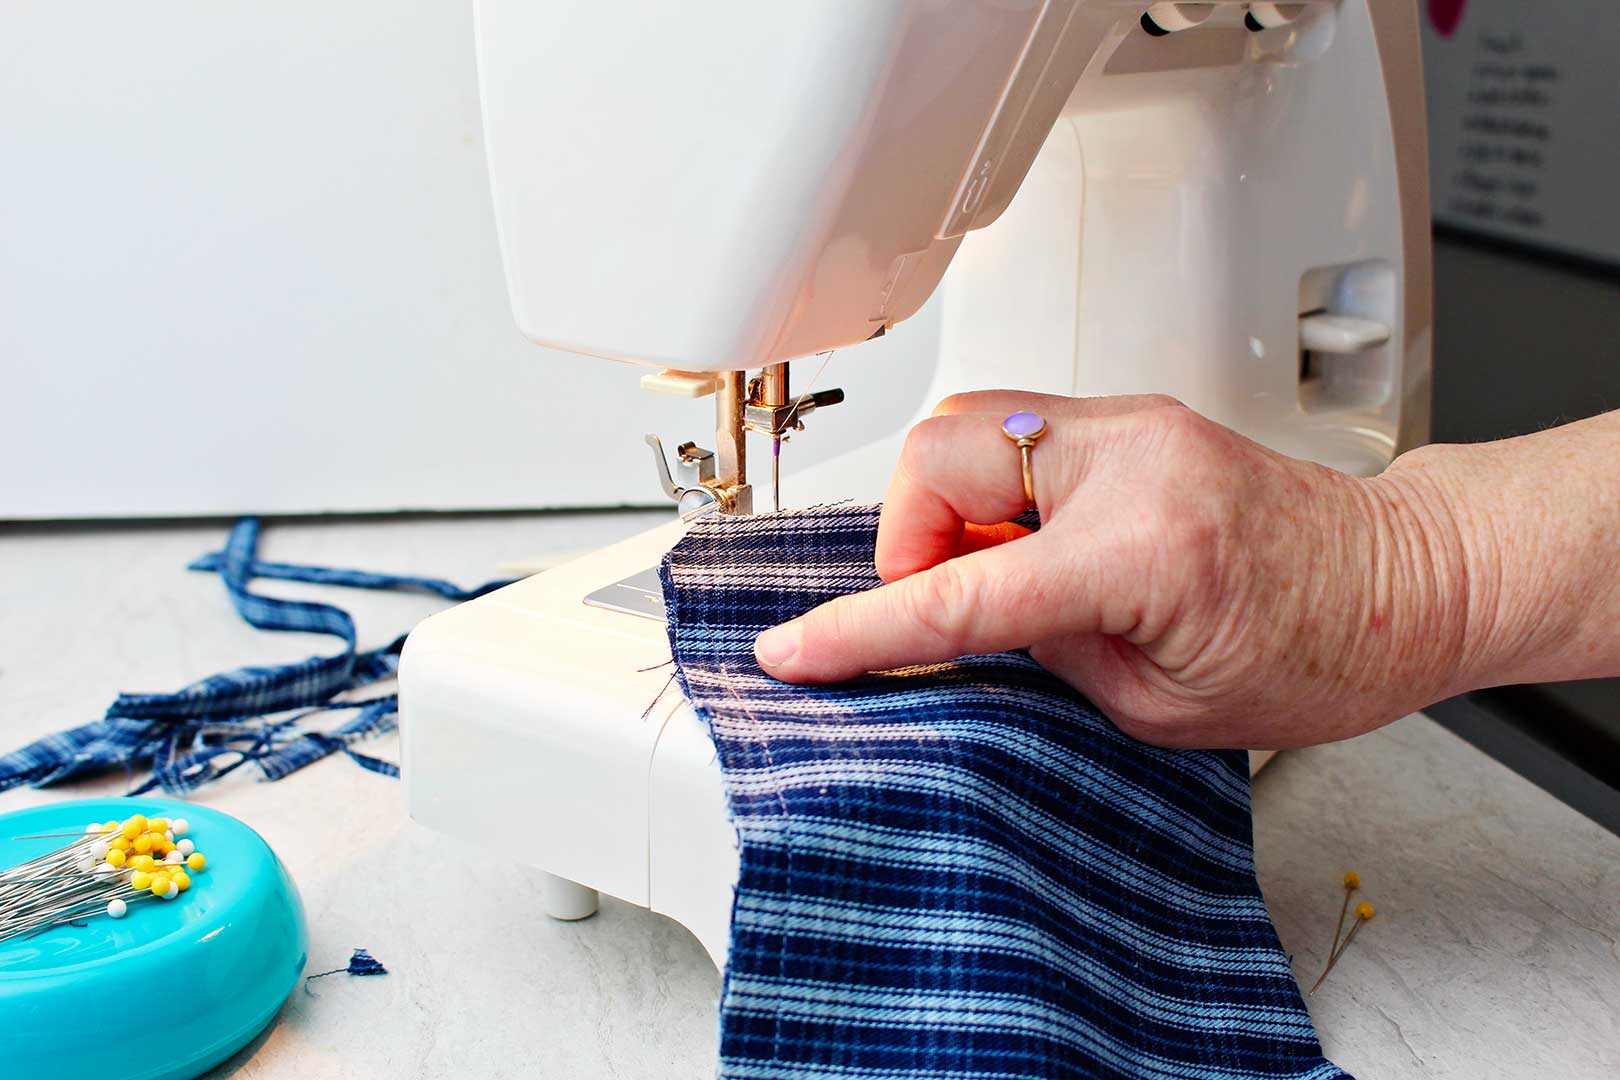
Take this to the sewing machine, and sew a ⅛" seam down both long edges of the fabric, back stitching on both ends.
Fold the long narrow piece in half the other direction. So now it should be 2 inches long and a half inch wide or so.
Set the loop piece aside for a minute while we work on the larger piece.
Cell phone pillow holder- large piece
Sewing the pillow edges
On the 8” x 12” piece of fabric, turn one long edge to the wrong side one half of an inch. Press this in place with an iron.
Then fold this piece in half with the wrong sides together so that it makes a folded piece that is 6“ x 8“ in size.
Make sure the two unfinished edge sides are together so that the edges are even and then pin in place.
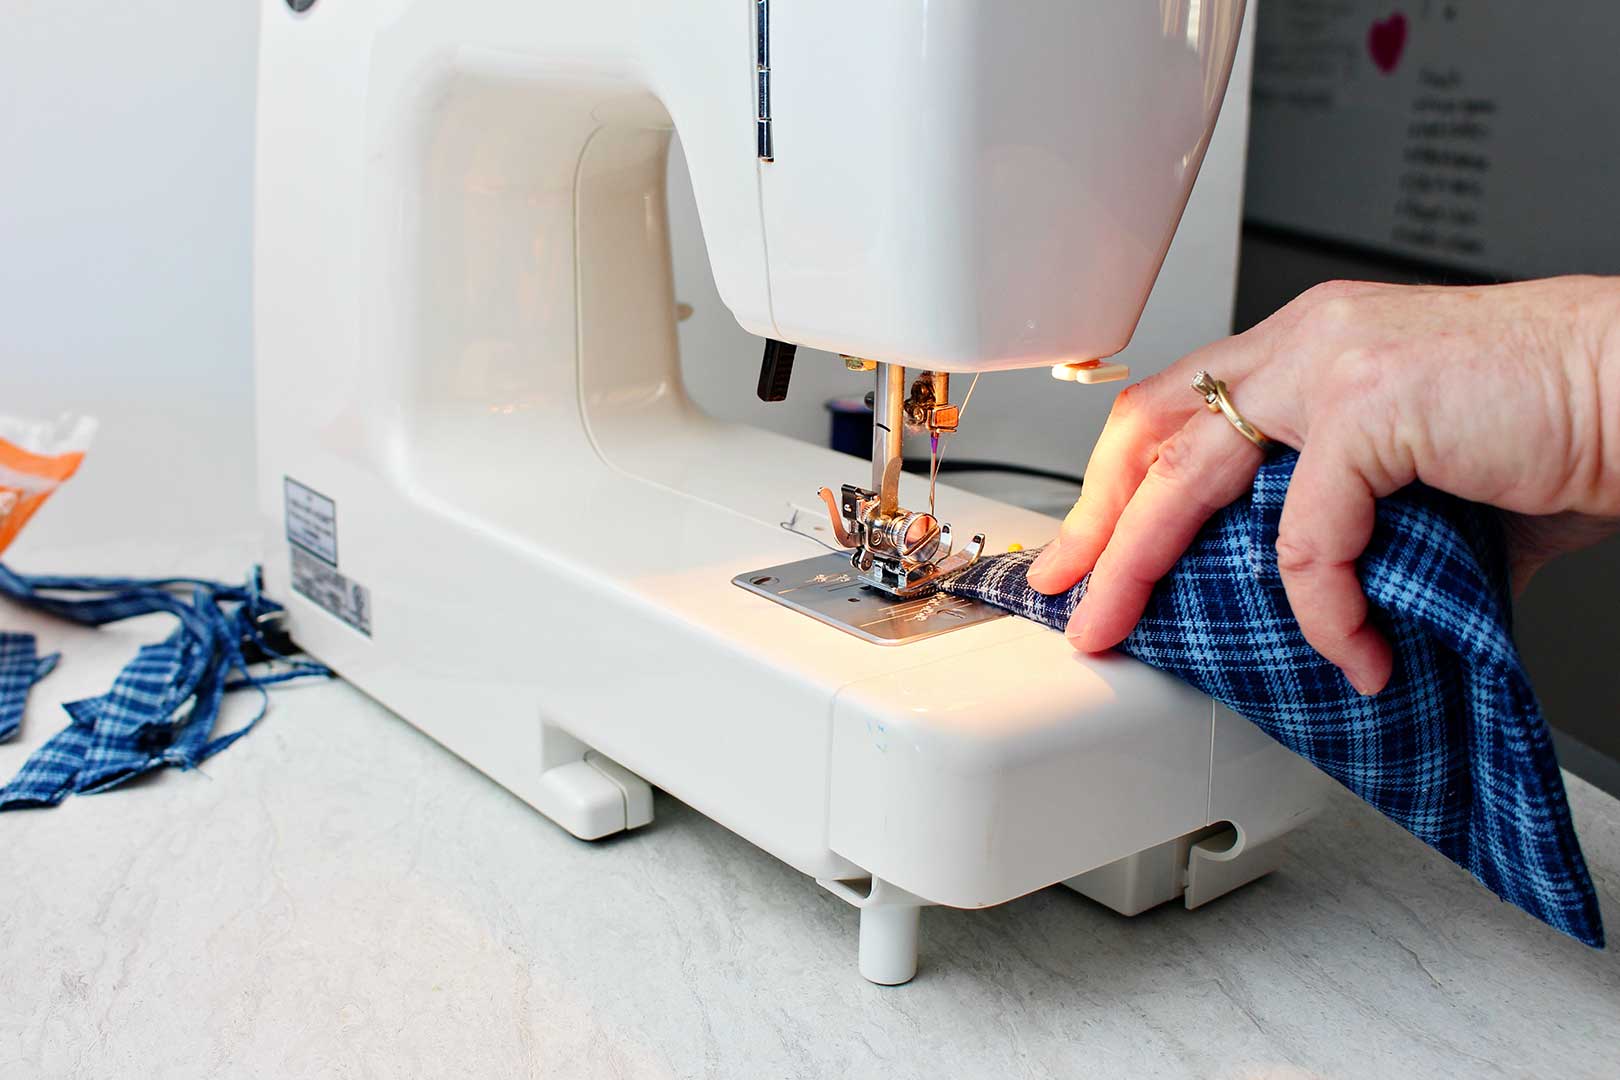
You are going to sew a ⅜th inch seam on your sewing machine across the bottom edge (the 6" side that is opposite of the folded down edge). Back stitch both ends.
From this seam, use a marking pencil to place a dot 1 inch above the seam you just sewed along the second seam line on the side of the bag.
Then from the folded edge down towards the edge that you just sewed, stitch a ⅜th inch seam, but stop at the dot you made 1 inch from the bottom of the seam. Backstage both ends of the seam. This leaves a 1 inch opening at the bottom of the 8" side.
Turn the fabric right sides out. Gently push out the corners so they’re as square as possible.
Sewing the "lip" of the cell phone holder pillow
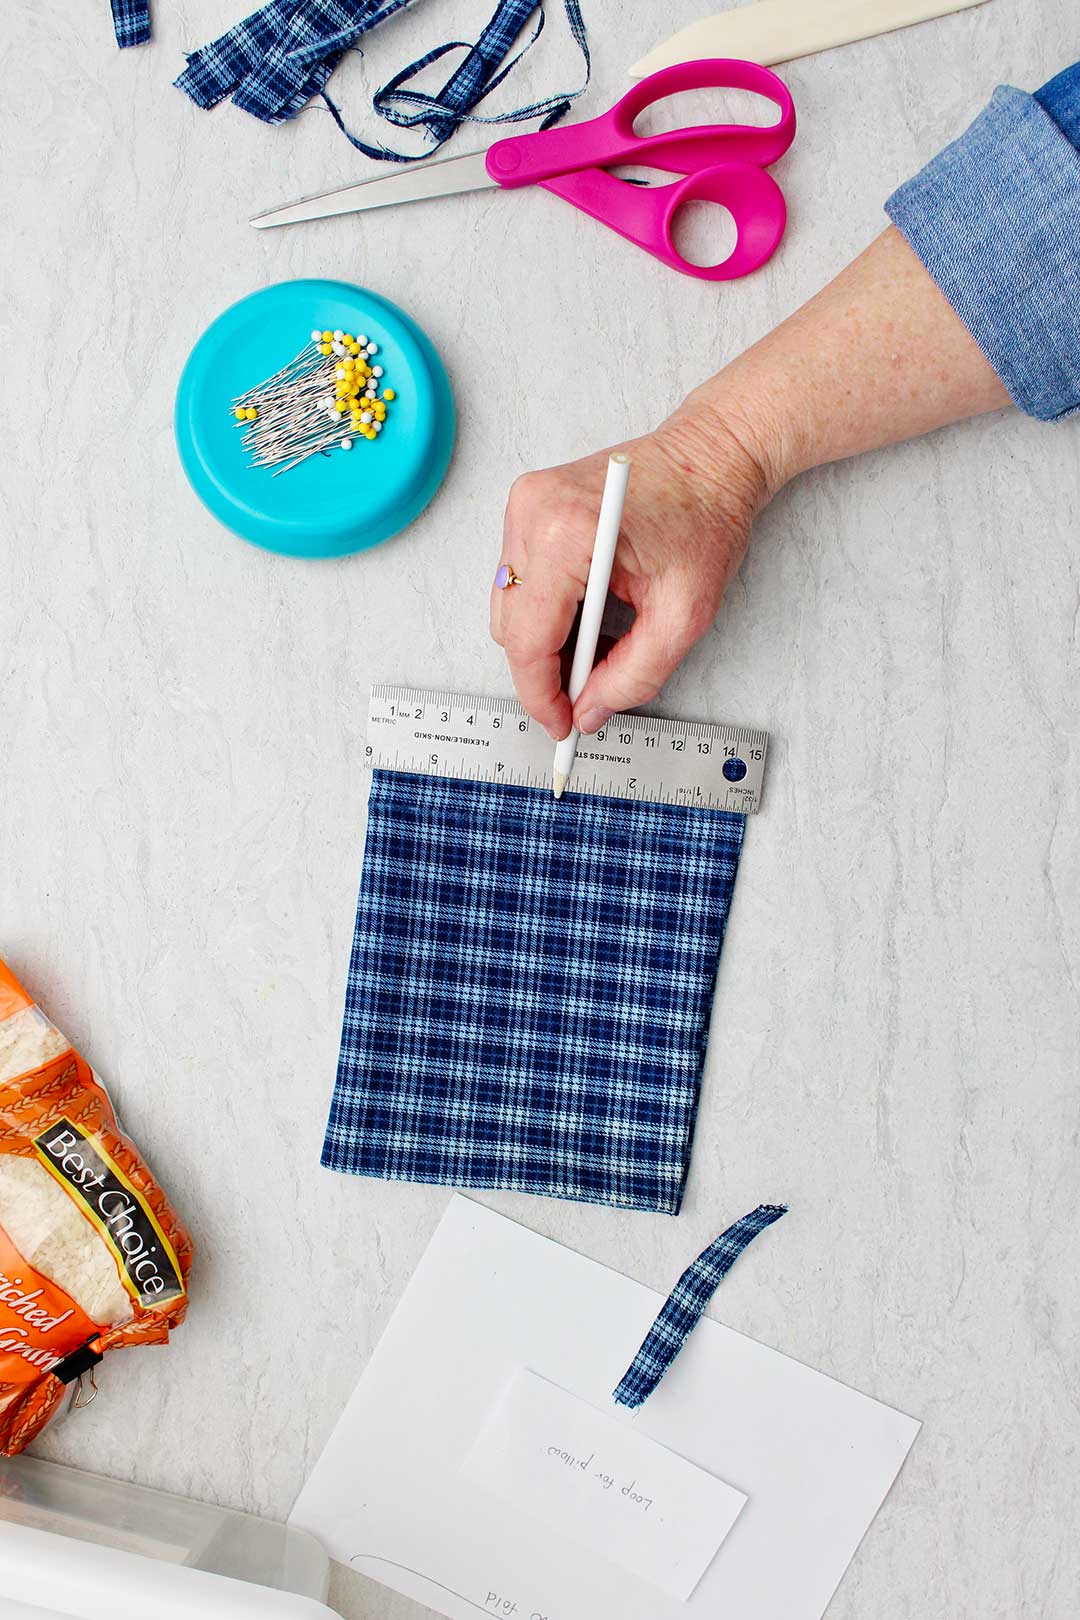
Use a ruler and a chalk pencil or a water based sewing marker to draw a line that’s 1 inch away from the bottom seam, the one that is opposite the opening of the bag.
Draw a second line that is parallel to the last line you drew, a half an inch closer to the opening of the bag.
Go to the sewing machine, and sew all the way across the bag on the first line back stitching up on both ends.
Repeat this with the second line that’s a half an inch away from the first line back stitching at both end.
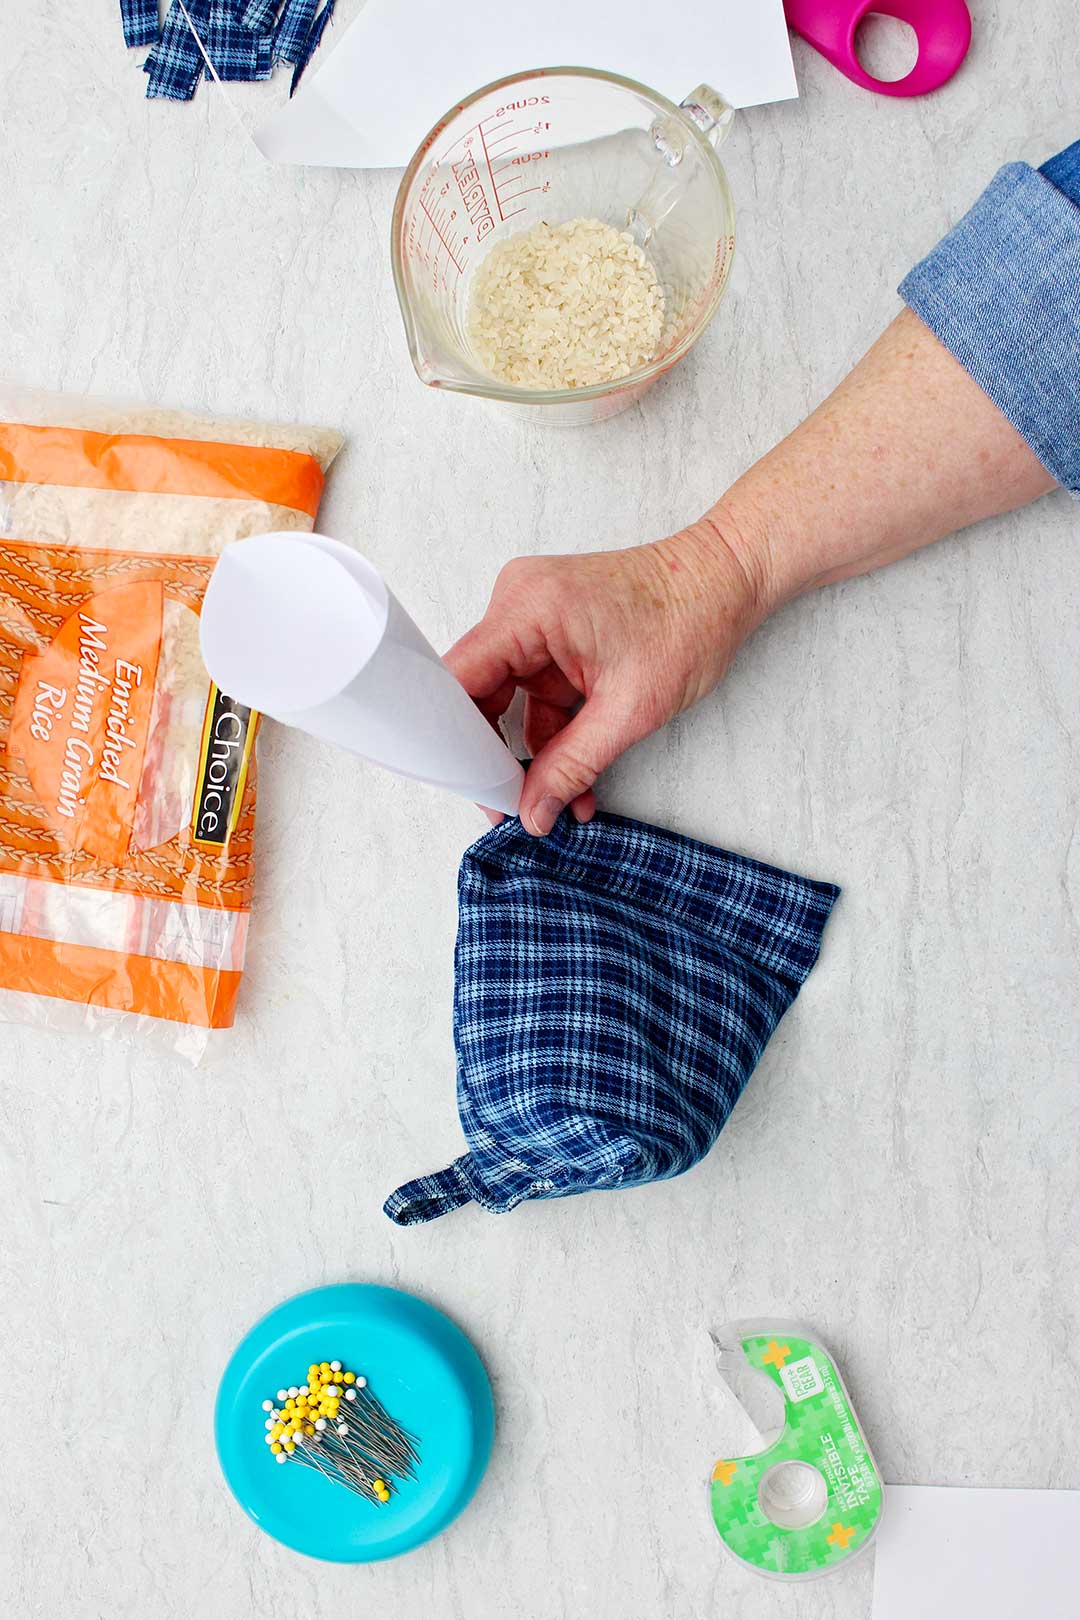
Adding filling
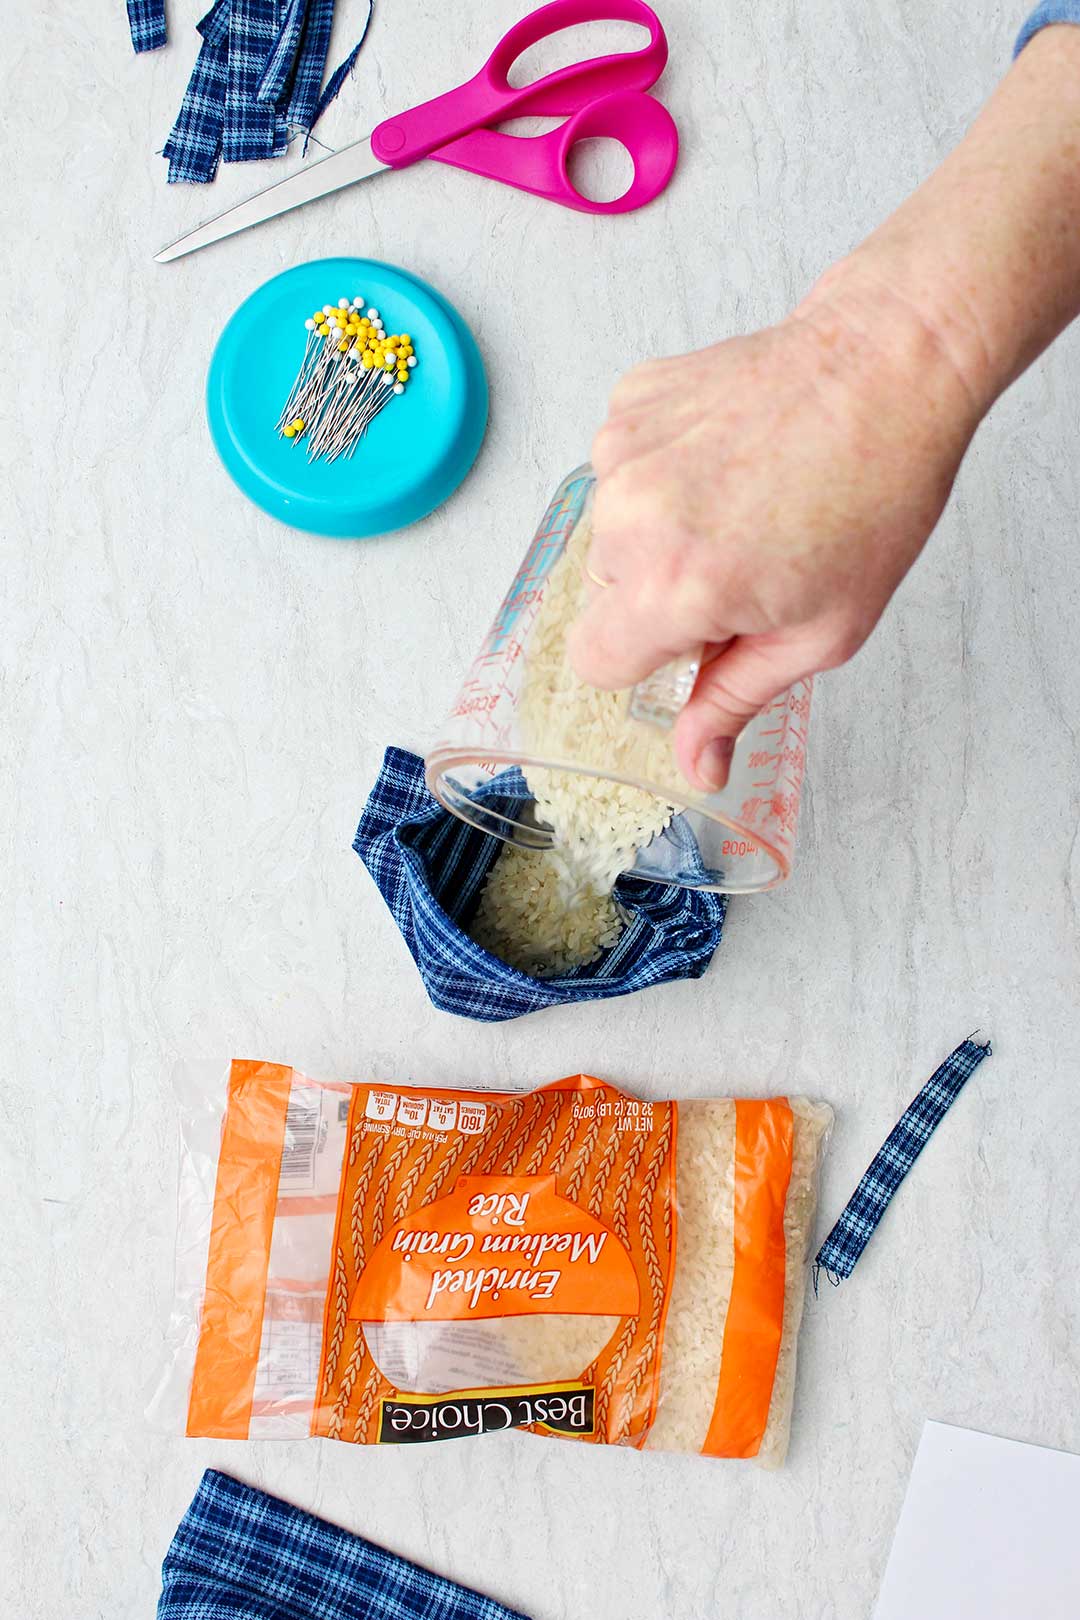
Now you’re going to add about a cup and a half of white rice into the large open end of the bag. This is to weight the bag so it can hold up the phone and not slip easily.
Note: I used a little more than a cup.
Stick one or two handfuls of fiber fill into the bag as well. Don’t overfill the bag and make it too tight. It needs to be soft, but not limp. So the cell phone pillow will be filled with a combination of fiber fill and rice.
Finishing the pillow
Next you are going to sew the top edge of the bag, but not flat like you normally would sew a rice bag.
You’re going to fold it in half so that the side seam is halfway across the seam that you’re going to sew. The top seam will be "caddy wompus" to the bottom seam that you’ve already sewn.
It may be helpful to watch the video to see what I’m talking about if the pictures don’t show this step well enough for you to understand what I’m saying. It's not very often that you read "caddy wompus" in sewing instructions! Ha!
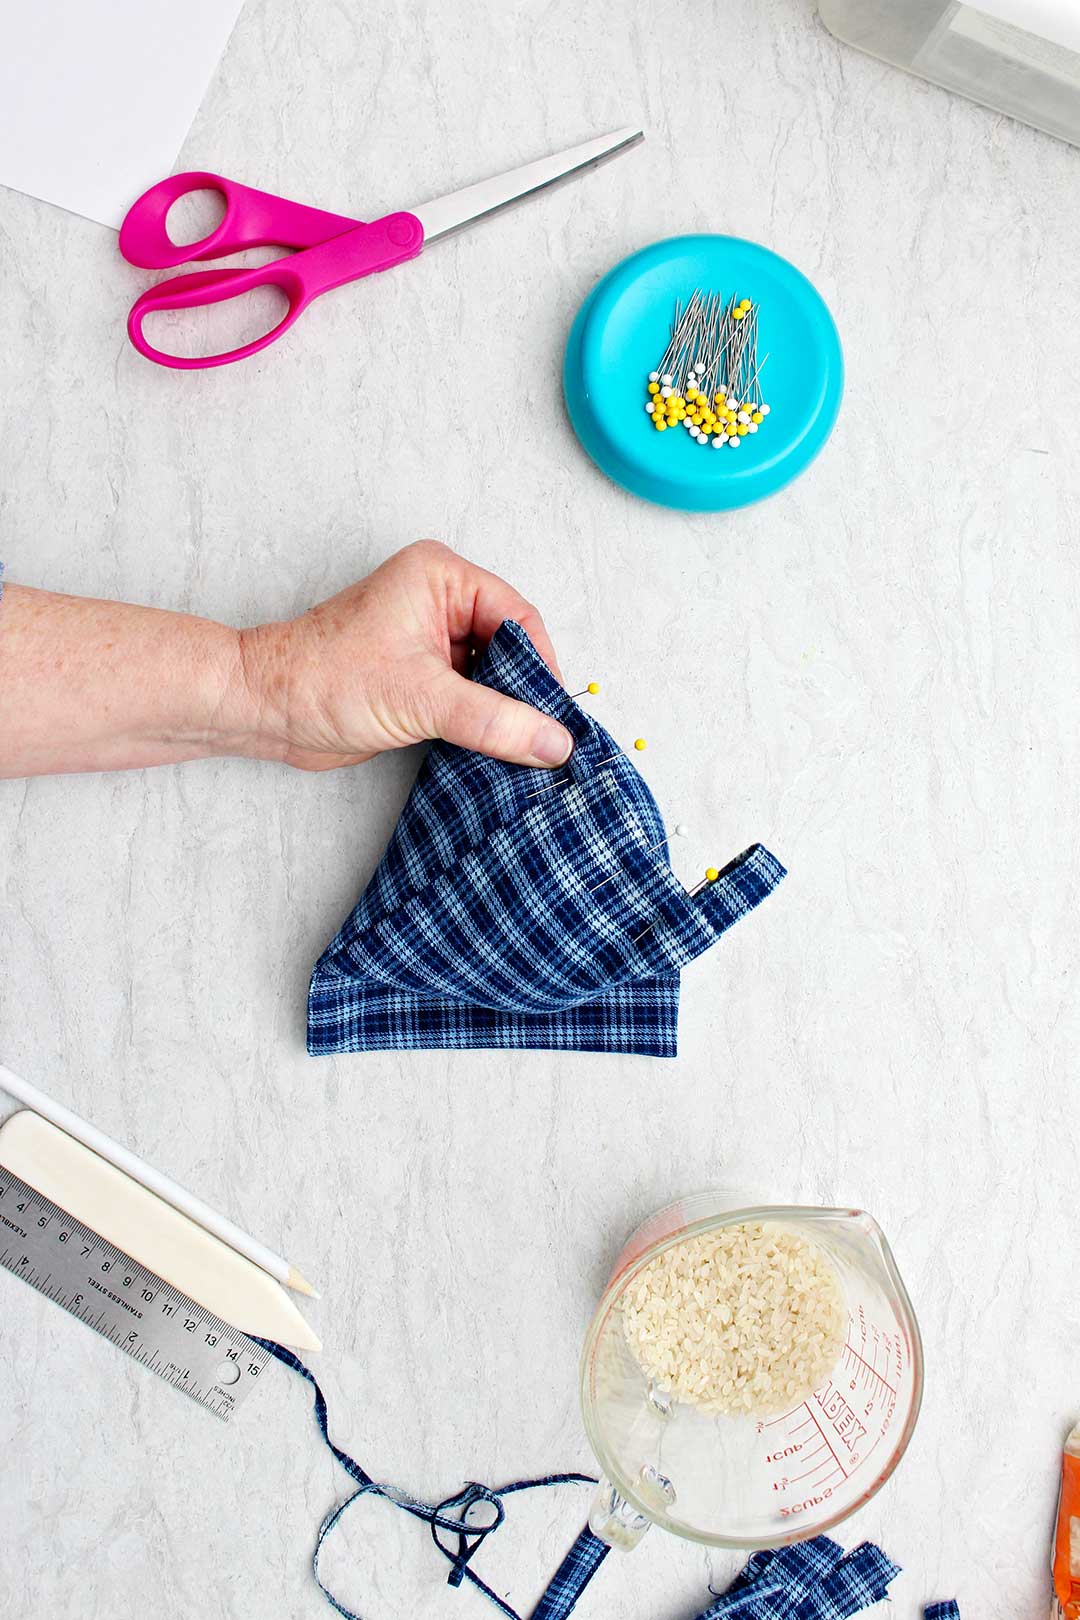
Pin the seam so that the folded edges are even and the seam that you have just sewn is located halfway across the seam that you’re going to sew next.
But before sewing this shut, you are going to insert the little loop that you made earlier.
Inserting the loop to the seam
Insert the loop so that it’s sticking up out of the seam and is placed towards one end of the seam. You will stick the loop in about half of inch into the bag.
You can adjust that to the size loop that you want. It’s nice if your cell phone cord can slip through the loop to hold the cord in place while charging.
The end of the seam with the loop will become the front of the cell phone holder pillow. Pin the loop in place.
Sew the top of the bag
Then go to the sewing machine and stitch across the edge about ⅛th inch from folded edge.
Be sure that it sews through both layers of the folded fabric so there are no open edges of the bag (the rice would leak out). Backstitch both ends of the seam.
Finish the "lip" of the phone holder
Now we’re going to go back to the 1 inch seam at the bottom of the bag that still has an open end.
If you have a small funnel that will fit into the end of the bag, that may be helpful for the next step.
If you don’t have a funnel, you can roll up a piece of paper so that it creates a funnel that will fit into the 1 inch end of the bag. It helps to tape this paper Into the funnel shape so it doesn’t come undone while you’re trying to do the next step.
Now use a small amount of white rice to pour down into the little 1 inch area of the bag. Fill it so that there’s about ¾ inch space at the top so that you can sew your seam. If the area is too full you can't sew the seam.
Go to the sewing machine and stitch the little 1 inch area closed. Sew through both layers of folded fabric with the edges even.
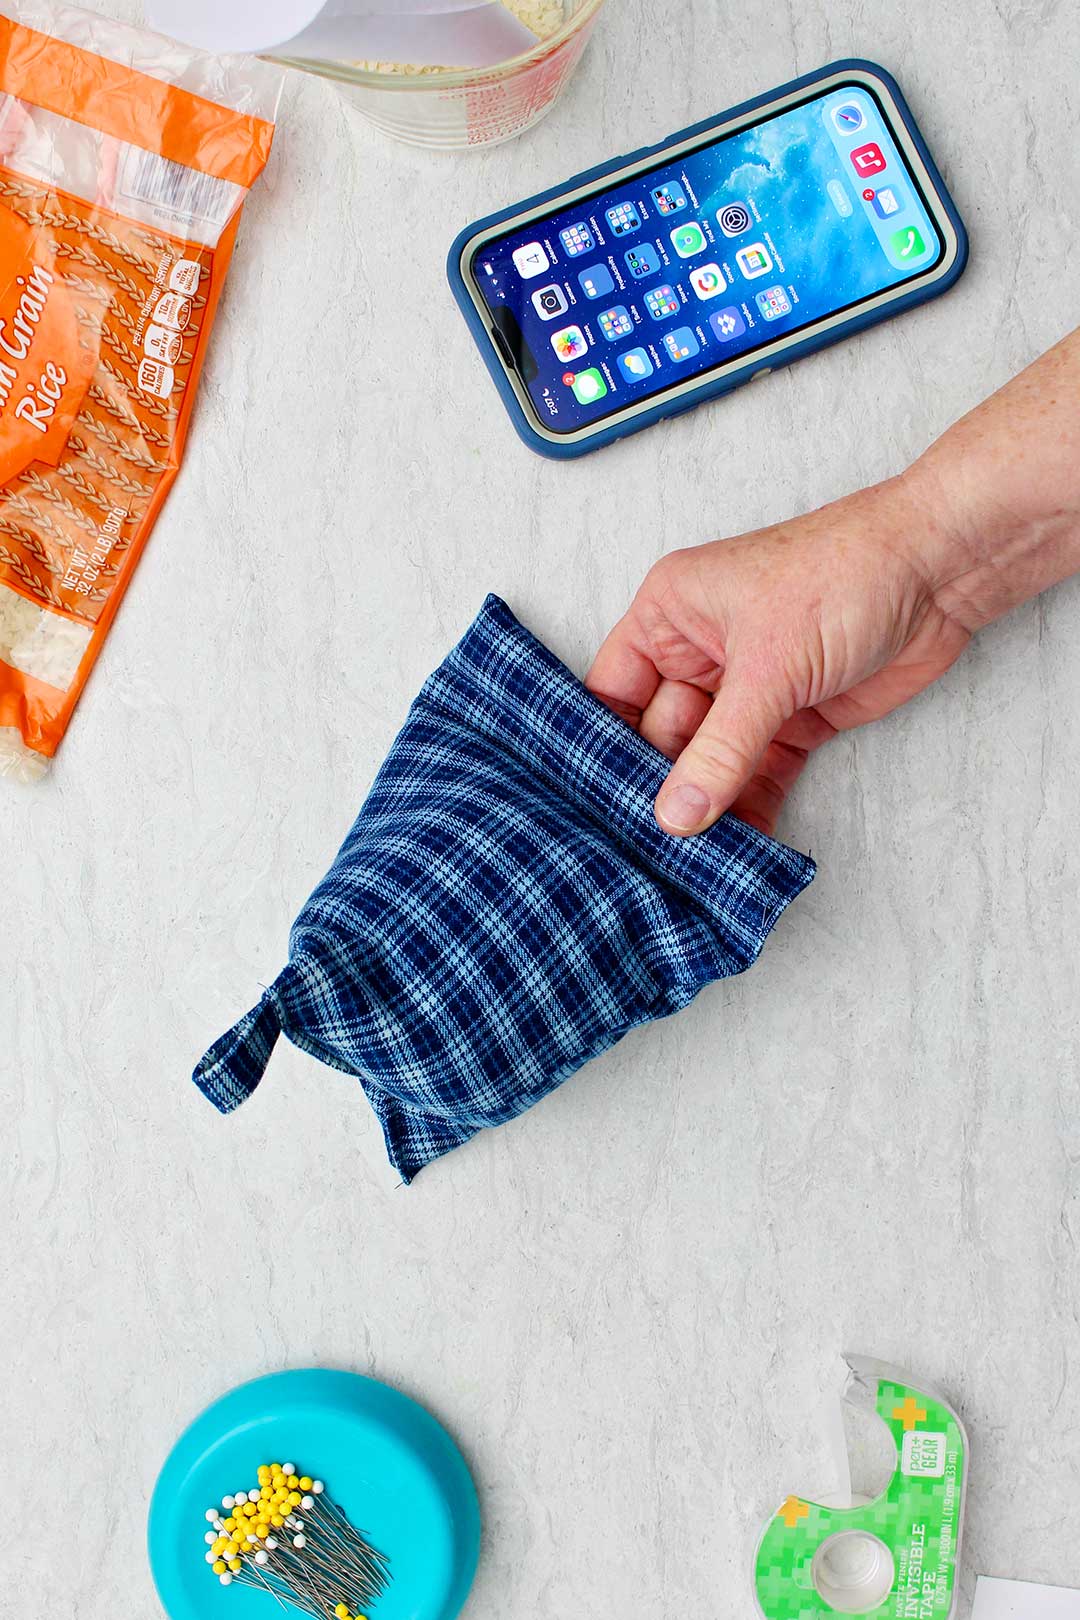
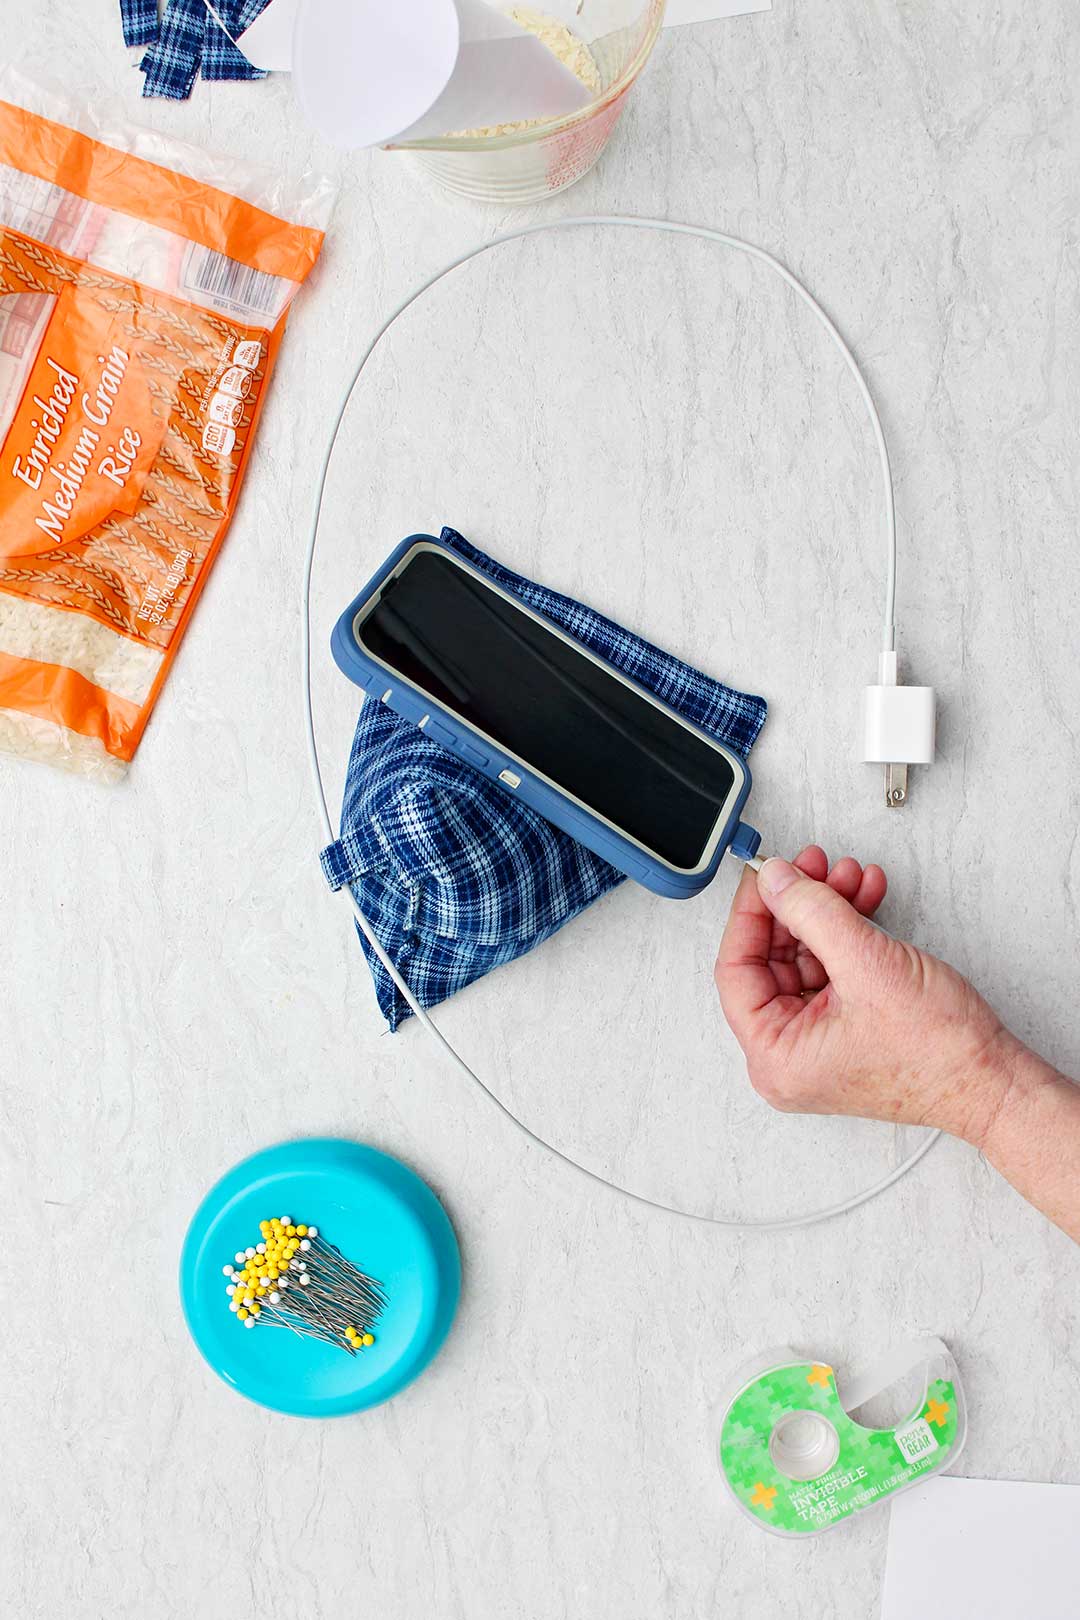
You’re done with your cell phone holder pillow!
I really enjoy having a cell phone holder pillow next to me while I work so that I can just set my phone up and work on my computer or do other tasks. It's great to have hands-free cell phone viewing especially when listening to a podcast.
The little lip at the bottom that you made with the 1 inch seam holds the phone up nicely. You can place your phone upright or horizontally on the bag.
How about a tablet holder pillow?
As I was making the cell phone holder pillow, I thought about making a larger one that would work for a tablet or iPad.
It would just take increasing the size of the original large piece of fabric to make a tablet holder pillow. Let me know if you give that a try!
Cleaning your phone pillow holder
On a practical note, your phone pillow holder is not something that should be put in the washer because of the rice filling.
So if the outer cover needs to be cleaned I would only use a damp cloth to wipe it off.
If you chose to put plastic filler pellets inside instead of rice it could be washed.
I'm off, got to get sewing!
So pardon me, but I'm off to make several more as gifts and also my own phone pillow for my kitchen counter!!
But before I go, here is the link to the free pattern again: How To Sew a Cell Phone Holder Pillow Free Pattern as well as the link to the full length video tutorial: Cell Phone Holder Pillow Full Length Video Tutorial.
More learn to sew projects
Would you like some other easy learn to sew projects? Here are a few ideas.
- DIY Easy to Sew Microwavable Rice Pack
- Simple to Sew DIY Apron Gift
- How to Sew a Pillowcase Tutorial
- How to Make Jeans Into Bell Bottoms
Looking for a great way to prop up your phone? Try making your own DIY phone pillow! You can create one of these fun phone holders with just some fabric, rice, thread, and a few other items. It's an easy-to-sew project that is perfect for a fun and inexpensive phone holder alternative.
If you want to make your own phone pillow holder, first you'll need this free sewing pattern! Then you can grab some fabric, rice, fiberfill, and a few sewing items. Follow the steps to create your own simple DIY phone holder pillow!
Enjoy!
If you try this craft, let me know! Go ahead and leave a comment, rate it, and tag a photo with #WelcometoNanas wherever you post.
Come join the fun at https://welcometonanas.com
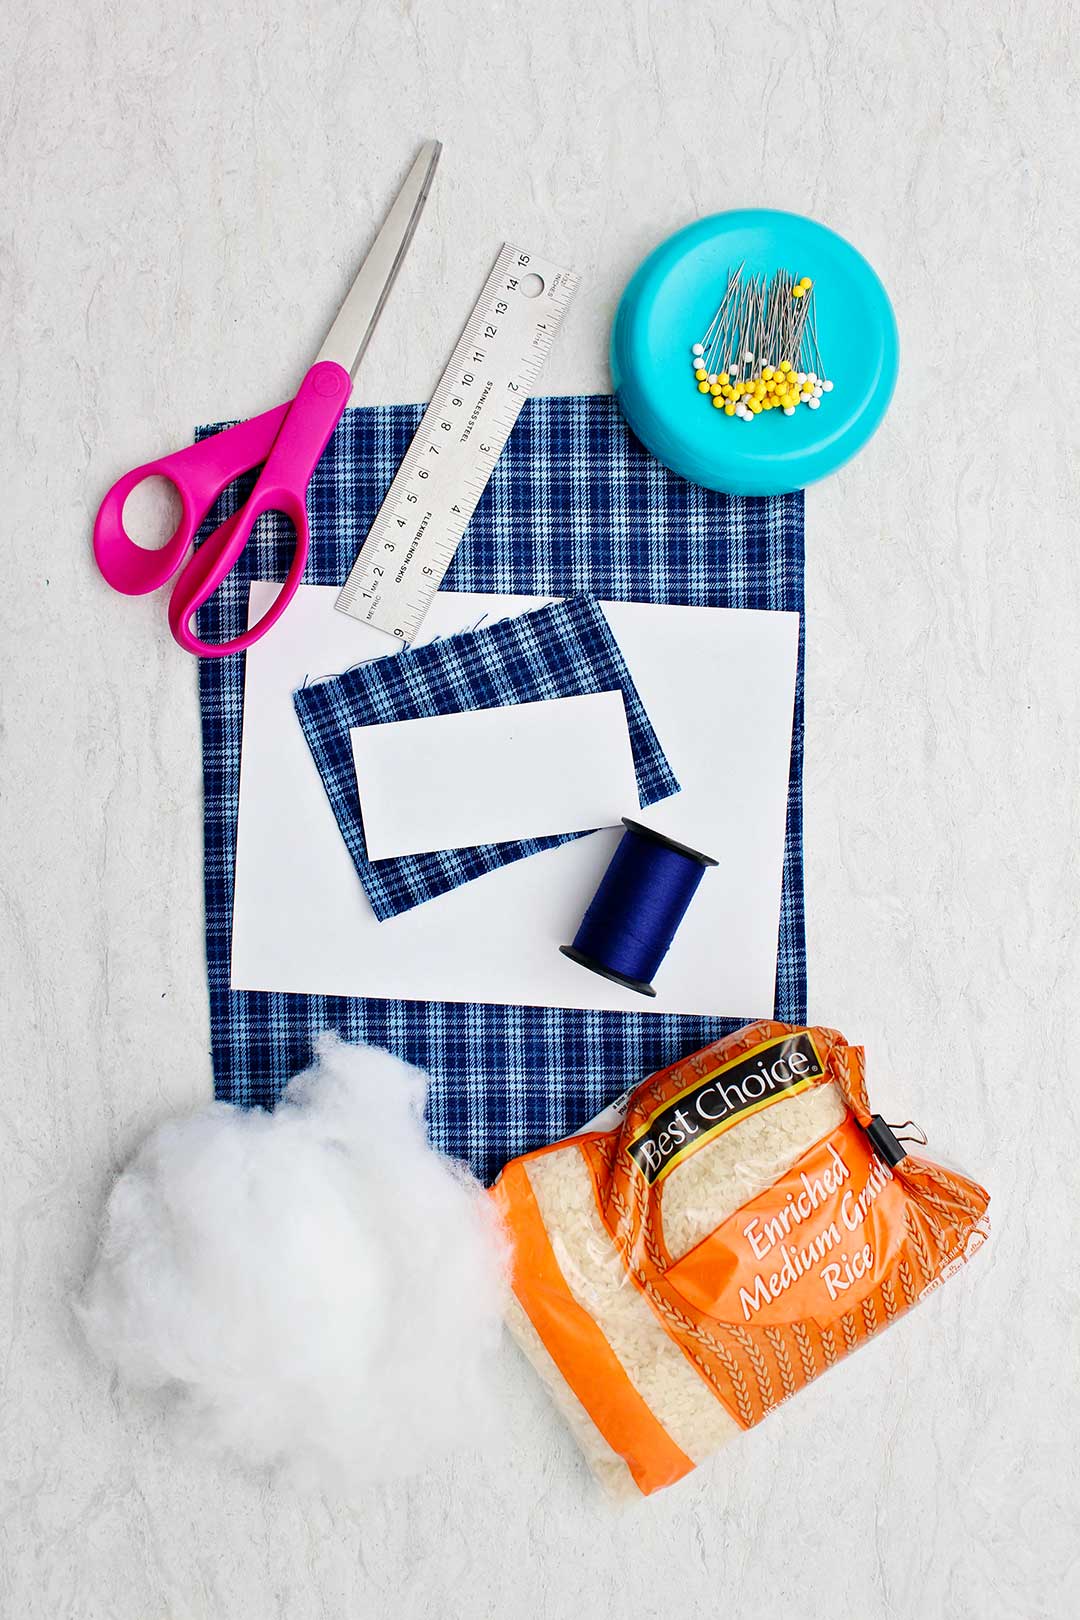
Supplies:
- How to Sew a Cell Phone Holder Pillow Free Pattern- print a copy
- Fabric- a fat quarter works well
- Thread- matching your fabric
- Marking pencil or marking pen for fabric
- 1 ½ cups of white rice (or weighted plastic pellets for stuffing)
- Fiberfill- small amount
- Small funnel (optional)
- Scissors
- Pins
- Ruler
- Sewing Machine
How to Sew a Cell Phone Holder Pillow (Gift for Mom)
Equipment
- Small funnel (optional)
- Scissors
- Pins
- Ruler
- Sewing machine
Items Required
- How to Sew a Cell Phone Holder Pillow Free Pattern- print a copy
- Fabric- a fat quarter works well
- Thread- matching your fabric
- Marking pencil or marking pen for fabric
- 1 ½ cups of white rice (or weighted plastic pellets for stuffing)
- Fiberfill- small amount
- Small funnel (optional)
- Scissors
- Pins
- Ruler
- Sewing Machine
Instructions
- You can use any fabric you’d like to make it. So you can make a decorative cell phone stand for every person you want to give it to, a personalized cell phone pillow.The cell phone holder pillow is a perfect project to use up scraps of fabric from other projects.If you purchase fabric, like some specialty cotton fabric, a fat quarter would be a great amount. You could make two of these cell phone pillows out of one fat quarter.
- Here is your free fabric phone stand pattern. Just click this link- WTN Cell Phone Holder Pillow Free Pattern. Print one copy.
- Cut one piece of fabric that is 8” x 12” and then cut a second piece that is 2” x 4”.
- Take the 2 x 4” piece and fold it in half lengthwise, wrong sides together,. Give it a press if you have an iron.Note: If you don't own an iron (many people don't) at least finger press it well. Any time in these directions that I mention ironing, know that you are to finger press instead.Open it back up. Fold one long outside edge into the fold with the wrong sides together then fold the other long side into the folded area and press.Then fold the fabric in half on the first fold again. So that the long cut edges are tucked to the inside.Take this to the sewing machine, and sew a ⅛" seam down both long edges of the fabric, back stitching on both ends. Fold the long narrow piece in half the other direction. So now it should be 2 inches long and a half inch wide or so.
- On the 8” x 12” piece of fabric, turn one long edge to the wrong side one half of an inch. Press this in place with an iron.Then fold this piece in half with the wrong sides together so that it makes a folded piece that is 6“ x 8“ in size.Make sure the two unfinished edge sides are together so that the edges are even and then pin in place.You are going to sew a ⅜th inch seam on your sewing machine across the bottom edge (the 6" side that is opposite of the folded down edge). Back stitch both ends.From this seam, use a marking pencil to place a dot 1 inch above the seam you just sewed along the second seam line on the side of the bag.Then from the folded edge down towards the edge that you just sewed, stitch a ⅜th inch seam, but stop at the dot you made 1 inch from the bottom of the seam. Backstage both ends of the seam. This leaves a 1 inch opening at the bottom of the 8" side.Turn the fabric right sides out. Gently push out the corners so they’re as square as possible.
- Use a ruler and a chalk pencil or a water based sewing marker to draw a line that’s 1 inch away from the bottom seam, the one that is opposite the opening of the bag.Draw a second line that is parallel to the last line you drew, a half an inch closer to the opening of the bag.Go to the sewing machine, and sew all the way across the bag on the first line back stitching up on both ends.Repeat this with the second line that’s a half an inch away from the first line back stitching at both end.
- Now you’re going to add about a cup and a half of white rice into the large open end of the bag. This is to weight the bag so it can hold up the phone and not slip easily.Note: I used a little more than a cup.Stick one or two handfuls of fiber fill into the bag as well. Don’t overfill the bag and make it too tight. It needs to be soft, but not limp. So the cell phone pillow will be filled with a combination of fiber fill and rice.
- Next you are going to sew the top edge of the bag, but not flat like you normally would sew a rice bag.You’re going to fold it in half so that the side seam is halfway across the seam that you’re going to sew. The top seam will be "caddy wompus" to the bottom seam that you’ve already sewn.It may be helpful to watch the video to see what I’m talking about if the pictures don’t show this step well enough for you to understand what I’m saying. It's not very often that you read "caddy wompus" in sewing instructions! Ha!Pin the seam so that the folded edges are even and the seam that you have just sewn is located halfway across the seam that you’re going to sew next.But before sewing this shut, you are going to insert the little loop that you made earlier.Insert the loop so that it’s sticking up out of the seam and is placed towards one end of the seam. You will stick the loop in about half of inch into the bag.You can adjust that to the size loop that you want. It’s nice if your cell phone cord can slip through the loop to hold the cord in place while charging. The end of the seam with the loop will become the front of the cell phone holder pillow. Pin the loop in place.Then go to the sewing machine and stitch across the edge about ⅛th inch from folded edge.Be sure that it sews through both layers of the folded fabric so there are no open edges of the bag (the rice would leak out). Backstitch both ends of the seam.
- Now we’re going to go back to the 1 inch seam at the bottom of the bag that still has an open end.If you have a small funnel that will fit into the end of the bag, that may be helpful for the next step. If you don’t have a funnel, you can roll up a piece of paper so that it creates a funnel that will fit into the 1 inch end of the bag. It helps to tape this paper Into the funnel shape so it doesn’t come undone while you’re trying to do the next step.Now use a small amount of white rice to pour down into the little 1 inch area of the bag. Fill it so that there’s about ¾ inch space at the top so that you can sew your seam. If the area is too full you can't sew the seam.Go to the sewing machine and stitch the little 1 inch area closed. Sew through both layers of folded fabric with the edges even.You're done with your cell phone holder pillow!!! Enjoy!


Phyllis says
I've made 8 of these now, using your pattern. Written instructions are off just a bit but easily corrected. Tutorial is flawless and very much appreciated. I now have a very nice Samsung tablet which measures approximately 11". In a case but no keyboard, which is fine. Perfect for my sewing room. Using your same phone pattern I plan to increase the size to fit the tablet, but not sure how much larger I should cut the fabric. At your convenience, if you have advice, please share. In the meantime, huge thank you for the phone pattern. It's by far the best I've found on the internet.
Shelly says
I am so glad you liked the tutorial. I try hard to be accurate.
I don't have a tutorial for a tablet but I did think of that as I made this one for the phone.
If you have made several that are phone sized, set your tablet on one and measure how much higher you would want it.
Then measure how much wider you would want it.
Increase the pattern by those two measurements.
This will increase the length of the area where rice is placed and increase the amount of rice needed too of course.
You will have to use your judgement on if the size of the rice area will be adequate to hold the tablet.
I'm eager to hear how it turns out!!