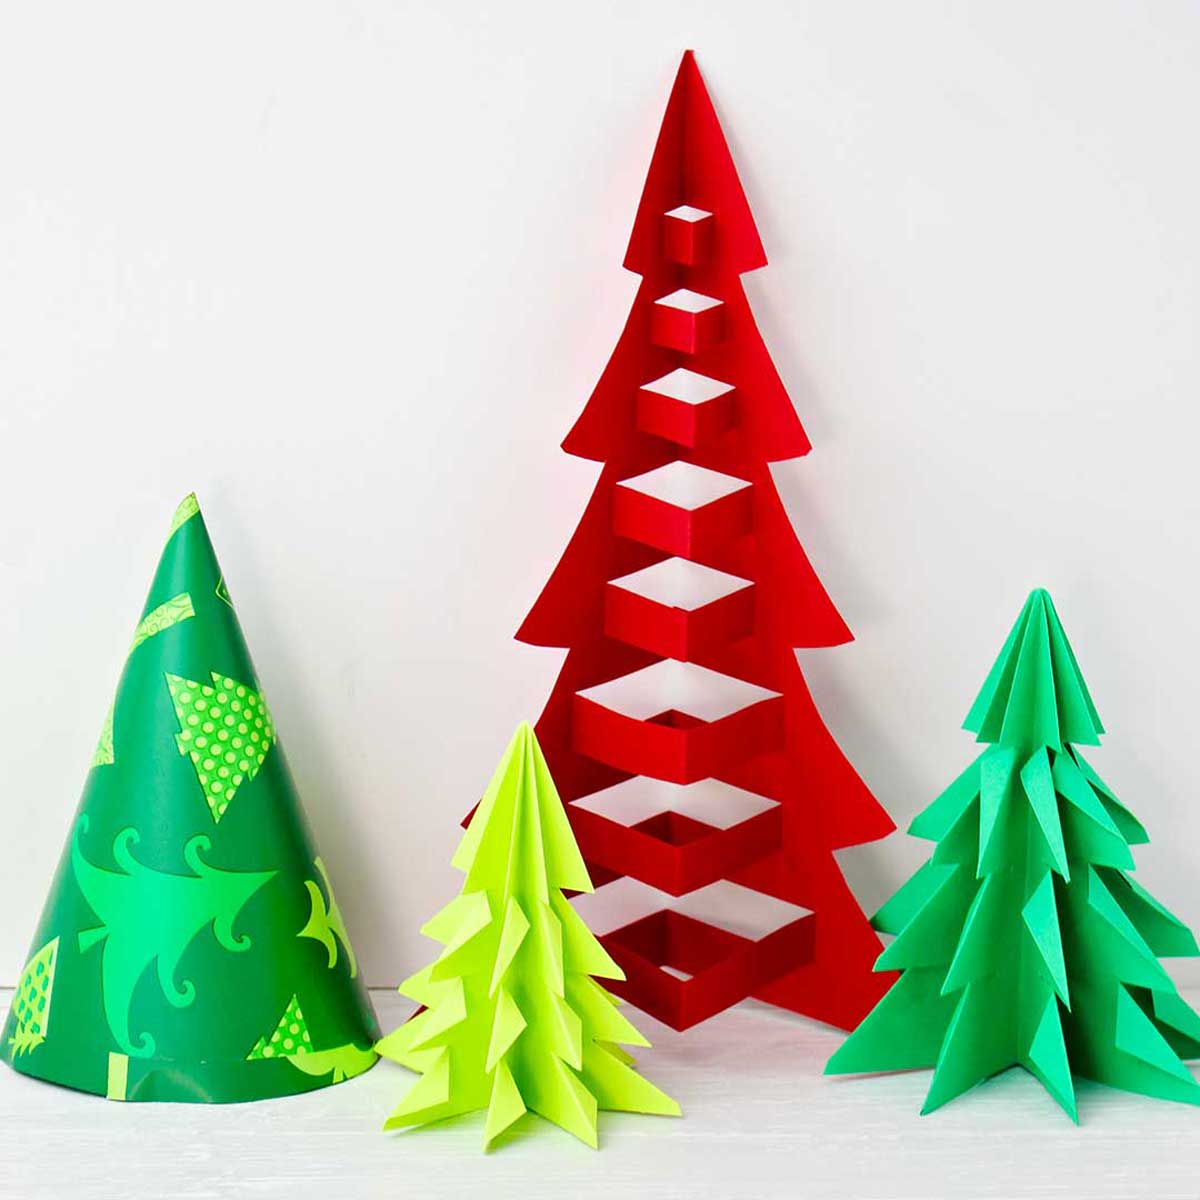
Learn how to make 3 different easy Origami Christmas Trees with this step-by-step tutorial! This fun craft for kids offers options for all age and skill levels, and only requires paper and a pair of scissors to make!
Jump to:
Fun Origami Christmas Project Ahead!
Origami is so intriguing to me. Who thought up these clever folded origami trees? They are amazing.
These 3 methods allow you to make a paper tree that matches any ability level! Also you can use any color papers you would like, creating a forest of decorative trees in coordinating themes.
The kids can quickly whip up these beautiful decorations for your Christmas table this holiday season. It's a great way to have a little bit of crafting fun and celebrate at the same time with the whole family.
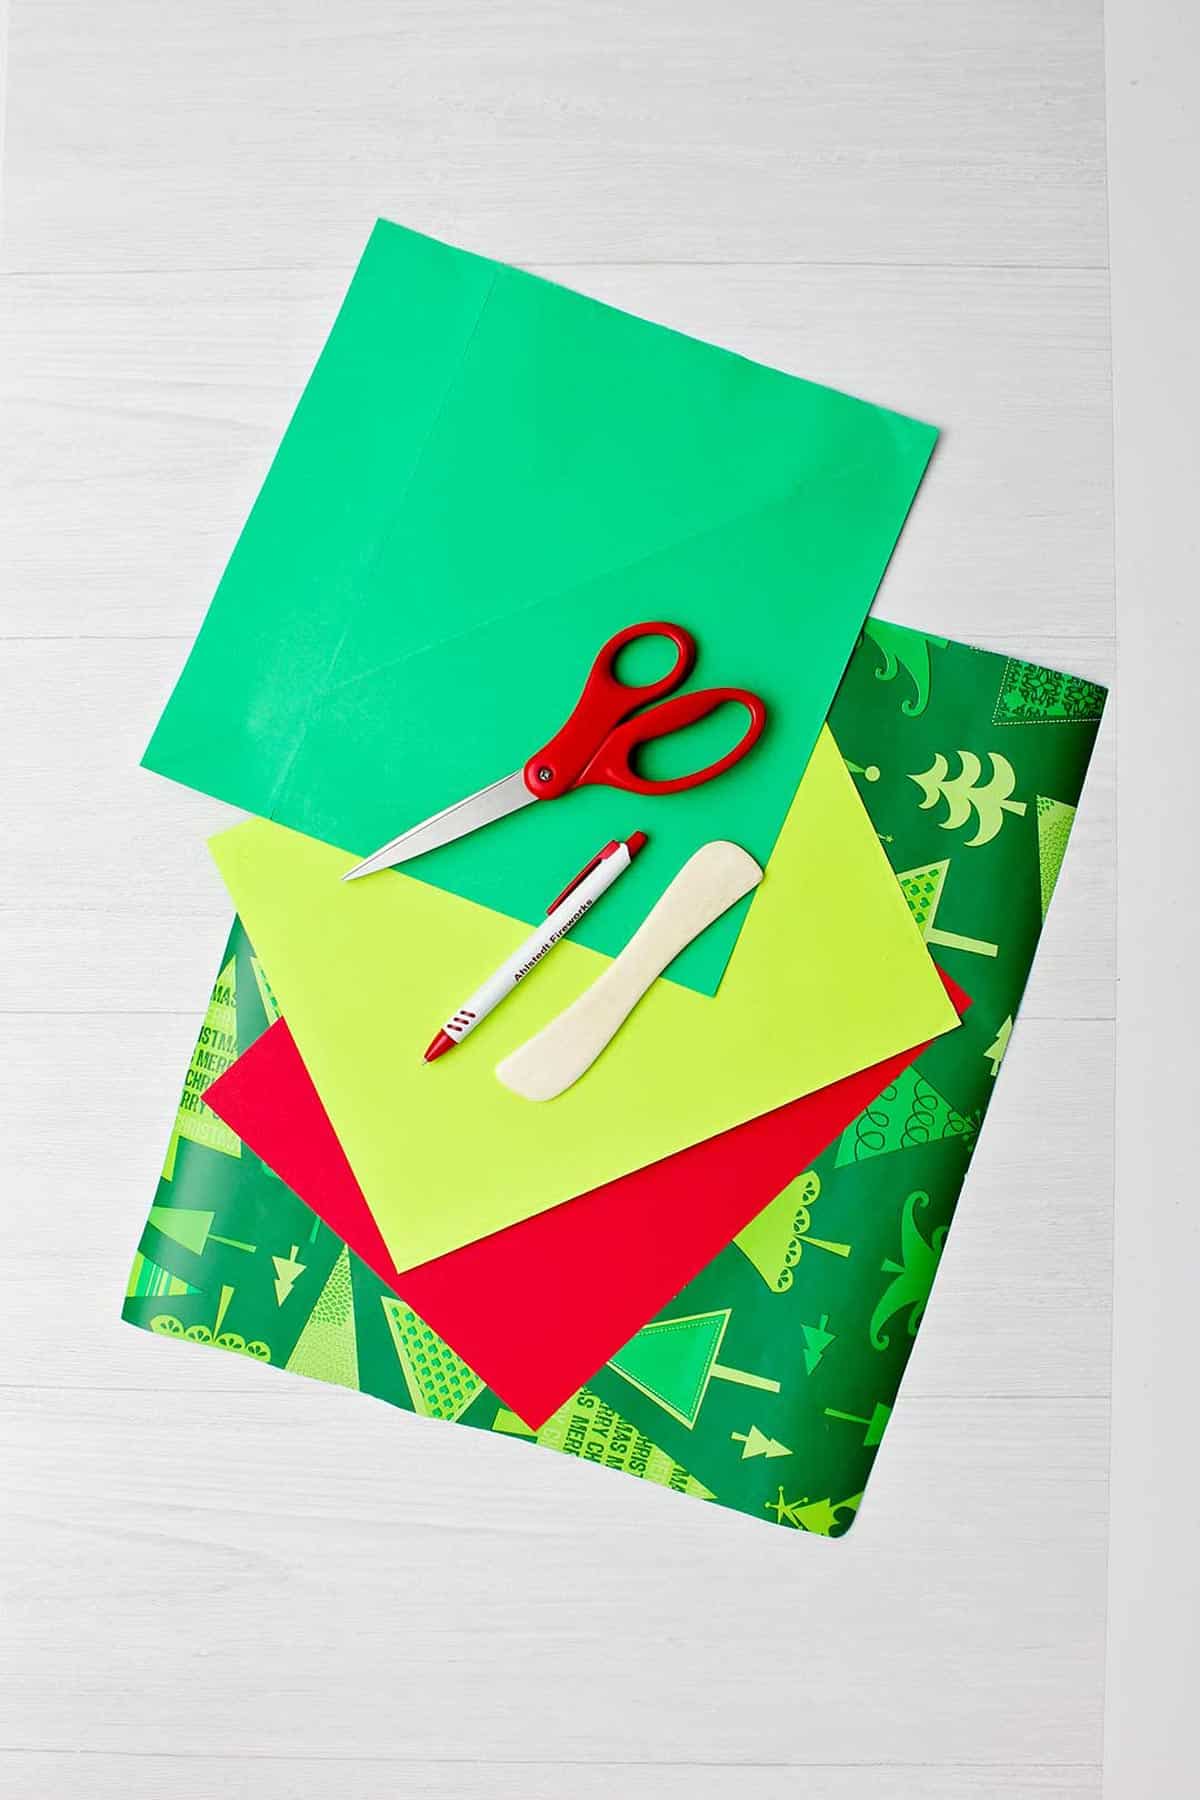
Supplies for a Folded Paper Tree
You don't need much to bring these cute folded trees to life.
- Paper- You don't need craft supplies for this project, but the paper is important! You can use regular paper, computer paper, square origami paper, or even gift wrap or butcher paper.
- Scissors- Use scissors to cut the paper to size. I just put them on the supply list to have two items listed!

Origami Christmas Tree Step-by-Step Instructions
You can learn the 3D Christmas tree origami process and make an origami Christmas tree right along with me. Click here to watch on a full length video tutorial. Pause at any time along the way to catch each step, one of the best ways to make sure you've got the right corners and folds!
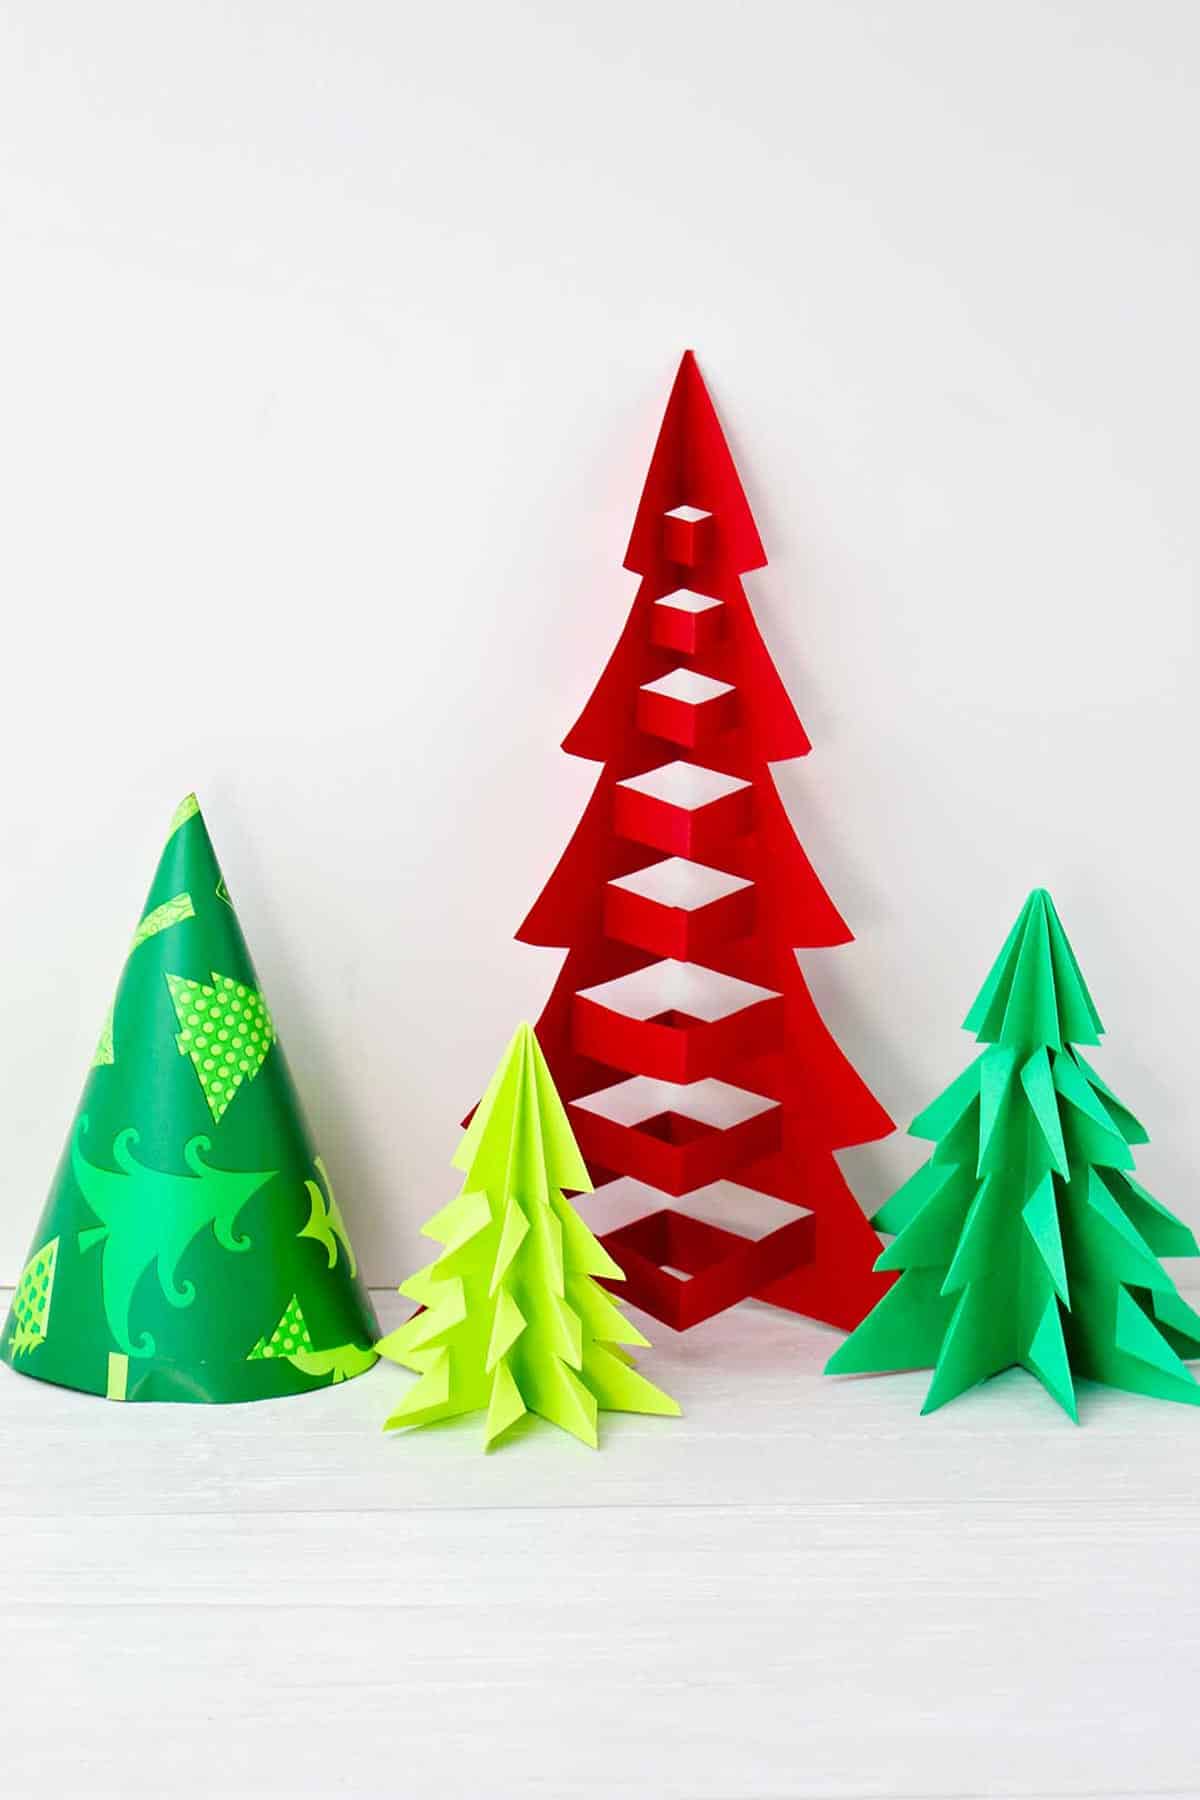
3D Christmas Tree Origami - 3 Ways!
Simple Origami Christmas Tree #1: Folded
The folded tree is the one in the solid green paper in my photos. This is a good option for older kids as this little Christmas decoration has some more complicated folds.
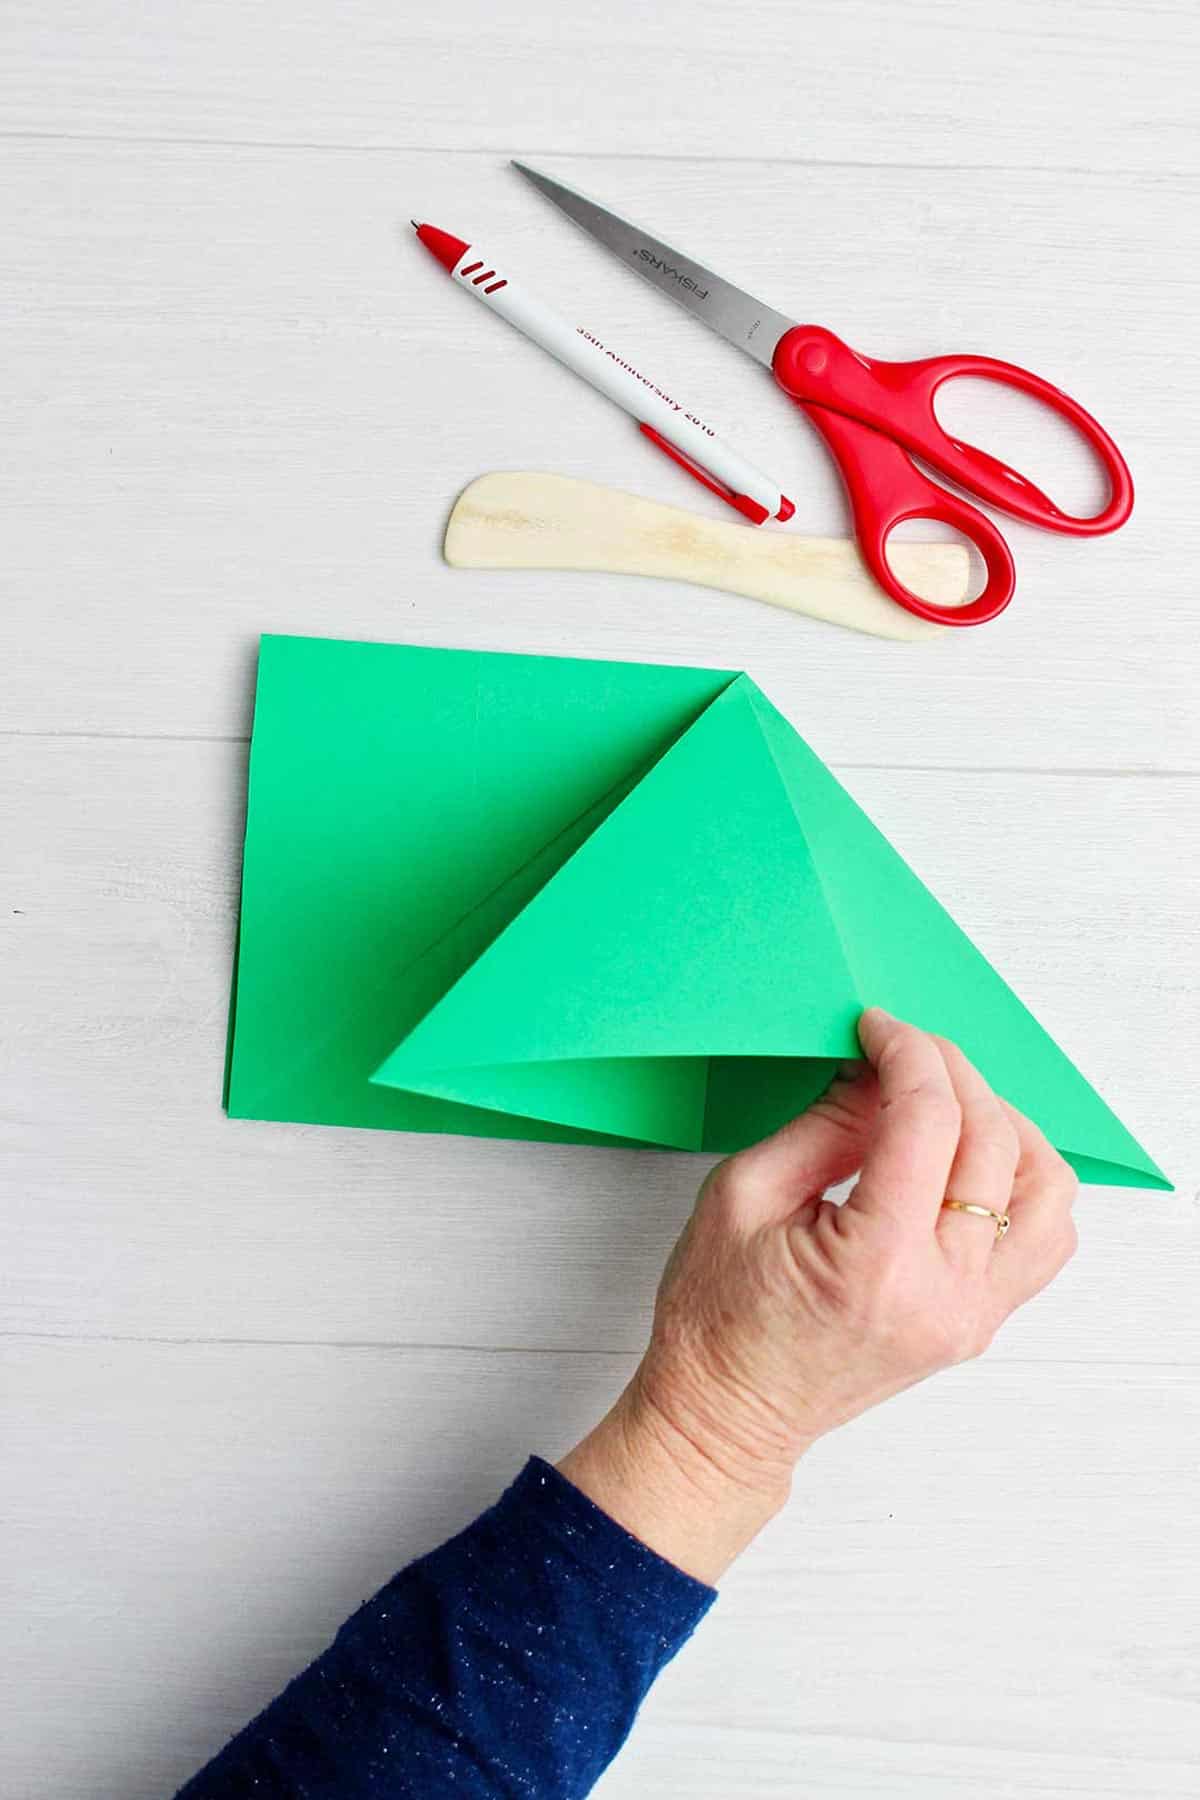
Cut a single sheet of paper into a square. The larger the square, the larger the finished origami tree will be. I cut a square sheet of paper that is 11x11 inch in size for this example.
Fold the square into a triangle (corner to corner), unfold it. Then fold it into a triangle the other direction, and unfold. Be sure to make good creases, these folds are important to make future folds easier.
Then fold the square into a rectangle (hamburger fold), unfold, then fold it into a rectangle the other direction.
Origami folds, step-by-step
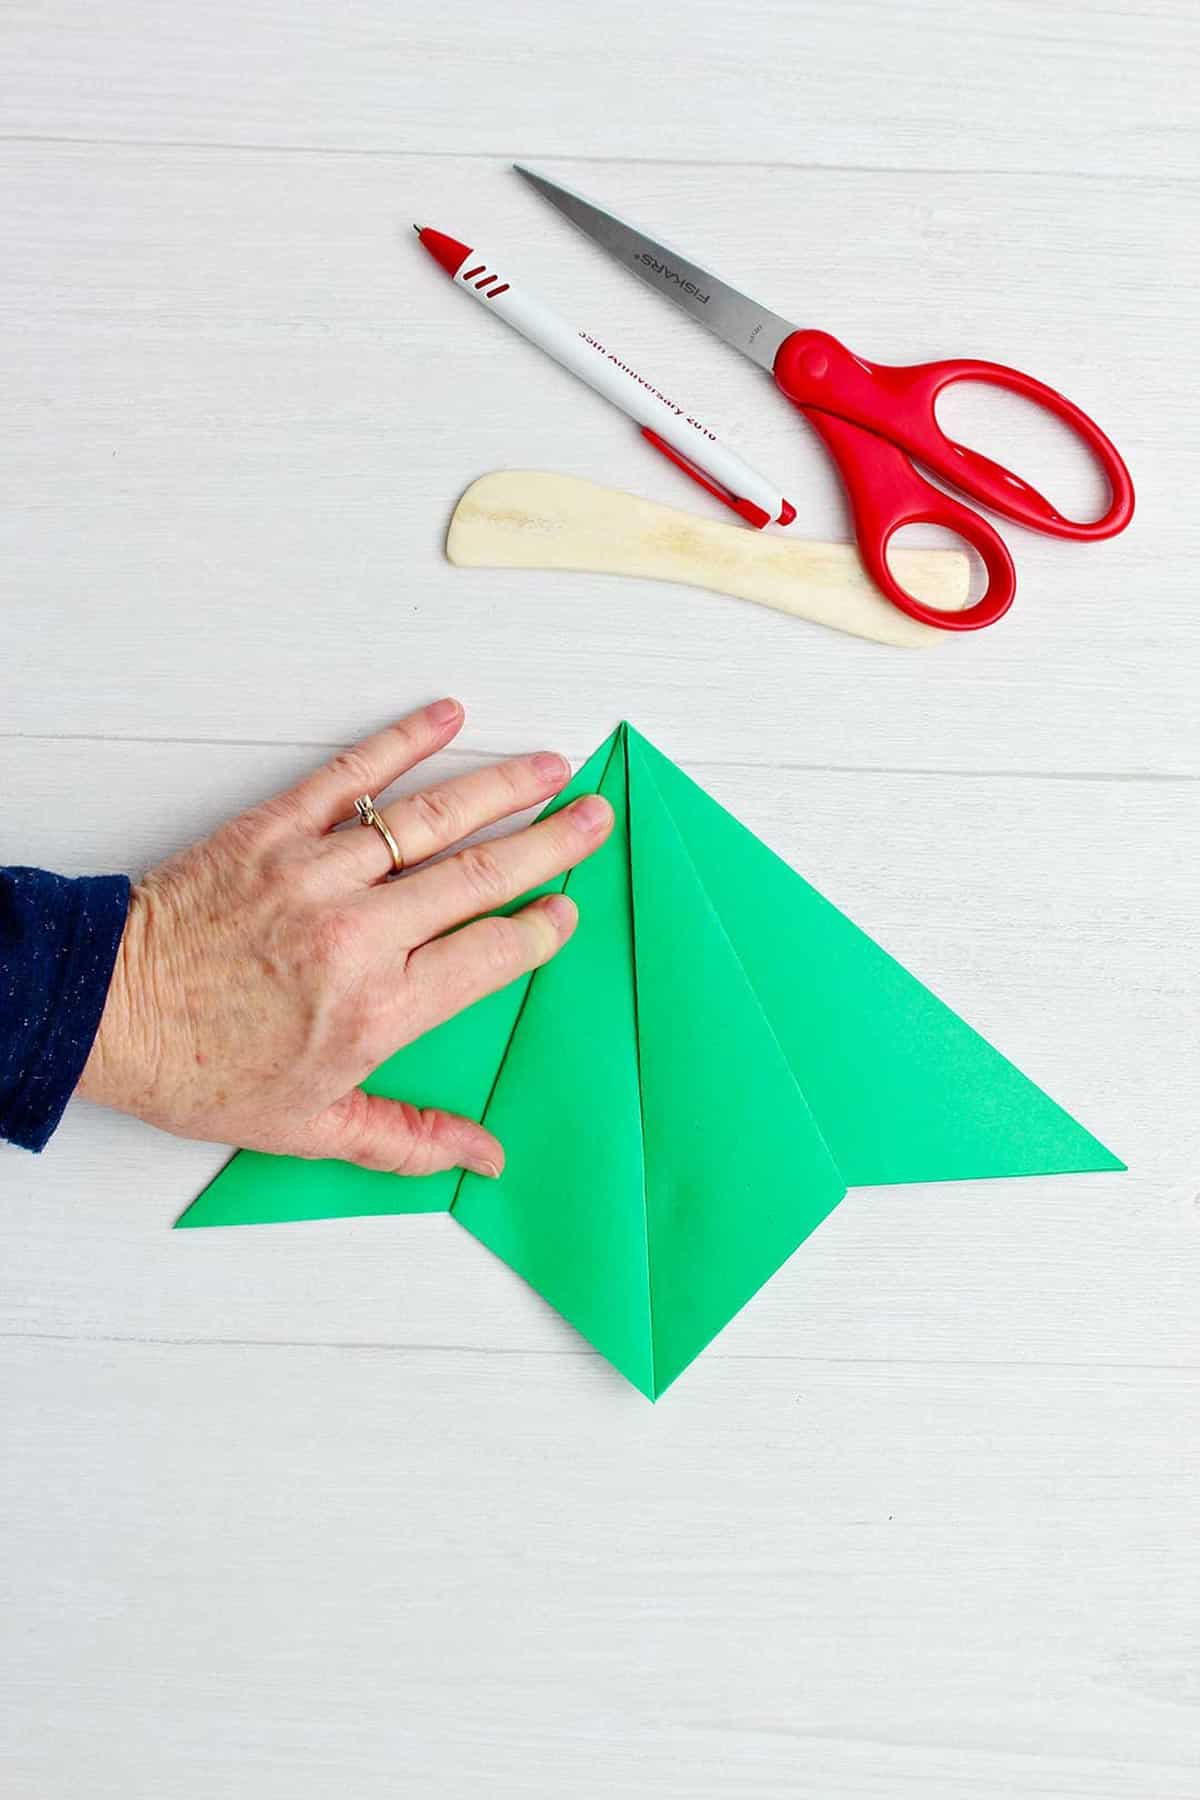
With the square still folded into a rectangle, lay it on the table in front of you with the fold to the top.
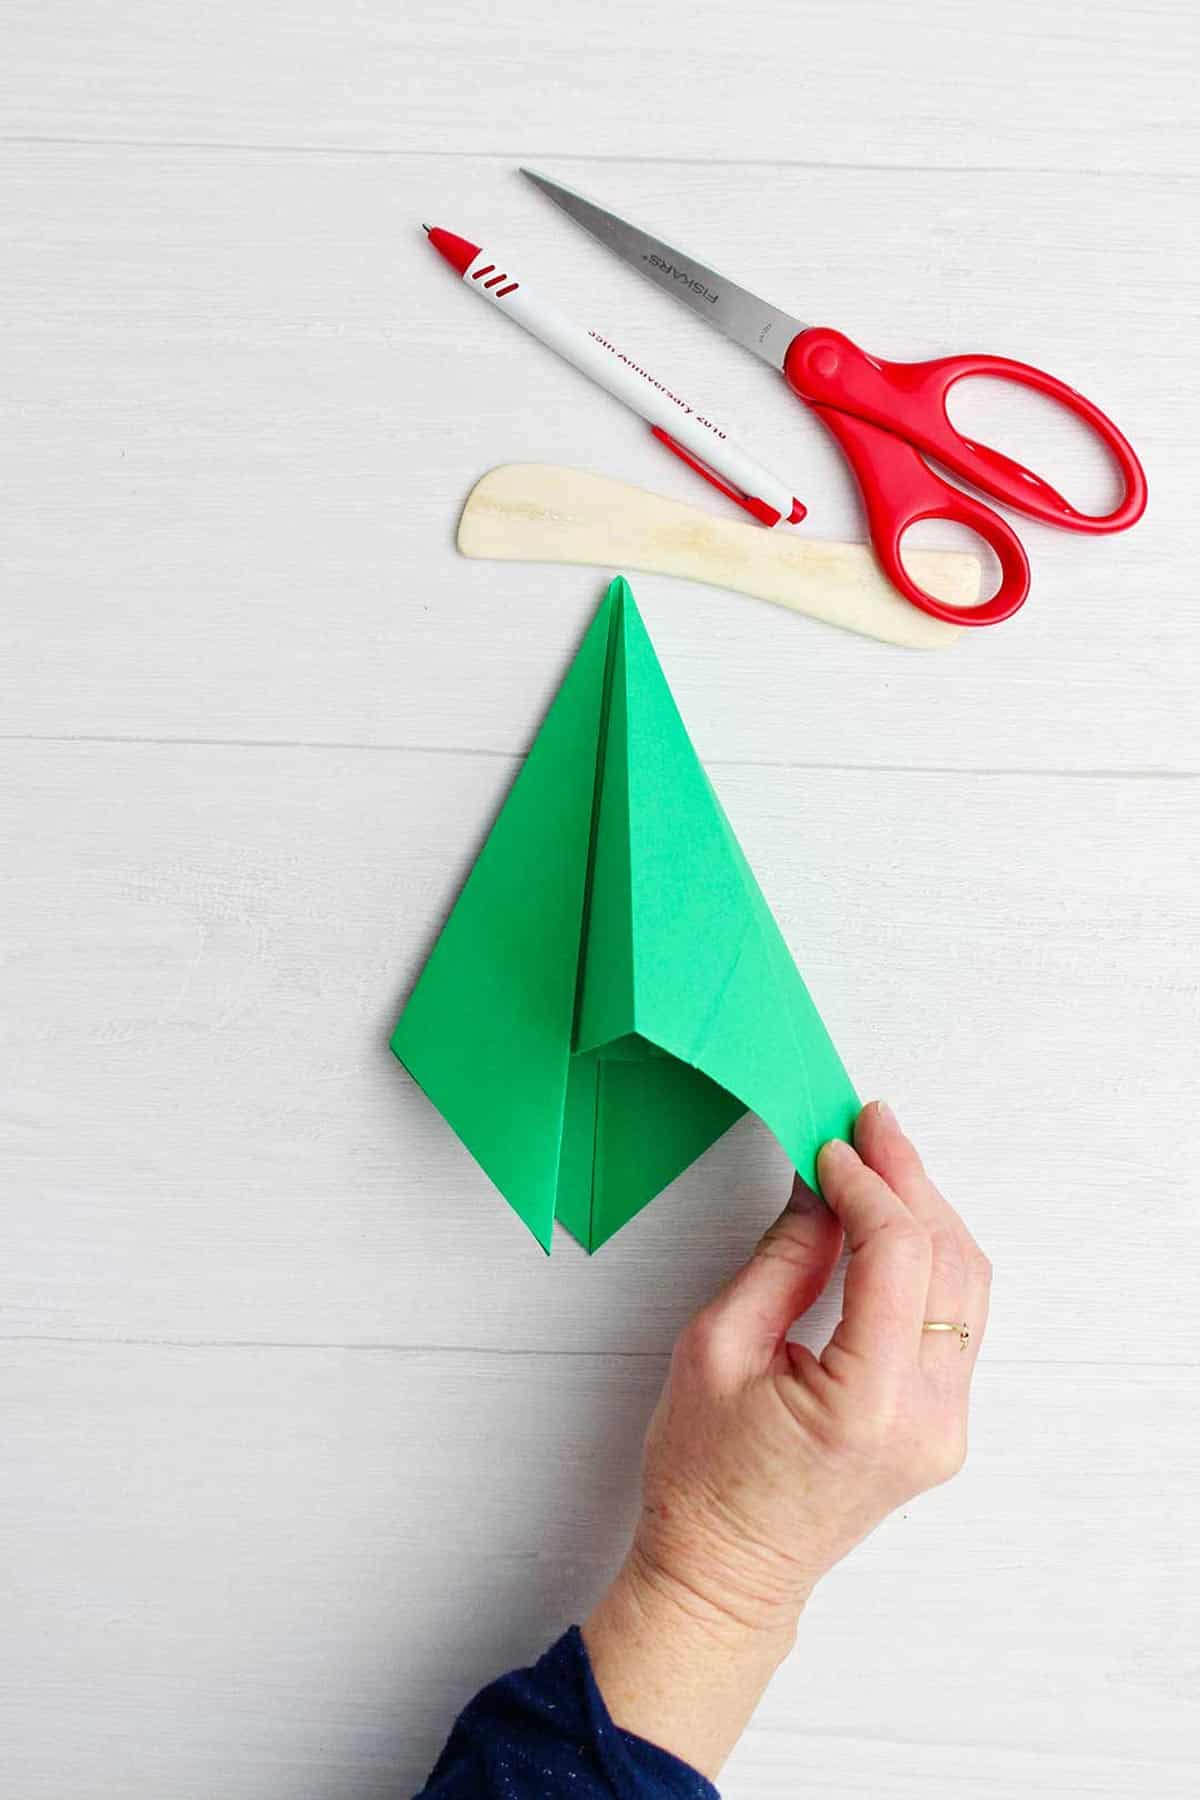
Take the top right folded corner, open the right side of the square. Tuck that upper corner of the paper down inside of the square. Do the same thing with the top left folded corner.
This will make a triangle shape with the point to the top.
Fold top right flap, fold it into the center line and crease. Repeat that step with the top left flap.
Flip the paper over and fold those two flaps to the center line and crease as well.
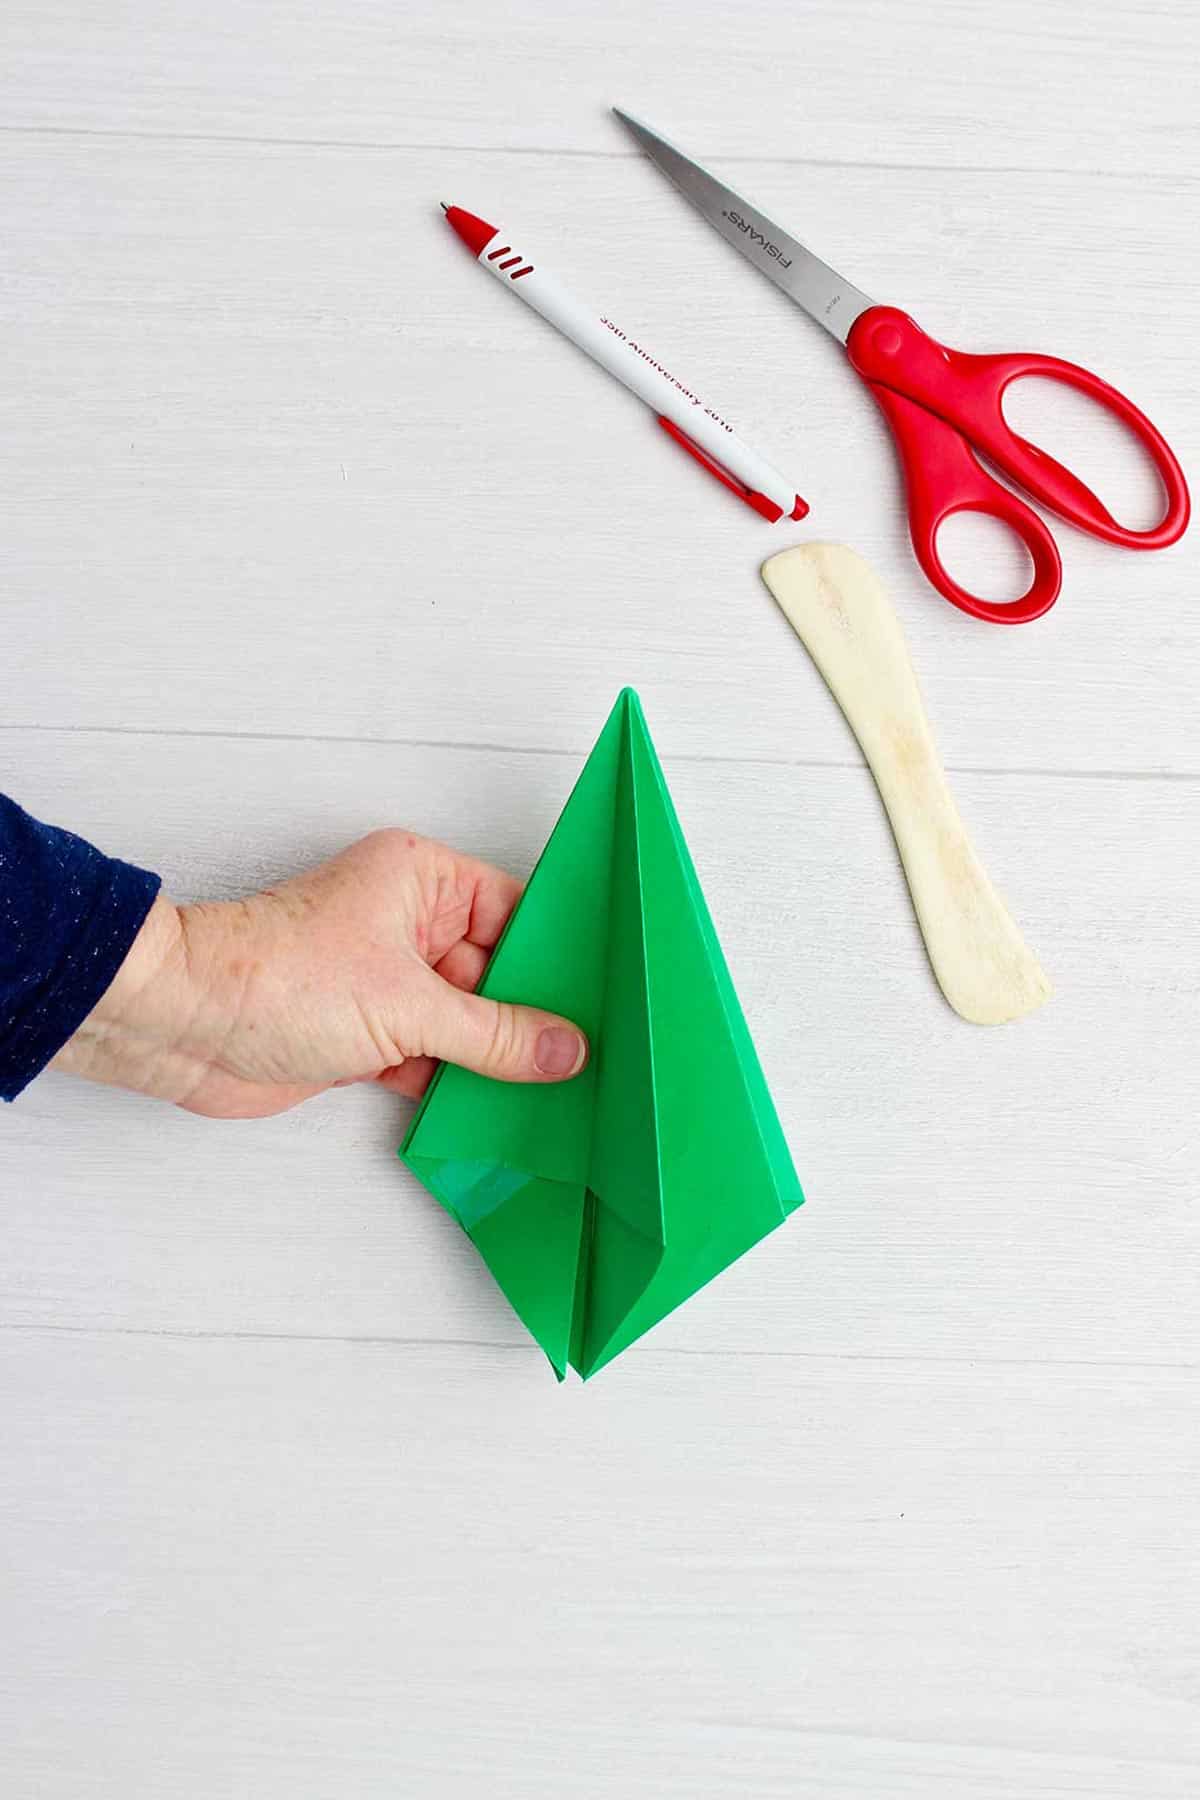
Cut the bottom tips off these flaps from side to side. So the bottom edge is even with the original part of the original folded triangle.
Open one of the front flaps and tuck the folded edge inside. This will cause that flap to become two flaps. Open and tuck the other front flap the same way.
Turn over the paper and tuck both of those flaps inside as well.
Now there are eight flaps on your festive origami Christmas tree!
I sure do like my bone folder and creaser tool- not a necessity but so handy when making origami.

How to Make the Paper Christmas Tree 3D!
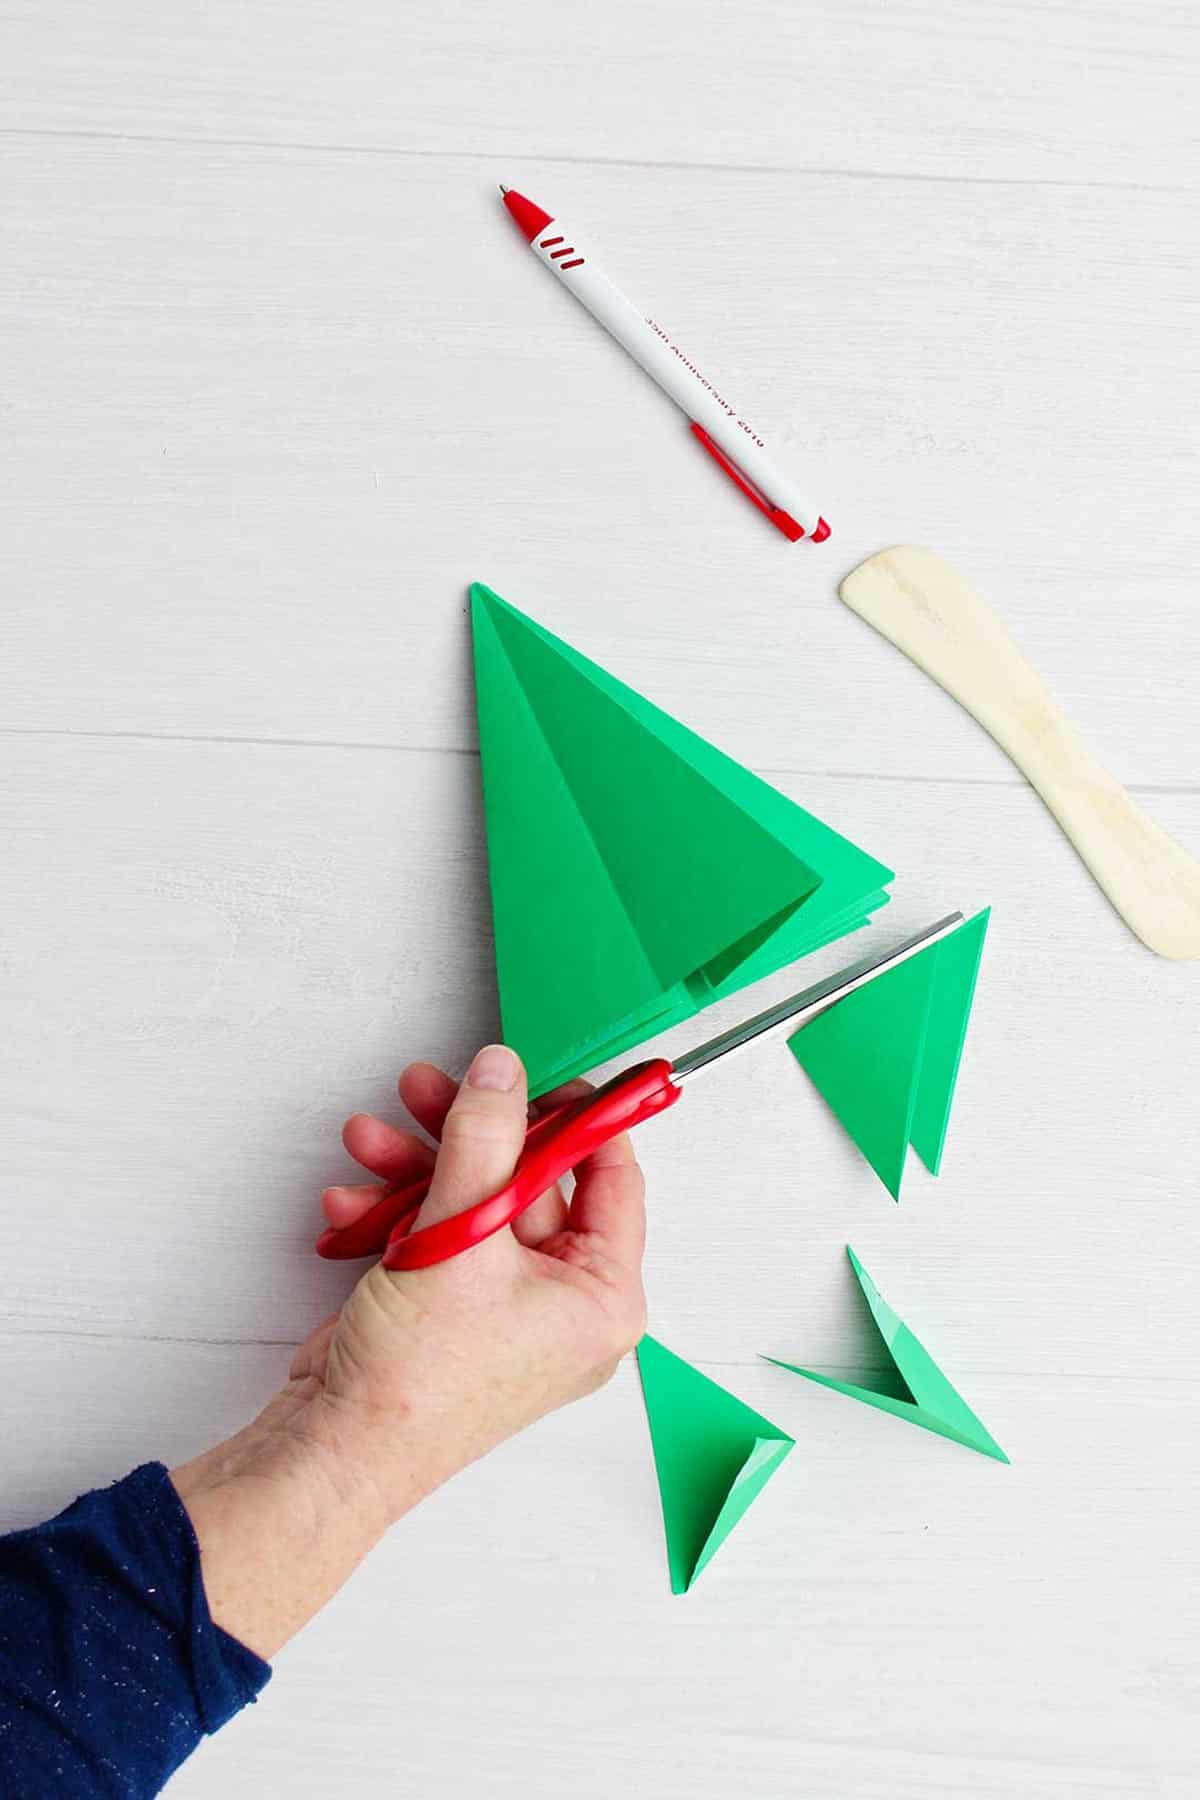
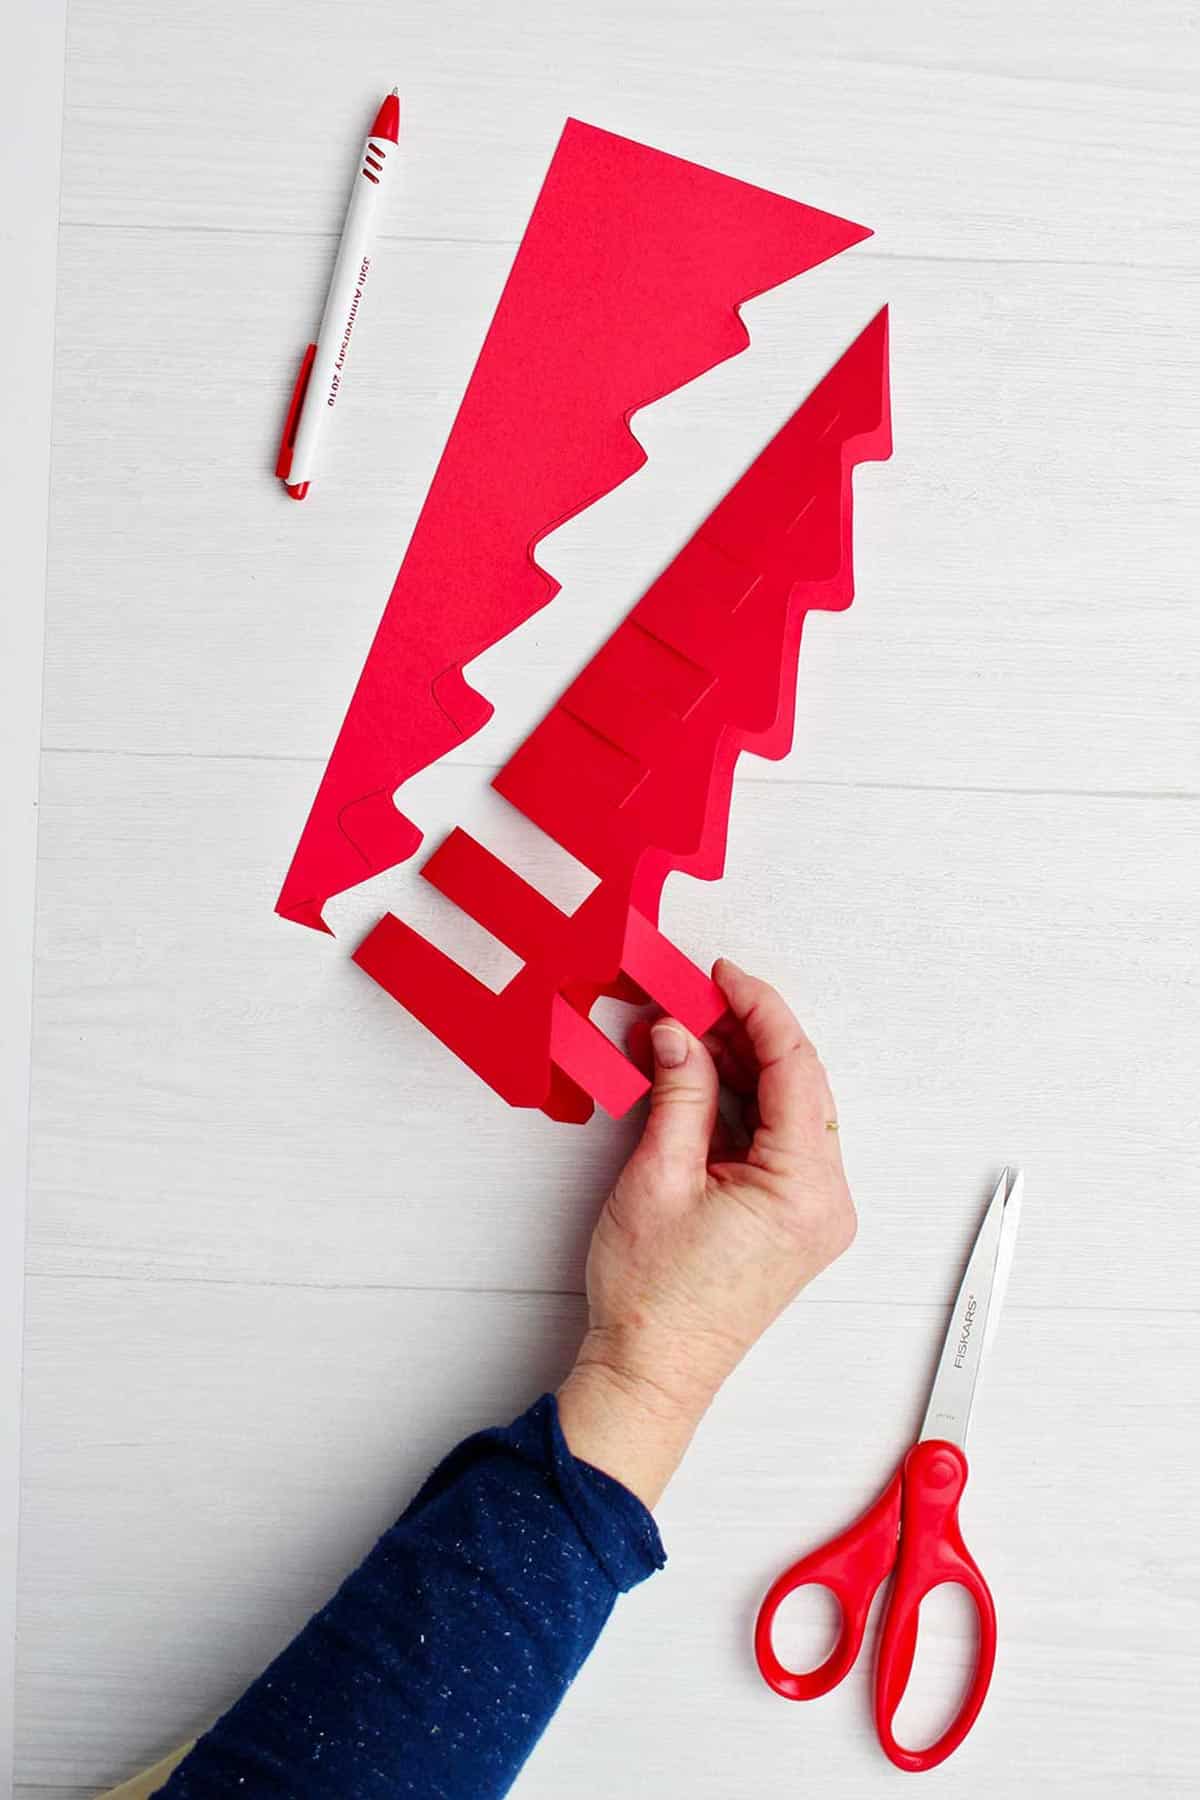
Lay the tree down in front of you with the point to the top. On the right side, clip three slits into every flap from the side and part way into the flaps.
Don’t cut all the way to the center, just cut to about ½-3/4 inch from the center crease. Try to make the slits an even distance apart and parallel to the bottom of the tree.
Repeat this from the left, or opposite side of the tree.
Do the next step on two flaps of the tree at a time. Start with the right two flaps.
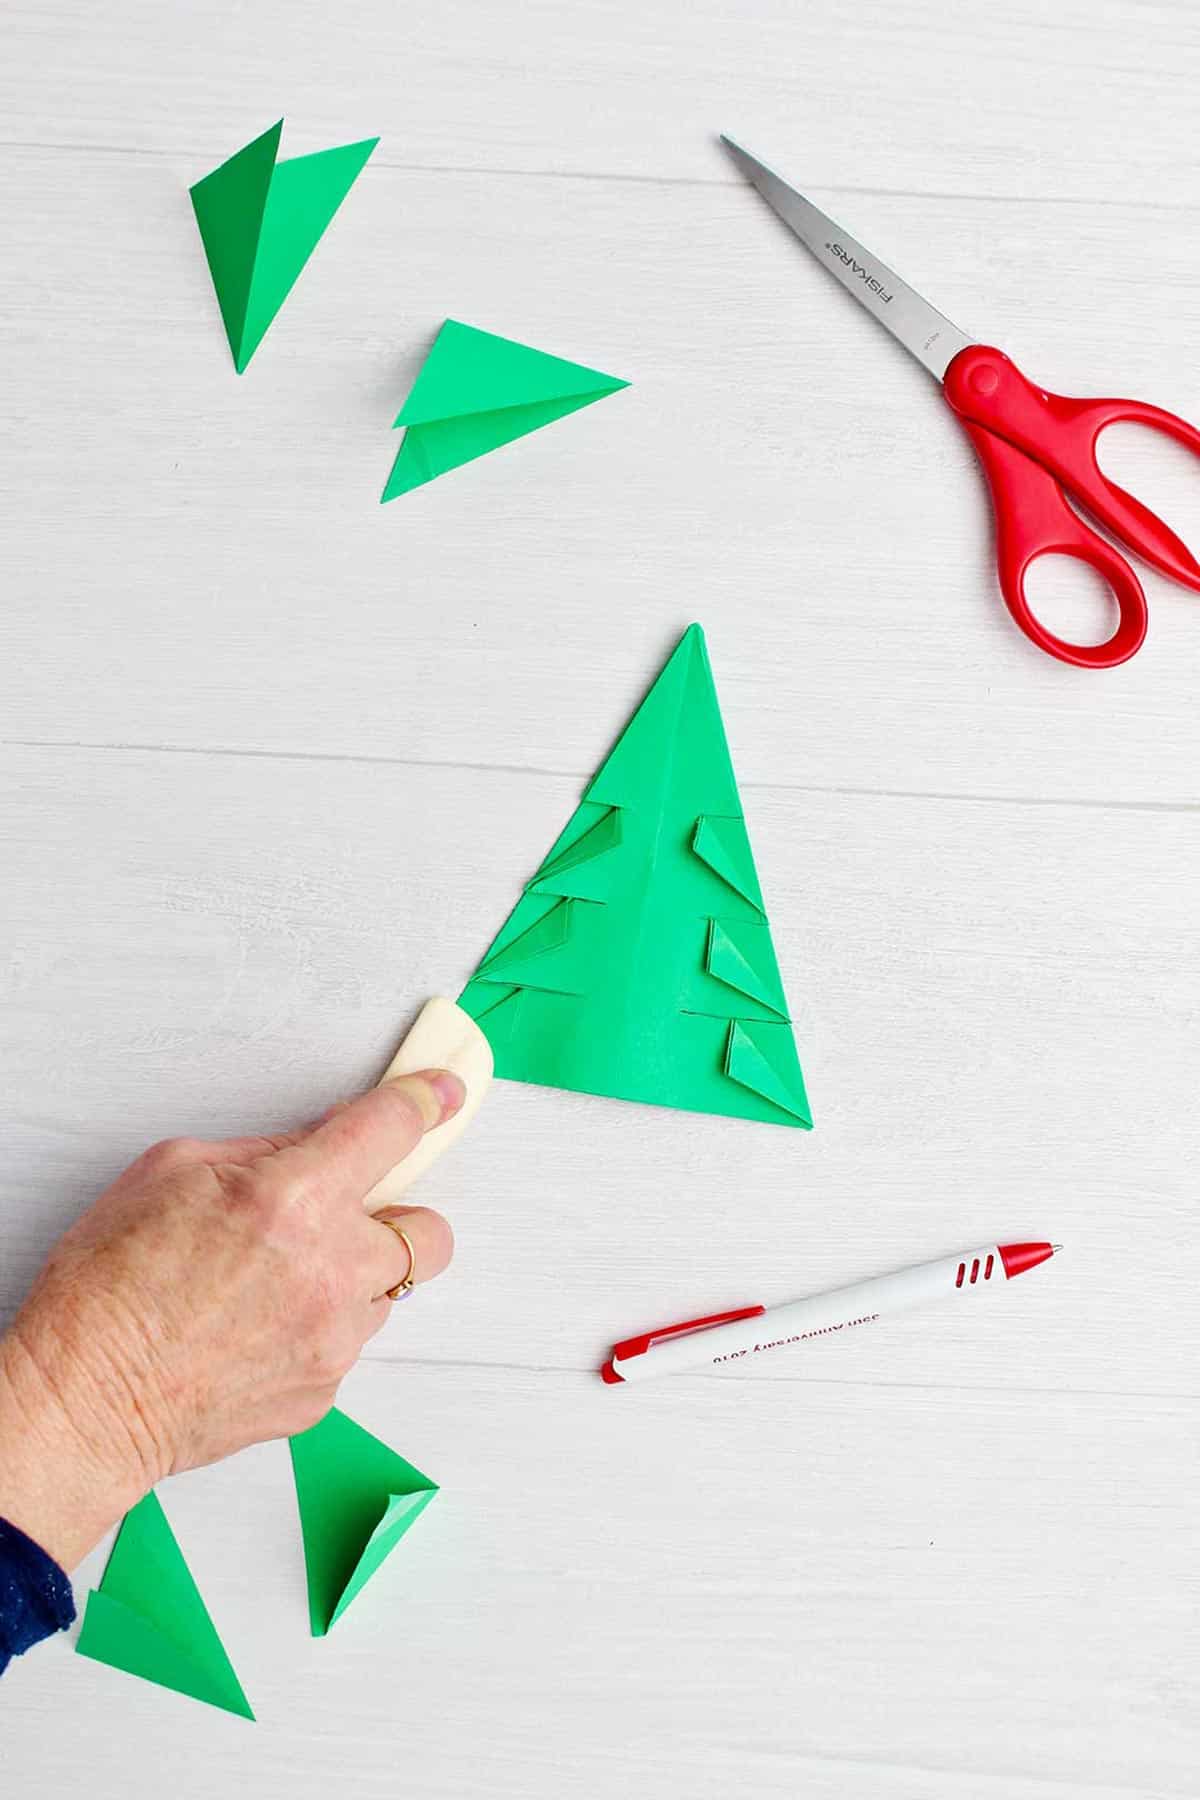
Take the top edge corner of each of the slits that you cut and fold it down, making a diagonal edge. This creates the “branches” and the Christmas tree shape.
Repeat this step with the left two flaps.
Turn the paper over and repeat this last step with the right two flaps and then the left two flaps.
Separate each of the sets of two flaps so that there are eight flaps with folded down “branches”.
“Fluff” up so the branches so they go out in eight directions and the tree stands easily.

Easy Origami Christmas Tree #2: Accordion
This is another great looking paper Christmas tree, shown in the red paper in my photos. You can use any size paper for this, as you'll draw the shape before you cut it out. It comes out taller if you use a full sheet of 8.5x11 inch paper.

A Simpler foldable paper Christmas tree variation
Fold the paper in half the long way, hot dog fold.
Place it on the table in front of you with the fold to the right, one short end towards you.
Draw a Christmas tree shape from the top right folded corner to the bottom left unfolded corner.
Now draw sets of two lines from the fold out to about ¾ inch from the unfolded edges of the tree. The sets of lines are to be the same length and are about ¾ inch apart. Refer to the photo or video to make this step clear if needed.
Cut the slits you drew- cutting through all layers of each side of the tree.

Reach inside the folded tree and take ahold of the center paper in each set of two lines. Pull it out from the fold towards the unfolded edge of the tree. Crease it at the place where the slits end.
Open the tree up and it will stand- the folded pieces with make the tree look dimensional.
DIY Origami Christmas Tree #3: Cone
This is the simplest to make and of course the quickest as well. It adds variety to the folded trees and young kids can easily make this one. Make it as a large or little tree!
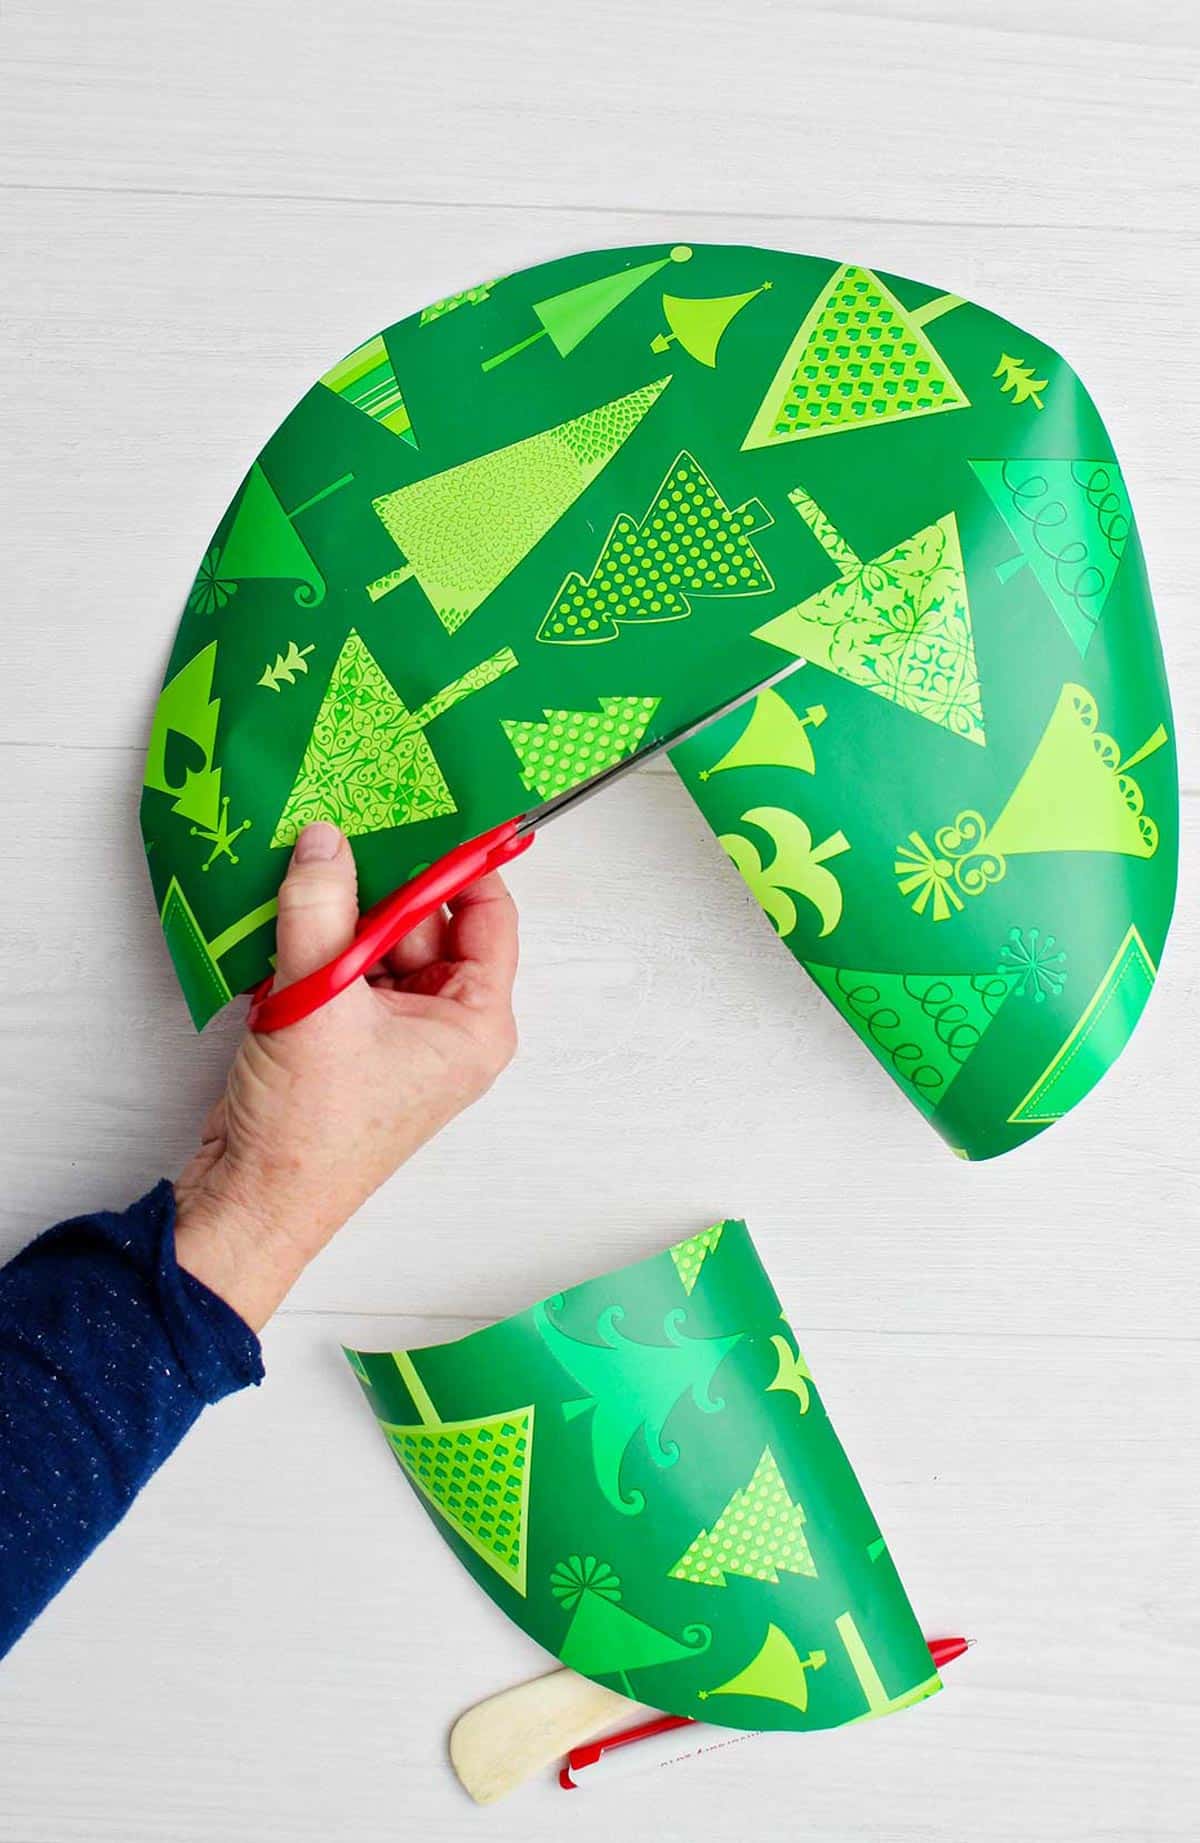
Use an object that is large and round to draw a circle out of a piece of square paper. I used a large Tupperware bowl lid and Christmas wrapping paper. Cut out the circle.
Mark the center of the circle and cut a slit from the bottom edge into the center. Cut another slit from the right side into the center. This will remove a piece of paper from the circle that is about ¼ of the circle.

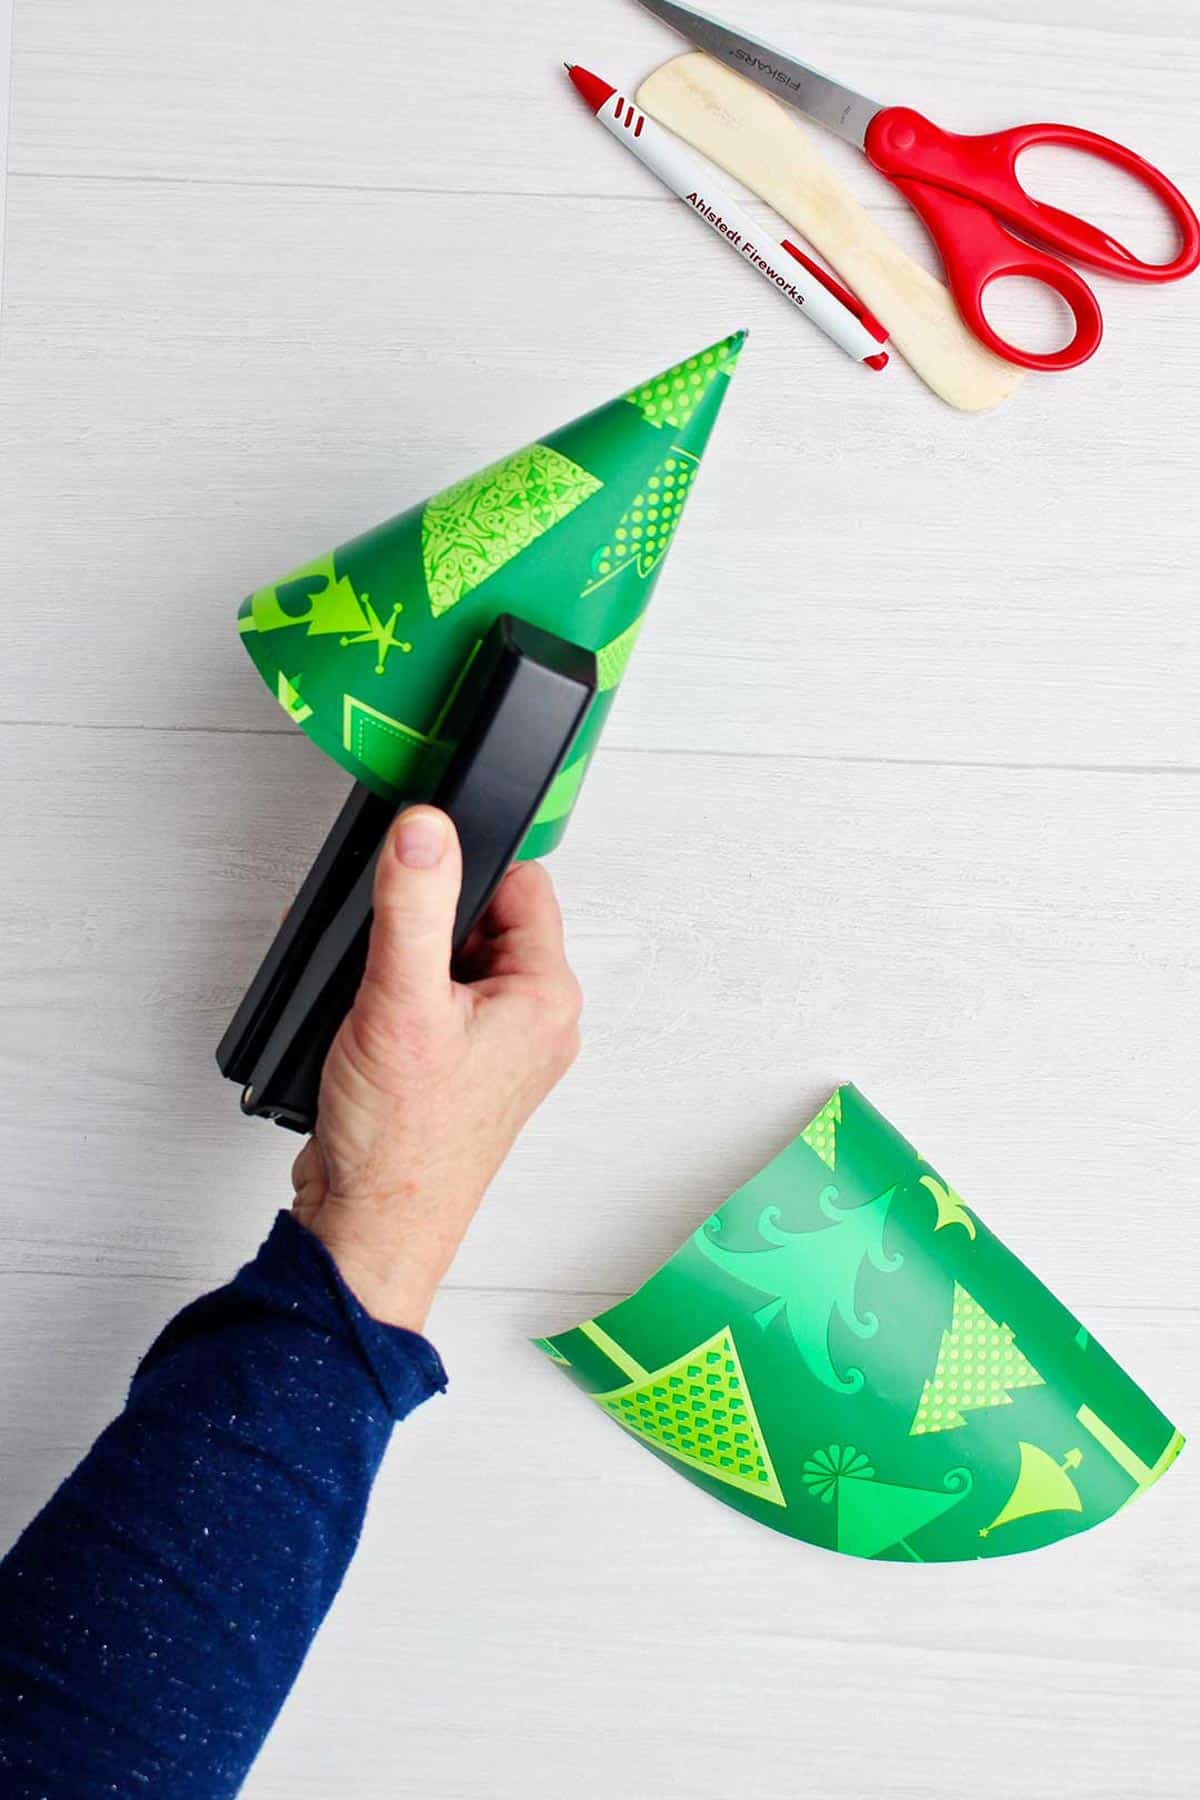
Create a cone from the paper circle.
Grab the two corner edges and overlap them to make the paper into a cone. Place the color or printed side of the paper outwards.
Staple the edges to hold the cone shape in place. This will stand up on the table! You could also try using a glue gun or glue stick along the top flap. But I would highly recommend the staple as it holds so well.
Craft Tips to Make Your Trees
- Origami paper- Origami paper is available at the craft store or online. It comes pre-cut in a square.
- Paper types- Think creatively when choosing paper, what do you have on hand? Use an old map, wrapping paper, butcher paper, etc.
Craft Variations
- Origami tree size- Remember the size of the paper will give you different heights of a tree! For little Christmas trees, choose your method before cutting your square of paper as some of the folds can be pretty small. For a large origami Christmas tree, you'll have to find creative ways to make different sizes! This would be the time to try larger paper like gift wrap or butcher paper.
- Tree #2 Accordian- I made the branches kind of rounded on the tips, but you could make them pointed if you prefer.
- Dressy color theme- You could dress up the decorations by making these trees out of coordinating papers. Papers such as butcher paper, white paper, and white/beige/gold designed Christmas gift wrapping paper. That would make a dressy table centerpiece.
- Plaid theme- Or you could use red paper, black paper, and plaid Christmas wrapping paper in white and black or red and black. This would give you another look!
FAQ
This tutorial offers 3 different options for all age and skill levels! Make tree #3 for younger kids, tree #2 for kids 5 and up, and tree #1 for kids 8 and up. Some will be able to do the trees at a younger age with help!
You can use all kinds of paper to make origami Christmas trees! Think of colored or designed copy paper, origami paper, butcher paper, or wrapping paper for example. But notice the size of paper selected for each of the three trees.
These beautiful trees make great table decorations for a Christmas table setting. They would make a lovely addition to a fireplace mantle, a bookshelf, or a dresser too!
More DIY Christmas Decorations
To make more holiday decor with the kids, check out these ideas below!
- Punched Tin Can Lanterns
- DIY Frosty the Snowman Hat Candle
- Glowing Paper Bag Luminaries
- EASY Glass Bowl Christmas Centerpiece
- DIY Button Candle Decorations
- Simple Decoupage Stained Glass Candle Holder
- No Sew Sock Gnome for Christmas
Come join the fun at WTN!
Happy holidays! Make this craft, leave a comment, rate it, and tag a photo with #WelcometoNanas wherever you post.
3 Ways to Make Easy Origami Christmas Trees
Equipment
- Scissors
- Stapler
Items Required
- Paper in sizes and designs of your choice: Designed or solid colored paper, Christmas wrapping, other papers like maps, butcher paper, etc.
- Bone folder & creaser tool (optional)
Instructions
- Simple Christmas tree origami #1:Cut a piece of paper into a square. The larger the square, the larger the finished origami tree will be. I cut a square of paper that is 11x11 inch in size for this example.Fold the square into a triangle (corner to corner), unfold, fold it into a triangle the other direction, and unfold. These folds are important to make future folds easier.Then fold the square into a rectangle (hamburger fold), unfold, then fold it into a rectangle the other direction.
- With the square still folded into a rectangle, lay it on the table in front of you with the fold to the top.Take the top right folded corner, open the right side of the square, and tuck that upper corner down inside of the square. Do the same thing with the top left folded corner. This will make a triangle shape with the point to the top.Fold top right flap, fold it into the center line and crease. Repeat that step with the top left flap.Flip the paper over and fold those two flaps to the center line and crease as well.Cut the bottom tips off these flaps from side to side so the bottom edge is even with the original part of the original folded triangle.Open one of the front flaps and tuck the folded edge inside. This will cause that flap to become two flaps. Open and tuck the other front flap the same way.Turn over the paper and tuck both of those flaps inside as well.Now there are eight flaps on your origami Christmas tree!I sure do like my bone folder and creaser tool- not a necessity but so handy when making origami.
- Lay the tree down in front of you with the point to the top. On the right side, clip three slits into all of the flaps from the side and part way into the flaps. Don’t cut all the way to the center, just cut to about ½-3/4 inch from the center fold. Try to make the slits an even distance apart and parallel to the bottom of the tree.Repeat this from the left side of the tree.Do the next step on two flaps of the tree at a time. Start with the right two flaps. Take the top edge corner of each of the slits that you cut and fold it down, making a diagonal edge. This creates the “branches” and the Christmas tree shape. Repeat this step with the left two flaps.Turn the paper over and repeat this last step with the right two flaps and then the left two flaps.Separate each of the sets of two flaps so that there are eight flaps with folded down “branches”.“Fluff” up so the branches so they go out in eight directions and the tree stands easily.
- Origami easy Christmas tree #2:This is another great looking paper Christmas tree. It comes out taller if you use a full sheet of 8.5x11 inch paper. Fold the paper in half the long way, hot dog fold.Place it on the table in front of you with the fold to the right, one short end towards you.
- Draw a Christmas tree shape from the top right folded corner to the bottom left unfolded corner. Now draw sets of two lines from the fold out to about ¾ inch from the unfolded edges of the tree. The sets of lines are to be the same length and are about ¾ inch apart. Refer to the photo or video to make this step clear if needed.Cut the slits you drew- cutting through all layers of each side of the tree.
- Reach inside the folded tree and pull the center paper in each set of two lines out from the fold towards the unfolded edge of the tree. Crease it at the place where the slits end.Open the tree up and it will stand- the folded pieces with make the tree look dimensional.
- Easy origami xmas tree #3: So this really isn’t origami, but it’s made from paper, Christmas wrapping paper that is!This is the simplest to make and of course the quickest as well. It adds variety to the folded trees and young kids can easily make this one. Use an object that is large and round to draw a circle out of paper. I used a large Tupperware bowl lid and Christmas wrapping paper. Cut out the circle.Mark the center of the circle and cut a slit from the bottom edge into the center. Cut another slit from the right side into the center. This will take out a piece of paper from the circle that is about ¼ of the circle.
- Grab the two corner edges and overlap them to make the paper into a cone. The printed side of the paper will be on the outside of the cone of course.Staple the edges to hold the cone shape in place. This will stand up on the table!
Video
Notes
This post was originally published in November 2023 and has been updated to add more relevant and detailed content.


Laura says
I'd make a mix of all three!