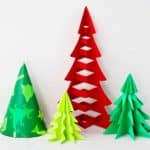
3 Ways to Make Easy Origami Christmas Trees
3 Ways to Make Easy Origami Christmas Trees to decorate your table beautifully and quickly. Fast to make with options for all ability levels.
Servings: 1 Origami Christmas Tree
Cost: $1
Equipment
- Scissors
- Stapler
- Bone folder & creaser tool (optional)
Ingredients
- Paper in sizes and designs of your choice: Designed or solid colored paper, Christmas wrapping, other papers like maps, butcher paper, etc.
Instructions
- Simple Christmas tree origami #1:We are going to start with the origami Christmas tree design with more steps.Cut a piece of paper into a square. The larger the square, the larger the finished origami tree will be. I cut a square of paper that is 11x11 inch in size for this example.Fold the square into a triangle (corner to corner), unfold, fold it into a triangle the other direction, and unfold. These folds are important to make future folds easier.Then fold the square into a rectangle (hamburger fold), unfold, then fold it into a rectangle the other direction.
- With the square still folded into a rectangle, lay it on the table in front of you with the fold to the top.Take the top right folded corner, open the right side of the square, and tuck that upper corner down inside of the square. Do the same thing with the top left folded corner. This will make a triangle shape with the point to the top.Fold top right flap, fold it into the center line and crease. Repeat that step with the top left flap.Flip the paper over and fold those two flaps to the center line and crease as well.Cut the bottom tips off these flaps from side to side so the bottom edge is even with the original part of the original folded triangle.Open one of the front flaps and tuck the folded edge inside. This will cause that flap to become two flaps. Open and tuck the other front flap the same way.Turn over the paper and tuck both of those flaps inside as well.Now there are eight flaps on your origami Christmas tree!I sure do like my bone folder and creaser tool- not a necessity but so handy when making origami.
- Lay the tree down in front of you with the point to the top. On the right side, clip three slits into all of the flaps from the side and part way into the flaps. Don’t cut all the way to the center, just cut to about ½-3/4 inch from the center fold. Try to make the slits an even distance apart and parallel to the bottom of the tree.Repeat this from the left side of the tree.Do the next step on two flaps of the tree at a time. Start with the right two flaps. Take the top edge corner of each of the slits that you cut and fold it down, making a diagonal edge. This creates the “branches” and the Christmas tree shape. Repeat this step with the left two flaps.Turn the paper over and repeat this last step with the right two flaps and then the left two flaps.Separate each of the sets of two flaps so that there are eight flaps with folded down “branches”.“Fluff” up so the branches so they go out in eight directions and the tree stands easily.
- Origami easy Christmas tree #2:This is another great looking paper Christmas tree. It comes out taller if you use a full sheet of 8.5x11 inch paper. Fold the paper in half the long way, hot dog fold.Place it on the table in front of you with the fold to the right, one short end towards you.Foldable paper Christmas tree
- Draw a Christmas tree shape from the top right folded corner to the bottom left unfolded corner. I made the branches kind of rounded on the tips, but you could make them pointed if you prefer.Now draw sets of two lines from the fold out to about ¾ inch from the unfolded edges of the tree. The sets of lines are to be the same length and are about ¾ inch apart. Refer to the photo or video to make this step clear if needed.Cut the slits you drew- cutting through all layers of each side of the tree.
- Reach inside the folded tree and pull the center paper in each set of two lines out from the fold towards the unfolded edge of the tree. Crease it at the place where the slits end.Open the tree up and it will stand- the folded pieces with make the tree look dimensional.
- Easy origami xmas tree #3: Ready for one more?So this really isn’t origami, but it’s made from paper, Christmas wrapping paper that is!This is the simplest to make and of course the quickest as well. It adds variety to the folded trees and young kids can easily make this one. Use an object that is large and round to draw a circle out of paper. I used a large Tupperware bowl lid and Christmas wrapping paper. Cut out the circle.Mark the center of the circle and cut a slit from the bottom edge into the center. Cut another slit from the right side into the center. This will take out a piece of paper from the circle that is about ¼ of the circle.
- Grab the two corner edges and overlap them to make the paper into a cone. The printed side of the paper will be on the outside of the cone of course.Staple the edges to hold the cone shape in place. This will stand up on the table!
