Looking for a fast craft that can be used for a DIY gift or decoration? These easy Upcycled Tin Can Flower Vases are “green” in more ways than one! This craft for kids makes a great DIY gift that hangs on the wall in the house or in the garden.

Jump to:
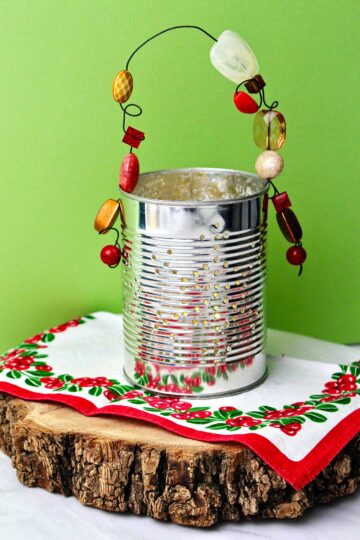
Cute Craft Alert: A Cute Vase from a Tin Can!
I love springtime and the perennial flowers that come up! I was looking for a quick vase to use for Mother’s Day or May Day and a recycled tin can vase came to mind.
These cute little vases are fast and easy and the can gives a rustic look to the floral arrangement. They are a fun variation on a May basket, but they would make a great gift any time of the year!
You’ll make a tin can flower vase in just a few minutes and be able to fill it up with your own blooms. The gift will brighten up someone’s day when you give it to them!
Kids will love making this craft. Just follow the step-by-step directions to create a floral vase from something in your recycling bin!

Supplies
Here are a few quick notes about the supplies you will need to make these cute DIY tin can vases!
- Tin can – You will use a tin can of whatever size you choose. Anything from a small soup can up to a large gallon can.
- Can opener- I love my Pampered Chef can opener, it takes the lid off a can without leaving any sharp edges. Here is a link to a similar can opener. If you use a regular can opener be careful there’s no sharp edges (especially if doing this with children).
- Hammer and a nail- To make a hole in the can for a handle, use a hammer and a nail to make a hole in the can for the handle placement.
- Block of wood- I placed a block of wood inside the can to do the hammering with the nails, so the can did not collapse.
- Wire- I used some soft wire for a handle.
- Pliers- (optional) A needle nosed pliers is to bend the wire if it can’t be bent by hand.
- Ribbon- (optional) Use ribbon as an optional handle or to wrap around the wire handle to add color.
- Flowers – Of course you’ll need some blooms of some sort to put in the tin can vase (artificial flowers or real).
- Craft foam (optional)- Craft foam is useful inside the can to hold the flowers in place.


Craft Steps
Prepare the tin can
Choose your tin can from the recycle bin and make sure to wash it well. Remove the label and as much glue as possible
Use a can opener to cut the bottom of the can off so it is open at the top and the bottom.

Create the shape
Place the block of wood inside the can and use the hammer and a nail to make two holes in the can. These holes will be about a fourth of an inch or a half an inch from the top edge and will be equal distances across the can. This is to attach the handles.
Smash the bottom of the can with your hands or with your foot. Smash it so that it is flat with the handle holes in line with the folds in the can. This is the bottom of the vase. Do not smash the top of the can, just the bottom.


Add a handle
Cut a piece of wire that is about three times as long as the can is wide.
Run the wire through one of the holes and bring it up and twist it so that it stays in place. (You may need a pliers.) Do the same thing on the other end of the wire through the second hole in the can. You can use ribbon for this or string or twine if you prefer.
Decorate!
I wrapped a ribbon around the wire handle just to add some extra color. And tied it in a bow on either end.
Fill the can with flowers (real blooms or artificial). You can use some craft foam inside of the can to hold the flowers in place if you would like.
Give away your floral arrangement or hang it up and enjoy it yourself!

Craft Tips
These tips can help make upcycling tin cans even easier!
- Use Goo Gone- I use a substance called Goo Gone to take off labels and extra glue. This is just one brand, I'm sure there are others.
- Covering your surface- Cover your work surface with newspaper or a cutting board so it isn't damaged.
- Line with a plastic bag- Line the vase with a plastic bag if using real flowers and having the desire to water them. This needs to be something that will hold water well.

Craft Variations
Here are a few tin can vase ideas you’re welcome to try:
- Change the can size- Use a gallon can or a small soup can to make different sizes of vases.
- Use artificial flowers- Artificial flowers will make this gift last for a long time. Your flowers don’t have to be fresh, the can be "forever" flowers.
- Handle materials- Use ribbon, string, or twine to make the handle.
- Stand- Prefer a vase that can stand on its own instead of hang? Leave the bottom on the can and remove the step of squashing it with your foot! Or try make a different kind of vase, like one of these twine wrapped vases made from a glass bottle.

FAQ
This tin can vase is made by taking off the bottom and top of the can and then smashing the bottom edge of the can. Add a handle of wire, ribbon, or twine. Then fill with flowers (fresh or artificial). Complete instructions in the post. There are also more ideas for upcycling tin cans at the bottom of the post!
A clean tin can of any size can be used as a vase. Paint it or leave it plain, add a handle. This post is about taking off the bottom of the can too and smashing it shut. Add a handle of wire, twine or ribbon. Then add your flowers. It is really cute. Complete instructions are on this post.
More Tin Can Crafts for Kids
Looking for more great DIY upcycled tin can crafts for kids? Here are a few ideas for you to try:

Come join the fun at WTN!
Try this craft, leave a comment, rate it, and tag a photo with #WelcometoNanas wherever you post.
Want More Crafts?
Love getting crafts straight to your inbox? Sign up to receive a weekly email and get a free gift!


Fast Upcycled Tin Can Flower Vases
Equipment
- Pliers A needle nosed pliers
Items Required
- tin can of whatever size you choose
- block of wood to aid in making a nail hole
- soft wire for a handle
- Use ribbon as an optional handle
- artificial flowers or real flowers
- Craft foam (optional)
Instructions
- Choose your tin can from the recycle bin and make sure to wash it well. Remove the label and as much glue as possibleUse a can opener to cut the bottom of the can off so it is open at the top and the bottom.
- Smash the bottom of the can with your hands or with your foot. Smash it so that it is flat with the handle holes in line with the folds in the can. This is the bottom of the vase. Do not smash the top of the can, just the bottom.
- Cut a piece of wire that is about three times as long as the can is wide.Run the wire through one of the holes and bring it up and twist it so that it stays in place. (You may need a pliers.) Do the same thing on the other end of the wire through the second hole in the can. You can use ribbon for this or string or twine if you prefer. I wrapped a ribbon around the wire handle just to add some extra color. And tied it in a bow on either end.
- Fill the can with flowers (real blooms or artificial). You can use some craft foam inside of the can to hold the flowers in place if you would like. Give away or enjoy yourself!!


Leave a Reply