You can use the easy art technique of decoupage on all kinds of crafts! Learn how to decoupage with this craft tutorial for kids, then try out some of the fun ideas for beginners.

Jump to:
Easy Art Technique: How to Decoupage
We are all about easy art techniques at Welcome to Nana's, and decoupage is one of those fun ones you don't want to miss!
Decoupage uses colorful paper, tissue paper or other materials to cover just about any surface. Want to give an old box new life? Do you have some extra mason jars sitting around just waiting for a craft project? Redecorate them and give them a new finish with decoupage!
This tutorial will walk you through HOW to decoupage, including some tips that I've learned over the years. Plus, you'll find lots of fun ideas to get you started, no matter your skill level!
Are you ready for some fun? Let's jump in!

Craft Supplies
You'll need a few supplies too try the simple technique of decoupage:
- Mod Podge- glues and finishes the project.
- Paint brush or paint sponge- to spread Mod Podge and cover the decorative materials.
- Decorative materials- you'll coat and attach these to your surface, so thinner materials work best. Try magazine pictures, scrapbook paper, tissue paper, leaves, fabric (read on for more options)
- Something to decorate- I used a cardboard shaped box, but you can cover lots of things! (read on for more options)
- Scissors- to cut your decorative materials into the shapes you'd like to attach.
- Optional- Tweezers (for placement), Waxed paper or parchment paper (for easy cleanup)

What Is Decoupage?
Decoupage is a simple art form that covers the surface of an object with cutout materials. This covering transforms the object, giving it a completely different look and finish at the same time. That makes decoupage the ultimate recycling technique!
I found a set of nesting star cardboard shaped boxes to use for this tutorial. We called them memory boxes, or our treasure boxes. Browse any craft store and you'll find a myriad of cardboard items to cover.
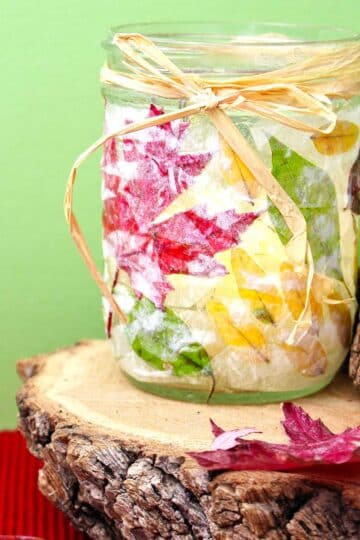
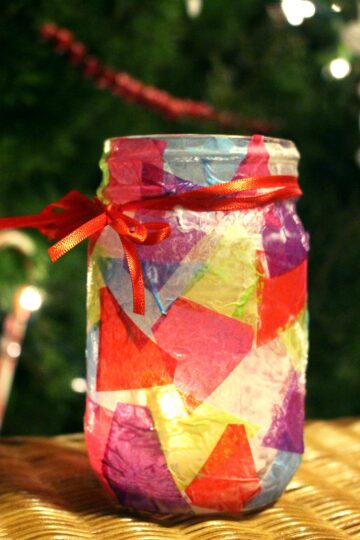
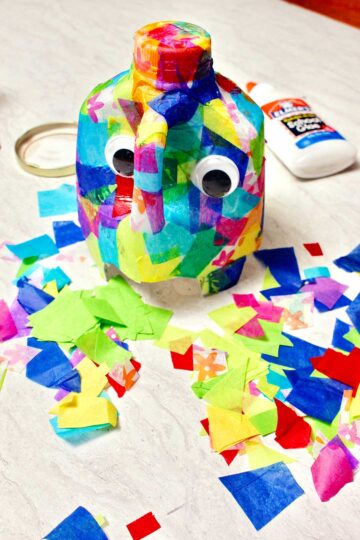
Or you could use an object or container you already have at your house! How about turning an oatmeal container into a gift box? Or making a mason jar candle holder that looks like stained glass?

You can decoupage all kinds of surfaces, here are a few ideas:
- Homemade cards
- Rocks
- Wood
- Metal
- Terracotta pots
- Plastic
- Glass
- Canvas
- Cardboard
Don’t stand still for too long or I’ll decoupage YOU! Ha. Can't wait to see what you choose repurpose with decoupage.
Thoroughly clean the surface of your item so the materials and glue will attach well. For decoupaged terracotta pots, you might consider adding a clay sealant.
If you'd like to leave any of the item showing beneath your decoupage, paint with acrylic paint and let it dry.

Choose Decoupage Materials
After choosing an object to decoupage, the next fun things to do is find the materials you want to use to cover it. The grands and I used pictures from a magazine as well as some scrapbook paper as our decoupage medium.
I like the lighter weight papers but look at this list of possibilities to use:
- Decoupage paper
- Paper napkins
- Stickers or stamps
- Flowers or leaves
- Fabric
- Wrapping paper
- Tissue paper
- Magazine pictures
This is a great way to use those little scraps of paper from other projects- recycle them! You will cut or tear the material into small pieces, then glue them down all over the box or object. Decoupage is not like wrapping a present with one large piece of paper.
I like to save scraps of paper from other projects in a plastic bag or envelop to use in decoupage. Gather and tear the paper, or cut with a crafting knife so it is ready for gluing.

The Best Decoupage Glue: Mod Podge
If possible, use Mod Podge Glue for your decoupage project. Mod Podge is a special glue with the correct consistency. It contains a finisher that will help protect the project when completed.
If you don’t have any, you can use regular school glue and just water it down a little bit. Shoot for three parts glue to one part water and stir it up well.
The grands and I used school glue as we were crafting on a heavy snow day and couldn't get out to buy Mod Podge. It worked great!
Since school does not act as a finisher like Mod Podge. Because of this, you'll need to add an extra layer of protection once the project is complete. I suggest some clear polyurethane spray or paint to finish and protect.

How to Decoupage, Step by Step
Now that you have your item, materials and glue, it's time to start decoupaging!
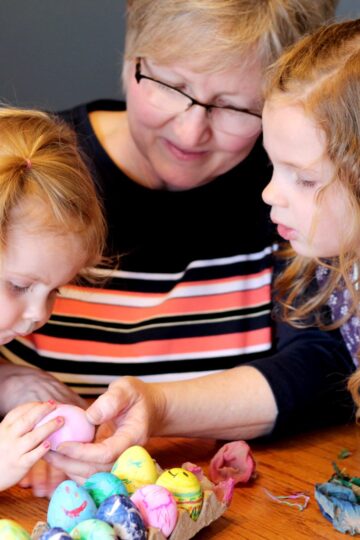
Lay down some waxed paper or parchment paper on your work surface. Let the kids know that it is OK for them to get glue on their hands in this project. Provide a wet cloth nearby for them to wipe their hands on so they don’t get too sticky.
Use your paint brush to brush Mod Podge onto the surface of your item, I'll call it a "box" since this is what we used. Place the paper (or whatever material your chose) on the area of the box with the wet glue. Press out any air bubbles that form as you go.
Continue brushing Mod Podge and adding paper in whatever pattern or design you'd like. Fold the paper around the edges of the box and cover all the surfaces.
Wipe hands on the wet washcloth to keep the stickiness down.
When the surface is covered completely, brush a smooth finish layer of Mod Podge in an all over as a protective coating. Let the box sit on the waxed paper until fully dry. DON’T put the lid back on until you are completely sure you've let it dry completely!

Decoupage Tips for Beginners
- Prepare for easy cleanup- Use waxed paper or parchment paper under the project for easy cleanup. Mod Podge will stick to a work surface or to newspaper.
- Use a tool to place paper- Having trouble placing paper cutouts precisely? Use tweezers to pick up the paper pieces as hands get sticky with glue!
- Keep brushes clean- Wash brushes out immediately after you are done so they don't get stuck with glue.
- Make the project waterproof- Keep in mind that decoupage isn’t waterproof! If you are planning to place your project outside, cover it with a special outdoor finish. There is a special Mod Podge Glue that is made for outdoor projects, but I haven’t tried it yet to give a recommendation.
FAQ
Decoupage is a simple art form that covers the surface of an object with cutout materials. This covering transforms the object, giving it a completely different look and finish at the same time. That makes decoupage the ultimate recycling technique!
Yes! Mod Podge is the best glue to use for your decoupage project. Mod Podge is a special glue with the correct consistency. It contains a finisher that will help protect the project when completed.
You can use all kinds of materials for decoupage, for example: decoupage paper, tissue paper, magazine pictures, leaves, or fabric. The best glue to use to secure your materials is Mod Podge as it has the right consistency and acts as a finisher as well.
More Decoupage Crafts for Kids
Enjoy!
If you try this craft, let me know! Go ahead and leave a comment, rate it, and tag a photo with #WelcometoNanas wherever you post.
Want More Crafts?
Sign up for a free gift and a weekly email with the newest crafts from Welcome To Nana's!


Easy Beginner Decoupage Ideas for Kids
Equipment
- 1 Paint brush or paint sponge
- 1 Wet washcloth
- 1 Scissors
- 1 Tweezers (optional)
Items Required
- 1 Cardboard box or cardboard shaped box
- Mod Podge
- Magazine pictures
- Scrapbook paper
- Other papers of choice- see the list of ideas in tutorial
- Waxed paper (optional)
Instructions
- Place waxed paper or parchment paper on the work surface. Set a wet washcloth nearby for sticky fingers.
- Cut or tear paper (or other thin materials) into pieces.
- Brush Mod Podge glue onto an area of the box (or object of your choice).
- Lay paper pieces on the glued area, overlapping them and folding them over edges. Work until you completely cover the box. Press out any air bubbles that form as you go.
- Brush over the whole project with a protective layer of Mod Podge
- Allow project to dry completely.
Video
This post was originally published in February 2022 and has been updated to add more relevant and detailed content.


Laura says
This would be a fun way to decorate a gift box!