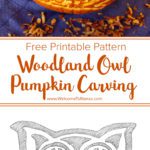
This Woodland Owl Pumpkin Carving uses a chiseling technique to make a cute DIY decoration for Halloween. Print off the free pattern, choose a pumpkin, and get the whole family having some fall fun!
Jump to:
- Pumpkin Carving with a Chiseled Technique
- Choosing the Perfect Pumpkin
- Woodland Owl Pumpkin Carving Pattern
- Steps to Chisel the Woodland Owl
- Adding Light to Your Pumpkin (Let it Glow!)
- Variations on the Woodland Owl Pumpkin Carving
- Preserving Your Pumpkin
- More Pumpkin Crafts for Kids
- ENJOY!
- DIY Woodland Owl Pumpkin Carving
Pumpkin Carving with a Chiseled Technique
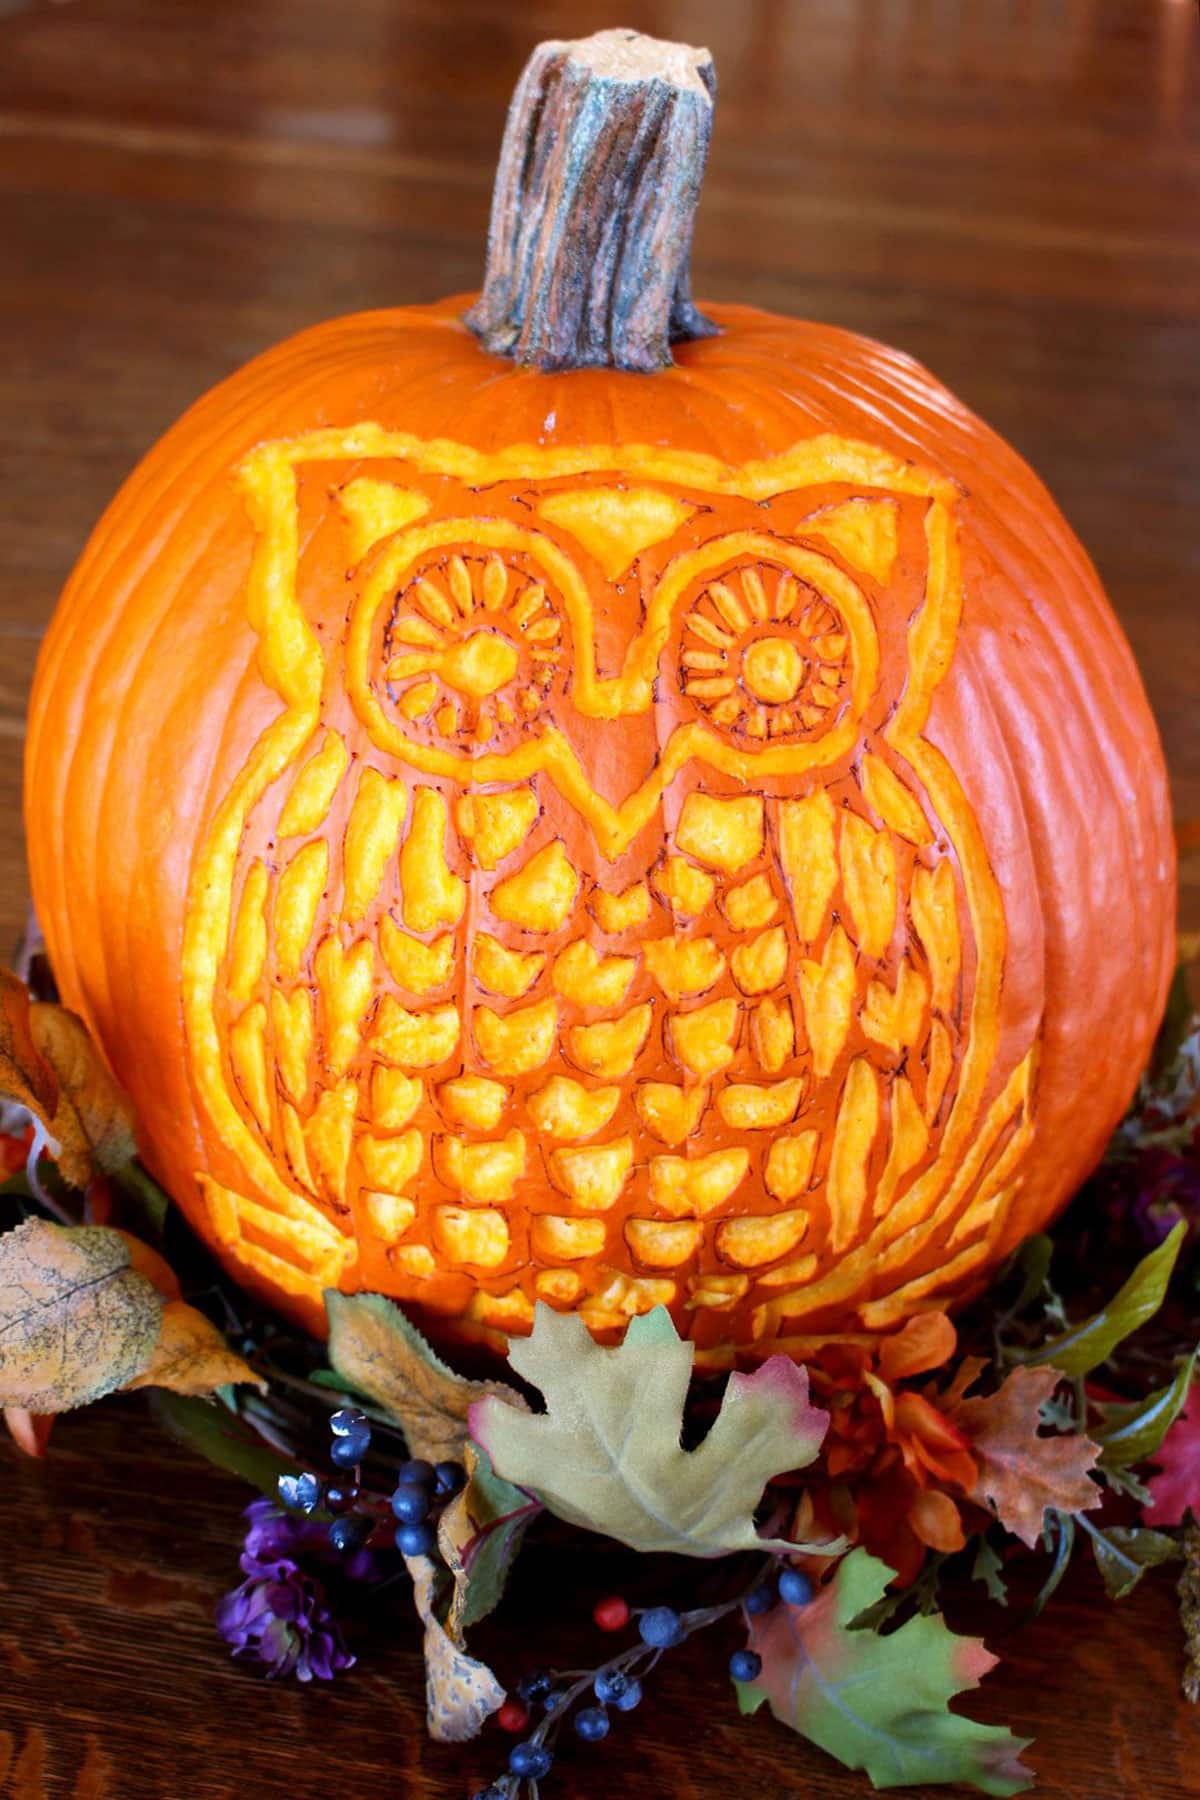
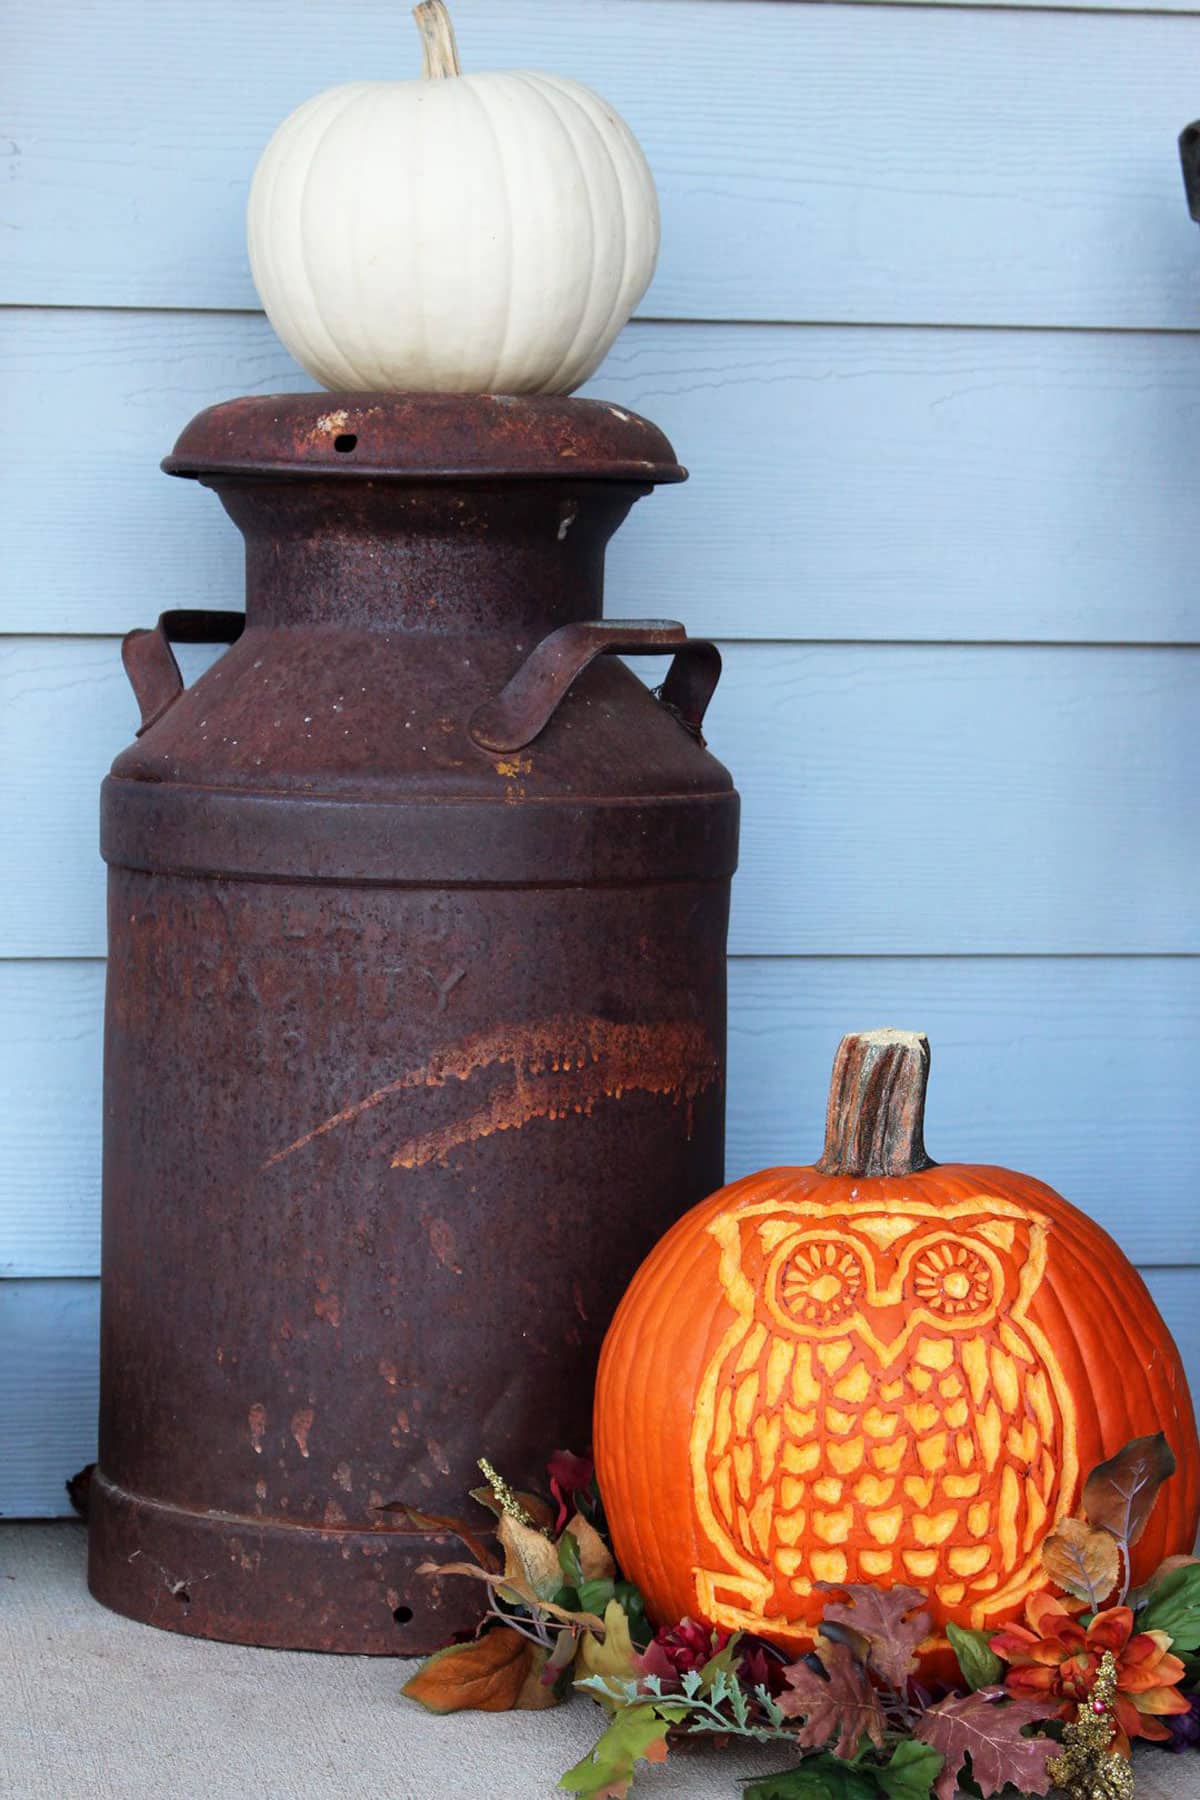
What’s Halloween without a carved pumpkin on the porch? If you are looking for a fun and unique pumpkin carving idea, give this chiseled technique a try to make a cute woodland owl.
With the stencil pattern and a few tips, the kids will love a new twist on the traditional carved jack-o-lantern. It was so much fun to make and I hope you will love it as much as I did.
This is a great craft for the whole family. It would also be a fun activity to do for a Halloween celebration, or a cute DIY decoration for the spooky season!

Choosing the Perfect Pumpkin
Step one to bringing this halloween pumpkin to life is to choose that perfect pumpkin from the pumpkin patch or the store. I can’t help but think one that is big and round and has a large stem is the perfect choice for me.
The stencil pattern I created is made for a large pumpkin (it is easier for kids to work with a slightly larger size), and prints out at a standard 8x11" paper size. However if you chose a slightly different size, you can adjust the pattern to fit the pumpkin size once downloaded.
A small pumpkin will work okay, but if the kids are liking the look of some mini pumpkins, this pattern may be a bit too detailed. However you could apply the same chisel technique and have them create their own designs!
Next year I have my eye on the large gourd varieties that were available...
Woodland Owl Pumpkin Carving Pattern
Since we did a woodland owl Halloween and dress up costume for Halloween, I was inspired to draw up a woodland owl pattern to carve. You'll find the pattern free for download and your personal use here at this link:
Welcome To Nana's - Woodland Owl Pumpkin Carving Patterns
There is also a simplified owl pattern if you prefer something a bit easier and faster. And if you want to get extra creative, let the kids draw one of their own!
Steps to Chisel the Woodland Owl
Ready to get started? Now that you've got your own pumpkin chosen and your pattern downloaded, let's jump in!
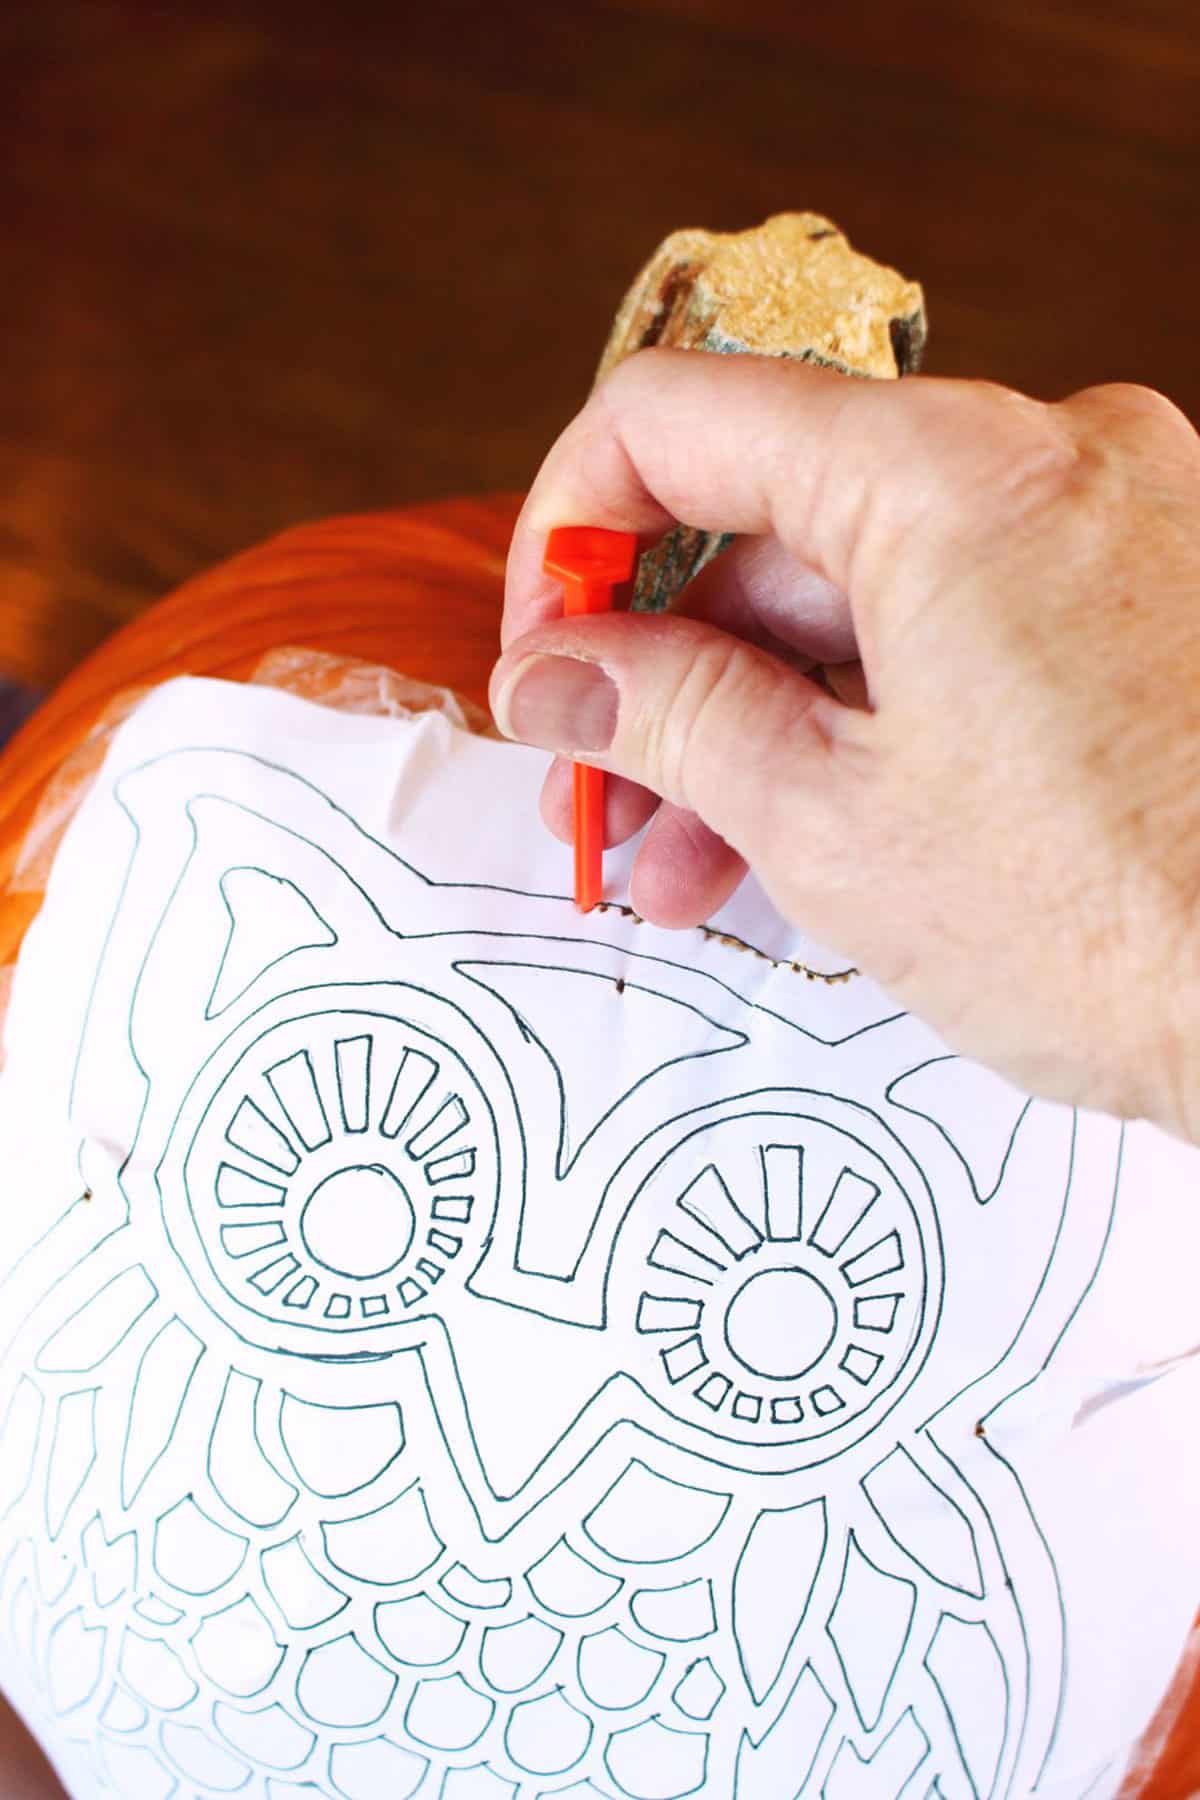
Download and Print the Pattern
Once you've downloaded the Woodland Owl Pumpkin Carving Patterns, adjust the pattern to fit correctly for a smaller or larger pumpkin. Again, as-is the attached woodland owl patterns print to a standard 8x11” paper size.
Welcome To Nana's - Woodland Owl Pumpkin Carving Patterns
Print off the pattern and tape with scotch or masking tape to the side of the pumpkin that is most suitable for carving. Because the flat pattern is forming to a round surface you may need to make a few tucks (like darts) to make it fit.
Try to tape the tucks where it least affects the pattern.
Transfer the Pattern to the Pumpkin
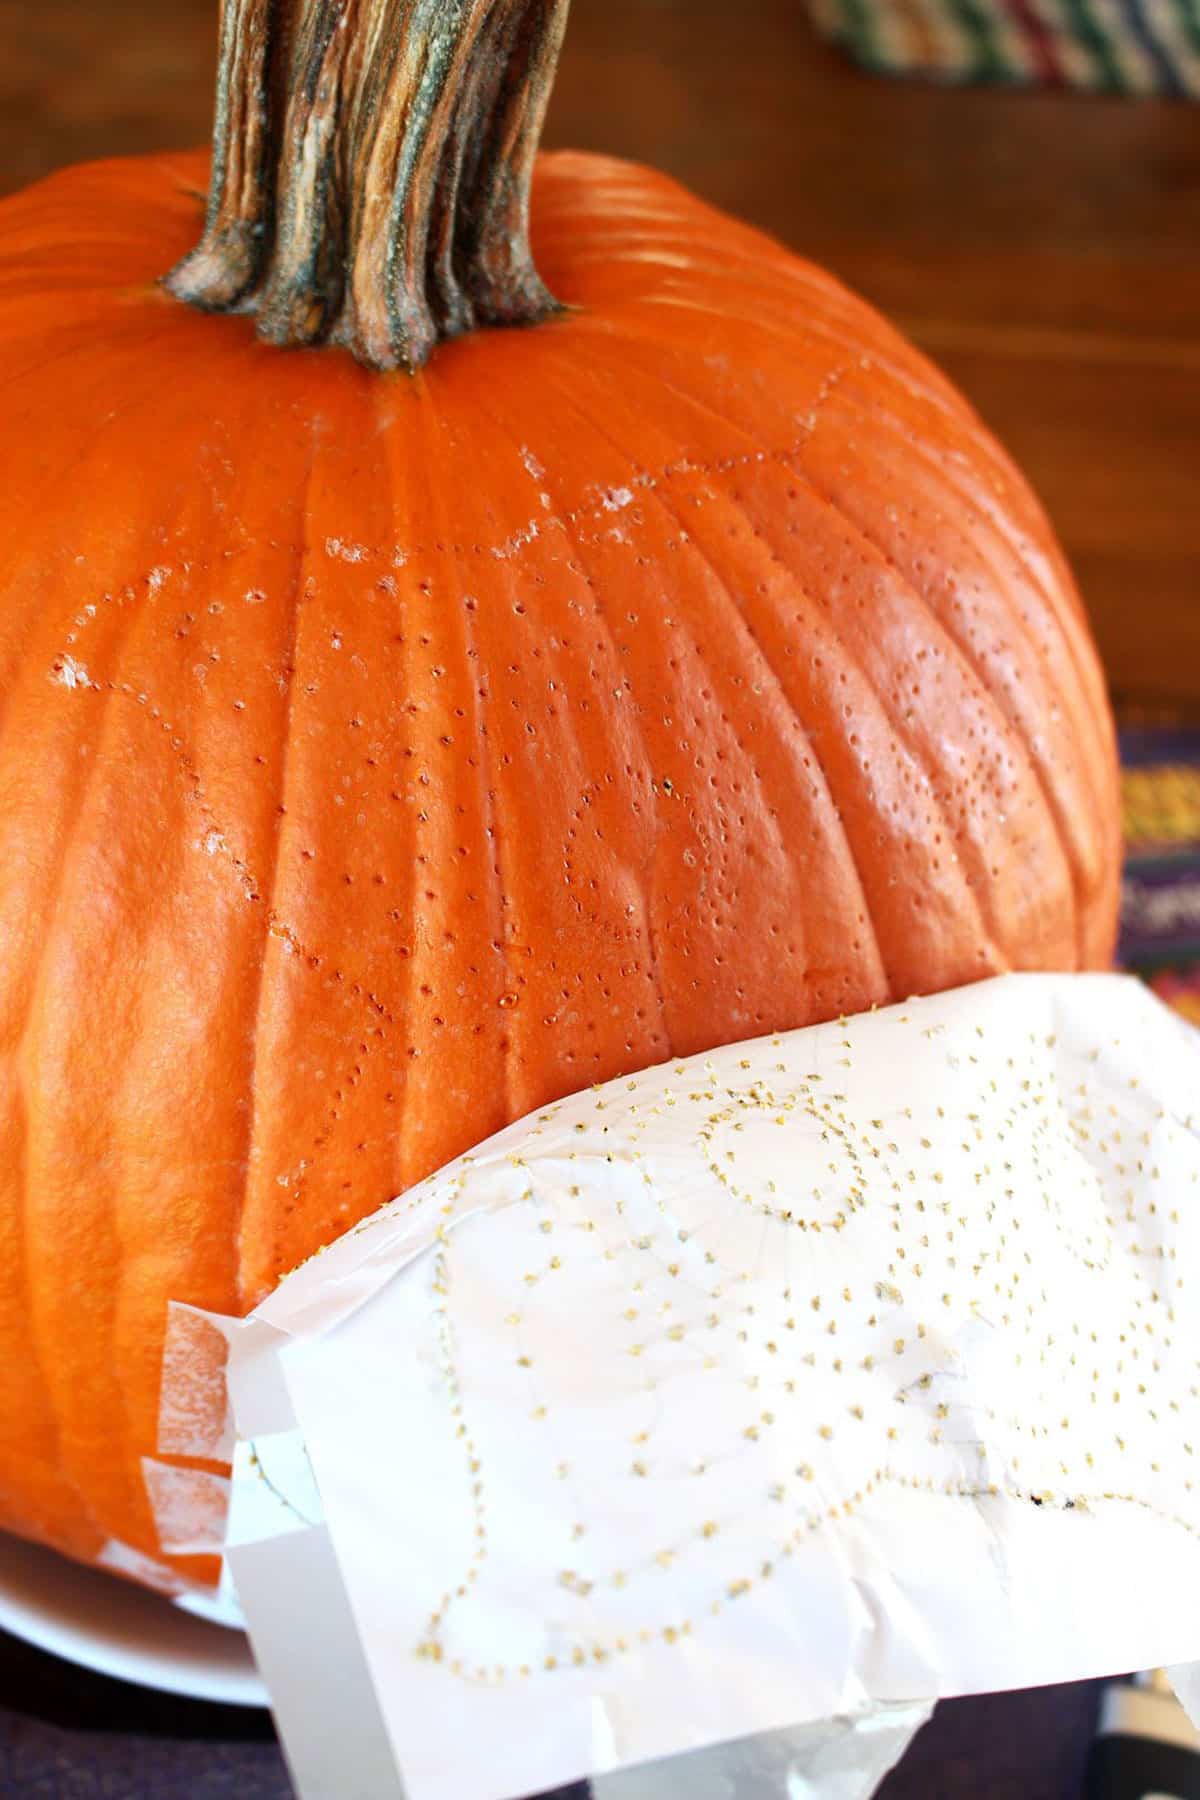
Transfer the pattern to the pumpkin by poking small holes through the lines of the pattern about ⅛ inch apart.
To make the small holes I used a small pointed tool that was in one of the pumpkin carving kits you can purchase at the store, but a push pin could work just as easily. If you or your child like to draw, it is even easier to draw the pattern directly onto the pumpkin, just sayin’.
Tip: The closer together the holes are, the easier the pattern will be to see when you take the paper off the pumpkin.
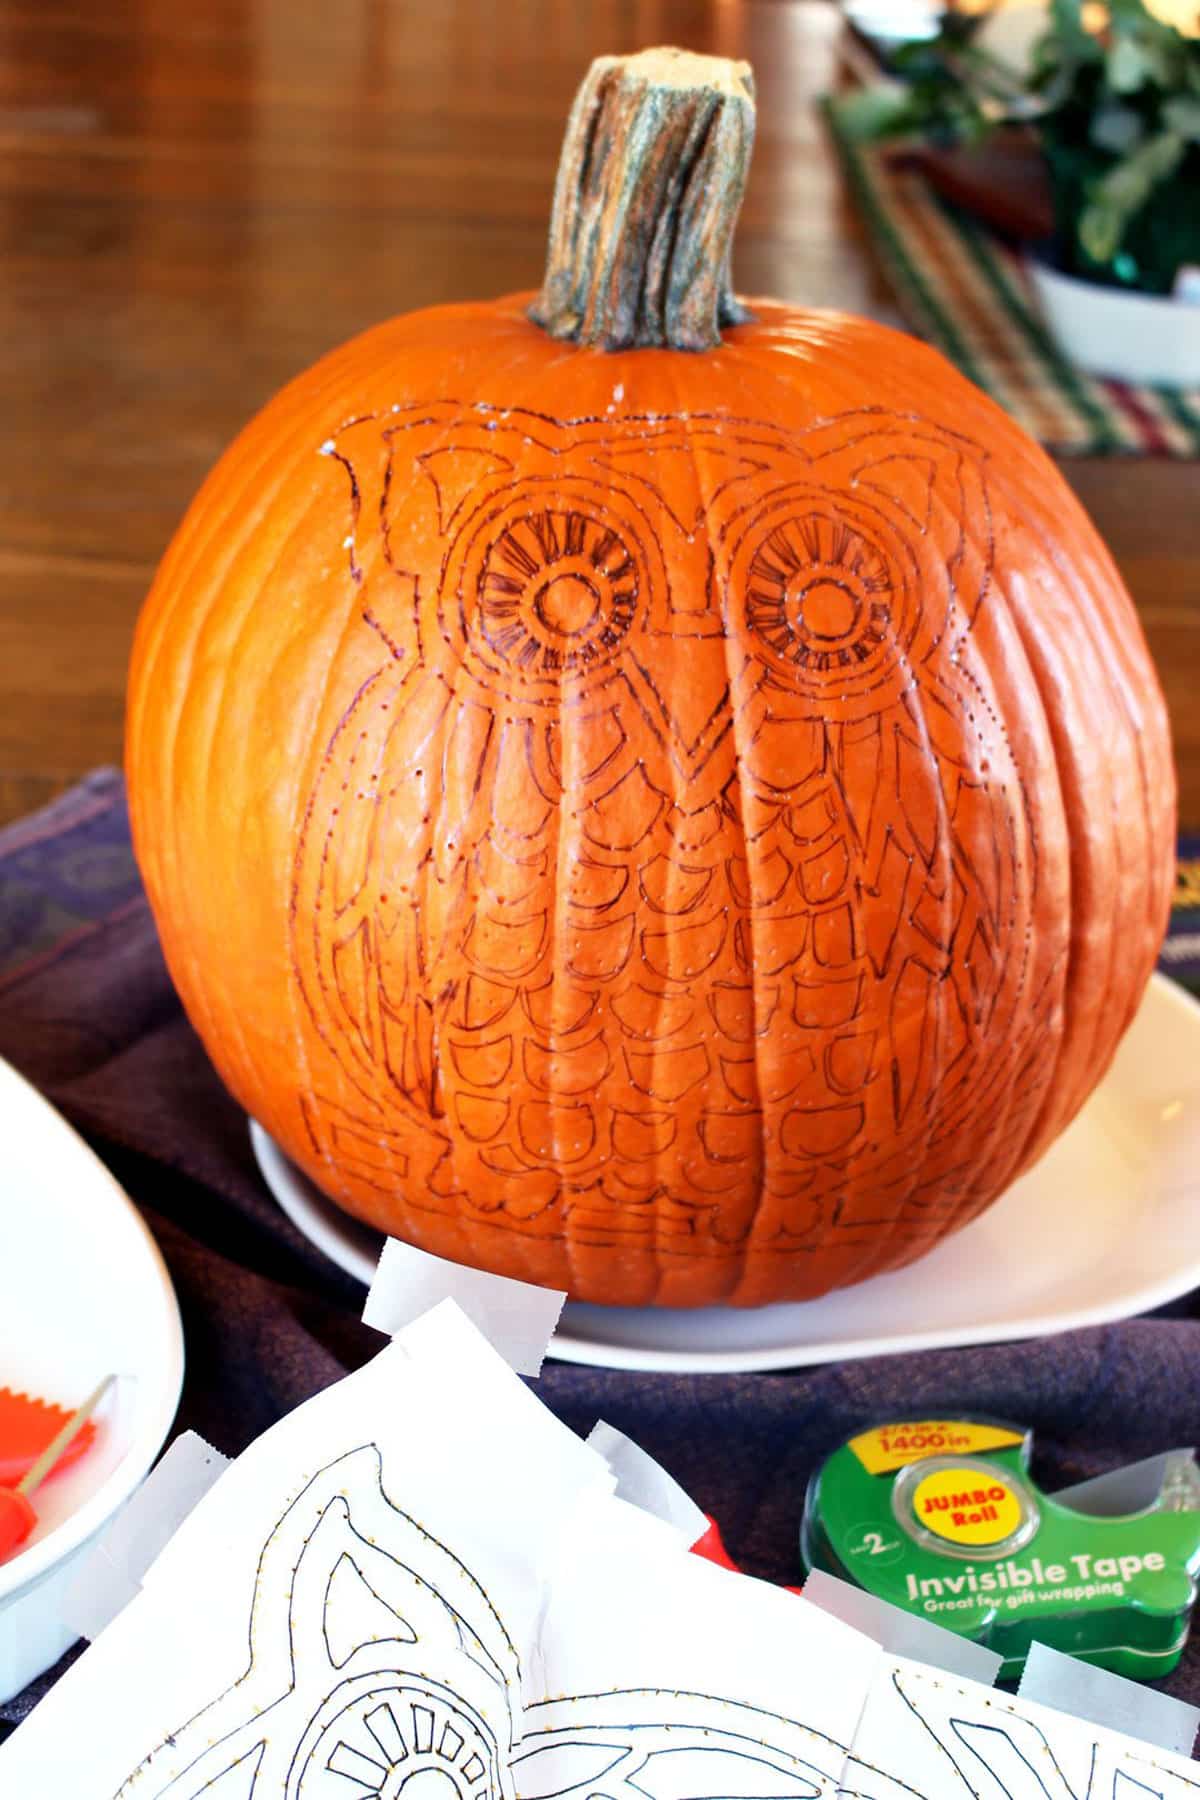
Connect the Dots
With all the dots added, remove the paper from the pumpkin and wipe it dry with a paper towel.
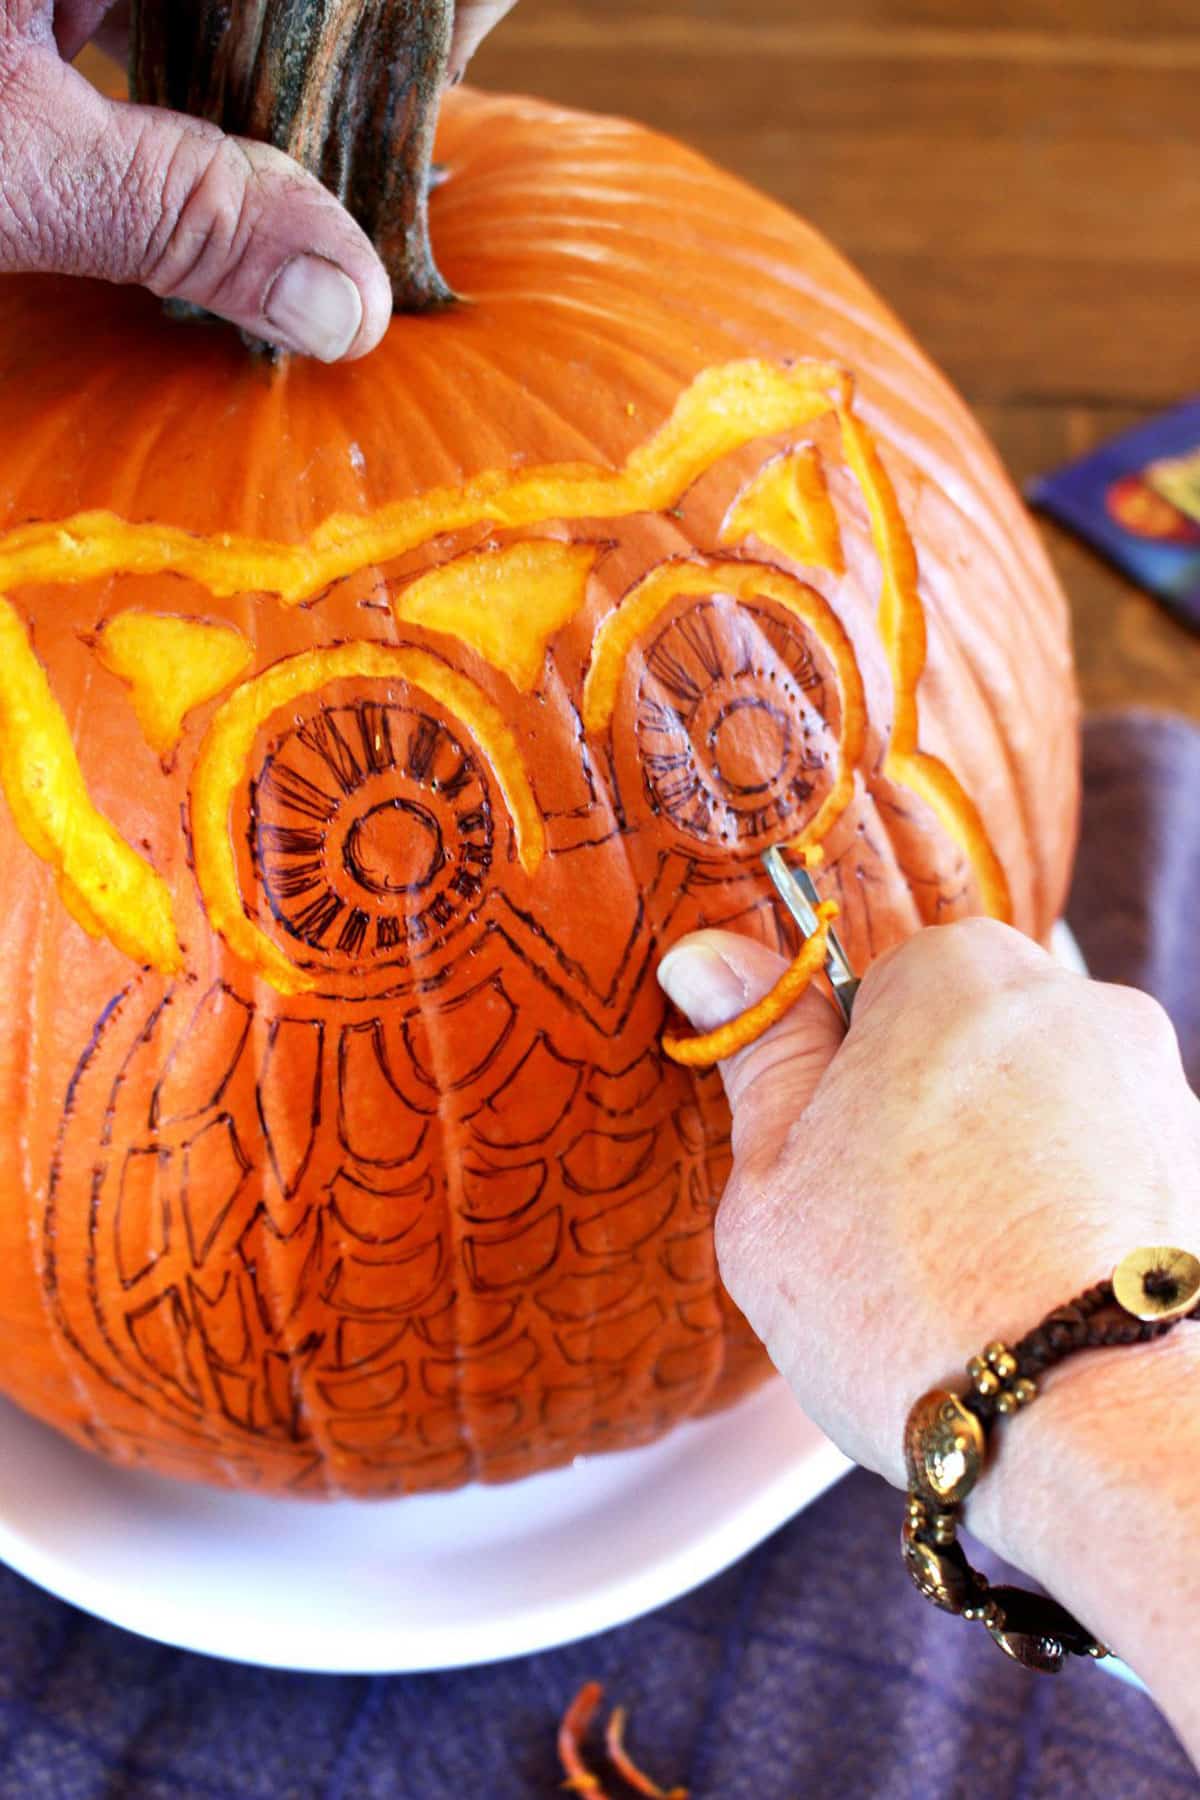
Using a dry erase marker, connect the dotted lines left from your pin pokes through the pattern (this rubs off after carving- my extra ink pen marks didn’t). You may want to color in the areas shown on the pattern that are darkened with a solid color so you know what to chisel off during the next step.
Use the Chisel Technique
Begin to chisel off the skin of the pumpkin in the areas that are darkened on the pattern.
I tried several tools to chisel out the design from the pumpkin skin. A wire end modeling tool for clay worked best, by far! You can purchase these at a craft store (like Hobby Lobby) or online.
Work with smaller motions as you get the feel for how hard to push and pull the wire end modeling tool. The skin of a pumpkin is tough, so you'll have to be patient with yourself and your kid, but you’ll get the hang of it quickly! You could try a few practice strokes on the bottom of the pumpkin before starting on the design if you want.
Tip: don’t carve too deeply into the pumpkin. The point is to have the contrasting color, not to dig through to the inside of the pumpkin and have open holes like a typical jack-o-lantern. You can always take more off later, if desired.
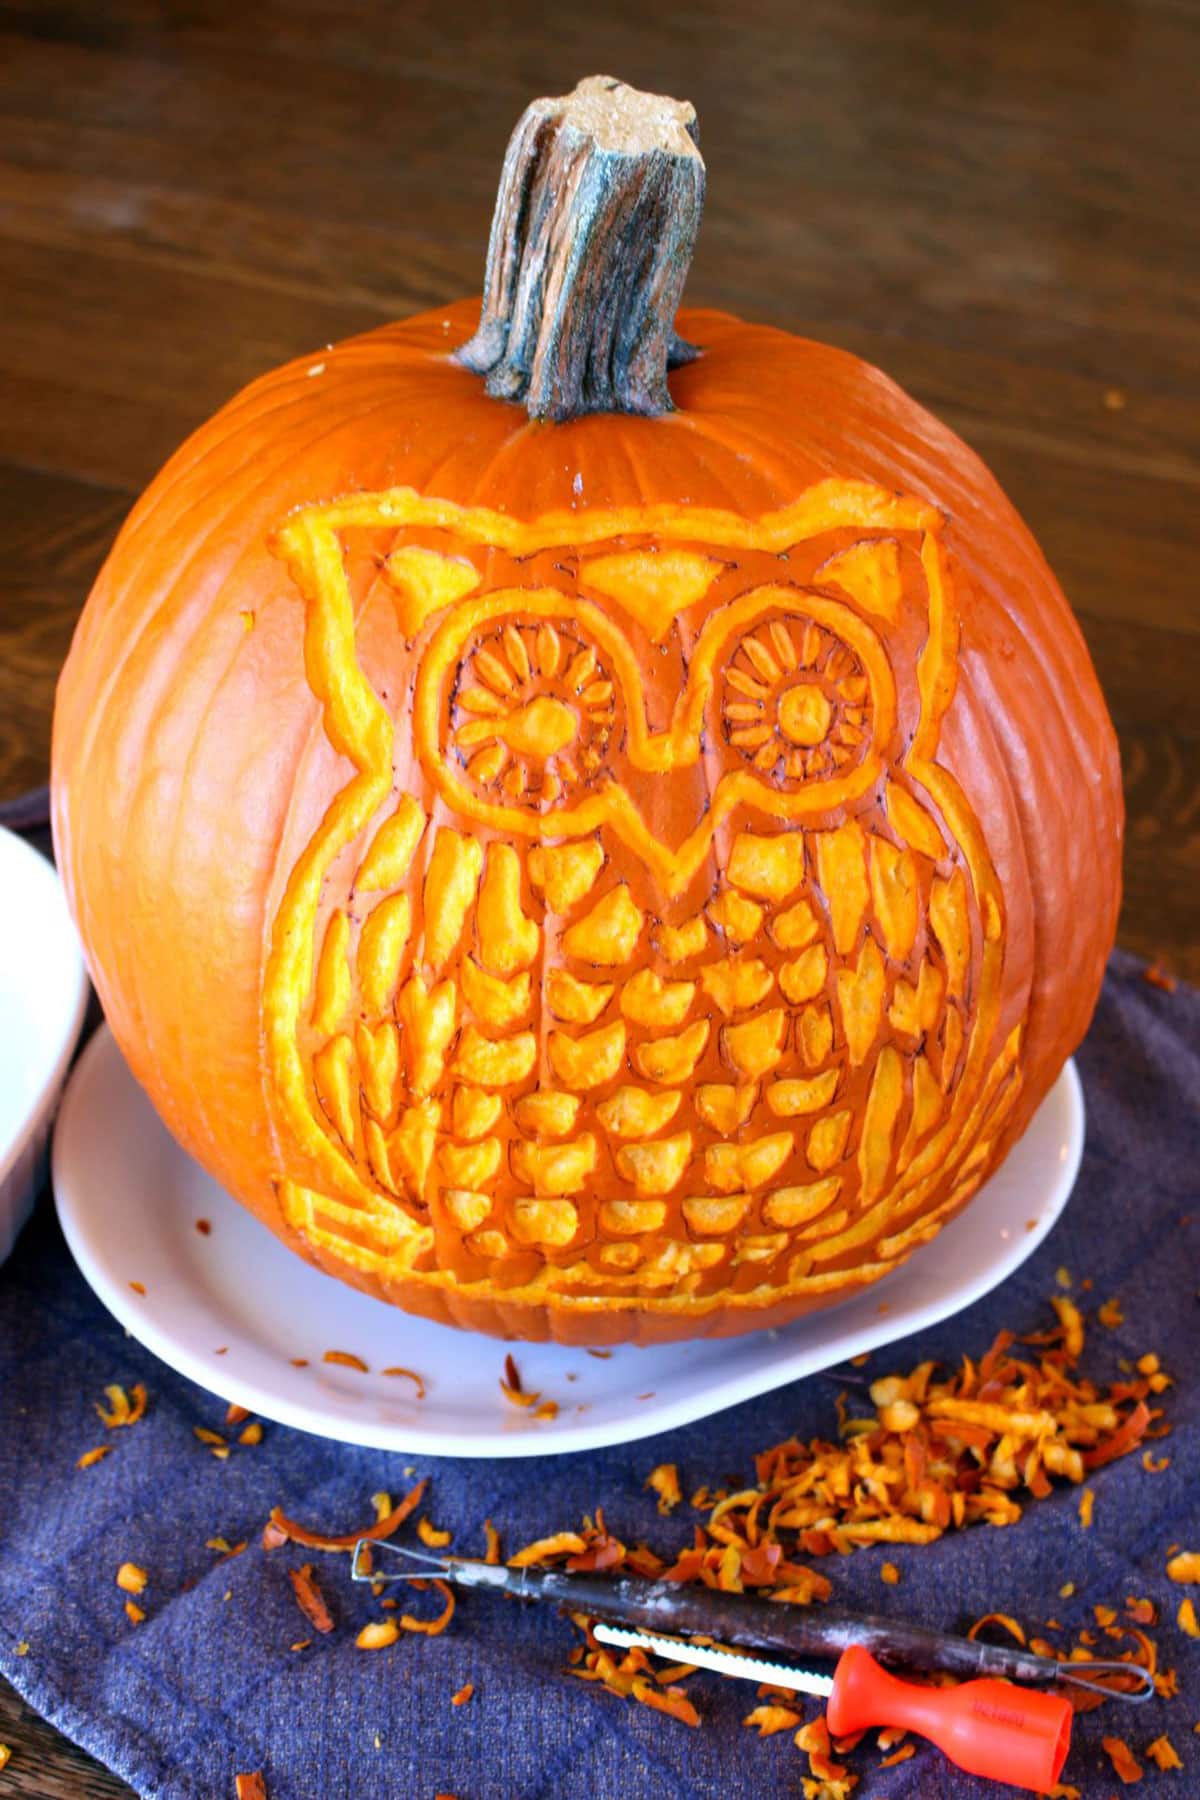
Finish the Woodland Owl Design
Enjoy the chiseling process! My lines weren’t perfectly straight and I goofed in some places, but it still made for a nice look in the end!
Don't worry if it isn't perfect, the key is to just have some fun.
Once you are finished, you can decide if you'd like to leave the pumpkin whole, or remove the inside. I didn’t choose to carve out the inside of this pumpkin, I'm hoping it lasts longer this way. However if you'd like to, you definitely can!
Carving out the inside of the pumpkin will allow you to add some light to the inside for a glowing effect. Read on for tips on how to do this...
Adding Light to Your Pumpkin (Let it Glow!)
If you want the pumpkin to glow, carve out the inside of the pumpkin when you are done chiseling the pattern. Doing it in this order keeps the pumpkin stronger while chiseling. There are a couple ways to do this:
- Through the Bottom: You can cut a hole in the bottom of the pumpkin and set it on top of an electric light source (like a tea light). To do so, cut a hole in the pumpkin bottom and clean out the pumpkin seeds and the stringy fiber with a spoon or an ice cream scoop.
- Through the Top: You can also clean the pumpkin out from the top in the traditional manner, if you prefer. To do so, cut a hole around the stem at a 45 degree angle inward so the lid will fit back on the top of the pumpkin and not fall inside. Now continue to clean out the inside as mentioned above.
This technique glows instead of shining light like a typical jack-o-lantern with open holes. Chisel out a bit more in areas you want to glow more brightly, like the eye holes.
Wait! Don't throw away those pumpkin seeds! You can turn them into a tasty snack with this simple recipe.

Variations on the Woodland Owl Pumpkin Carving
Once you know the chiseling technique, there's no reason you need to stop at making a woodland owl! Give one of these variations a try:
- Carve a different animal: wouldn't a cat, a spider, or a bat pumpkin be spooky?
- Chisel a design: it would be SO cool to chisel a design around the whole pumpkin! How about a geometric pattern, or maybe some vines and flower winding around the pumpkin?
- Paint the pattern: add color to the feathers and face of the owl by painting the design, or the rest of the pumpkin.
- Add a light: as I mentioned above, you could carve out the interior and add some light!
- Add dimension: my favorite thing about the chisel technique is that you can play with the depth of the carving to add dimension when it's lit from the inside. Chisel more pumpkin skin away to allow more light through the skin
Preserving Your Pumpkin
Once you've finished your pumpkin, you'll want to preserve it for as long as possible.
The best method I have found is to spray the pumpkin inside and out with a spray cleaner with bleach in it. This will kill bacteria and preserve the pumpkin longer. Repeating this every day or every other day will help even more.
Another option is to soak the pumpkin for a few hours in bleach water at a 1 teaspoon of bleach per gallon of water ratio. Why hadn’t anyone told me this piece of news before?? This is a step you will definitely want to do yourself, or supervise older children very closely.
Get a pumpkin for the grands and one for you to chisel. It is so much fun...you'll be hooked. Happy Halloween from Welcome to Nana's!
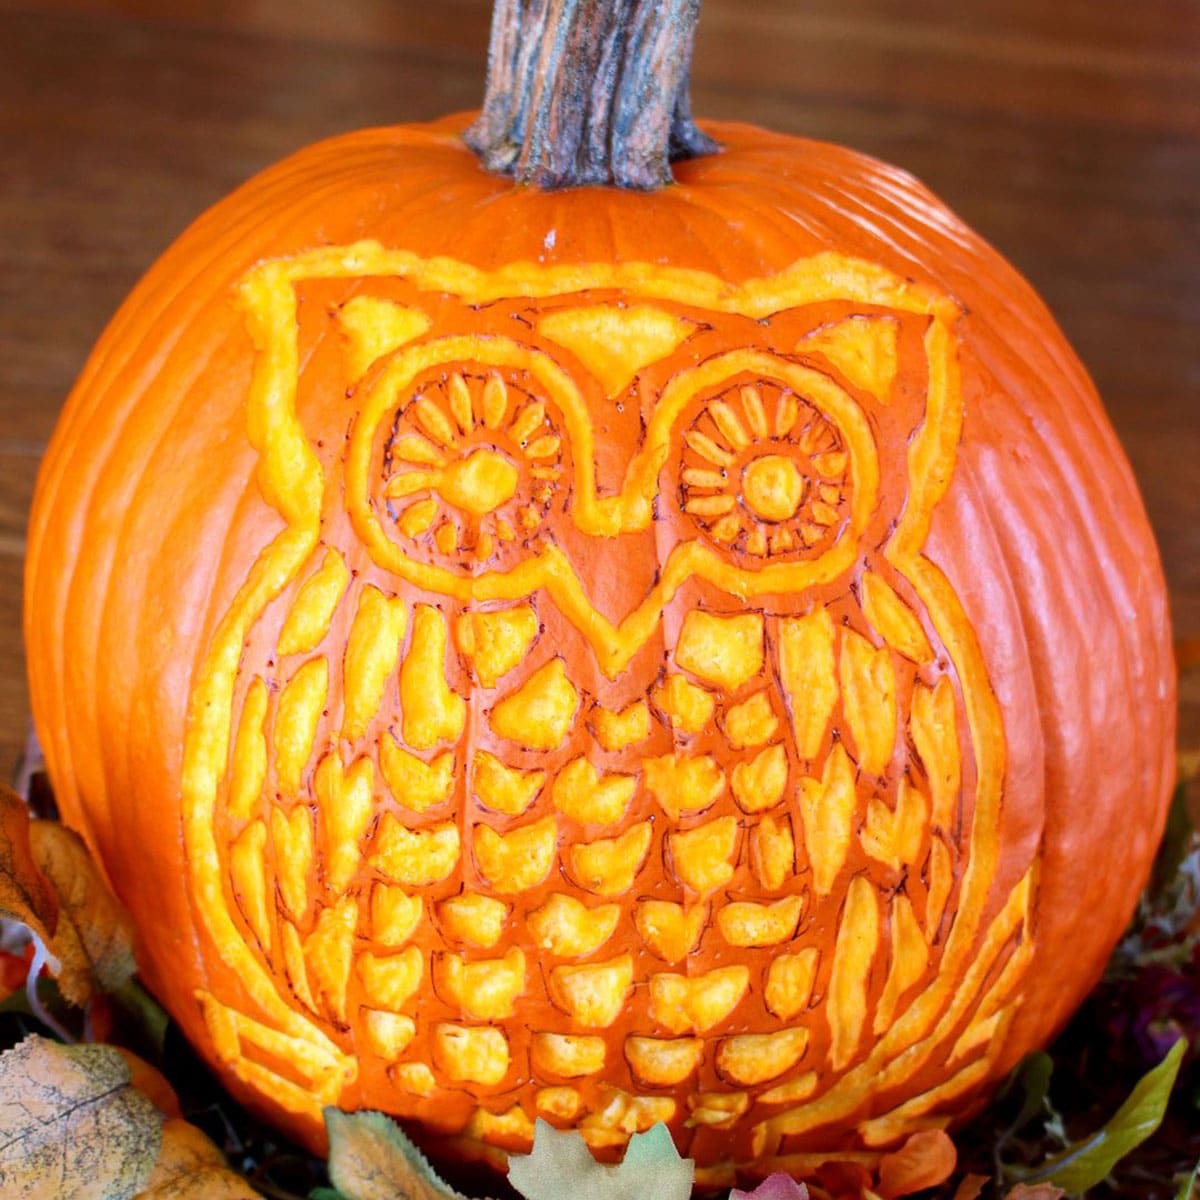
This cute woodland owl pumpkin is carved using a chiseled technique. Tape the pattern to your pumpkin, then poke holes around the guidelines to create an outline. Follow the outlines to remove the shaded parts of the pattern and you'll be left with a unique Halloween owl pumpkin carving!
Carving owl eyes into this pumpkin is as easy as following the pattern! Simply chisel out the shape of the eyes after outlining the pattern with small holes. If you want to make the eyes glow, cut a little deeper into the skin of the pumpkin. That way, light can shine through more intensely from the inside of the pumpkin.
More Pumpkin Crafts for Kids
If you are on a roll with pumpkin themed crafts with the kids, check these out from around the blog:
- Painted Mini Pumpkin Halloween Decorations
- Apple Stamping Pumpkin Craft
- Sew a Pumpkin Fall Pillow
- Paper Strip Pumpkin Craft
- How to Color A Pumpkin
ENJOY!
If you try this craft, let me know! Go ahead and leave a comment, rate it, and tag a photo with #WelcometoNanas wherever you post.
Come join the fun at https://welcometonanas.com
DIY Woodland Owl Pumpkin Carving
Equipment
- Push pin or pointed tool from a purchased pumpkin carving kit
- Dry erase marker or pen
- Wire end modeling tool for clay
- Knife optional
- Ice cream scoop or metal spoon optional
- Spray cleaner product with bleach or liquid bleach optional
Items Required
- 1 Pumpkin
- 1 Pattern, printed to size for your pumpkin
- Scotch tape
Instructions
- Choose that perfect pumpkin(s)
- Print out the woodland owl pattern or another design of your choice in a size to fit your pumpkin Tape the pattern to the side of the pumpkin that is most suitable for carving. Make a few tucks (like darts) to make it fit.
- Transfer the pattern to the pumpkin by poking small holes through the lines of the pattern about ⅛ inch apart using a small pointed tool or a push pin.
- Remove the paper from the pumpkin and wipe it dry with a paper towel.Using a pen, connect the dotted lines left from your pin pokes through the pattern.
- Chisel off the skin of the pumpkin in the areas that are darkened on the pattern.
- If you want to illuminate the pumpkin, carve out the inside of the pumpkin when you are done chiseling the pattern (can cut the whole in the bottom or the top to do the cleaning). Clean out the seeds and the stringy fiber with a spoon or an ice cream scoop.
- If desired, spray the pumpkin inside and out with a spray cleaner with bleach in it to help preserve the pumpkin or soak the pumpkin for a few hours in bleach water at a 1teaspoon per gallon of water ratio.
Video

Notes
This post was originally published in October 2017 and has been updated to add more relevant and detailed content.

Laura says
Fun technique idea! I think I would carve out the middle to make it glow - that could be cool on a front porch.