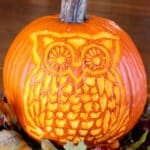
DIY Woodland Owl Pumpkin Carving
This woodland owl pumpkin carving uses a chisel technique to create a cute DIY Halloween decoration. Print off the free pattern and have fun!
Servings: 1 Carved Pumpkin
Cost: $5
Equipment
- Push pin or pointed tool from a purchased pumpkin carving kit
- Dry erase marker or pen
- Wire end modeling tool for clay
- Knife optional
- Ice cream scoop or metal spoon optional
- Spray cleaner product with bleach or liquid bleach optional
Ingredients
- 1 Pumpkin
- 1 Pattern, printed to size for your pumpkin
- Scotch tape
Instructions
- Choose that perfect pumpkin(s)
- Print out the woodland owl pattern or another design of your choice in a size to fit your pumpkin Tape the pattern to the side of the pumpkin that is most suitable for carving. Make a few tucks (like darts) to make it fit.
- Transfer the pattern to the pumpkin by poking small holes through the lines of the pattern about ⅛ inch apart using a small pointed tool or a push pin.
- Remove the paper from the pumpkin and wipe it dry with a paper towel.Using a pen, connect the dotted lines left from your pin pokes through the pattern.
- Chisel off the skin of the pumpkin in the areas that are darkened on the pattern.
- If you want to illuminate the pumpkin, carve out the inside of the pumpkin when you are done chiseling the pattern (can cut the whole in the bottom or the top to do the cleaning). Clean out the seeds and the stringy fiber with a spoon or an ice cream scoop.
- If desired, spray the pumpkin inside and out with a spray cleaner with bleach in it to help preserve the pumpkin or soak the pumpkin for a few hours in bleach water at a 1teaspoon per gallon of water ratio.
Video
Notes
*