Make an easy DIY Sit-Upon Cushion from a reusable shopping bag with just a few items and some simple hand stitching! It's a great craft for kids to make and take on camping trips and outdoor adventures.
Jump to:
- DIY Sit-Upon Cushion from a Reusable Shopping Bag
- Girl Scout Craft
- A Perfect Cushion for Camping or Picnics!
- Sit-upon Upgrade: Using a reusable shopping bag!
- Choosing the Material for the Sit-Upon
- Draw Lines to Show the Size
- No-Sew Duct Tape Option
- Cut the Bag to Size
- Punch Holes Around the Edges
- Choosing the String to Sew the Cushion
- Prep the String to Sew
- Two Sewing Stitch Options
- Hand Sewing Stitch "how to" Videos
- Beginning the Sewing with a Knot
- Whipstitch the edges of the reusable shopping bag
- Filling the bag
- Upcycle those old plastic bags!
- Sew the fourth side of the DIY sit upon
- Tie off the string
- Porch Pillow Sit-Upon
- Other Purposes for the Outdoor Sit-Upon
- Want More Easy-to-Sew Craft Ideas?
- Enjoy!
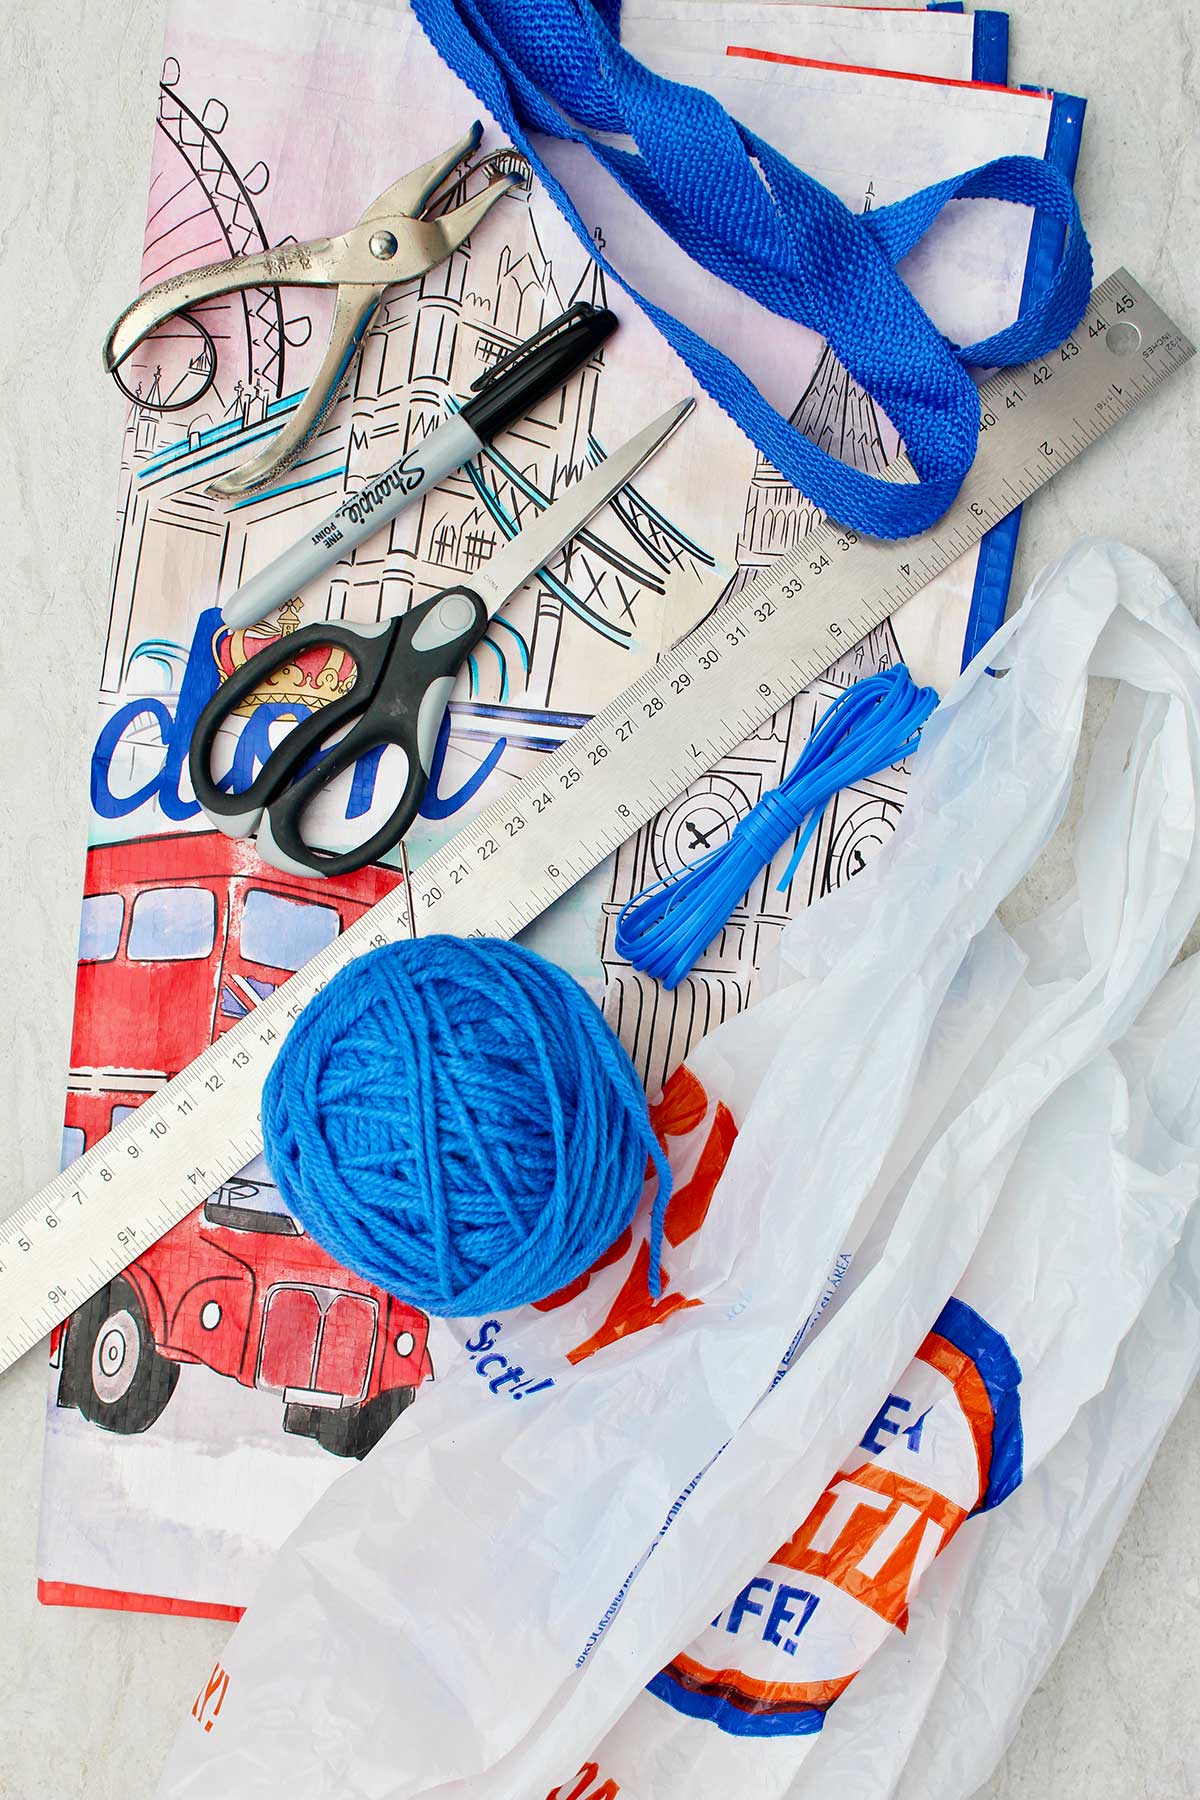
- Supplies for the DIY Sit-Upon Cushion:
- DIY Sit-Upon Cushion from a Reusable Shopping Bag
DIY Sit-Upon Cushion from a Reusable Shopping Bag
Ready for some outdoor summer adventures? Well this sit-upon cushion is ready to be grabbed by the handles and taken outside! It’s waterproof to sit on and it’s very easy to make.
When I was a young girl, I was in Brownies and Girl Scouts and a sit-upon cushion was something that we made at one of our meetings. Now I can't wait to share the tutorial with you and the kids!
Girl Scout Craft
My Girl Scout troop leader had the materials ready and we stitched it together. Then we used it on an outing so that we would have something to sit upon, thus the name.
I did not realize this was a Girl Scout tradition. It wasn’t just our troop that made them, they are made in many places by many troops.
A Perfect Cushion for Camping or Picnics!
I was outside recently and we needed to sit down on the ground. It reminded me of these sit upon cushions and I was wishing I had one. The ground was damp.
This would be great for all kinds of nature activities like hiking, camping, an outdoor class, or sitting around the fire pit. It’d be perfect for your off-road adventure, a car trip, or camping trip this summer!
Sit-upon Upgrade: Using a reusable shopping bag!
I thought I would make my sit upon with a slight upgrade over the one made long ago.
Let's make a sit upon out of reusable shopping bags!
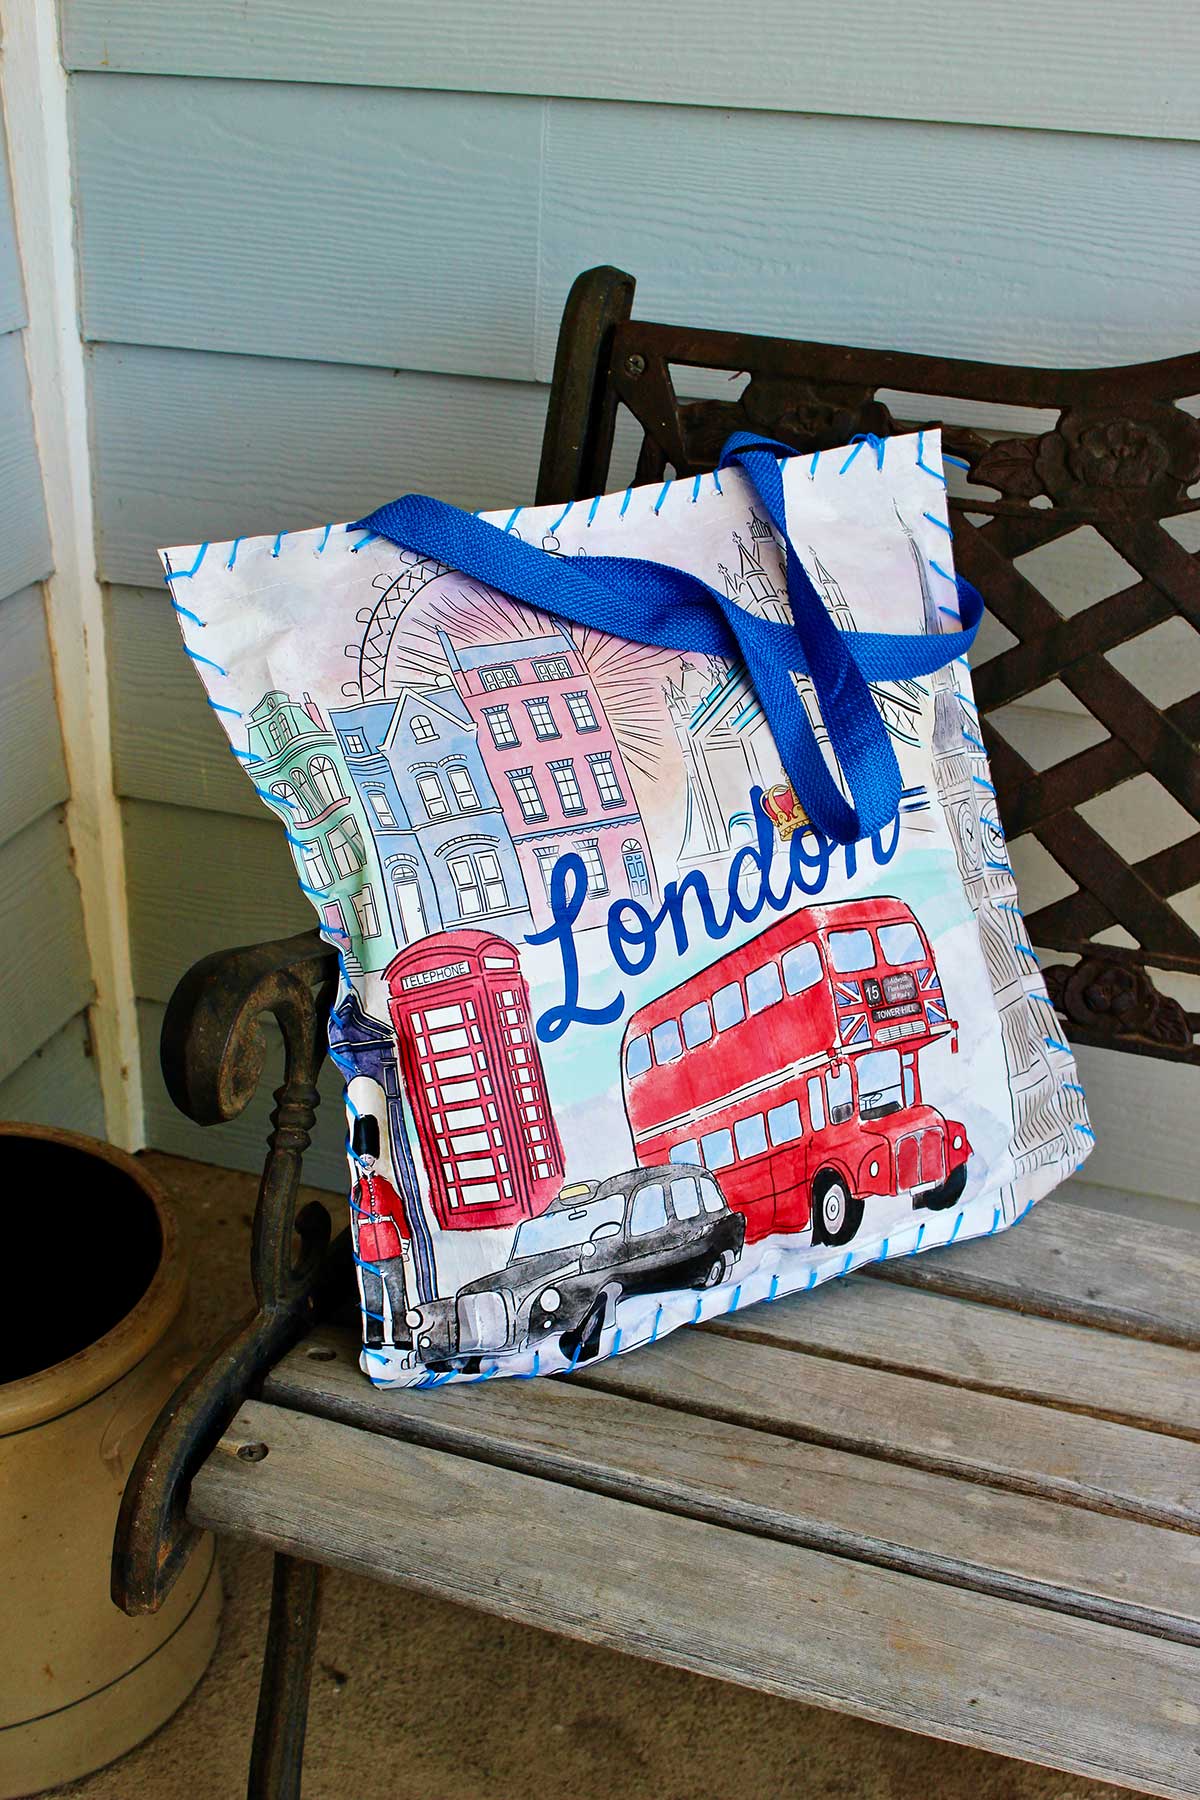
I had this reusable shopping bag as an extra. It was purchased at a department store a long time ago. This is a great second use. Don't you love the "London" pictures on the front side as well as the back?
It’s a water resistant fabric, extremely strong. It’ll work perfectly for a sit upon.
Choosing the Material for the Sit-Upon
The shopping bag is about 18 inches wide by 17 inches tall and about 8 inches deep. It’s the height and width that’s the most important issue.
What I really like about using a shopping bag for this project is that we are going to keep the handles. Then you can carry it by the handles when you go outdoors.
Note: You could also make this out of a vinyl tablecloth fabric if you would like. I’m pretty sure that’s what we did in our troop meeting years ago.
If you would like to follow along and make this craft with me there is a full length tutorial video found at: Make a Sit-upon Cushion from a Reusable Shopping Bag Full Length Video.
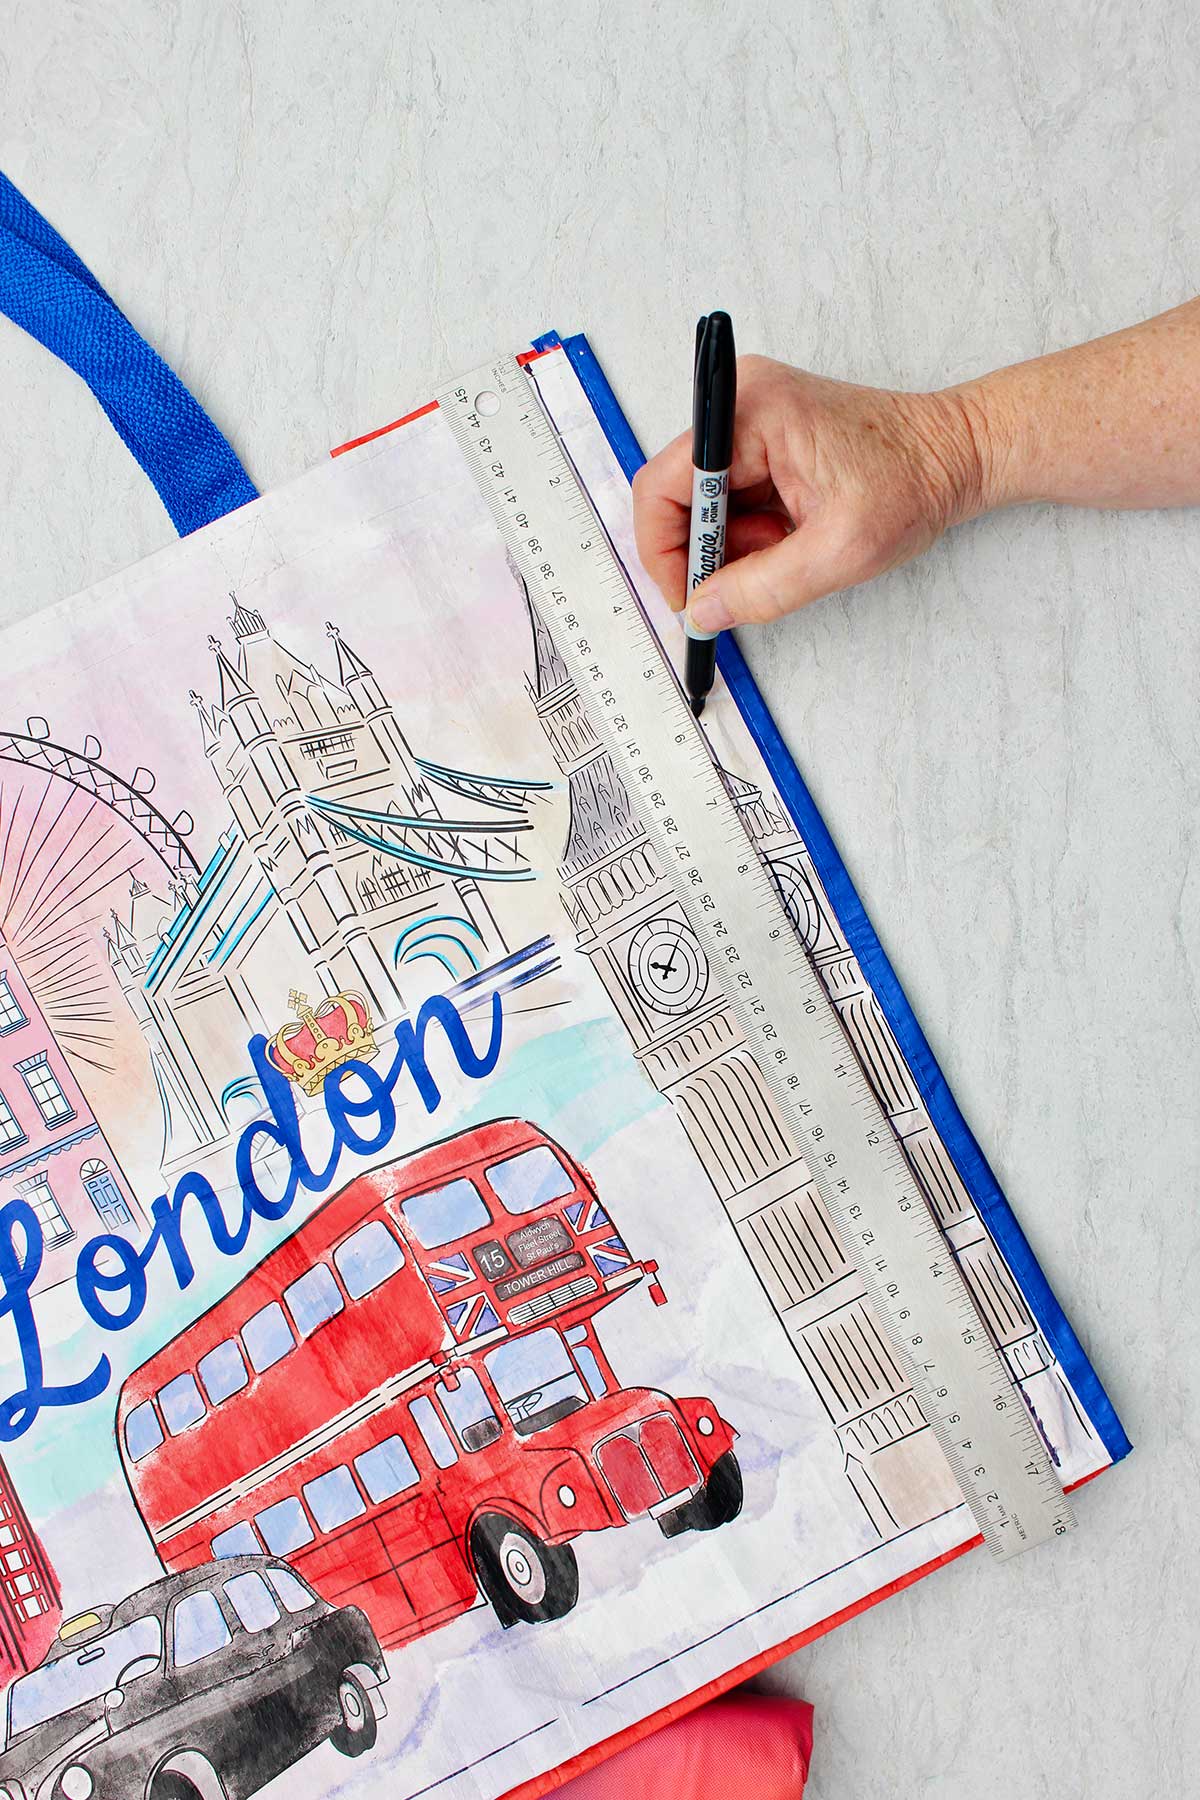
Draw Lines to Show the Size
We want to make our sit upon as large as possible. My bag allow me to make a 17 x 17“ square. That is a good size. Make it larger if you want. But don’t go too much smaller.
Use a ruler and use a permanent marker to draw lines on the three sides of the bag that do not have handles. Draw them as close to the seamed edges of the bag as possible.
These three lines along with the handle side will make the outside edge of the sit upon.
No-Sew Duct Tape Option
Note: You can make a no sew sit upon by duck taping these three edges and later duct taping the handled edge as well. Just use a piece of duct tape to run along each side of the bag. Fold the tape over so half is on the front side and half is on the back side. Don't make any cuts in the bag.
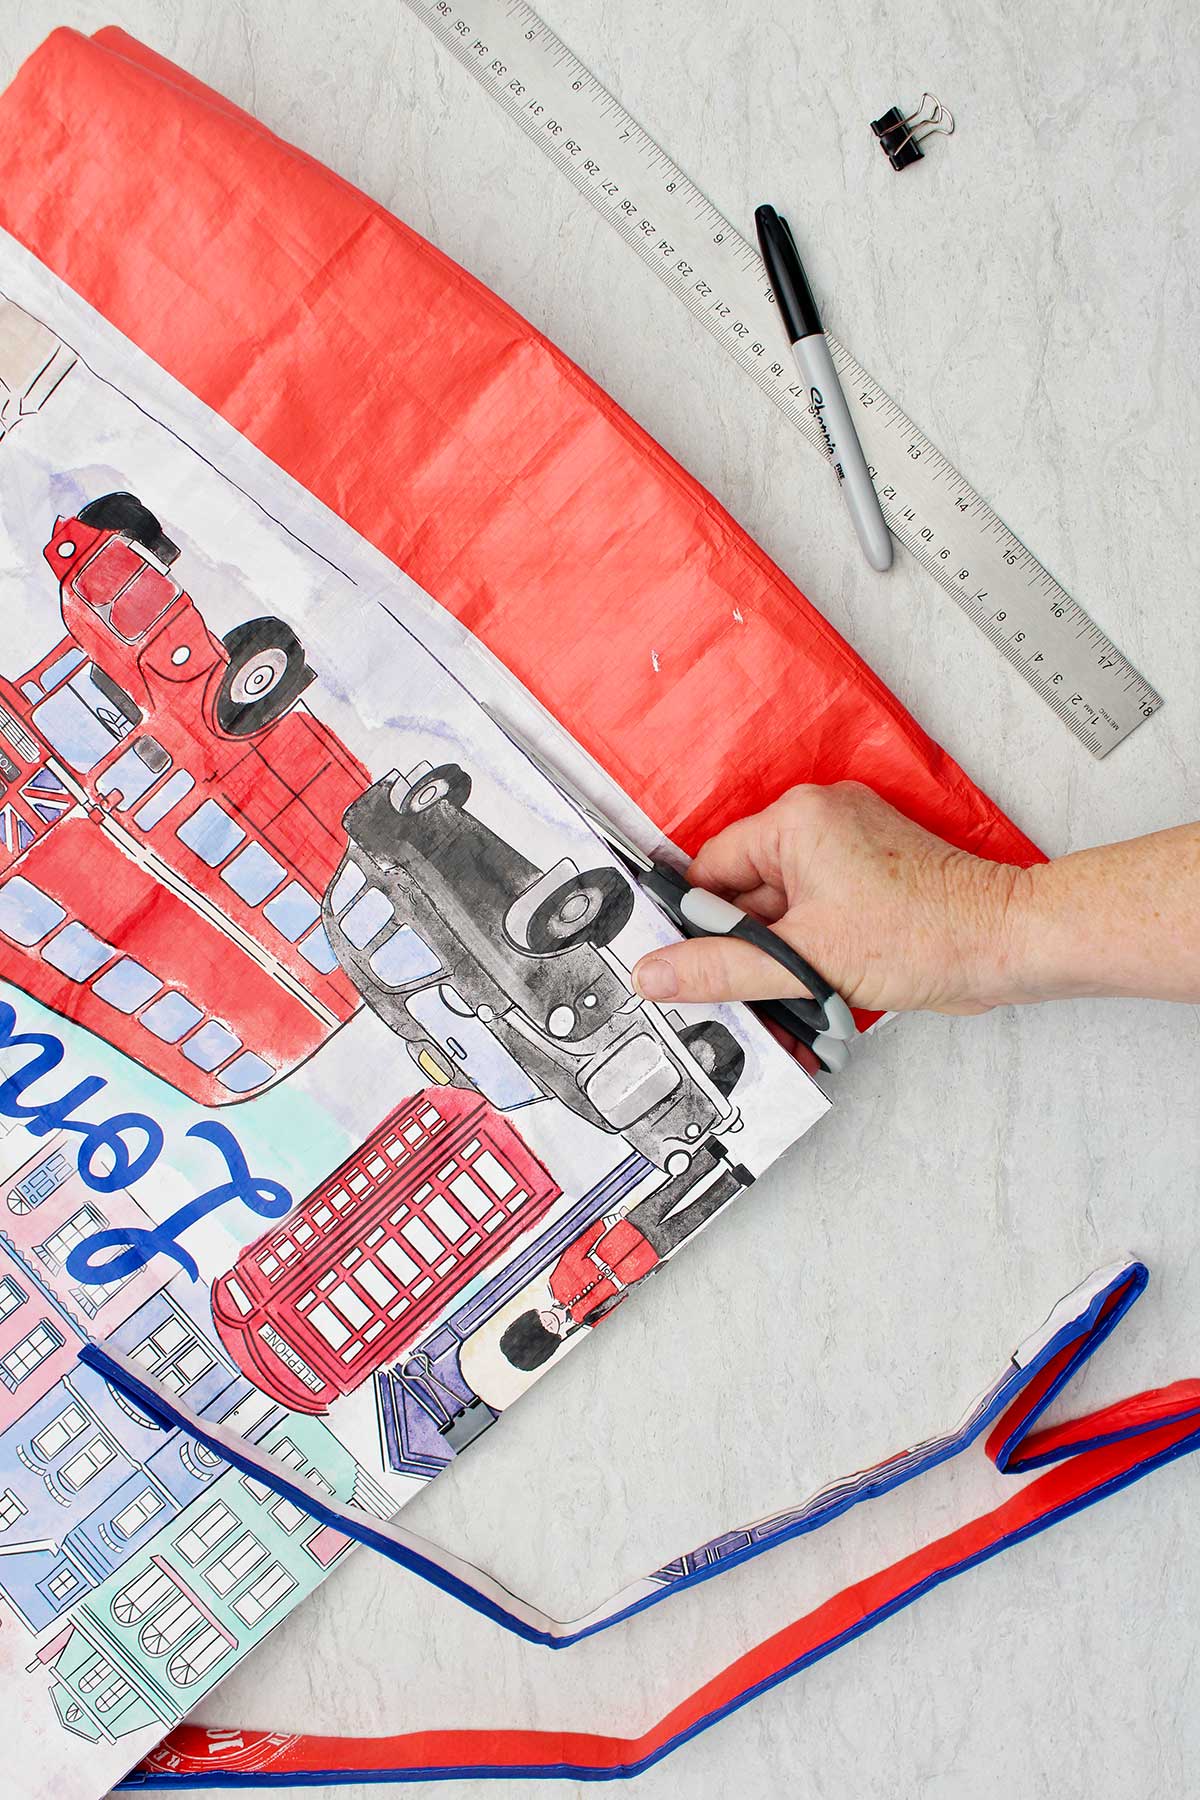
Cut the Bag to Size
Cut along the lines that you just drew with a Scissors.
Remember, do not cut the edge of the reusable shopping bag with the handle on it.
This will cut off the sides of the bag and leave only the front and back of the bag. So don’t be surprised when that happens. 🙂
Remove the extra side sections of the bag that get cut off in the process. Just throw away the side sections and bottom of the bag unless you have another project in mind.
Keep the right sides out. Do not turn the reusable shopping bag inside out.
Use a binder clip on each of the four sides of the bag. This will hold it together nicely while you do the next couple steps.
Note: If you are using a vinyl tablecloth, cut your pieces of vinyl into an 18 x 18" square. You can make it larger if you’d like, but I wouldn’t make it too much smaller.
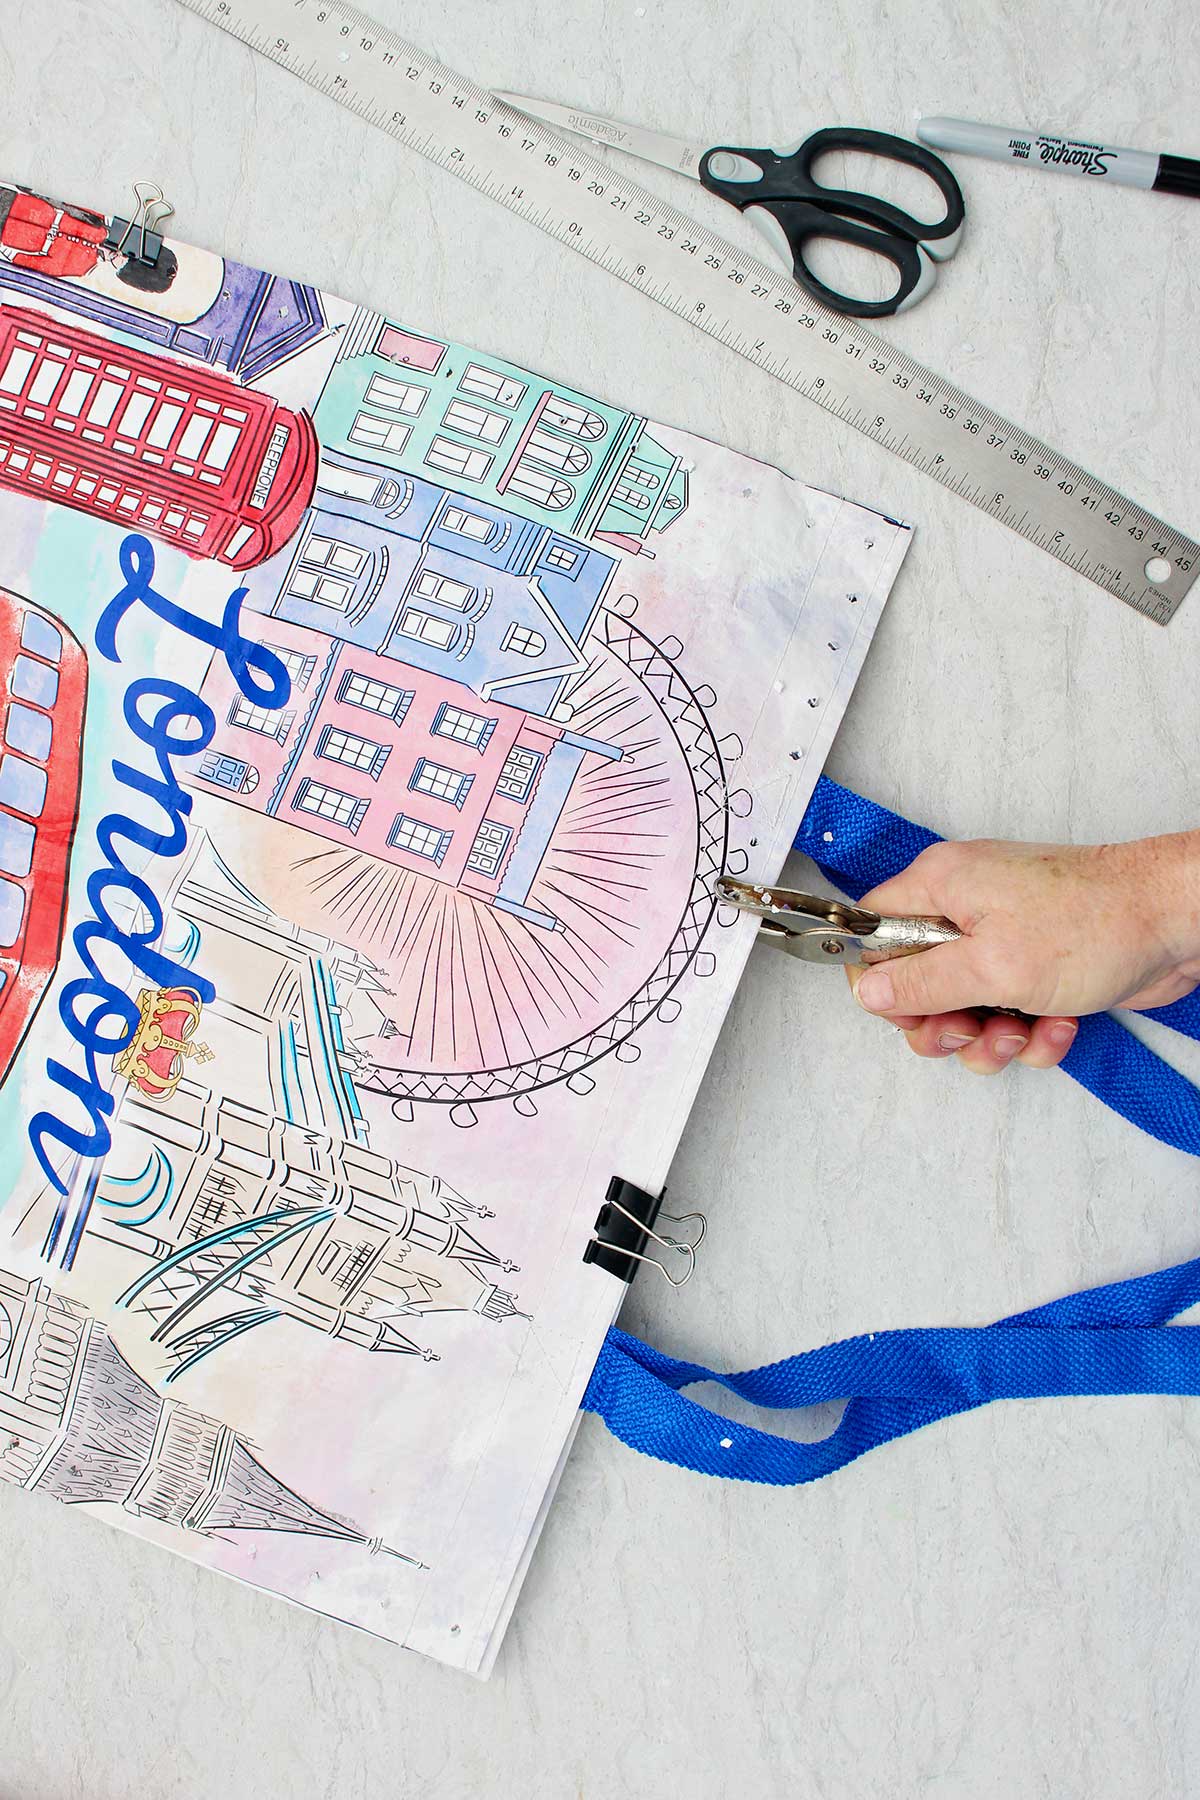
Punch Holes Around the Edges
Use a hole punch to punch all the way around all four edges of the bag.
Make the holes about 1 inch apart and about ¾ of an inch from the edge of the bag.
Do your best to get a hole in each corner- ¾ inch from both edges of that corner.
Tip: If you are making this project with younger children, you could draw the lines on the bag. Then you could draw dots where they are supposed to punch the holes, if they’re capable of using the hole punch. You could go ahead and punch the holes as well if you think that they would not be able to do that.
Punch a hole on either side of the handles. It’s too hard to punch through the heavy thickness of the handled area.
Choosing the String to Sew the Cushion
Now comes the sewing part!
So when I thought about doing this craft, I didn't think about it being a great "learn to sew" project. There is no need for a sewing machine, it is all hand sewing.
There’s several materials you can use to do the hand sewing.
Probably the one you're most likely to have on hand is yarn. If you choose to use yarn, you will also need a yarn needle.
I suggest that you use the plastic yarn needles with a very large hole and a rounded tip. This is a safe option for younger kids.

Another option is regular string. You would also use a yarn needle for that as well.
The last option I will suggest is the one that I’m going to be using in this tutorial. That’s what you will see in the pictures and in the video.
I am using plastic lacing, which is used in boondoggle key rings. I had some leftover from another project and wanted to use it up!
A big plus of using plastic lacing or plastic string is that you do not need a needle. It is stiff enough to go through the holes without one. I find that a big plus!
Prep the String to Sew
Cut a piece of your plastic string, yarn, or string that’s at least twice the distance around your bag. If you need to use a yarn needle, go ahead and thread the needle.
This is nice to have done ahead of time if you’re doing this in a group of kids.
Tip: You could have all of the materials in a plastic bag, one per child in the group.
Two Sewing Stitch Options
Next, we are going to sew the three edges of the bag that do not have the handles.
There are two different stitches that you can use to do the sewing.
The first is a whipstitch. It is the one I show in the tutorial videos and pictures.
This stitch goes around and around the edge.
The second stitch is the running stitch. It just goes up and down through the holes around the edge. It's a very simple stitch that also works well.
Hand Sewing Stitch "how to" Videos
I have a tutorial video for learning the whipstitch found at this link: How to Sew a Whipstitch Full Length Video.
The tutorial video for the running stitch is found at this link: How to Hand Sew the Running Stitch Video.
Again, I will be using the whipstitch so please insert the running stitch directions if that is what you choose
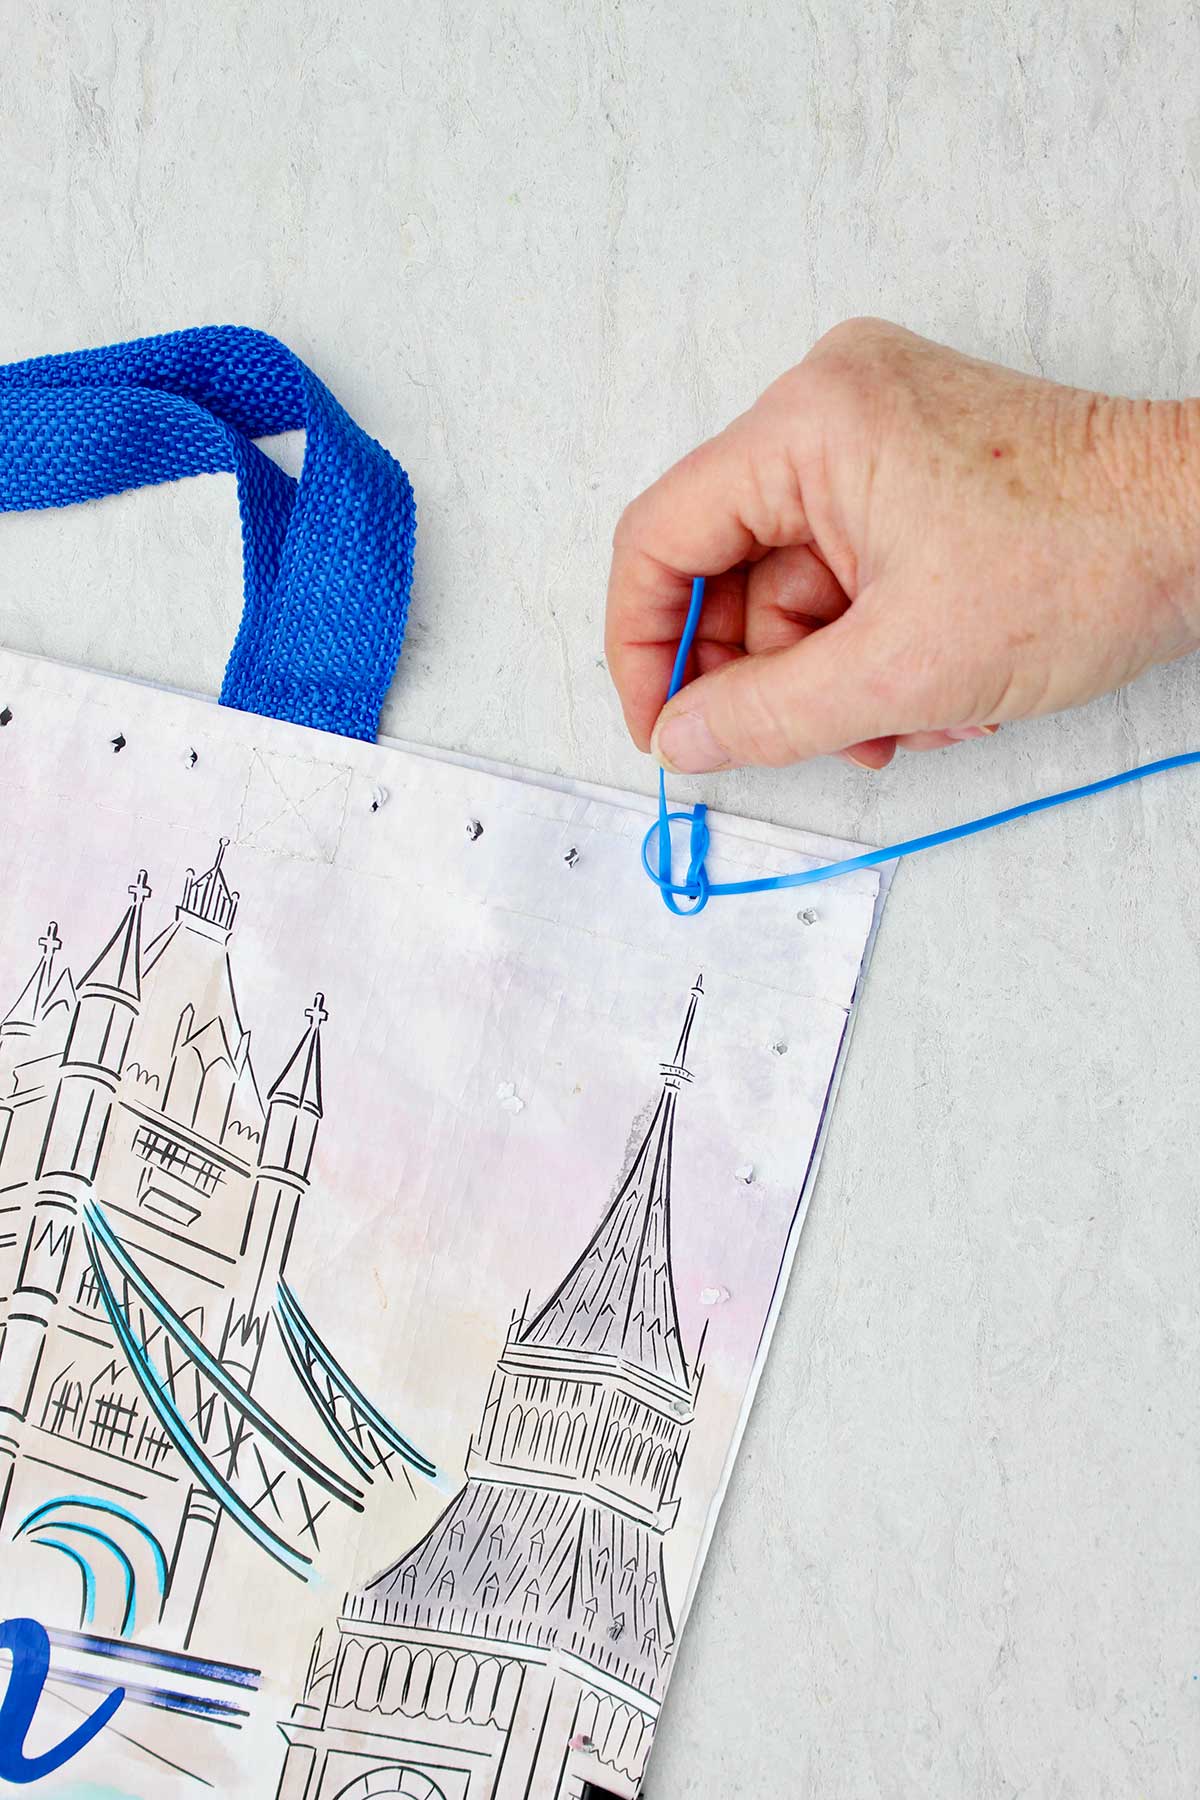
Beginning the Sewing with a Knot
Whenever we take a stitch on our reusable shopping bag, we will be going through both layers of the bag. So when I refer to a hole, I am talking about going through two layers of the material as if it is one hole.
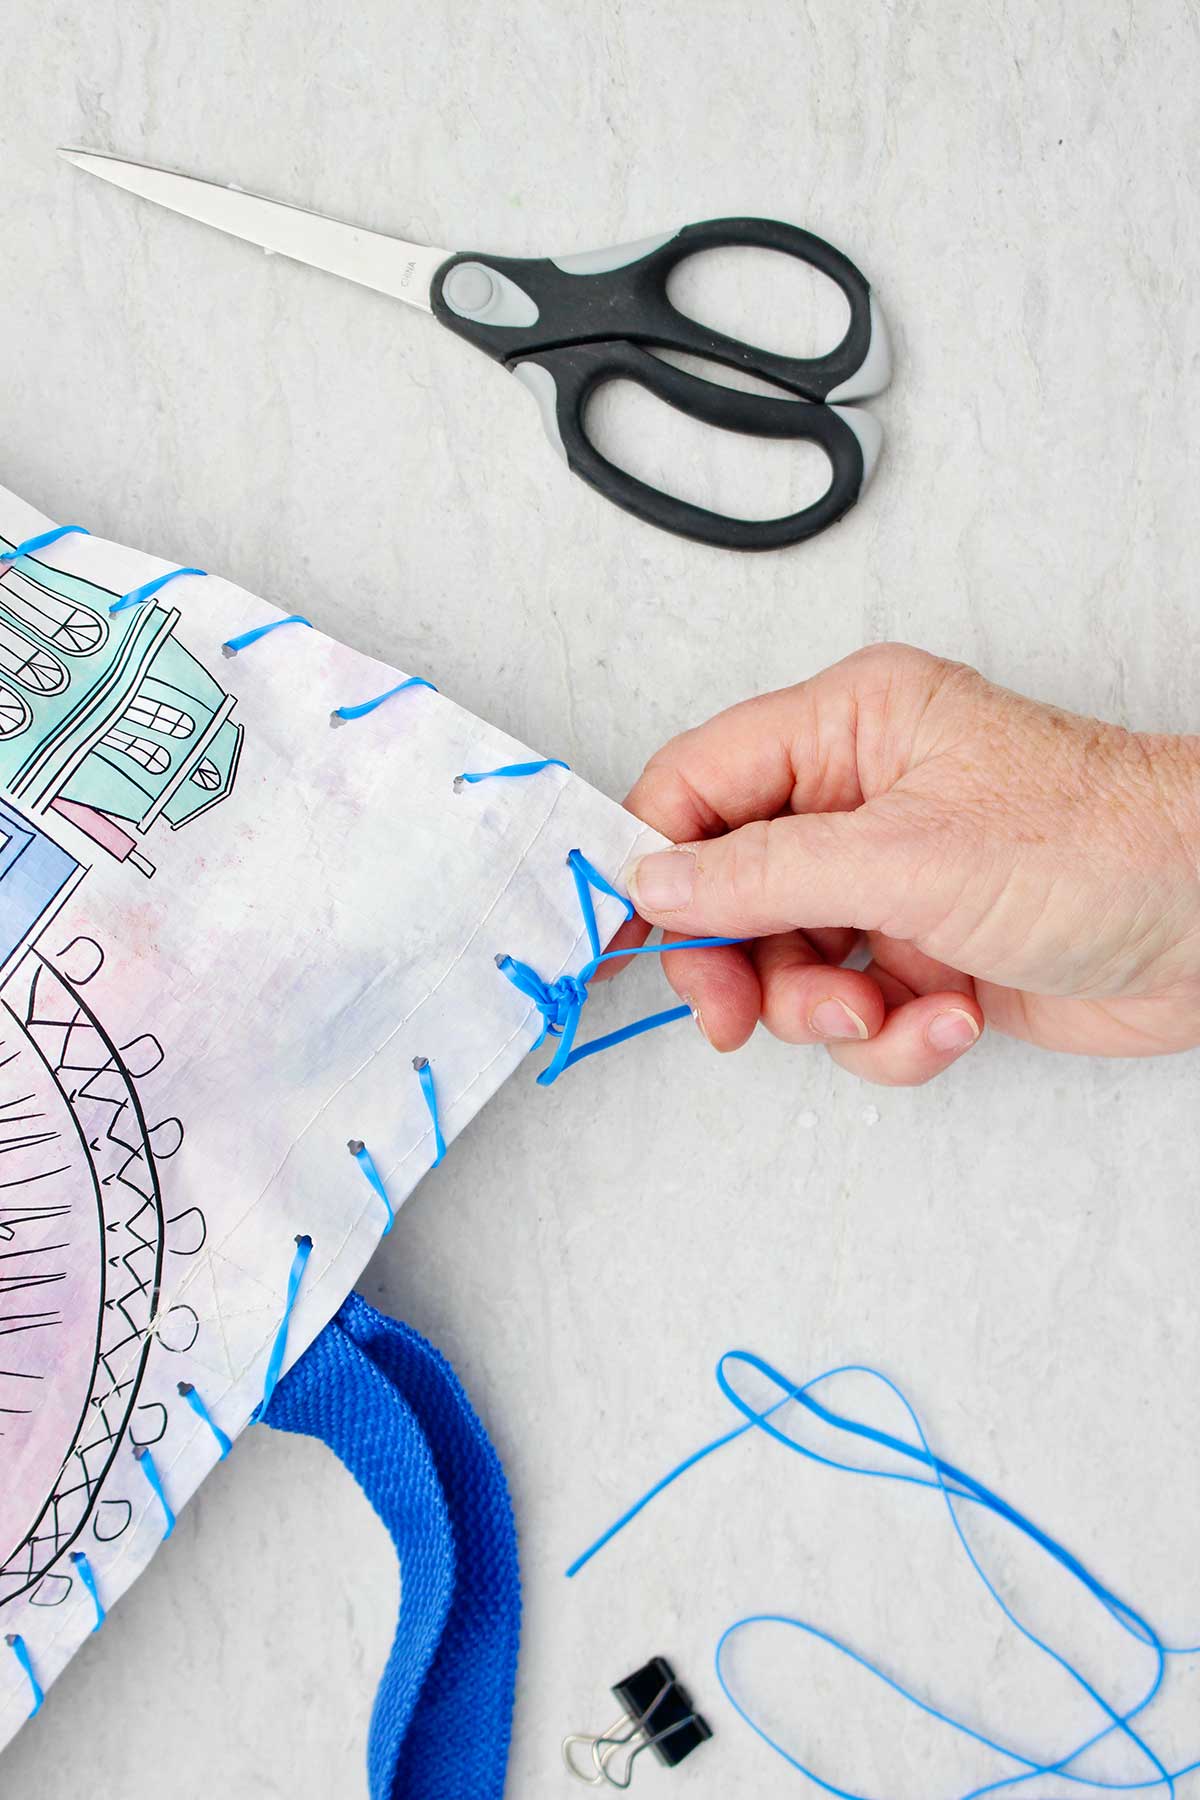
We are going to tie our string on the top handle edge of the bag, one hole from one end.
Pull your string through the hole and leave about a 3 inch tail. Tie a square knot through this hole with the string. Leave the dangling tail of the string because we will use it when we finish off the sewing.
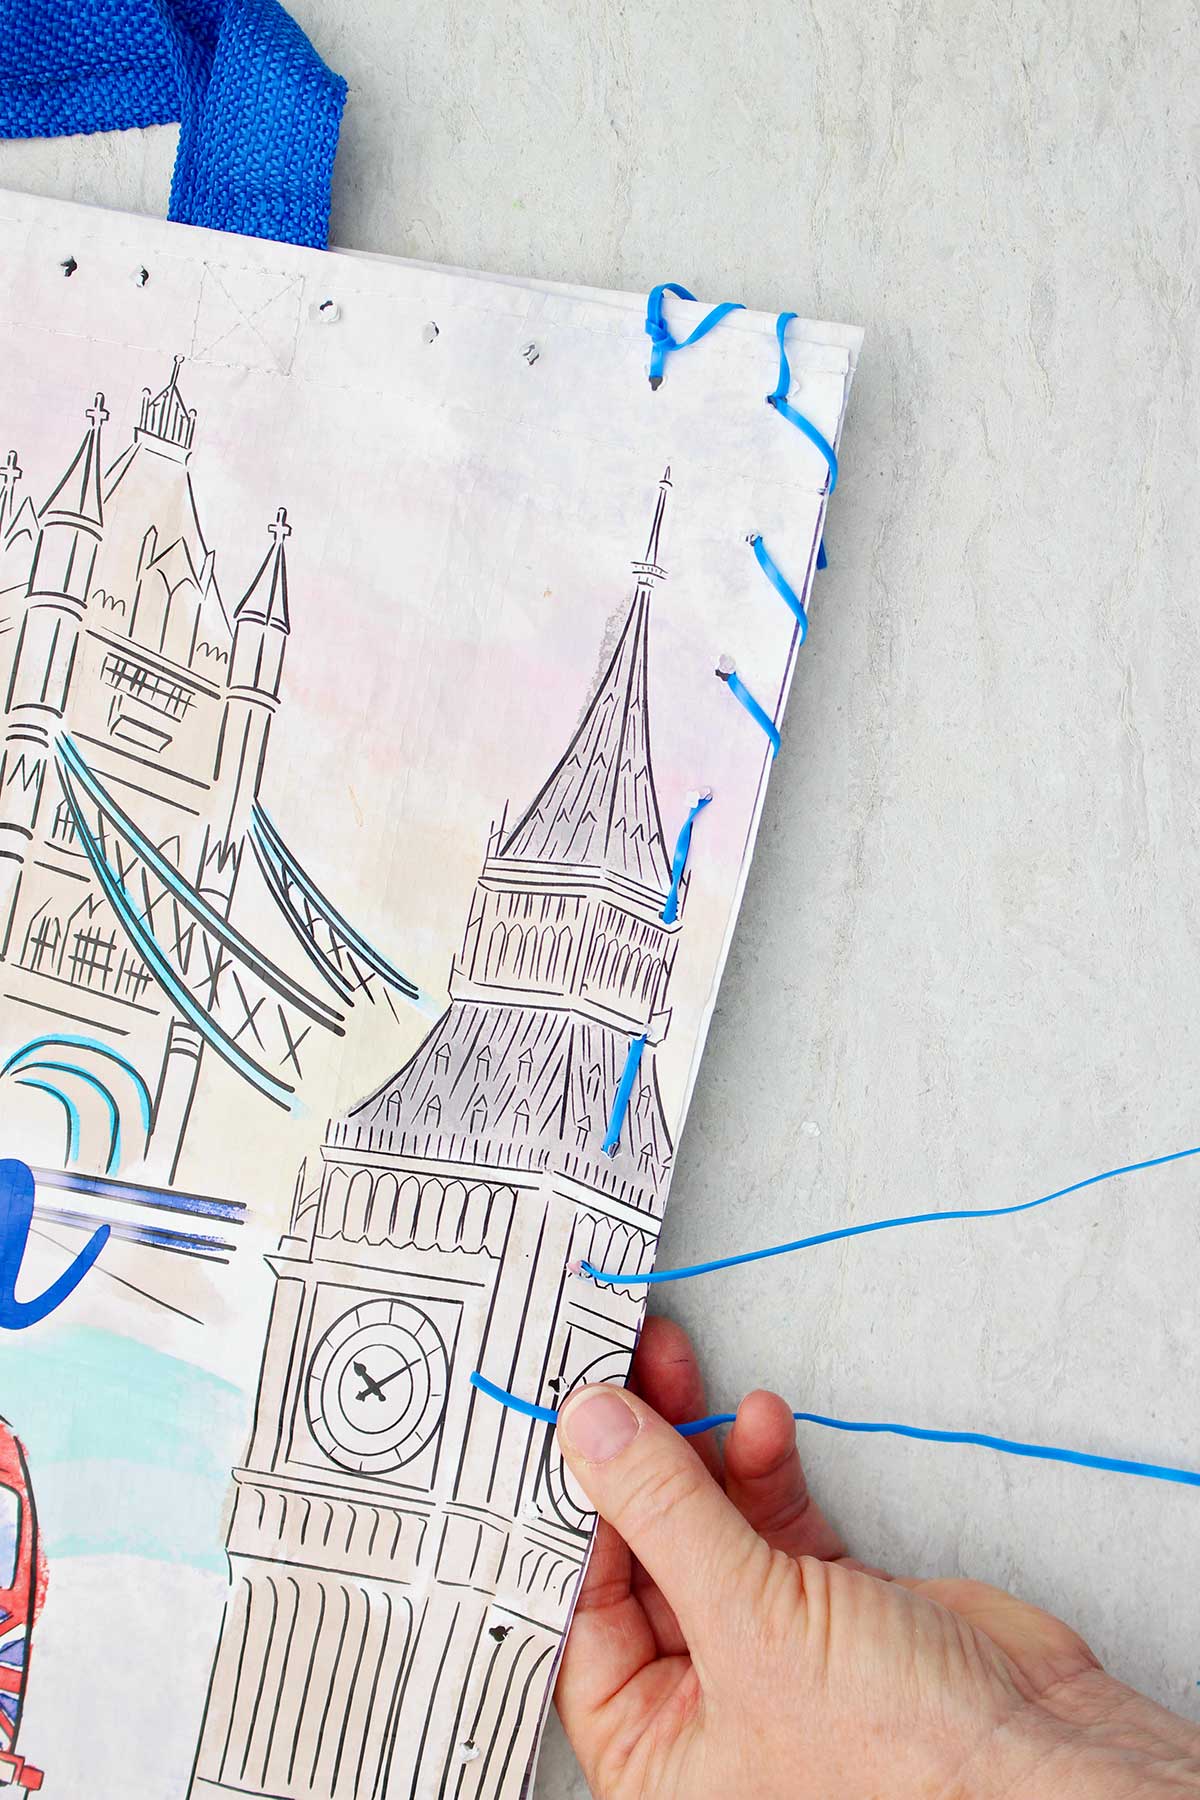
Whipstitch the edges of the reusable shopping bag
Begin your stitching and move around the corner going down the side of the bag.
When making the whipstitch, you always bring your plastic lacing or yarn needle to the back of the bag and come up through the hole. Pull all the string through that hole.
That may be the most frustrating part of this whole craft! The long string.
Encourage the kids not to worry too much if they get little knots or loops. Be sure to help them get them the knots out if they can though. We want to make learning to sew a good positive experience.
Once you’ve pulled the thread all the way through, take the string around to the back of the bag and coming up through the next hole. Pull the thread through.
Pull each stitch tight before making the next stitch.
Go all the way down the side of the bag, across the bottom of the bag, and then up the third side of the bag with the whipstitch.
When you come to a binder clip, just take it out off. It will no longer be needed after the bag is stitched together
If you run out of string, just cut another piece of string and tie it onto the end of the one that you finished off. Then keep sewing.
When you get back to the top edge of the bag, make one stitch in on the top edge of the bag.
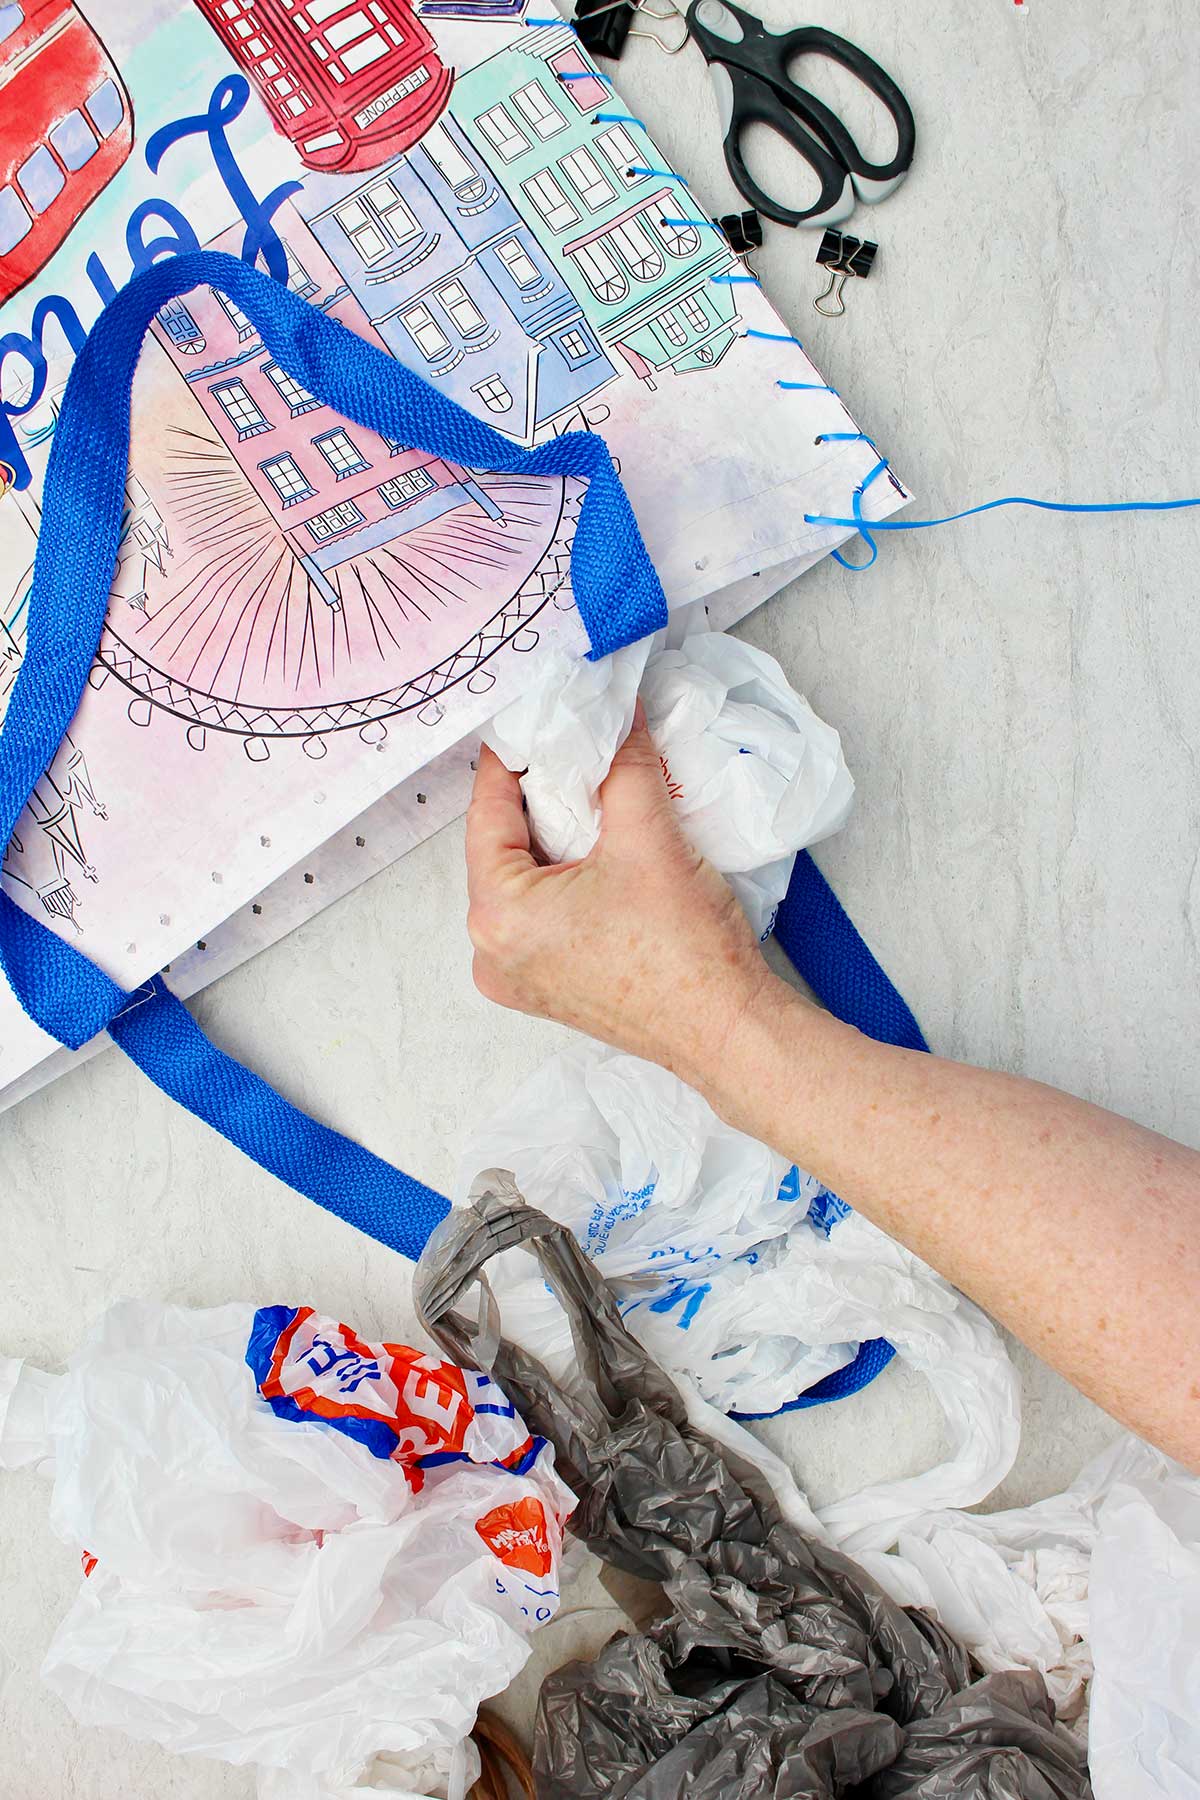
Filling the bag
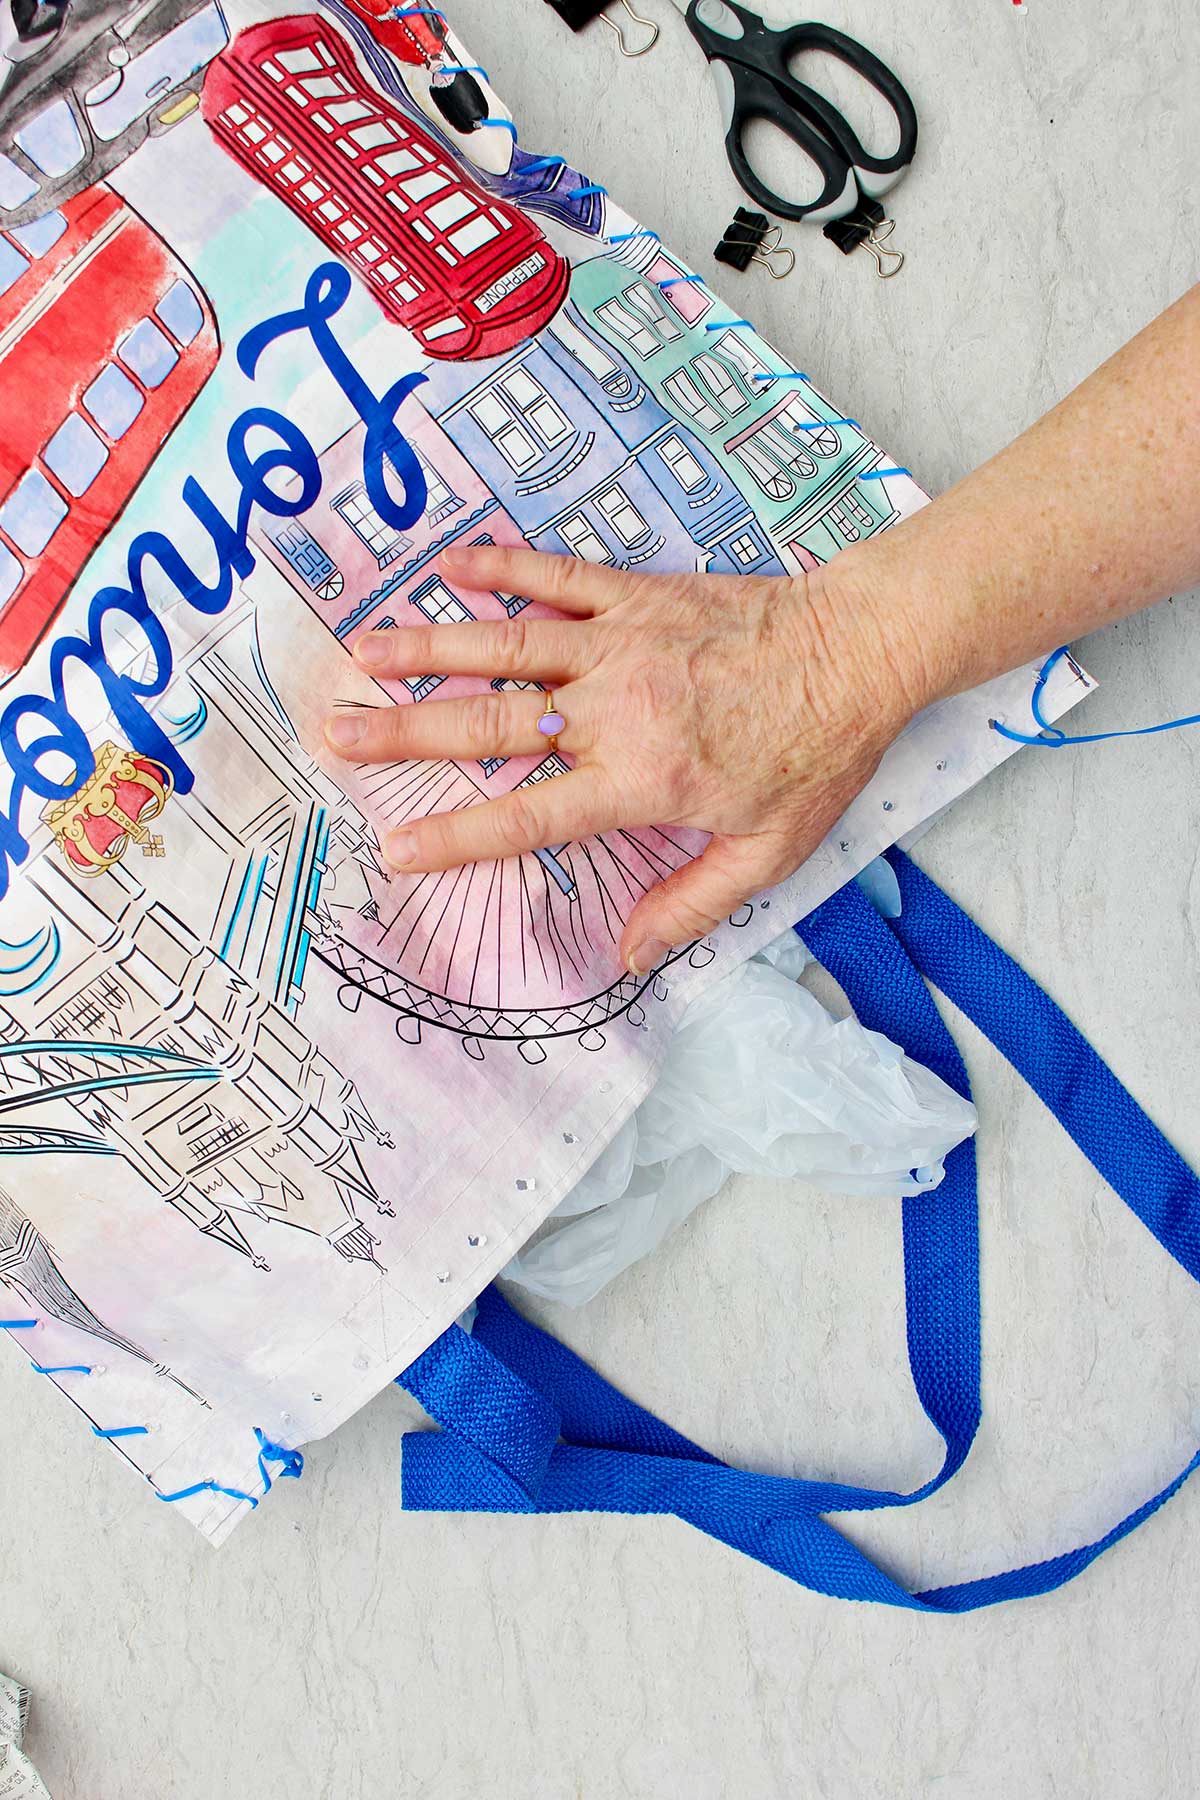
Before we sew the top edge of the reusable shopping bag, we are going to stuff it with a recyclable material (preferably).
When I was young, we used folded up newspaper inside our sit upon cushions.
Back then, everyone took the newspaper and had a lot of it sitting around the house. That was a wonderful way to recycle a newspaper.
We will need another option now because very few people take the newspaper any more.
I chose to use some of the plastic bags that come from the grocery store or discount store.
During Covid I accumulated a lot of the small plastic bags from my pick up orders. I am so happy to have a way to upcycle a bunch of them! This is a great way to do that.
Gently wad up your bags and stuff them into your reusable shopping bag.
Upcycle those old plastic bags!
It took quite a few bags to make the sit upon cushion fluffy. You might try pressing down on it to see how they compact before you are done stuffing.
Mine compacted down and was very flat on my first try. I added at least double the number of recycled bags before it had, more thickness to the stuffing.
That's another thing I love about this craft is it useless mostly recycled materials.
Note: No plastic bags to reuse? You can use polyfill stuffing (used in pillows), an old pillow, or a piece of foam.
Sew the fourth side of the DIY sit upon
When you are content with how thick and cushioned the bag is, you will finish sewing the fourth edge of the bag.
Continue your sewing stitch across the top of the bag where the handles are attached.
When you get to a handle, just go around the back and come up on the other side of the handle. Then continue your stitch just as you’ve done before.
Tie off the string
When you get back to where you tied the knot to begin your stitching, you are going to tie the ends of the strings together.
Use the tail that you left on your string and tie it to the other end of the string. Use a square knot (over under then under over). I made an extra knot in it just for good measure.
I didn’t think the plastic lacing would stay tied, but it does very well if you give it a good tug. It seems to stretch and then kind of spring back together and make a tight knot.
And that's it! You are finished with your DIY Sit-Upon Cushion from a Reusable Shopping Bag!
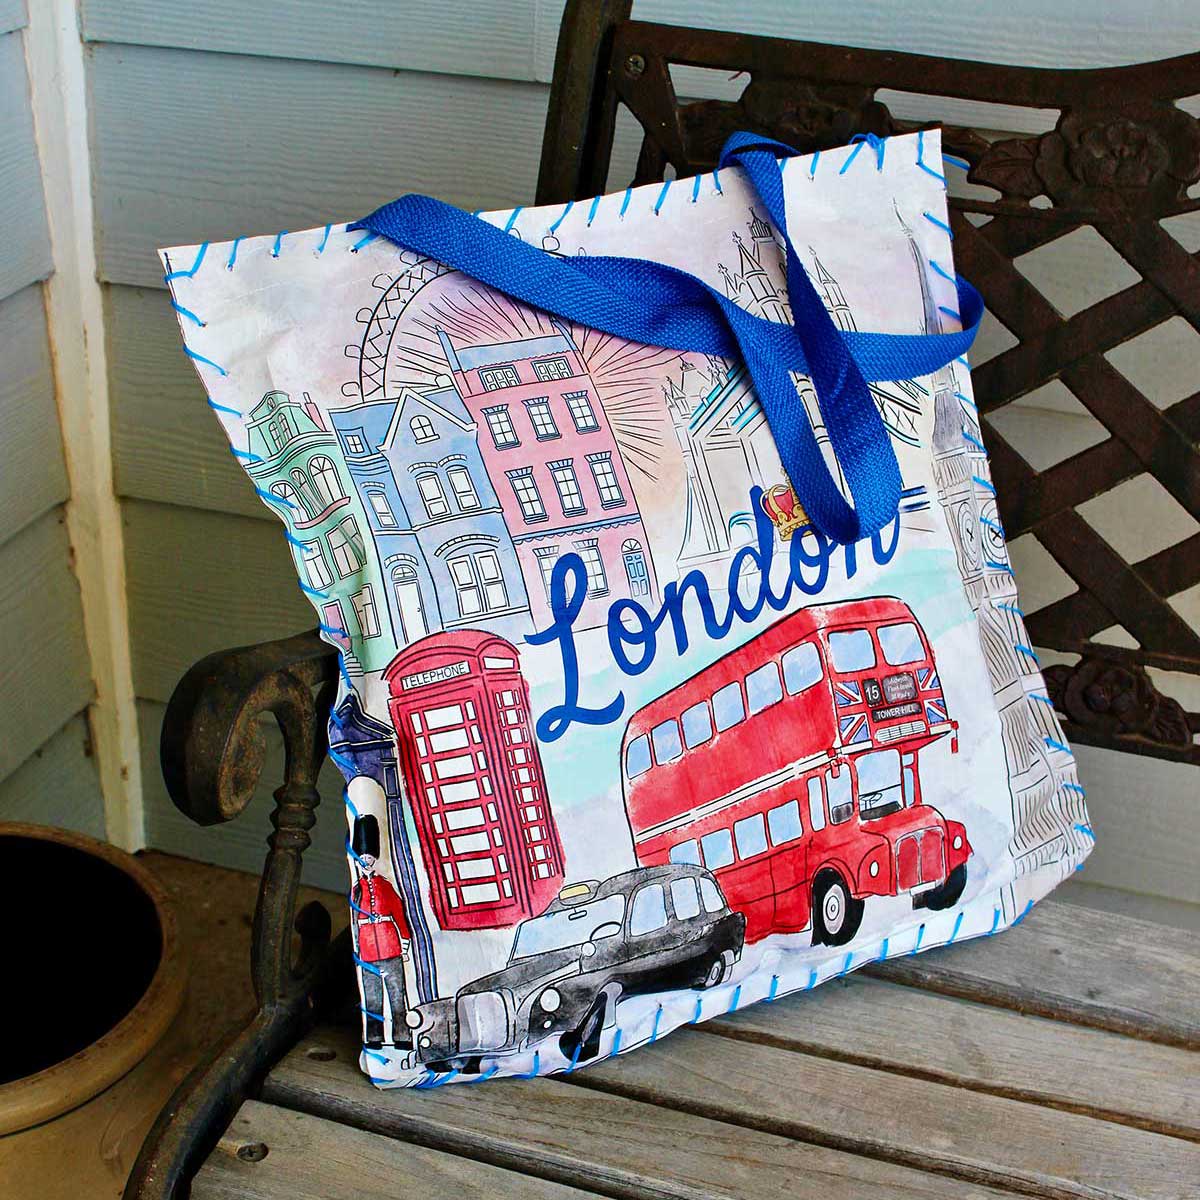
Porch Pillow Sit-Upon
I’ve seen some people use these for cushions on their outdoor furniture. They’re a bit crinkly sounding, but they do work.
I don’t know how well they will last out in the sun though. The design may fade pretty quickly, but that’s true of almost any fabric outdoors.
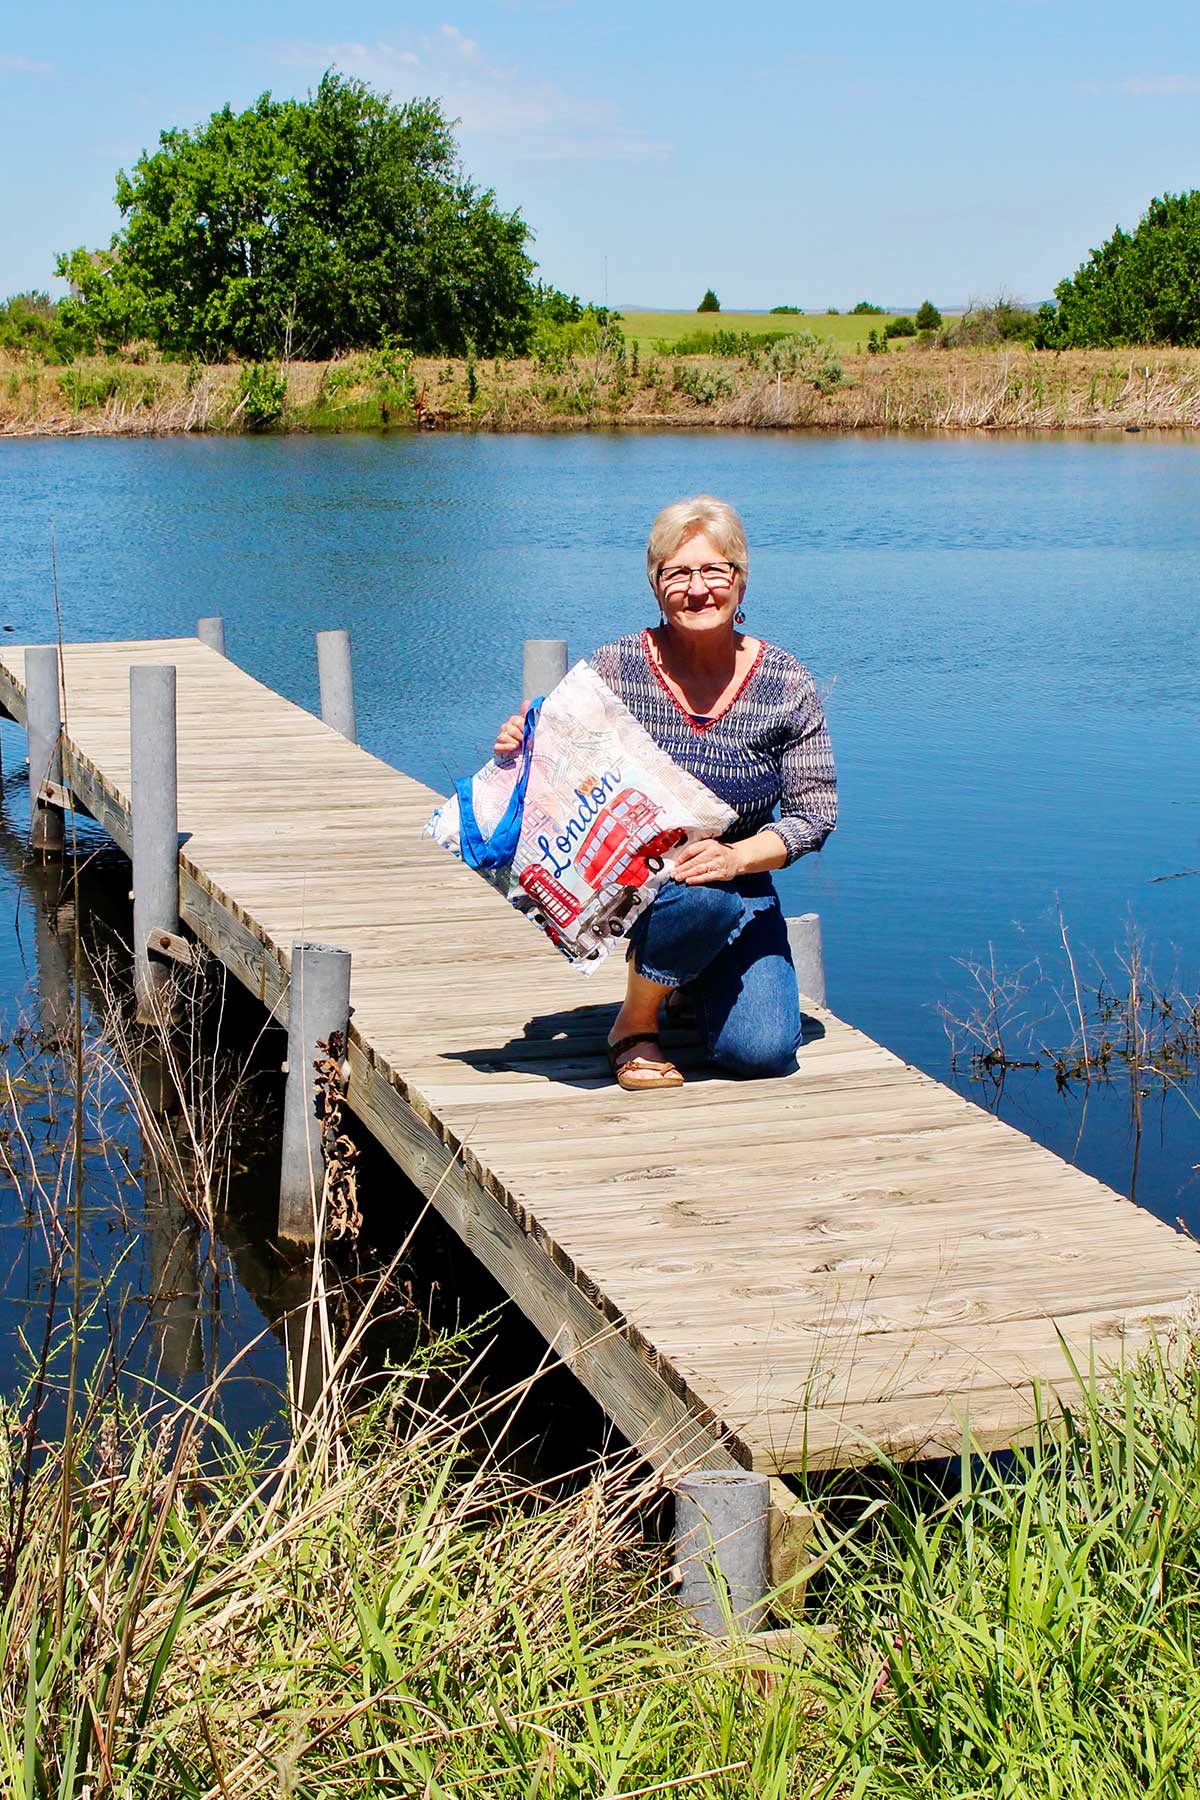
With the handles on your sit upon, you can easily grab it and head out on your hike. My handles are long enough where it fits over the shoulder like a shoulder strap.
Other Purposes for the Outdoor Sit-Upon
A sit-upon would be good in the regular classroom. Use it to sit on the floor for any activity.
This would also be good for gardening. Kneel on it or sit on as you pull weeds in the flower bed.
In our area we have chiggers. Hopefully the sit upon cushion will prevent some chiggers from biting you!
Sitting on a cushion also creates a dry place to sit. It will keep dampness away from your clothing.
I hope you enjoy making your DIY Sit-Upon Cushion from a Reusable Shopping Bag and also enjoy using it when you’re outdoors.
Again, if you would like to follow along and make this craft with me there is a full length tutorial video found at: Make a Sit-upon Cushion from a Reusable Shopping Bag Full Length Video.
When I was a young girl, I was in Brownies and Girl Scouts and a sit-upon cushion was a project that we made at one of our meetings. We stitched a simple cushion together as a troop, then we used it on an outing so that we would have something to sit upon - thus the name!
This DIY sit upon is made out of a reusable shopping bag so it's sturdy and waterproof! Stuff with upcycled grocery bags to create a cushion, then sitch together the sides. It's perfect for grabbing and taking outside for camping or a picnic!
Want More Easy-to-Sew Craft Ideas?
If you would like more simple sewing projects that help kids learn to sew, check out these fun crafts from around the blog:
- How to Make a T-Shirt Tote Bag
- DIY Hand Embroidered Cards
- DIY Upcycled Jeans Pocket Purse
- How to Make a Scrunchie
- Easy Sew DIY Fleece Hat
Enjoy!
If you try this craft, let me know! Go ahead and leave a comment, rate it, and tag a photo with #WelcometoNanas wherever you post.
Come join the fun at https://welcometonanas.com
Supplies for the DIY Sit-Upon Cushion:
- Reusable shopping bag- large size, vinyl material OR vinyl tablecloth
- Permanent marker
- Ruler
- Scissors
- Hole punch
- Binder clips
- Plastic bags from shopping (throw away type) or other plastic to use as stuffing
- String, yarn, or plastic lacing
- Yarn needles (blunt ends, large eye)
DIY Sit-Upon Cushion from a Reusable Shopping Bag
Equipment
- Ruler
- Hole punch
- Binder clips
- Scissors
Items Required
- Reusable shopping bag- large size, vinyl material OR vinyl tablecloth
- Permanent marker
- Ruler
- Hole punch
- Scissors
- Binder clips
- Plastic bags from shopping (throw away type) or other plastic to use as stuffing
- String, yarn, or plastic lacing
- Yarn needles (blunt ends, large eye)
Instructions
- We want to make our sit upon as large as possible. My bag allow me to make a 17 x 17“ square. That is a good size. Make it larger if you want. But don’t go too much smaller.Use a ruler and use a permanent marker to draw lines on the three sides of the bag that do not have handles. Draw them as close to the seamed edges of the bag as possible.
- Cut along the lines that you just drew.Remember, do not cut the edge of the reusable shopping bag with the handle on it.This will cut off the sides of the bag and leave only the front and back of the bag. So don’t be surprised when that happens. 🙂Use a binder clip on each of the four sides of the bag. This will hold it together nicely while you do the next couple steps.
- Use a hole punch to punch all the way around all four edges of the bag.Make the holes about 1 inch apart and about ¾ of an inch from the edge of the bag. Do your best to get a hole in each corner- ¾ inch from both edges of that corner.
- Cut a piece of your plastic string, yarn, or string that’s at least twice the distance around your bag. If you need to use a yarn needle, go ahead and thread the needle.
- We are going to tie our string on the top handle edge of the bag, one hole from one end.Pull your string through the hole and leave about a 3 inch tail. Tie a square knot through this hole with the string. Leave the dangling tail of the string because we will use it when we finish off the sewing.
- Begin your stitching and move around the corner going down the side of the bag.When making the whipstitch, you always bring your plastic lacing or yarn needle to the back of the bag and come up through the hole. Pull all the string through that hole. Once you’ve pulled the thread all the way through, take the string around to the back of the bag and coming up through the next hole. Pull the thread through.Pull each stitch tight before making the next stitch.Go all the way down the side of the bag, across the bottom of the bag, and then up the third side of the bag with the whipstitch.When you come to a binder clip, just take it out off. It will no longer be needed after the bag is stitched togetherIf you run out of string, just cut another piece of string and tie it onto the end of the one that you finished off. Then keep sewing.When you get back to the top edge of the bag, make one stitch in on the top edge of the bag.
- Before we sew the top edge of the reusable shopping bag, we are going to stuff it with a recyclable material (preferably).When I was young, we used folded up newspaper inside our sit upon cushions.We will need another option now because very few people take the newspaper any more.I chose to use some of the plastic bags that come from the grocery store or discount store. Gently wad up your bags and stuff them into your reusable shopping bag.When you are content with how thick and cushioned the bag is, you will finish sewing the fourth edge of the bag.
- Continue your sewing stitch across the top of the bag where the handles are attached.When you get to a handle, just go around the back and come up on the other side of the handle. Then continue your stitch just as you’ve done before.
- When you get back to where you tied the knot to begin your stitching, you are going to tie the ends of the strings together.Use the tail that you left on your string and tie it to the other end of the string. Use a square knot (over under then under over). I made an extra knot in it just for good measure.Good job!!


nature home says
What a creative idea! Turning a reusable shopping bag into a sit-upon cushion is such a smart way to reuse and upcycle. I love that it’s simple enough for kids to make and perfect for outdoor trips.
It’s inspiring to see how versatile a shopper bag can be — not just for groceries, but also for DIY projects like this. For anyone looking for sustainable and practical shopping Taschen or shopper Damen bags that can be reused in creative ways, I found some great options here: https://naturehome.com/