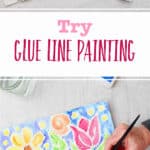
Let’s try glue line painting today! This is a fun technique that involves drawing plus introduces us to watercolor and watercolor wash.
Try Glue Line Painting- glue lines & watercolor wash
This art project is a good one for school age kids and bigger kids too, of course!
We will make a simple drawing on watercolor paper, trace over our drawing with glue, and let it dry. Then we'll do a watercolor wash on the watercolor paper between those glue lines. I'm getting excited!
If you would like to follow along with me as I do my glue line painting, there is a full length tutorial found at this link: Glue Line Painting Full Length Tutorial.
Wanting to learn about watercolor painting?
Watercolor tends to be a medium that causes people to be a little hesitant at trying it. And that makes sense as it’s water and kind of runs around on the paper!
I’m hopeful that this simple glue line painting will be a great introduction for the young artists, and will also build confidence in the rest of us! Plus, it is so fun to experiment with allowing the colors to run together in the areas that will have wet.
Use watercolor paper
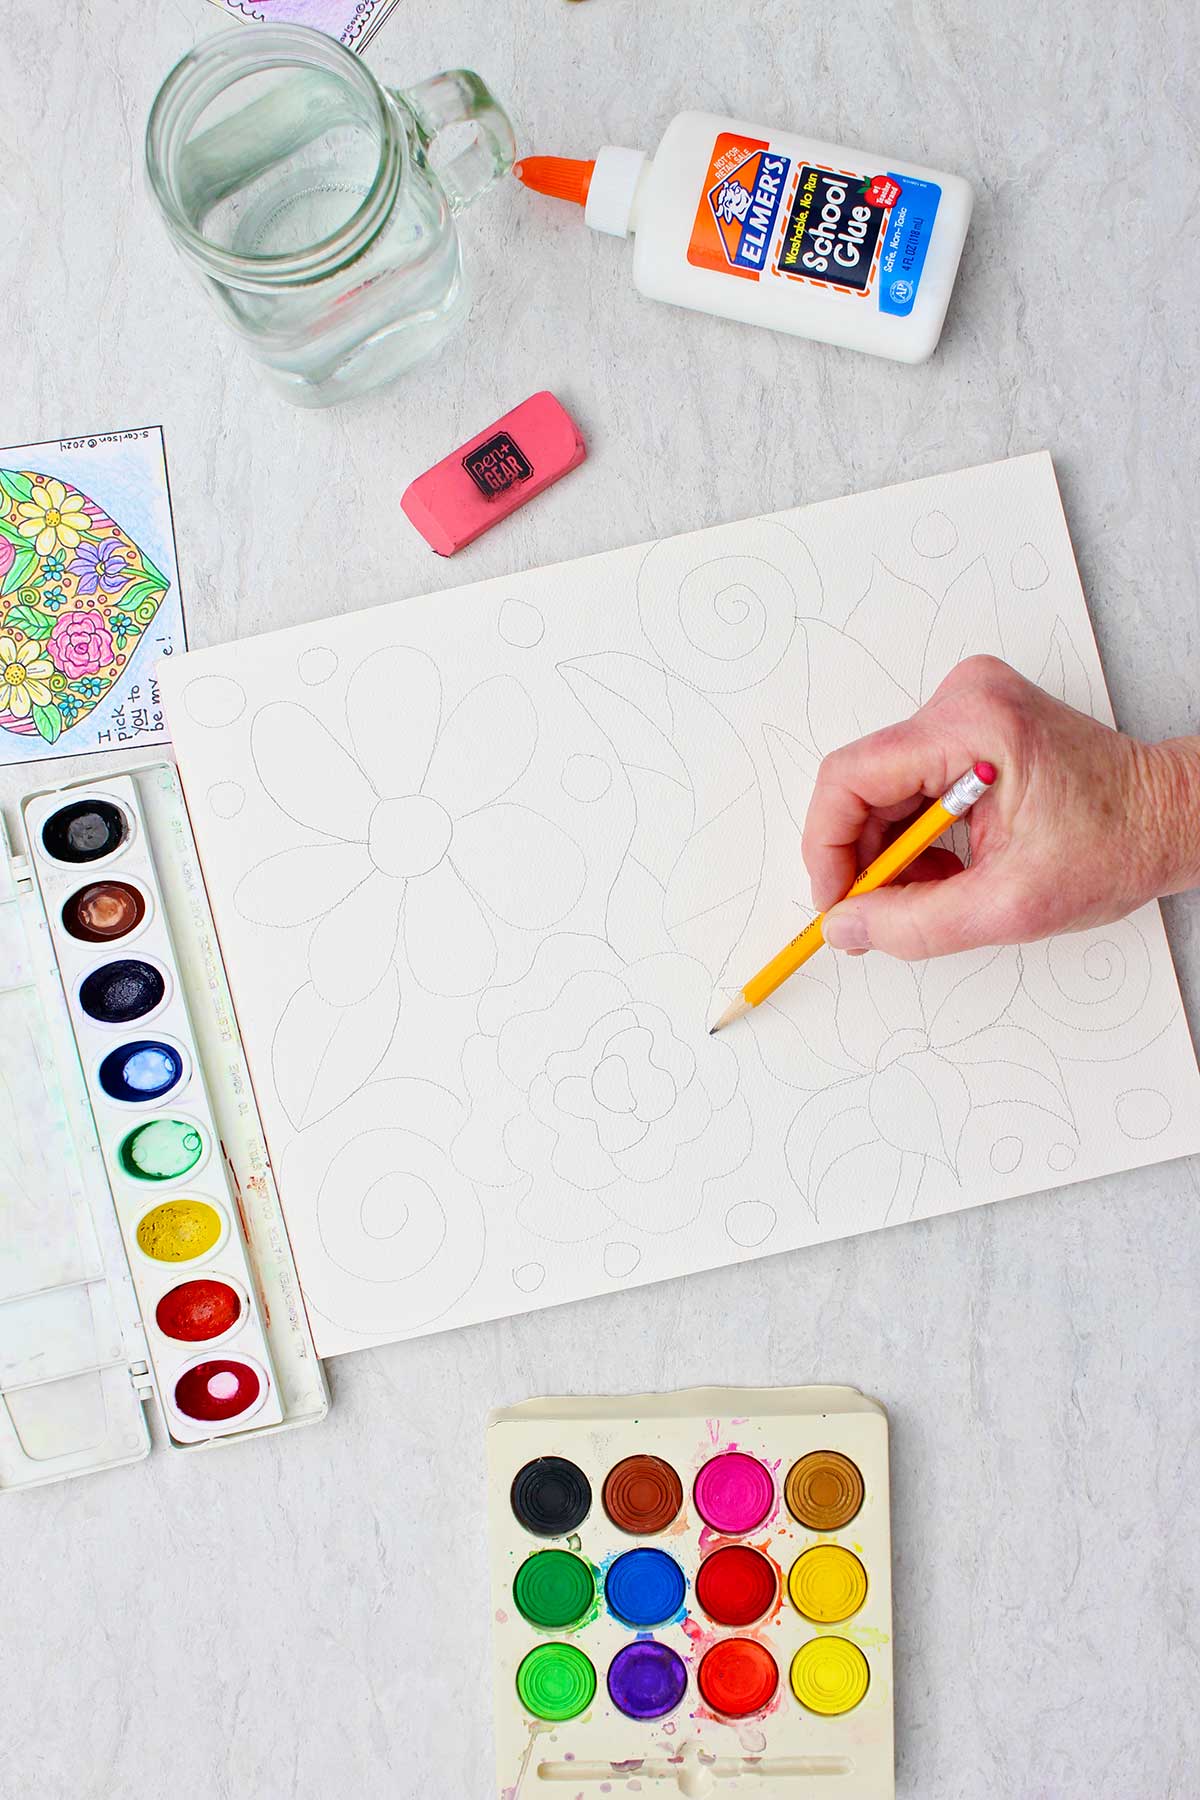
We are going to make a simple drawing on watercolor paper. It’s important that it’s watercolor paper because we will be getting the surface wet. Watercolor paper is thicker and made to standup to having water on it.
Typical drawing and copy paper will wrinkles more and and tends to shred when it gets wet.
Let’s start with our drawing
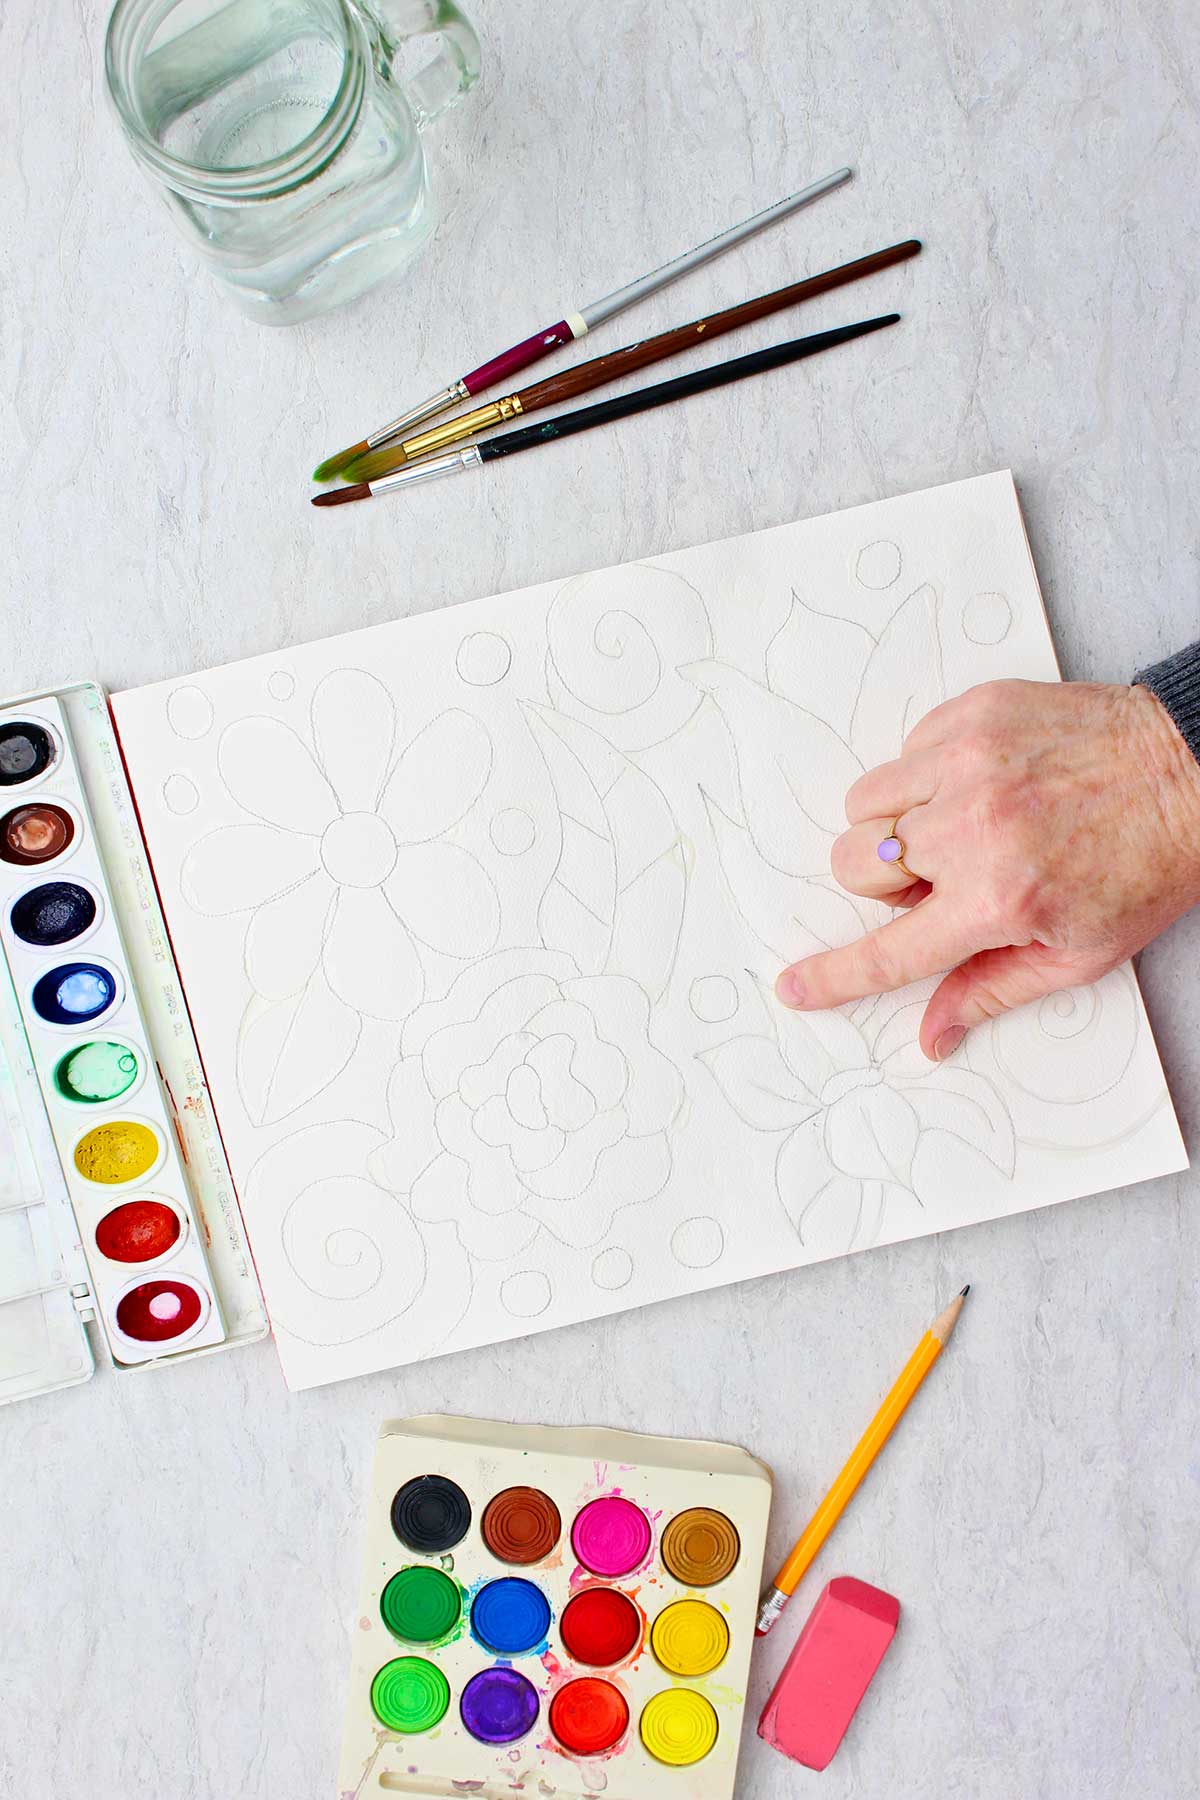
The drawing that we’re going to make to will be a simple drawing with lines that are not too close together. We need to leave some room between the pencil lines so that we can do the watercolor wash in the open paper areas.
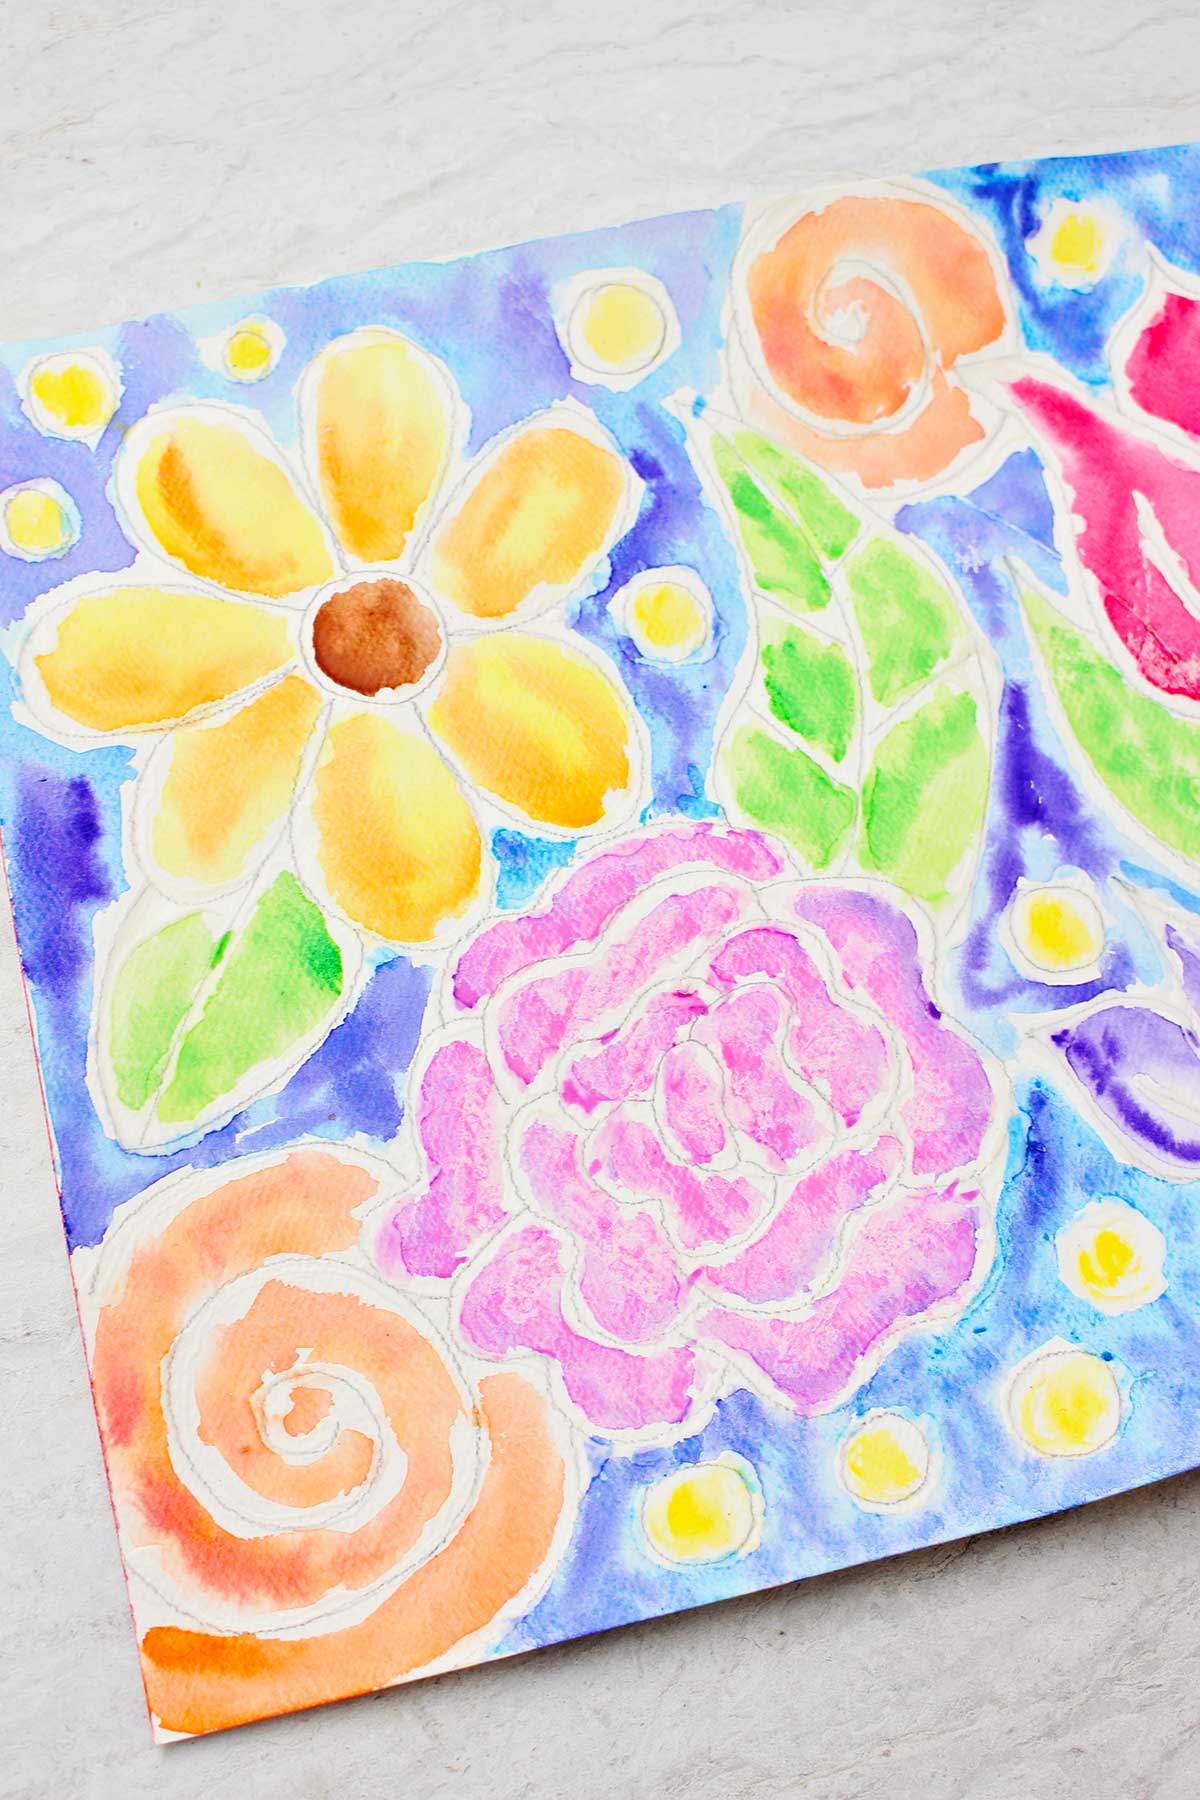
You can see in my drawing I chose to do a floral design. But of course you may choose any type of drawing that you would like. You could draw dinosaurs, leaves, the solar system, an animal (like your cat or dog), a superhero, etc.
Size of the drawing
I will say that the larger flowers worked better in my drawing than the smaller flowers, such as the rose. The spaces in the rose got a bit small.
If I had just chosen to do one large rose drawing on my paper, it would’ve worked well, but the one that I did, put my glue lines a bit too close together. So you can learn from me going ahead of you!
Pencil lines show...
Your pencil lines will show through the glue, so remember that as you draw and perhaps make the lines lighter. You could also choose to use colored pencil if you would like.
Are you pleased with your drawing? If so, we can go onto the next step!
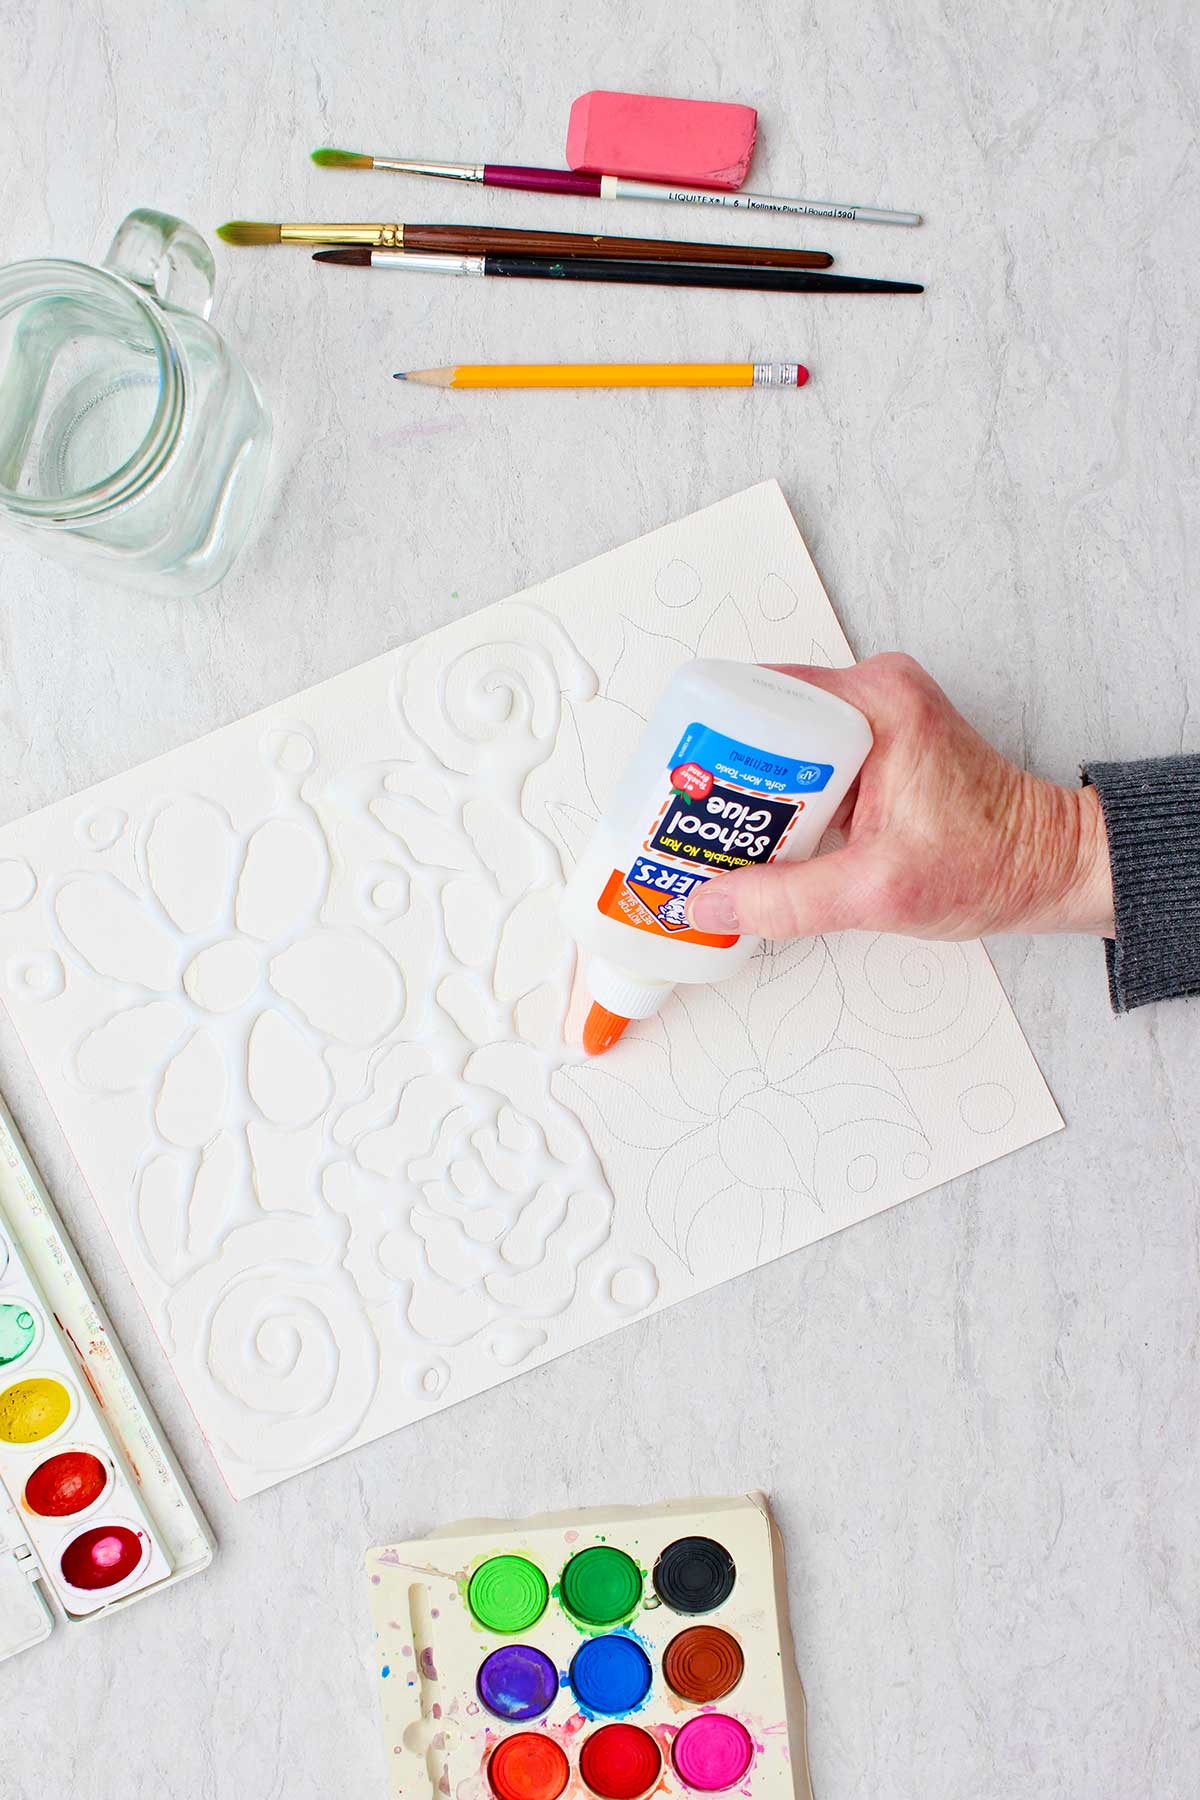
Time to add some glue
Glue over the drawing
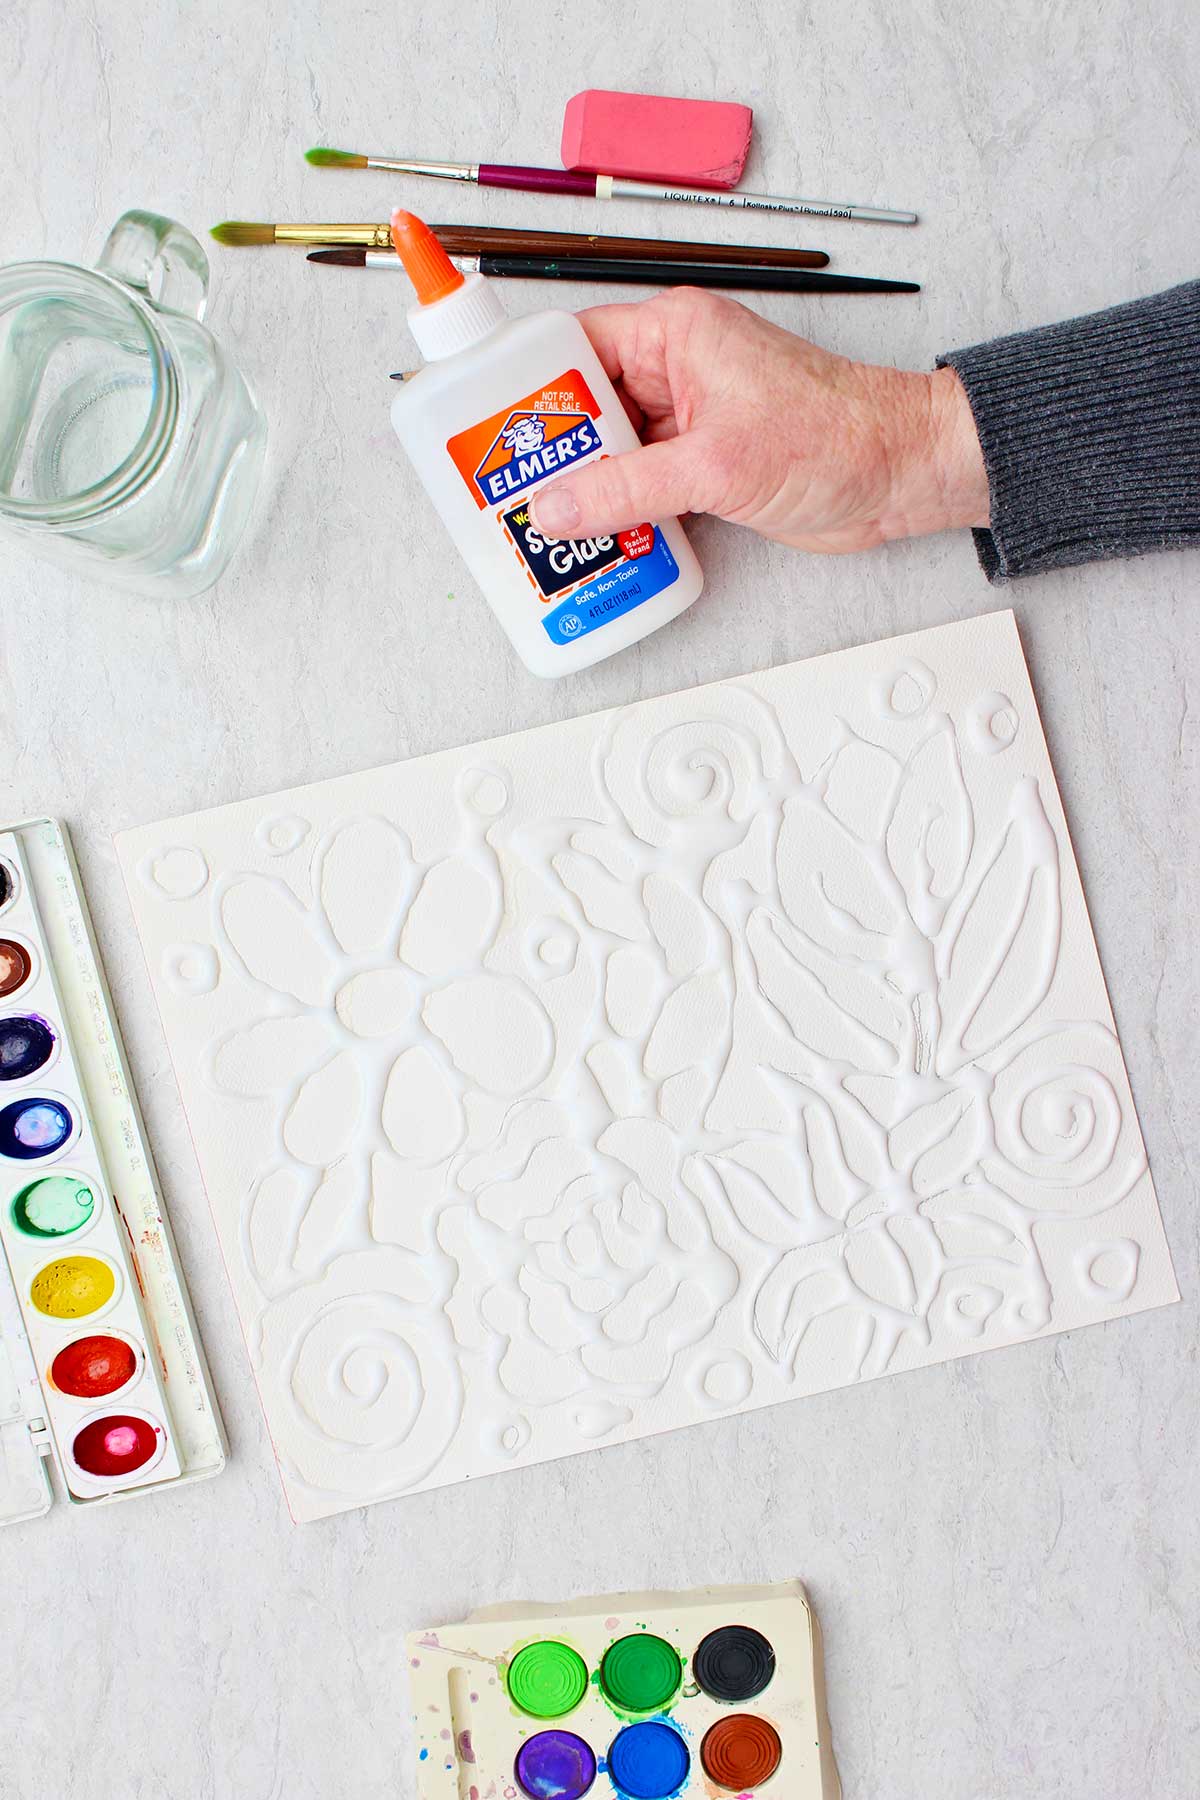
For this glue drawing, you will use regular school glue or tacky glue. It can be white glue or clear glue and will dry pretty clear. Of course a glue stick will not work. The glue will dry to be a raised line which is cool.
Practice your glue lines
Open the top of your glue, and practice making a glue line on an extra piece of paper.
You’re wanting to be able to squeeze the glue and draw a line of glue that is fairly even in size and flows in a continuous stream. This will never work perfectly, but practicing does help a bit.
We’re trying to avoid big blobs of glue or the glue getting to be a really skinny line.
Note: It’s OK if you go back and go over lines that are smaller than you want them. And if you get some glue blobs (you’ll see on my picture that I did too) don’t worry, they’ll just become part of the drawing! The blobs or puddles of glue happen primarily at the glue joints, where two glue lines meet.
Experiment until you've got it
Experiment with how you hold the glue bottle, the slant of the bottle, how hard you squeeze, and how the tip of the glue bottle touches the paper.
When you’re happy with how you are doing, you can start on your actual drawing on paper.
Where do I start making the glue lines?
If you’re right handed, start in the upper left corner of your drawing and work down to the lower right corner.
The reason for this is you do not want to drag your hand through the glue lines that you make. So if you start at the bottom and have to reach over what you’ve already done, it’s very likely that you will drag your hand in that glue and ruin your drawing.
If you are left-handed, you will start in the upper right corner and work downward to the lower left corner for the same reason.
Ask me how I know that glue smears :-). Anything I warn you about is because I've done it before! Ha!
Draw over each pencil line with glue
Take your time and go over every pencil line that you have drawn carefully with your glue. Try to keep your glue running smoothly and take a little time to go back over the lines that are too small. It’s pretty fun, isn’t it?
I added a few glue dots or I should call them circles in a few areas for fun. Wait till you see how they turn out when painted. It is part of my favorite part of the painting.
Let your glue dry
Next you will need some patience because you have to let your drawing dry. I had to let mine sit for at least 10 hours.
I would recommend setting your Glue Line Drawing someplace safe and coming back the next day to do the watercolor wash step.
If this is an activity you are doing as a project, like in a school room or a class, this will need to be done in two sessions. It takes a long time to dry obviously, especially those areas that kind of puddle up a little bit.
The watercolor wash
Were you patient? Good! I think this next step is also so much fun!
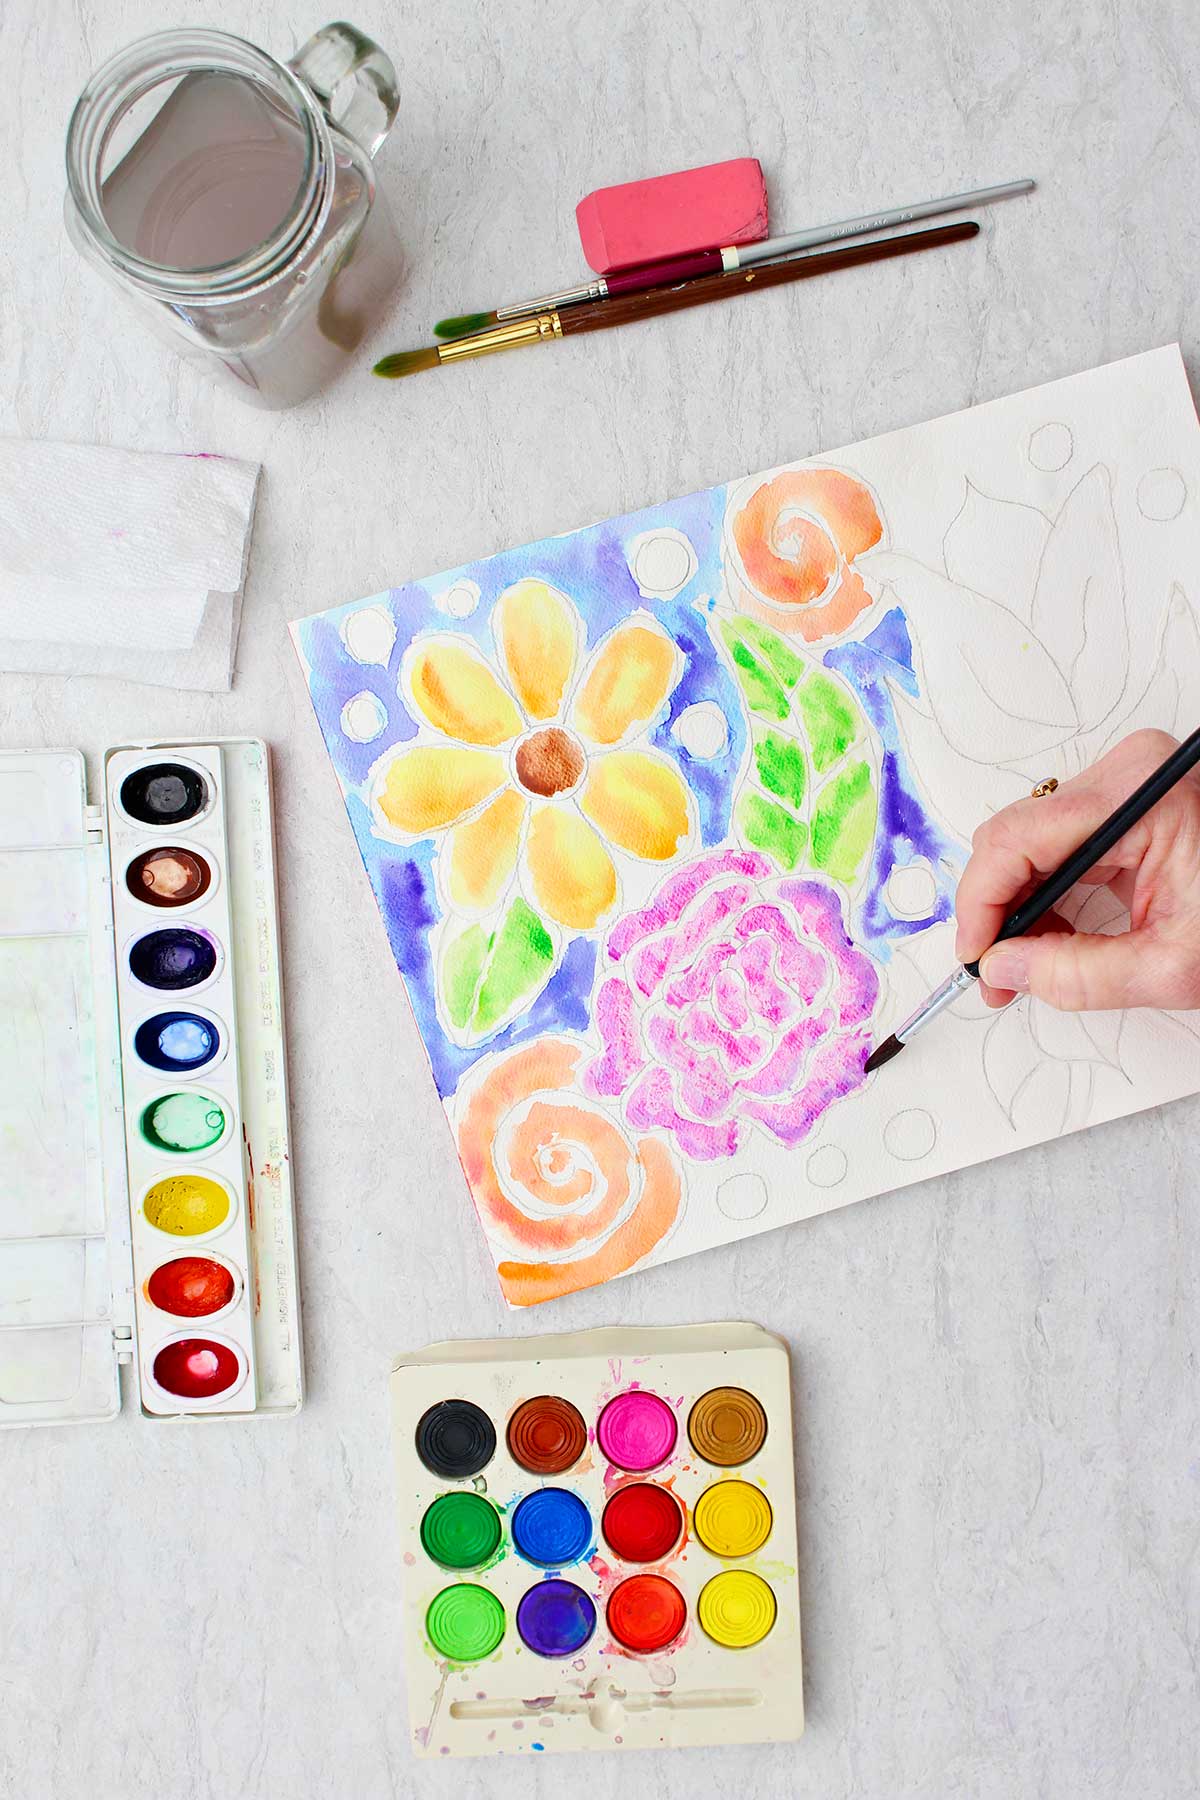
We are going to do what is called a watercolor wash in between the glue lines.
What is a watercolor wash?
A watercolor wash is a wet on wet technique with watercolor. We are going to add some water onto a section of paper between the glue lines and then add some wet color into that water.
Thus, it is wet on wet! Now you know why we used watercolor paper!!
Note: You just need to wet the paper. You don’t need to make large puddles of water. We’re going to try to leave the glue areas as our boundaries and not paint over them. So think of this kind of like a coloring book where you are doing your watercolor between the lines.
Supplies for the watercolor wash
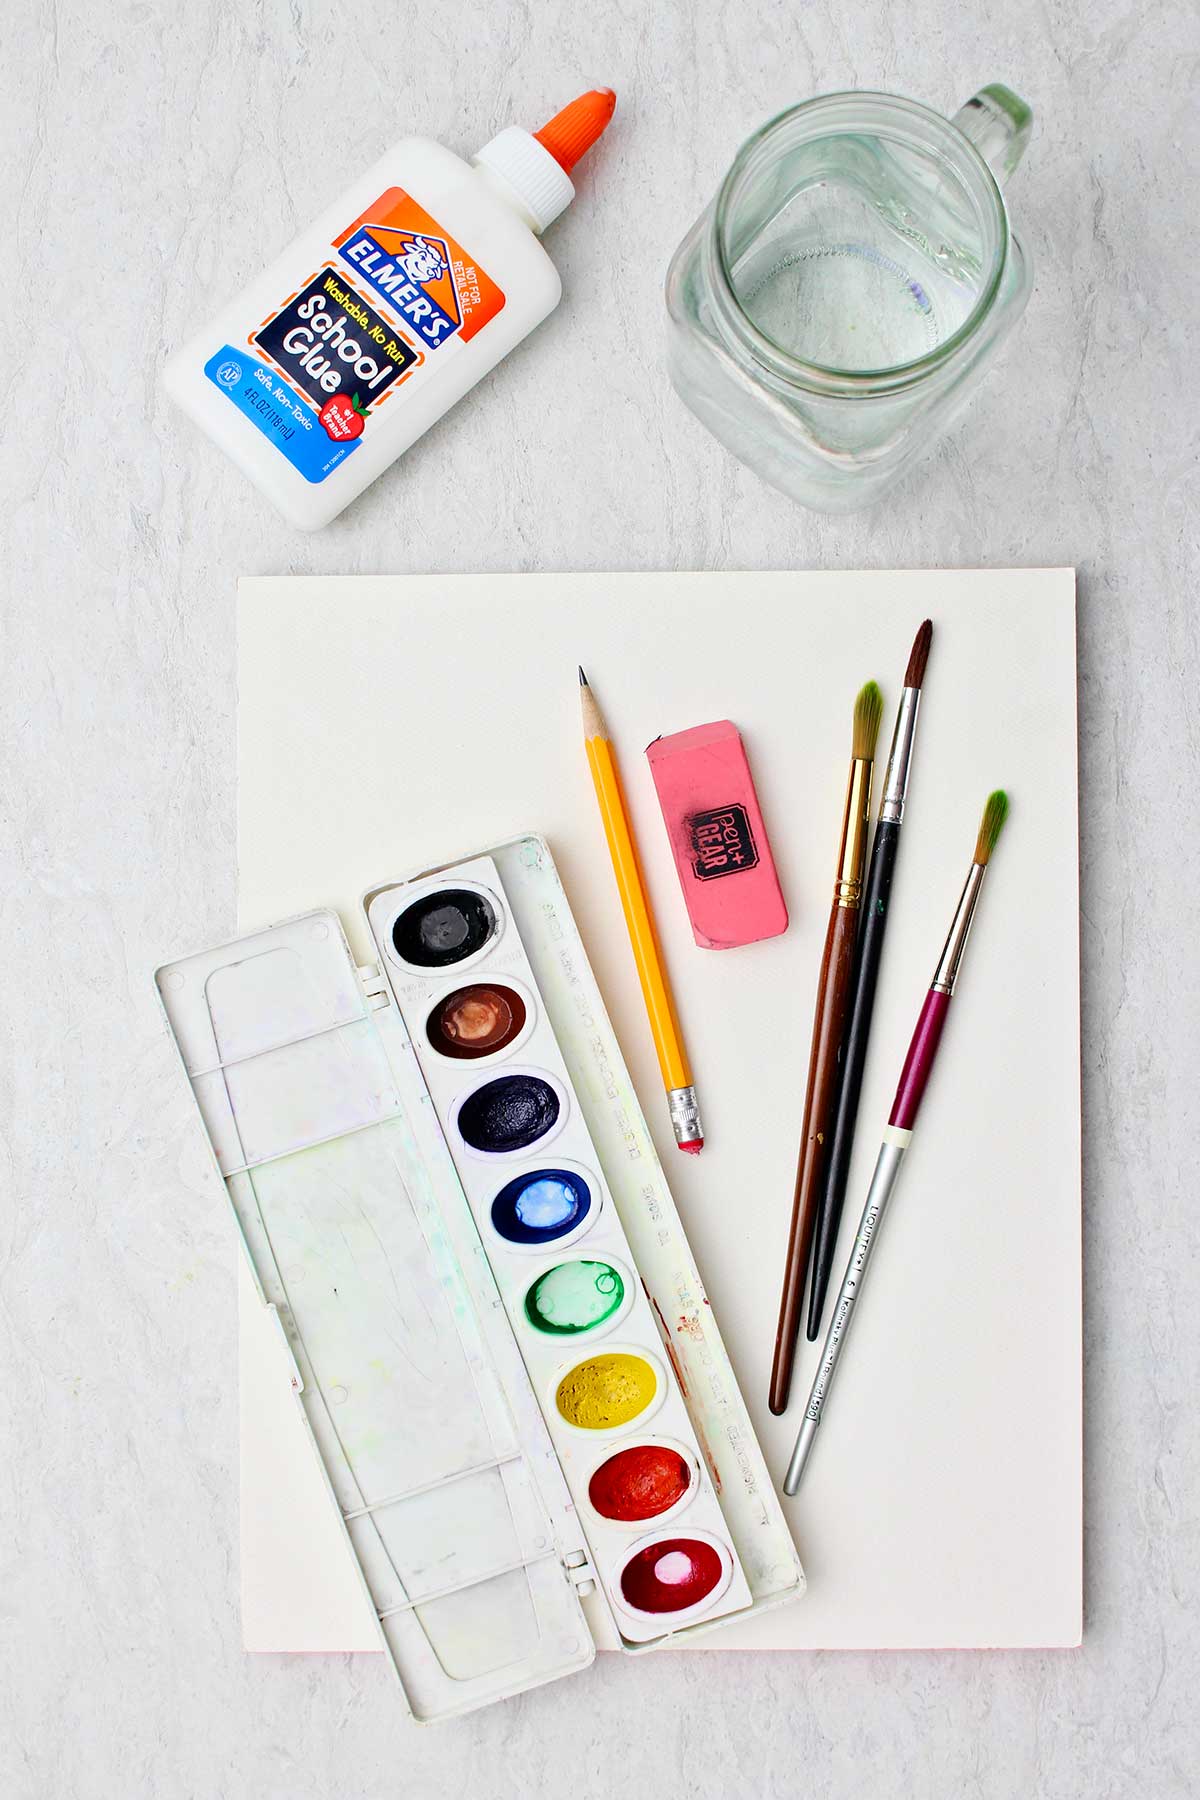
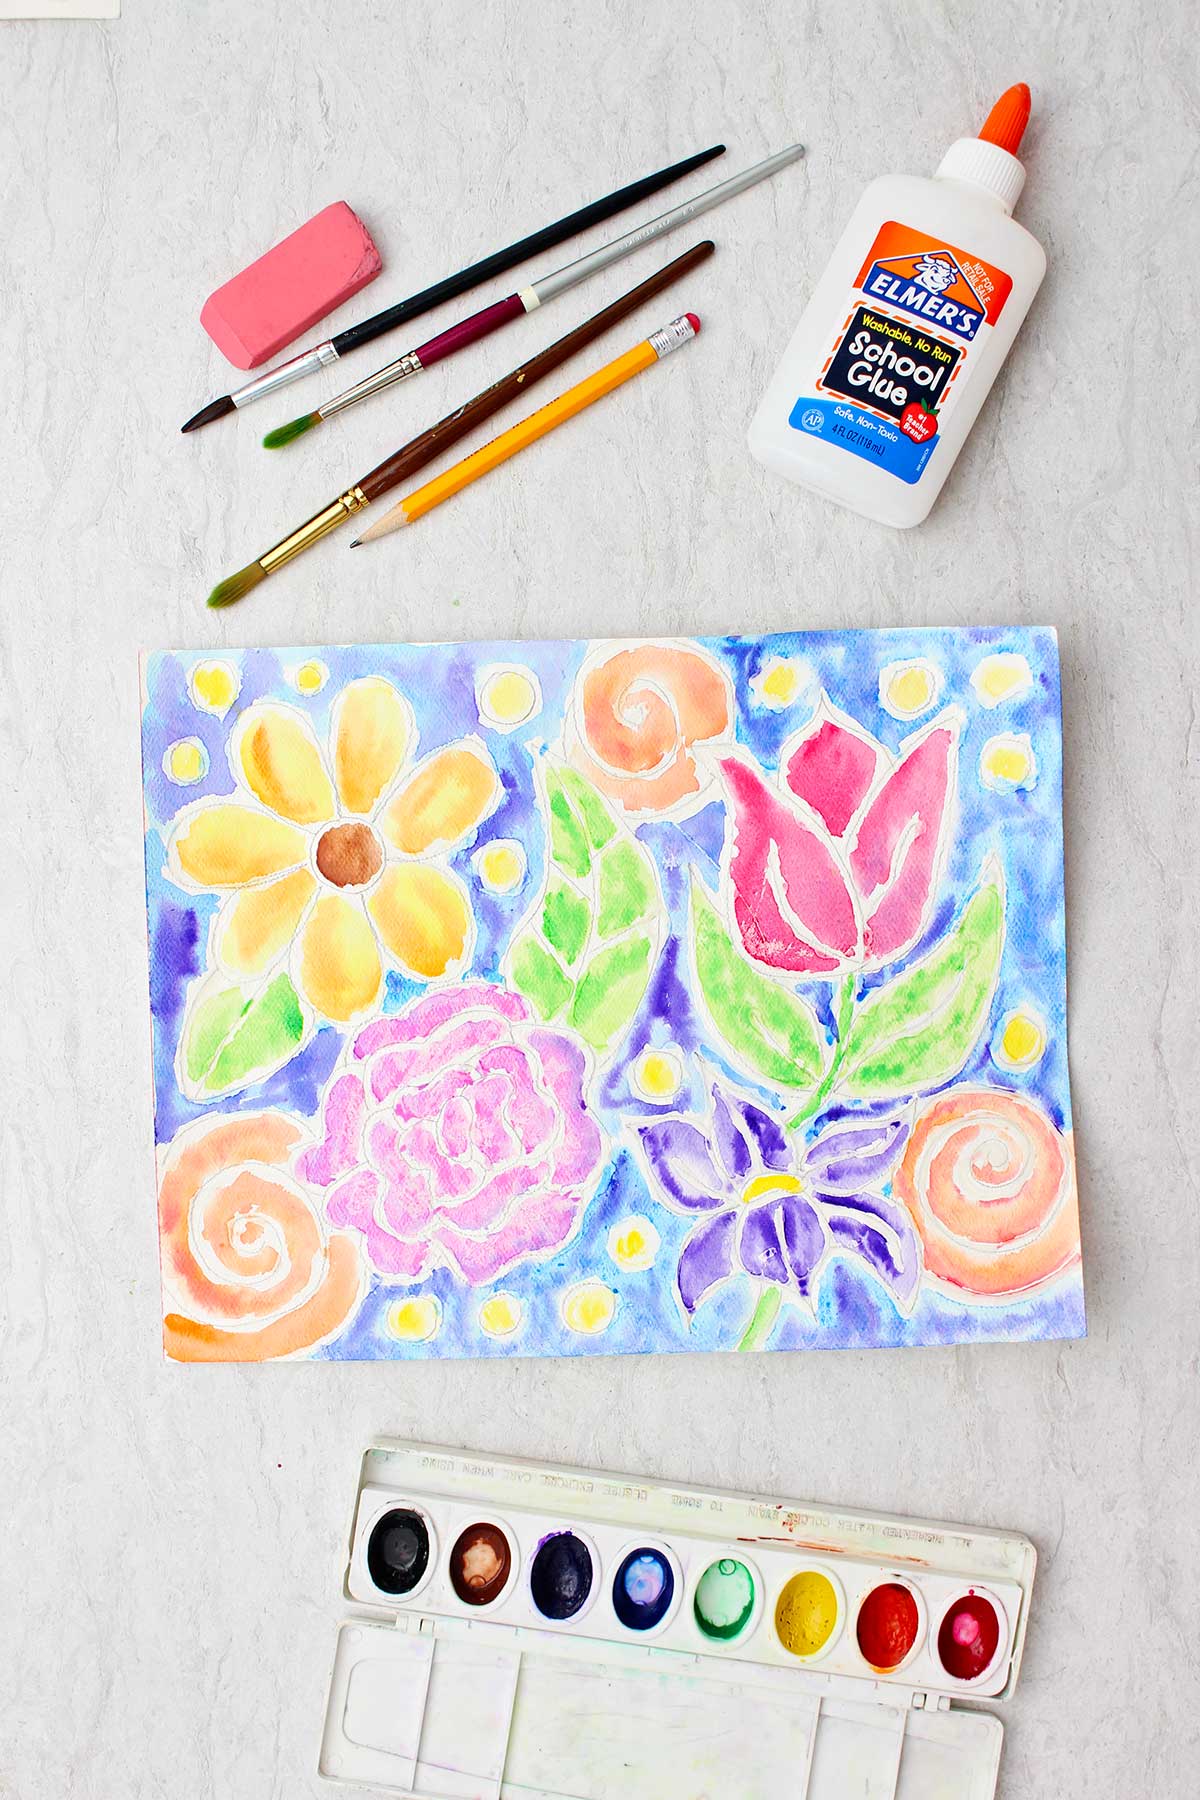
You’ll need a glass of clean water and your watercolor paints. I used my set of Prang watercolor paints, and another little set that I had given to me a while back.
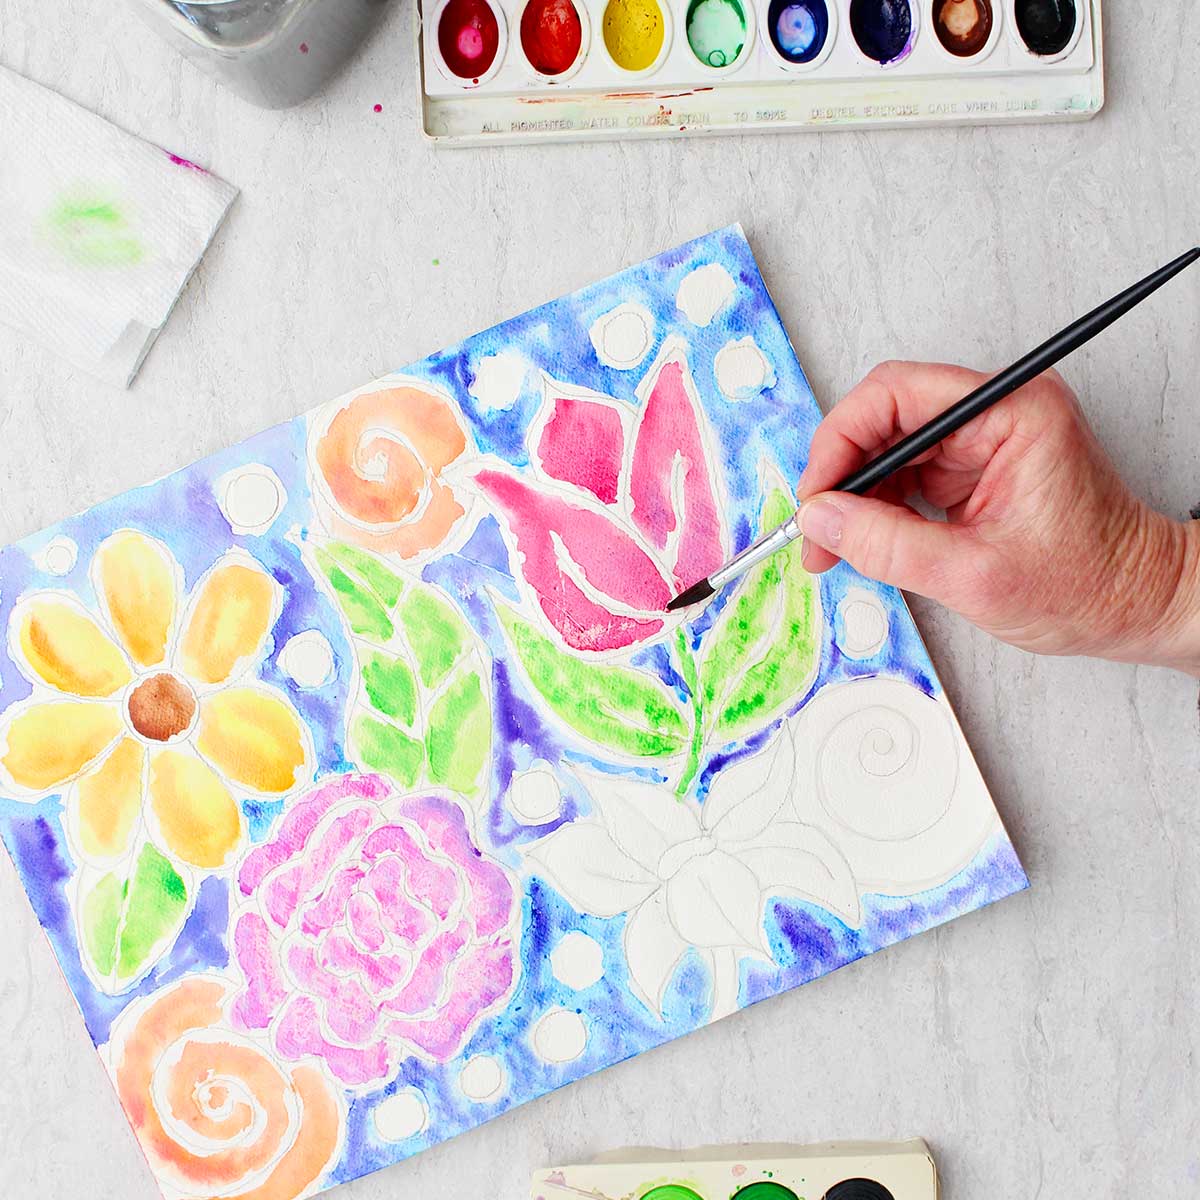
Where do I start painting?
Look at your drawing, and choose an area that you would like to start on. Again, you might want to start in the upper left if you’re right handed or the upper right if you’re left-handed, or with your background first.
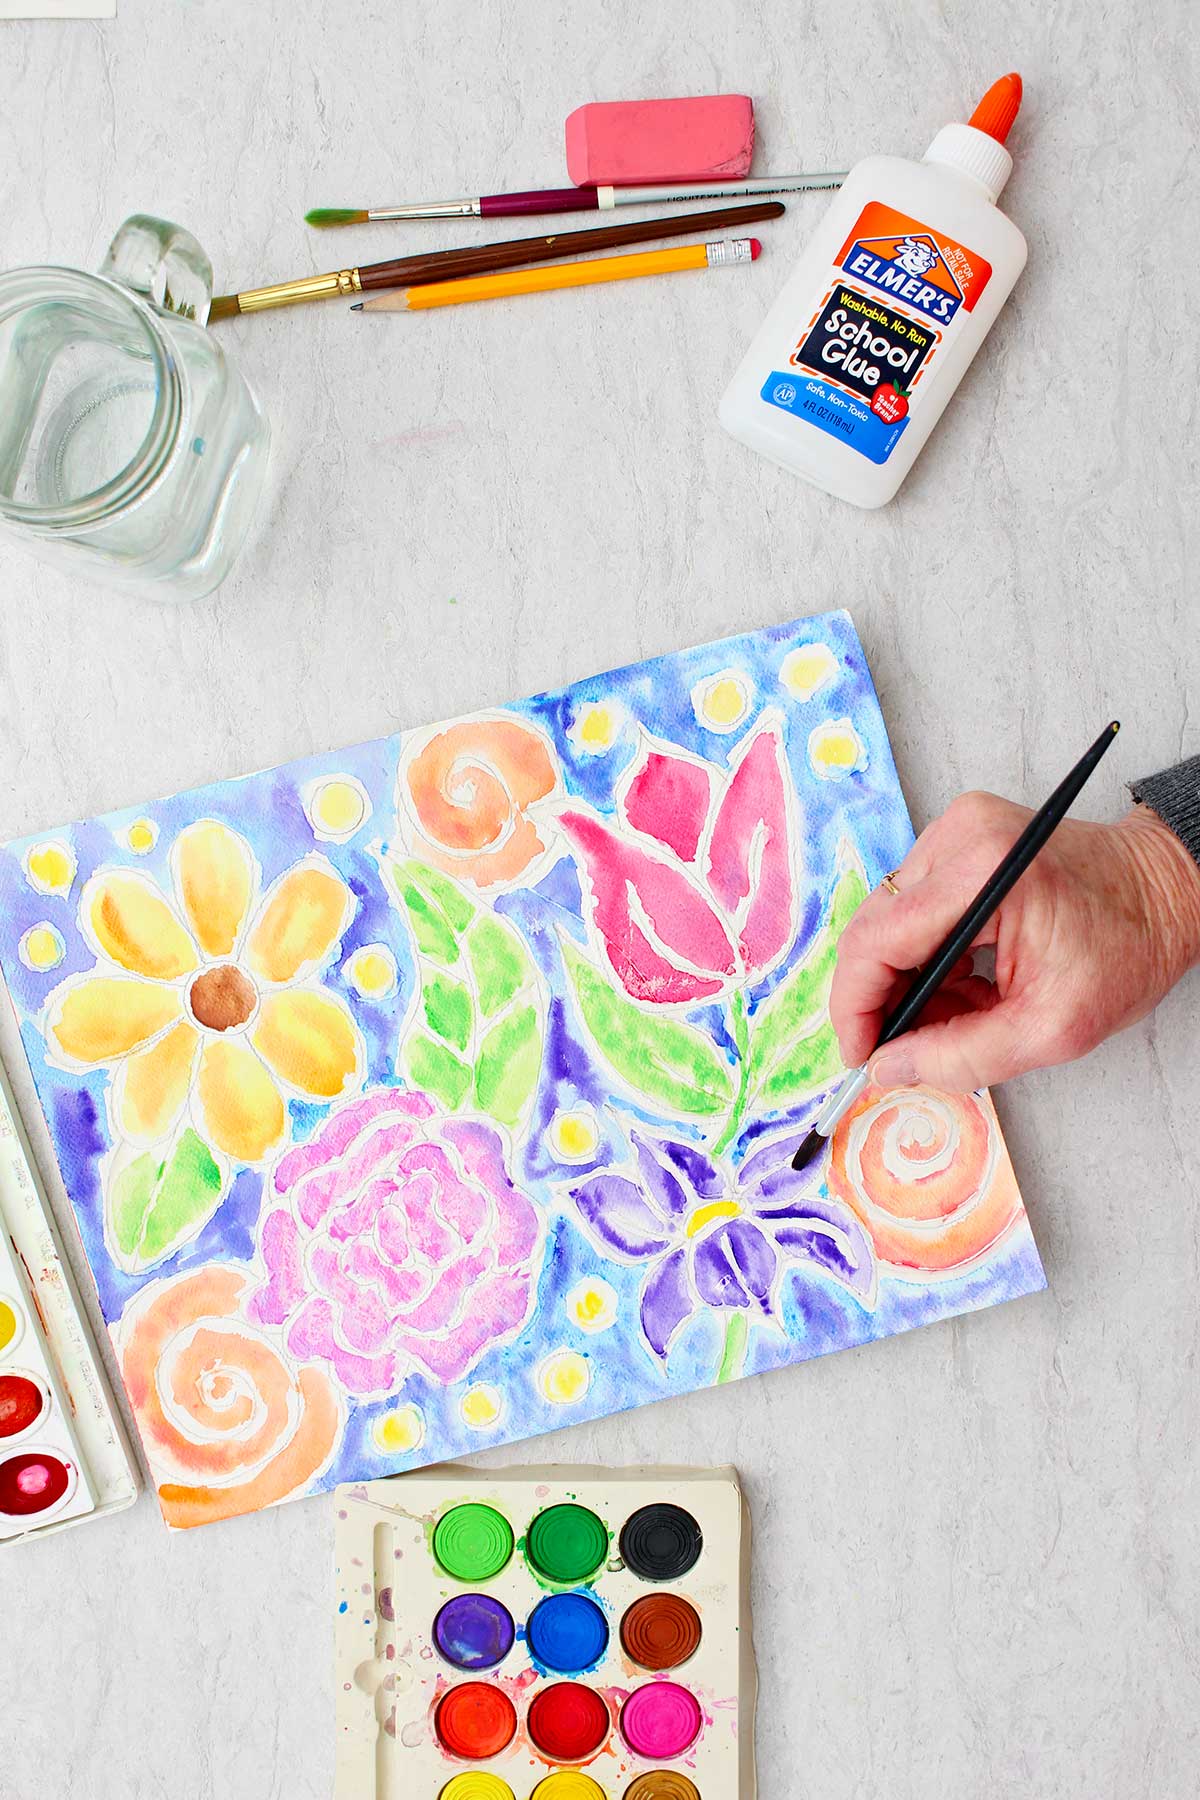
I started with the background at the top of my paper that is around my flowers.
Wet the paper
Wet a section of paper between the glue lines. Then load your paint brush up with some color by rubbing it on the colored paint area a little bit.
Drop in the paint
Dip the tip of your paint brush down into the wet area of paper and let the paint kind of run into the water.
You can load more paint of a different color onto your brush and put it in the same area and watch it blend.
You might want to watch this part of the video clip to see what this looks like as it happened on my watercolor paper.
Choose your colors- so fun
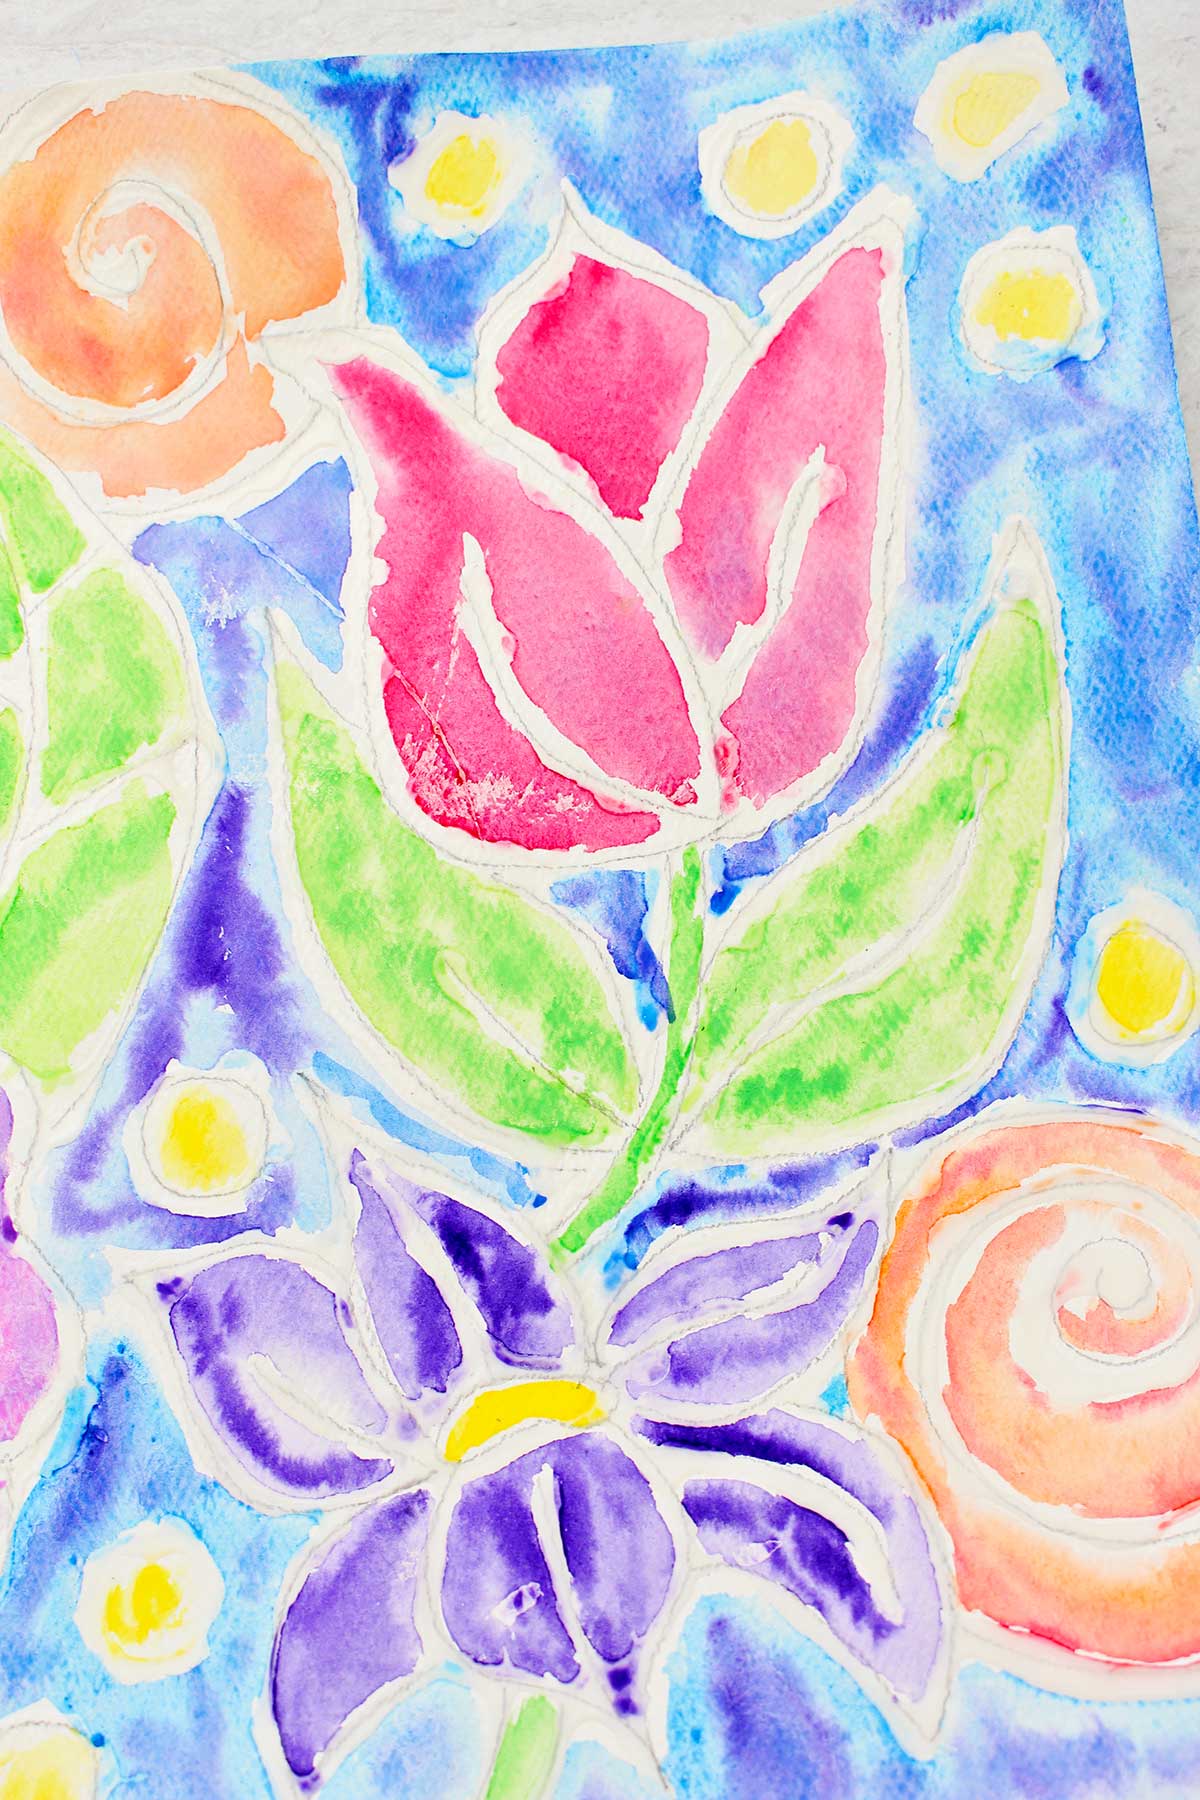
On my background, I use some blue and then I dot in a little bit of purple in the wet area as well. It made a beautiful, almost stained glass looking effect.
If there’s other little sections that you would like to be those same colors, go ahead and do those next. It helps to kind of keep the colors the same in the adjoining sections if that’s what you are wanting to do.
When you’re done with that color, swish your brush in the clean water and then tap it on the side of the container to get off extra water.
I always keep a paper towel handy to dab my brush on, so I don’t get too much water on my paper. You can experiment with this. That’s the whole point of this project- to kind of experiment with this technique.
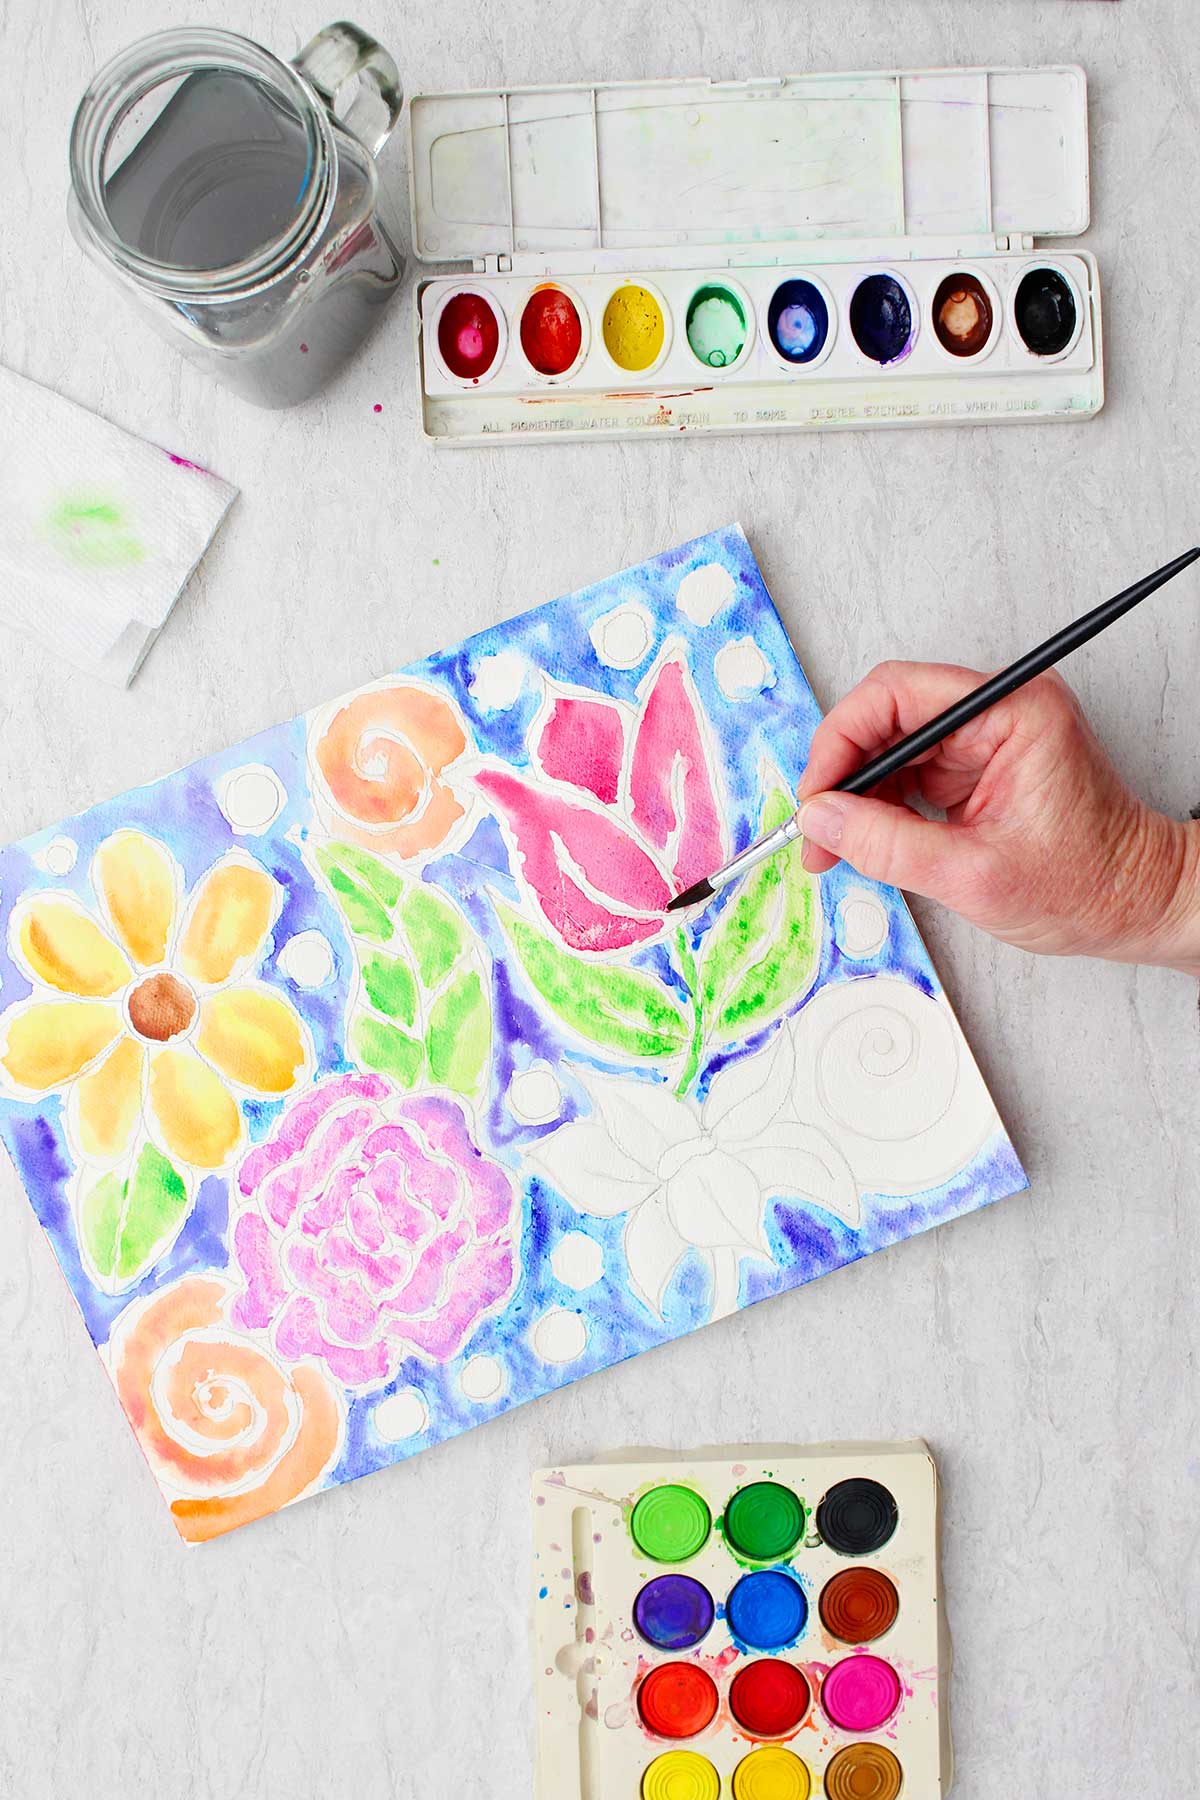
Change colors, try blending
Continue on from section to section, changing colors of paint as you like. Remember to try a little bit of blending colors by dotting a second color into the wet area after the first color that you placed there.
Load more paint onto your paint brush to create more bold colors in certain sections of your painting.
The fun of this is that the water kind of carries the paint around. You don’t paint-paint-paint over the area over and over again. The water does the work for you.
Experiment, learn about watercolor
You’ll learn how the watercolor paint runs and moves as you experiment. Do you see how it kind of moves towards the puddly areas or the wet areas? The dry paper acts differently than the wet paper, doesn’t it? Have fun experimenting
Keep working from section to section, cleaning your brush between colors. You may need to change your water every once in a while if it gets really dirty.
When you’ve placed watercolor in all of the different paper sections that you’ve made between the glue lines of your drawing, step back and look at what you’ve made. Isn’t that cool? It kind of has a stain glass effect, doesn’t it?
The raised line of the glue makes your drawing almost look like 3-D objects in a way.
Here's the link to the full length tutorial video for this post if you would like to follow along with me as make this project. Try a Glue Line Painting Full Length Tutorial.
What's your favorite part?
There are things I would do differently on my glue line painting. I would make the rose with larger spaces between the lines for example.
But my favorite part of the picture is the yellow circles of color- I think they look like fireflies in the night sky. Where I live we see fireflies in the summer evenings and I just love them. I just added the circles in as a last minute idea. A happy accident!
More things to try with glue!!
I’ve also seen this glue line technique done with black glue. We will try that sometime in the future! I also thought it might be fun to make a spider web for Halloween or a snowflake for Christmas!
We may also try using chalk pastels between our glue lines in a future project. We get so many ideas, don't we?
There’s lots of things that we can do with glue besides just glue things together!
Well, it’s been fun to try glue line painting and I hope that you enjoyed making the glue lines and using a watercolor wash.

For this glue drawing, you will use regular school glue or tacky glue. It can be white glue or clear glue and will dry pretty clear. Of course a glue stick will not work!
We will make a simple drawing on watercolor paper, trace over our drawing with glue, and let it dry. Then we'll do a watercolor wash on the watercolor paper between those glue lines.
More Fun and Easy Art Projects:
Looking for more art projects to try? Check out these fun ideas:
- Fun Watercolor Ideas on an Art Play Day!
- Watercolor Resist Painted Windsock for Kids
- Watercolor Resist with Crayons for July 4th
- Easy DIY Watercolor Flower Card for Mom
- Easy How to Paint Aspen Trees In Watercolor
Enjoy!
If you try this craft, let me know! Go ahead and leave a comment, rate it, and tag a photo with #WelcometoNanas wherever you post.
Come join the fun at https://welcometonanas.com
Supplies for Glue Line Painting
- Watercolor paper
- Watercolor paints (I prefer Prang brand as the colors are more vivid)
- Paint brushes
- Pencil
- White glue
Try Glue Line Painting- glue lines & watercolor wash
Equipment
- Paint brushes
Items Required
- Watercolor paper
- Watercolor paints (I prefer Prang brand as the colors are more vivid)
- Paint brushes
- Pencil
- White glue
Instructions
- We are going to make a simple drawing on watercolor paper. It’s important that it’s watercolor paper because we will be getting the surface wet. Watercolor paper is thicker and made to standup to having water on it. Typical drawing and copy paper will wrinkles more and and tends to shred when it gets wet.The drawing that we’re going to make to will be a simple drawing with lines that are not too close together. We need to leave some room between the pencil lines so that we can do the watercolor wash in the open paper areas.You can see in my drawing I chose to do a floral design. But of course you may choose any type of drawing that you would like. You could draw dinosaurs, leaves, the solar system, an animal (like your cat or dog), a superhero, etc.
- Open the top of your glue, and practice making a glue line on an extra piece of paper. You’re wanting to be able to squeeze the glue and draw a line of glue that is fairly even in size and flows in a continuous stream. This will never work perfectly, but practicing does help a bit. We’re trying to avoid big blobs of glue or the glue getting to be a really skinny line. Note: It’s OK if you go back and go over lines that are smaller than you want them. And if you get some glue blobs (you’ll see on my picture that I did too) don’t worry, they’ll just become part of the drawing! The blobs or puddles of glue happen primarily at the glue joints, where two glue lines meet.When you’re happy with how you are doing, you can start on your actual drawing on paper. If you’re right handed, start in the upper left corner of your drawing and work down to the lower right corner. The reason for this is you do not want to drag your hand through the glue lines that you make. So if you start at the bottom and have to reach over what you’ve already done, it’s very likely that you will drag your hand in that glue and ruin your drawing. If you are left-handed, you will start in the upper right corner and work downward to the lower left corner for the same reason. Take your time and go over every pencil line that you have drawn carefully with your glue. Try to keep your glue running smoothly and take a little time to go back over the lines that are too small. It’s pretty fun, isn’t it?Next you will need some patience because you have to let your drawing dry. I had to let mine sit for at least 10 hours. I would recommend setting your Glue Line Drawing someplace safe and coming back the next day to do the watercolor wash step.
- We are going to do what is called a watercolor wash in between the glue lines. A watercolor wash is a wet on wet technique with watercolor. We are going to add some water onto a section of paper between the glue lines and then add some wet color into that water. Thus, it is wet on wet! Now you know why we used watercolor paper!!Note: You just need to wet the paper. You don’t need to make large puddles of water. We’re going to try to leave the glue areas as our boundaries and not paint over them. So think of this kind of like a coloring book where you are doing your watercolor between the lines.Look at your drawing, and choose an area that you would like to start on. Again, you might want to start in the upper left if you’re right handed or the upper right if you’re left-handed, or with your background first.I started with the background at the top of my paper that is around my flowers.Wet a section of paper between the glue lines. Then load your paint brush up with some color by rubbing it on the colored paint area a little bit. Dip the tip of your paint brush down into the wet area of paper and let the paint kind of run into the water. You can load more paint of a different color onto your brush and put it in the same area and watch it blend. You might want to watch this part of the video clip to see what this looks like as it happened on my watercolor paper. Continue on from section to section, changing colors of paint as you like. Remember to try a little bit of blending colors by dotting a second color into the wet area after the first color that you placed there.Keep working from section to section, cleaning your brush between colors. You may need to change your water every once in a while if it gets really dirty.When you’ve placed watercolor in all of the different paper sections that you’ve made between the glue lines of your drawing, step back and look at what you’ve made. Isn’t that cool? It kind of has a stain glass effect, doesn’t it?


Leave a Reply