Try Glue Line Painting- glue lines & watercolor wash
Try Glue Line Painting for a craft or card! Make a drawing with glue and then do a watercolor wash on the paper between. Such a cool effect!
Servings: 1 glue line painting
Cost: $1
Equipment
- Paint brushes
Ingredients
- Watercolor paper
- Watercolor paints (I prefer Prang brand as the colors are more vivid)
- Paint brushes
- Pencil
- White glue
Instructions
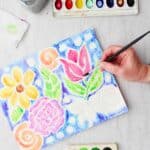
- We are going to make a simple drawing on watercolor paper. It’s important that it’s watercolor paper because we will be getting the surface wet. Watercolor paper is thicker and made to standup to having water on it. Typical drawing and copy paper will wrinkles more and and tends to shred when it gets wet.The drawing that we’re going to make to will be a simple drawing with lines that are not too close together. We need to leave some room between the pencil lines so that we can do the watercolor wash in the open paper areas.You can see in my drawing I chose to do a floral design. But of course you may choose any type of drawing that you would like. You could draw dinosaurs, leaves, the solar system, an animal (like your cat or dog), a superhero, etc.
- Open the top of your glue, and practice making a glue line on an extra piece of paper. You’re wanting to be able to squeeze the glue and draw a line of glue that is fairly even in size and flows in a continuous stream. This will never work perfectly, but practicing does help a bit. We’re trying to avoid big blobs of glue or the glue getting to be a really skinny line. Note: It’s OK if you go back and go over lines that are smaller than you want them. And if you get some glue blobs (you’ll see on my picture that I did too) don’t worry, they’ll just become part of the drawing! The blobs or puddles of glue happen primarily at the glue joints, where two glue lines meet.When you’re happy with how you are doing, you can start on your actual drawing on paper. If you’re right handed, start in the upper left corner of your drawing and work down to the lower right corner. The reason for this is you do not want to drag your hand through the glue lines that you make. So if you start at the bottom and have to reach over what you’ve already done, it’s very likely that you will drag your hand in that glue and ruin your drawing. If you are left-handed, you will start in the upper right corner and work downward to the lower left corner for the same reason. Take your time and go over every pencil line that you have drawn carefully with your glue. Try to keep your glue running smoothly and take a little time to go back over the lines that are too small. It’s pretty fun, isn’t it?Next you will need some patience because you have to let your drawing dry. I had to let mine sit for at least 10 hours. I would recommend setting your Glue Line Drawing someplace safe and coming back the next day to do the watercolor wash step.
- We are going to do what is called a watercolor wash in between the glue lines. A watercolor wash is a wet on wet technique with watercolor. We are going to add some water onto a section of paper between the glue lines and then add some wet color into that water. Thus, it is wet on wet! Now you know why we used watercolor paper!!Note: You just need to wet the paper. You don’t need to make large puddles of water. We’re going to try to leave the glue areas as our boundaries and not paint over them. So think of this kind of like a coloring book where you are doing your watercolor between the lines.Look at your drawing, and choose an area that you would like to start on. Again, you might want to start in the upper left if you’re right handed or the upper right if you’re left-handed, or with your background first.I started with the background at the top of my paper that is around my flowers.Wet a section of paper between the glue lines. Then load your paint brush up with some color by rubbing it on the colored paint area a little bit. Dip the tip of your paint brush down into the wet area of paper and let the paint kind of run into the water. You can load more paint of a different color onto your brush and put it in the same area and watch it blend. You might want to watch this part of the video clip to see what this looks like as it happened on my watercolor paper. Continue on from section to section, changing colors of paint as you like. Remember to try a little bit of blending colors by dotting a second color into the wet area after the first color that you placed there.Keep working from section to section, cleaning your brush between colors. You may need to change your water every once in a while if it gets really dirty.When you’ve placed watercolor in all of the different paper sections that you’ve made between the glue lines of your drawing, step back and look at what you’ve made. Isn’t that cool? It kind of has a stain glass effect, doesn’t it?
Video
Notes
Your pencil lines will show through the glue, so remember that as you draw and perhaps make the lines lighter. You could also choose to use colored pencil if you would like.
If this is an activity you are doing as a project, like in a school room or a class, this will need to be done in two sessions. It takes a long time to dry obviously, especially those areas that kind of puddle up a little bit.