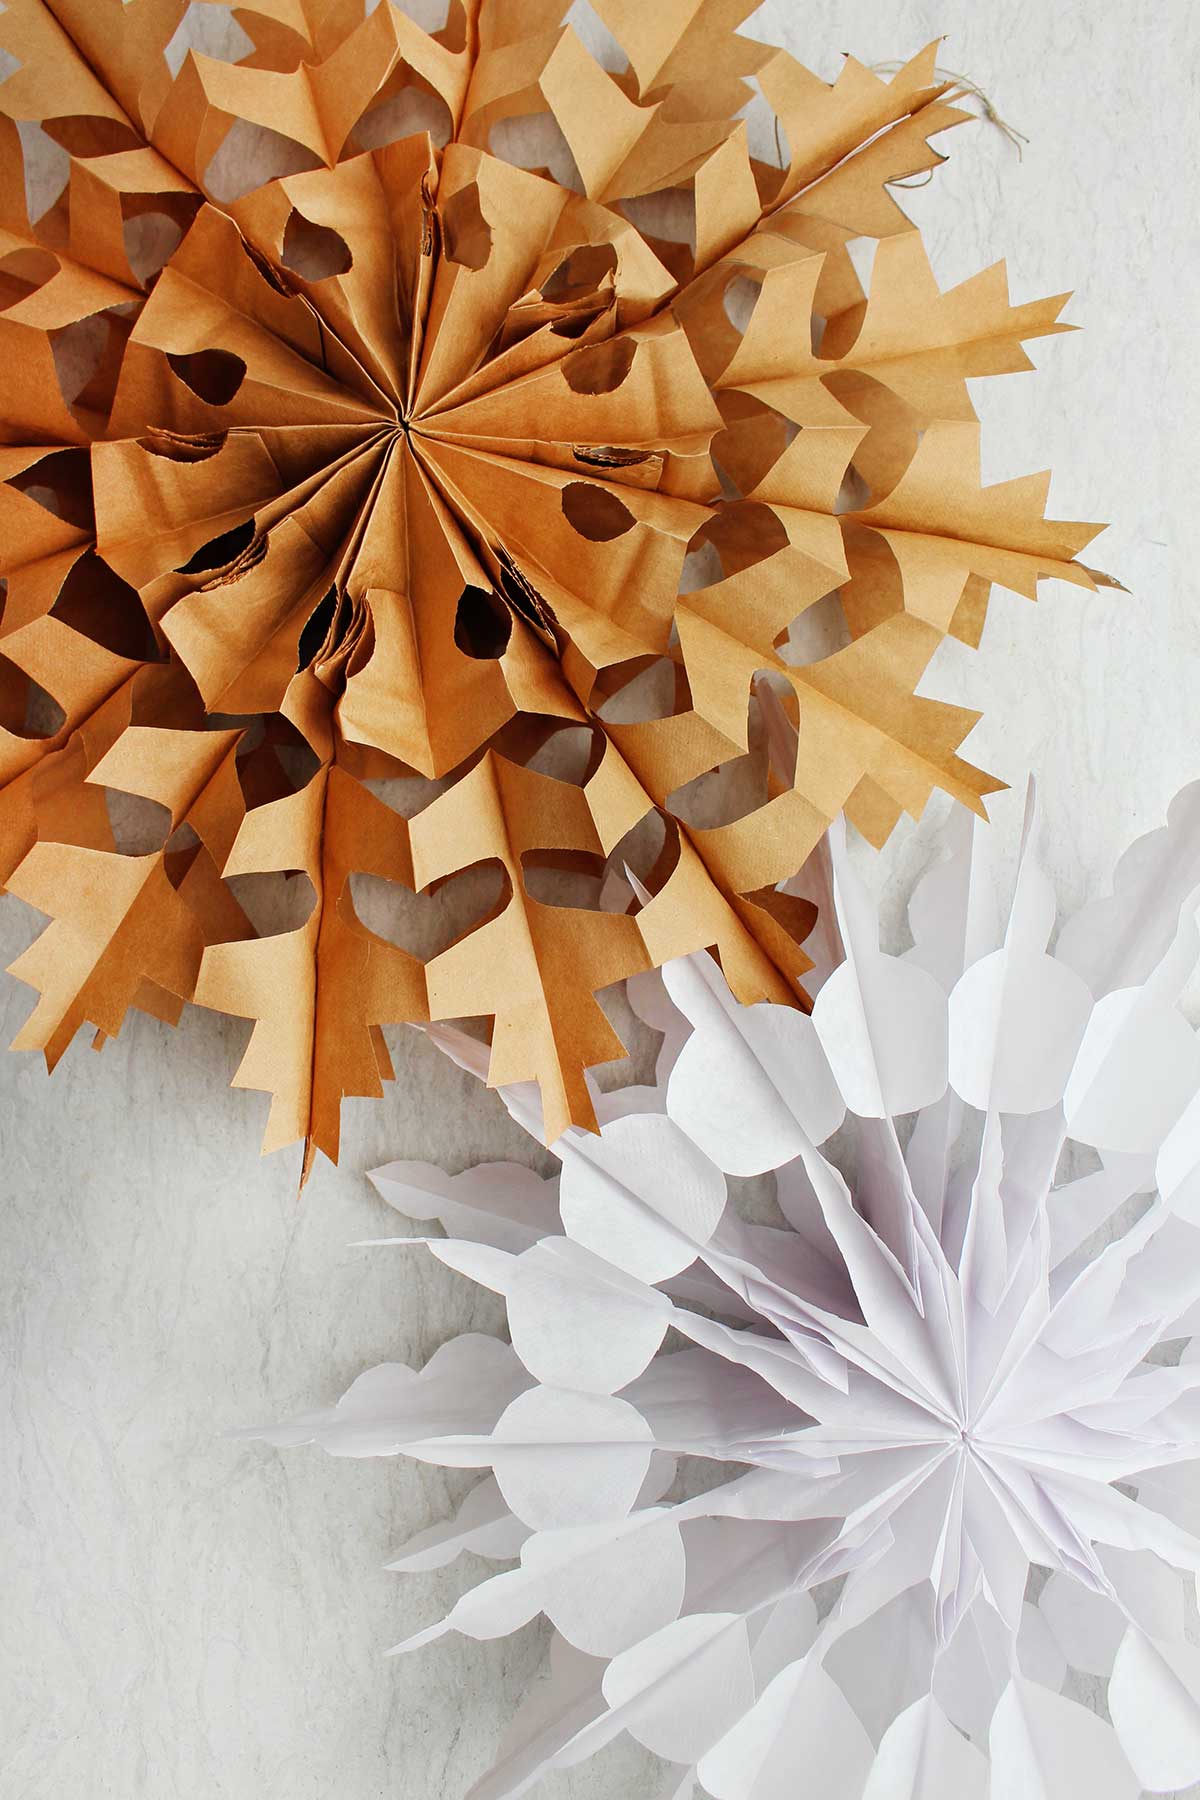
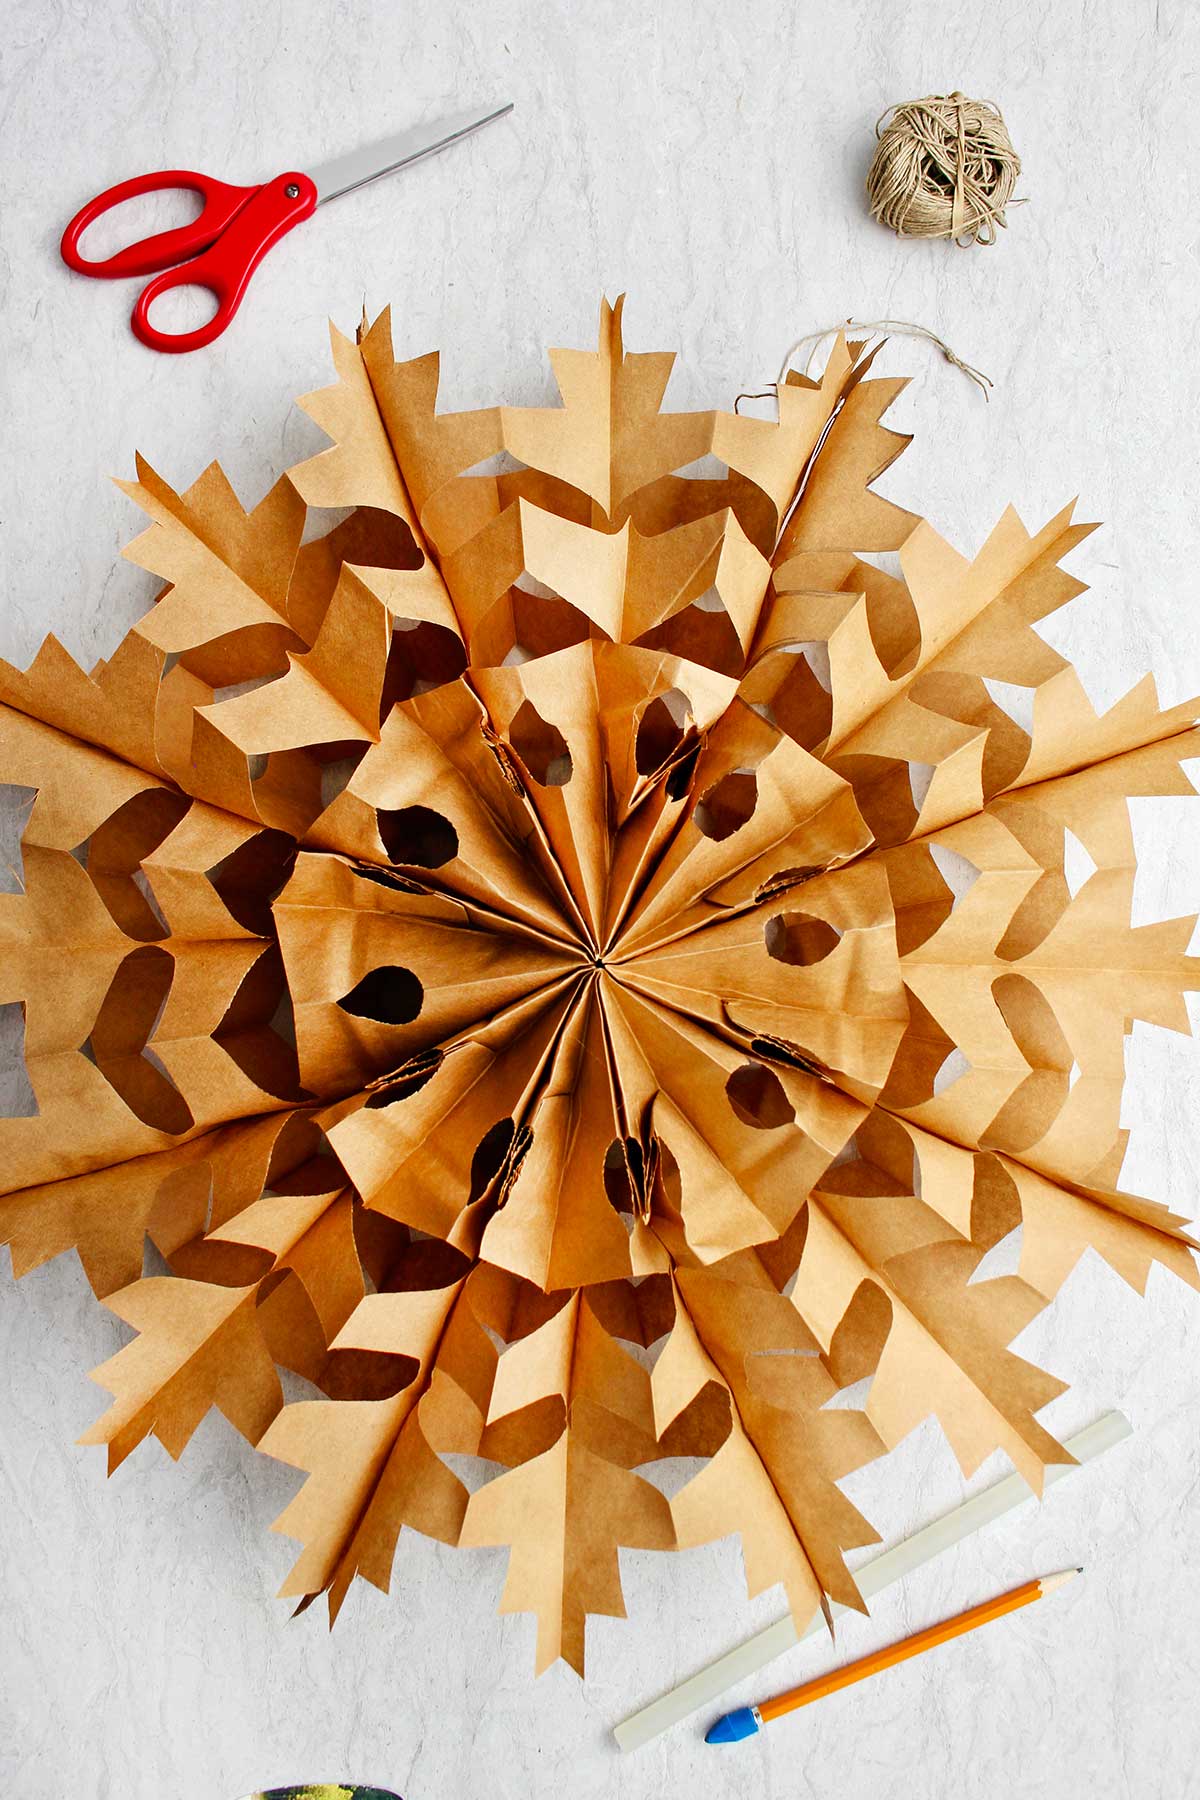
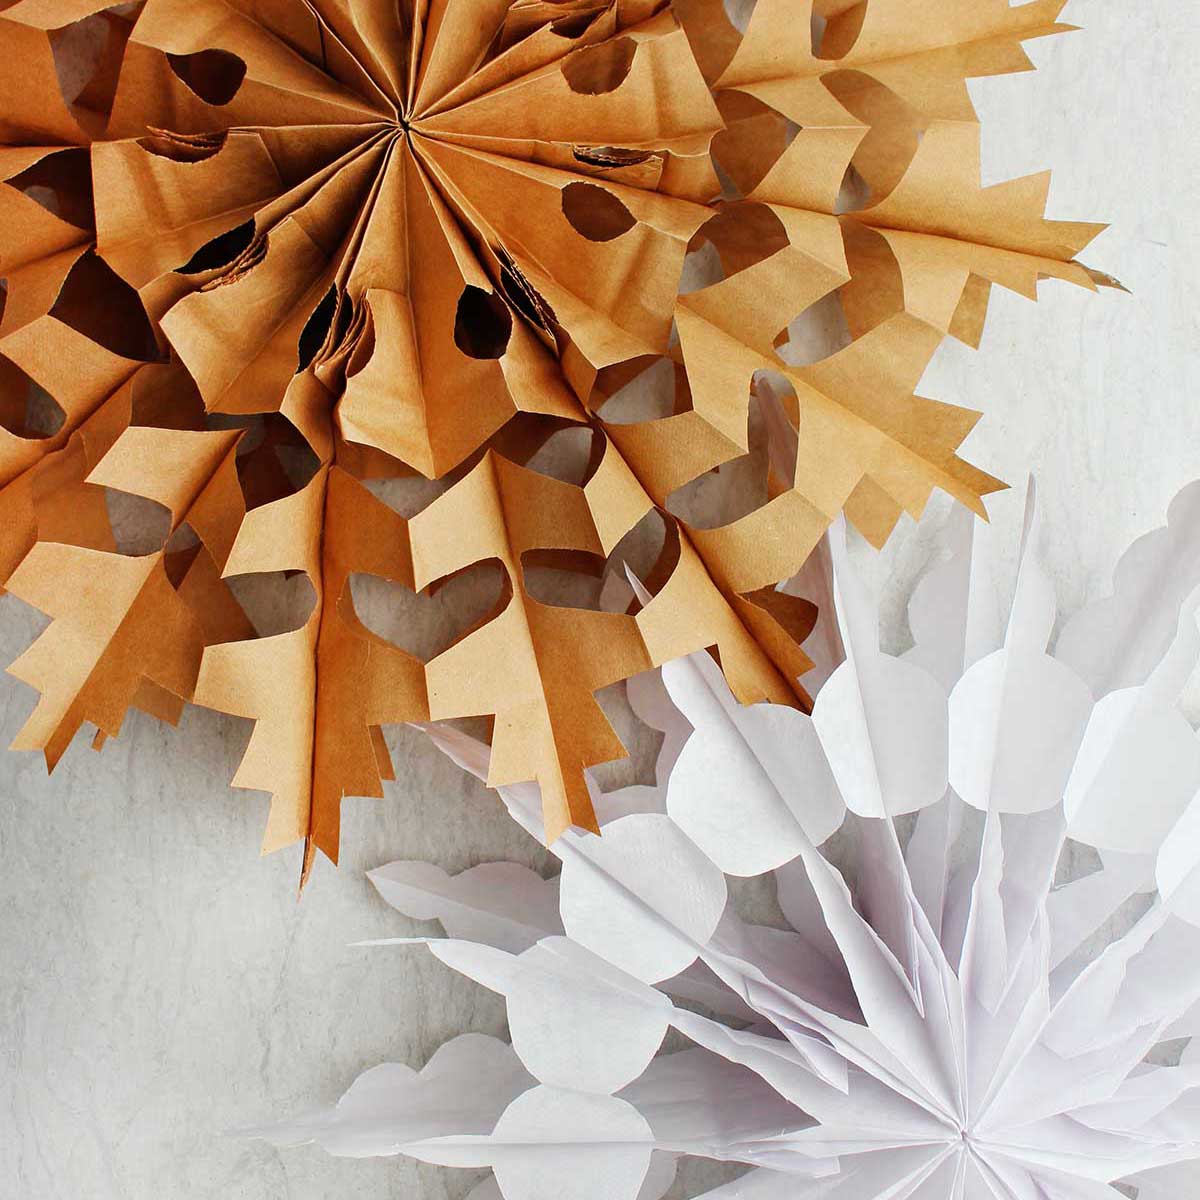
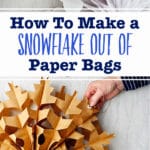
Did you know you can make giant paper bag snowflakes out of just paper bags? These huge snowflakes are a great craft for kids, coming together quickly and easily from in all sorts of beautiful patterns.
Jump to:
- These Paper Bag Snowflakes Are The Perfect Craft
- Paper Bag Snowflake Supplies
- How to Make Snowflakes Out of Paper Bags
- How to Open Paper Bag Snowflakes
- How to Hang Brown Paper Bag Snowflakes
- Paper Bag Snowflake Tips
- Variations of These Brown Paper Bag Snowflakes
- FAQ
- More DIY Christmas Craft Decorations
- Happy Holidays!
- How to Make Snowflakes Out Of Paper Bags
These Paper Bag Snowflakes Are The Perfect Craft
With five decades of crafting under my belt, it’s the easy, inexpensive, jaw-dropping projects like these paper bag snowflakes that I just love making with kids! Use my step-by-step tutorial and printable pattern to skip the guesswork and get straight to crafting giant, beautiful, hanging snowflakes.
Between my 3 kids and 7 grandkids, I’ve made my fair share of these snowflakes. Believe me, when your kids open up their 1 ½ foot wide creation, they’ll immediately want to start making another! You are going to love this one.
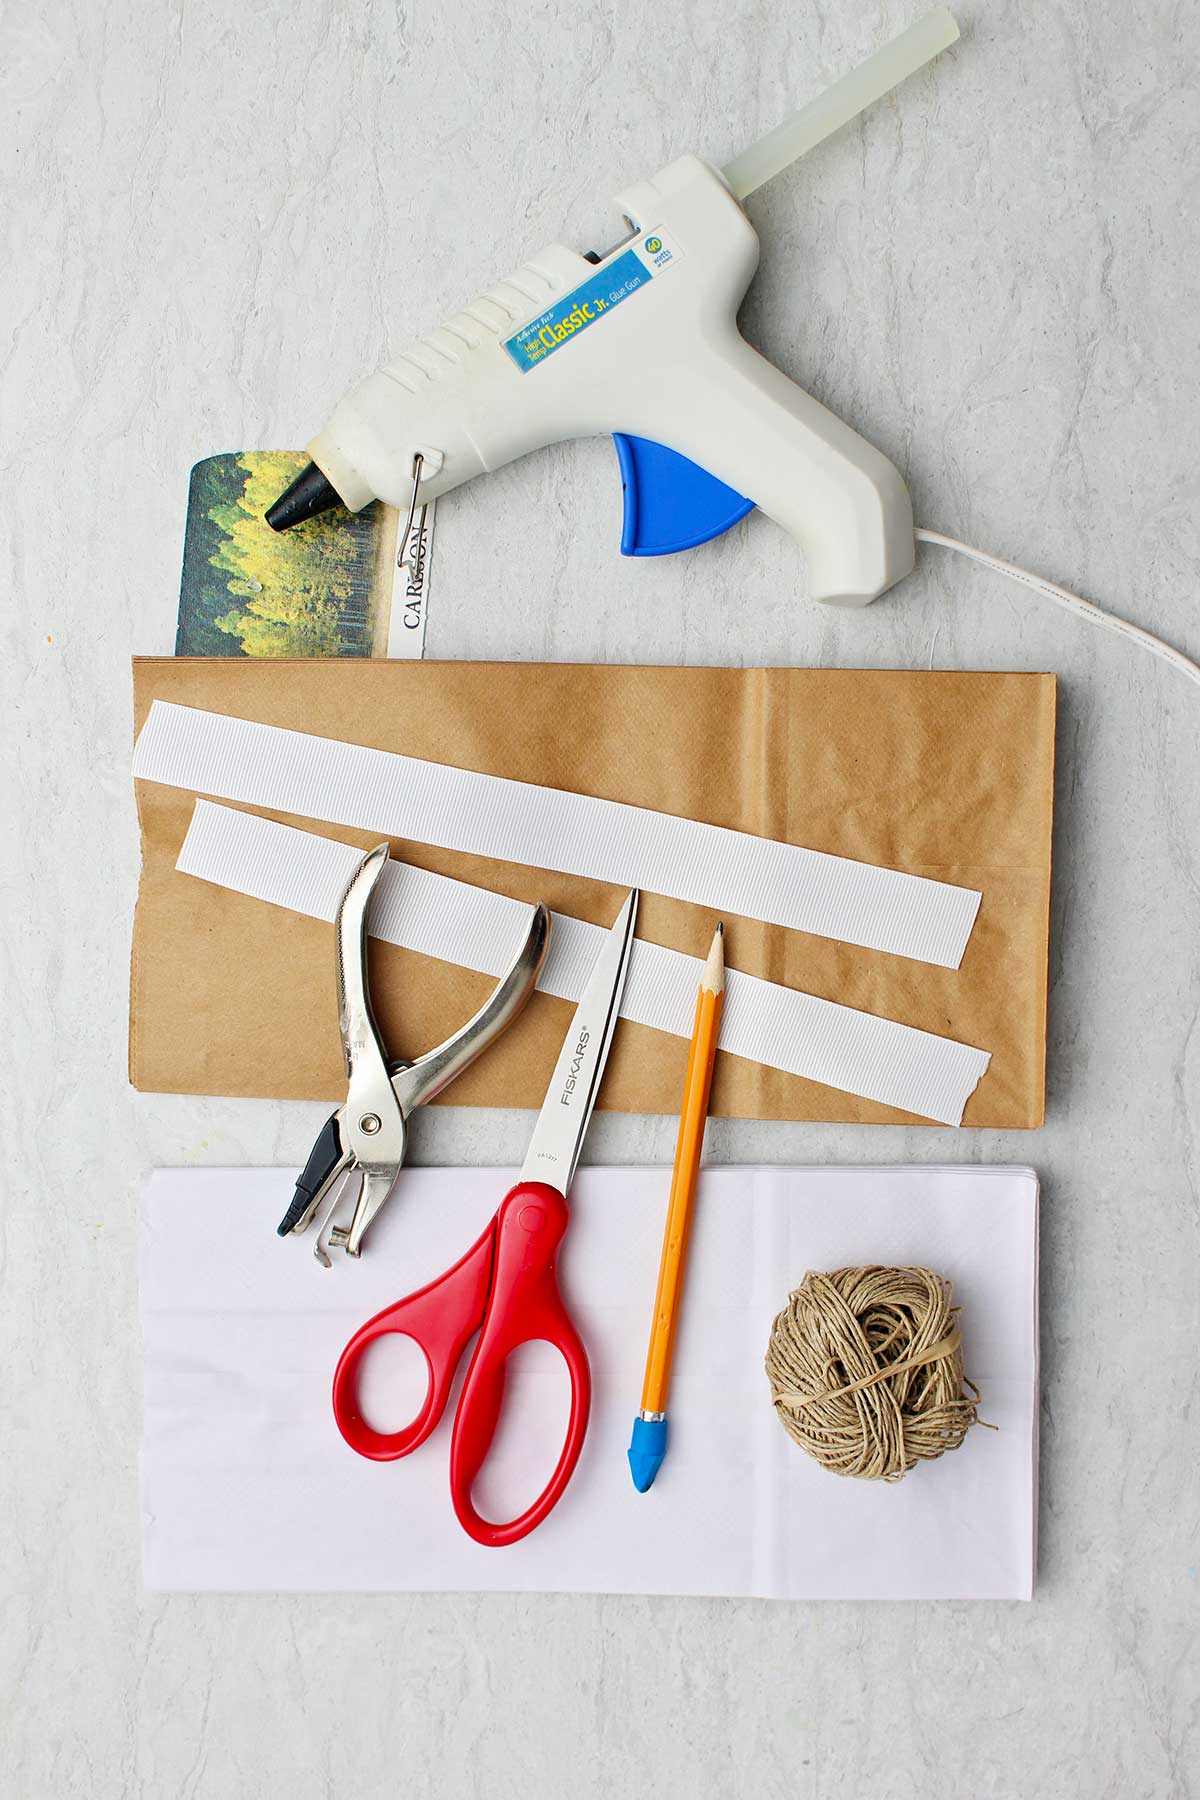
Paper Bag Snowflake Supplies
Free pattern found here: How to Make Easy DIY Snowflake from Paper Bags Free Pattern.
- Lunch sized paper bags - Use white paper lunch bags or brown paper bags (8 per snowflake). I used lunch bag size 10.5x5.25x3.25-inches, the 4 lb size.
- Pencil - Use a pencil to transfer the pattern onto the paper bag.
- Craft scissors - A craft scissors is handy for this and all crafts.
- Hot glue gun - You’ll need a hot glue gun and hot glue for assembling the bags.
- Hole punch - A hole punch will come in handy for punching a hole in the snowflake to hang it up.
- String, twine, or fishing line - A string, a piece of twine, or fishing line work well for hanging the snowflake.
- Stapler - Use a stapler to connect the front and back bag
- Hole reinforcers - I used hole reinforcers (that are for notebook paper) after using the hole punch. This is optional.
Free Printable Paper Bag Snowflake Patterns
I have made a printable with six different snowflake pattern ideas on it. Free pattern found here: How to Make Easy DIY Snowflake from Paper Bags Free Pattern.
The step by step tutorial video on our YouTube channel makes this even easier. You can fiYou can find it at this link: How to Make a Simple DIY Snowflake from Paper Bags Full Length Tutorial.
How to Make Snowflakes Out of Paper Bags
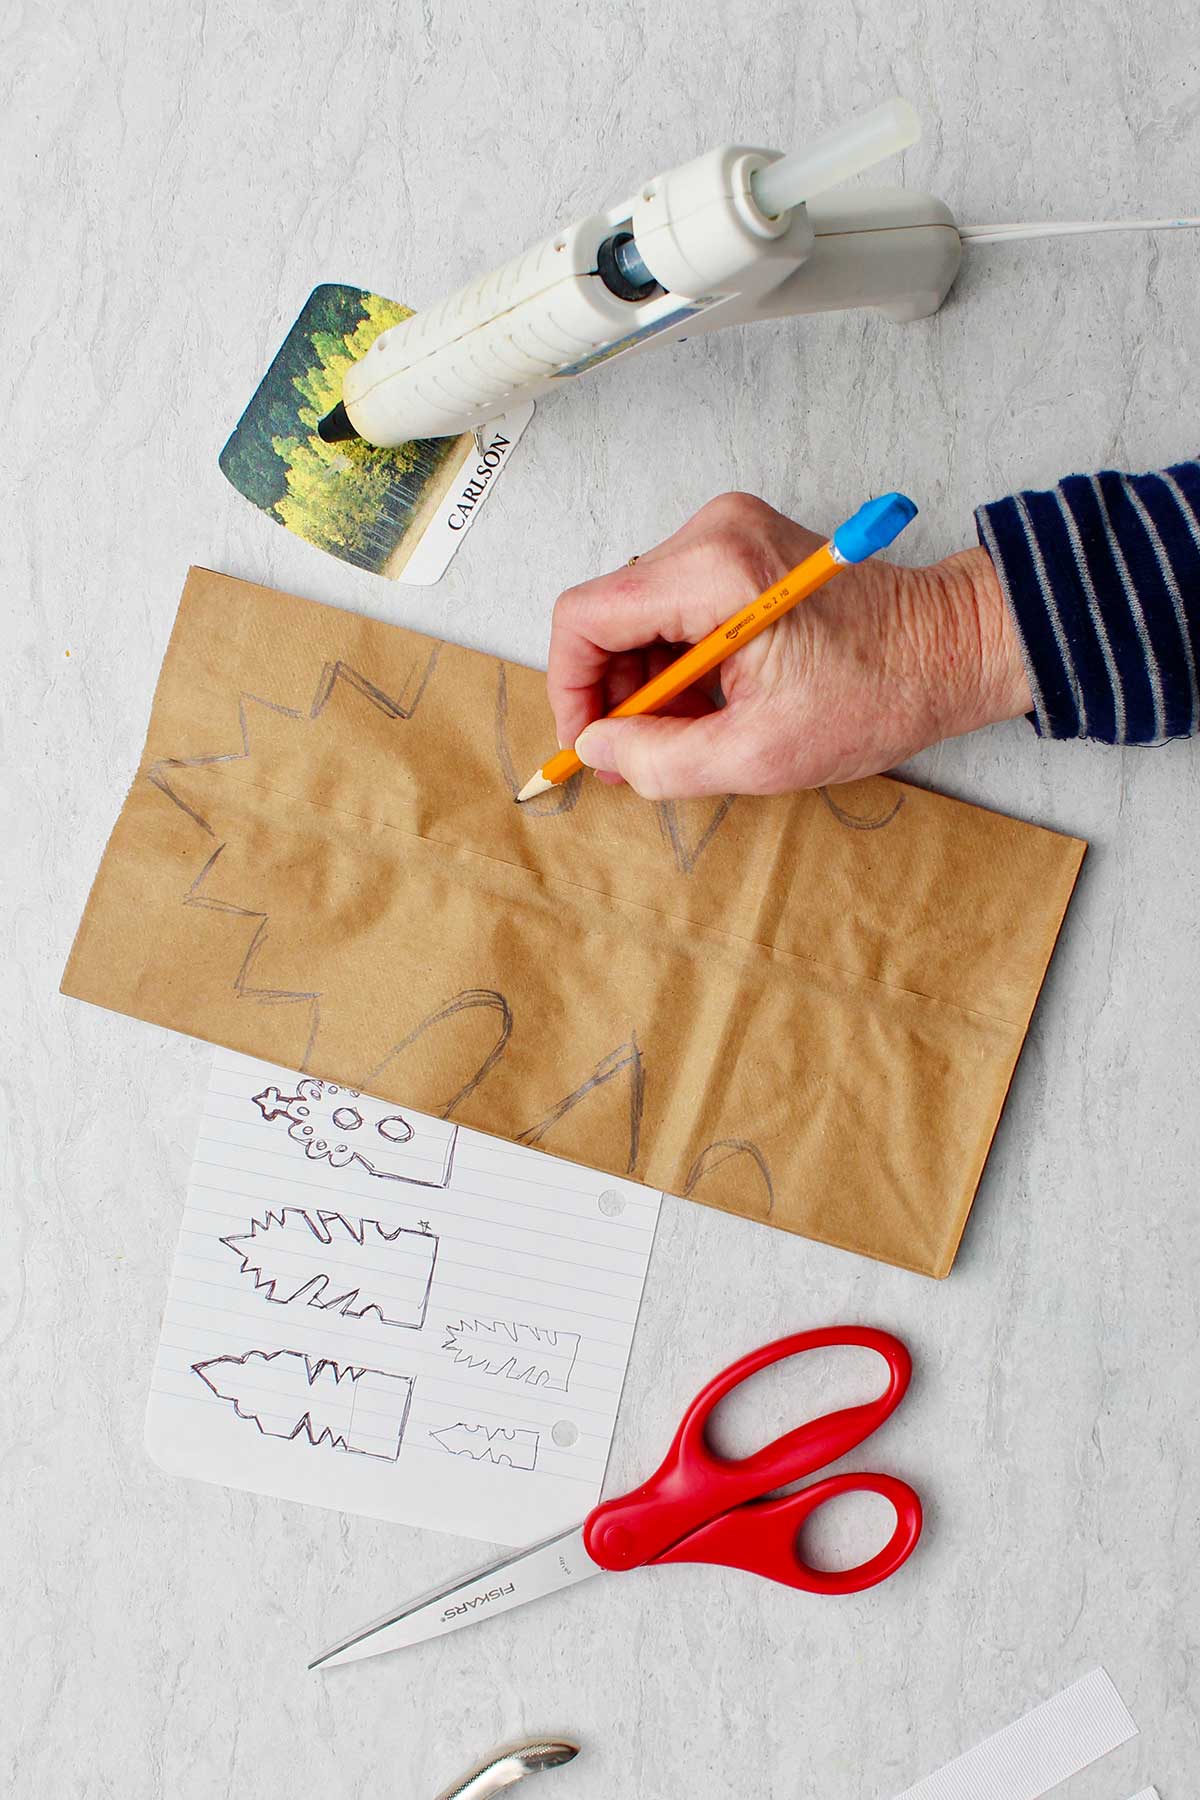
Step 1: Draw your pattern on a paper bag
I found that using eight bags was what worked best. This makes a full and even snowflake.
Lay the first bag down in front of you with the bottom fold closest to you. The opening of the bag is at the top, and the flat unfolded side upward (lay each bag down in this same way).
Draw your pattern on the top of the first bag. You will use this as a template to cut the rest of the bags.
Set this bag to the side for a minute.
Step 2: Glue paper bags together
Take another one of the bags and set it in front of you.
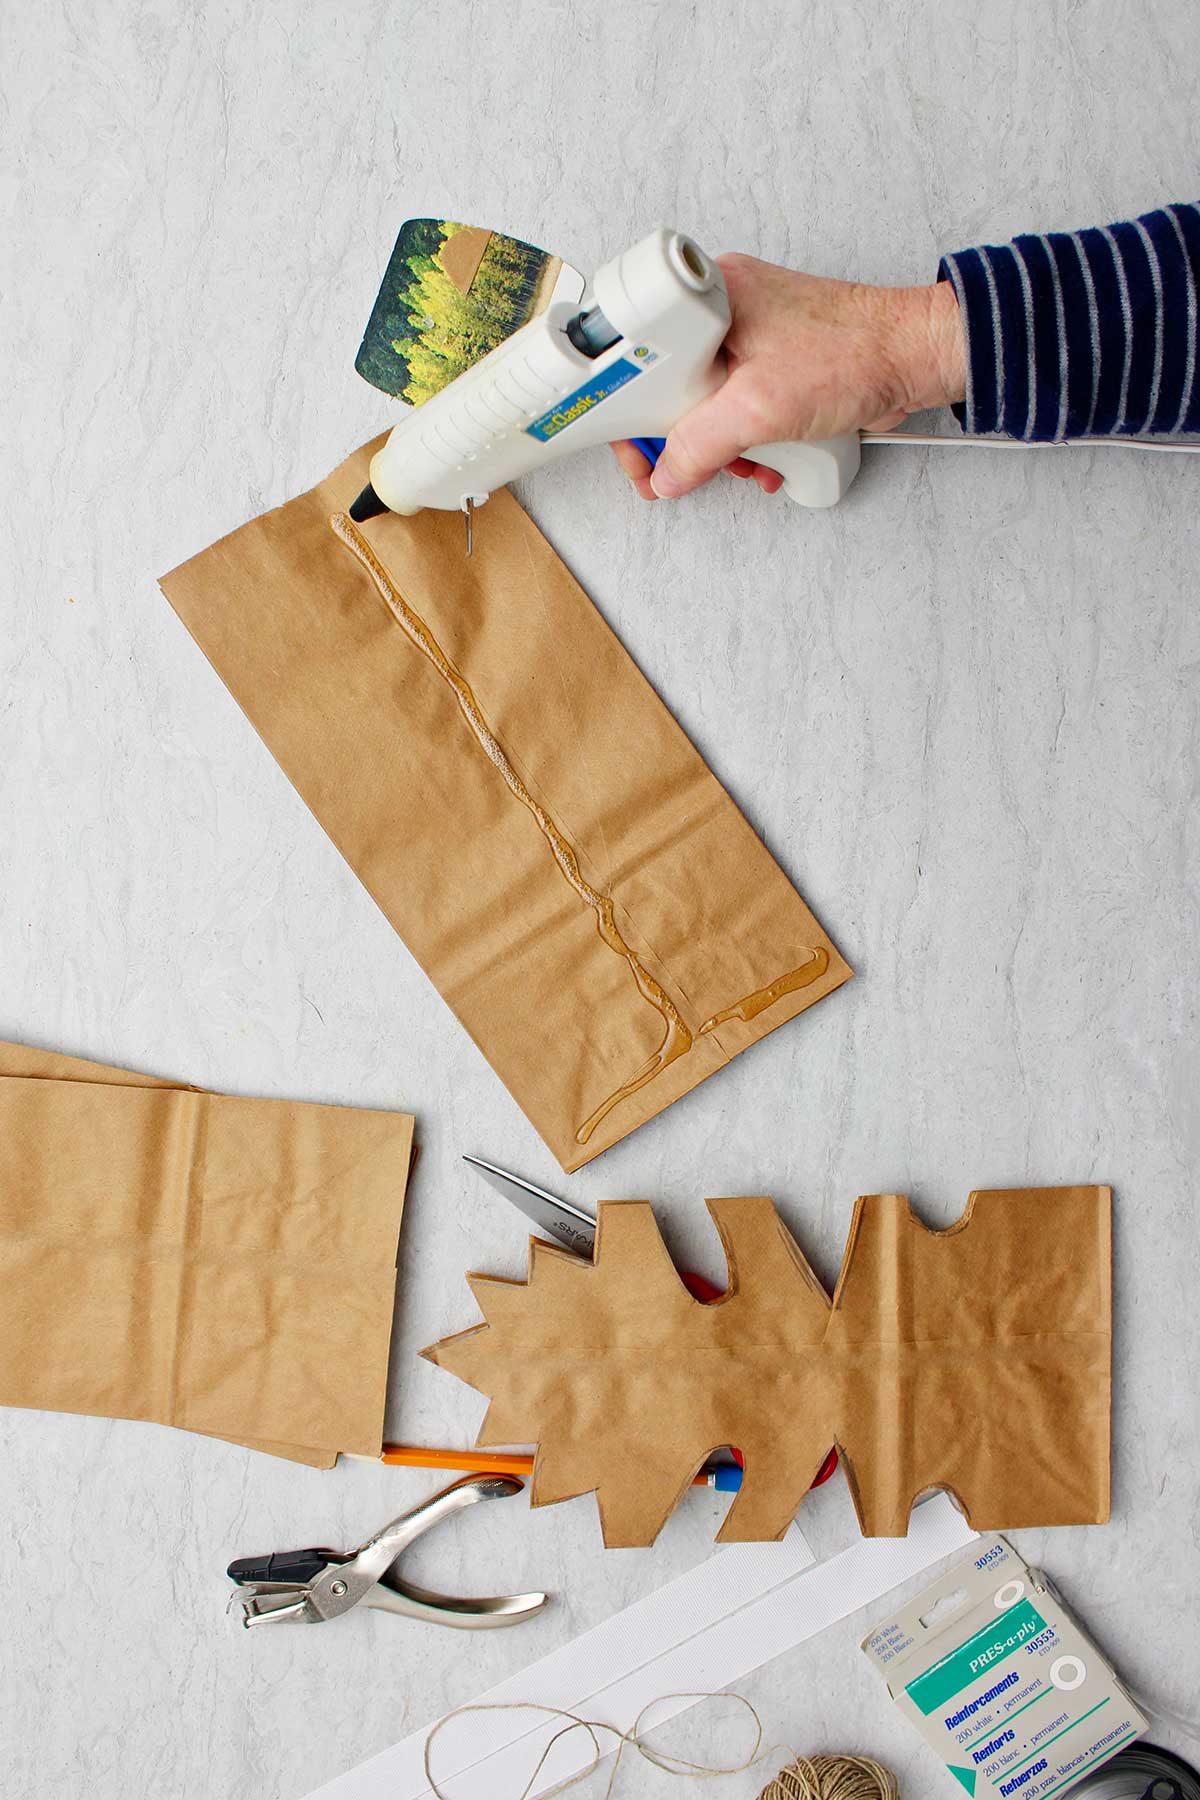
Take your hot glue gun and place a strip of glue down the center of the paper bag from the top to the bottom. Then place glue sideways from one side of the bag to the other along the bottom edge. You’re making an upside-down “T” with these two glue lines.
Set the next bag on top (second bag). Line up the sides in a straight line.
Make a hot glue “T” on the top bag and set the bag you drew your design on top next.
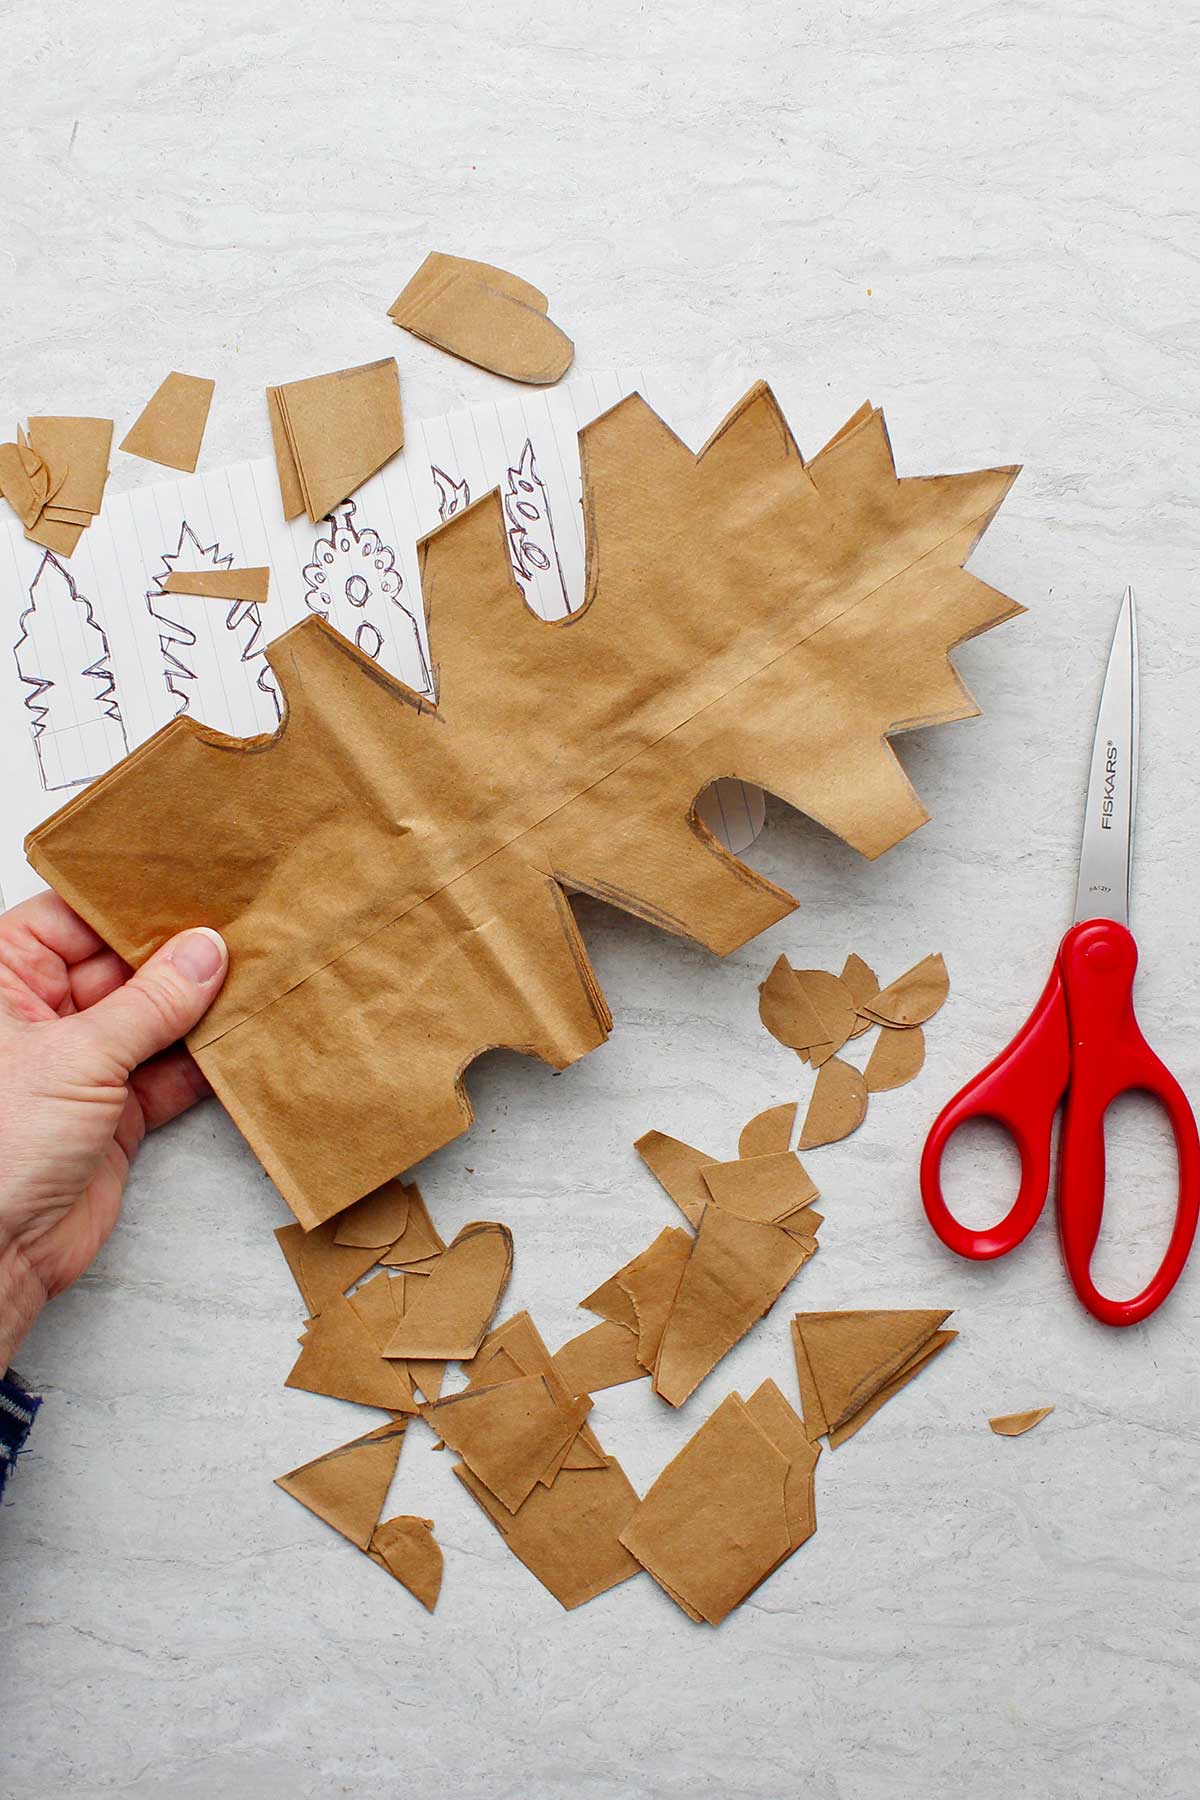
Step 3: Cut out the design
Using a good scissors, cut out the design you drew on the first bag. Cut through all the three bags you have glued together.
Glue three more individual bags together. Then glue the first set of bags on top. Cut the second set of three bags using the first set as a template.
Glue the last two bags together. Glue the set of six bags on top. Then cut the last two bags using the other bags as a template.
At the end, you’ll have a stack of eight bags one on top of the other glued together and cut in the same shape.
How to Open Paper Bag Snowflakes
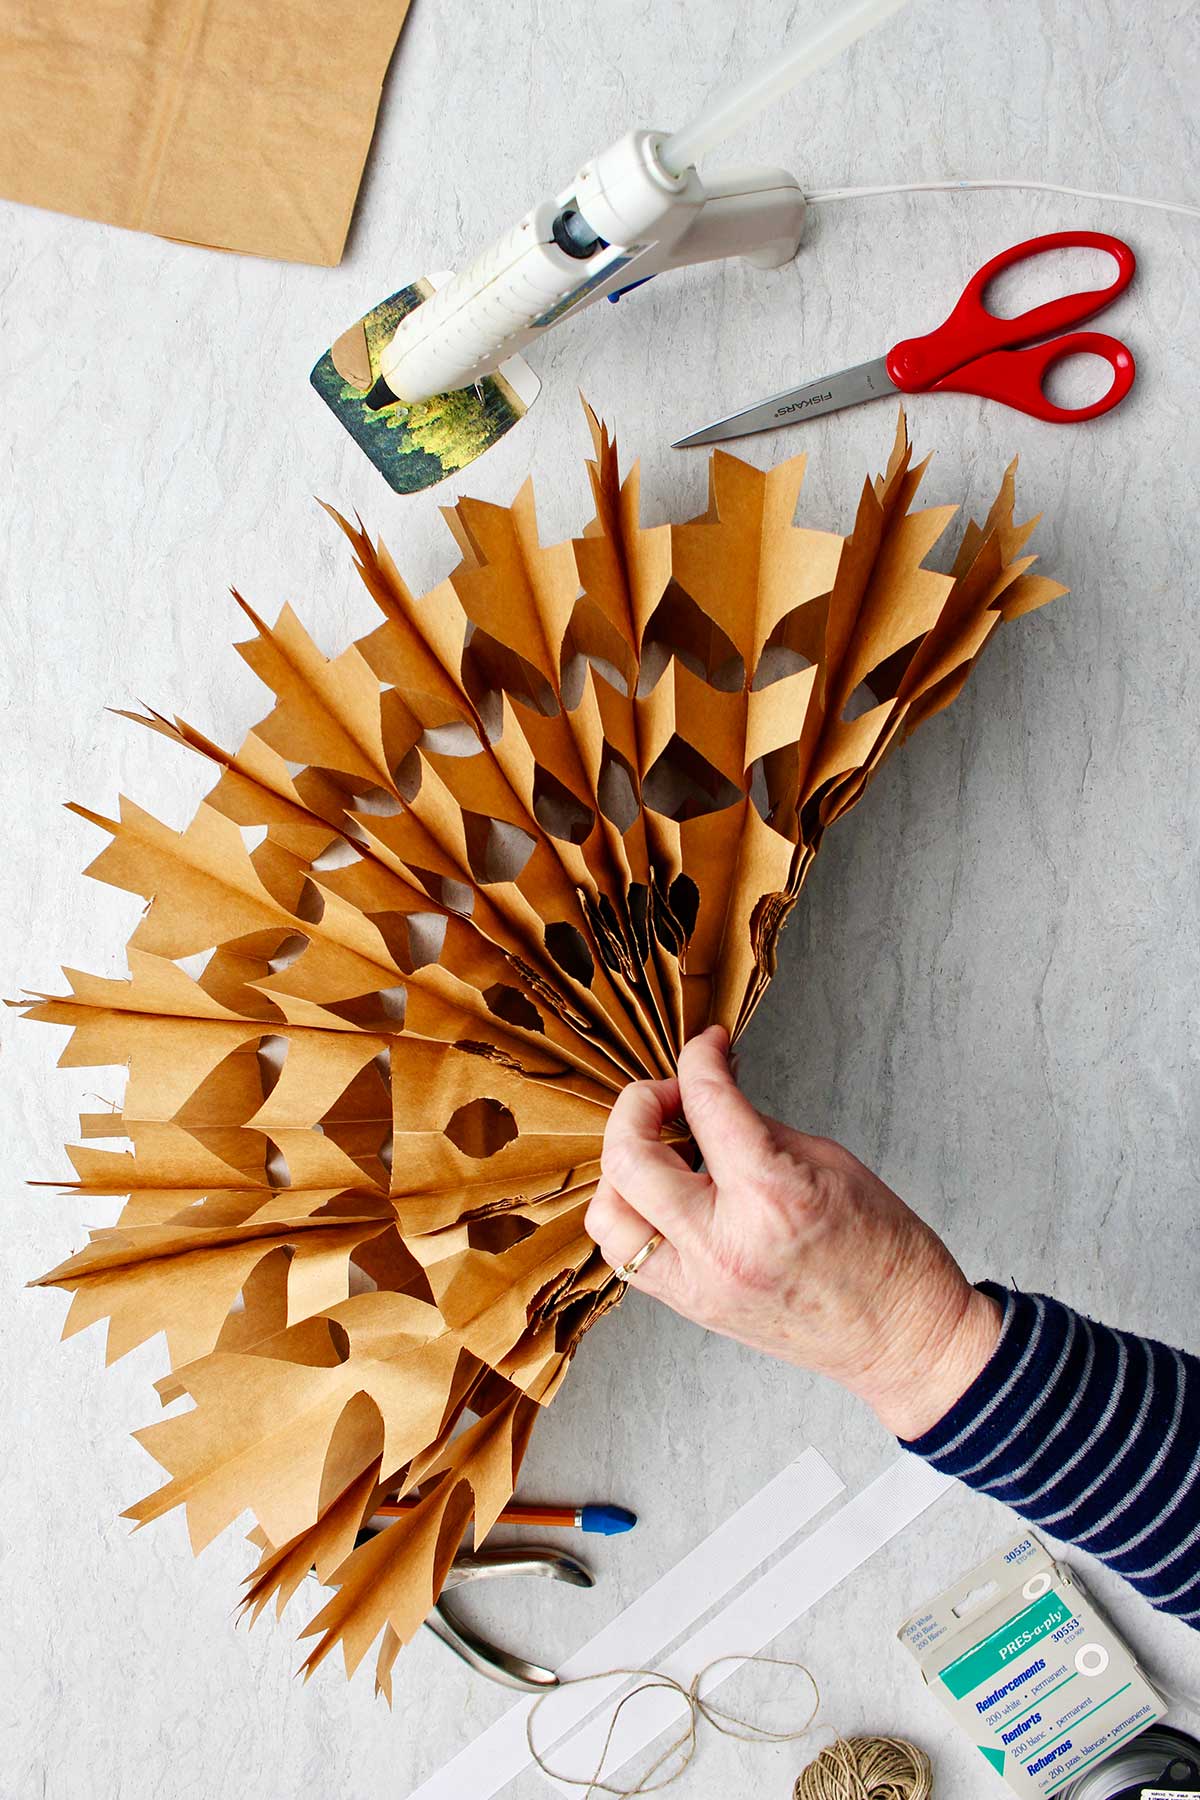
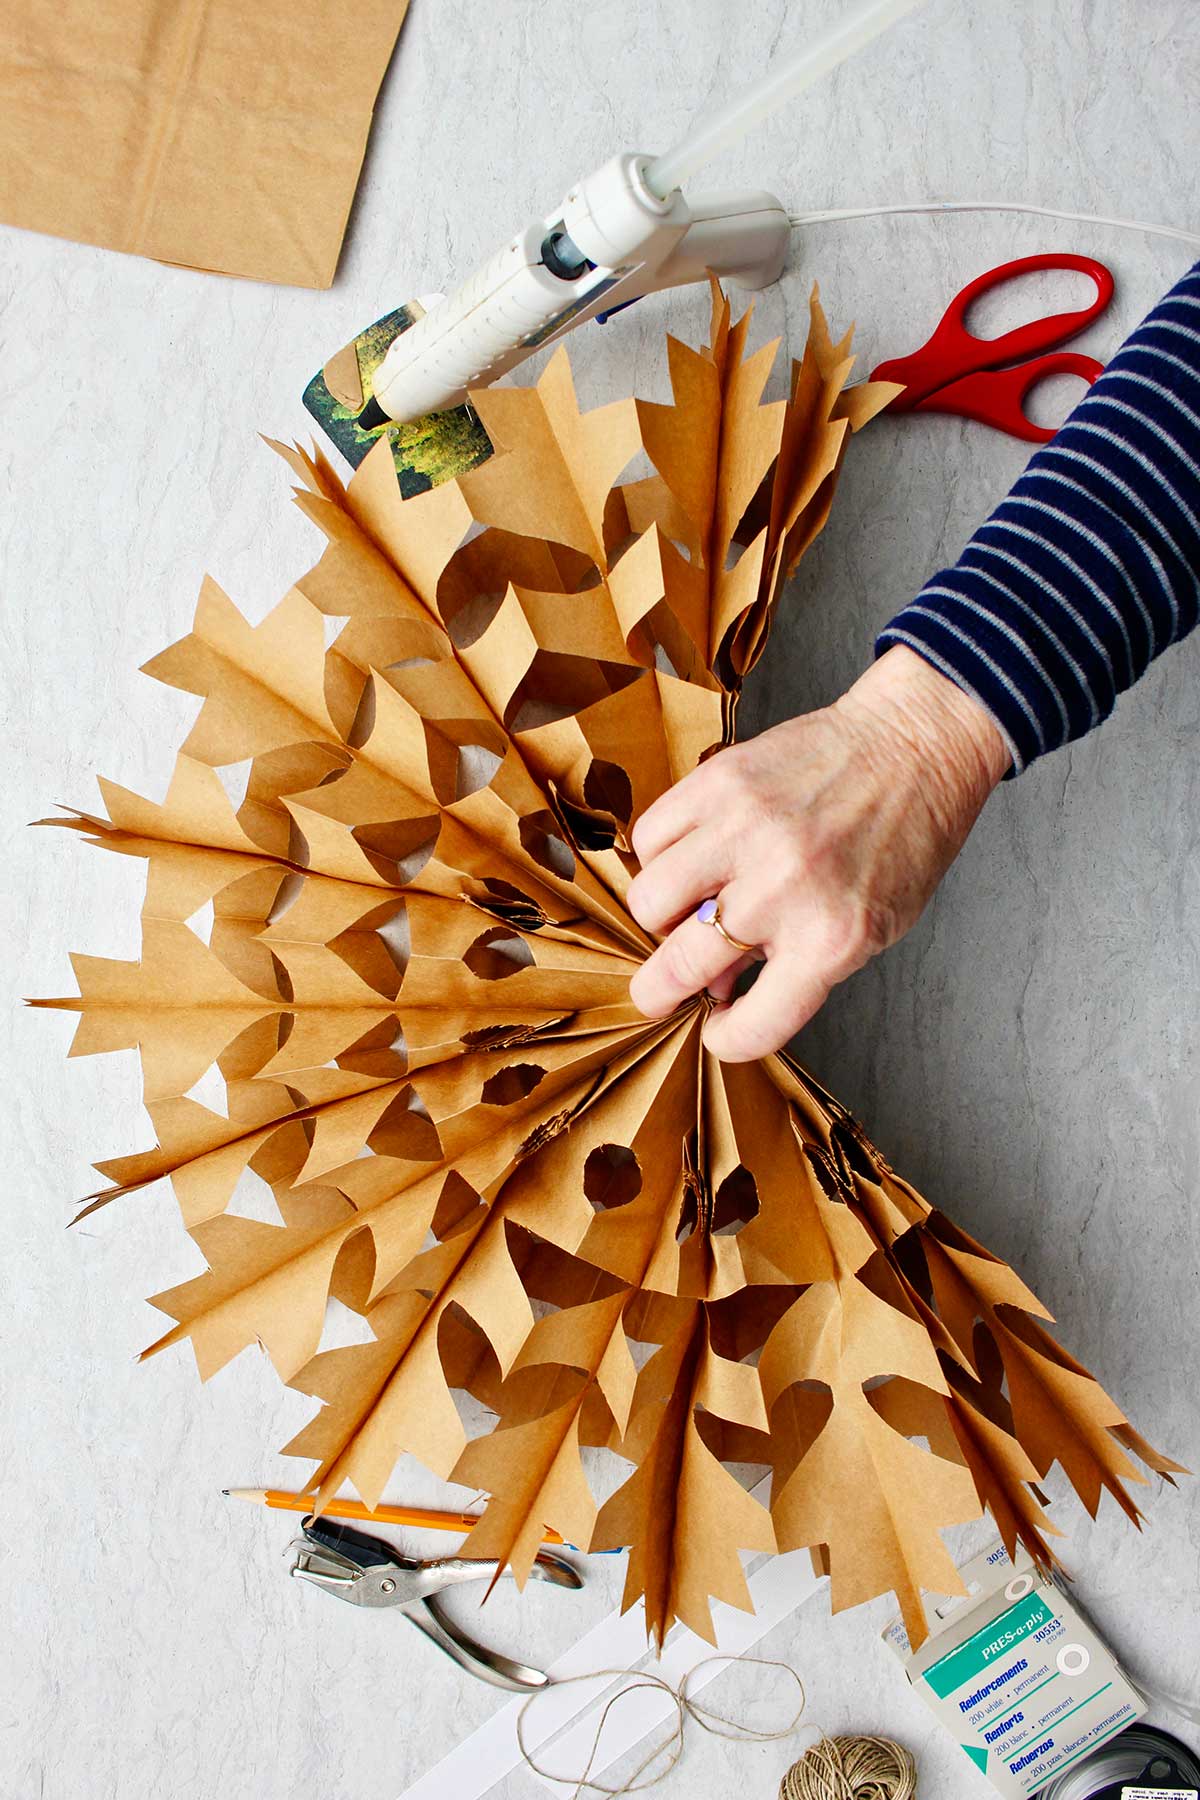
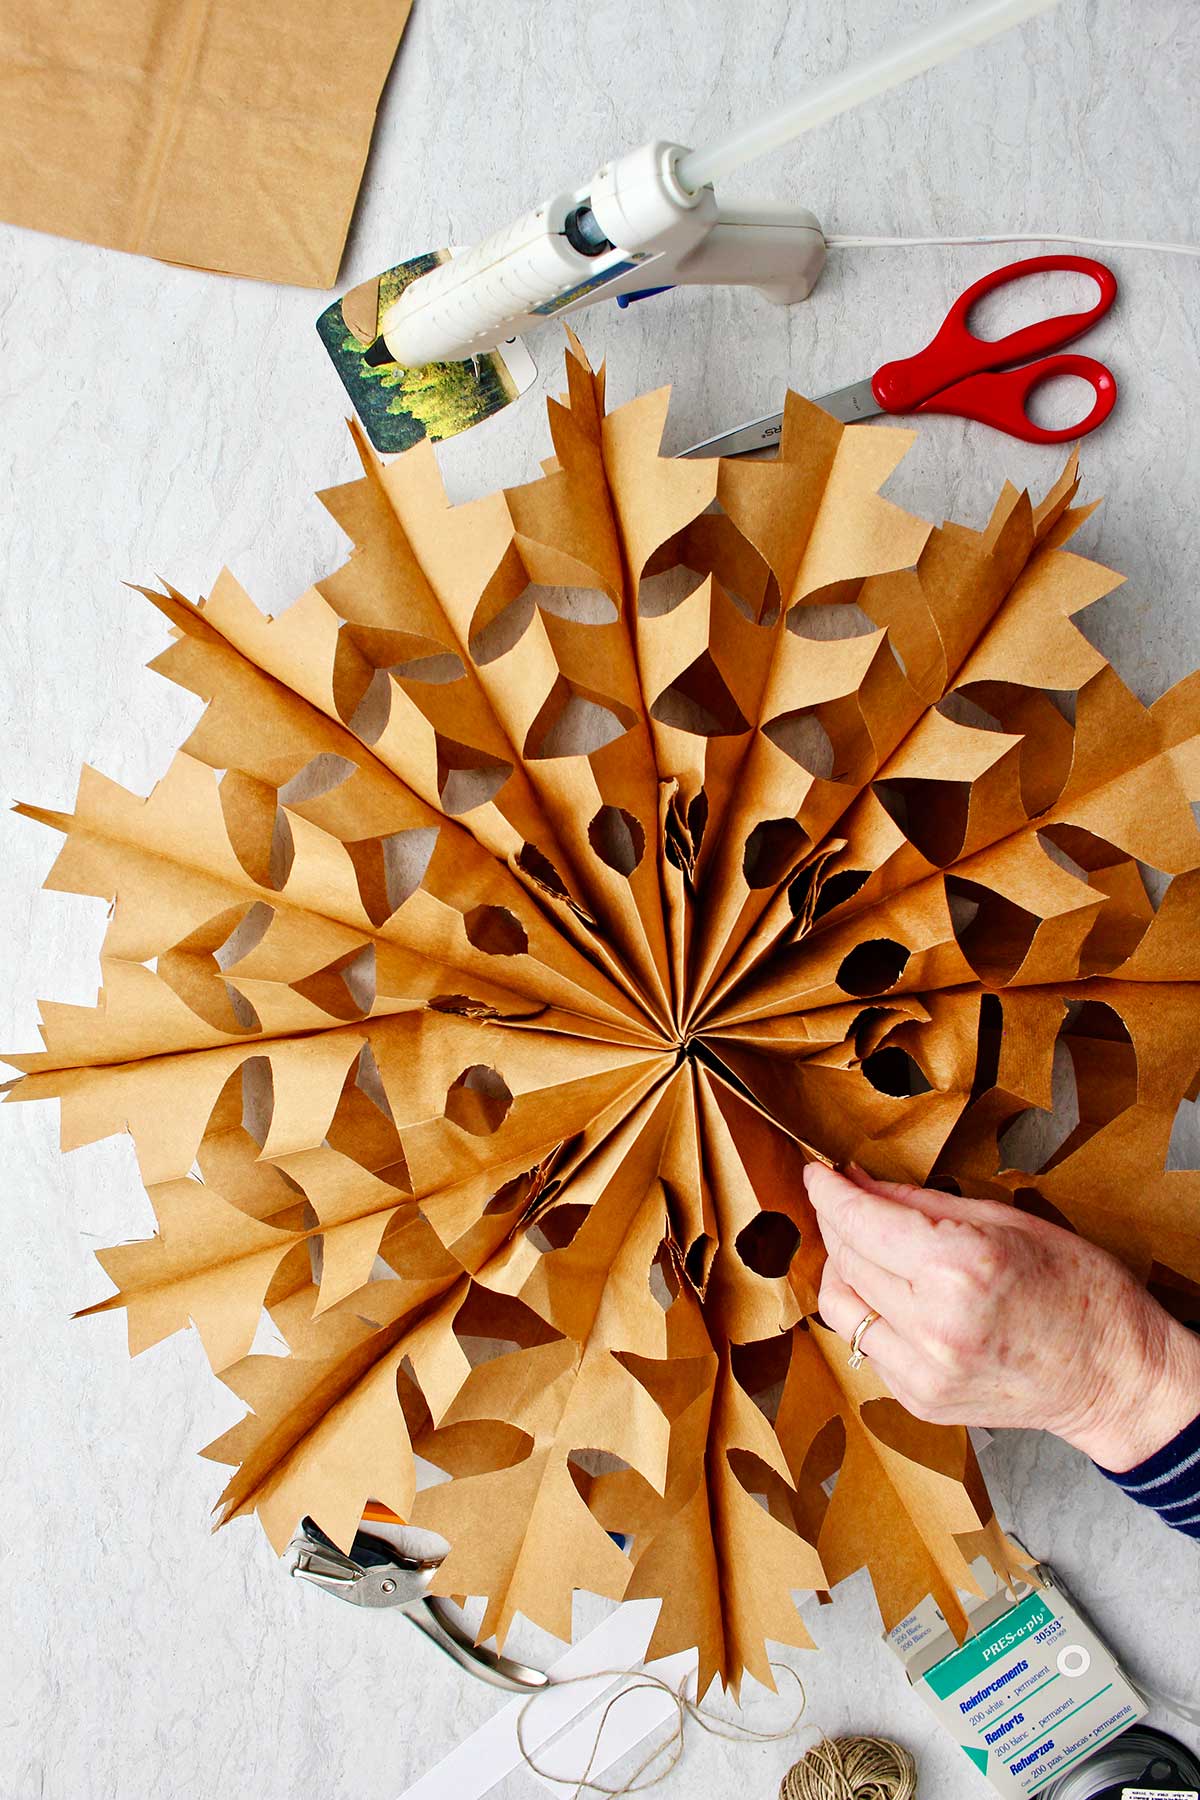
Drum roll- the next step is the fun part!! It's SO FUN to open your giant snowflakes, especially the first time!
- Pick up the stack of eight bags glued together. Hold the top open end of the front bag and the back bag. Gently pull them around toward each other.
- This will open your snowflake into its full large shape.
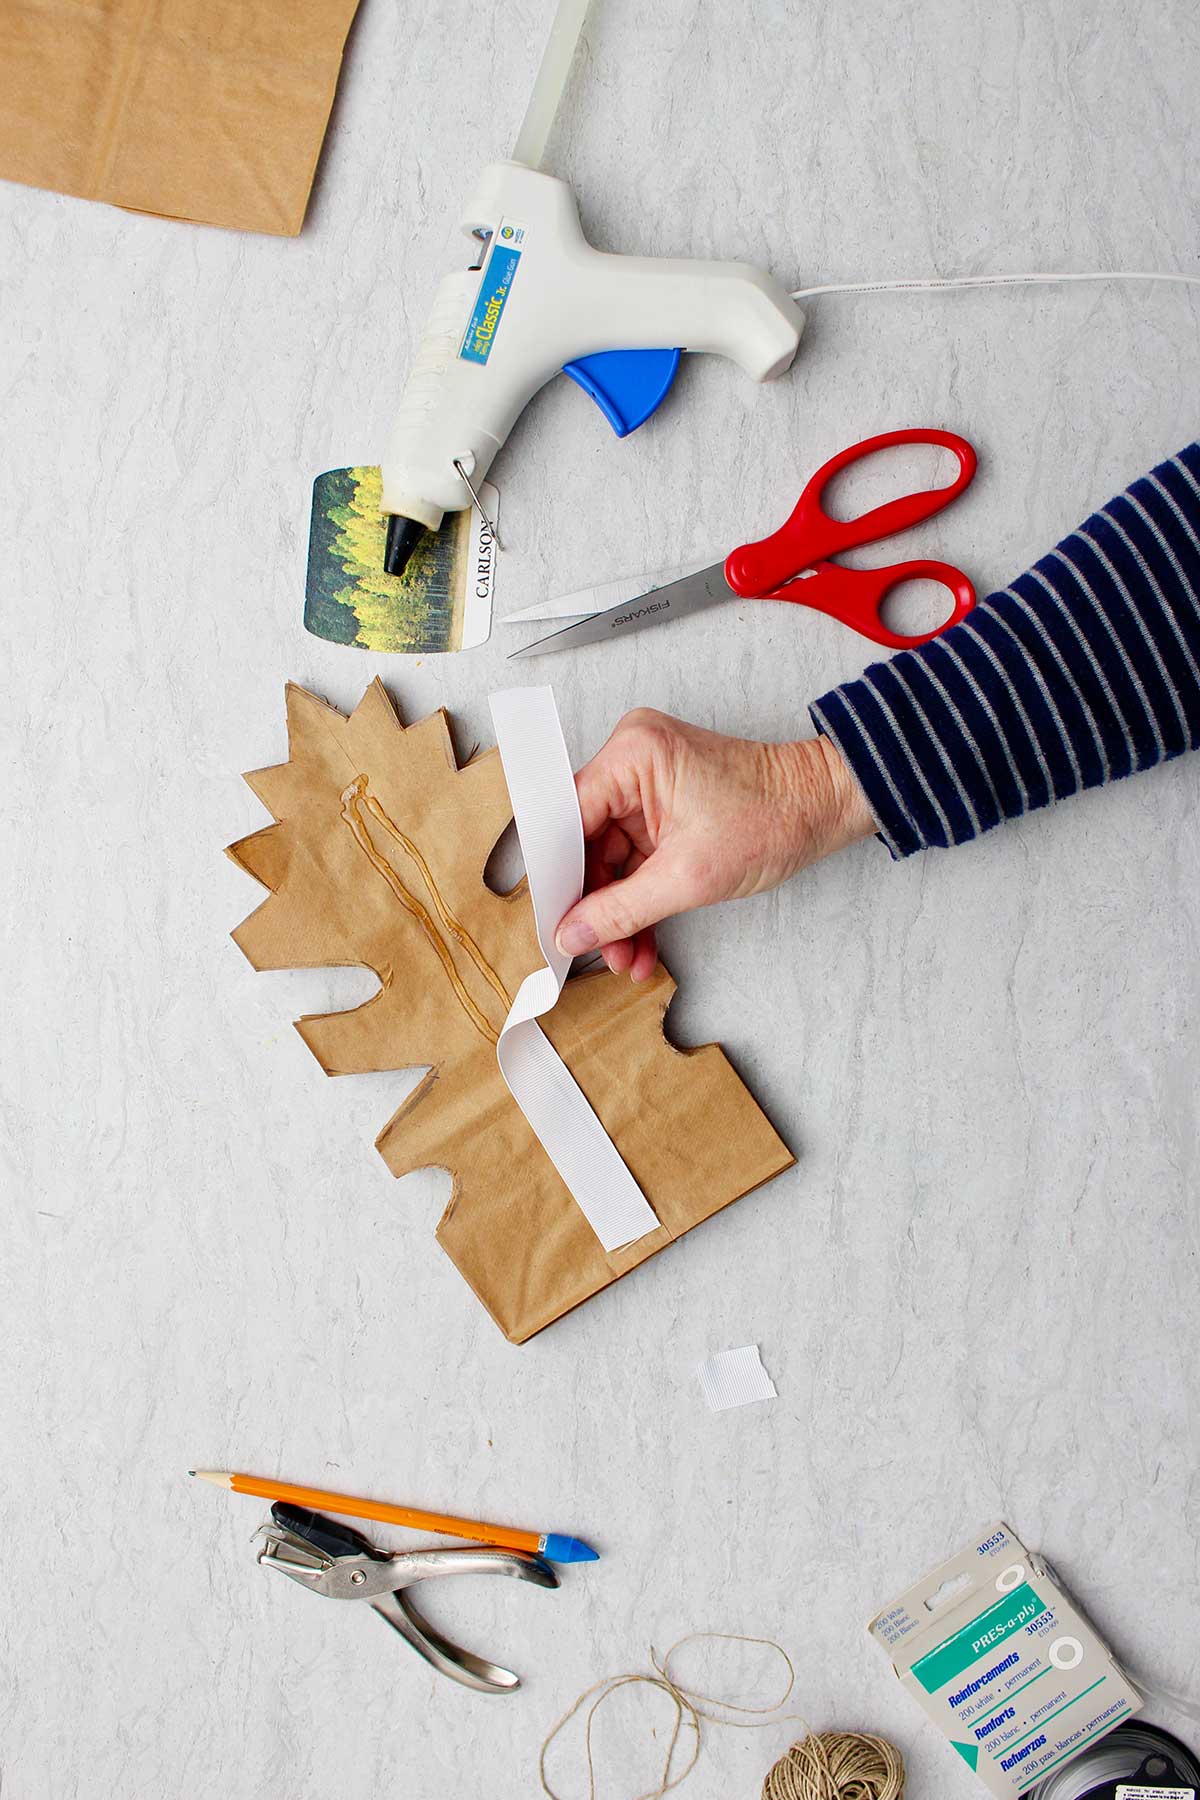
- Use a line of glue to hot glue the surfaces of these two bags together. I may be easier to use a Glue stick for this step. A glue stick helps avoid the heat of the hot glue when connecting the last two bags.
How to Hang Brown Paper Bag Snowflakes
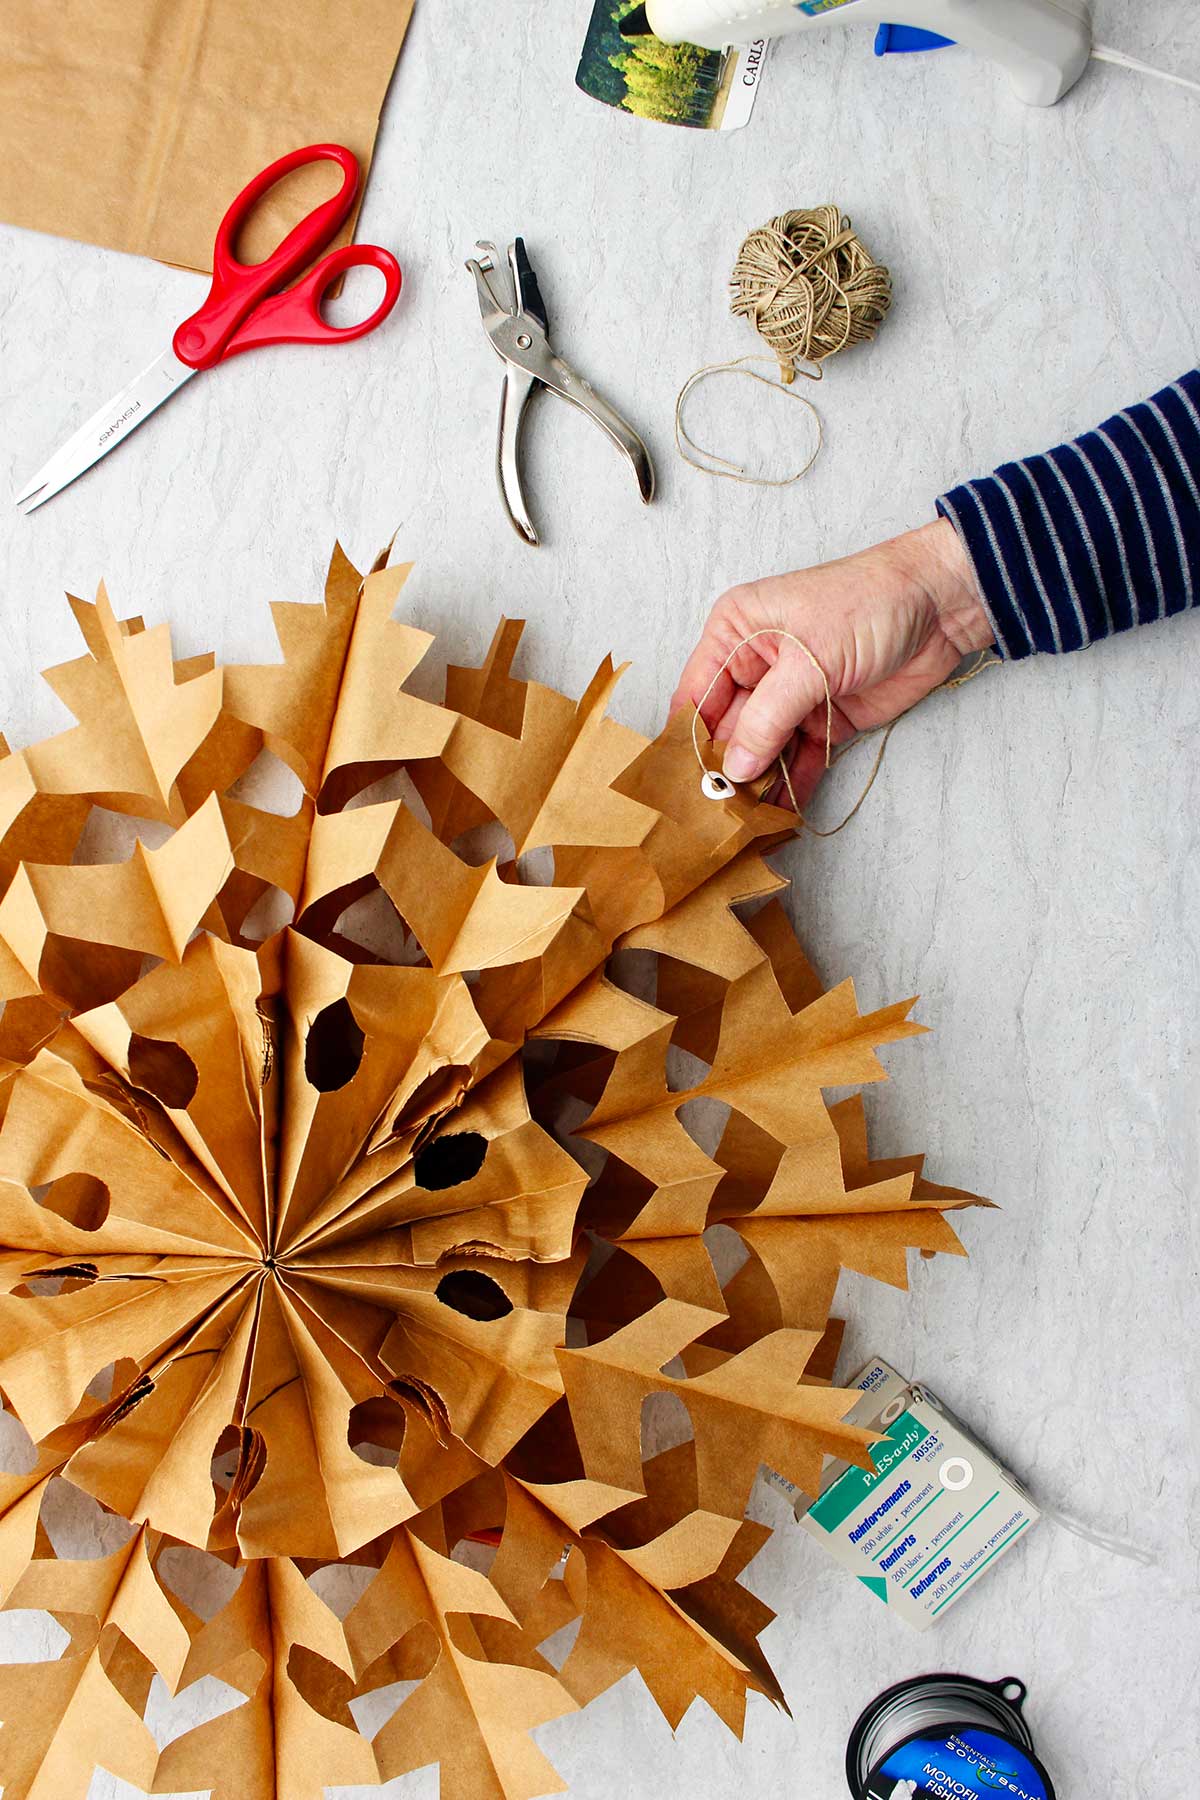
Cut a piece of string, a piece of twine, or fishing line that’s about 8 to 12 inches long and set it to the side.
Use a hole punch to punch a hole in the top of the bag. If you don’t have a hole punch, carefully make a small hole with a scissors.
Then just take your string, go through the hole and tie the two string ends together.
Now you can hang your 3D paper snowflake! Command hooks work well for this.
Paper Bag Snowflake Tips
- Start with a simple design- You can make a simple snowflake with just a few little triangle cut outs, especially with young children.
- Edge of bag- Remember to leave uncut areas on the sides of the paper bags so the snowflake holds together.
- Don't glue all bags and then cut- Even with strong scissors I found cutting all 8 bags at once too difficult.
- Position of each bag- Carefully set each bag on top with the folded edge closest to you. The flat side will be on top (folded bottom area is underneath). This makes your snowflake unfold correctly and look symmetrical.
- Stapler to connect bags- Use a stapler to connect the front and back bag. Then you can remove the staples and use the easy paper bag snowflakes again next year.
- Hole reinforcers- I used hole reinforcers (that are for notebook paper) on both sides of the bag around the hole I’d punched. This prevents the hole from ripping.
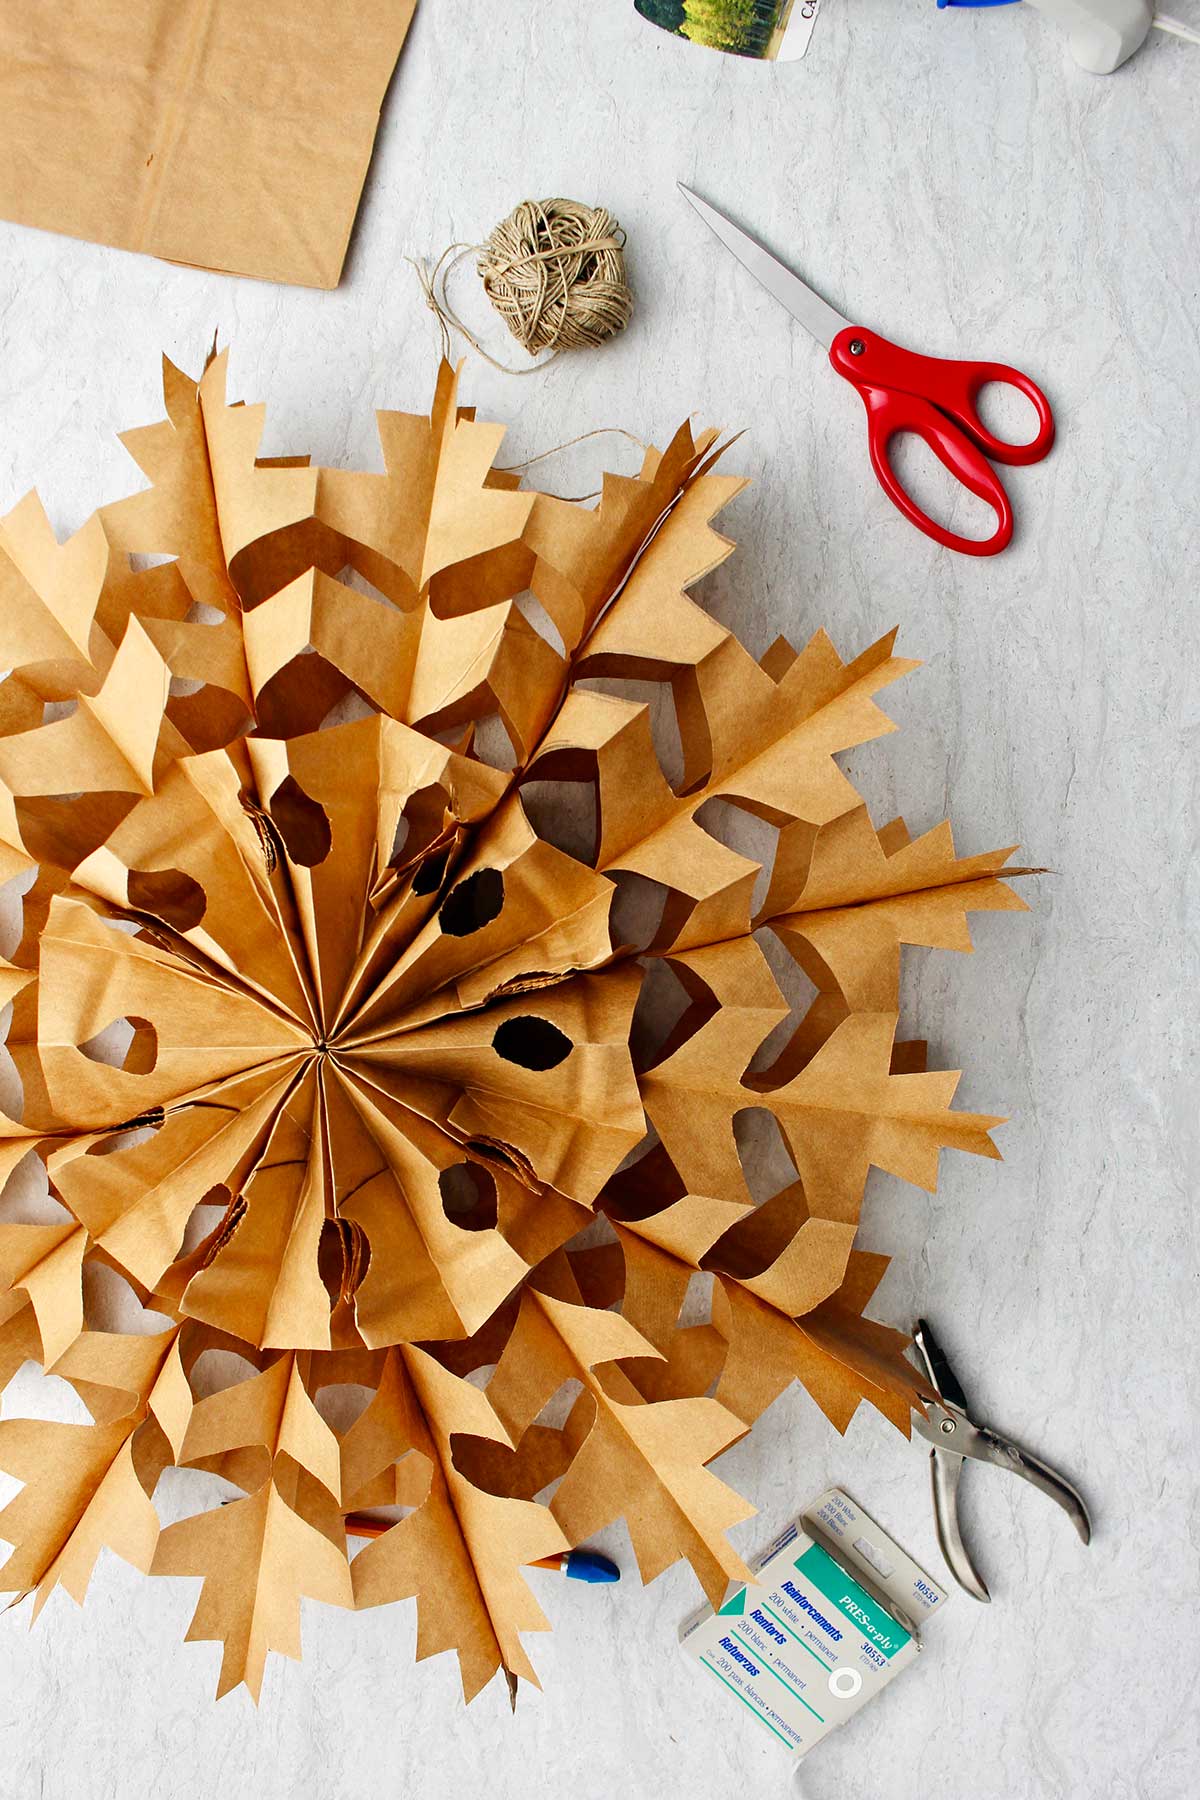
Variations of These Brown Paper Bag Snowflakes
Here are a few variations you’re welcome to try with this craft:
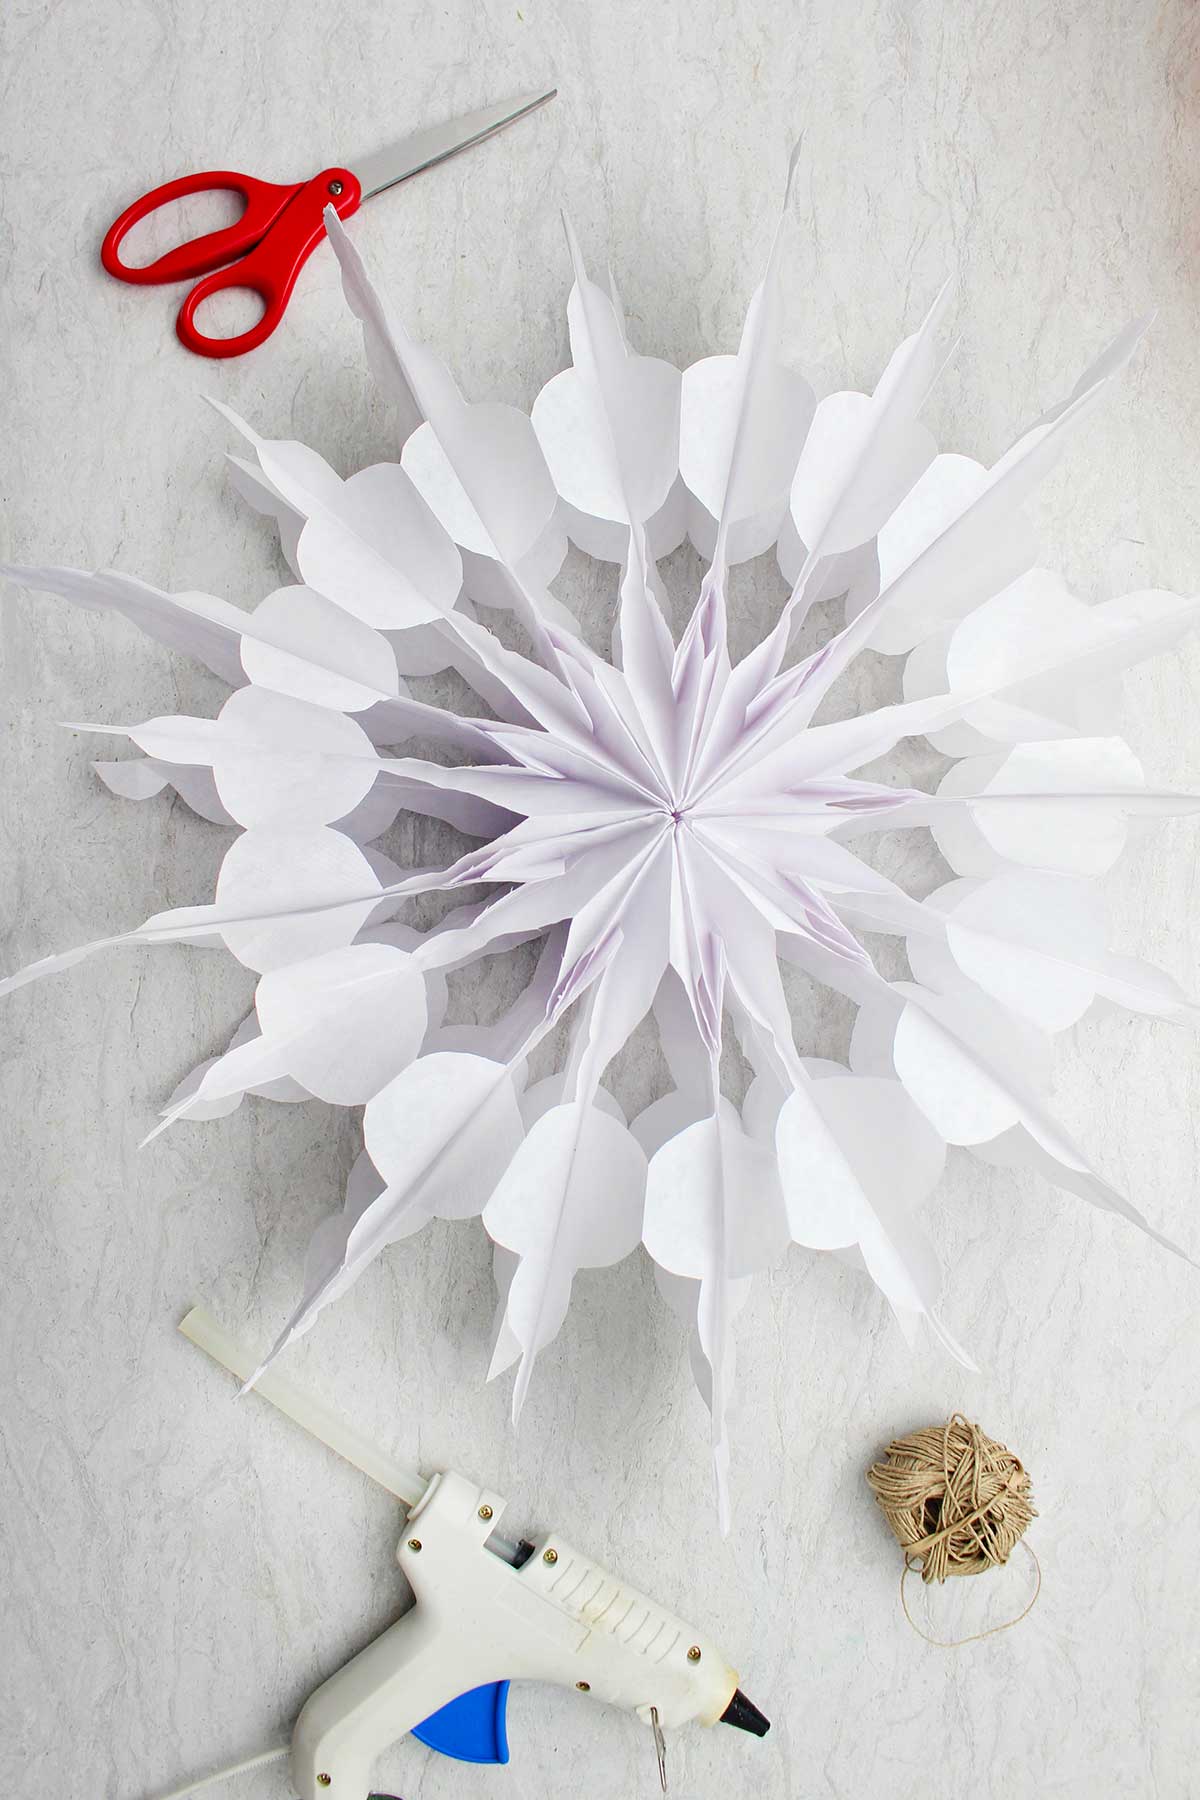
- Snowflake pattern ideas- Cut more intricate shapes as you cut as designs from the side of the stacked bags. This will make a more delicate looking snowflake when it’s finished.
- Fairy lights- Weave fairy lights through your paper bag stars to create a festive touch to this winter decor.
- Ribbon to connect bags- You can hot glue a ribbon on the last sides of the bags, fold them up, and use that to hang the bags. Or use a little hot glue on these ribbons and then peel that off after the season. Fold the bags up and use them again.
- Velcro to connect bags- Use adhesive backed Velcro circles or squares to connect the front and back bags.
FAQ
This tutorial uses 8 paper bags to make a large snowflake. This amount holds the shape well, without becoming too cumbersome to cut!
Turn some paper bags into beautiful large snowflakes with this tutorial! Then simply choose your method for hanging them up and display as many as you'd like. Perfect for holiday parties or DIY home decorations!
I find that hot glue works the best for making paper bag snowflakes, as it cools and connects the bags quickly. The down side is the heat, which can be more dangerous for kids. A Tacky Glue for crafts would be my second choice.
More DIY Christmas Craft Decorations
Come to Welcome To Nana's for more Christmas craft ideas for kids. These easy DIY decorations will keep the crafting fun going!

Happy Holidays!
I hope you’re getting excited about the upcoming holiday season! Perhaps having these simple decorations will make things seem even more festive for you.
Try this craft, leave a comment, rate it, and tag a photo with #WelcometoNanas wherever you post.
How to Make Snowflakes Out Of Paper Bags
Equipment
- Hot glue gun and hot glue
- Good Scissors
- Hole punch
- Stapler (optional)
Items Required
- Brown paper lunch bags or white paper lunch bags
- Easy DIY Snowflake Out of Paper Bags Free Pattern
- String, twine, or fishing line
- Ribbon (optional)
- Hole reinforcers (optional)
- Glue stick (optional)
Instructions
- I have made a printable with six different snowflake pattern ideas on it. Free pattern found here: How to Make Easy DIY Snowflake from Paper Bags Free Pattern.
- I found that using eight bags was what worked best. This makes a full and even snowflake.Lay the first bag down in front of you with the bottom fold closest to you. The opening of the bag is at the top, and the flat unfolded side upward (lay each bag down in this same way).Draw your pattern on the top of the first bag. You will use this as a template to cut the rest of the bags. Set this bag to the side for a minute.
- Take another one of the bags and set it in front of you. Take your hot glue gun and place a strip of glue down the center of the paper bag from the top to the bottom. Then place glue sideways from one side of the bag to the other along the bottom edge. You’re making an upside-down “T” with these two glue lines.Set the next bag on top (second bag). Line up the sides in a straight line. Make a hot glue “T” on the top bag and set the bag you drew your design on top next.
- Using a good scissors, cut out the design you drew on the first bag. Cut through all the three bags you have glued together.Glue three more individual bags together. Then glue the first set of bags on top. Cut the second set of three bags using the first set as a template.Glue the last two bags together. Glue the set of six bags on top. Then cut the last two bags using the other bags as a template.At the end, you’ll have a stack of eight bags one on top of the other glued together and cut in the same shape.
- Drum roll- the next step is the fun part!! It's SO FUN to open your giant snowflakes, especially the first time!Pick up the stack of eight bags glued together. Hold the top open end of the front bag and the back bag. Gently pull them around toward each other. This will open your snowflake into its full large shape. Use a line of glue to hot glue the surfaces of these two bags together. I may be easier to use a Glue stick for this step. A glue stick helps avoid the heat of the hot glue when connecting the last two bags.
- To hang these DIY paper bag snowflakes you can use Cut a piece of string, a piece of twine, or fishing line that’s about 8 to 12 inches long and set it to the side.Use a hole punch to punch a hole in the top of the bag. If you don’t have a hole punch, carefully make a small hole with a scissors.Then just take your string, go through the hole and tie the two string ends together. Now you can hang your 3D paper snowflake! Command hooks work well for this.
- There are tips and variations for this project on the website post.
Video
Notes
This post was originally published in December 2023 and has been updated to add more relevant and detailed content.
Laura says
Wow this takes making snowflakes to a different level! Must try!
Shaylee Calaway says
Thank you for your easy to follow tutorial! We are going to use this for an upcoming church craft night activity and are so excited. Could we have permission to share a picture as an example to our participants? Thanks!
Shelly says
That is so fun to hear! Yes please feel free to share the photo as an example, I always just ask for credit to be provided! Hope you have a great time with the craft!
Debbie says
I was wondering which of the free patterns, thank you very much, is the white one. It is gorgeous. Thank you.
Shelly says
This simple craft is truly gorgeous, isn't it? The white snowflake is most like the top left of the free patterns. Except instead of making straight cuts into the bags I curved the cuts into the bag to make more rounded areas. Remember not to cut all of the folded edge off of the bags so they bags don't fall apart though! Have fun...and they all turn out pretty!! LOVE this craft!!