How to Make Snowflakes Out Of Paper Bags
Learn to make giant Paper Bag Snowflakes with this easy kid's craft tutorial! Use brown or white paper bags to make DIY Christmas decorations.
Servings: 1 Snowflake out of paper bags
Cost: $1
Equipment
- Hot glue gun and hot glue
- Good Scissors
- Hole punch
- Stapler (optional)
Ingredients
- Brown paper lunch bags or white paper lunch bags
- Easy DIY Snowflake Out of Paper Bags Free Pattern
- String, twine, or fishing line
- Ribbon (optional)
- Hole reinforcers (optional)
- Glue stick (optional)
Instructions
- I have made a printable with six different snowflake pattern ideas on it. Free pattern found here: How to Make Easy DIY Snowflake from Paper Bags Free Pattern.
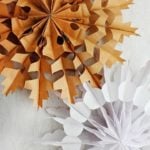
- I found that using eight bags was what worked best. This makes a full and even snowflake.Lay the first bag down in front of you with the bottom fold closest to you. The opening of the bag is at the top, and the flat unfolded side upward (lay each bag down in this same way).Draw your pattern on the top of the first bag. You will use this as a template to cut the rest of the bags. Set this bag to the side for a minute.
- Take another one of the bags and set it in front of you. Take your hot glue gun and place a strip of glue down the center of the paper bag from the top to the bottom. Then place glue sideways from one side of the bag to the other along the bottom edge. You’re making an upside-down “T” with these two glue lines.Set the next bag on top (second bag). Line up the sides in a straight line. Make a hot glue “T” on the top bag and set the bag you drew your design on top next.
- Using a good scissors, cut out the design you drew on the first bag. Cut through all the three bags you have glued together.Glue three more individual bags together. Then glue the first set of bags on top. Cut the second set of three bags using the first set as a template.Glue the last two bags together. Glue the set of six bags on top. Then cut the last two bags using the other bags as a template.At the end, you’ll have a stack of eight bags one on top of the other glued together and cut in the same shape.
- Drum roll- the next step is the fun part!! It's SO FUN to open your giant snowflakes, especially the first time!Pick up the stack of eight bags glued together. Hold the top open end of the front bag and the back bag. Gently pull them around toward each other. This will open your snowflake into its full large shape. Use a line of glue to hot glue the surfaces of these two bags together. I may be easier to use a Glue stick for this step. A glue stick helps avoid the heat of the hot glue when connecting the last two bags.
- To hang these DIY paper bag snowflakes you can use Cut a piece of string, a piece of twine, or fishing line that’s about 8 to 12 inches long and set it to the side.Use a hole punch to punch a hole in the top of the bag. If you don’t have a hole punch, carefully make a small hole with a scissors.Then just take your string, go through the hole and tie the two string ends together. Now you can hang your 3D paper snowflake! Command hooks work well for this.
- There are tips and variations for this project on the website post.
Video
Notes
The step by step tutorial video on our YouTube channel makes this even easier. You can fiYou can find it at this link: How to Make a Simple DIY Snowflake from Paper Bags. Full Length Tutorial.