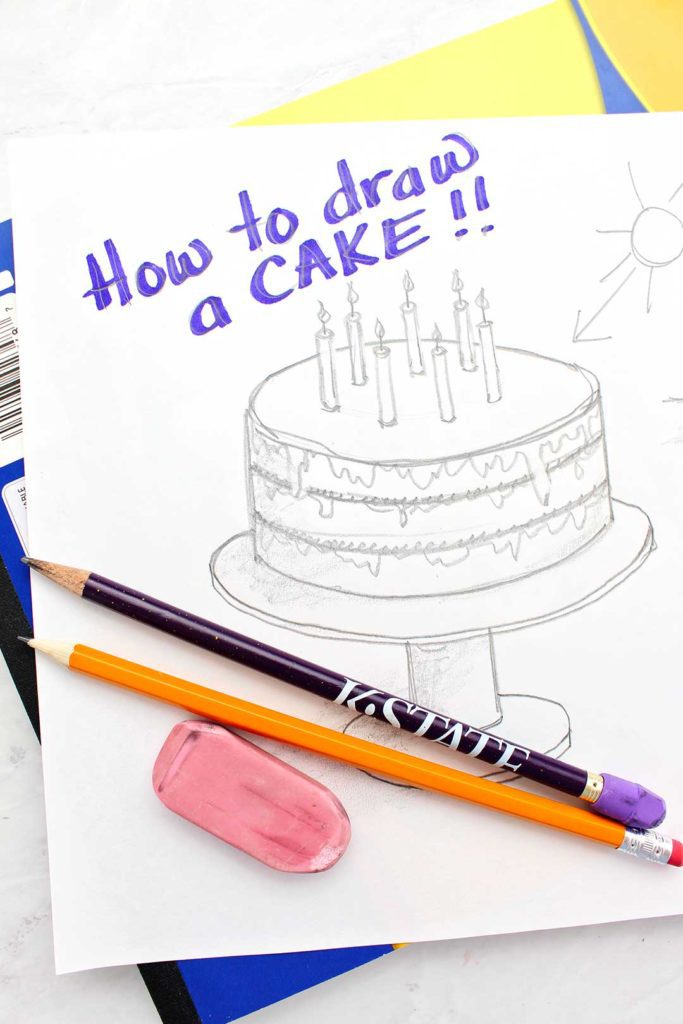
Learning How to Draw a Cake puts drawing a cylinder on steroids. You will be able to draw a cake, complete with decorations and candles in one easy lesson!
How to draw a cake
Let’s take what we learned about drawing a cylinder and a foreshortened circle and have some fun with it. If you missed that lesson, you may want to take a few minutes and catch up by going to the lesson at this link- How to Draw a Cylinder.
Go get your drawing pad, pencils and eraser. Hopefully you have been practicing!
Read more: How to Draw a CakeFirst Steps for Drawing your Cake
Think of a round birthday cake and what it looks like. If you looked straight down on the cake you would see a circle shape. But what if you tip the cake a bit and look at it from the side?
Guess what? A cake is just a short and wide cylinder! So, let’s start there.
Draw a short and wide cylinder on your drawing paper. Remember, the more the cake (cylinder) is tipped away from you, the flatter the first smile line will be at the bottom of the foreshortened circle that is the top of the cake.
We will wait a bit to do the contour lines and shading.
Place the cake on a plate
That cake needs to sit on a plate, don’t you think?
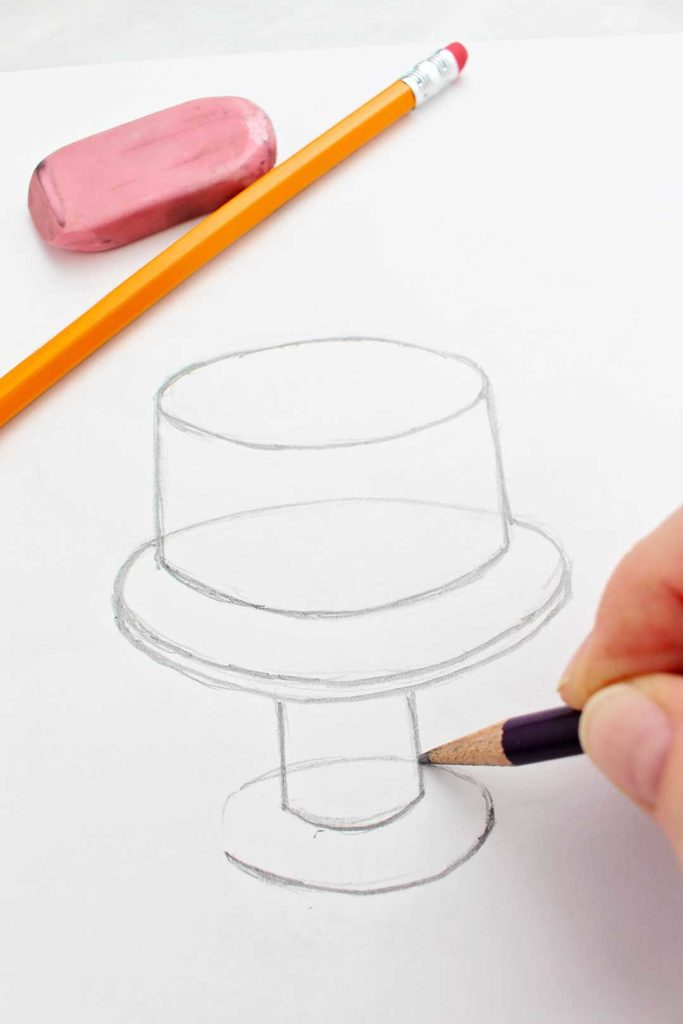
To draw a plate that sits under the cake draw a matching smile line a small distance under the cake, but make it a bit wider than the cake. Then imagine drawing the top part of a foreshortened circle to complete the cake but part of it is behind the cake. If it helps you to see this, draw the top part of a foreshortened circle very lightly to complete the plate. Then draw over the part that does not go behind the cake and erase the part that does go behind the plate.
To make the plate have thickness, draw another smile line uner the first but very, very close to is. Connect the two lines at the sides of the foreshortened circle.
Do you see it? A plate is basically a very flat and wide cylinder!
Ready for more cylinder fun?
Let’s draw a cake stand!
Now let’s imagine that our cake and plate are sitting on a cake stand.
So the stem of the cake stand is going to be a…you guessed it, a cylinder.
Draw the two sides of the stem going down from near the center of the plate. We are imagining tht the plate covers up the top of the cake stand. Or you could say that what we first drew as a plate is now the top of the cake stand.
Draw a matching smile line at the bottom of the stem.
We will finish the cake stand with a base at the bottom of the stem. It will be smaller than the top of the cake stand.
Draw a matching smile line below the bottom of the stem- but wider.
Draw the top of a foreshortened circle over the to of this- it disappears behind the stem and reappears on the other side. You can lightly draw the entire thing and just erase the part that goes behind the stem if that is easier for you.
To give the base some thickness, draw another smile line under the first, the same size and very close to it. Connect the two at the sides. Yep, another very flat cylinder.
See what I mean, cylinders on steroids!
This is basically a series of stacked cylinders.
The secret is the smile line, keeping it basically the same curve and the foreshortened circle.
Once you understand these concepts you will be amazed at how many things you can draw so much more accurately and realistically.
How to draw a birthday cake
OK, ready to make it a birthday cake?
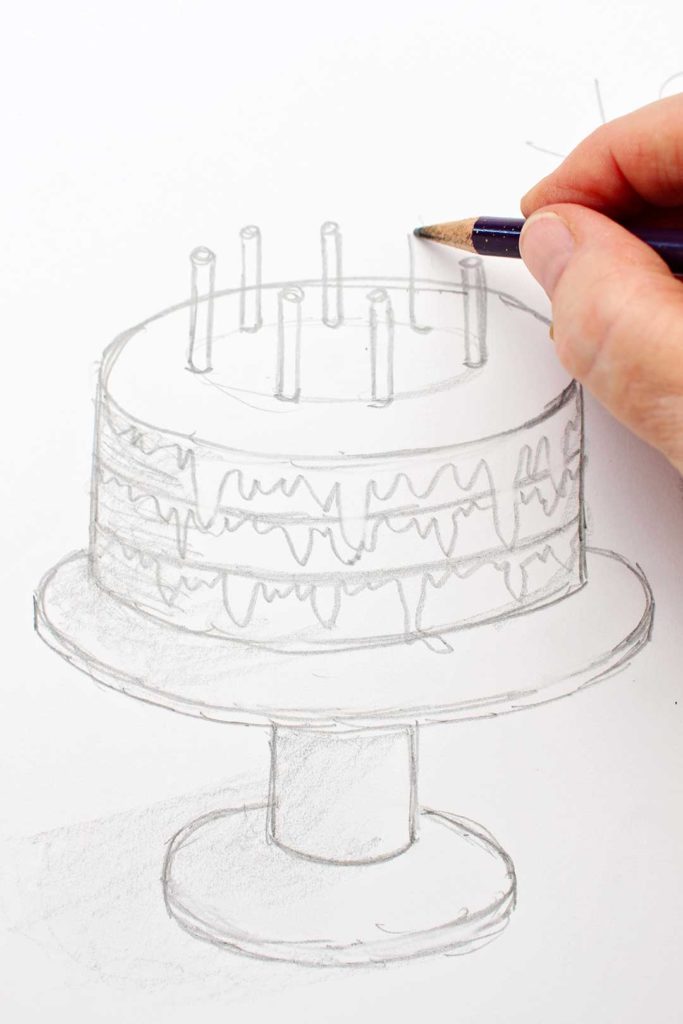
Want the cake to have tiers with frosting between them? Draw smile lines on the side of the cake that match the top and bottom smile lines. You can make one, two, three or ten layers this way. I made the lines a bit thicker to make it like frosting.
Decorate- with dripping frosting and candles
Draw on the Frosting!
For fun, add some frosting dripping over the side of the cake. Draw a squiggly line below the top of the cake (the foreshortened circle).
Add some Candles
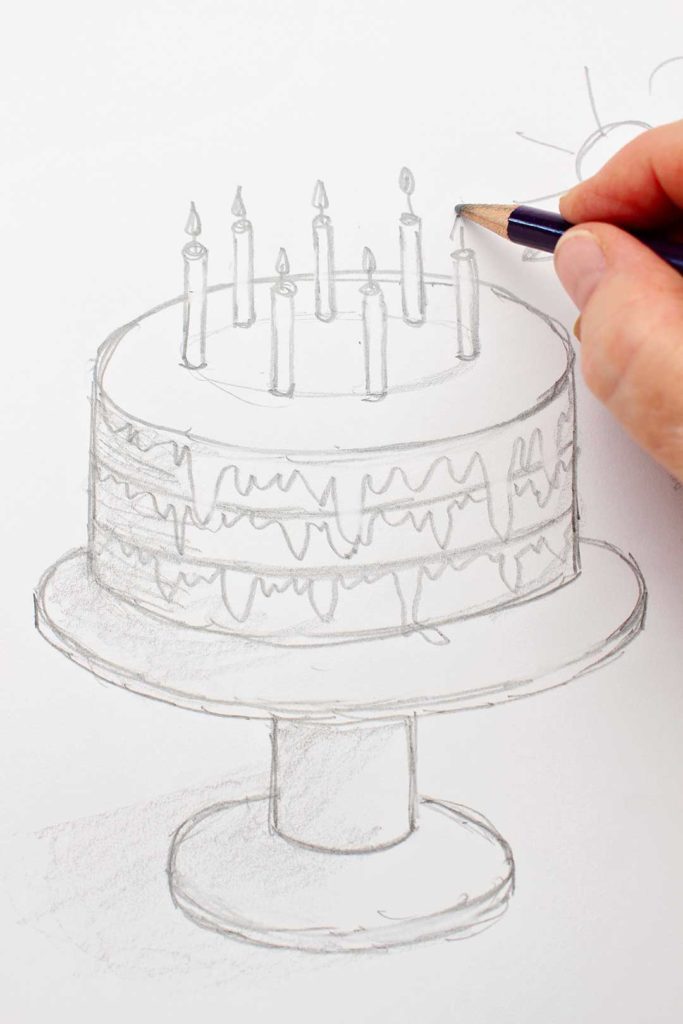
If you notice, a candle is a tall and slender cylinder! Crazy, huh?
Draw a light foreshortened circle on the top of your cake. It should be the same shape as the top only smaller. You will draw the base of each candle on this line.
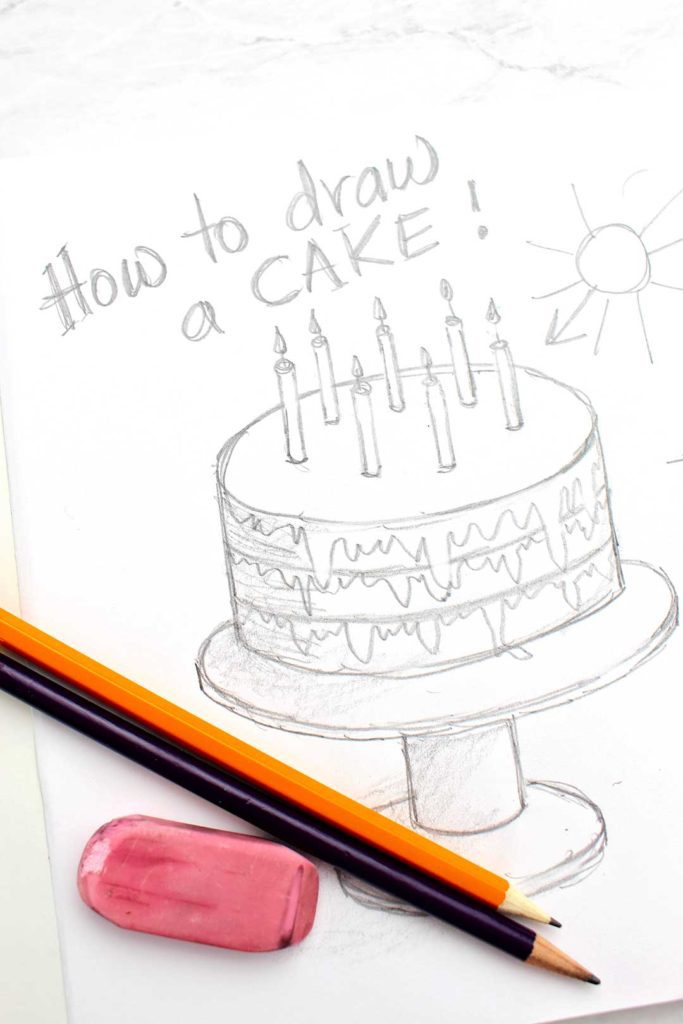
So draw your candles with two close and parallel lines with the bottom smile line on the foreshortened circle you drew and the top line a small foreshortened circle. Repeat this around the top until you have the number of candles you want. It really helps to watch the video or refer to the picture on this step.
You are finished unless you want to add more decorations on the cake.
Doodle and Practice!
Challenge yourself to doodle pictures such as this one whenever you can- just for fun. You will be amazed at how your skill grows.
Another lesson will be on How to draw a cupcake and a multi-tiered wedding cake!
More Drawing Tutorials for Beginners
If you want to practice some more, there is a growing number of How to Draw videos at WelcomeToNanas.com. You can easily follow these step-by-step instructions to draw at any skill level, don't worry, and you'll have lots of drawing ideas on the other side!
Enjoy!
If you try this craft, let me know! Go ahead and leave a comment, rate it, and tag a photo with #WelcometoNanas wherever you post.
Come join the fun at https://welcometonanas.com
How to Draw a Cake
Equipment
- none needed
Items Required
Instructions
- Let’s take what we learned about drawing a cylinder and a foreshortened circle and have some fun with it. If you missed that lesson, you may want to take a few minutes and catch up by going to the lesson at this link- How to Draw a Cylinder.
- It will be very helpful to watch the video in this post, How to Draw a Cake.
- Draw a short and wide cylinder on your drawing paper. Remember, the more the cake (cylinder) is tipped away from you, the flatter the first smile line will be at the bottom of the foreshortened circle that is the top of the cake.
- To draw a plate that sits under the cake draw a matching smile line a small distance under the cake, but make it a bit wider than the cake. Then imagine drawing the top part of a foreshortened circle to complete the cake but part of it is behind the cake. If it helps you to see this, draw the top part of a foreshortened circle very lightly to complete the plate. Then draw over the part that does not go behind the cake and erase the part that does go behind the plate. To make the plate have thickness, draw another smile line uner the first but very, very close to is. Connect the two lines at the sides of the foreshortened circle. A very short wide cylinder!
- Now let’s imagine that our cake and plate are sitting on a cake stand. So the stem of the cake stand is going to be a…you guessed it, a cylinder.
- Draw the two sides of the stem going down from near the center of the plate. We are imagining tht the plate covers up the top of the cake stand. Or you could say that what we first drew as a plate is now the top of the cake stand. Draw a matching smile line at the bottom of the stem.
- We will finish the cake stand with a base at the bottom of the stem. It will be smaller than the top of the cake stand.Draw a matching smile line below the bottom of the stem- but wider.Draw the top of a foreshortened circle over the to of this- it disappears behind the stem and reappears on the other side. You can lightly draw the entire thing and just erase the part that goes behind the stem if that is easier for you.To give the base some thickness, draw another smile line under the first, the same size and very close to it. Connect the two at the sides. Yep, another very flat cylinder.
- For fun, add some frosting dripping over the side of the cake. Draw a squiggly line below the top of the cake (the foreshortened circle).
- So draw your candles with two close and parallel lines with the bottom smile line on the foreshortened circle you drew and the top line a small foreshortened circle. Repeat this around the top until you have the number of candles you want. It really helps to watch the video or refer to the picture on this step.Candles are tall, narrow cylinders!You are finished unless you want to add more decorations on the cake.




Leave a Reply