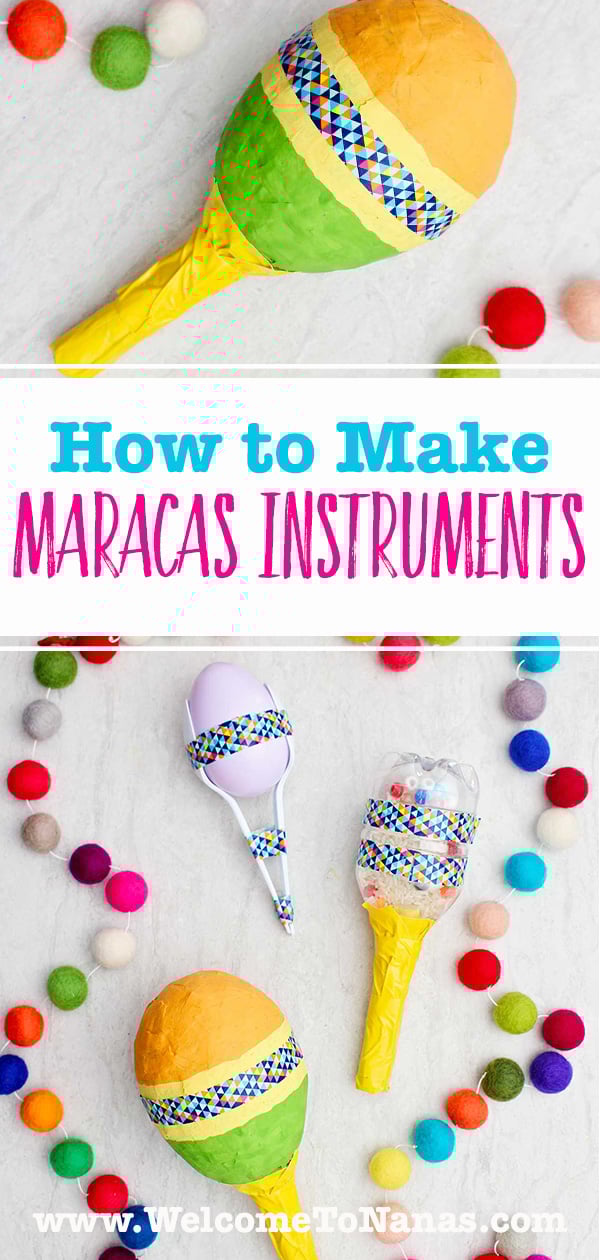
This DIY Maracas Instrument craft lets you learn how to make a maraca 3 ways, PLUS learn about creativity, sound, rhythm, and movement. An extra bonus is that the craft uses supplies you probably have at home!
Jump to:
- DIY Maracas Instrument (3 Ways!)
- Cute Craft Alert: Homemade Maracas
- What Are Maracas?
- Supplies Needed for DIY Maracas
- How to Make Homemade Maracas
- Craft Tips
- DIY Maracas Variations
- How to Use Homemade Maracas
- The Skills Your Kids Will Use and Learn
- FAQ About How to Make Maracas
- More DIY Recycled Crafts for Kids
- Come join the fun at WTN!
- More Crafts Please!
- How to Make Maracas Instrument
DIY Maracas Instrument (3 Ways!)
My three children made maracas and other instruments and often marched around the living room playing along with the music playing. Now it’s the grandkid’s turn to make and play maracas.
Choose your favorite of the three different styles of maracas, or try them all. There’s a whole lot of shakin’ goin’ on!
Cute Craft Alert: Homemade Maracas
When I was in grade school, my favorite part of music time was getting to play an instrument while we sang. The music teacher pulled out sticks, tambourines, bells, and maracas! We couldn’t help but move with the music when shaking the maracas.
I think maracas are great shaking instruments to make and play. They have such a pleasant sound with music, are easy and inexpensive to make, and are portable. They can be used at home, church, school, or programs. Kids (and adults) love them.

What Are Maracas?
A maraca is a hand held instrument that shakes. It usually has a handle and a bulb end that holds small objects inside. When it shakes it creates sound as the small objects hit the sides of the bulb container. It is used to keep rhythm and add that shaking sound to the music that is being played. It is considered a percussion instrument and is often played in pairs.
What does “Maracas” mean?
A maraca means a rattle made from a dried gourd with pebbles inside. It’s played as a percussion instrument by shaking it. The word is from the Caribbean and South American languages.

Where did Maracas Originate?
The maraca has an interesting but uncertain history. Maracas are thought to date back to about 500 BC with artifacts discovered in the Latin American area. But which specific people group or specific area is uncertain. Maracas were spread from that area because of travel and wars through South America, Africa, and the Pacific Islands.
They were made from a tree fruit (that remind me of gourds) or from turtle shells with small objects like stones or beans placed inside.
Originally the maraca was mainly used in the Caribbean and Latin music of South America. But its popularity spread across the world and thus spread to all musicians. The maraca is now a beloved instrument for kids everywhere in their early years of learning about music.
Supplies Needed for DIY Maracas
You don’t need much to bring these cute homemade maracas to life!
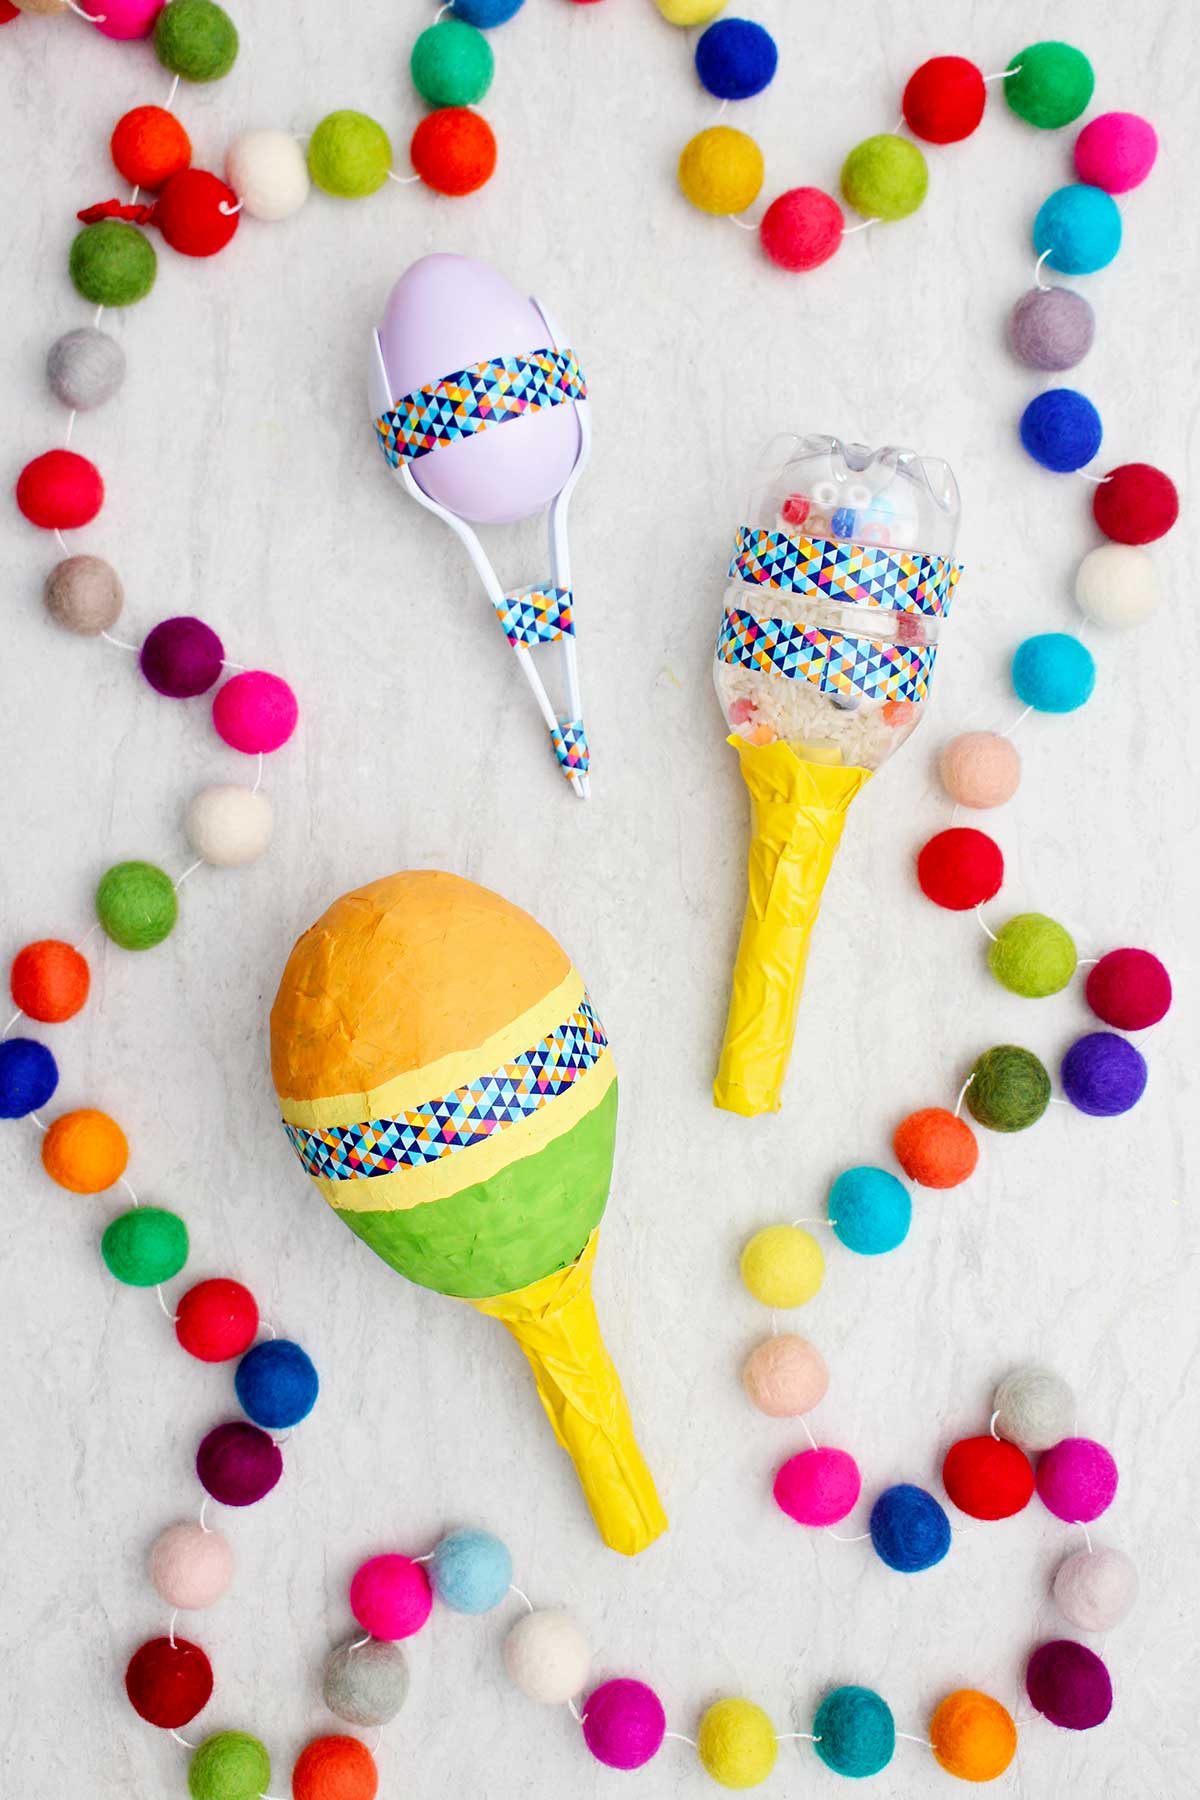
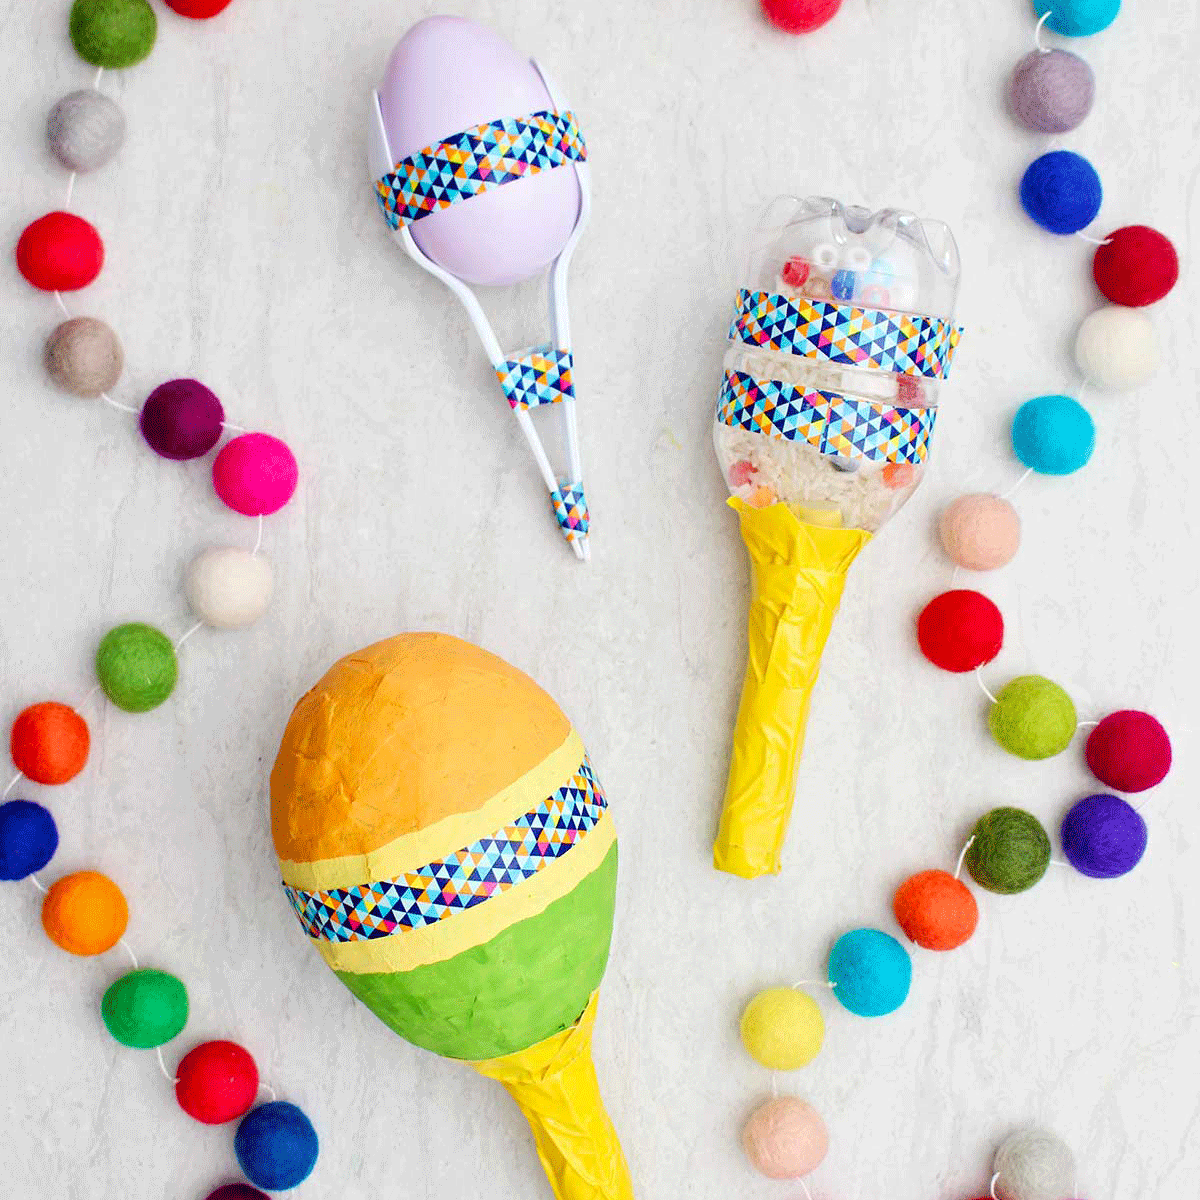
Option 1: Water bottle maraca
- Plastic water bottle (short size if possible)- The plastic water bottle will be the bulb of this maraca.
- Toilet paper tube- The TP tube will be the handle on the maraca.
Option 2: Plastic egg maraca
- Plastic Easter egg- A plastic Easter egg will be the bulb of this maraca.
- Plastic spoons- Two plastic spoons for maraca handles.
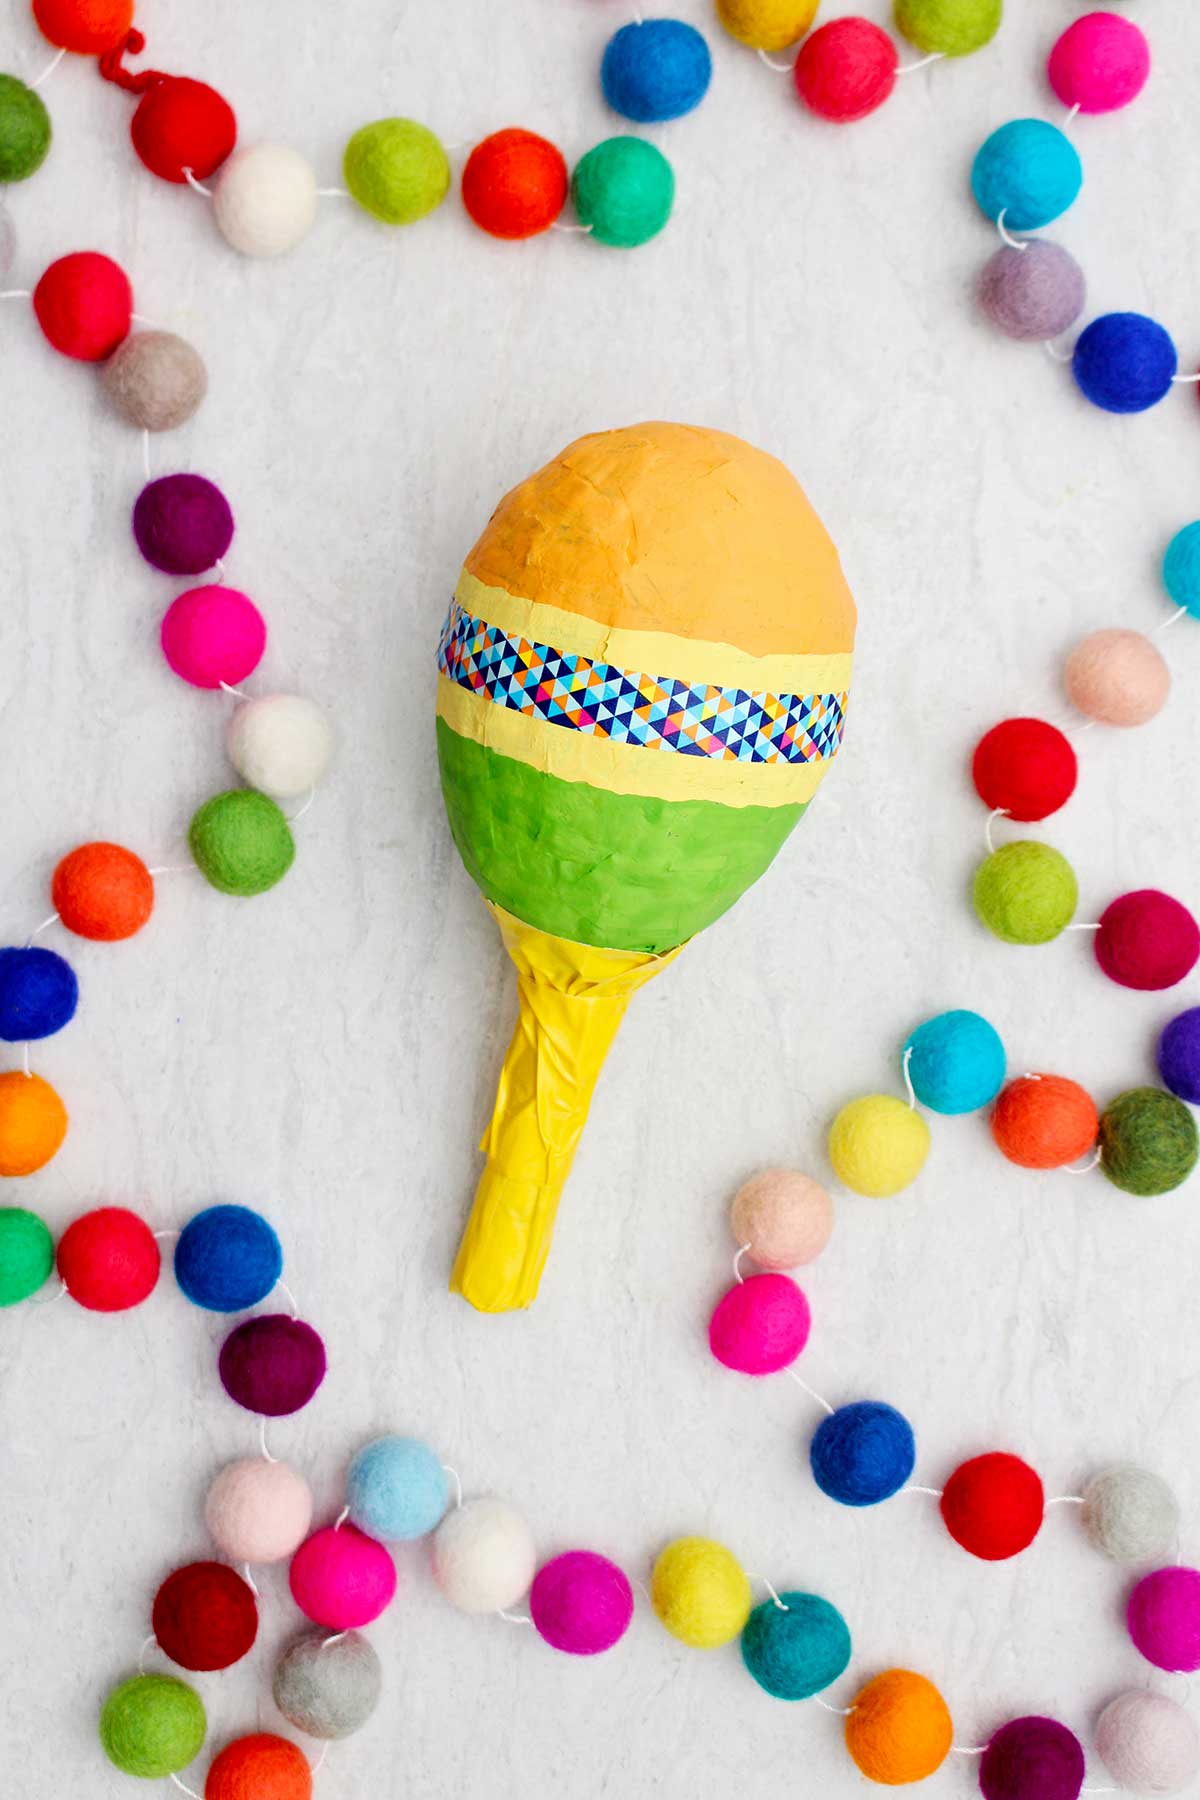
Option 3: Papier mâche maraca
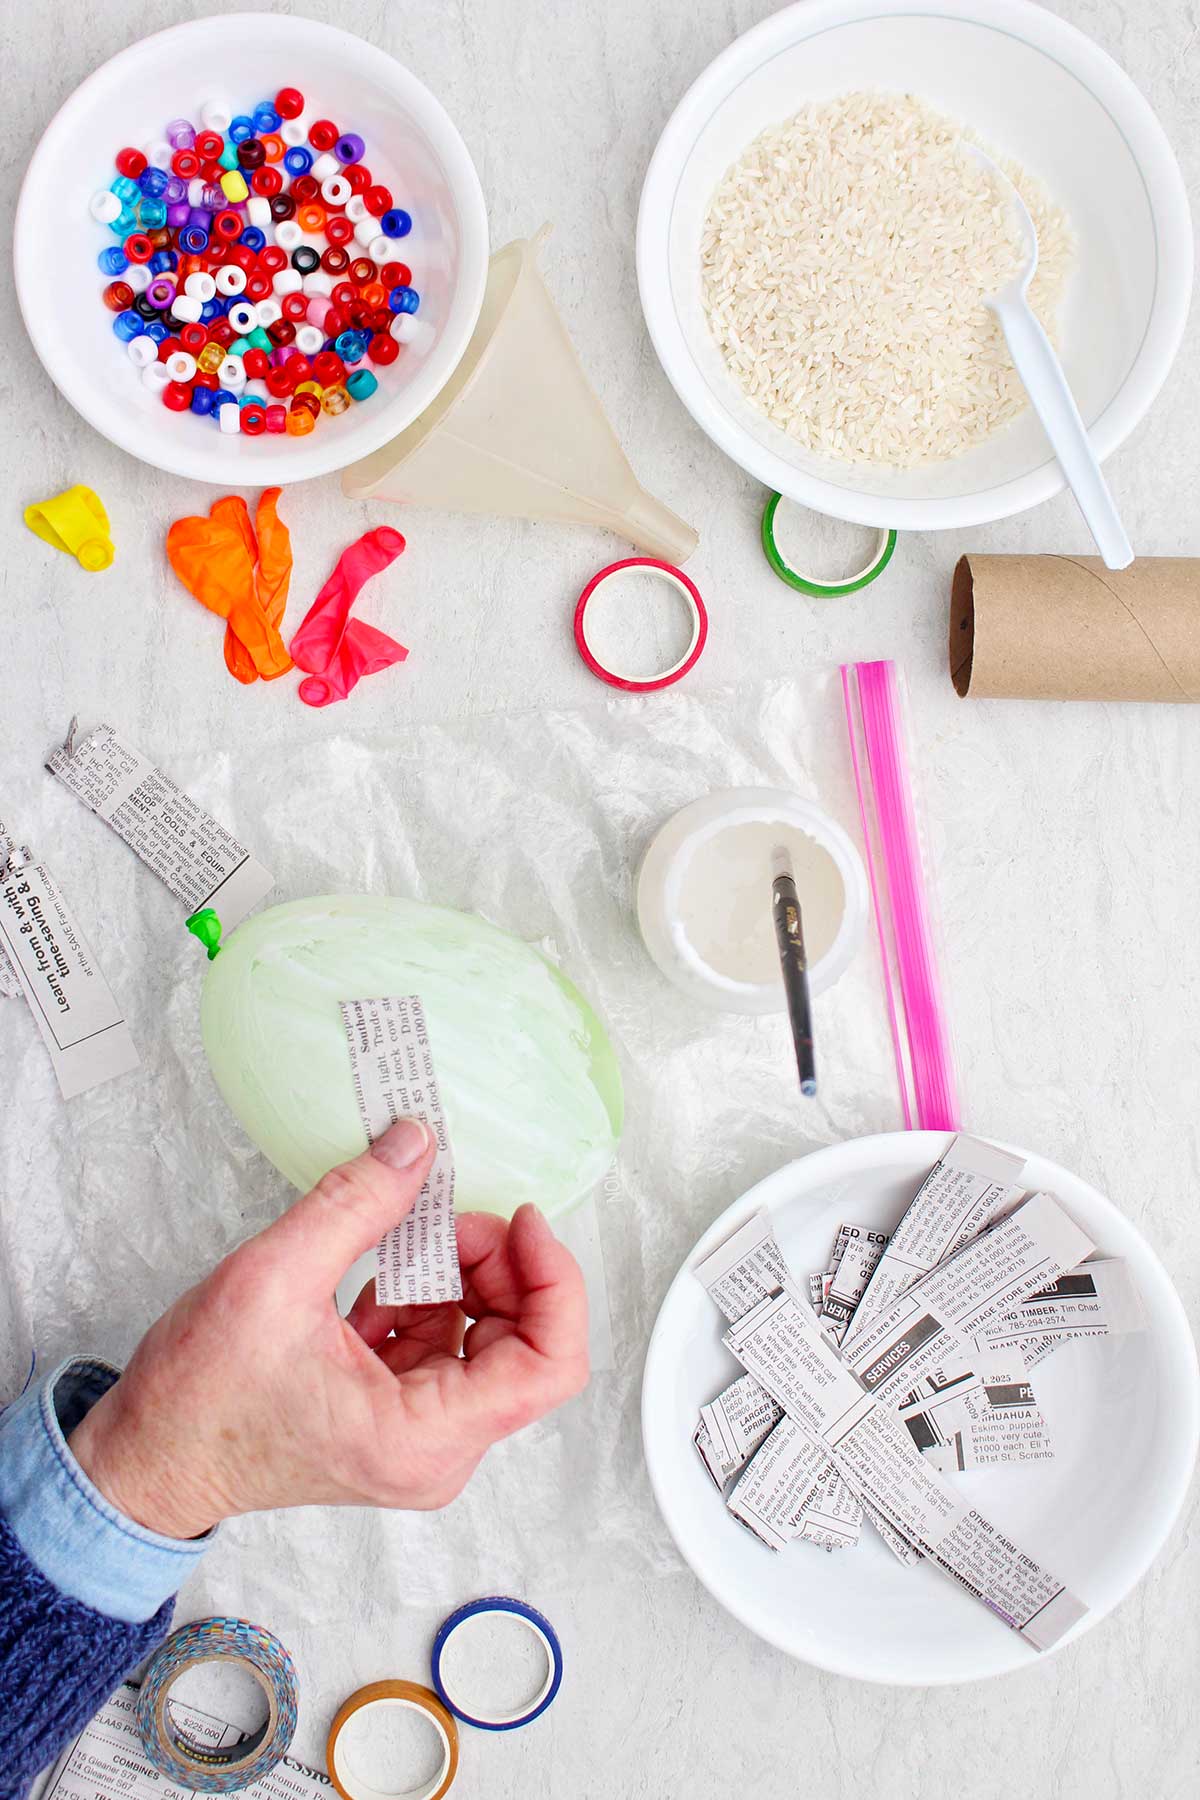
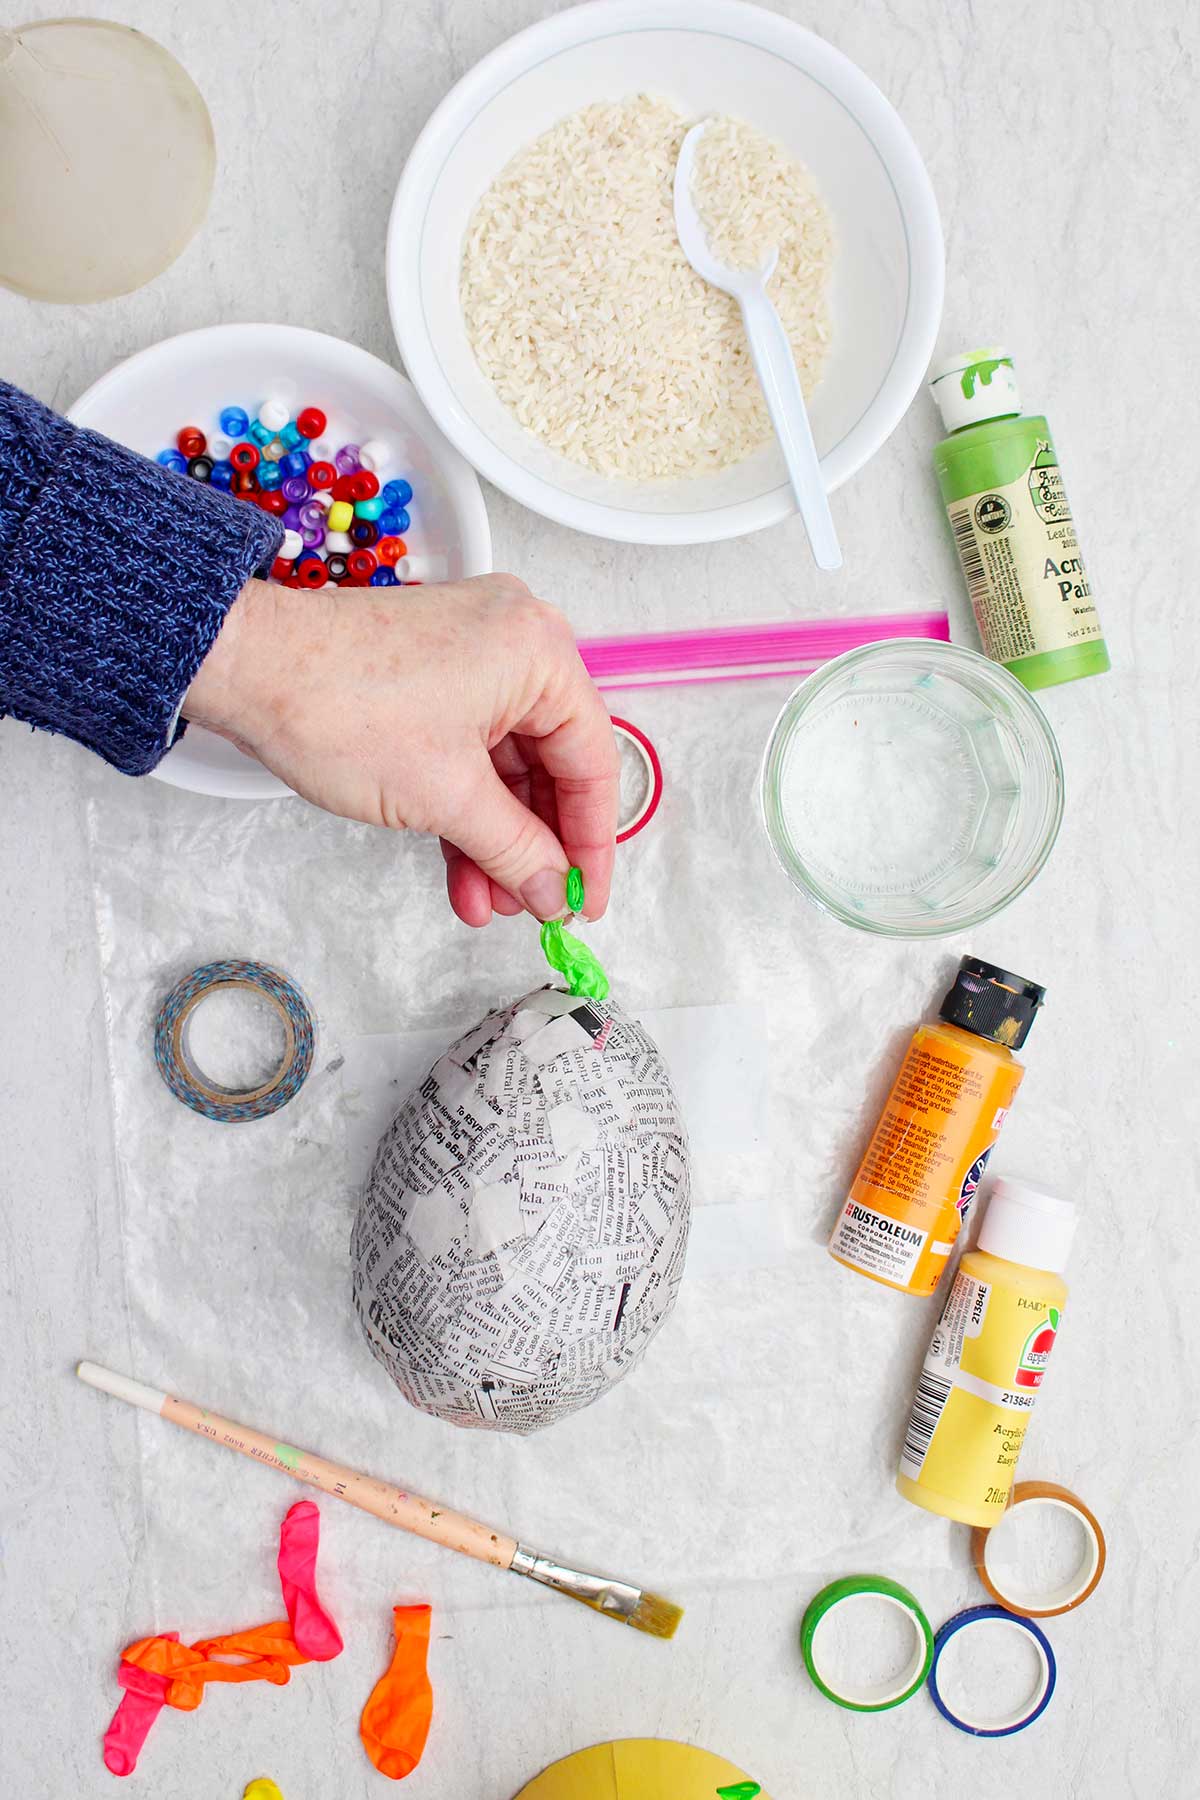
- Water balloon- A water balloon will make the bulb of this maraca
- Toilet paper roll- The toilet paper roll will be the maraca handle. Other cardboard could work.
- Lightweight paper- Lightweight paper covers the surface of this maraca
- Mod Podge- Mod Podge is used for the paper mache adhesive.
- Hot glue gun and glue- The hot glue gun and glue will be used to attach the handle.

All Options:
- Filler- Dry beans, popcorn, macaroni, rice, or other small items to make the sound in the maraca bulb
- Tape- A tape to hold the maraca pieces together: packaging tape, duct tape (colored is nice), or regular tape works.
- Washi tape- Washi tape works well for decorating the maraca
- Stickers (optional)- Stickers can be used for decorating the maraca
Equipment
- Spoon or small funnel (optional)- A spoon or small funnel may be used to fill the maraca bulb
- Baking sheet- A baking sheet with sides prevents the filler from spilling.
How to Make Homemade Maracas
Here are the steps to make each option of maracas.
Option 1: Water bottle maraca
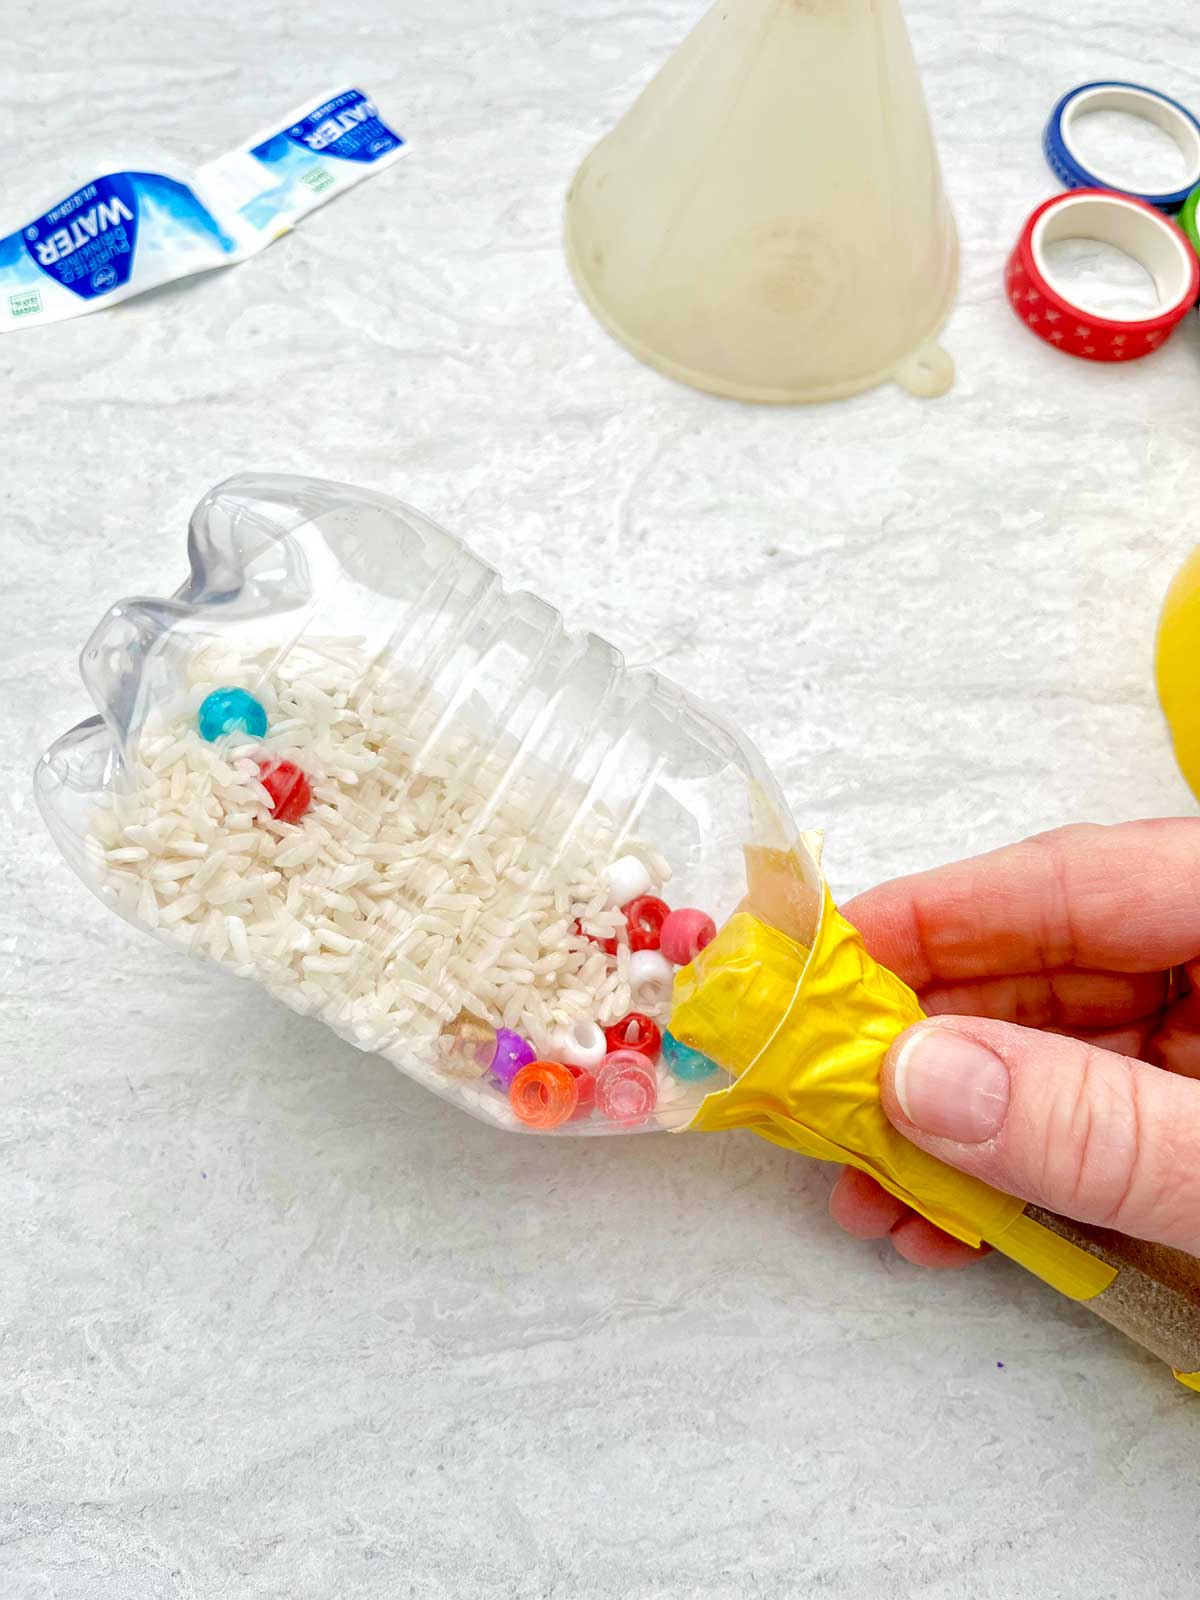
- Step 1- If the water bottle is full size, cut it in half. Trim off an inch from each half.
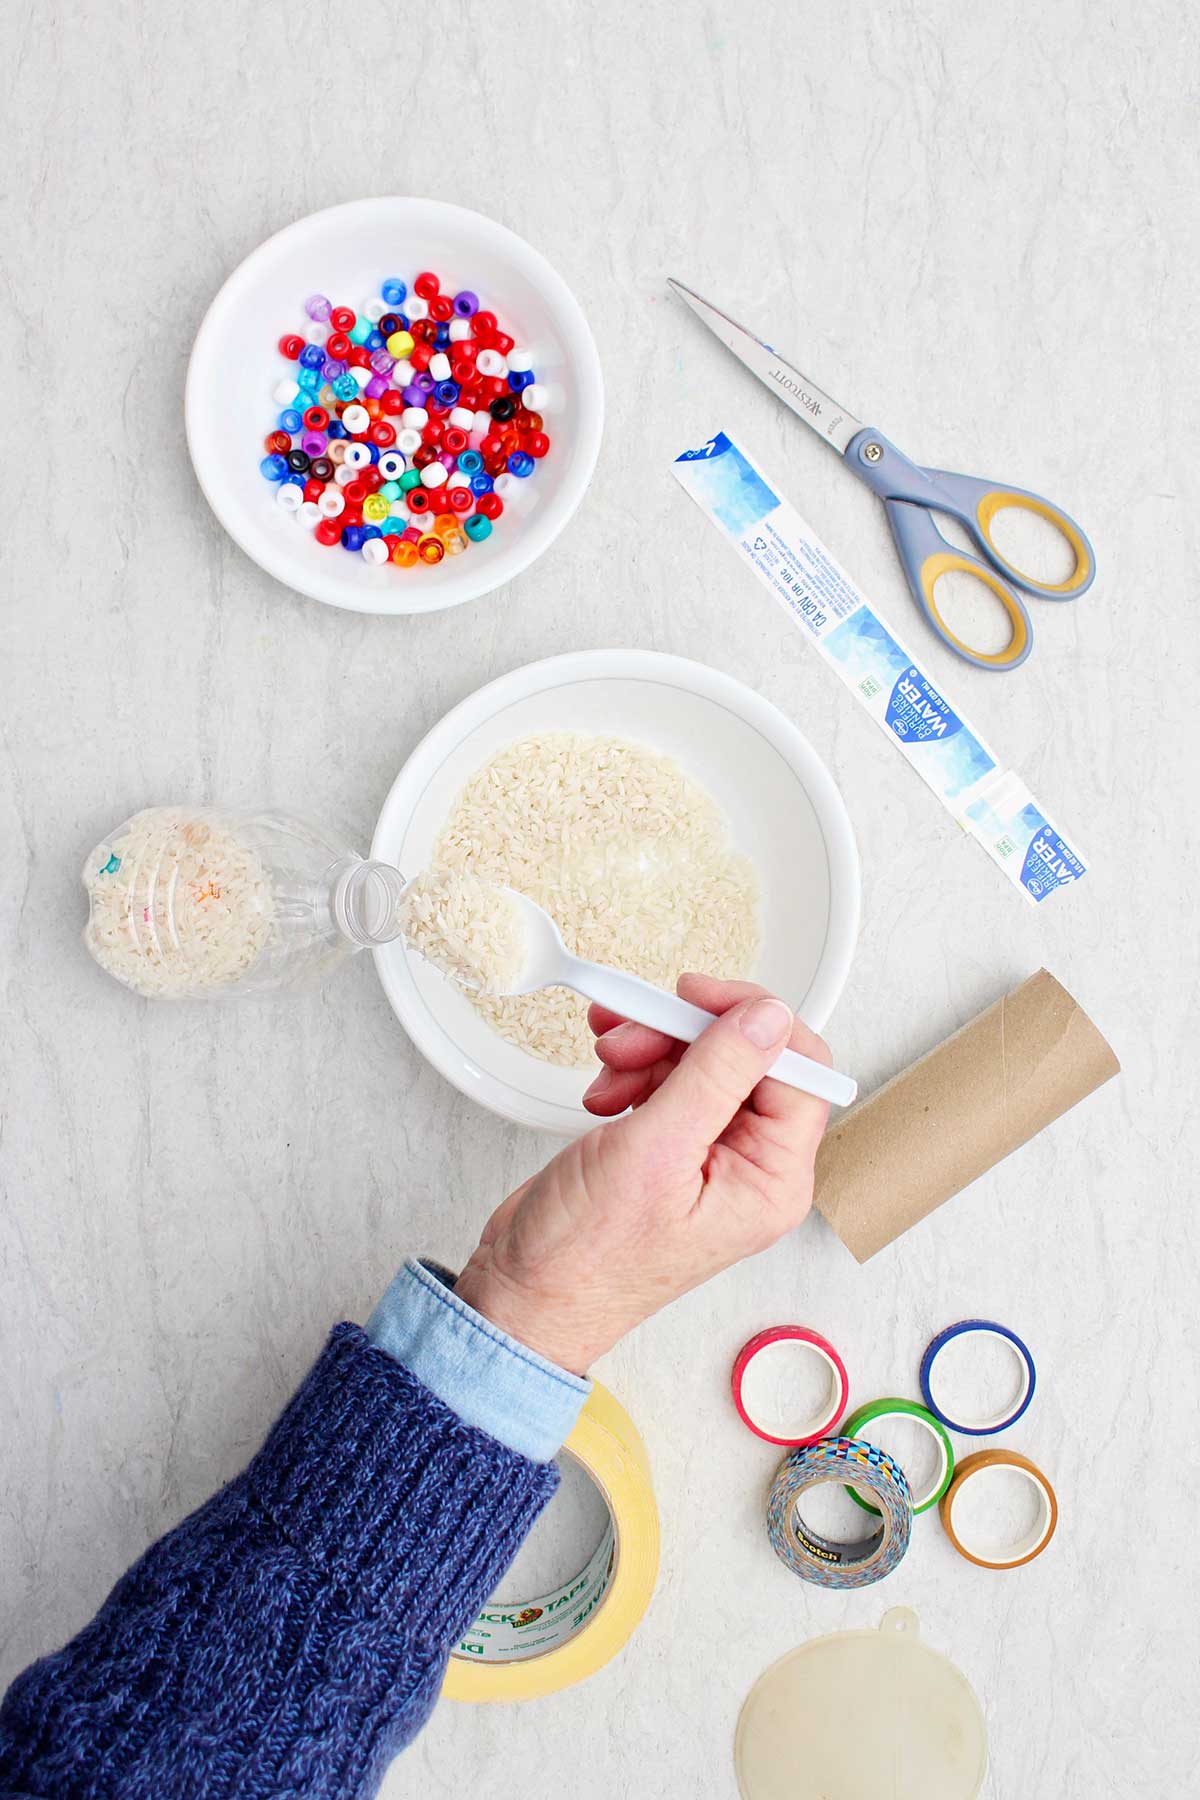
- Step 2- Place 1-2 Tablespoons of filler inside the bottom half. Then put the two ends back together, getting one half to kind of fit inside the other a bit. Then tape the two halves in place.
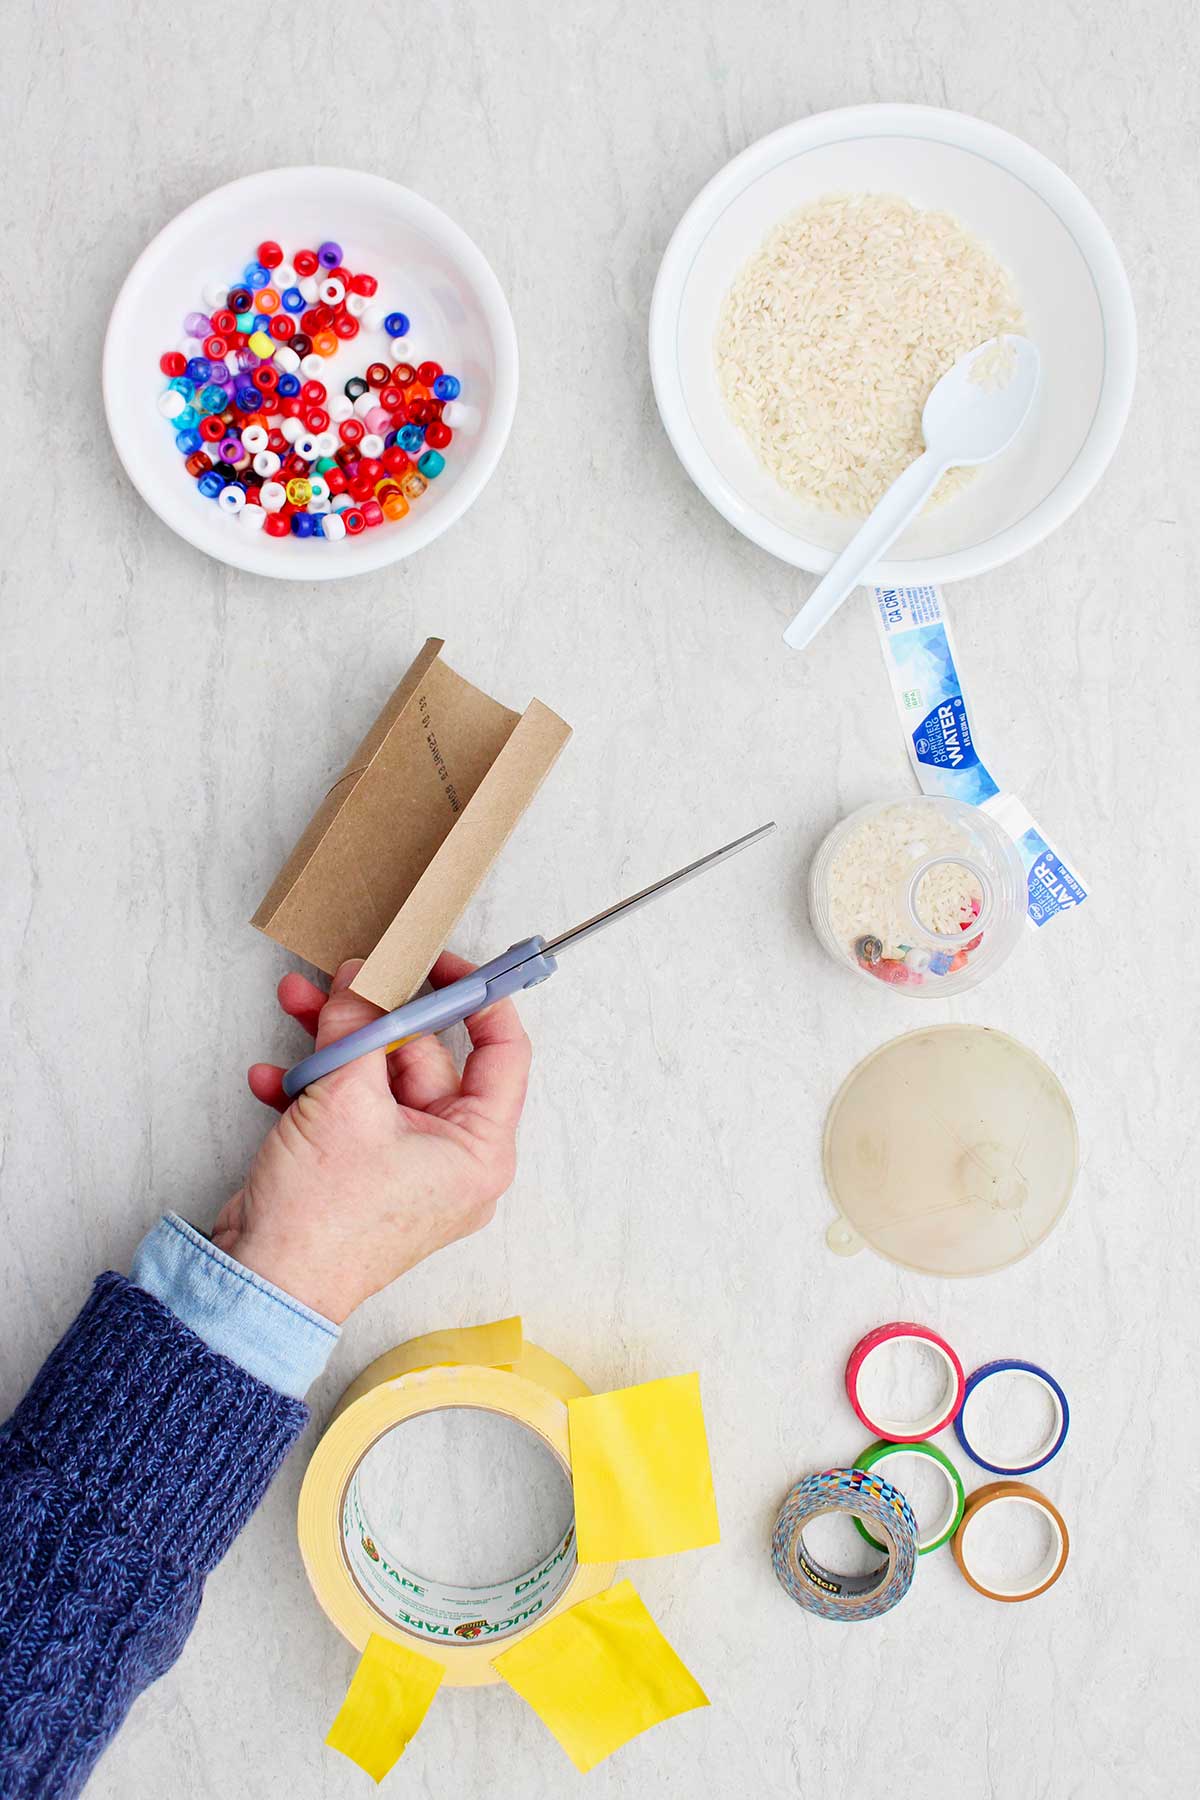
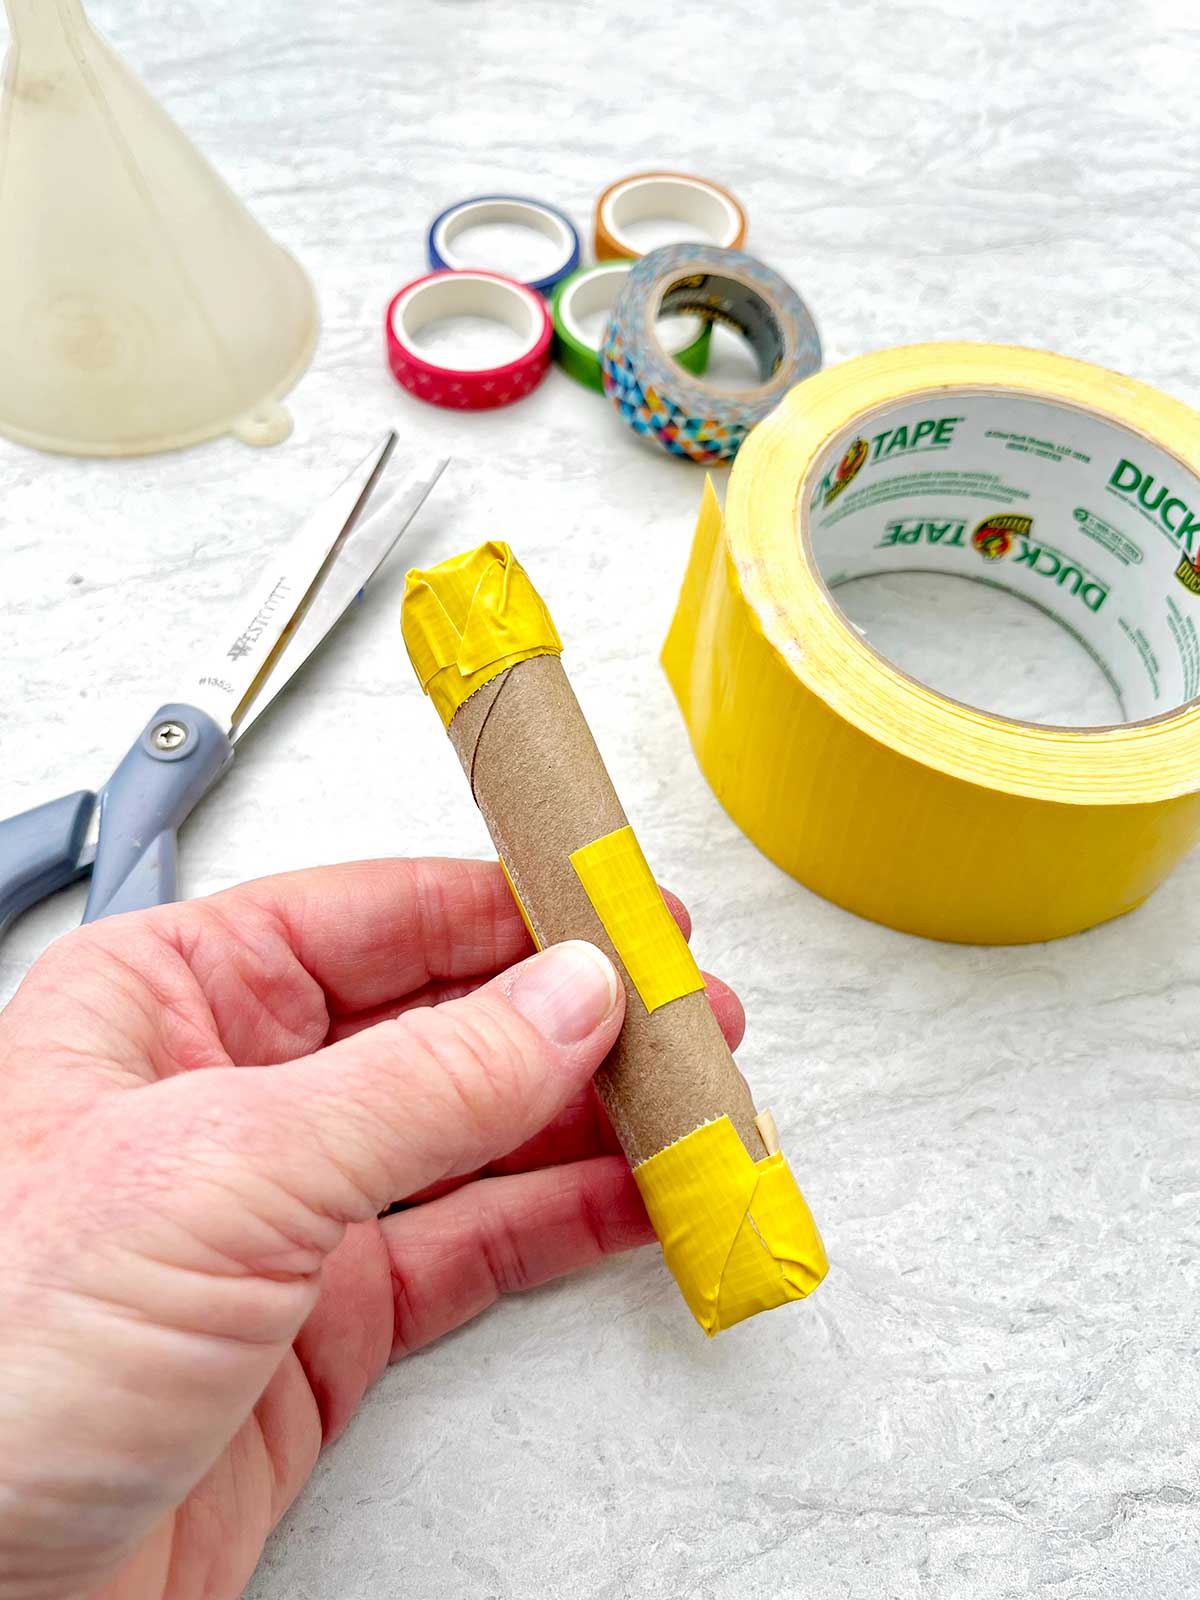
- Step 3- Cut the toilet paper tube from end to end. Roll it up into a smaller size until it fits into the open end of the water bottle. Tape the tube to keep it the proper size. Then tape over the top and bottom end of the TP tube.
- Step 4- Slip the toilet paper tube into the open end of the bottle and tape it into place.
- Step 5- Use colored tape to cover the handle and reinforce the attachment to the bottle.
- Step 6- Decorate the water bottle with washi tape and stickers.
Option 2: Plastic egg maraca
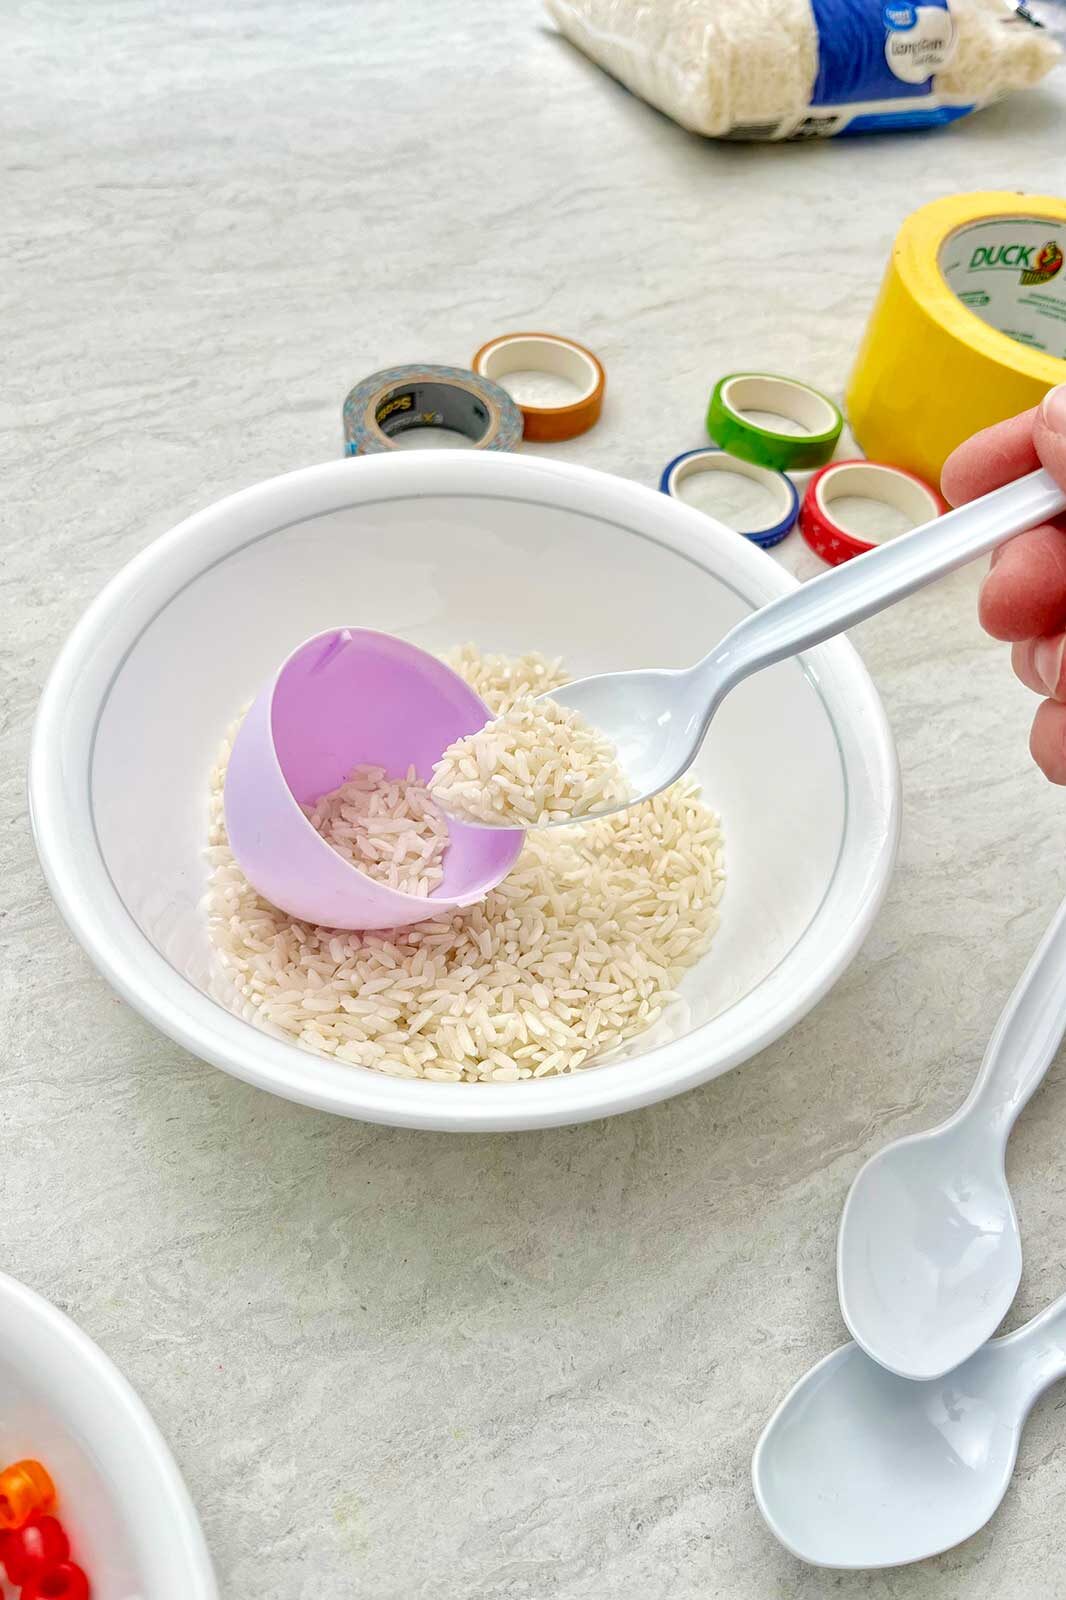
- Step 1- Open the plastic egg and place about 1Tablespoon of filler in one half of the egg. Put the two halves back together.
- Step 2- Use the tape to secure the two egg halves together.
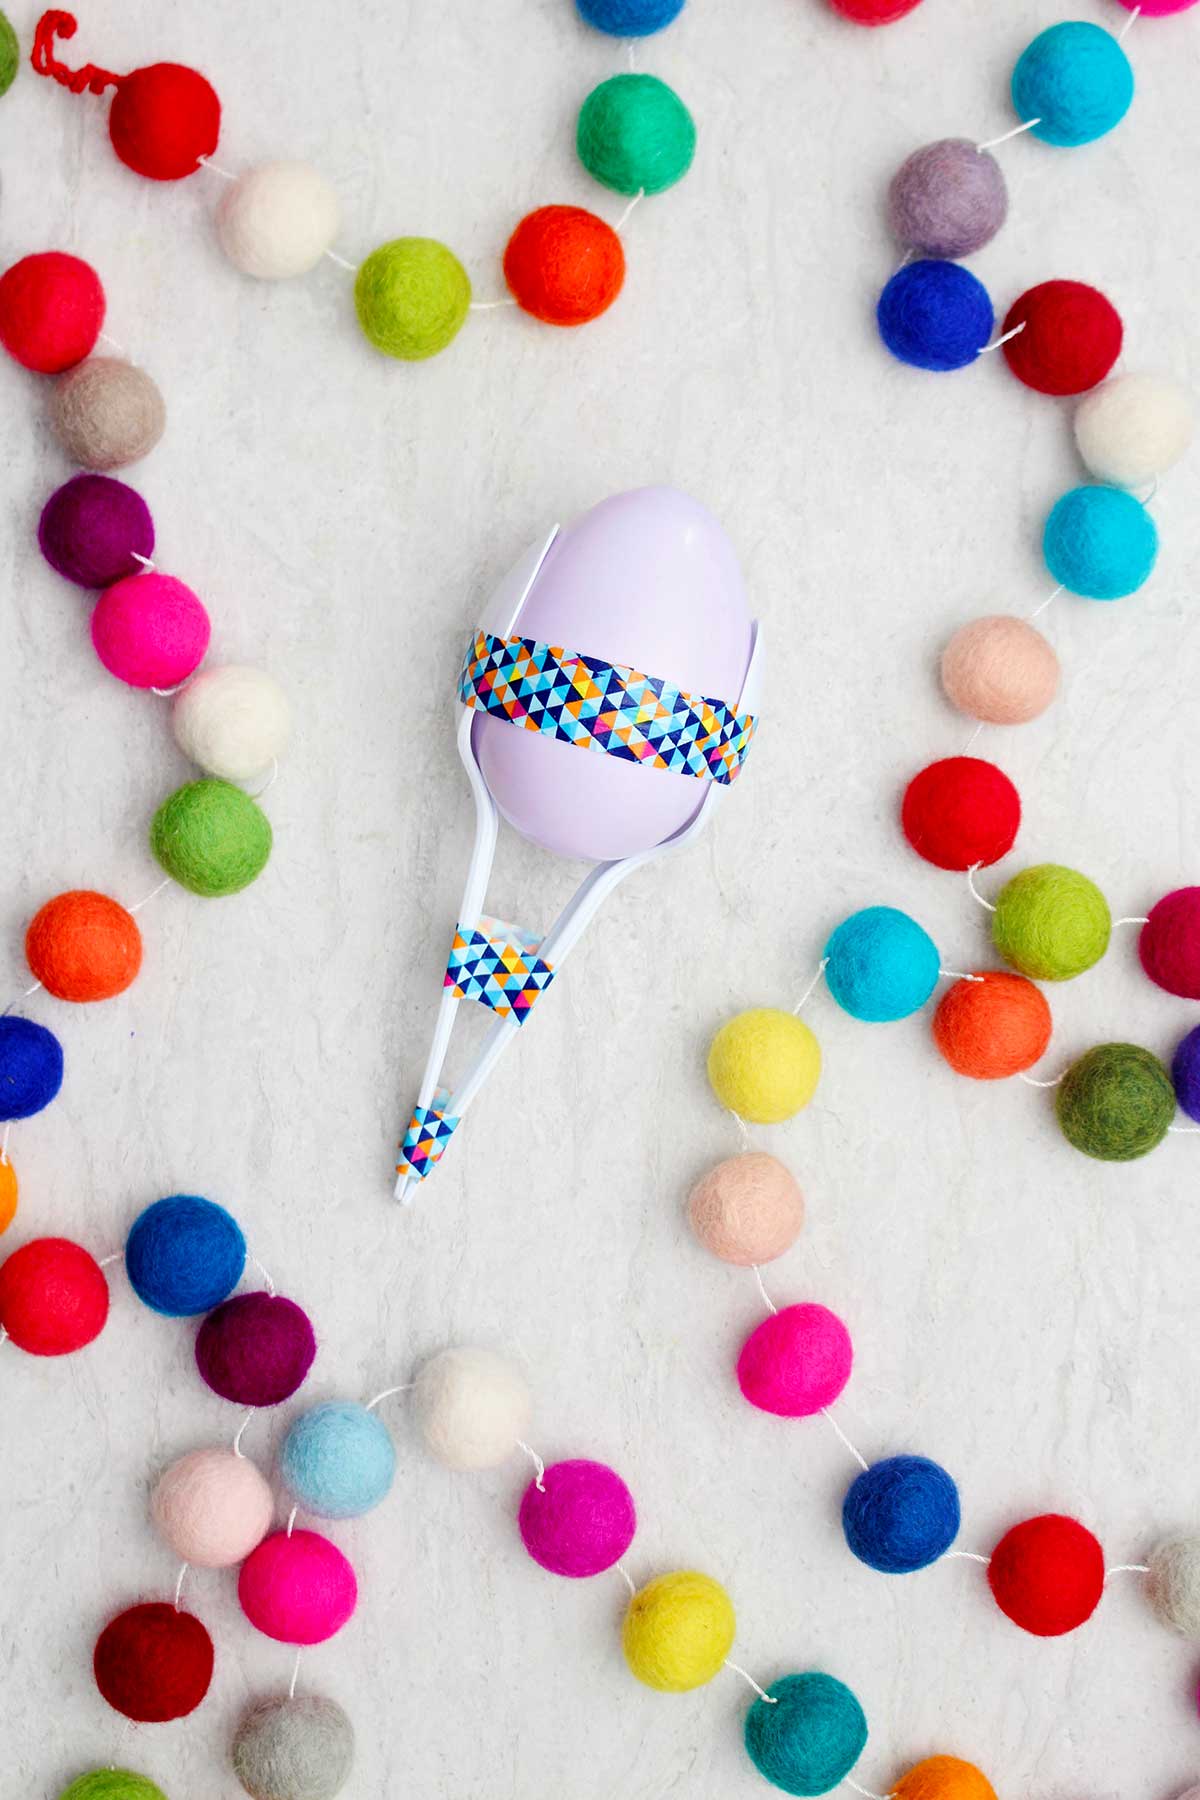
- Step 3- Place the egg so it fits in between the bowl of each spoon, handles together. Tape the handles and the bowls together to hold the egg in place.
- Step 4- Decorate the maraca with washi tape and stickers.
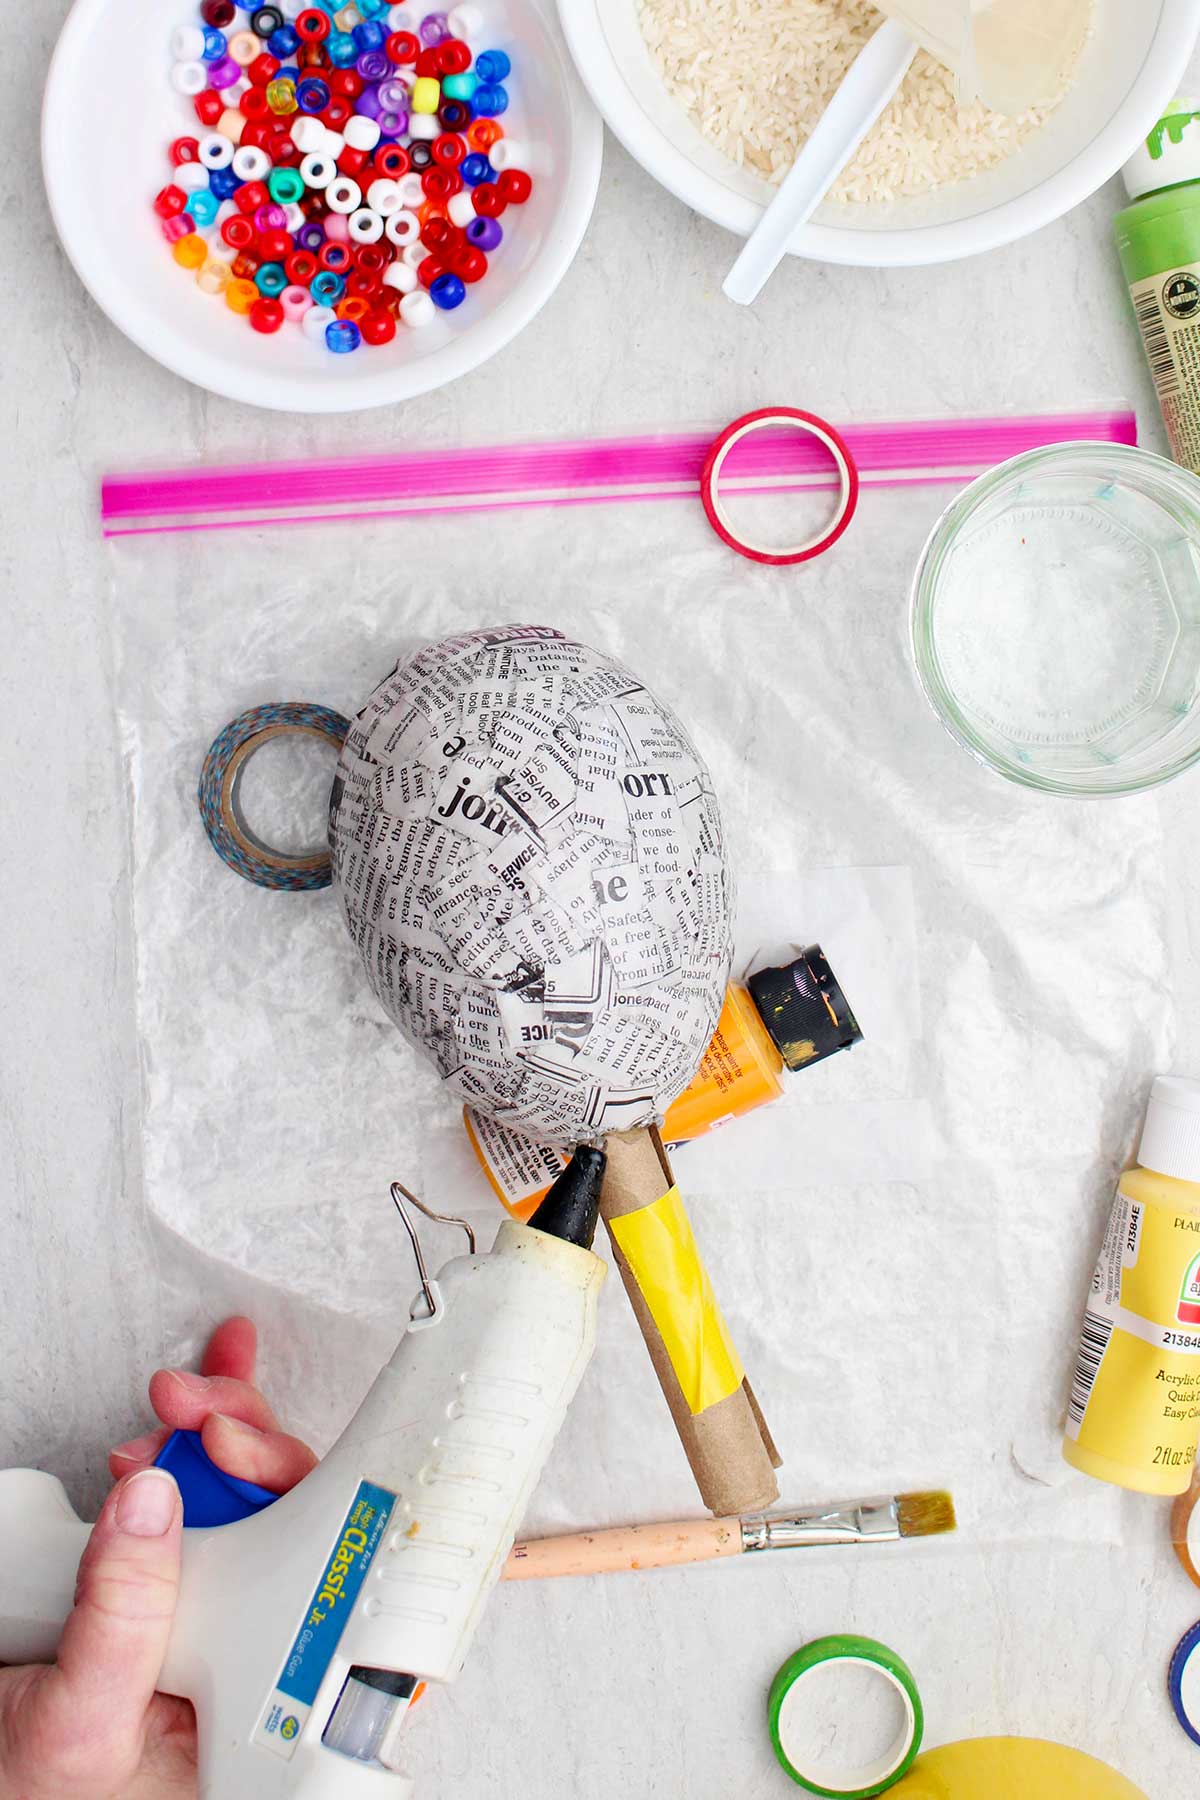
Option 3: Papier mache maraca
- Step 1- Blow up the water balloon to about 4 inches in diameter and tie off the end.
- Step 2- Use the Mod Podge to cover the surface of the balloon with small pieces of the paper. Leave the tie of the balloon exposed. Repeat this step several times. Place the bottle on plastic wrap to dry. When dry, check that the water balloon shape is hard, there are no soft spots. If you find soft spots, cover with more paper and let dry again.
- Step 3- Pop the balloon and pull it out of the paper bulb you’ve made. Put about 1-2 tablespoons of filler inside the shape.
- Step 4- Cut the toilet paper tube from end to end. Roll it up into a smaller size until it fits into the open end of the paper bulb. Tape the tube to keep it the proper size. Then tape over the top and bottom end of the TP tube.
- Step 5- Slip the toilet paper tube into the open end of the bottle and hot glue it into place.
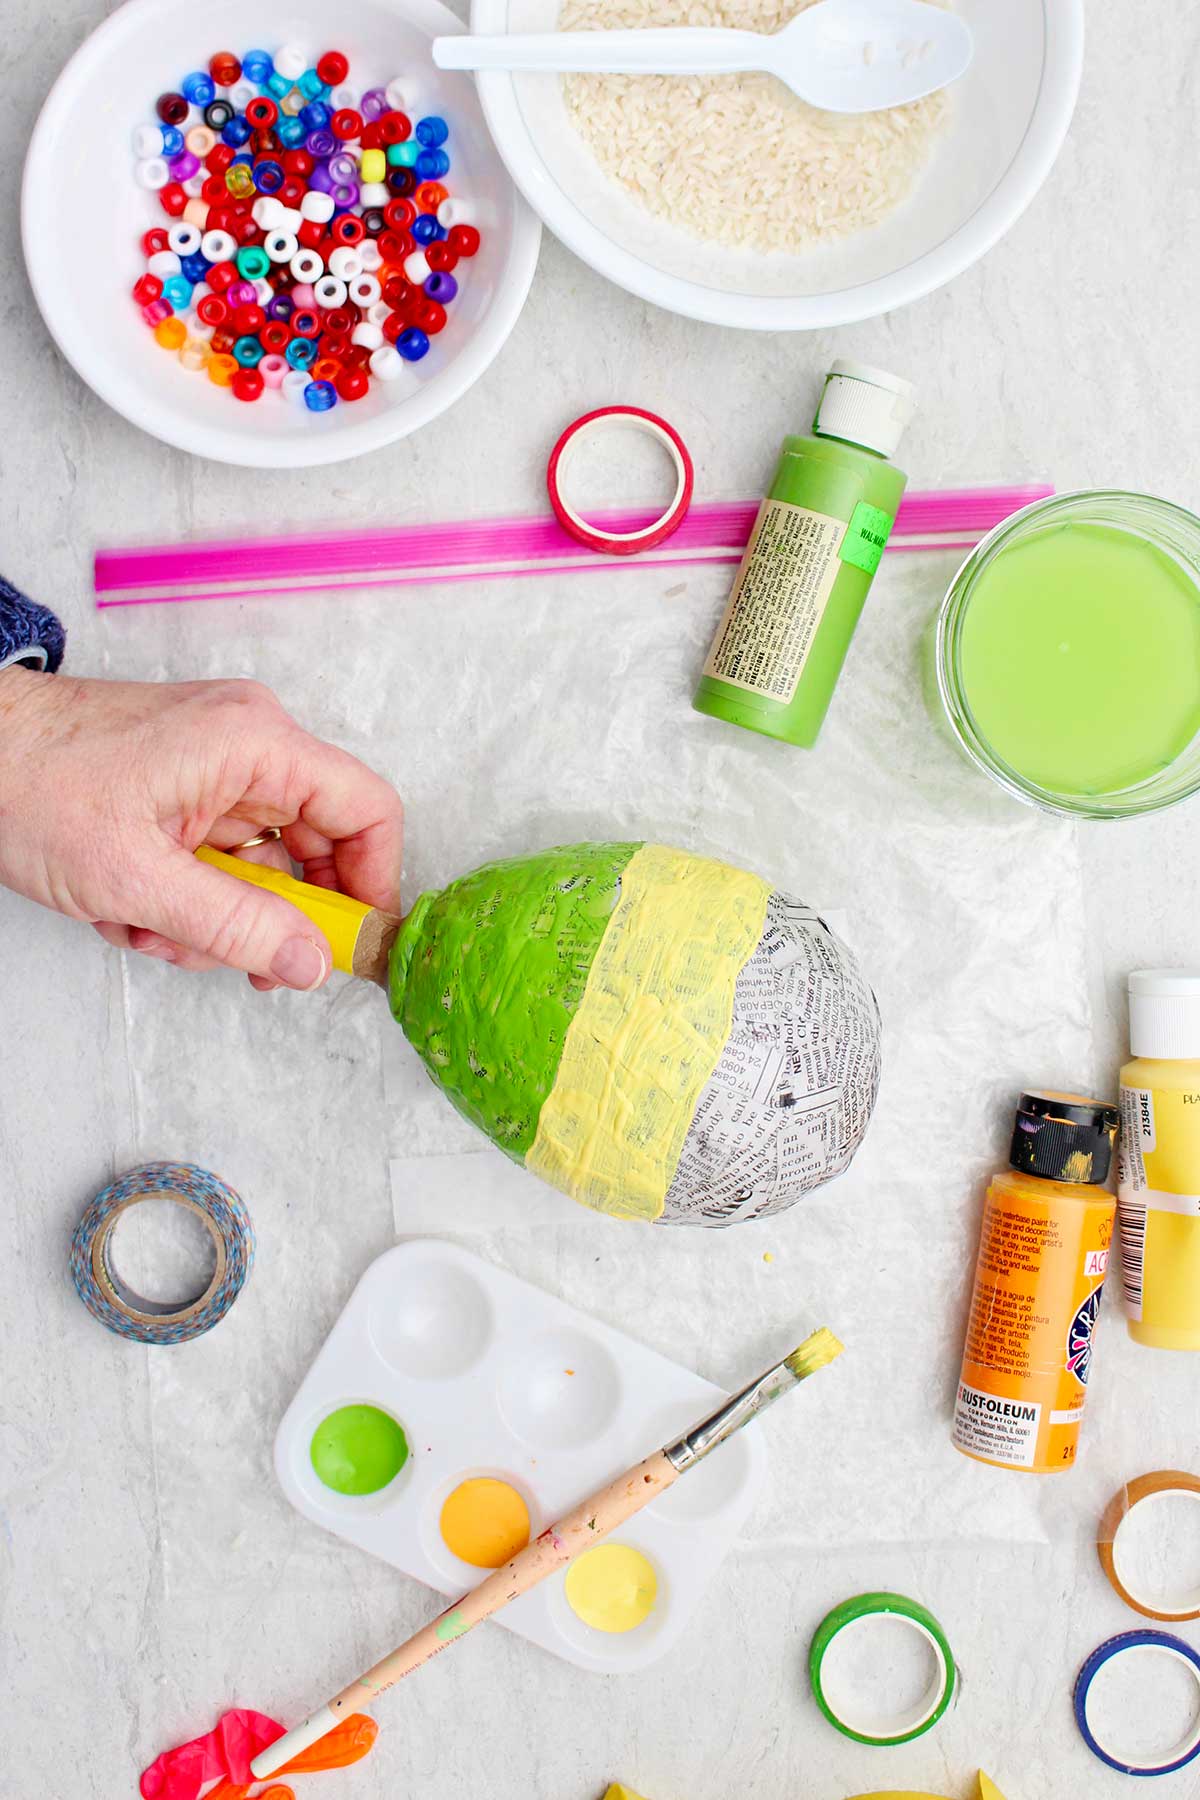
- Step 6- Cover the handle of the maraca with paper using the Mod Podge. Then cover the entire maraca with a coating of the Mod Podge. Let it dry on the plastic wrap.
- Step 7- Paint the maraca with acrylic craft paint. You can also decorate with washi tape and stickers.
Craft Tips
These tips can help making DIY maracas even easier!
- Filler- Try using less filler for a softer sound and more filler for a louder sound.
- Tape- Be sure to tape well so the maracas do not break easily. This is important for safety.
- Filling- Fill the bulb of the maraca over a sheet pan with edges to catch the extra filler.
- Work surface- Cover the work surface before starting to protect your work surface.
- Dry completely- Allow the craft to completely dry before using it as an instrument.
DIY Maracas Variations
Here are a few variations you’re welcome to try while making DIY maracas:
- Different container- Use whatever container you have for the “bulb” of the maraca and adapt it as needed. Use a plastic cup, pudding or yogurt container, toilet paper tube, or small plastic bottle.
- Egg maraca shaker- Don’t put a handle on the egg maraca and use it as a shaker.
- Filler types- Try different fillers like lentils, sand, buttons or pony beads.
- Paper mache- Cover any of the maracas with paper and Mod Podge.
- Tape- Cover any of the maracas with colored tape.
- Themed maracas- Decorate the maracas for a theme (holiday, an animal, rainbow, etc.)

How to Use Homemade Maracas
As soon as the homemade maracas are dry and finished, enjoy playing with them. Be creative!
- Turn on your favorite song and play along.
- Make maracas and use during music class or lessons.
- Have a dance party
- Keep rhythm to music, practice different rhythms and patterns
- Have a parade
The Skills Your Kids Will Use and Learn
Making a maraca is more than a craft, it is a skill builder. It encourages the development of:
- Fine motor skills
- Following directions step-by-step
- Creativity, expression ones self
- Rhythm
- Movement and coordination
- Listening
FAQ About How to Make Maracas
The filler inside a maraca can be any small items that will shake and make sound. Items such as rice, beans, lentils, popcorn, pasta, buttons, pony beads, sand.
Yes, but use supervision. It is important that the maracas are taped together securely.
Yes! You can use other small containers instead of plastic eggs such as: yogurt or pudding containers, toilet paper tubes, small plastic cups,or other recycled containers . Adapt the directions for covering the ends of the containers and adding handles.
More DIY Recycled Crafts for Kids
Looking for more great DIY Recycled Crafts for kids? Here are a few favorites for you to try:

Come join the fun at WTN!
Try this craft, leave a comment, rate it, and tag a photo with #WelcometoNanas wherever you post.
More Crafts Please!
Love getting crafts straight to your inbox? Sign up to receive a weekly email and get a free gift!
How to Make Maracas Instrument
Equipment
- Spoon or small funnel (optional) A spoon or small funnel may be used to fill the maraca bulb
- Baking sheet A baking sheet with sides prevents the filler from spilling
Items Required
Option 1: Water bottle maraca
- Plastic water bottle (short size if possible)
- Toilet paper tube
Option 2: Plastic egg maraca
- Plastic Easter egg
- 2 Plastic spoons
Option 3: Paper mache maraca
- Water balloon
- Toilet paper roll
- Lightweight paper
- Mod Podge
- Hot glue gun and glue
- Acrylic craft paint
All Options:
- Filler Dry beans, popcorn, macaroni, rice
- Tape
- Washi tape
- Stickers (optional)
Instructions
Option 1: Water bottle maraca
- If the water bottle is full size, cut it in half. Trim off an inch from each half. Place 1-2 Tablespoons of filler inside the bottom half. Then put the two ends back together, getting one half to kind of fit inside the other a bit. Then tape the two halves in place.
- Cut the toilet paper tube from end to end. Roll it up into a smaller size until it fits into the open end of the water bottle. Tape the tube to keep it the proper size. Then tape over the top and bottom end of the TP tube.
- Slip the toilet paper tube into the open end of the bottle and tape it into place. Use colored tape to cover the handle and reinforce the attachment to the bottle.
- Decorate the water bottle with washi tape and stickers.
Option 2: Plastic egg maraca
- Open the plastic egg and place about 1Tablespoon of filler in one half of the egg. Put the two halves back together. Use the tape to secure the two egg halves together.
- Place the egg so it fits in between the bowl of each spoon, handles together. Tape the handles and the bowls together to hold the egg in place.
- Decorate the maraca with washi tape and stickers.
Option 3: Paper mache maraca
- Blow up the water balloon to about 4 inches in diameter and tie off the end.
- Use the Mod Podge to cover the surface of the balloon with small pieces of the paper. Leave the tie of the balloon exposed. Repeat this step several times. Place the bottle on plastic wrap to dry. When dry, check that the water balloon shape is hard, there are no soft spots. If you find soft spots, cover with more paper and let dry again.
- Pop the balloon and pull it out of the paper bulb you’ve made. Put about 1-2 tablespoons of filler inside the shape.
- Cut the toilet paper tube from end to end. Roll it up into a smaller size until it fits into the open end of the paper bulb. Tape the tube to keep it the proper size. Then tape over the top and bottom end of the TP tube.
- Slip the toilet paper tube into the open end of the bottle and hot glue it into place. Cover the handle of the maraca with paper using the Mod Podge. Then cover the entire maraca with a coating of the Mod Podge. Let it dry on the plastic wrap.
- Paint the maraca with acrylic craft paint. You can also decorate with washi tape and stickers.


Leave a Reply