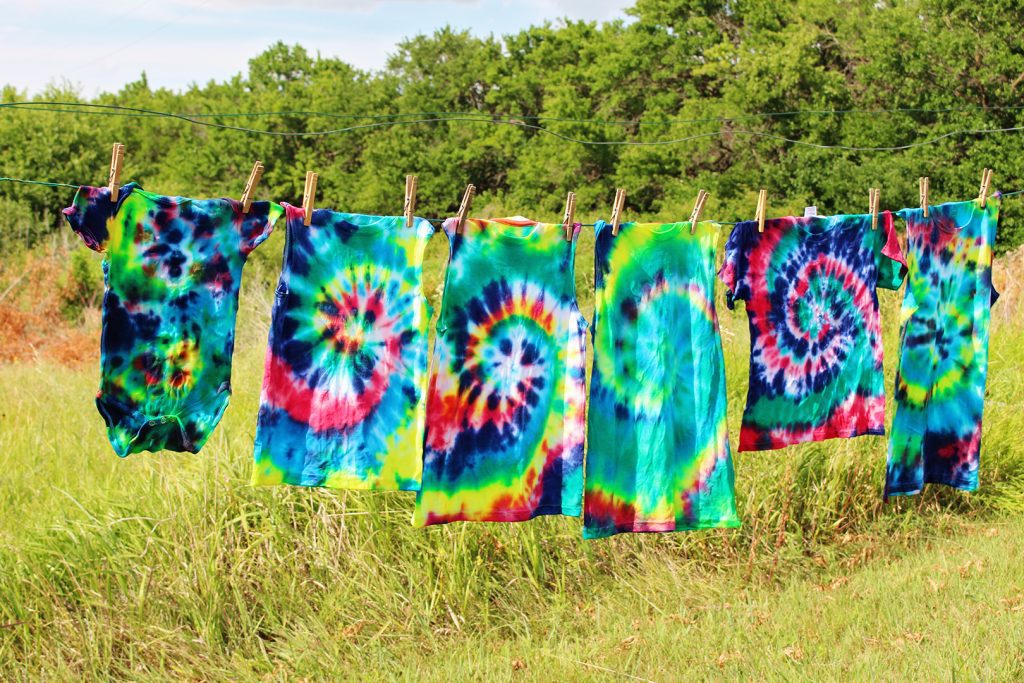
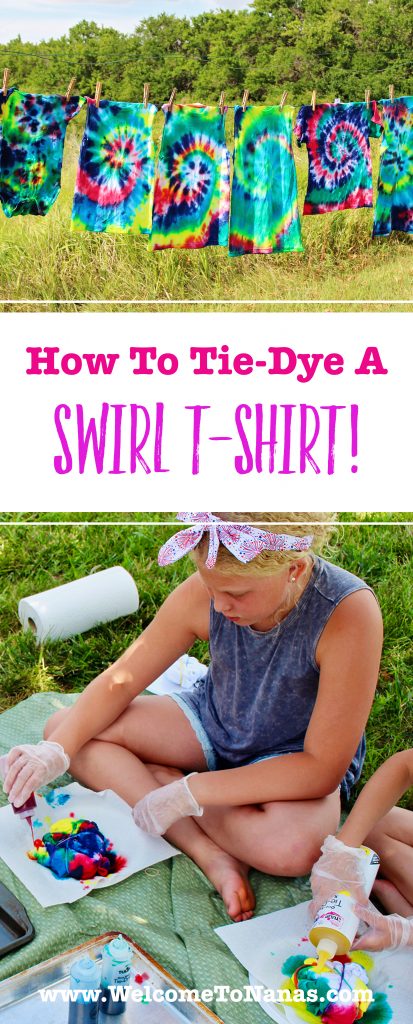
It's Groovy to Tie-Dye a Swirl T-shirt
My age is revealed with this post on How to Tie-Dye a swirl T-shirt. I am a 60’s girl, literally- I was born in 1960 (yes, I turned 60 this month!). Tie-Dye was the thing in the 60’s and it is the thing now as well. I just love the beautiful colors and patterns of Tie-Dye, don’t you? They are so “groovy”!
But the pattern that intrigues me the most is the swirl, so this post is How to Tie-Dye a Swirl T-Shirt. Boom! It is so easy and isn’t even that messy with a bit of planning. Let me help you out with that part, OK?
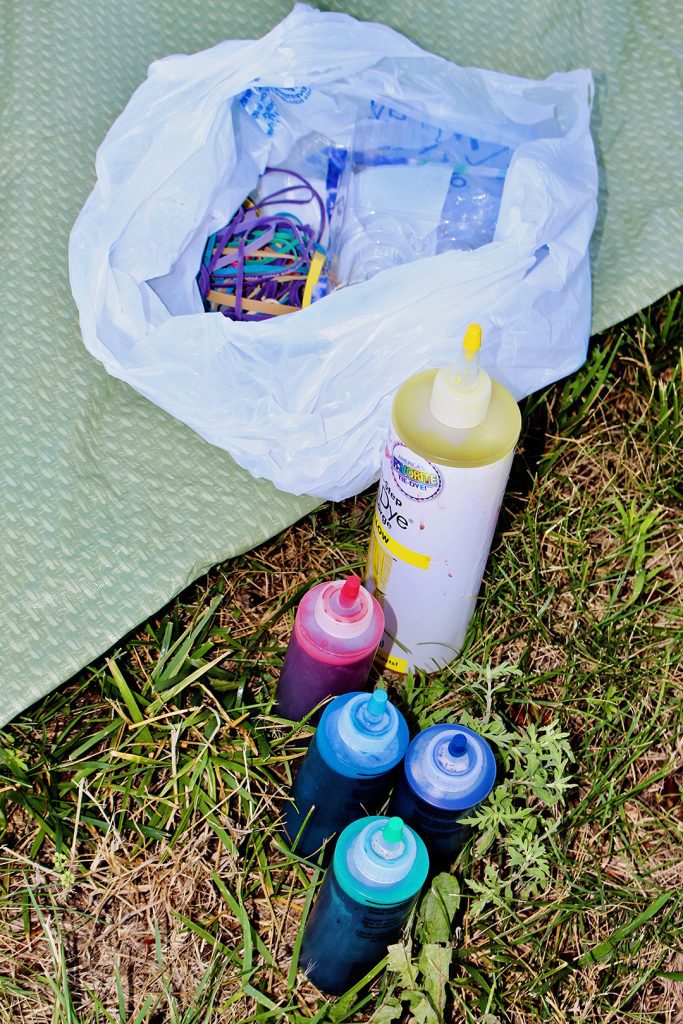
The Actual Dye for Tie-Dye
The actual tie-dye was in a powdered form and came in squirt bottle containers. You just add warm water to have them ready to use. I did that ahead of time along with having the other supplies gathered and ready.
Tip: Prewash the t-shirts and leave them damp or re-dampen them before doing the tie-dying process. This gets out finishes on the t-shirt fabric and helps the dye to penetrate better. Remember, the t-shirt needs to have as much cotton fiber as possible because the natural fibers will take the dye. Polyester (a man-made fiber) will not absorb dye.
Prep for surface, cover with plastic
We chose to do our tie-dye outside on a summer day. It is possible to tie-dye inside as well, but spilled dye may not come out of clothes and carpet so keep that in mind. It may be wise to let the kids wear old clothes. That being said, none of the grands got any dye on their clothes! Score!
We set an old plastic table cloth on the grass and the grands circled up. Each child got their t-shirt from the stack and we started by twisting them into the shape needed to make a swirl design. The kids had tie-dyed before, but this pattern was new.
Tip: It may help to show them what a tie-dye swirl pattern looks like so they can visualize the outcome.
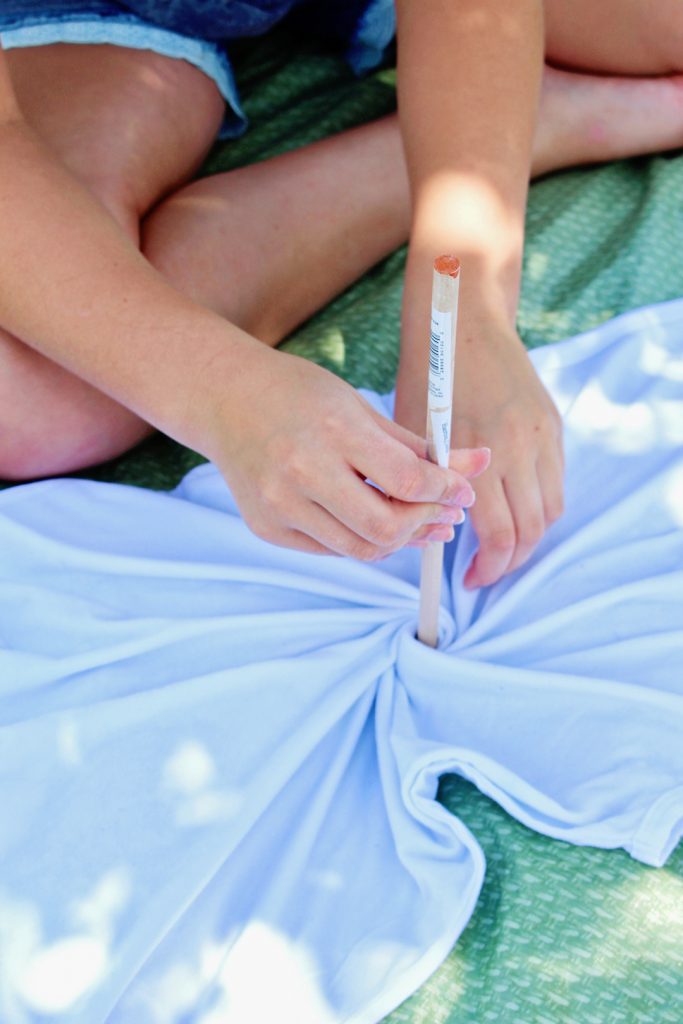
Twist the swirl with a dowel
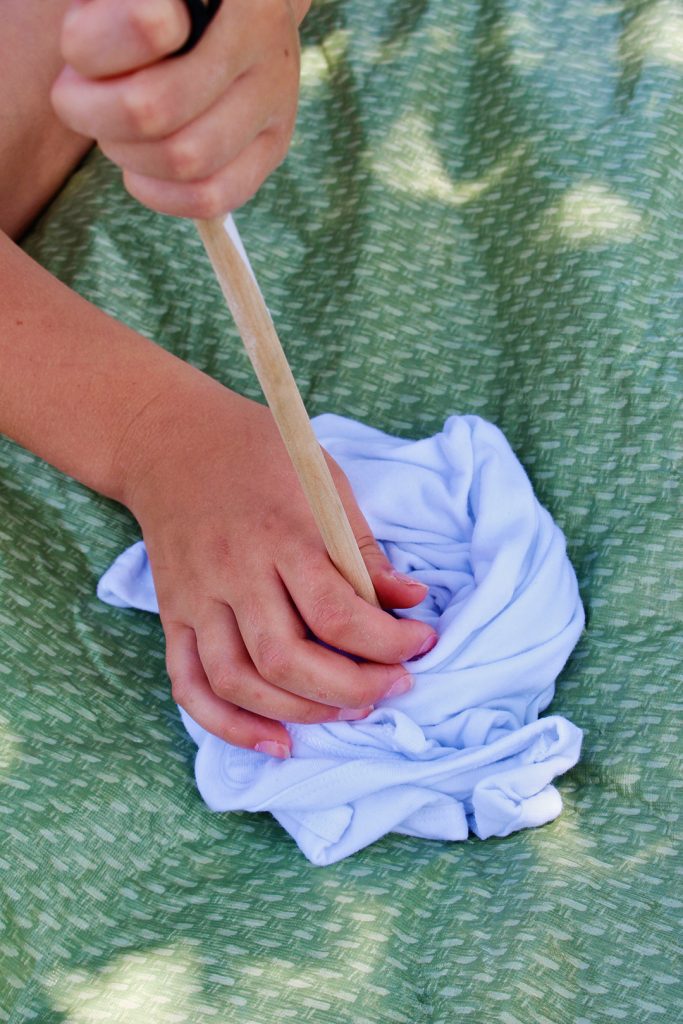
Use the dowel or the erase end of a pencil to start the swirl. Place the end of the dowel on the front of the t-shirt. It should be on the center of the chest area of the t-shirt front. Begin to turn the dowel in one direction to get the t-shirt to begin to swirl. Hold the dowel down and finish swirling the rest of the t-shirt around the dowel with your hands.
I thought the t-shirt looked like a giant cinnamon roll when we were done!
Hold onto the t-shirt and pull the dowel out of the center. Really hold on so it doesn’t pull the t-shirt with it and undo the swirl.
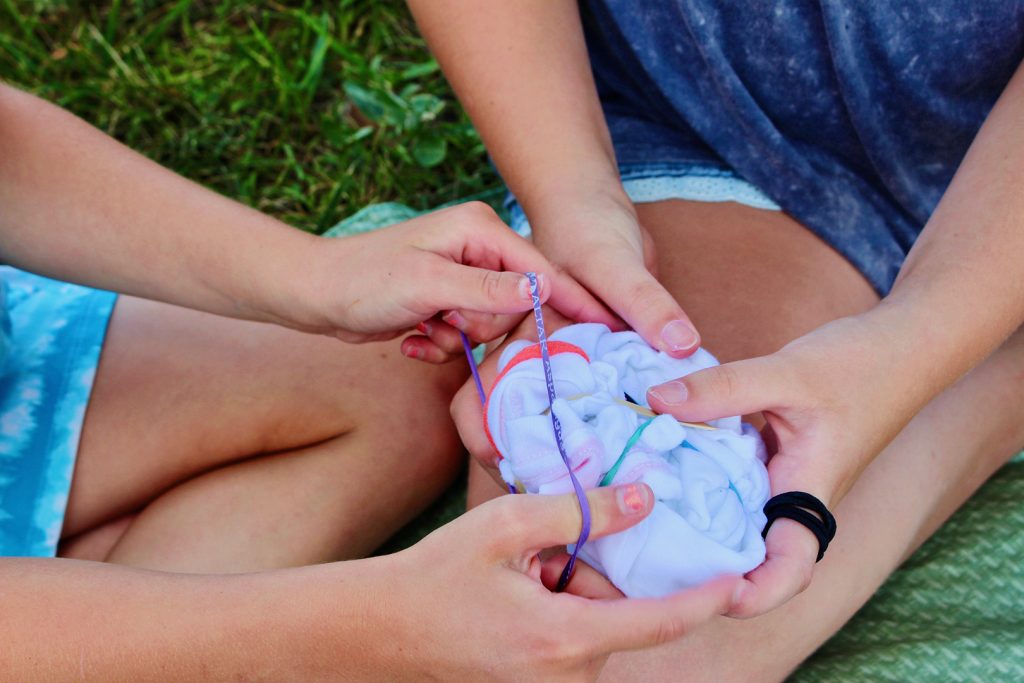
Rubber bands tie the t-shirt in place
It works best work in pairs to put on the rubber bands. One grand held up the giant shirt cinnamon roll and the other put rubber bands around it. The rubber bands will circle the shirt and cross in the center. 4 rubber bands held the shape of the child sized shirt pretty well for us. You may need more though.

Ready, set...
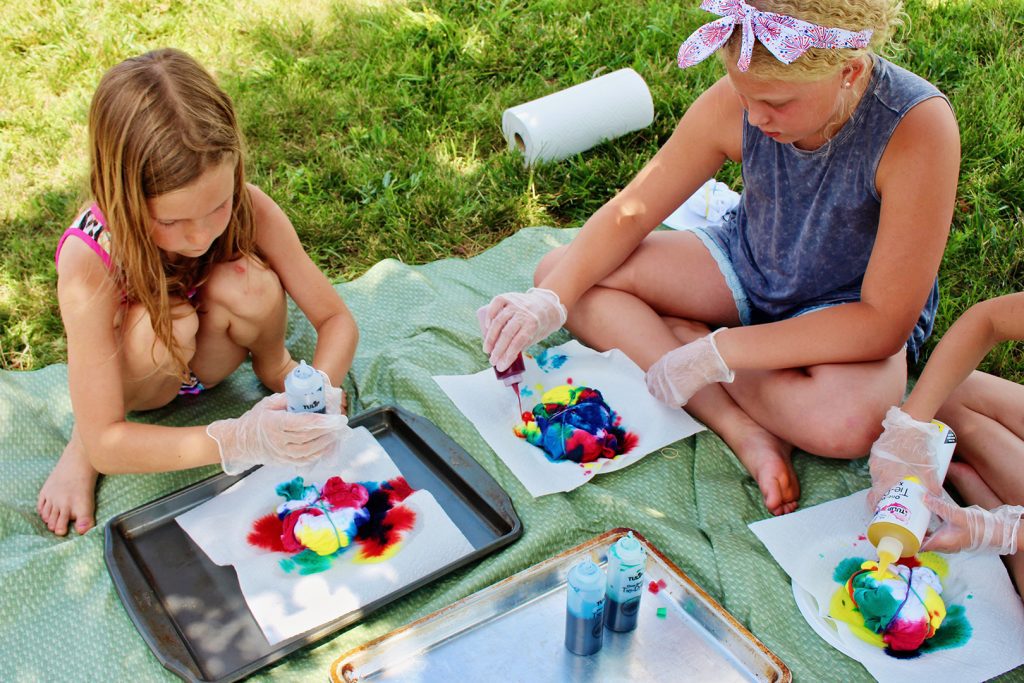
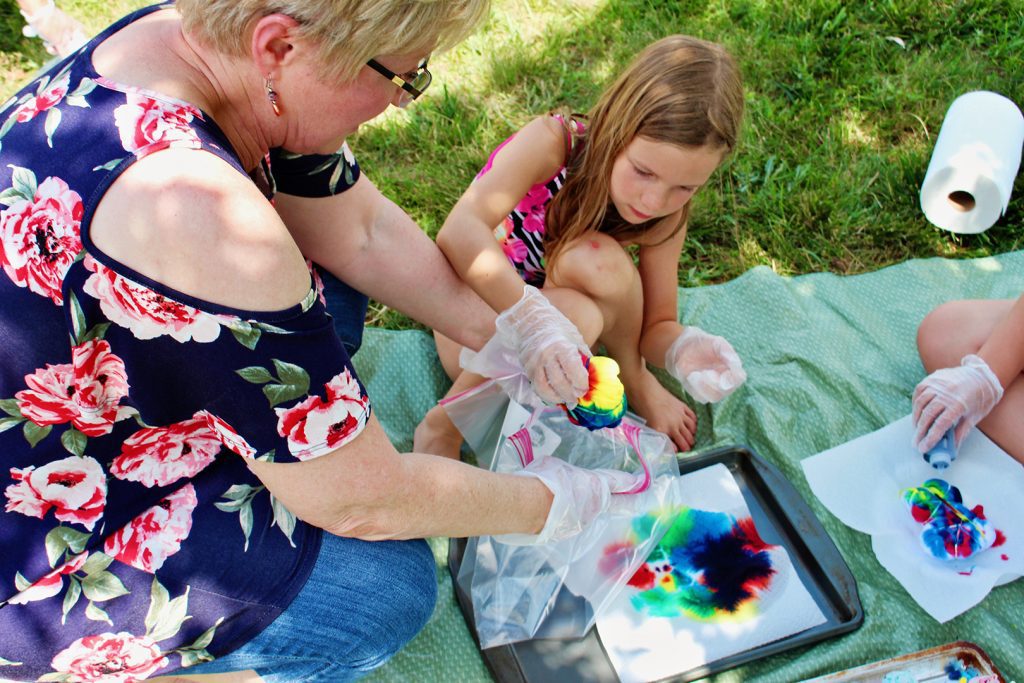
Let each grand place a paper towel on a foam plate and then put their shirt on top of that. Our plan was for the kids to put their plate on the cake pan and take turns dying their t-shirts. We soon found that the plates were adequate to prevent dripping dye so they shared the dye bottles and all started at once. You can choose what you would like to do for preventing spills.
Tip: Each person needs to be wearing plastic gloves or the hands get tie-dyed too!
Tie-dye the pie!
The next step is the trick to a great swirl pattern. The rubber bands divide the shirt up into pie shaped pieces. Explain to the grands that they are to squirt one tie-dye color into each of the pie shaped areas. This makes the cool circular rays of color that shoot out of the center of the swirl.
The grands had done tie-dye before so this was a bit different for them.
Start with the lightest color first (for us that was yellow) and leave an area white if you want a white stripe. The kids just loved this part, of course.
After the first side is dyed, flip the shirt over and dye the back side of the shirt. The rest of the secret for a great swirl design is to use the same color in each of the pie shapes as you did on the front of the shirt.
Let the shirt set, hurry up and wait
Then drop each shirt separately into a plastic bag and seal the bag. We wrote their names on the bags and then set the bags in a warm place overnight. THAT was the hard part, waiting. I read that this helps the dye to set better. That makes sense.
The grands were not at my house the next day so I did the following step.
Take the rubber bands off of a shirt and rinse it under running water. It is a bit unnerving to see how much color runs off the shirt, but eventually it stopped and the water ran pretty clear.
Tip: Don’t forget plastic gloves!
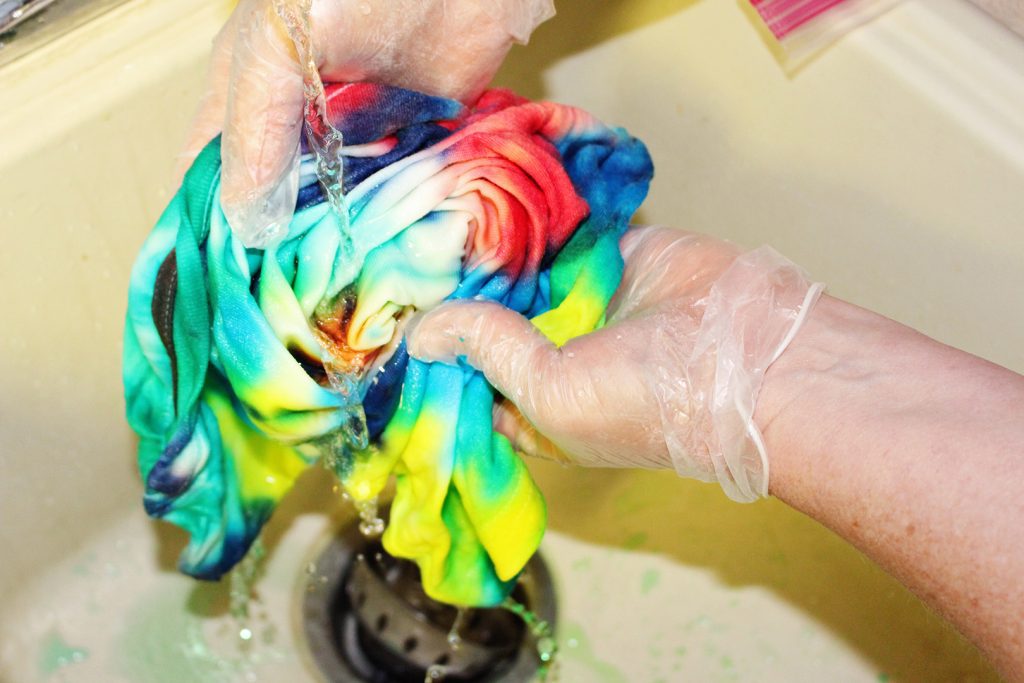
Set the dye with a vinegar soak
Something I learned later is that to help set the dye in the shirt, soak the shirts in a bucket of 1-2 cups vinegar and the rest water. I wish I’d found that out earlier, but it can be helpful for you!!
Wash the shirts a couple times to keep them from bleeding color on your other laundry. I hung ours to dry, but if you use the drier that is fine. Just remember that cotton shrinks in the heat!

What else can I tie-dye?
So I saved the extra dye to do a shirt for myself. Hmmm, perhaps I’ll tie-dye a couple pairs of Papa’s underwear! He would NOT think that was “groovy”!
Be sure to attach a picture of your creations! I love seeing what you are doing.
Supplies for How to Tie-Dye a Swirl T-Shirt
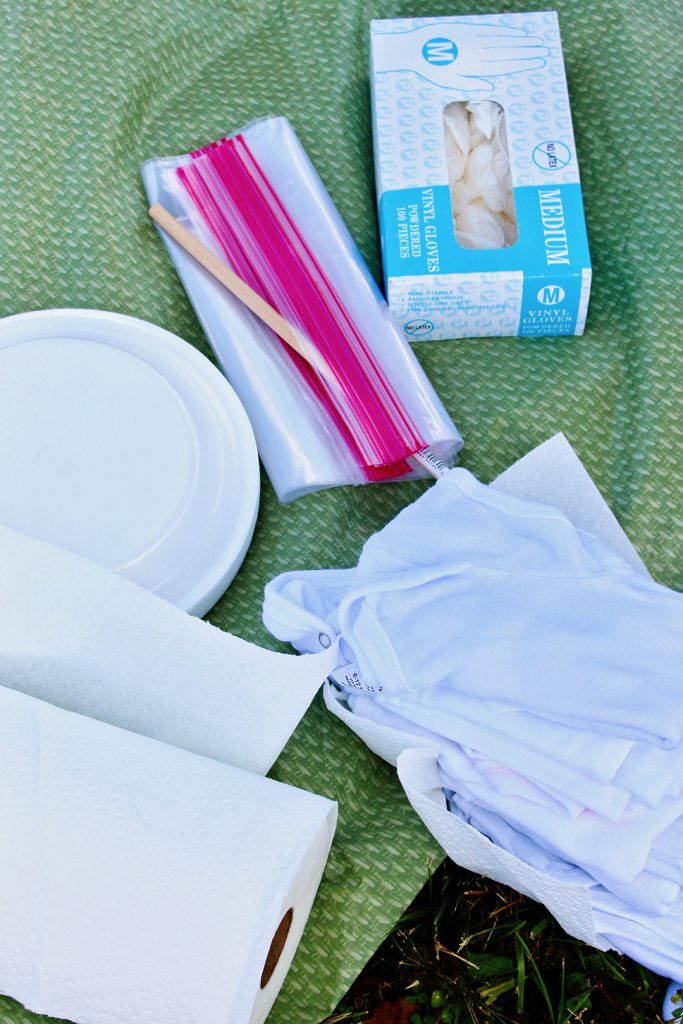
- T-shirt for each child- 100% cotton is best but some polyester with work, NOT 100% polyester though!!
- Tie-Dye in various colors (come in kits or individually)
- Plastic gloves (some come in the kits, I had a few extra lightweight ** gloves)
- Rubber bands (some come in the kits, I had some extras)
- Plastic sheet or plastic table cloth
- Dowel or a pencil with an eraser
- Cookie tray with edges (sheet cake pan I guess it is called**)
- Foam plate for each child
- Paper towels
- Plastic bags
- Permanent marker
- Vinegar
Enjoy!
Welcome to Nana’s! Where there’s fun things to do with your “grand” kids!
Come join the fun at www.WelcomeToNanas.com


Leave a Reply