DIY tin can lanterns
I love making DIY Tin Can Lanterns! They look nice sitting on the table as a decoration, on the front porch, or along the sidewalk as luminaries.
The free pattern included in this post has two Christmas punch patterns for you, this makes the project easy!
Save some tin cans and upcycle them into a wonderful project! I love upcycling, don’t you?
Tin can lantern- good skills!
This is another project my kids made when they were young. Such good memories.
Using a hammer and nails is a hit with the grands (pardon the pun). It is a good way to learn or improve this skill. Lots of kids like to use a hammer and nails!
It does take more dexterity to handle nails and hit the heads with a hammer, so the smaller children will not be able to do this craft without a lot of help. Keep that in mind.
I think this would be fun to do with a group of friends as well. It is fun to imagine a bunch of people talking and hammering on their tin cans!
Throw a “bring your own tin can and hammer” party!
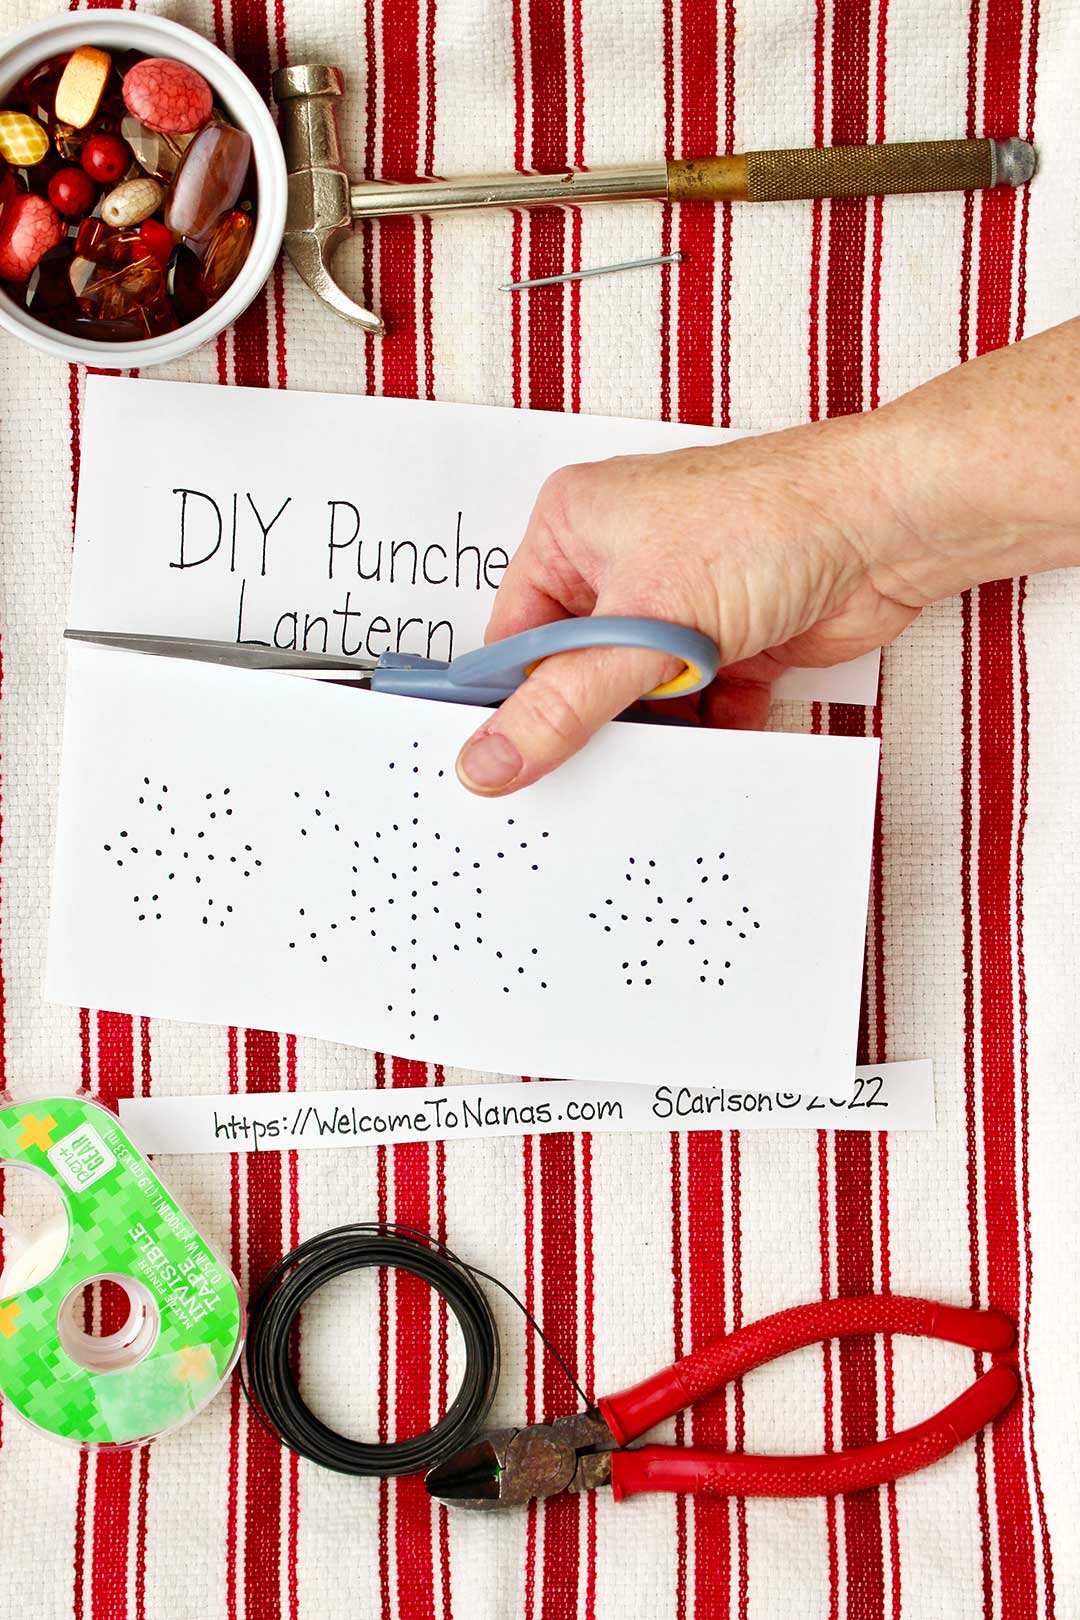
Supplies
Check out the supply list below or on the recipe. You may have all of these supplies in your stash.
Clean out and take the labels off a few tin cans from your cooking. There are a variety of sizes of tin cans and a grouping of different sizes would look nice.
Paint can lanterns and soup can lanterns
All sizes of cans make great lanterns. I’ve seen pictures of people that have used paint cans for lanterns. Of course they are much larger, but they look especially nice sitting on a front porch.
Small cans work too, like soup cans or tomato paste cans.
FREE Tin can lantern patterns
I’ve drawn two FREE Christmas patterns for you to use on your cans if you would like.
Here is the link for the Printable Tin Can Lantern Patterns: FREE DIY Punched Tin Can Lanterns Pattern.
Print it off and cut the two patterns apart.
The patterns are sized for the average tin can size but could be enlarged if you want.
Tip: If you enlarge the pattern redraw the dot placement. Dots are about ¼ inch apart.
Tin can lantern pattern ideas
If you have your own idea for a pattern that is awesome! Simple designs work the best, line drawings. If there are too many details, they get lost on the punch design on the tin can.
Draw or find a design that you like online.
Print it off in a size that fits on the tin can you want to use.
Take your line drawing and draw dots all along the lines at about ¼ inch apart.
Lanterns for other seasons
I know what you are thinking…these could be made for other seasons of the year! YES!
Lanterns for other seasons, just change the patterns you use! Are your wheels turning? Mine are.
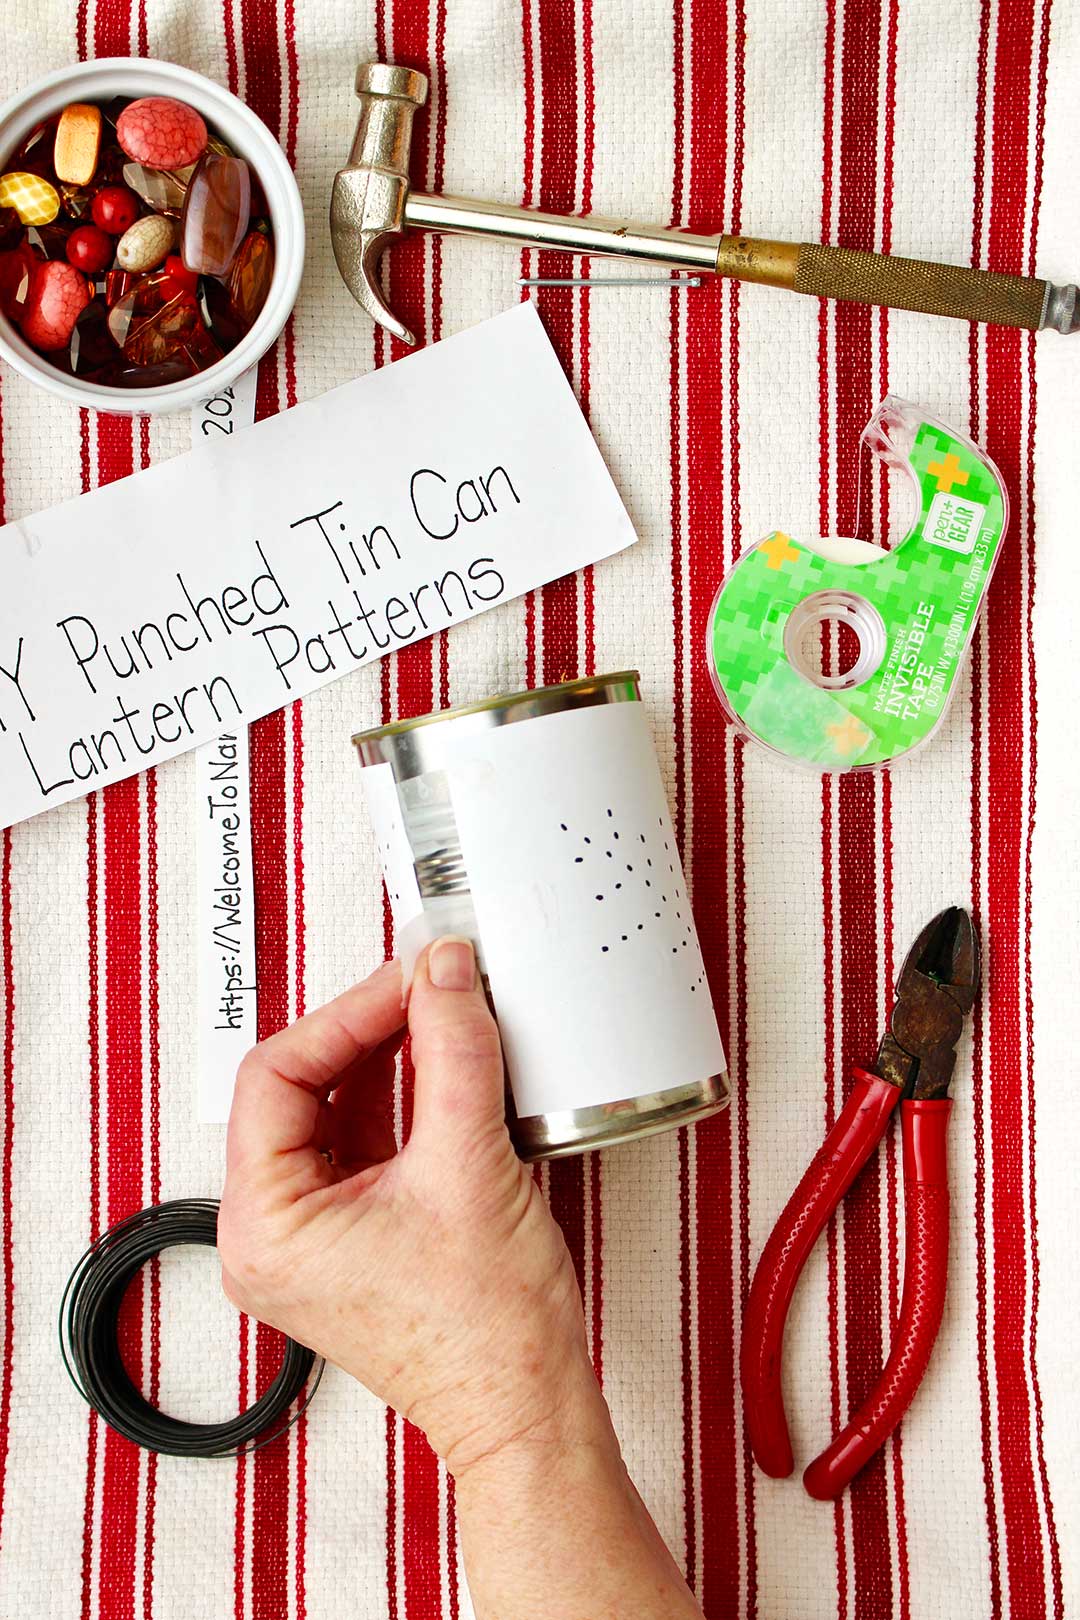
Prep the tin can
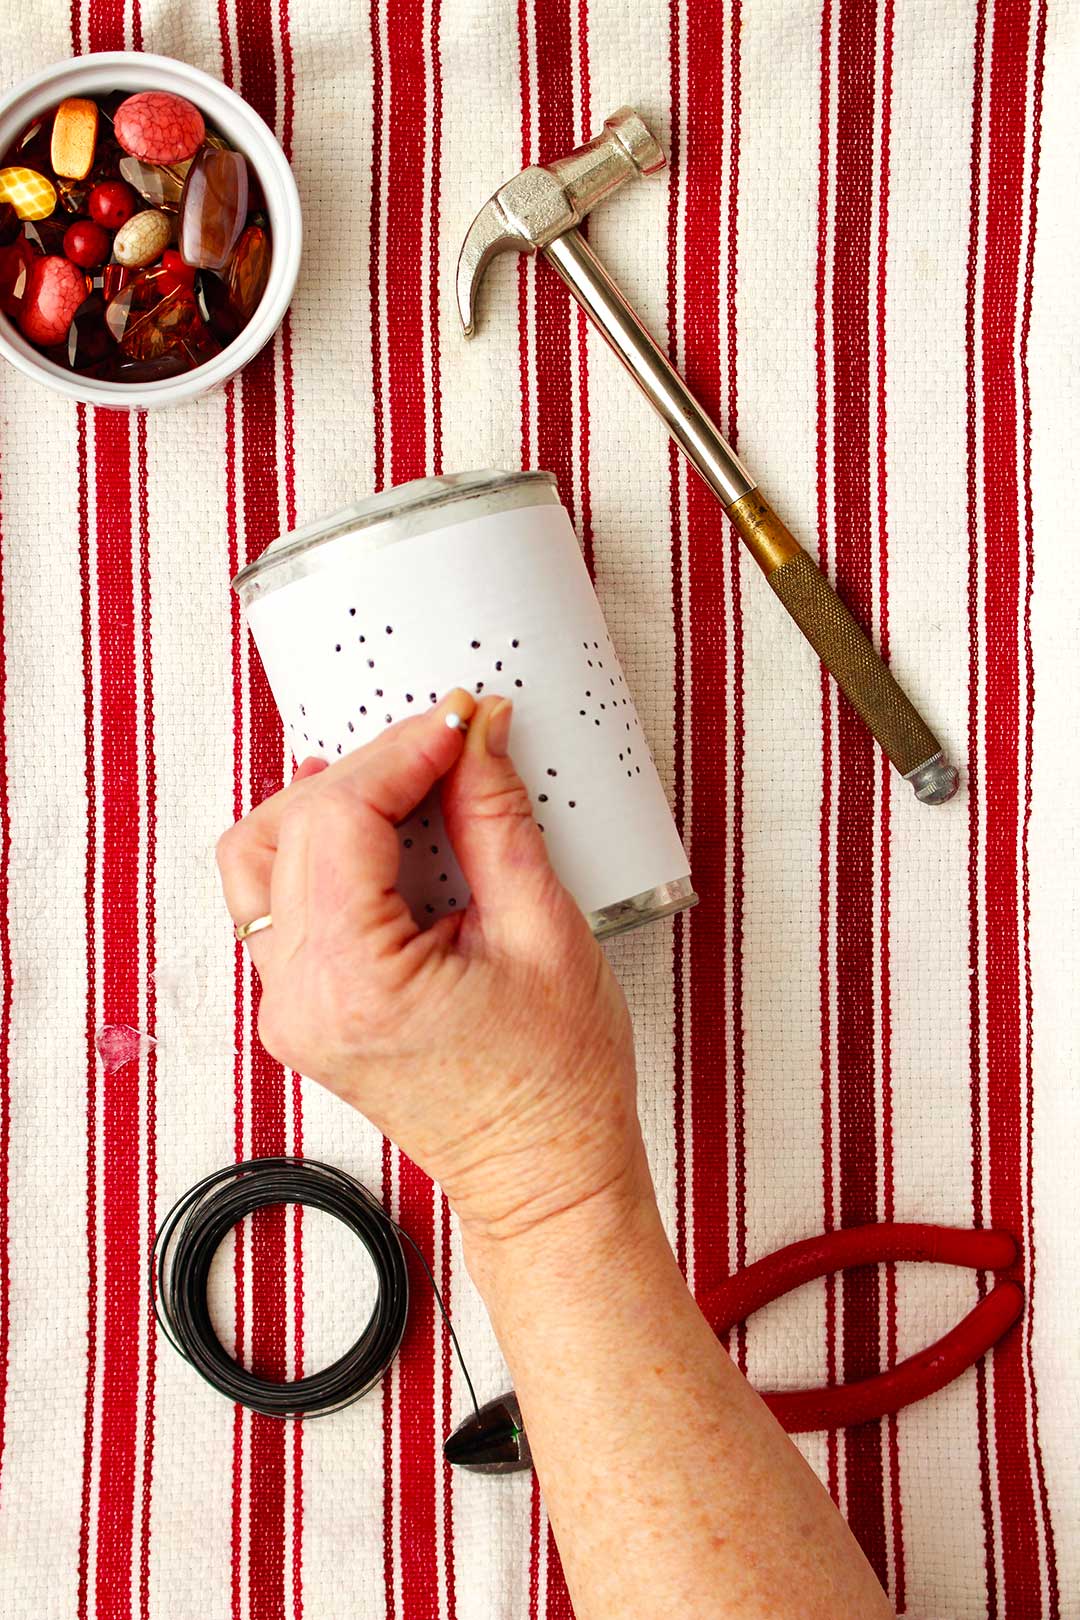
Tape your pattern around the can.
Then fill the can with water up to about ¼ inch from the top.
Place the can in the freezer and let it freeze fully. It’s best to leave it overnight.
Note: My tin can kind of bulged on the bottom when it was frozen. You can gently tap that in when you are all done.
Get ready to hit a nail (or two)
Place the can on a towel so it won’t hurt the surface you are working on.
Place the nail point on a dot on the paper design. Hammer the nail until it goes through the surface of the tin can. You don’t need to hammer it all the way in or it will be too hard to pull out by hand.
Watch out that you hit the nail...and not YOUR (finger)nail!!
Repeat this for every dot on the pattern. It takes a while. If you want to take a break, put the can back in the freezer so it stays solid.
Check to make sure you got every dot on the pattern.
Just a couple more things...
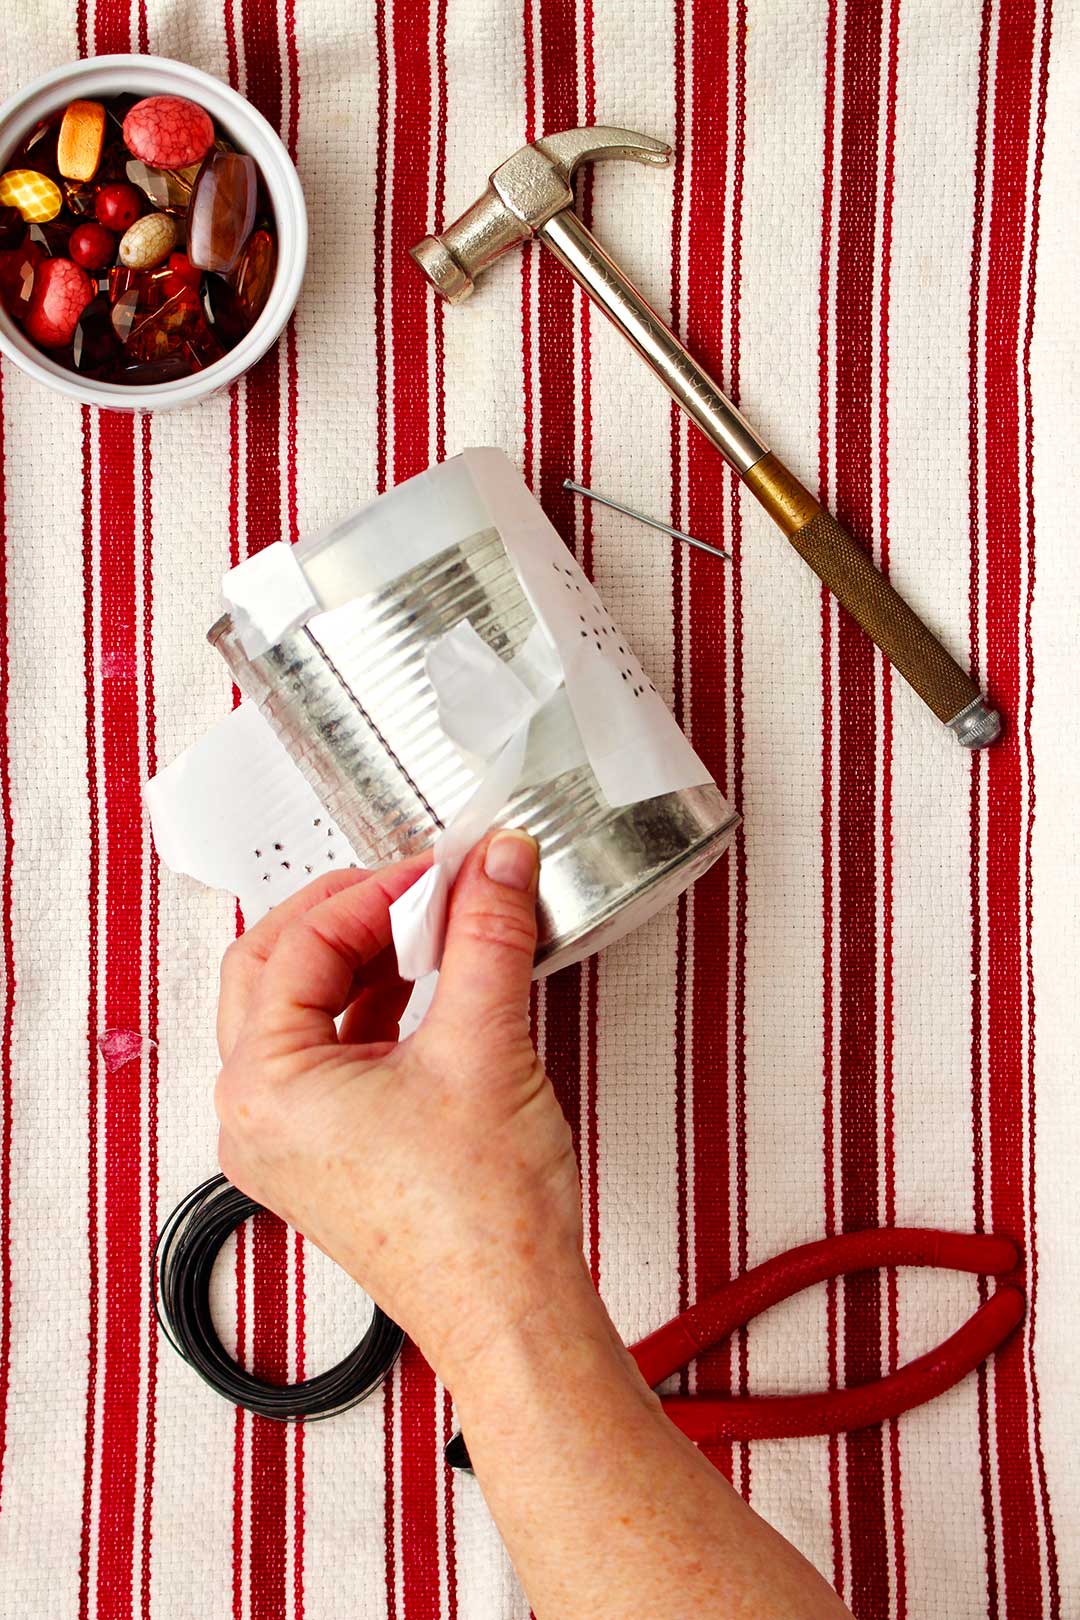
When finished, tear the paper off the can. Doesn’t that look nice?
Only two more holes to hammer! You can do it.
If you want a handle on your lantern, you need two holes to put the wire through.
Tap two holes on opposite sides of the can. They should be about ¼ inch from the top of the can. We will come back to the handles in just a second.
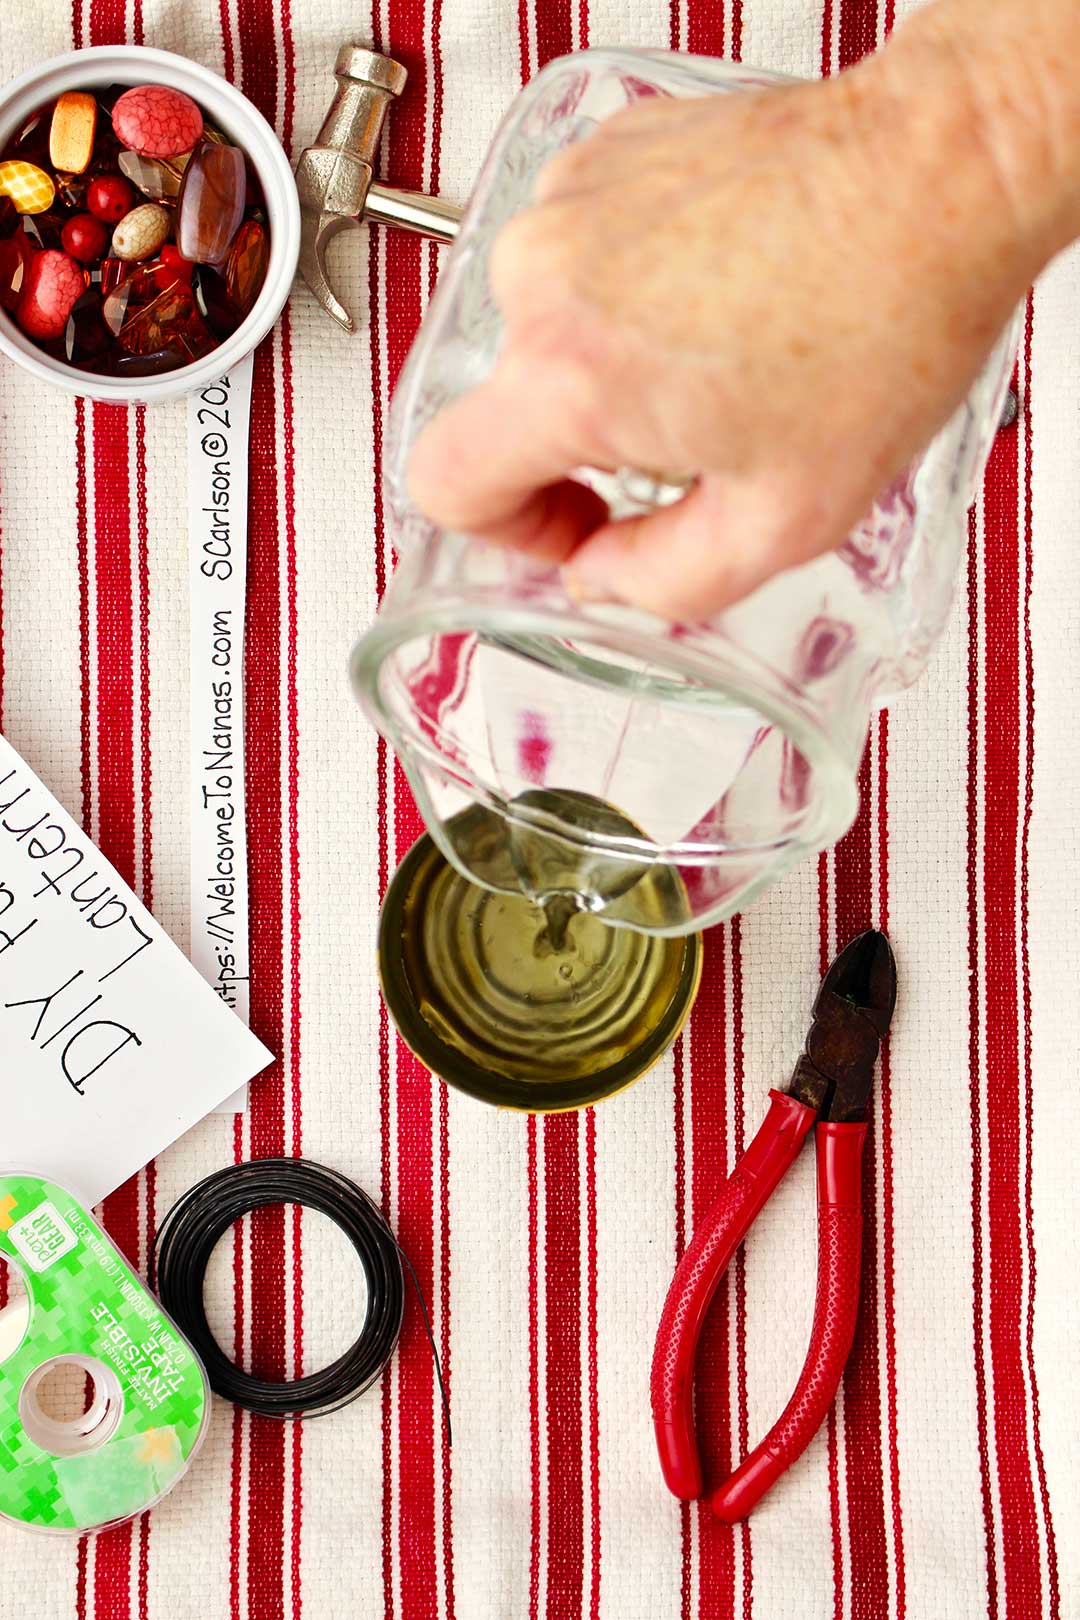
Let the ice melt
Place your can in the sink or a pan so that the ice inside can melt if you haven’t already don’t that.
Note: Don’t reach down inside the can. The holes you punched leave jagged edges.
Place your can in the sink or a pan so that the ice inside can melt if you haven’t already don’t that.
If the bottom of your can bulged a bit, just gently tap it down.
Painted or left silver
Another twist on the theme is to paint the tin cans after you have done the punch design.
Paint a color for the season like orange for fall, red for Christmas, white for winter.
Or you can choose a color that matches or compliments your décor.
The ideas are endless!
Painting is optional but if you do paint, make sure it is dry before making a handle!
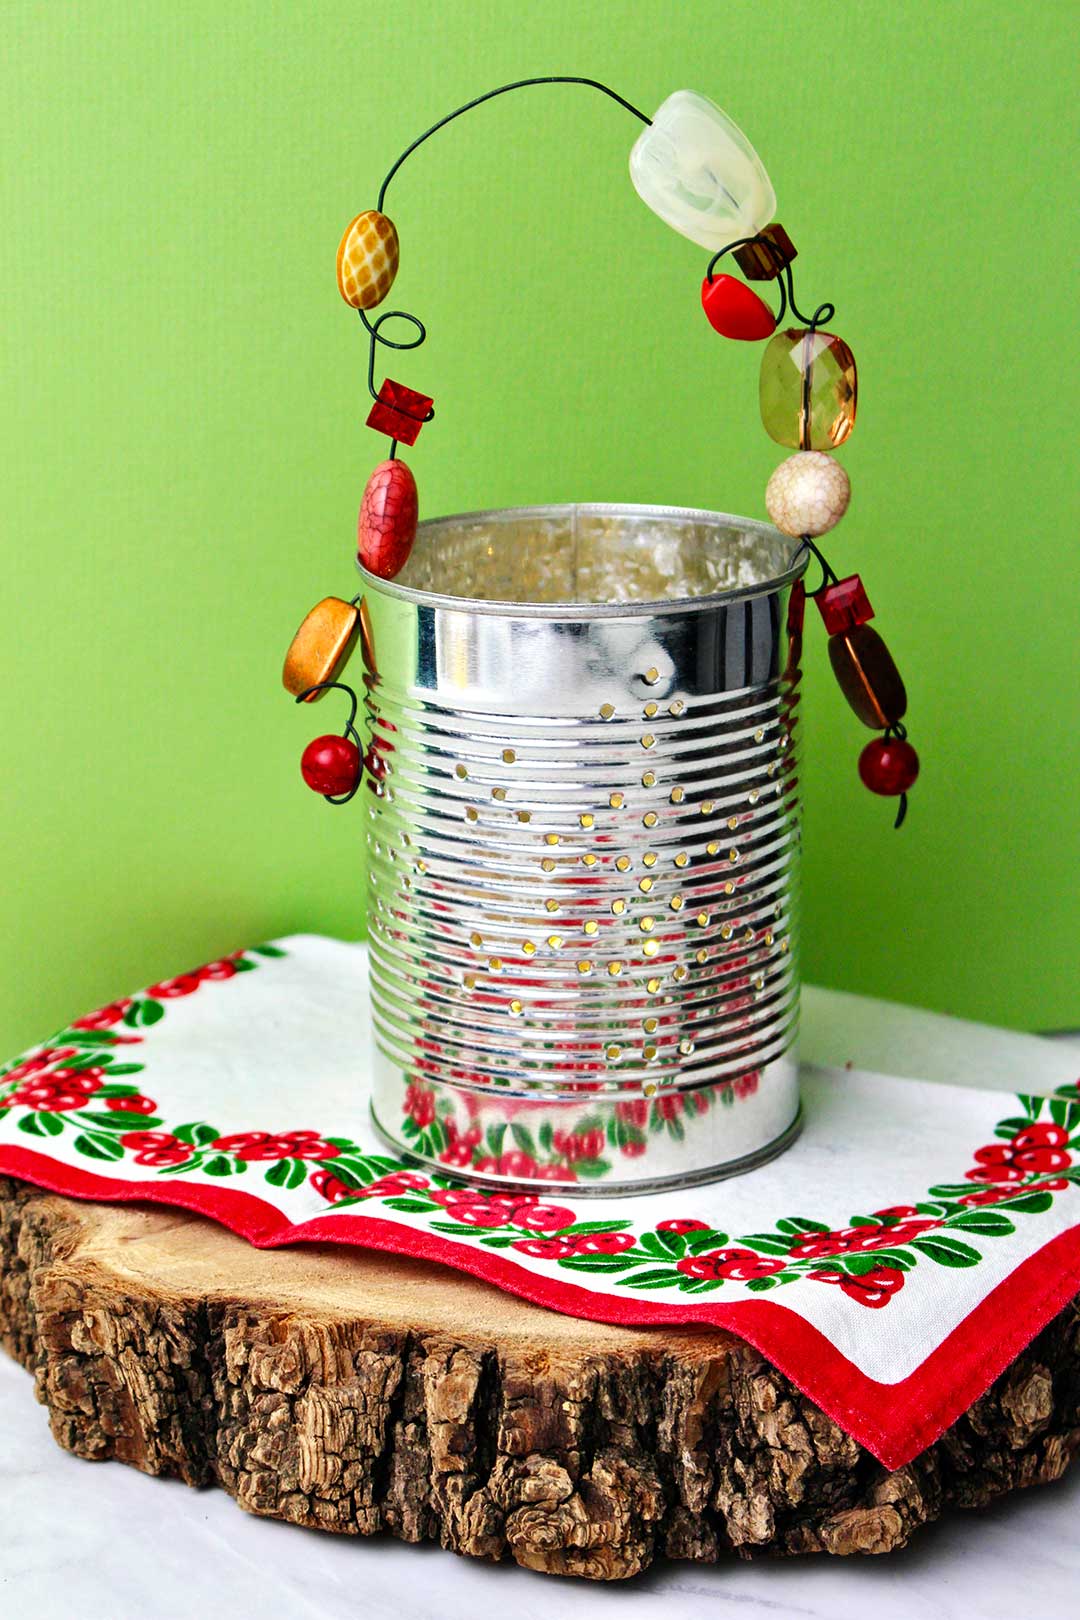
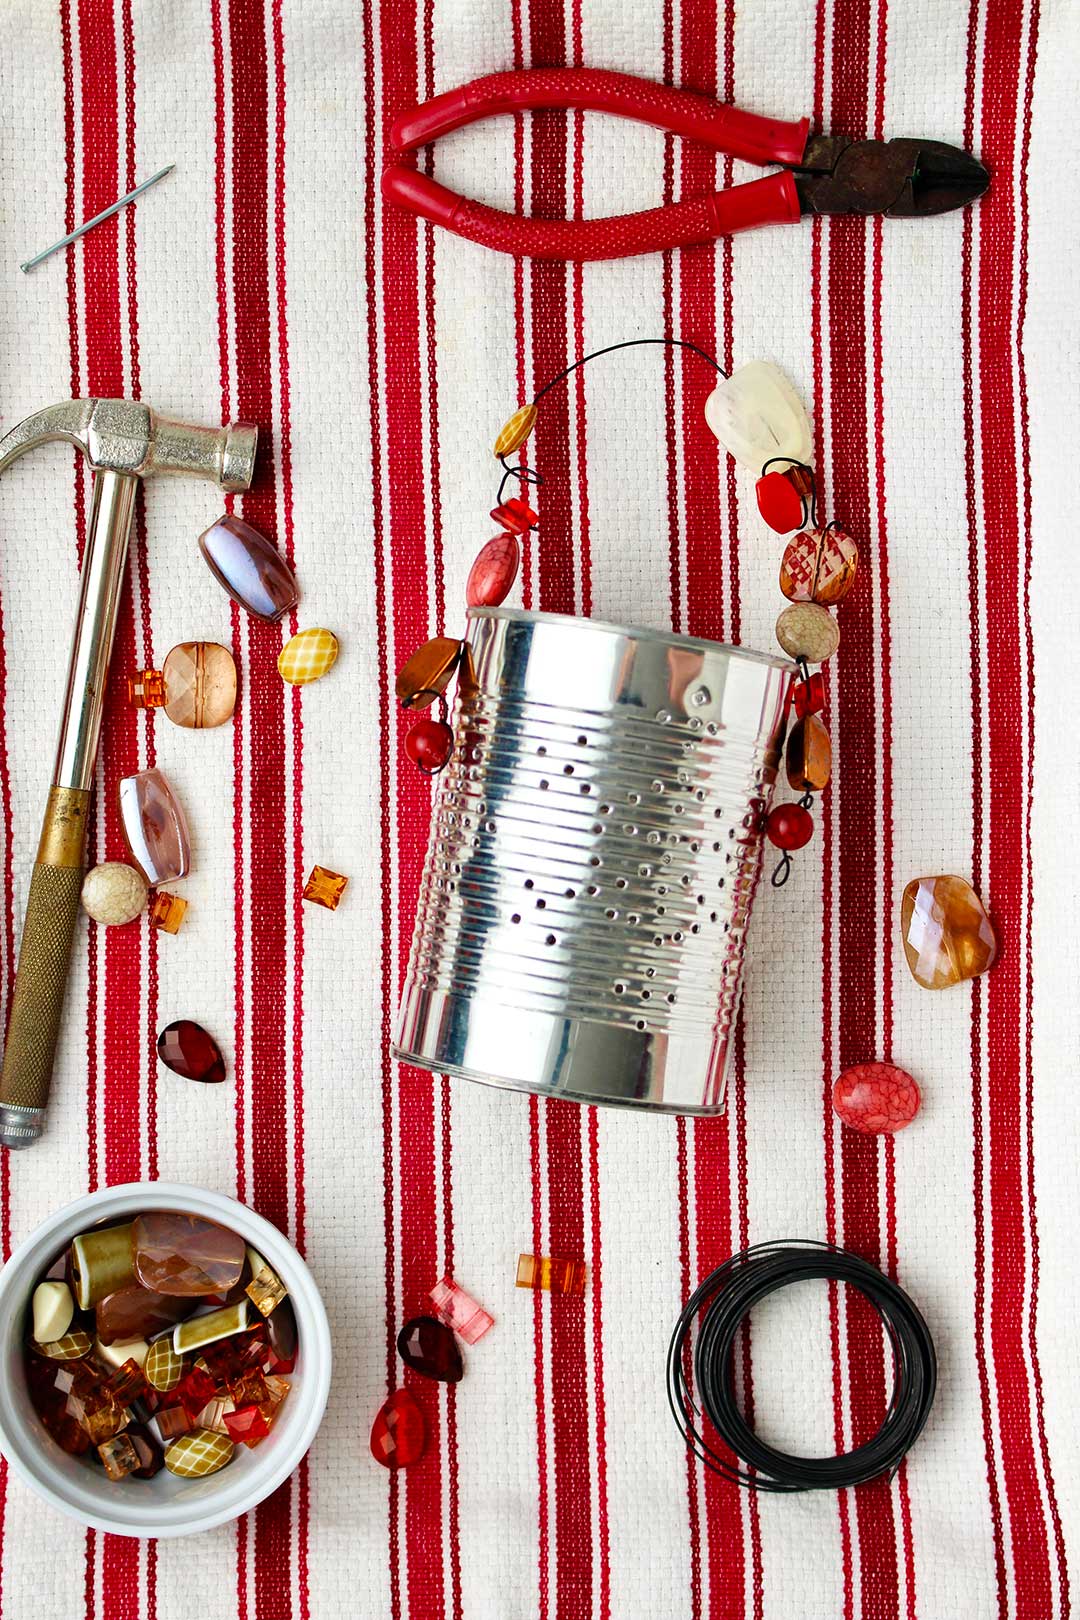
A handle for your tin can lantern
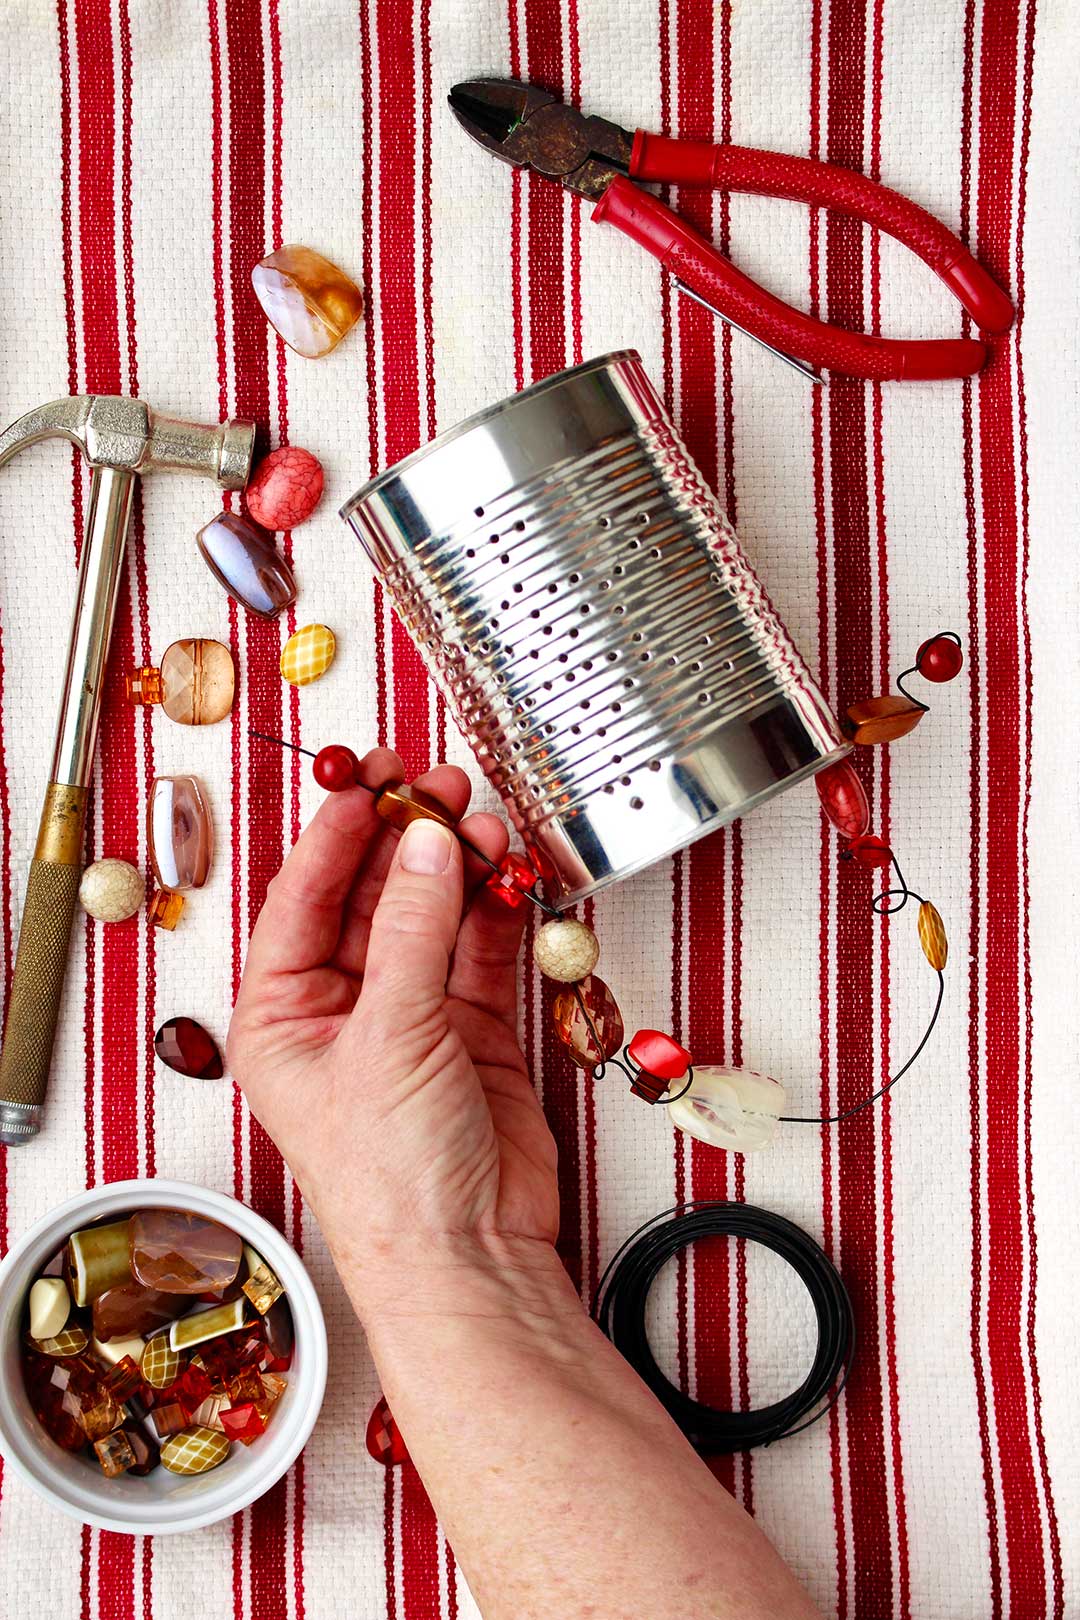
If you would like to make a handle, use wire clippers to cut a piece of wire that is about three times longer than needed for the handle length.
I added beads to mine just for fun but that is also optional.
The wire goes through the two extra holes you punched in your tin can at the top.
Note: Go from the inside of the can to the outside when stringing the wire through.
Thread the wire through the first hole and add a few beads to the end of the wire. Twist the wire on the end. This keeps the beads on and hides the pointed end of the wire for safety.
Twist the wire, loop de loops!
Twist the wire so that it stays in place by the top of the can.
Make twists and circles in the wire wherever you would like for decoration and add a few beads as well if you want.
When happy with how the handle looks, string the wire through the second hole and twist the wire so it stays in place.
Add a couple more beads and twists on the other end of the wire. Twist the wire on the end again and you are done!
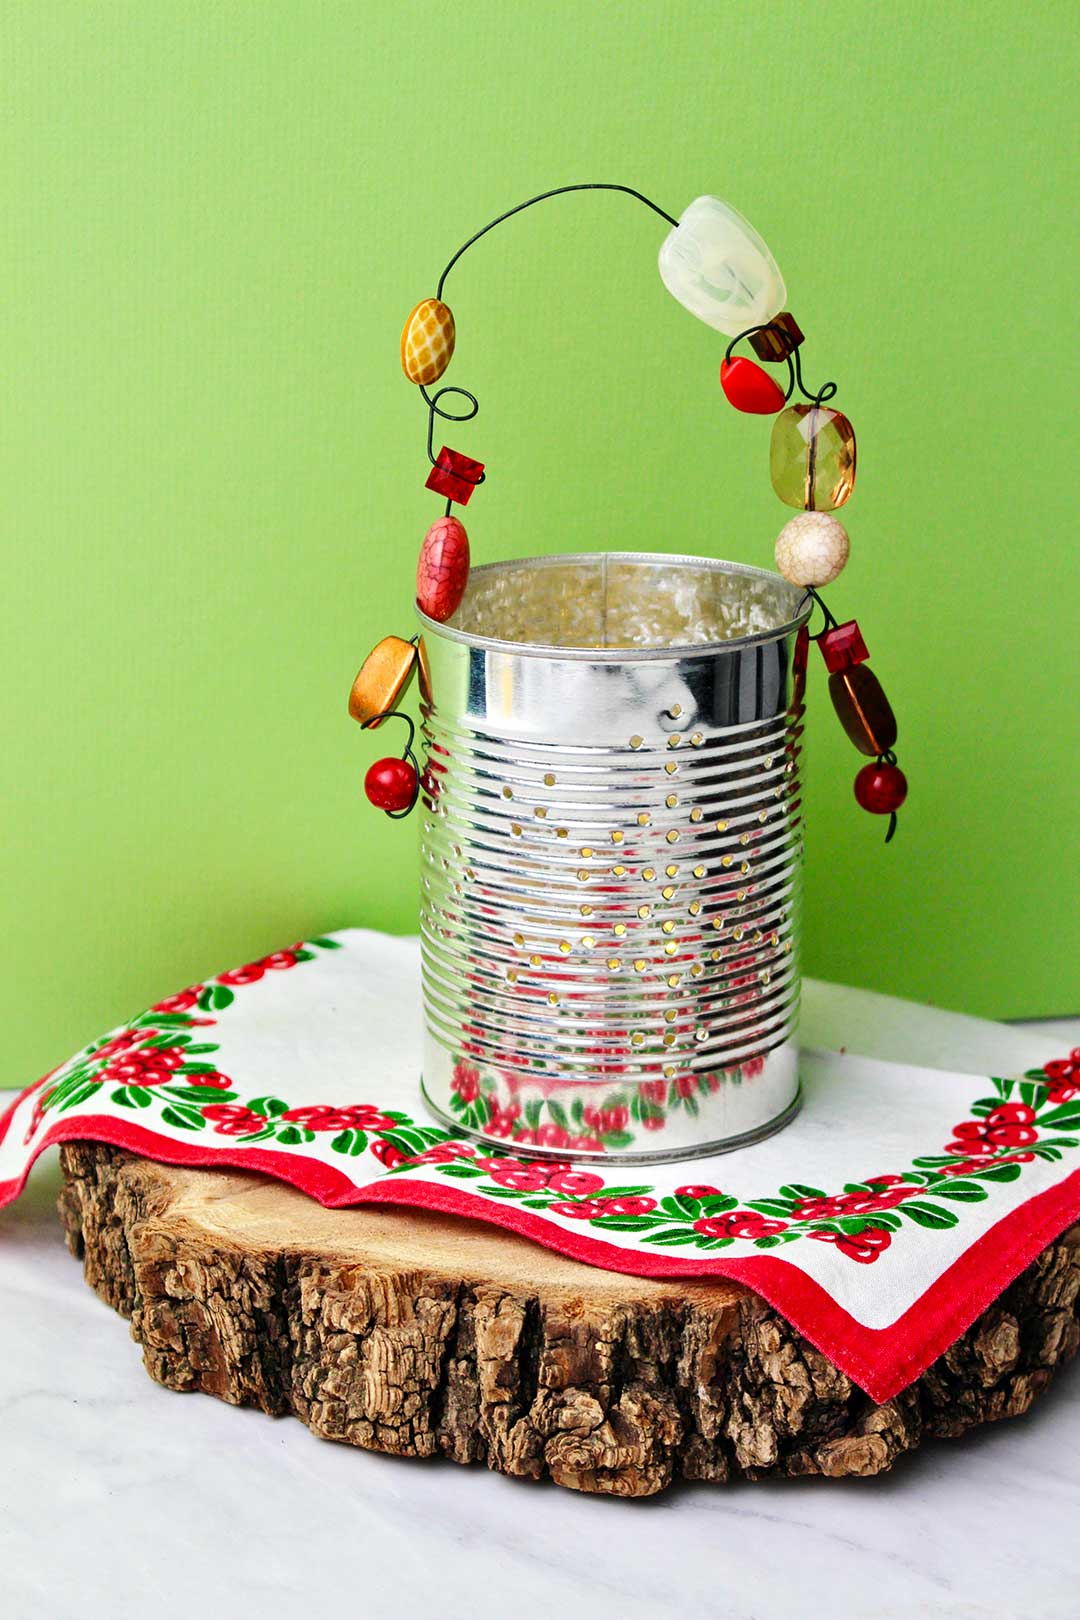
Light up your world!
Well, at least your tin can lantern!
To light up your DIY Punched Tin Can Lanterns you can place a battery lit candle or a string of mini fairy lights.
Note: You can use a real candle inside if you want but be careful where you place them and put them on top of a plate to protect your surface.
Luminaries
DIY Punched Tin Can Lanterns are showy holiday lights on the fireplace mantel, on the table or front porch.
But don’t forget how cute they would look lining your sidewalk as luminaries!
They are also cute hung along a garland or from a shepherd’s hook outside.
YouTube Video link is found here, watch and/or subscribe here: DIY Punched Tin Can Lanterns
Would you like some other fun Christmas crafts to make?
- Glowing Paper Bag Luminaries
- Make a No Sew Sock Gnome for Christmas
- Simple Decoupage Stained Glass Candle Holder
Oh, another hammer and nail craft that I LOVE!
This craft uses nails and string to make an art picture.
Enjoy!
If you try this craft, let me know! Go ahead and leave a comment, rate it, and tag a photo with #WelcometoNanas wherever you post.
Come join the fun at https://welcometonanas.com

DIY Punched Tin Can Lanterns
Equipment
- Scissors
- Hammer
- Wire clipper
- Needle nosed pliers is helpful to turn wire (optional)
Items Required
- Tin can(s)- size of your choice, clean, label removed
- FREE Printable pattern for DIY Punched Tin Can Lanterns- print off a copy
- Nail (Box nail or finishing nail)- small in diameter
- Wire (20 gauge wire works well)
- Beads (optional)
- Battery lit candle or fairy lights
Instructions
- Clean out and take the labels off a few tin cans from your cooking.
- Here is the link for the Printable Tin Can Lantern Patterns: FREE DIY Punched Tin Can Lanterns Pattern.Print it off and cut the two patterns apart.
- Tape your pattern around the can.
- Fill the can with water up to about ¼ inch from the top.Place the can in the freezer and let it freeze fully. It’s best to leave it overnight.
- When finished, tear the paper off the can. If you want a handle on your lantern, you need two holes to put the wire through. Tap two holes on opposite sides of the can. They should be about ¼ inch from the top of the can. We will come back to the handles in just a second.
- Place your can in the sink or a pan so that the ice inside can melt
- If the bottom of your can bulged a bit, just gently tap it down.
- Use wire clippers to cut a piece of wire that is about three times longer than needed for the handle length.I added beads to mine just for fun but that is also optional.The wire goes through the two extra holes you punched in your tin can at the top. Note: Go from the inside of the can to the outside when stringing the wire through.
- Thread the wire through the first hole and add a few beads to the end of the wire. Twist the wire on the end. This keeps the beads on and hides the pointed end of the wire for safety.Twist the wire so that it stays in place by the top of the can.Make twists and circles in the wire wherever you would like for decoration and add a few beads as well if you want.When happy with how the handle looks, string the wire through the second hole and twist the wire so it stays in place.Add a couple more beads and twists on the other end of the wire. Twist the wire on the end again and you are done!
- To light up your DIY Punched Tin Can Lanterns you can place a battery lit candle or a string of mini fairy lights.
Video
Notes
Supplies for DIY Punched Tin Can Lanterns
- Tin can(s)- size of your choice, clean, label removed
- FREE Printable pattern for DIY Punched Tin Can Lanterns- print off a copy
- Scissors
- Hammer
- Nail (Box nail or finishing nail)- small in diameter
- Wire (20 gauge wire works well)
- Wire clipper
- Needle nosed pliers is helpful to turn wire (optional)
- Beads (optional)
- Battery lit candle or fairy lights


Zoe says
I've been collecting costume jewelry for it's beads and pretty pieces for years now to use for my crafts projects. Thrift shops, yard sales, flea markets, rummage sales. Anywhere costume jewelry might turn up. I would say I have an abundance of them but truth be told, I never have enough! I'm always scrounging for more. These tin can lanterns are ideal for using up the tidbits left from other projects. I have about 30 beads on hand which aren't enough for any of my other projects but certainly are enough to make a few of these adorable lanterns!! Thanks so much for the inspiration!