Frosty the Snowman Cartoon anyone?
How many of you grew up watching the cartoon, Frosty the Snowman? If you haven’t seen it, it’s a must. It’s a 1969 wonder. Ha! If that doesn’t date me I don’t know what will.
My brother and I sat in wonder as Jimmy Durante narrated the story of the Christmas snow that kids made into a snowman. But the thing that brought that snowman to life was a magical hat!
The next half hour was spent following the adventures of Frosty and a magician that chased after his magical hat that was now on Frosty’s head.
A magic hat.
Doesn’t that just make the imagination soar? It’s well, magical!
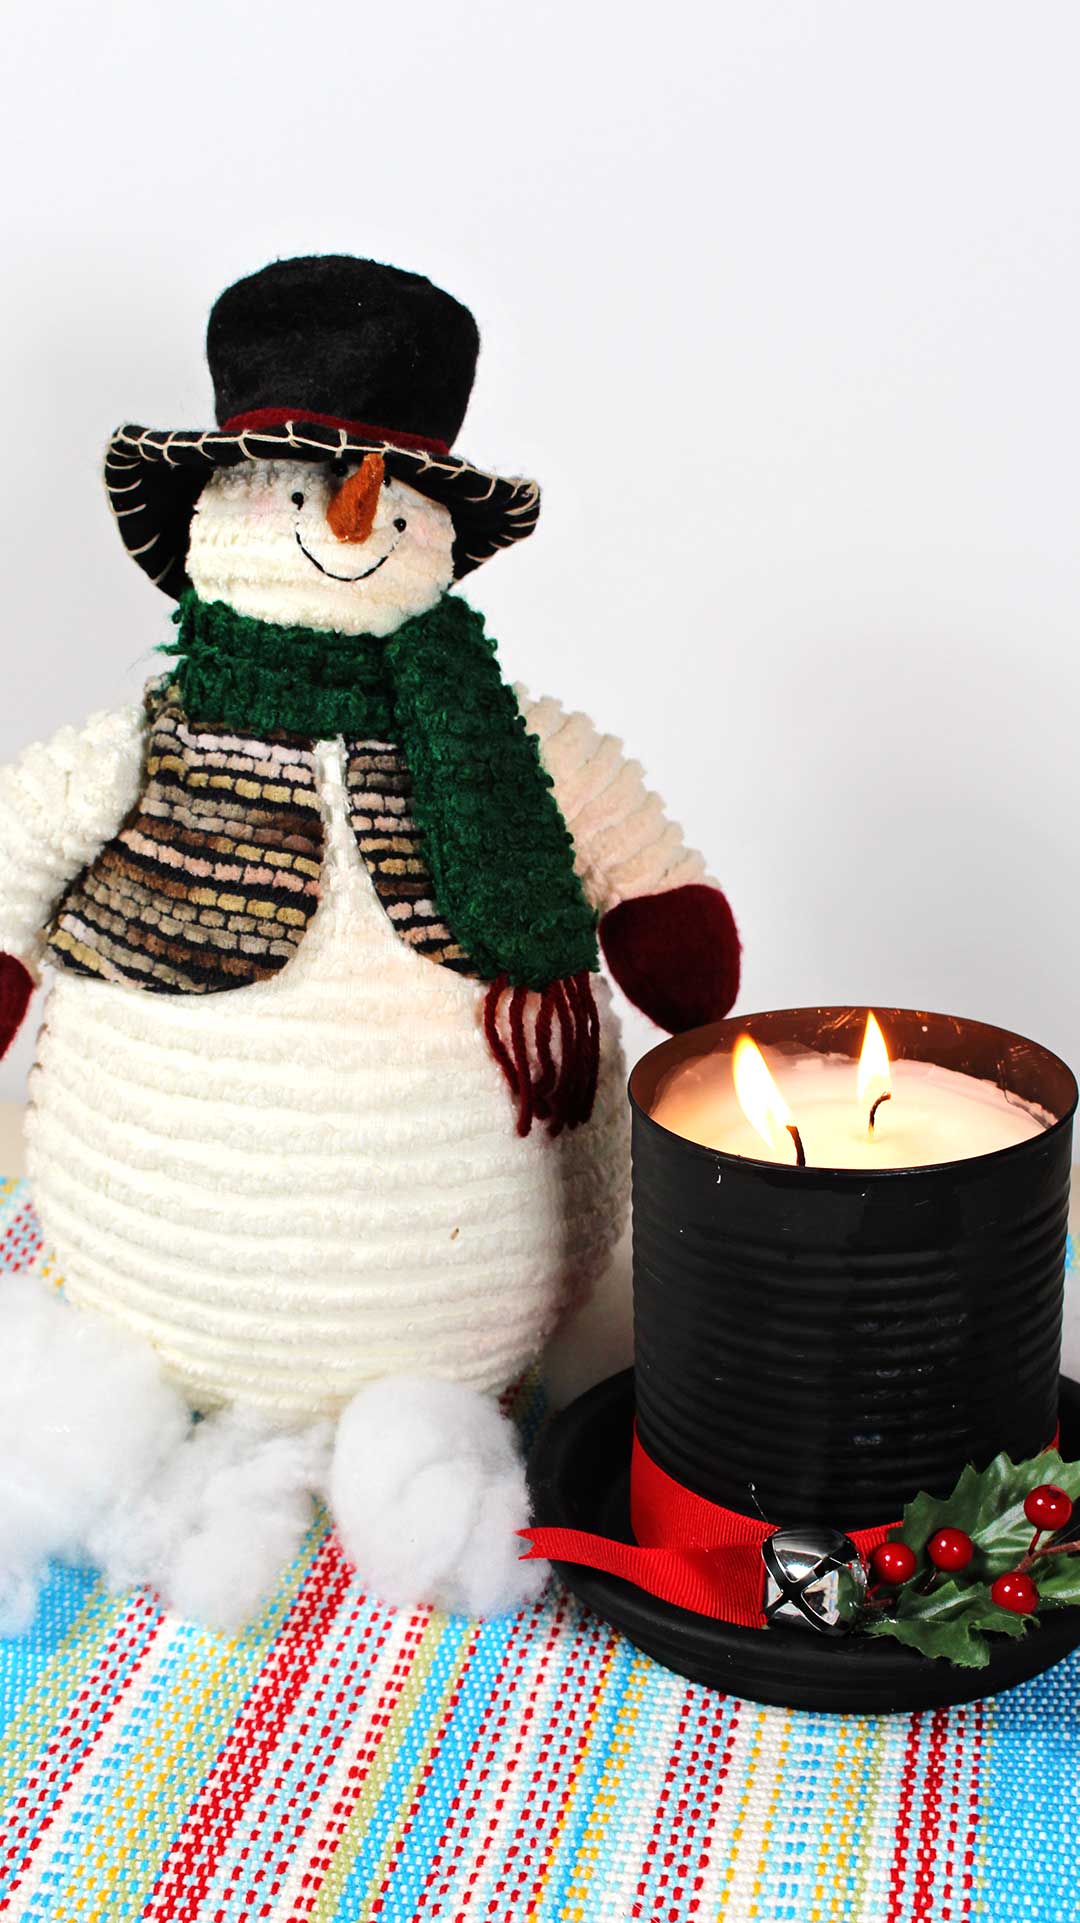
We should try making Frosty's hat. How about a DIY Frosty the Snowman Hat Candle? I know, it’s kind of corny- but I’m telling you, it came out cute.
My first attempt at making a candle was in the WTN How to Make Candles with Ice Cubes post. That wet my appetite to try making more candles. It’s not as intimidating the second time and the materials were on hand. Perhaps you would like to try too!?
How to Make a Frosty the Snowman Hat Candle
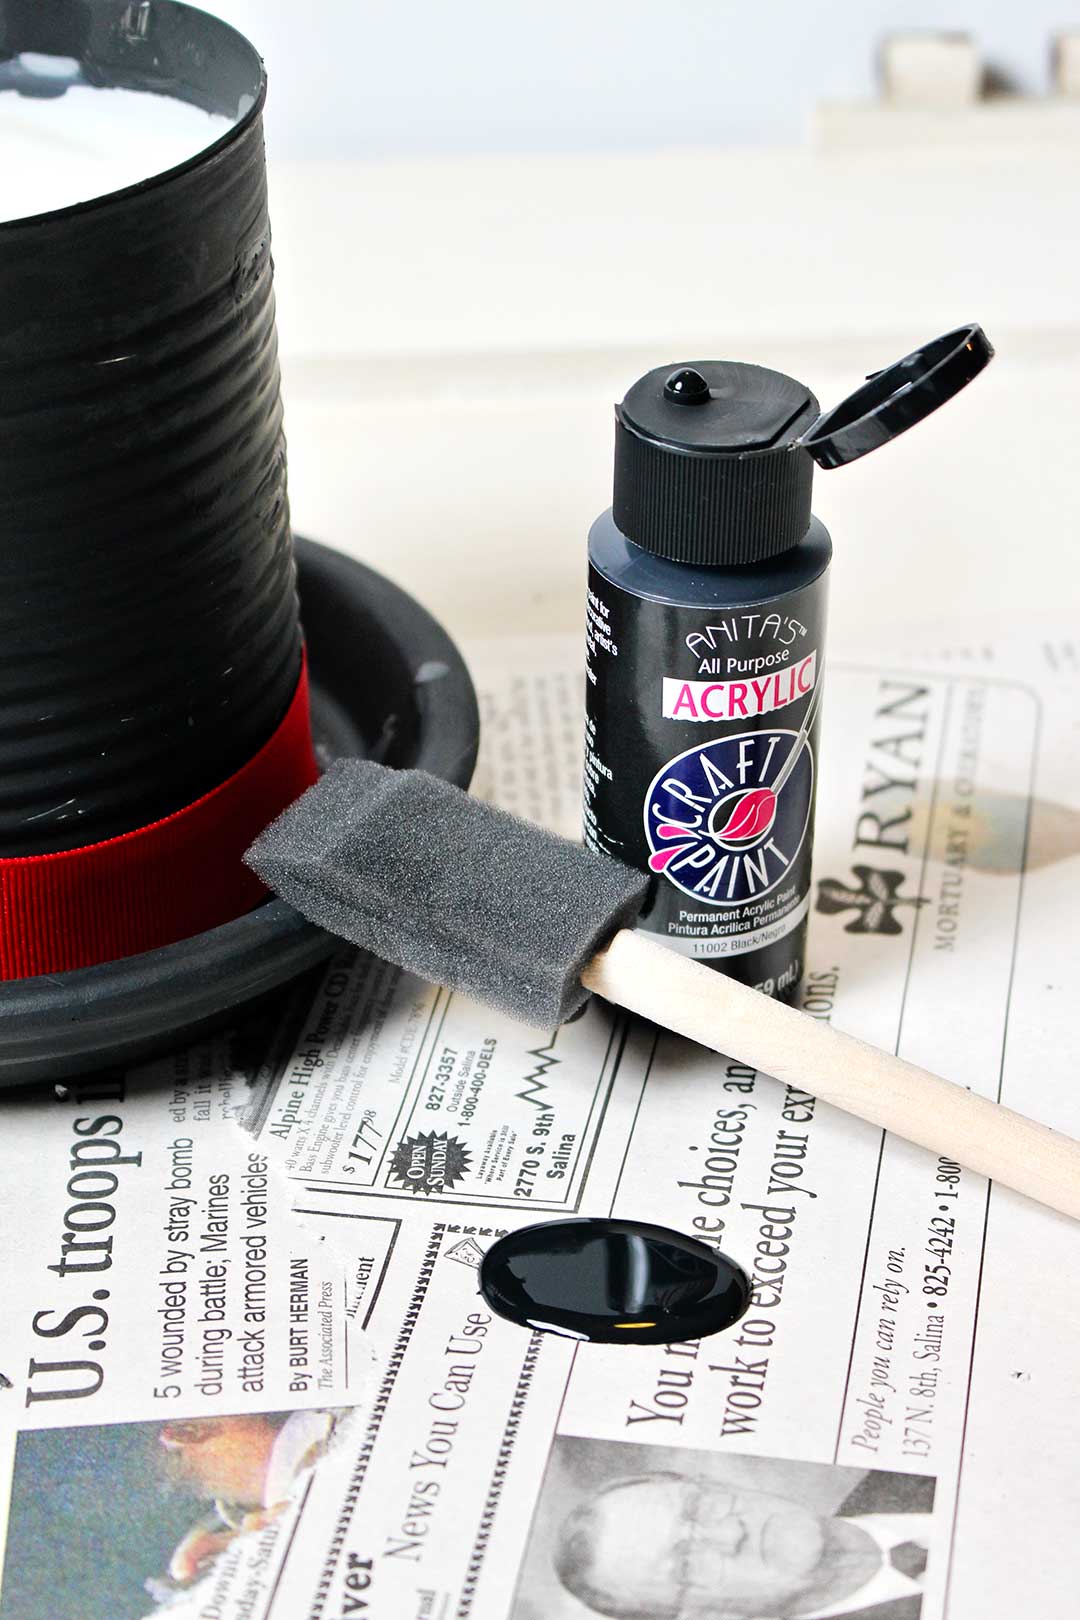
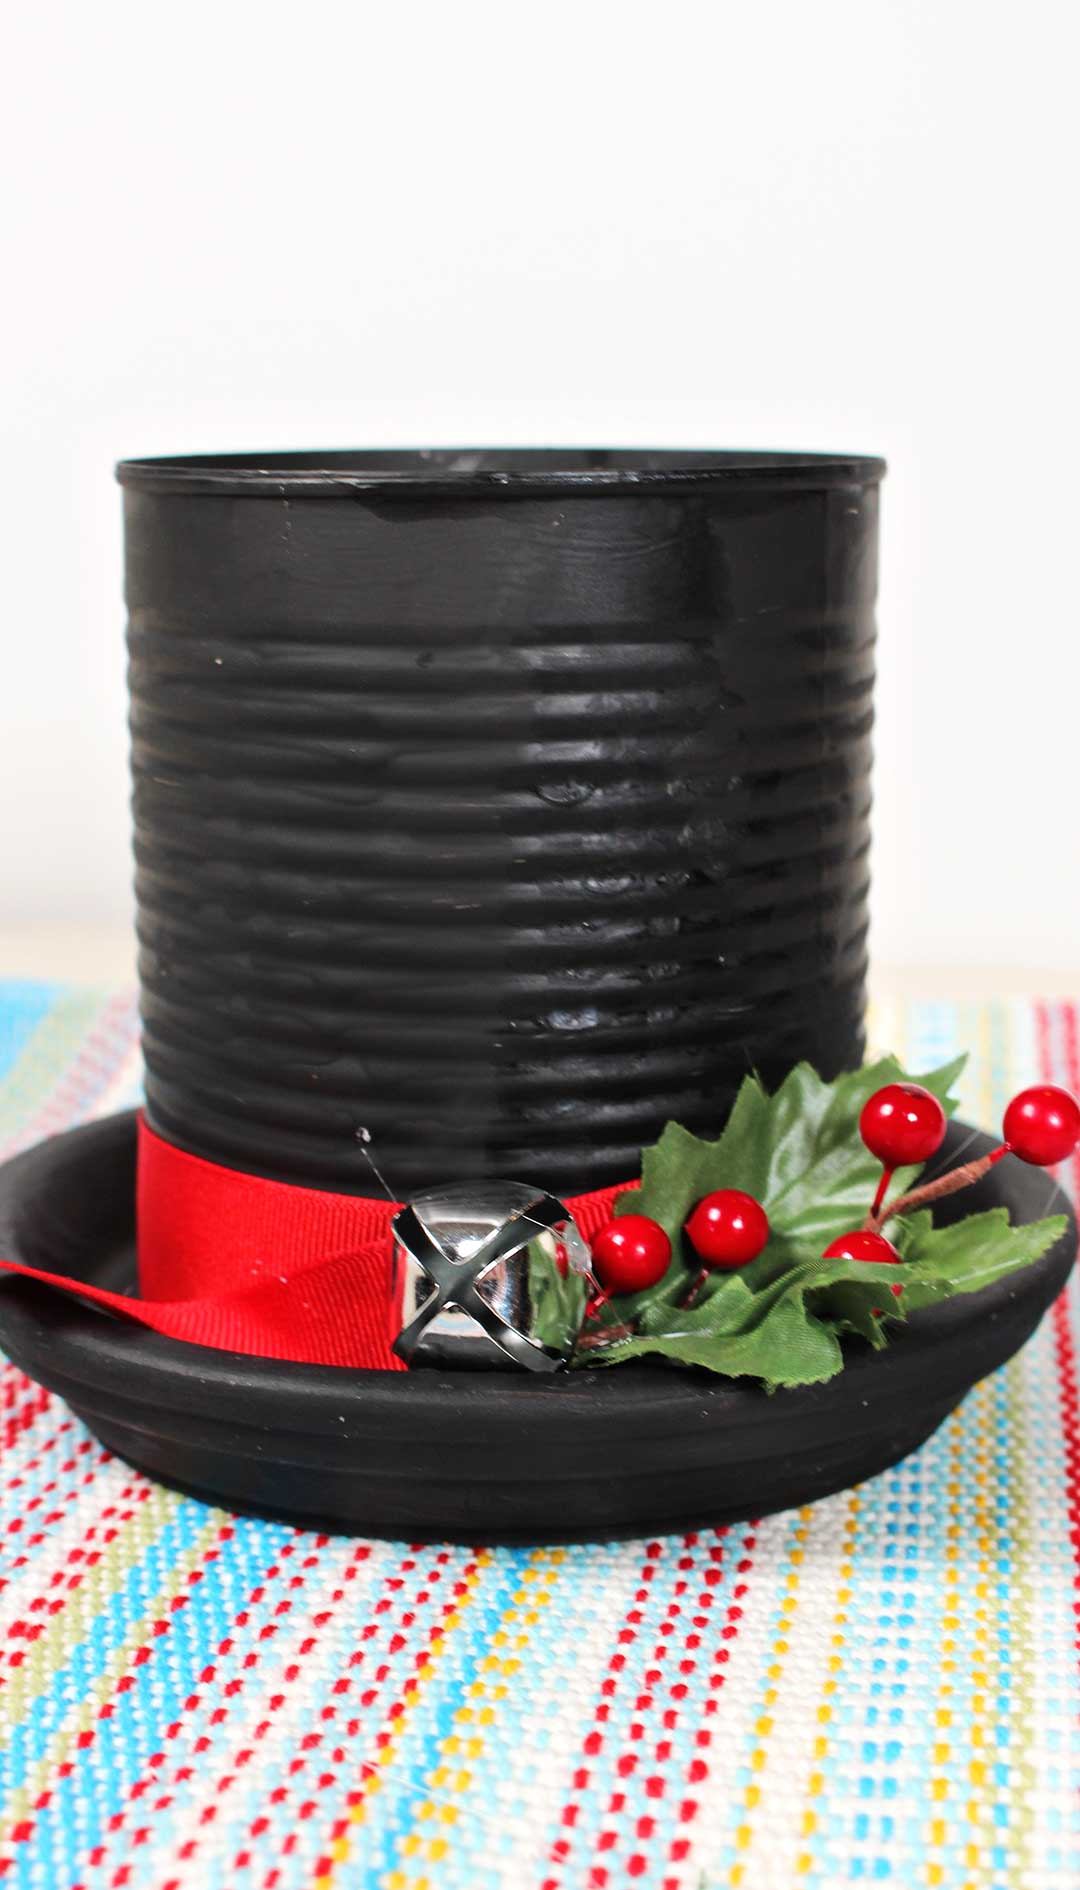
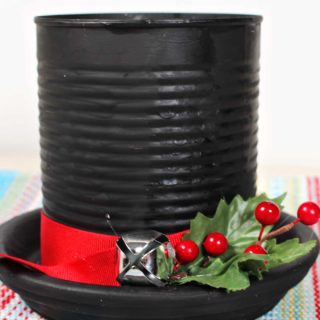
The top part of Frosty’s hat is made from a larger tin can from some pears we opened a few days ago. It was a 29 ounce can, also called a 2.5 can. Pumpkin comes in this larger sized can too. I just love recycling things, don’t you?
The brim of the hat was a Terra Cotta Saucer like you use under a plant so the water doesn’t leak when you water it. The saucer was about 6 inches in diameter.
I hot glued the tin can to the saucer, open end up.
Decorating Frosty's (Recycled) hat
Then both the can and saucer got a coat, actually two coats, of Black Acrylic Craft Paint. Be sure to set out some old newspaper to do your painting over. You’ll thank me later.
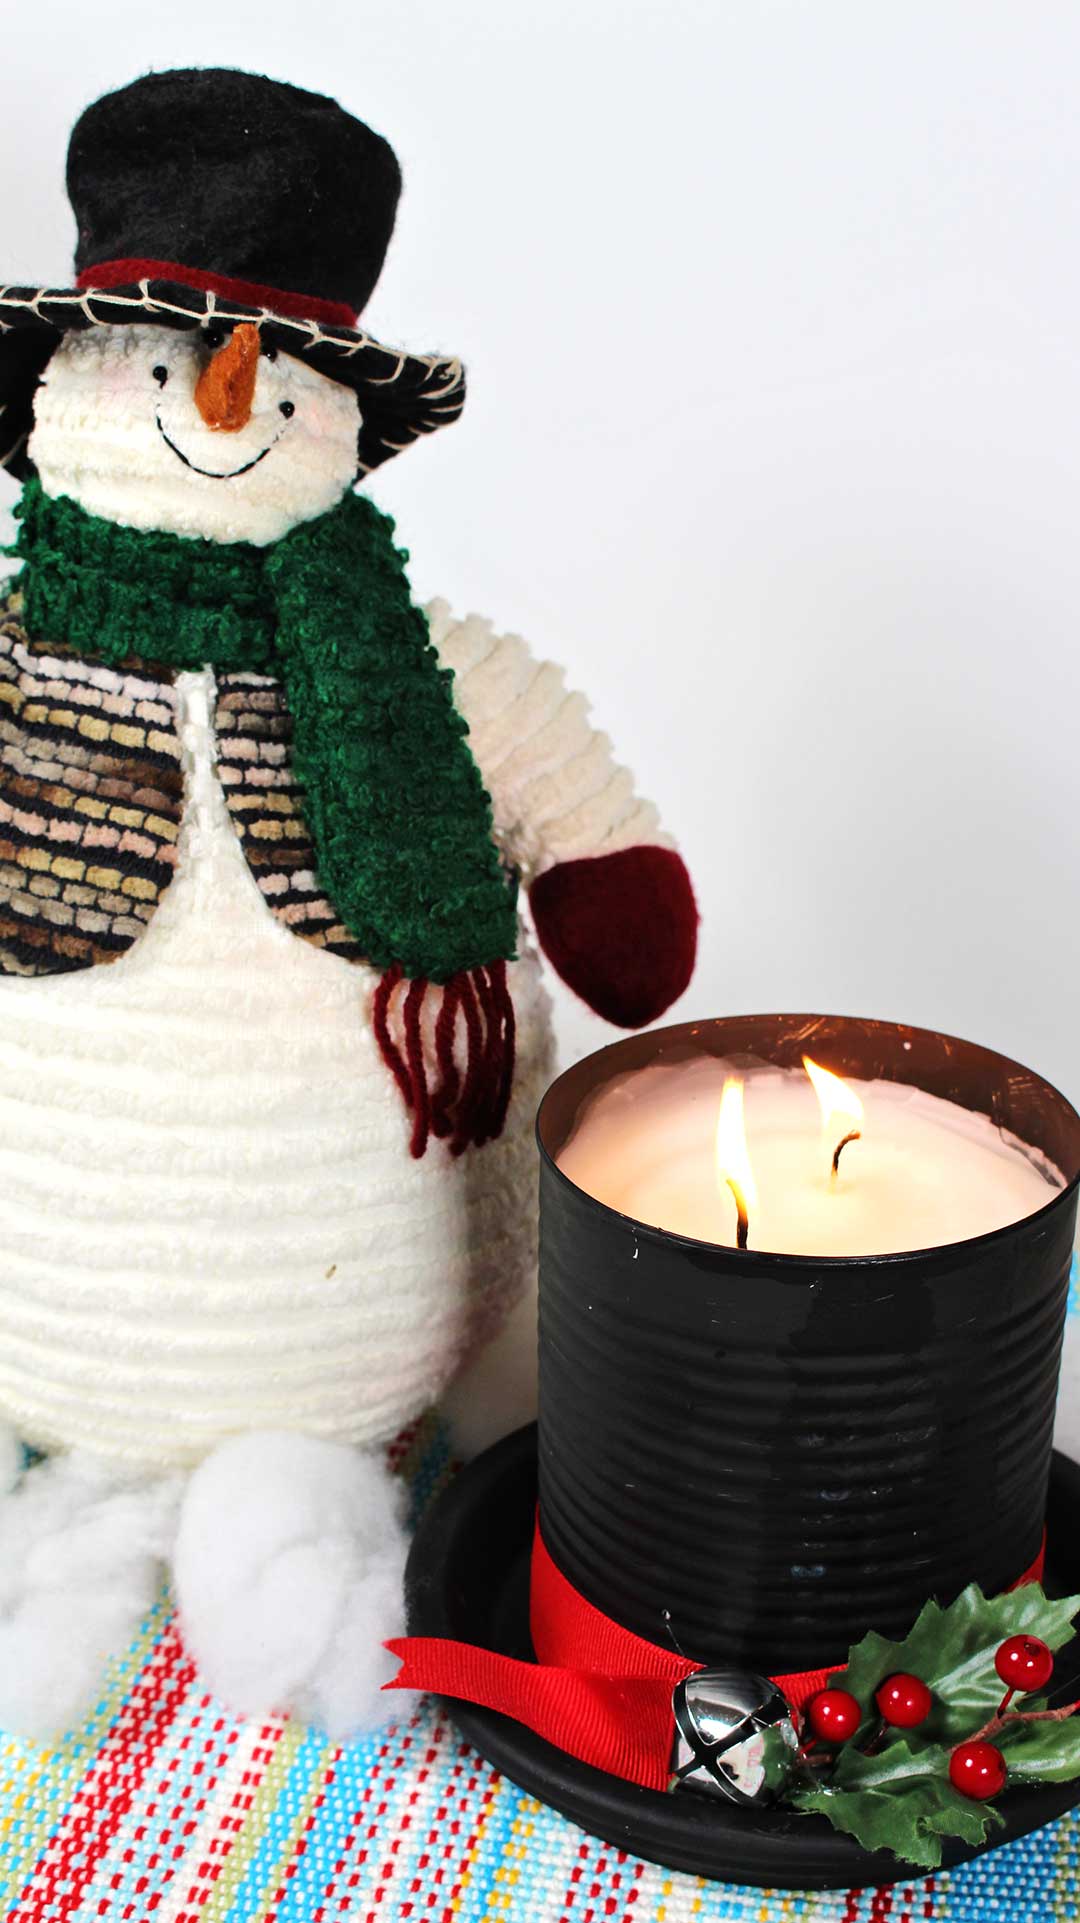
After painting the outside of the can also paint the inside of the can down about 1 ½ to 2 inches. The wax won’t go clear to the top so you will see the inside of the can down to where the wax will be.
Melt and pour the wax
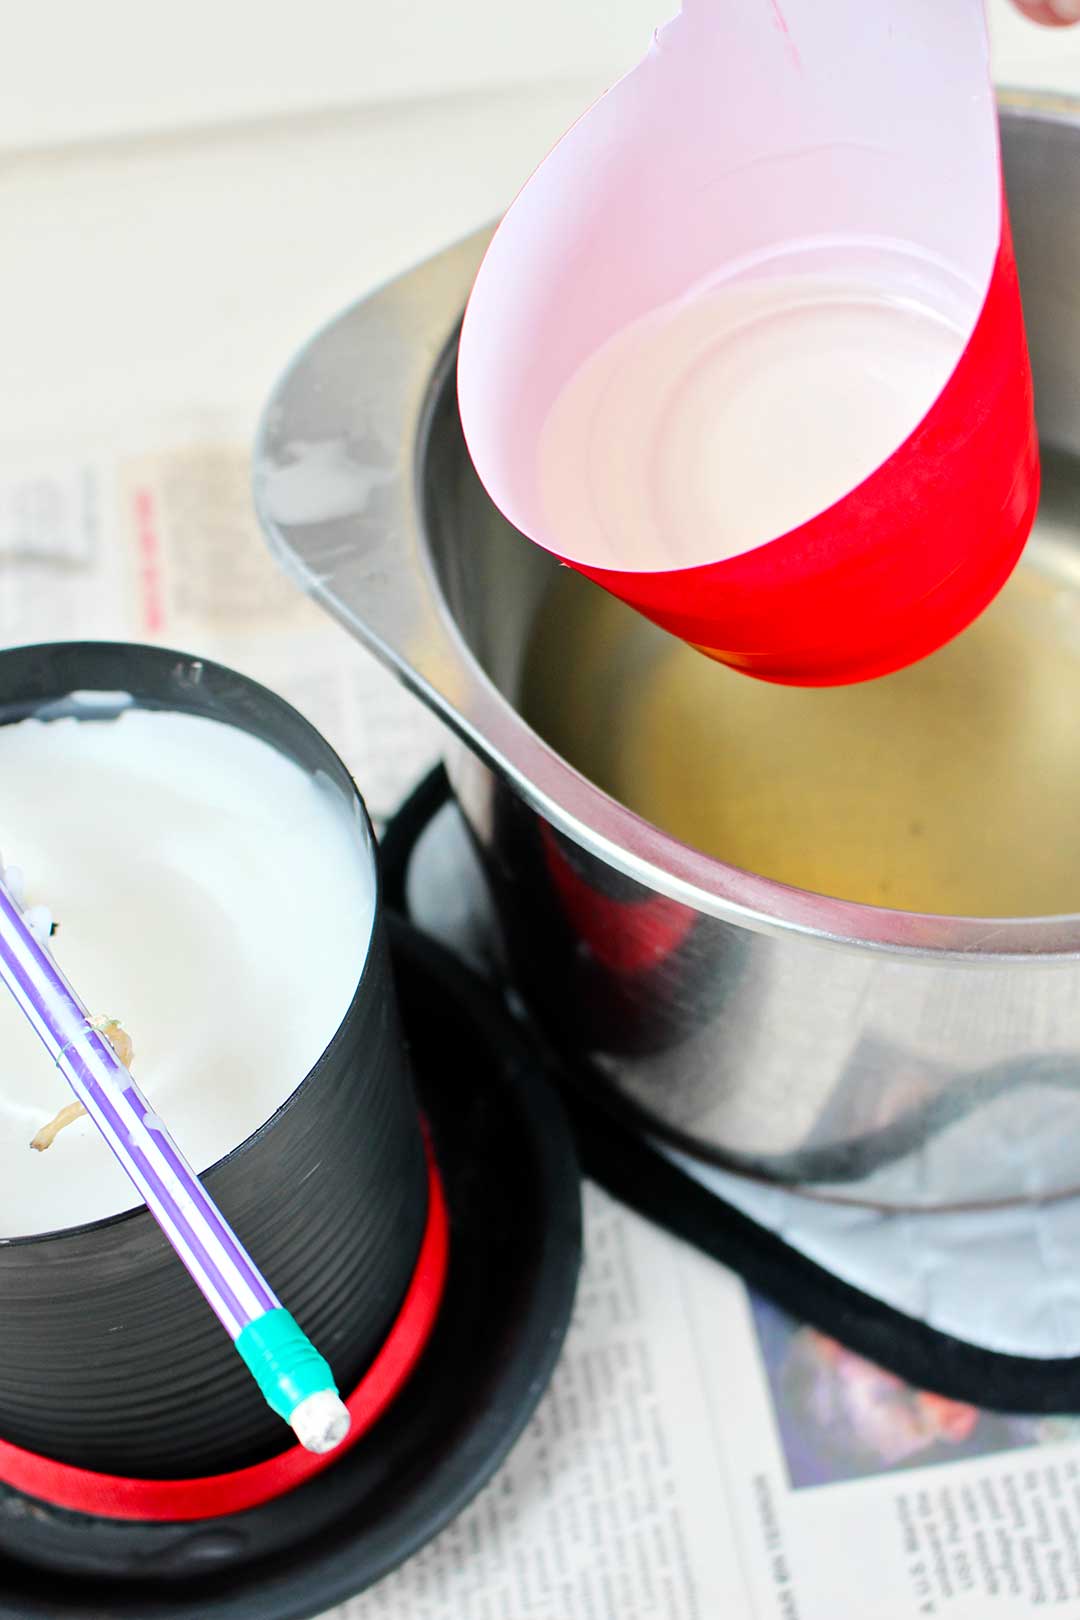
While the paint is drying, get out a Double Boiler and start melting the Candle Wax. A double boiler is a pan that sits on top of a saucepan of water. The wax goes in the double boiler, so the wax is never directly on the heat. The water heats and melts the wax. This makes it a safe process (although the wax is still hot of course).
You can purchase Candle Wax and Candle Wick for this project at a craft store. But I used two older white pillar candles that I already had from a Christmas long ago. After they melted down, I used the two wicks that were in the candles instead of using new wicks. It worked well, saved cost and repurposed the candles. Win, win, win.
NOTE: Never leave wax melting on the stove unattended.
I placed a pencil across the top of the tin can and tied the Candle Wicks to the pencil so they would stay in place when the wax was poured into the can. Some sewing thread worked perfectly for this step.
Two wicks will burn better in a candle with such a wide diameter. I even thought about using three wicks, but I went with the two I had.
A red plastic Solo cup worked great for a pouring cup after it was cut down about halfway, leaving a bit of the side for a handle. I wish I could patent this idea. Ha!
I poured the wax into the can to about ¾ inch from the top and let it set until hardened. OK, so I got impatient and set the whole thing in the freezer for a bit to hurry the process. I have to be honest.
Sometimes a candle will dip a bit in the center as it cools. This one did so I added a bit more wax to even it off on the top.
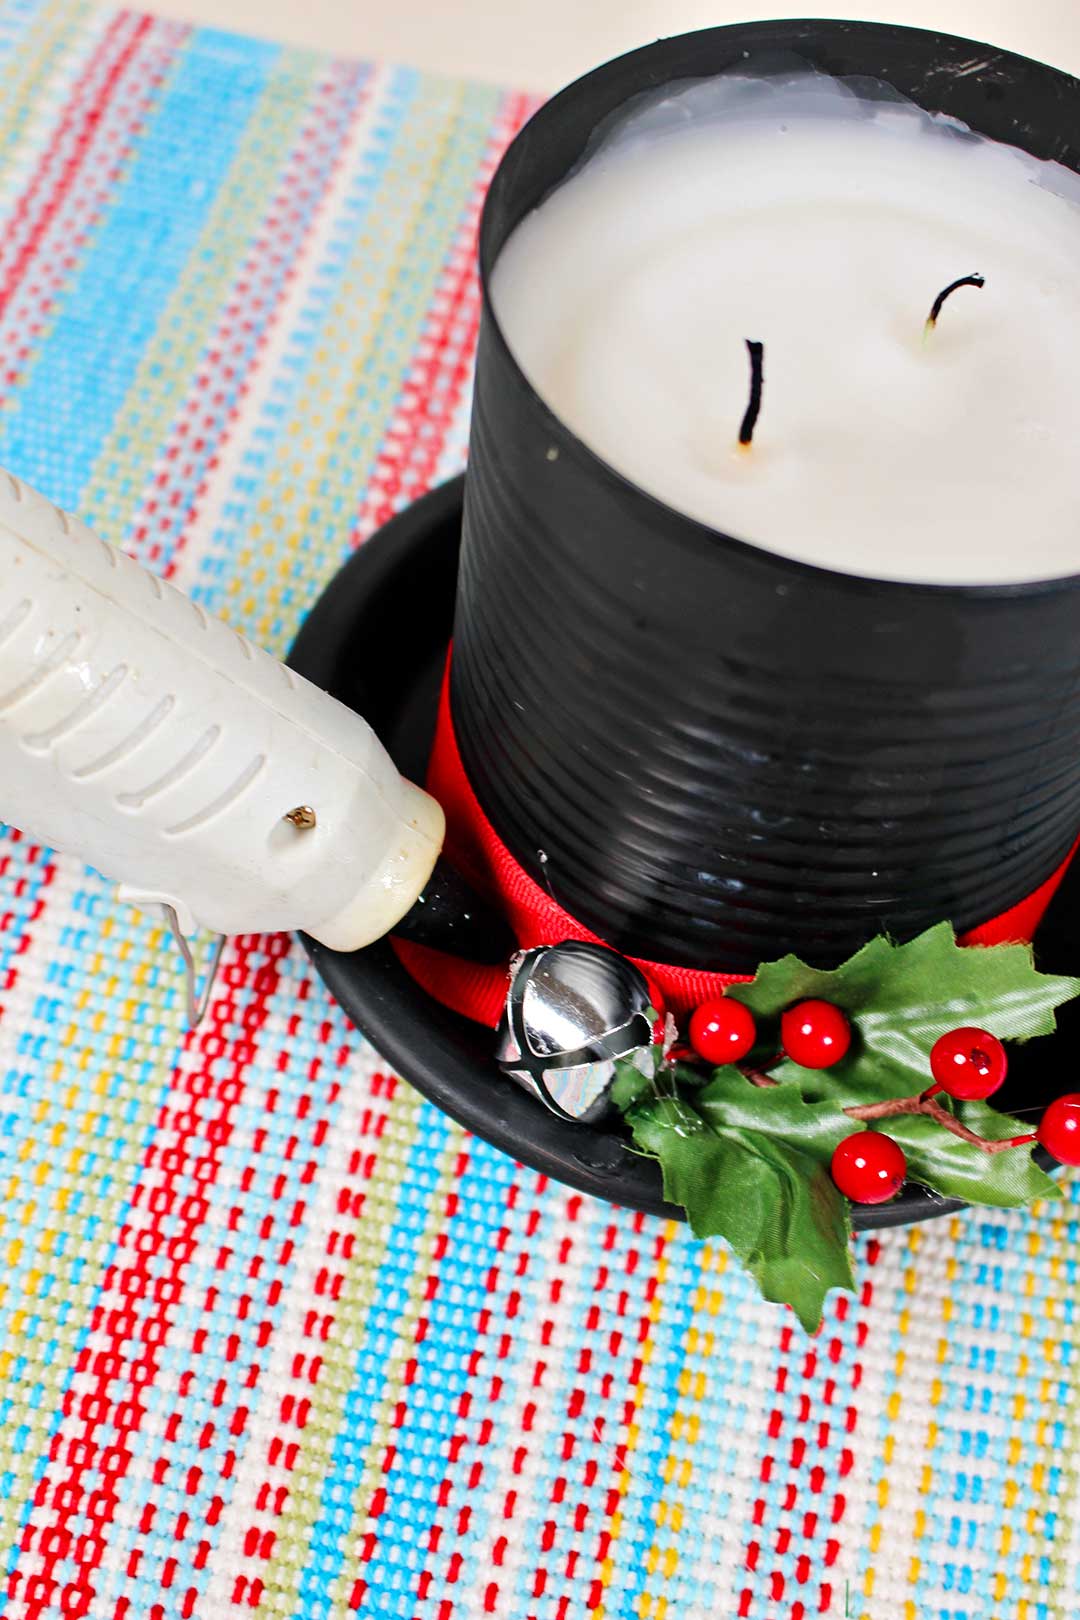
Once the thread was clipped from the wicks the pencil could be removed and the candle is ready to burn.
Trim the hat brim
But we have one more important step! The hat brim.
The cartoon Frosty hat had a black band and a pink flower. But, for Christmas, I used a 1 Inch Grosgrain Ribbon, a Jingle Bell and some artificial Holly Sprig. But now that I think of it, a pink flower would have looked awesome! These decorations were attached to the hat using a Hot Glue Gun.
With that the DIY Frosty the Snowman Hat Candle is done.
A magical Frosty the Snowman Hat Candle!
I was so pleased to see it burned well when lit. It is really cute, almost magical!?
Here is the YouTube link to the Frosty the Snowman cartoon. I hope you enjoy the cartoon and the candle craft.
More Christmas Crafts and Decorations
If you are looking for more fun Christmas craft and decoration ideas that you can toss together with just a few items, give one of these a try!
Easy Glass Bowl Christmas Centerpiece
Simple Decoupaged Stained Glass Candle Holder
Free Silent Night Stained Glass Coloring Page
Merry Christmas!!
Merry Christmas friends. I’m so grateful to be a part of your lives.
Remember the reason for the season.
If you try this craft, let me know! Go ahead and leave a comment, rate it, and tag a photo with #WelcometoNanas wherever you post.
Easy Glass Bowl Christmas Centerpiece
Equipment
- Double boiler
- Hot glue gun and glue
Items Required
- Large tin can
- Terra Cotta Saucer- 6 inch
- Black Acrylic Craft Paint
- Paint Brush or Foam Paint Brush
- Candle Wax - new or repurposed pillar candles
- Candle Wick (can be the wick from the repurposed candle)
- 1 Inch Grosgrain Ribbon - red or Christmas pattern
- Artificial Holly Sprig
- Jingle Bell
Instructions
- Glue the tin can to the terra cotta saucer (open end up).
- Paint the can and saucer with the black paint, paint the inside of the can down about 1 or 1 ½ inch.
- Melt the wax in a double boiler.
- Tie the wick to a pencil and put the wick down into the tin can.
- Pour the melted wax into the tin can.
- Allow the wax to cool and clip the wicks from the pencil.
- Hot glue a ribbon around the brim of the hat.
- Hot glue the dolly sprig and the jingle bell where the ribbon overlaps.
- Enjoy your candle yourself or give as a gift!

Leave a Reply