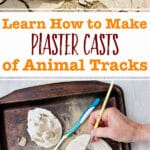
These Plaster Casts of Animal Tracks are a science craft and nature art project rolled into one! Kids will love identifying and capturing animal prints that they find on their hikes with this easy tutorial.
Jump to:
- How to Make Plaster Casts of Animal Tracks
- Making Animal Track Casts with Kids
- Friends with the Environment!
- How do I make a mold to make a plaster casting?
- Locate tracks on your hike
- How to make a plaster cast of an animal track
- Mix up the plaster of Paris
- Plaster casting
- A paper clip hanger
- Let the plaster cast firm up
- Lift up the mold and plaster cast- so exciting!
- Dirt! Cleaning up the plaster casting
- Get it home safely
- The tracks in my pictures
- Spray paint the plaster
- Uses for the animal track molds
- Identifying your animal tracks
- Enjoy and happy track hunting!
- Supplies:
- Learn How to Make Plaster Casts of Animal Tracks
How to Make Plaster Casts of Animal Tracks
I truly enjoyed making this post about making Plaster Casts of Animal Tracks. I take a walk each day and see animal tracks along the road regularly.
Well, we had a very good rain recently and in the mud were deep animal tracks that dried almost perfectly. I marked a couple sets of tracks along the road so I could find them again and headed home.
It took awhile to get all of the gear and supplies pulled together that are listed below, then I grabbed my camera and tripod and headed back down the road.
It was a beautiful morning and it truly was a joy just to be outside. Wait till you hear the birds singing in the video.
Making Animal Track Casts with Kids
I remember making plaster of Paris molds when I was young and then using them to cast animal tracks. I’m wondering if it was for one of my brothers Boy Scout merit badges or something. The whole thing was intriguing.
Intriguing. Don't you want kids to be intrigued with what is around them? Curiosity and learning should last a lifetime.
Making molds of animal footprints is a great science activity that fosters a lot of curiosity. It almost feels like a craft instead of a learning activity.
Friends with the Environment!
One of the things I love about making a plaster of Paris casting of animal tracks is that it doesn’t hurt the trail or the road or the environment. A person can make a casting and then take it home and have a little piece of the hike and things along the trail without hurting the trail!
How do I make a mold to make a plaster casting?
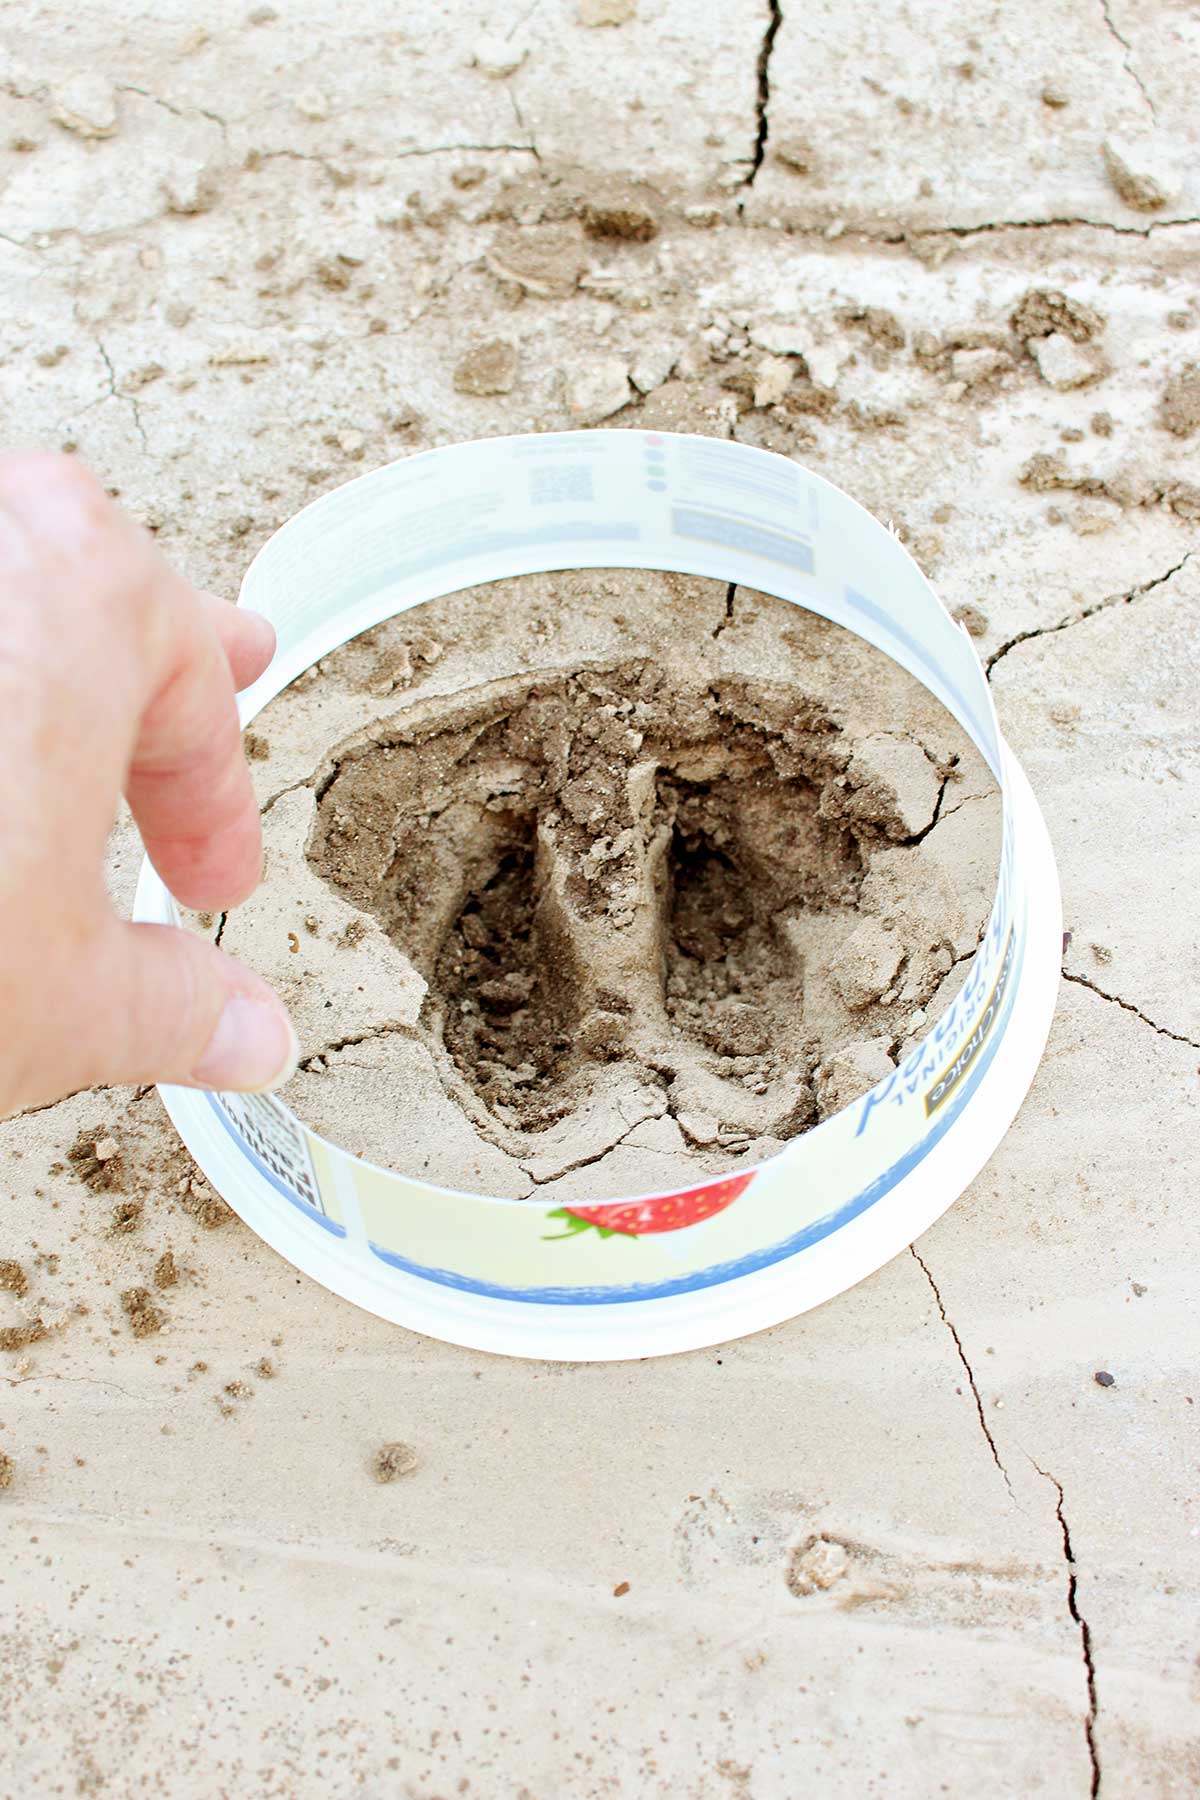
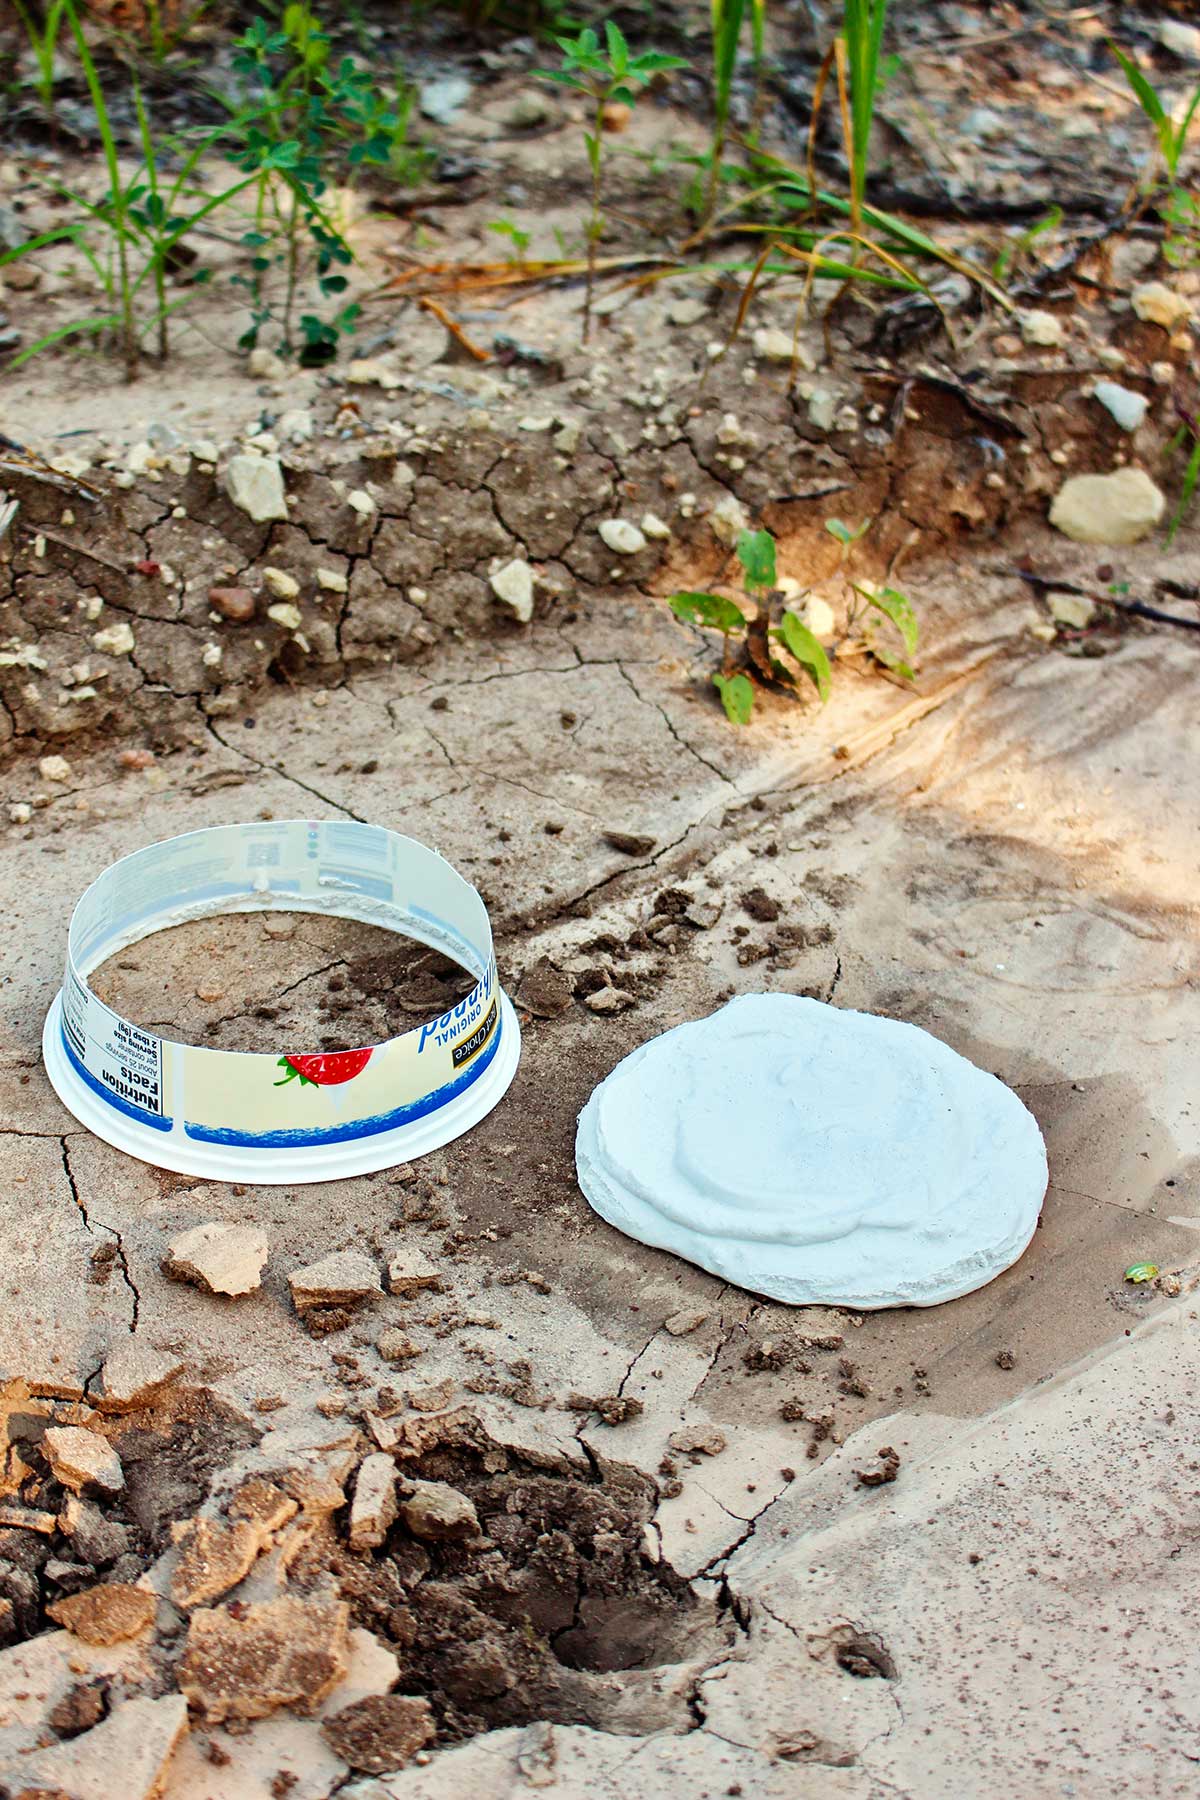
The first thing to get ready is a mold. I made my mold out of the top of a Cool Whip container.
Cut off about 2 inches from the top of the Cool Whip container, cutting all the way around. I did not keep the bottom of the Cool Whip container or the lid.
The mold can be set down on the ground with the lip (top edge) of the container set onto the dirt. This will be the form for the plaster of Paris. It makes a nice round shape and is a good size for most tracks.
Locate tracks on your hike
Plaster sets up quite quickly, so don't stir it up until you have located the tracks and set down the mold.
If you are going on a hike further away from home, you could put the dry plaster of Paris in a baggie along with the other supplies listed below and easily carry it in a backpack.
Carry an extra water bottle for mixing up the plaster if there isn't a water source nearby.
Then you could take a plaster casting and bring it home to study later. This would be especially fun if I you were hiking in a new area where you might see a new type of animal print.
How to make a plaster cast of an animal track
With your back pack of supplies, head out for a walk to find tracks. You could go to a local park that has nature trails or wilderness areas.
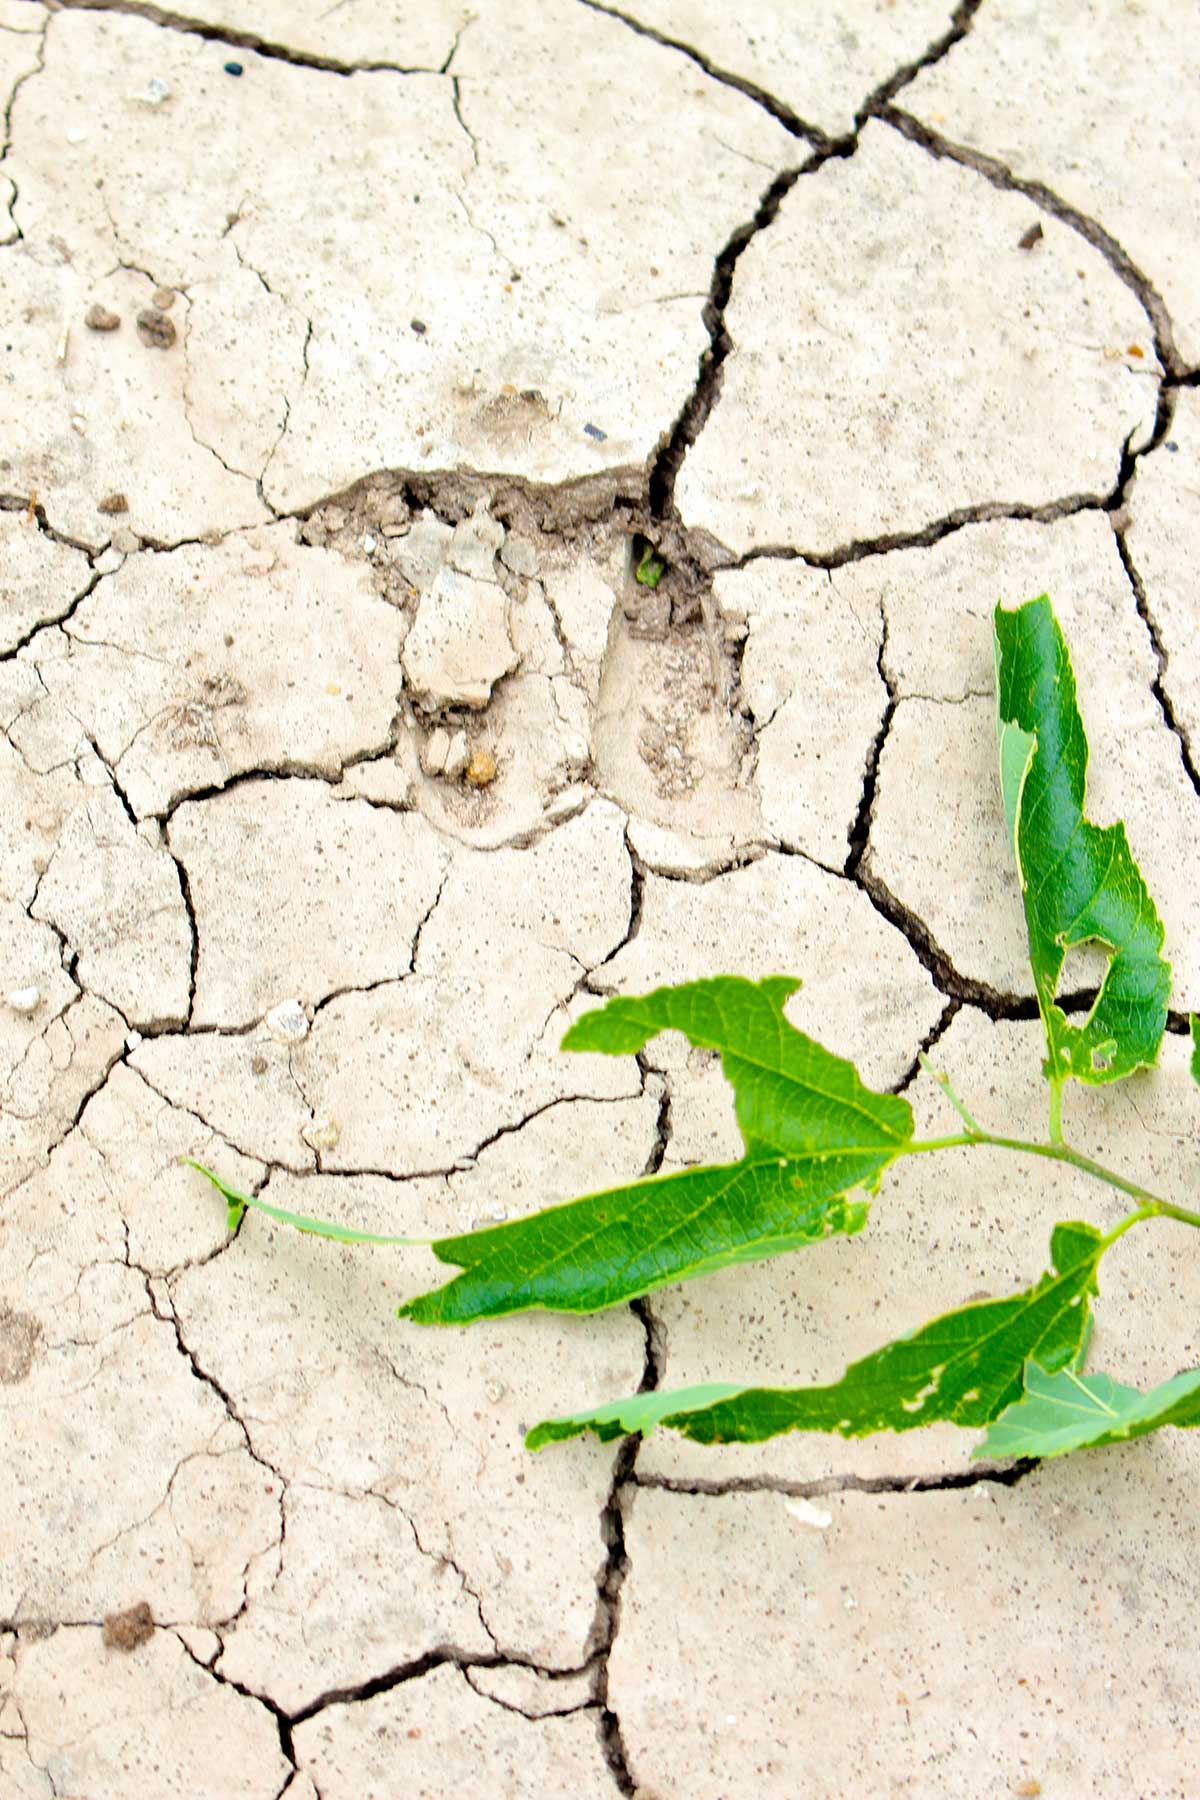
Keep your eyes open for some good prints. Watch in areas that might’ve been wet a couple days earlier, along the edge of water, or just in softer dirt. You want it to be firm enough so it won't crumble when molding the animal track.
Finding footprints this way will give you a clue as to where the animals come frequently.
If there’s any pieces of dirt that have fallen into the track, you might gently lift those out. But don’t do a lot to try to press on the edges of the print.
Upon finding a good print that is been pressed down into mud or soft soil and firmed up.

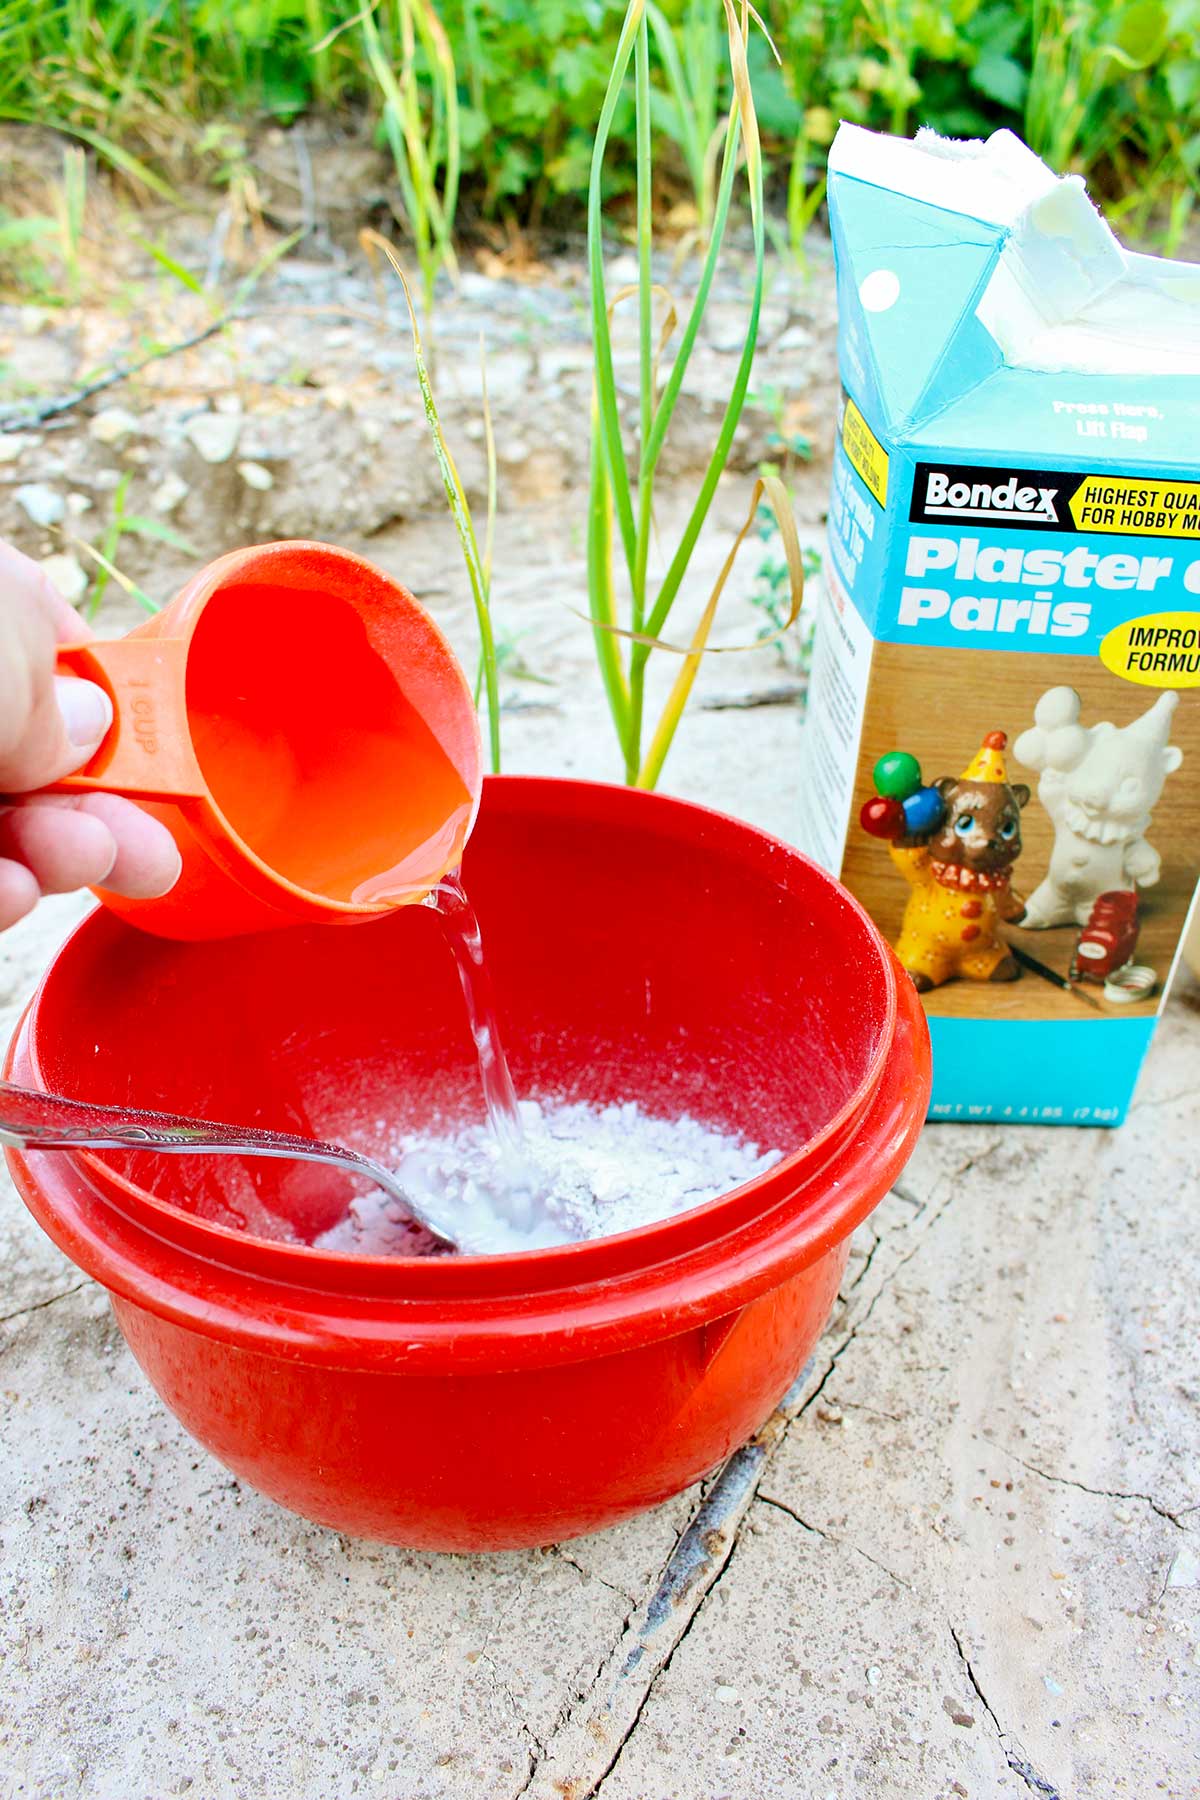
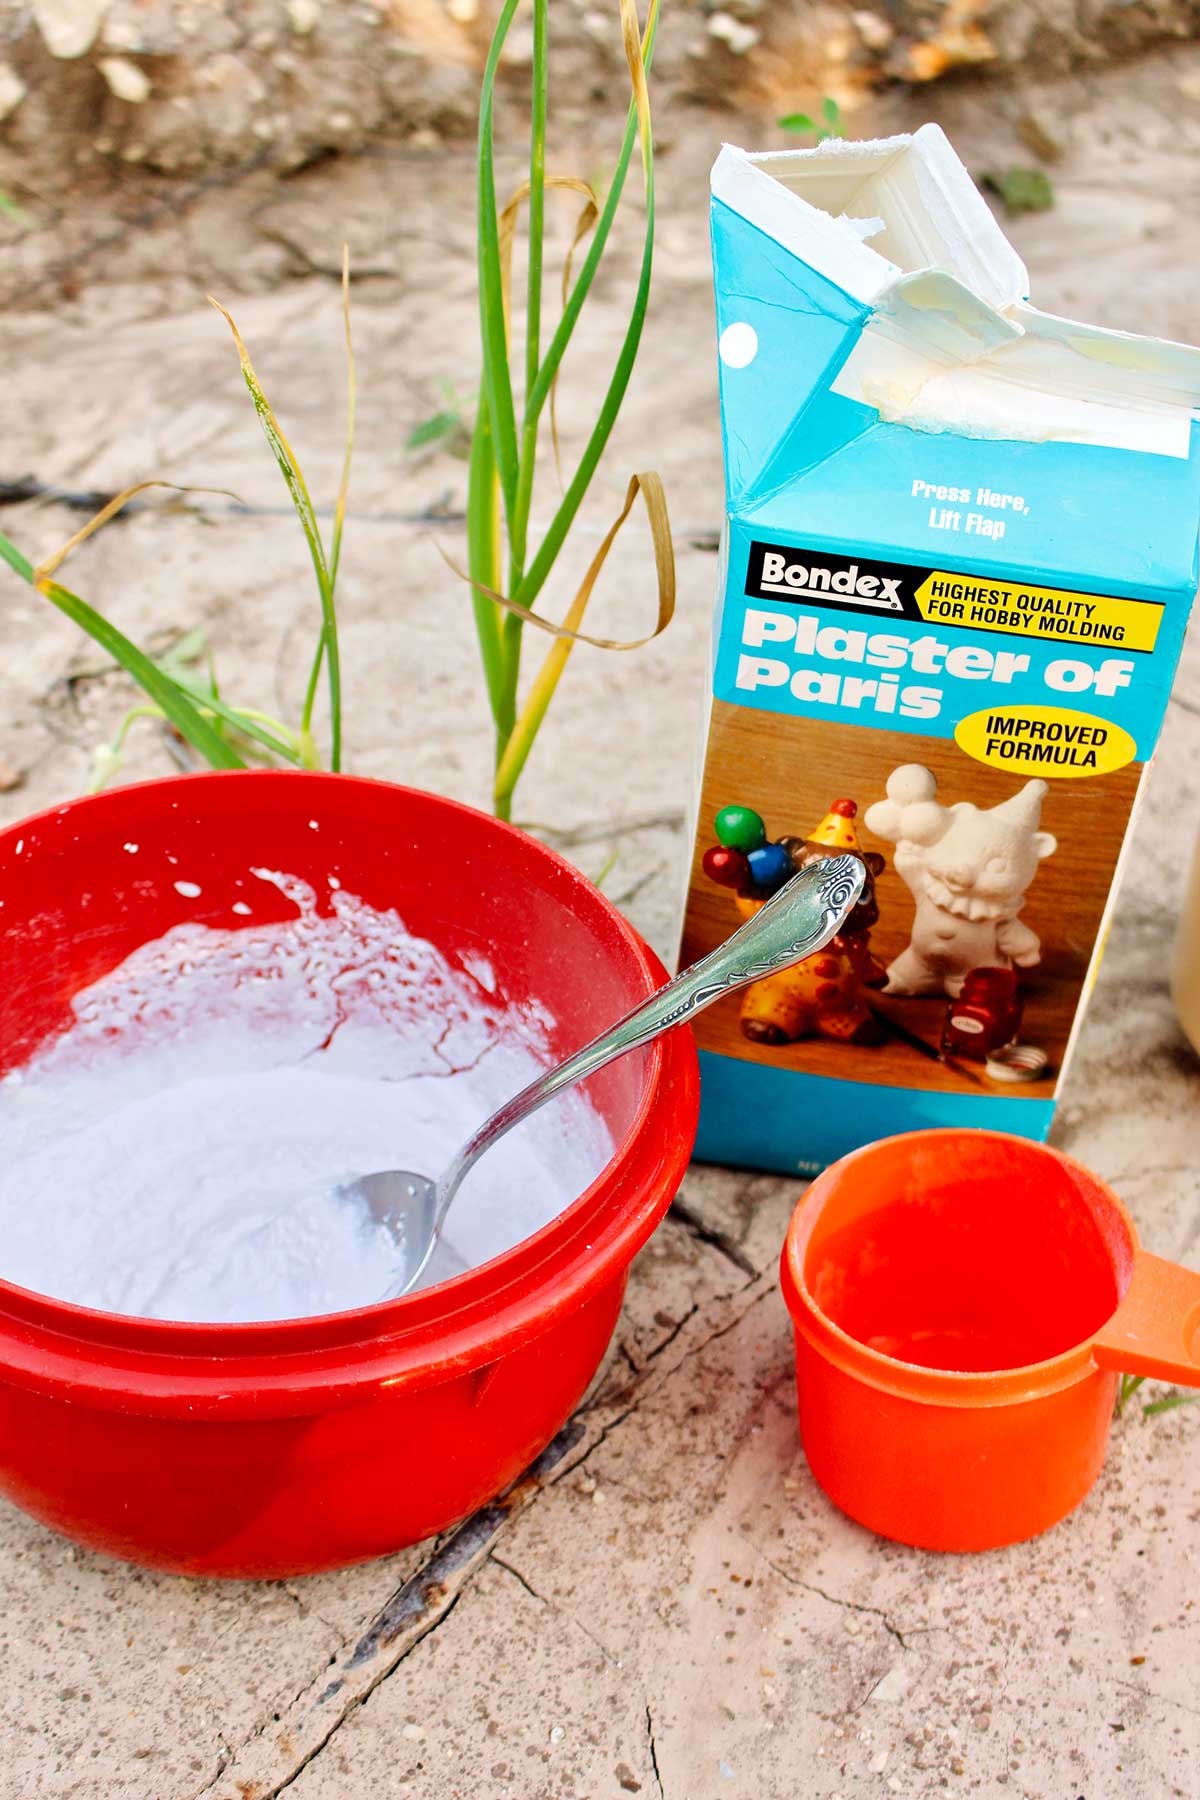
Mix up the plaster of Paris
Well, it’s time to mix up the plaster of Paris. Another whipped topping container worked well for the mixing container.
I mixed 3 cups plaster of Paris with 1 ½ cups of water. It makes a soft mixture that’s kind of like pancake batter.
This amount of plaster made one casting in the mold and 3-4 spoonfuls of left over mixture.
Tip: Plaster of Paris is mixed using 2 parts dry plaster to one part water...a 2 to 1 ratio. Keeping that in mind makes it easy to mix up whatever amount you need!
Tip: You don’t want air bubbles in the plaster of Paris so don’t whip it up. Just gently stir it and keep the air bubbles out.
Plaster casting
Set the mold over the track of your choice. Center the animal track in the middle of the mold.
Tip: some people use a little bit of cooking spray or Vaseline on their mold so that it will let go of the casting easily. With the slick plastic of the Cool Whip container, I didn’t have any trouble with it sticking at all. That would be a real mess to try to take with you on a hike too! :-).
Then gently spoon the plaster mixture into the mold and over the track. You’ll put in enough spoonfuls so that the plaster of Paris is about one inch thick. Kind of smooth it down.
A paper clip hanger
If you would like to hang the plaster cast on the wall, you can press a paper clip into the top of the casting. Don’t press it too deeply, or it will go all the way through the cast.
Just gently press it into the back of the cast so that half of the clip goes down into the plaster of Paris and the other half sticks out.
The end sticking out creates a loop that can be used to hang it on a nail on the wall.
Let the plaster cast firm up
You will take a little rest from your hike because you need to leave the plaster of Paris to set up for at least a half an hour.
Note: The directions actually say to let it sit for an entire hour. Mine hardened up more quickly than that.
The plaster of Paris will become firm to the touch so that is doesn’t leave a white substance on your fingers when you touch it. At that point you can gently remove the mold from around the plaster cast
Lift up the mold and plaster cast- so exciting!
Then gently hold onto the cast on two opposite edges and gently pull it up from the ground. Do this very gently and slowly (did I mention doing this gently?).
You may need to push your fingers down into the ground a little bit so you can get underneath the plaster so that it doesn’t crack in the center. I didn’t have any trouble with any of mine breaking, but it sometimes happens.
If kids are doing this with explain this process to them. Also, you might want to make a couple extras in case they get broken.
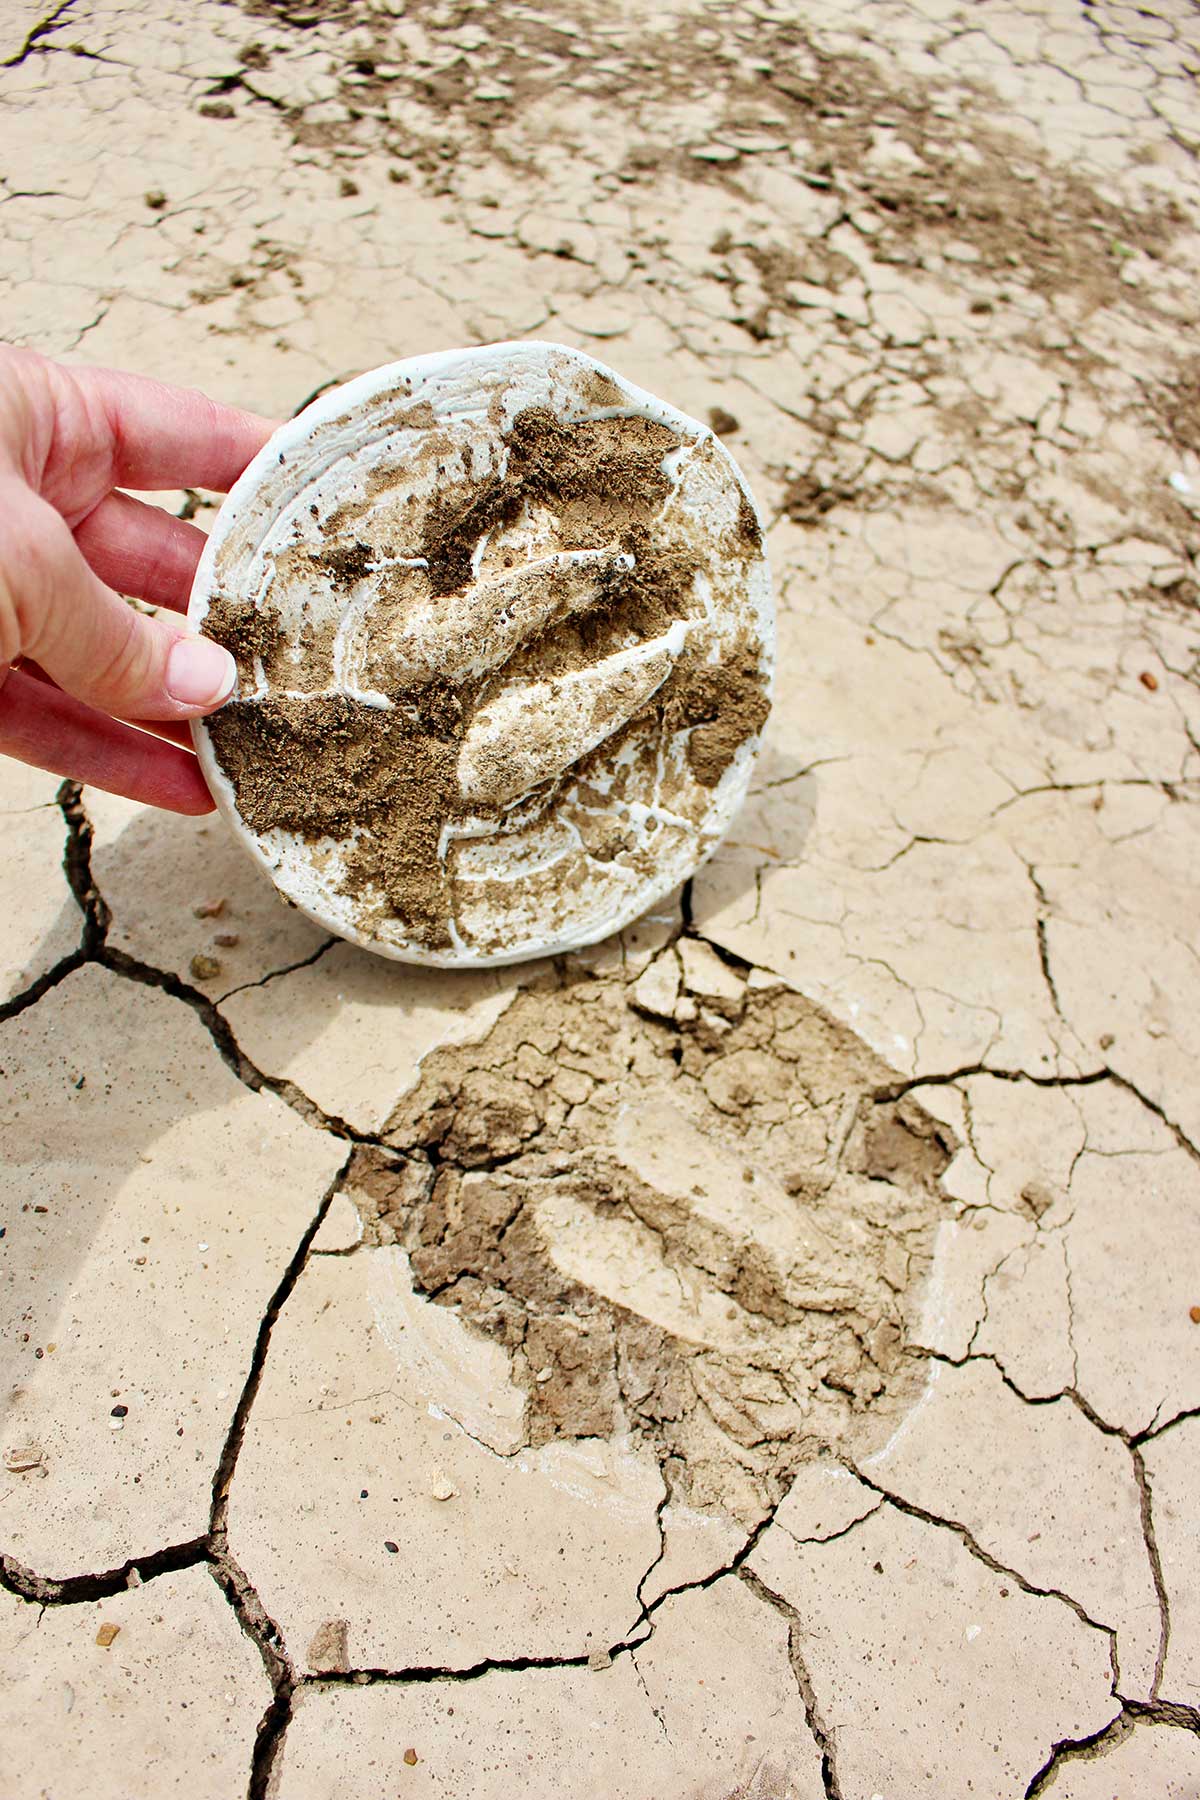
When you pull the cast out of the ground, you will be able to see the animal footprint on the surface of the plaster. It is so cool. You can still see the footprint in the ground too.
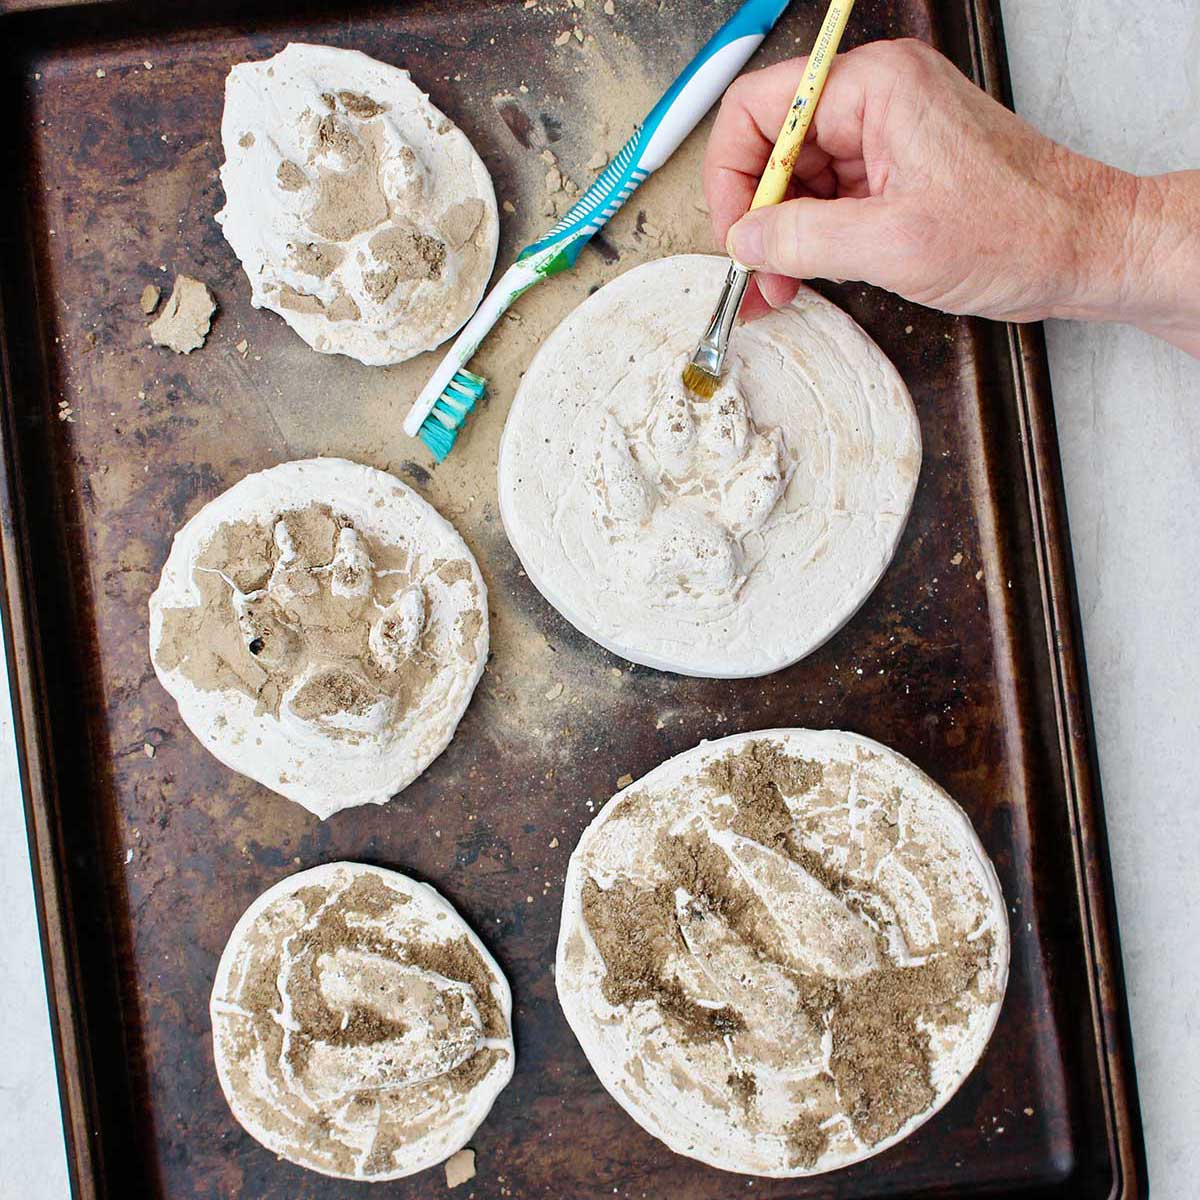
Dirt! Cleaning up the plaster casting
It will also have dirt on it.
Just leave most of that dirt on there. Don’t try to get it off because the plaster is still very soft.
Bring the whole thing home and let it fully dry and harden before you clean it up.
Get it home safely
Have a plastic bag along to place it in and then wrap it in sweatshirt or something to keep it safe on the trip home.
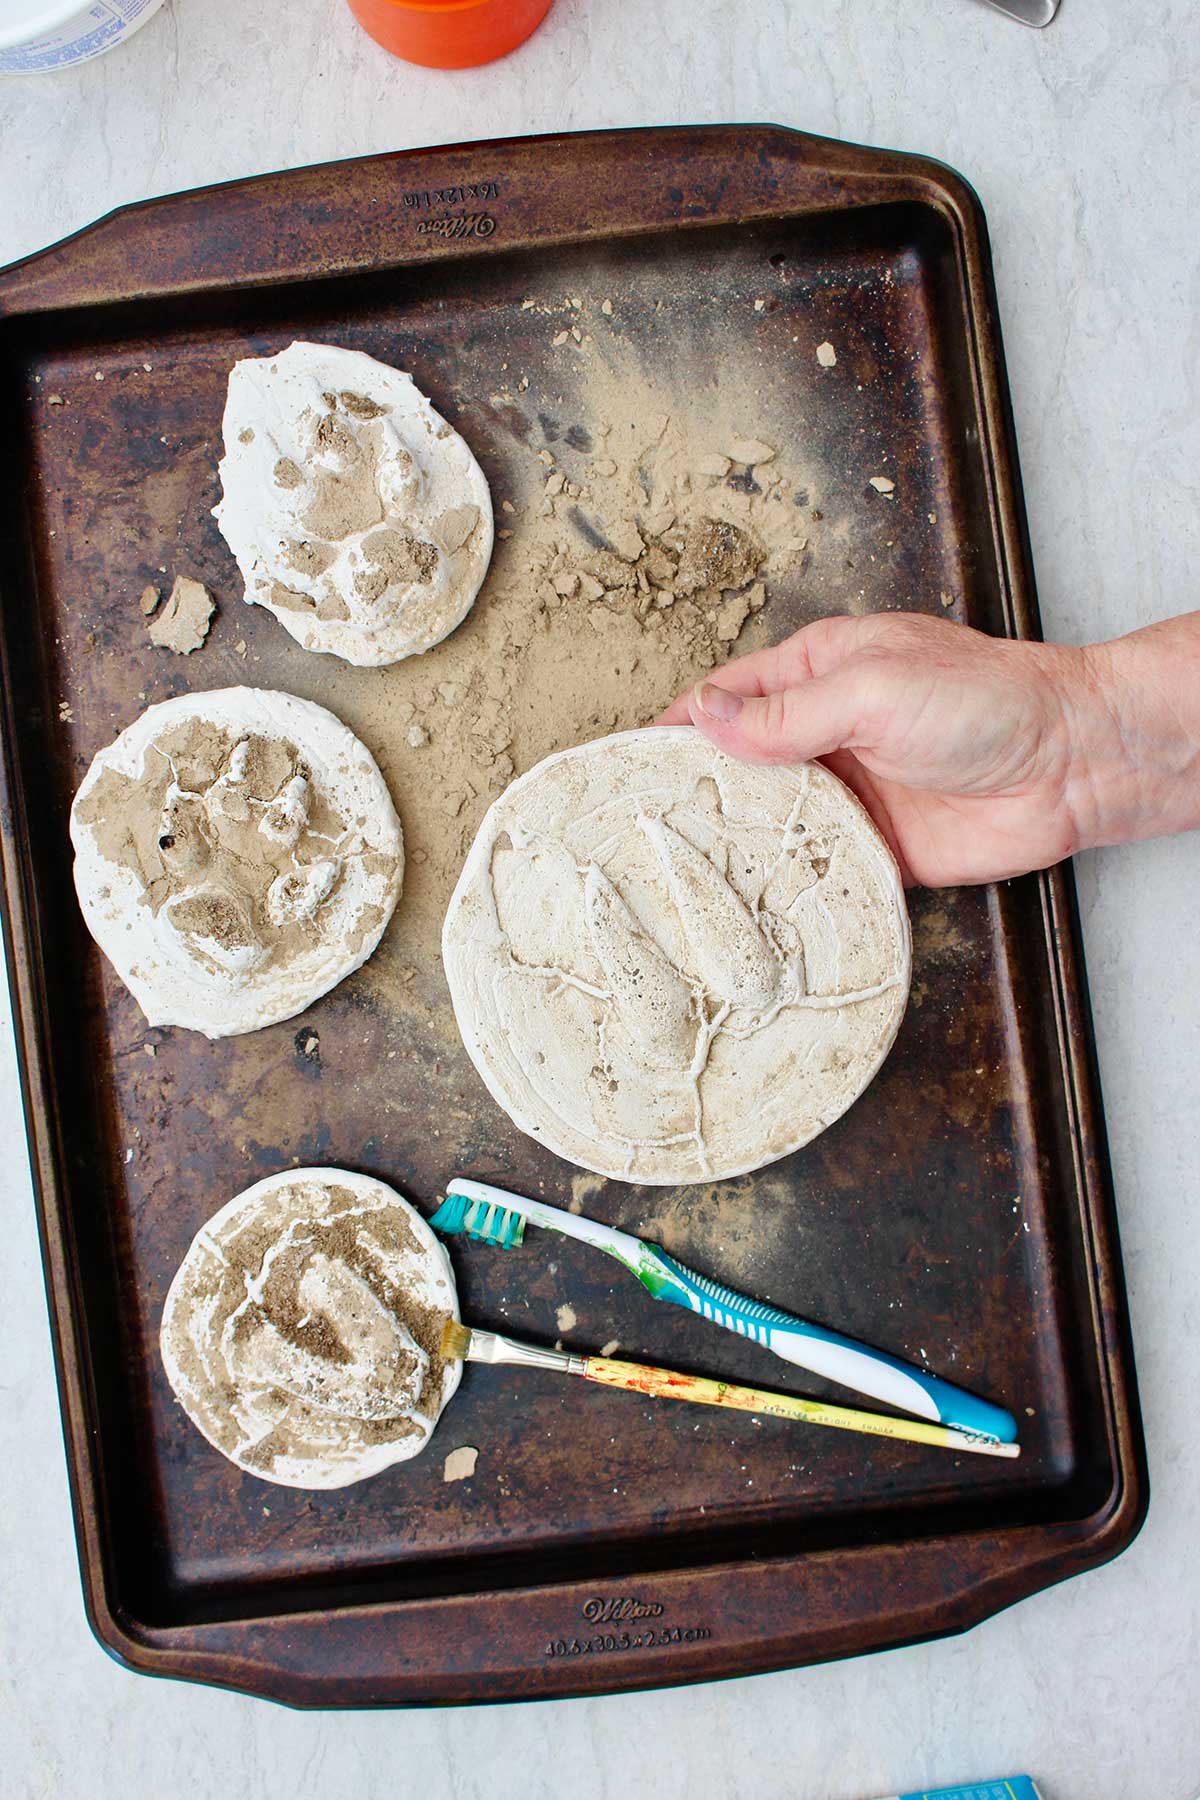
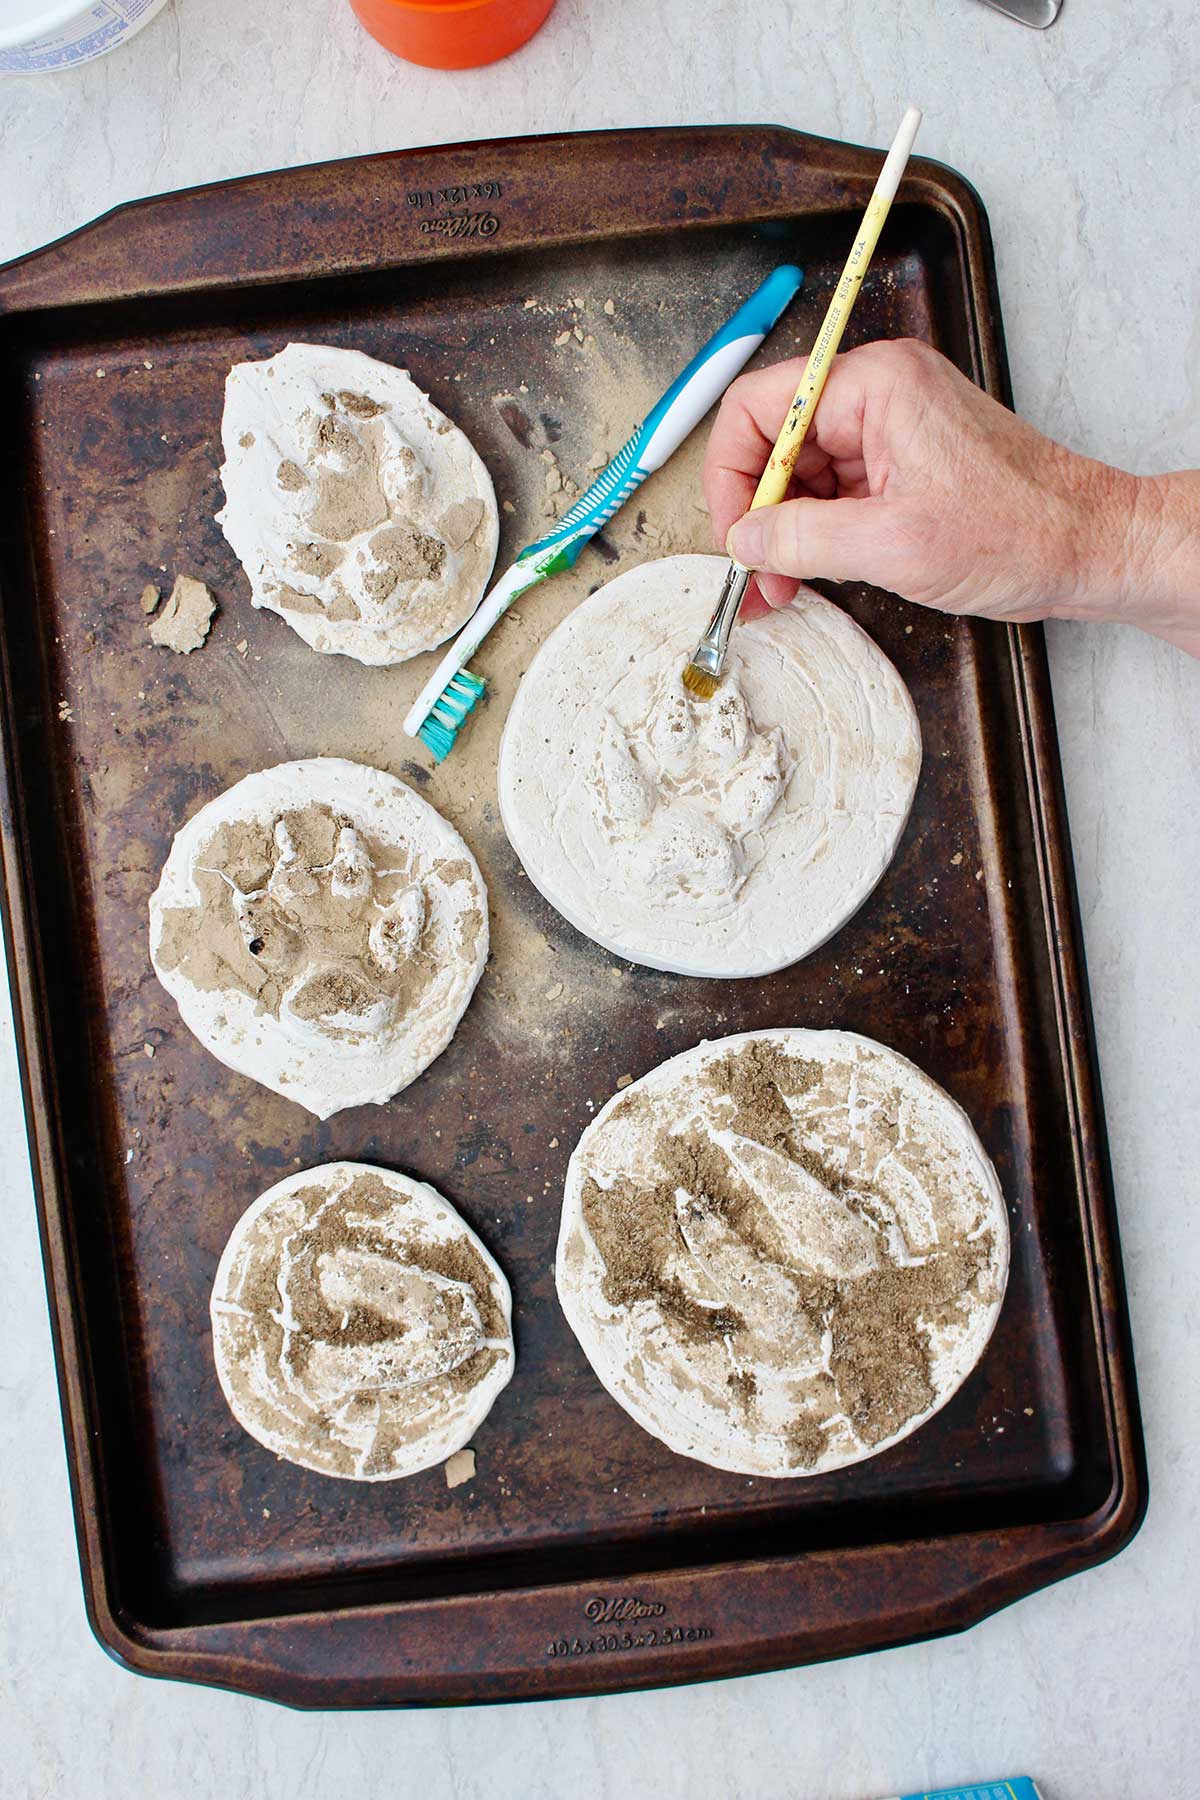
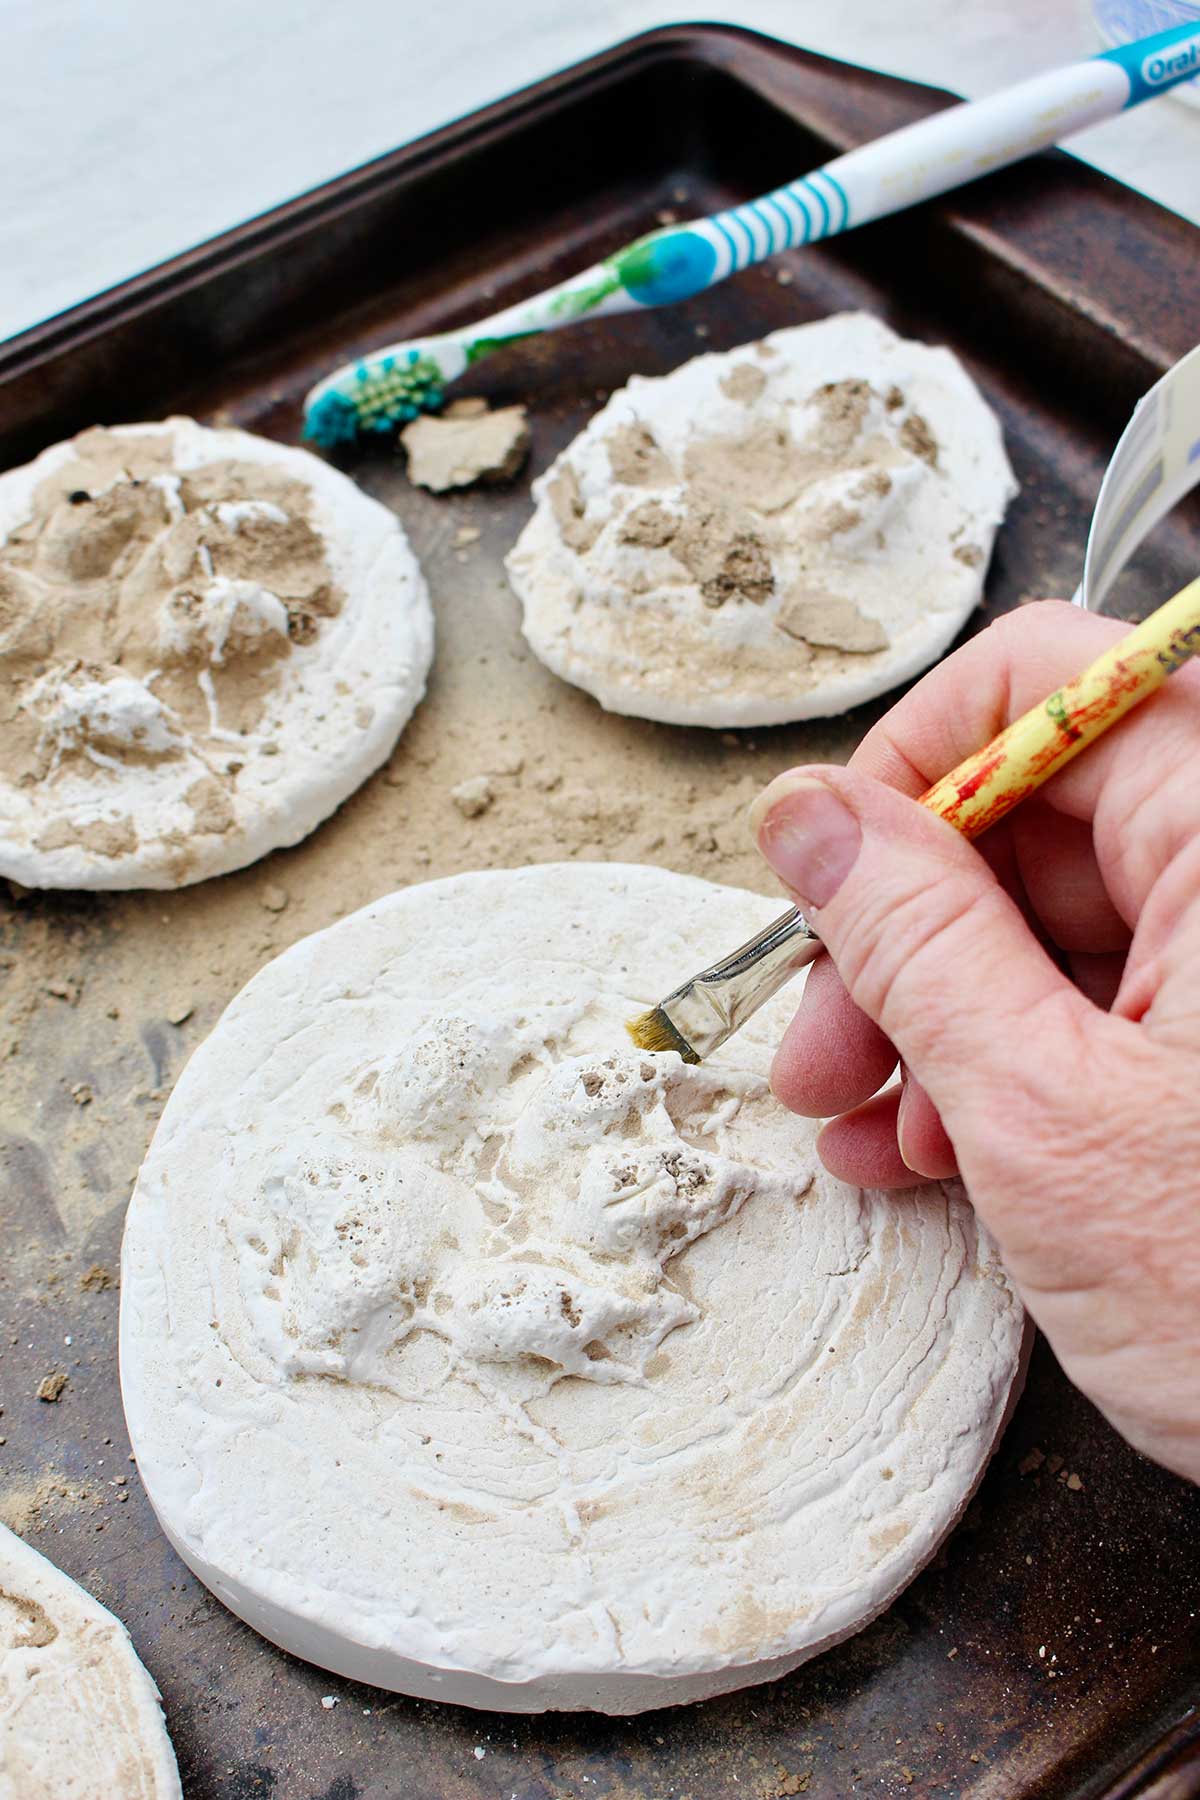
I set my plaster casts on a cookie sheet when I got home and let them sit until the next day. The dirt dried and the mold hardened well during that time.
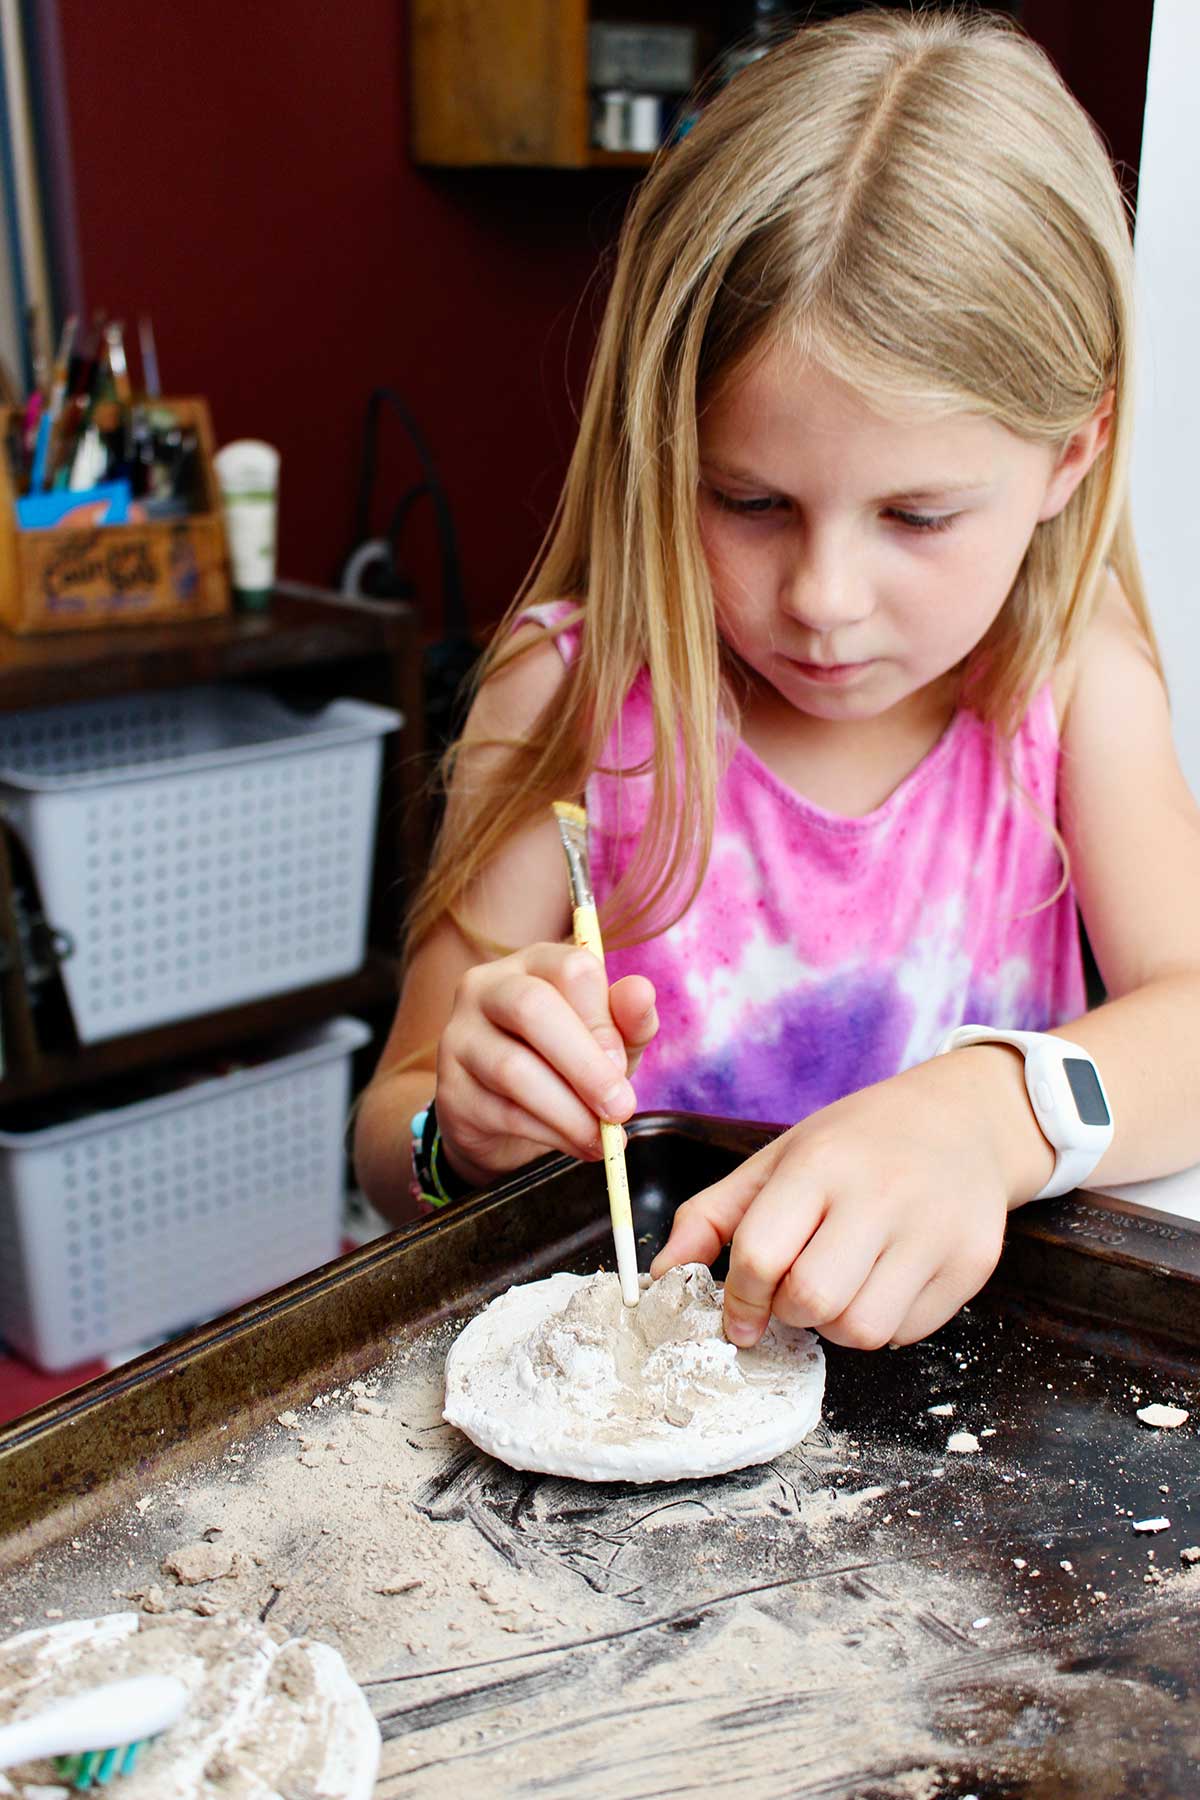
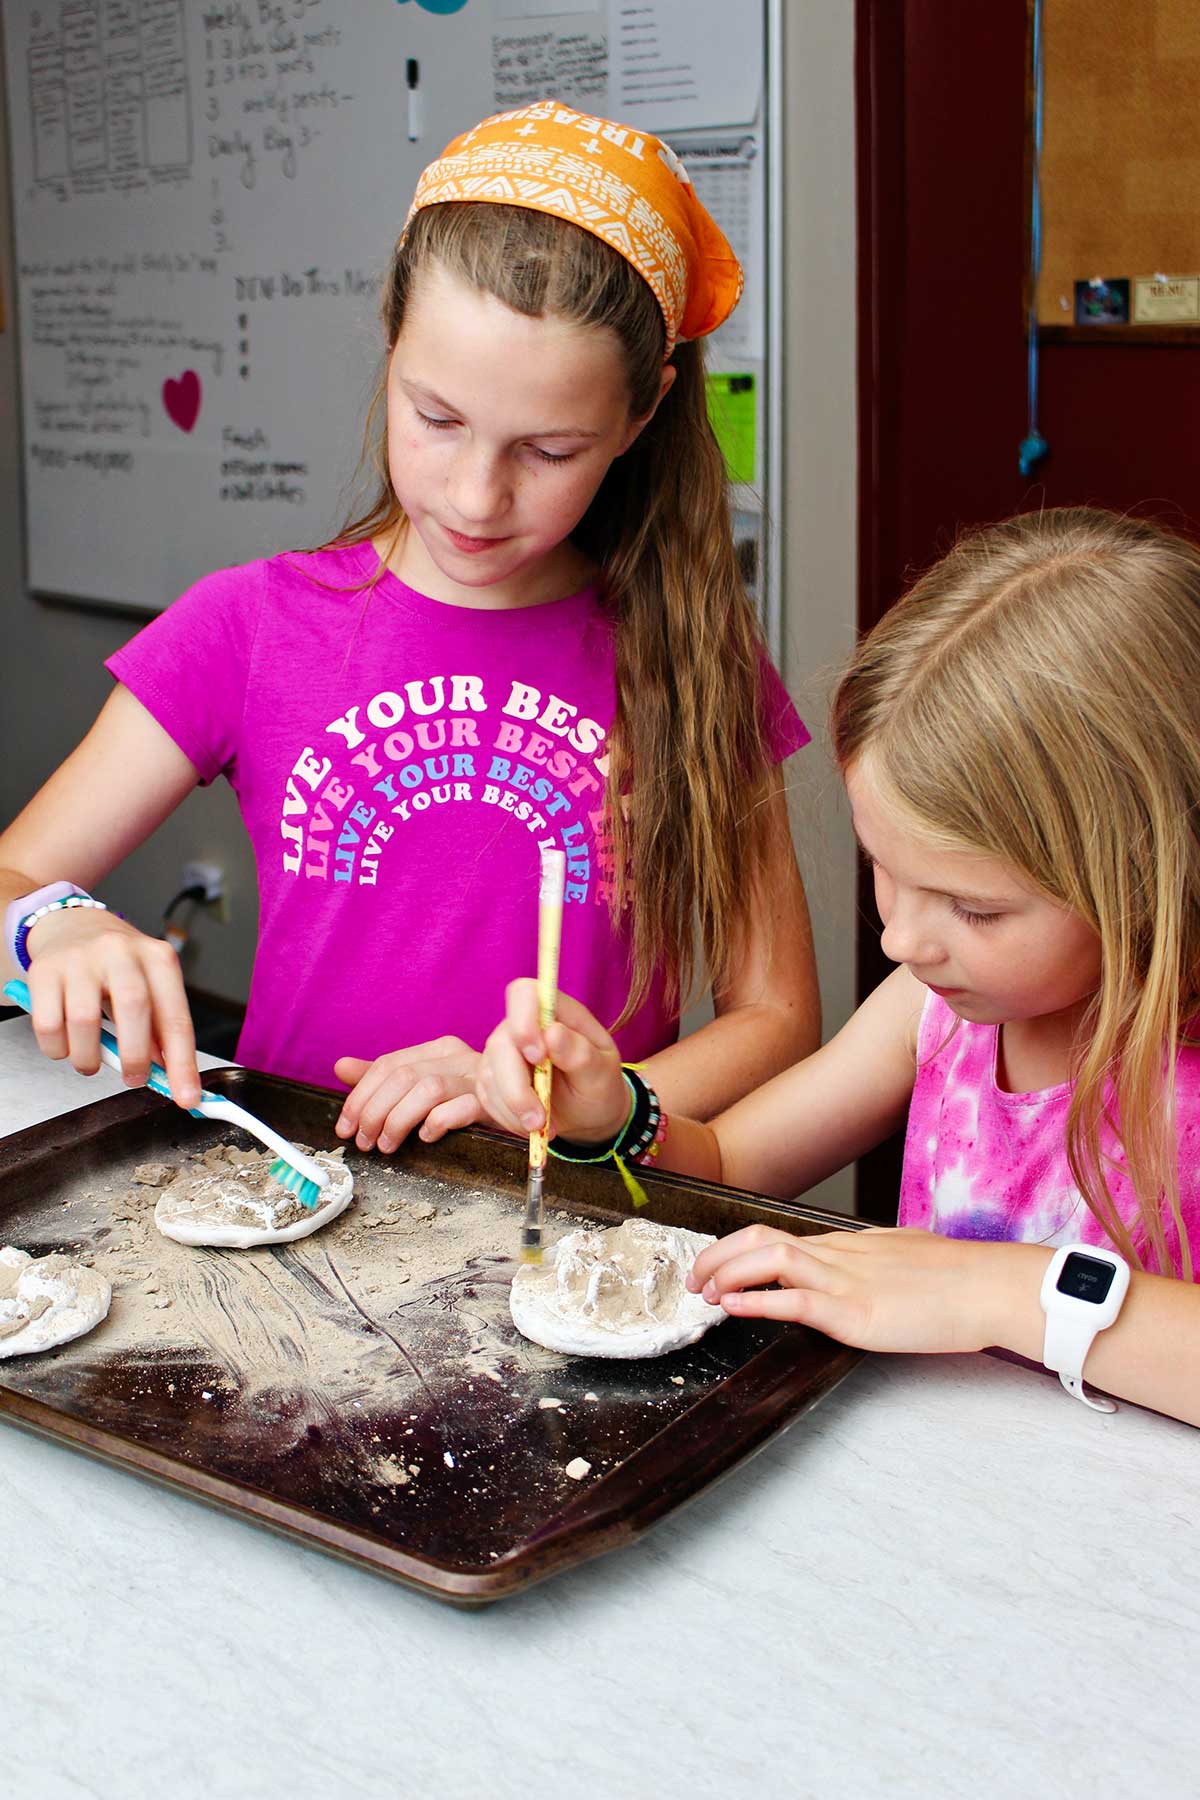
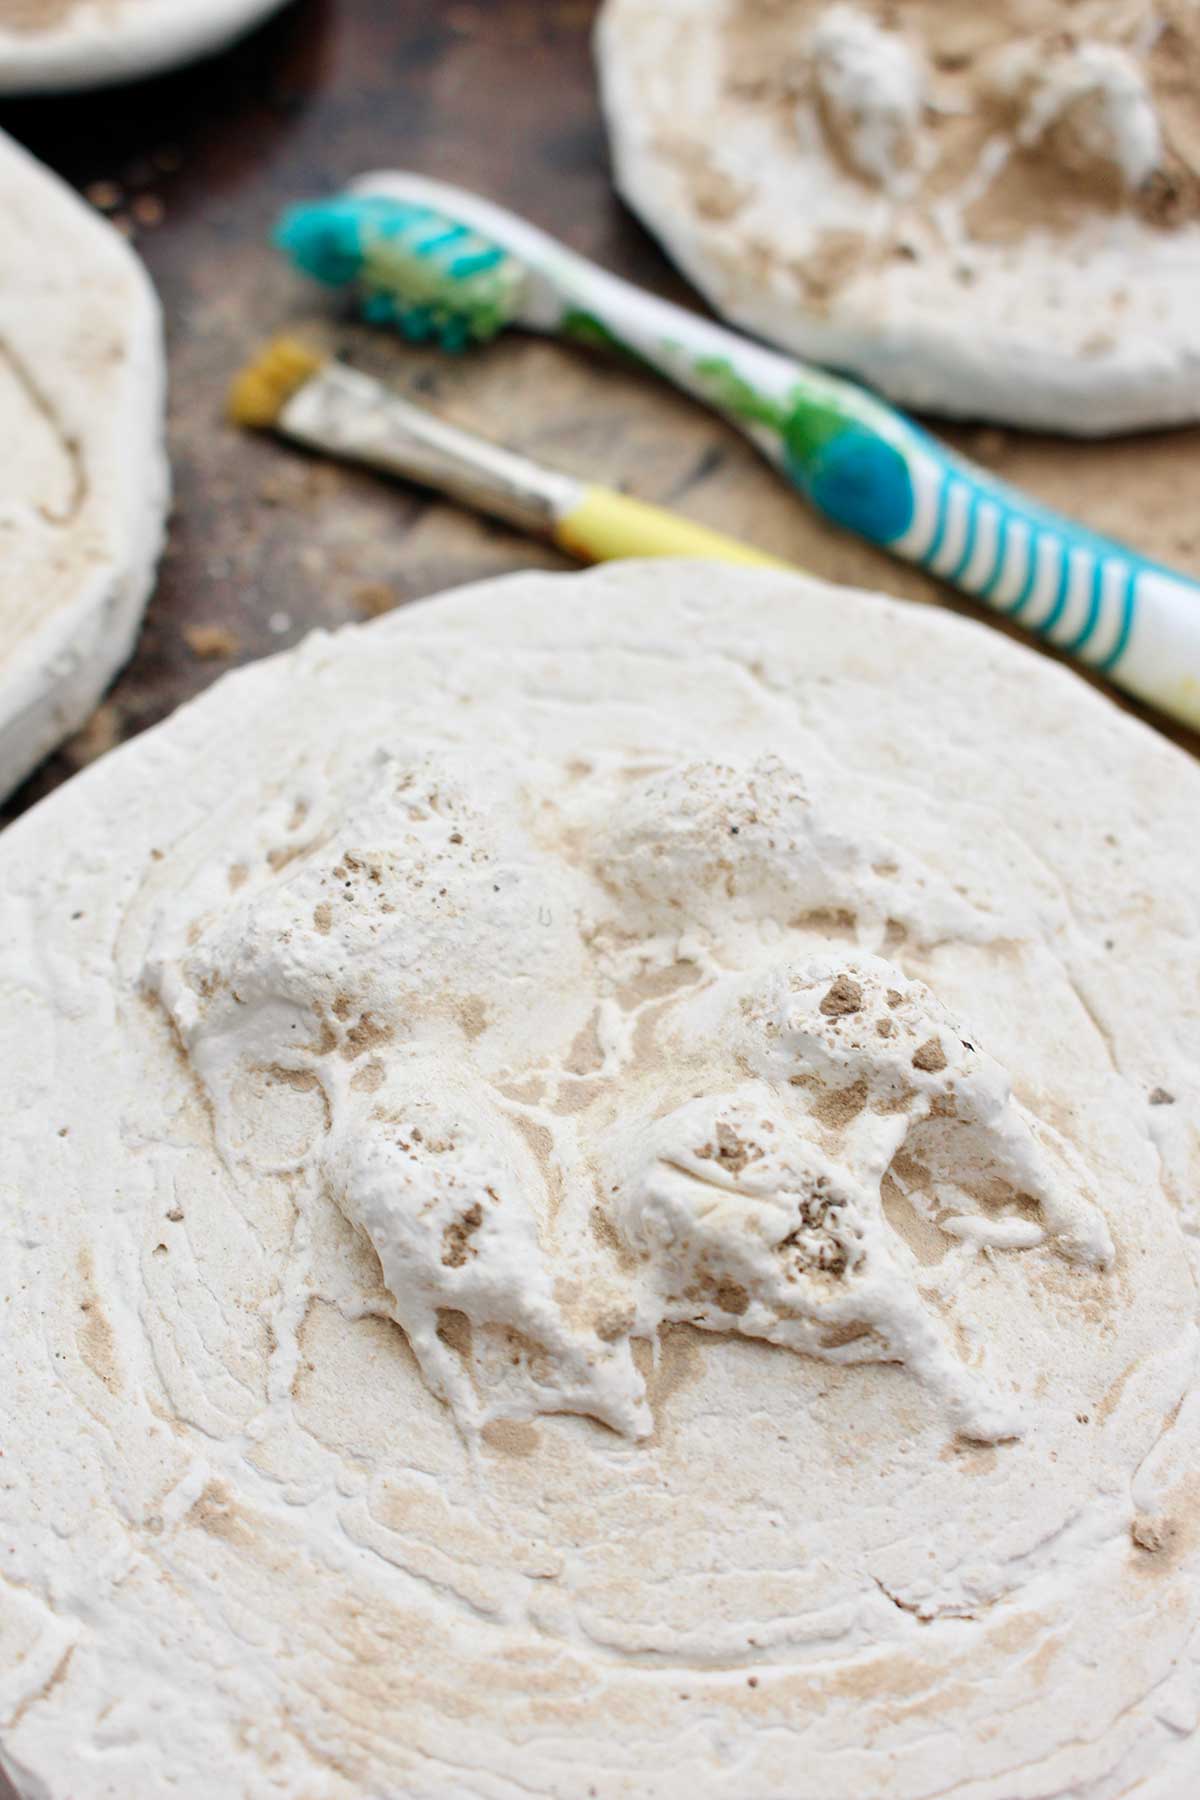
Use a soft toothbrush or an old paintbrush to gently sweep the remaining dirt off the surface of the mold.
This was really fun. It kind of surprised me. I felt like an archaeologist or something
My grandkids were not along to make the plaster castings with me. I saved them some to clean up when they were here. They really got into it, you can tell by the pictures. I do hope to bring them along to do some castings at sometime in the future.
The tracks in my pictures
The two tracks that I got were a deer track and a coyote track. Both of the castings came out so clear. I was very pleased.
You can see each pad on the coyotes paw along with each claw that went down into the mud.
The deer was equally as clear. You can see the two toes split on the front of its hoof as it ran across the road.
I’m on the lookout for different types of tracks: bobcat tracks, rabbit tracks, raccoon tracks, turkey tracks...
Spray paint the plaster
I almost forgot! These castings can be spray-painted if you would like. You can use any color that you want but gold shows off the 3-D look of the print nicely.
It would be fun to make a small grouping on the wall of various prints that you find on your hikes. See how many different types that you can find in one hiking seasons, for example.
Uses for the animal track molds
So this is really is an educational DIY project, but it is so much fun as well.
It would make a great show and tell for school.
I’m thinking this would make a great science project if a child needs that for school. There’s so much that a person can learn and if they are observant and curious.
Identifying your animal tracks
There are many sources online of identifying tracks if you are unfamiliar with one that you find. There may even be wildlife specialists in your area that could help you if you get stuck.
You may have different types of tracks in your area than I do! I love to learn so surprise me :-). I'm most familiar with American animal tracks (I live in the central United States).
We have a mountain lion that has passed through our area several times in the last few years. It would be awesome to find tracks from her (she had cubs the last time she was sighted).
On my last walk, I found raccoon tracks and turkey tracks. I may take castings of those in the next few days when my grandkids come.
I hope you enjoy making plaster cast of animal tracks as much as I did. Take some pictures and let me see what you find.
Enjoy and happy track hunting!
If you try this craft, let me know! Go ahead and leave a comment, rate it, and tag a photo with #WelcometoNanas wherever you post.
Come join the fun at https://welcometonanas.com
Supplies:
- Plaster of Paris
- Water
- Whipped topping containers (2)
- Spoon
- Measuring cup
- Scissors
- Paper clip (optional)
- Plastic bags
- Old paint brush (½” flat works well)
- Old toothbrush (soft bristles)
- Spray paint (optional)
Learn How to Make Plaster Casts of Animal Tracks
Equipment
- Spoon
- Measuring cup
- Scissors
Items Required
- Plaster of Paris
- Water
- 2 Whipped topping containers (2)
- Scissors
- Paper clip (optional)
- Plastic bags
- Old paint brush (½” flat works well)
- Old toothbrush (soft bristles)
- Spray paint (optional)
Instructions
- The first thing to get ready is a mold. I made my mold out of the top of a Cool Whip container.Cut off about 2 inches from the top of the Cool Whip container, cutting all the way around.
- If you are going on a hike further away from home, you could put the dry plaster of Paris in a baggie along with the other supplies listed below and easily carry it in a backpack.Carry an extra water bottle for mixing up the plaster if there isn't a water source nearby.With your back pack of supplies, head out for a walk to find tracks. You could go to a local park that has nature trails or wilderness areas.Keep your eyes open for some good prints. Watch in areas that might’ve been wet a couple days earlier, along the edge of water, or just in softer dirt. You want it to be firm enough so it won't crumble when molding the animal track.
- it’s time to mix up the plaster of Paris. Another whipped topping container worked well for the mixing container.I mixed 3 cups plaster of Paris with 1 ½ cups of water. It makes a soft mixture that’s kind of like pancake batter. This amount of plaster made one casting in the mold and 3-4 spoonfuls of left over mixture.
- Set the mold over the track of your choice. Center the animal track in the middle of the mold. Then gently spoon the plaster mixture into the mold and over the track. You’ll put in enough spoonfuls so that the plaster of Paris is about one inch thick. Kind of smooth it down.
- If you would like to hang the plaster cast on the wall, you can press a paper clip into the top of the casting. Don’t press it too deeply, or it will go all the way through the cast.Just gently press it into the back of the cast so that half of the clip goes down into the plaster of Paris and the other half sticks out.
- You will take a little rest from your hike because you need to leave the plaster of Paris to set up for at least a half an hour.The plaster of Paris will become firm to the touch so that is doesn’t leave a white substance on your fingers when you touch it. At that point you can gently remove the mold from around the plaster castThen gently hold onto the cast on two opposite edges and gently pull it up from the ground. Do this very gently and slowly (did I mention doing this gently?). You may need to push your fingers down into the ground a little bit so you can get underneath the plaster so that it doesn’t crack in the center. I didn’t have any trouble with any of mine breaking, but it sometimes happens. If kids are doing this with explain this process to them. Also, you might want to make a couple extras in case they get broken.Lift up the mold and plaster cast- so exciting!
- Just leave most of that dirt on there. Don’t try to get it off because the plaster is still very soft.Bring the whole thing home and let it fully dry and harden before you clean it up.Have a plastic bag along to place it in and then wrap it in sweatshirt or something to keep it safe on the trip home. I set my plaster casts on a cookie sheet when I got home and let them sit until the next day. The dirt dried and the mold hardened well during that time.
- Use a soft toothbrush or an old paintbrush to gently sweep the remaining dirt off the surface of the mold.This was really fun. It kind of surprised me. I felt like an archaeologist or something
- These castings can be spray-painted if you would like. You can use any color that you want but gold shows off the 3-D look of the print nicely.There are many sources online of identifying tracks if you are unfamiliar with one that you find. There may even be wildlife specialists in your area that could help you if you get stuck.


Leave a Reply