Learn How to Make Plaster Casts of Animal Tracks
Learn How to Make Plaster Casts of Animal Tracks. Bring the animal footprints home you find on a hike. Easy science activity for all ages.
Servings: 1 plaster animal track molding
Cost: $3
Equipment
- Spoon
- Measuring cup
- Scissors
Ingredients
- Plaster of Paris
- Water
- 2 Whipped topping containers (2)
- Scissors
- Paper clip (optional)
- Plastic bags
- Old paint brush (½” flat works well)
- Old toothbrush (soft bristles)
- Spray paint (optional)
Instructions
- The first thing to get ready is a mold. I made my mold out of the top of a Cool Whip container.Cut off about 2 inches from the top of the Cool Whip container, cutting all the way around.
- If you are going on a hike further away from home, you could put the dry plaster of Paris in a baggie along with the other supplies listed below and easily carry it in a backpack.Carry an extra water bottle for mixing up the plaster if there isn't a water source nearby.With your back pack of supplies, head out for a walk to find tracks. You could go to a local park that has nature trails or wilderness areas.Keep your eyes open for some good prints. Watch in areas that might’ve been wet a couple days earlier, along the edge of water, or just in softer dirt. You want it to be firm enough so it won't crumble when molding the animal track.
- it’s time to mix up the plaster of Paris. Another whipped topping container worked well for the mixing container.I mixed 3 cups plaster of Paris with 1 ½ cups of water. It makes a soft mixture that’s kind of like pancake batter. This amount of plaster made one casting in the mold and 3-4 spoonfuls of left over mixture.
- Set the mold over the track of your choice. Center the animal track in the middle of the mold. Then gently spoon the plaster mixture into the mold and over the track. You’ll put in enough spoonfuls so that the plaster of Paris is about one inch thick. Kind of smooth it down.
- If you would like to hang the plaster cast on the wall, you can press a paper clip into the top of the casting. Don’t press it too deeply, or it will go all the way through the cast.Just gently press it into the back of the cast so that half of the clip goes down into the plaster of Paris and the other half sticks out.
- You will take a little rest from your hike because you need to leave the plaster of Paris to set up for at least a half an hour.The plaster of Paris will become firm to the touch so that is doesn’t leave a white substance on your fingers when you touch it. At that point you can gently remove the mold from around the plaster castThen gently hold onto the cast on two opposite edges and gently pull it up from the ground. Do this very gently and slowly (did I mention doing this gently?). You may need to push your fingers down into the ground a little bit so you can get underneath the plaster so that it doesn’t crack in the center. I didn’t have any trouble with any of mine breaking, but it sometimes happens. If kids are doing this with explain this process to them. Also, you might want to make a couple extras in case they get broken.Lift up the mold and plaster cast- so exciting!
- Just leave most of that dirt on there. Don’t try to get it off because the plaster is still very soft.Bring the whole thing home and let it fully dry and harden before you clean it up.Have a plastic bag along to place it in and then wrap it in sweatshirt or something to keep it safe on the trip home. I set my plaster casts on a cookie sheet when I got home and let them sit until the next day. The dirt dried and the mold hardened well during that time.
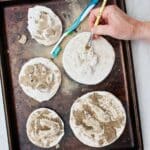
- Use a soft toothbrush or an old paintbrush to gently sweep the remaining dirt off the surface of the mold.This was really fun. It kind of surprised me. I felt like an archaeologist or something
- These castings can be spray-painted if you would like. You can use any color that you want but gold shows off the 3-D look of the print nicely.There are many sources online of identifying tracks if you are unfamiliar with one that you find. There may even be wildlife specialists in your area that could help you if you get stuck.
Video
Notes
Plaster sets up quite quickly, so don't stir it up until you have located the tracks and set down the mold.
Tip: Plaster of Paris is mixed using 2 parts dry plaster to one part water...a 2 to 1 ratio. Keeping that in mind makes it easy to mix up whatever amount you need!
Tip: You don’t want air bubbles in the plaster of Paris so don’t whip it up. Just gently stir it and keep the air bubbles out.