Welcome To Nana's

  • All Crafts
  • Arts & Crafts
    • Drawing
    • Painting
    • Sewing
    • Paper craft
    • Nature
    • Recycled
    • Coloring Book
    • 3-D Project
  • Activities
    • Indoor
    • Outdoor
    • Science
    • Trip Activities
    • Recipes
  • Holiday
    • Christmas
    • Thanksgiving
    • Halloween
    • Easter
    • Fourth of July
    • Father's Day
    • Flag Day
    • May Day
    • Midsummers Day
    • Mother's Day
    • New Years
  • About
menu icon
go to homepage
  • All Crafts
  • Arts & Crafts
    • Drawing
    • Painting
    • Sewing
    • Paper craft
    • Nature
    • Recycled
    • Coloring Book
    • 3-D Project
  • Activities
    • Indoor
    • Outdoor
    • Science
    • Trip Activities
    • Recipes
  • Holiday
    • Christmas
    • Thanksgiving
    • Halloween
    • Easter
    • Fourth of July
    • Father's Day
    • Flag Day
    • May Day
    • Midsummers Day
    • Mother's Day
    • New Years
  • About
search icon
Homepage link
  • All Crafts
  • Arts & Crafts
    • Drawing
    • Painting
    • Sewing
    • Paper craft
    • Nature
    • Recycled
    • Coloring Book
    • 3-D Project
  • Activities
    • Indoor
    • Outdoor
    • Science
    • Trip Activities
    • Recipes
  • Holiday
    • Christmas
    • Thanksgiving
    • Halloween
    • Easter
    • Fourth of July
    • Father's Day
    • Flag Day
    • May Day
    • Midsummers Day
    • Mother's Day
    • New Years
  • About
×
Home » Arts & Crafts

Make a Decorative Stepping Stone

Published: Jun 6, 2019 · Modified: Sep 5, 2020 by Shelly · This post may contain affiliate links · 3 Comments

A Decorative Stepping Stone looks so much more difficult to make than it actually is!! You’ll feel like “the boss” when you mix up some concrete!!

A stepping stone is a wonderful time marker for kids. I have several in my flower beds that our kids made many years ago. Every time I look at them I’m hit with a wave of nostalgia! I’m hoping to have one made by each grandchild as well. Plus we’ll make a second one for them to take home to their house and give to dad for Father’s Day!!

Gather Decorative Stepping Stone Supplies

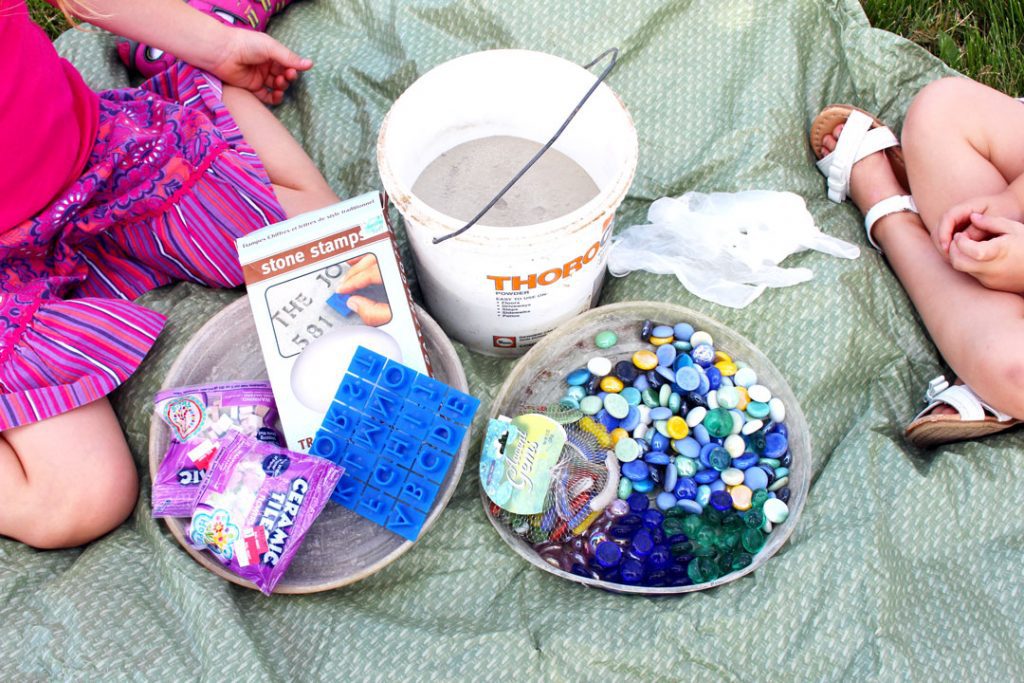
Gather up all your supplies so the wet concrete doesn’t set before you are ready to decorate.

If you have old pieces of pottery with colors and designs, place them into a couple paper bags, place on concrete and gently hit with a hammer. Repeat until the pieces are about postage stamp size. Dump the pieces into a tray so you can see the pieces easily. These can be sharp on the edges, so this may be better for the older grandkids, with garden gloves on. 

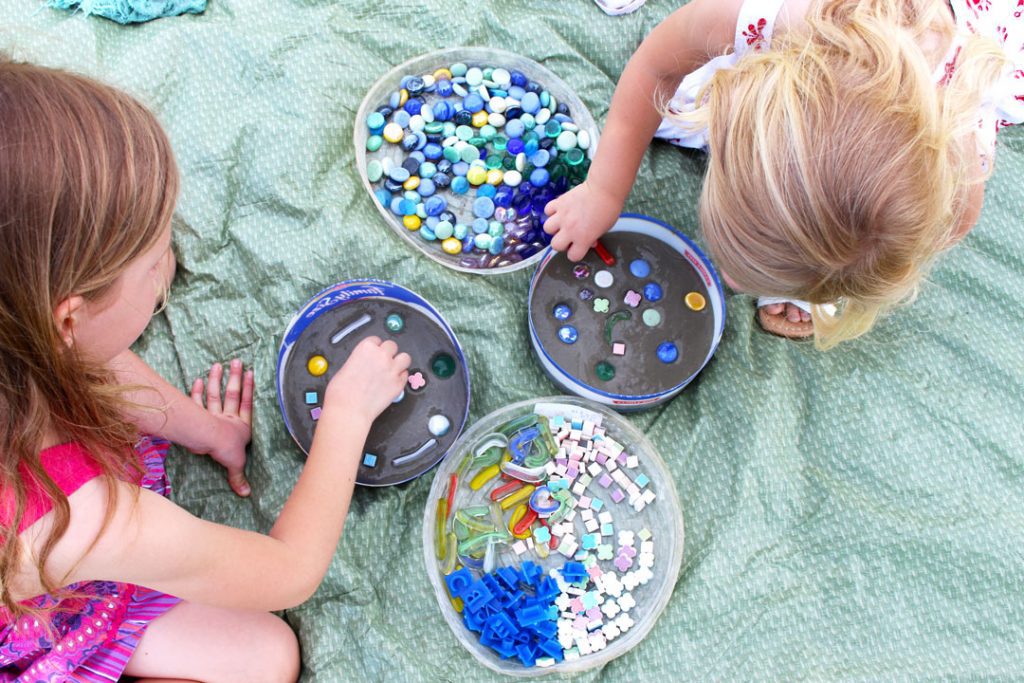
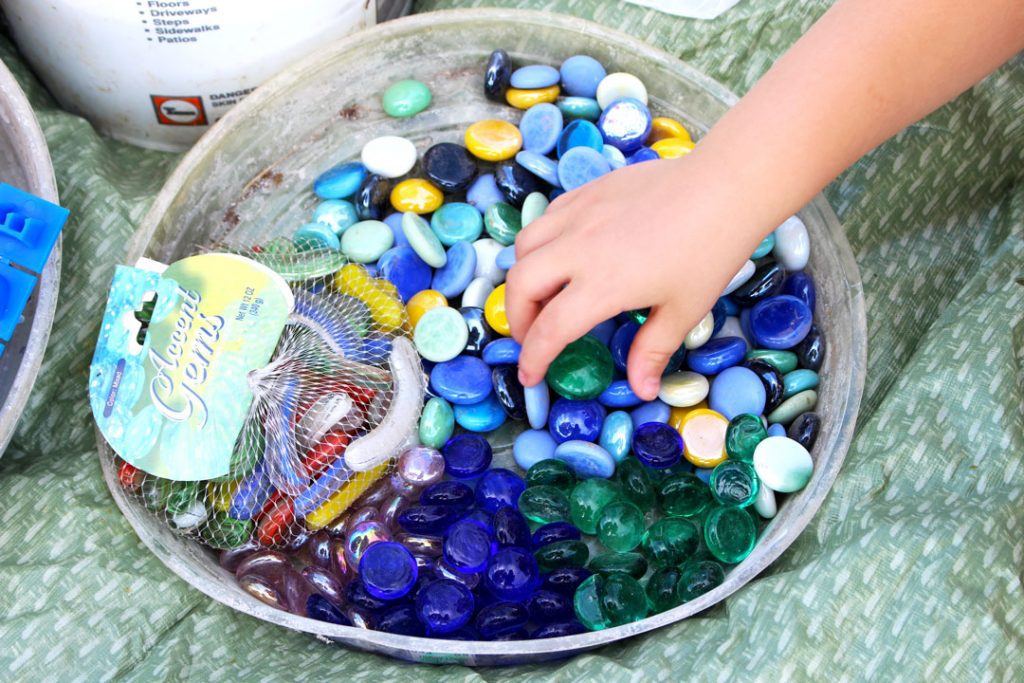
Place the other colored pebbles, sea shells and such in trays as well.

It works best to make a little picture or design with the pieces before mixing the concrete. Having a little plan usually helps a craft project turn out better. 

Prep the Mold

Spread a little Vaseline on the plastic tray mold. This will help the concrete stepping stone pop out better once dry.
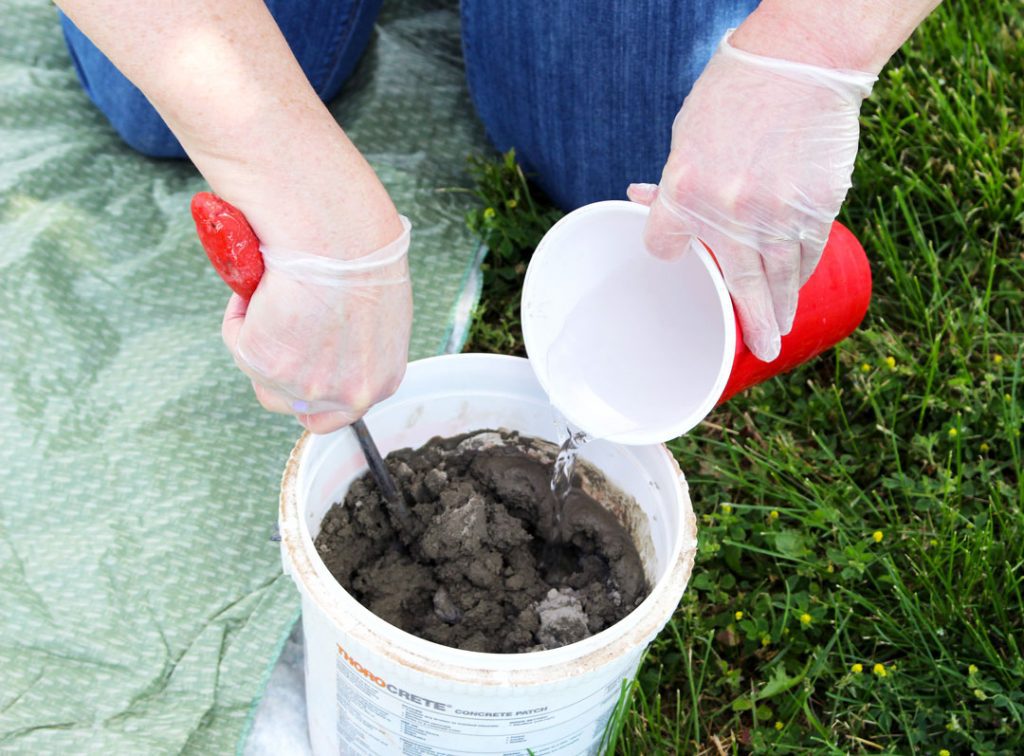
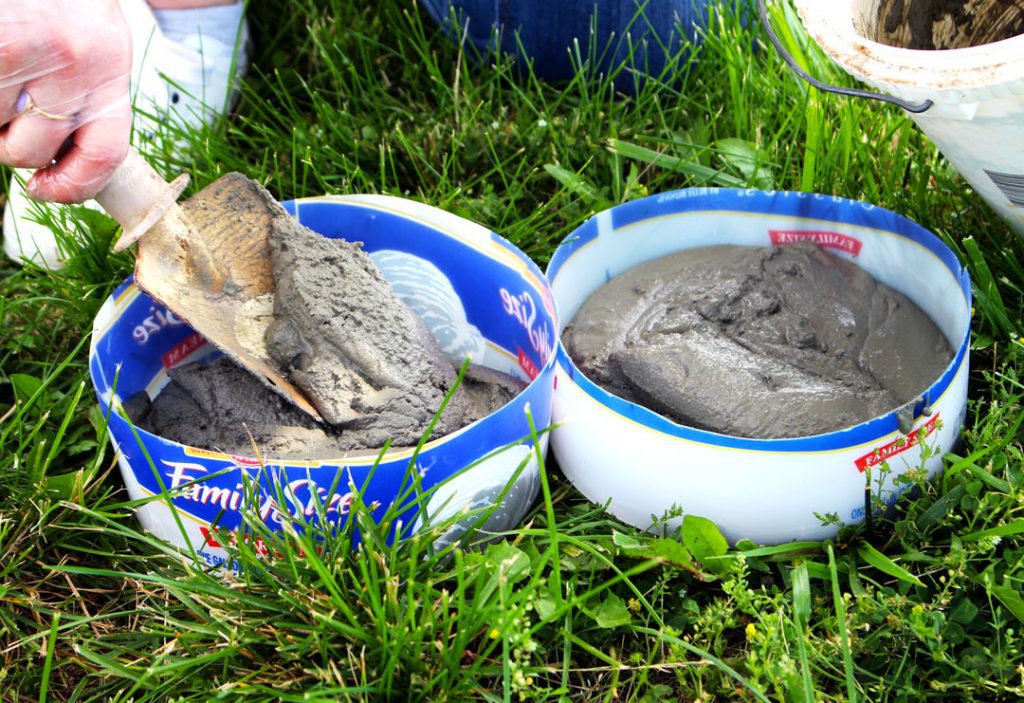
Mix Up Concrete

Mix up the concrete in a bucket or tub according to directions on the bag. You won’t need all of it if only making a few stepping stones so try mixing it up as you go.

Fill the Molds with Concrete

Scoop the concrete into the plastic trays to almost full. Give it a couple lifts and taps down on the ground to get out air bubbles.

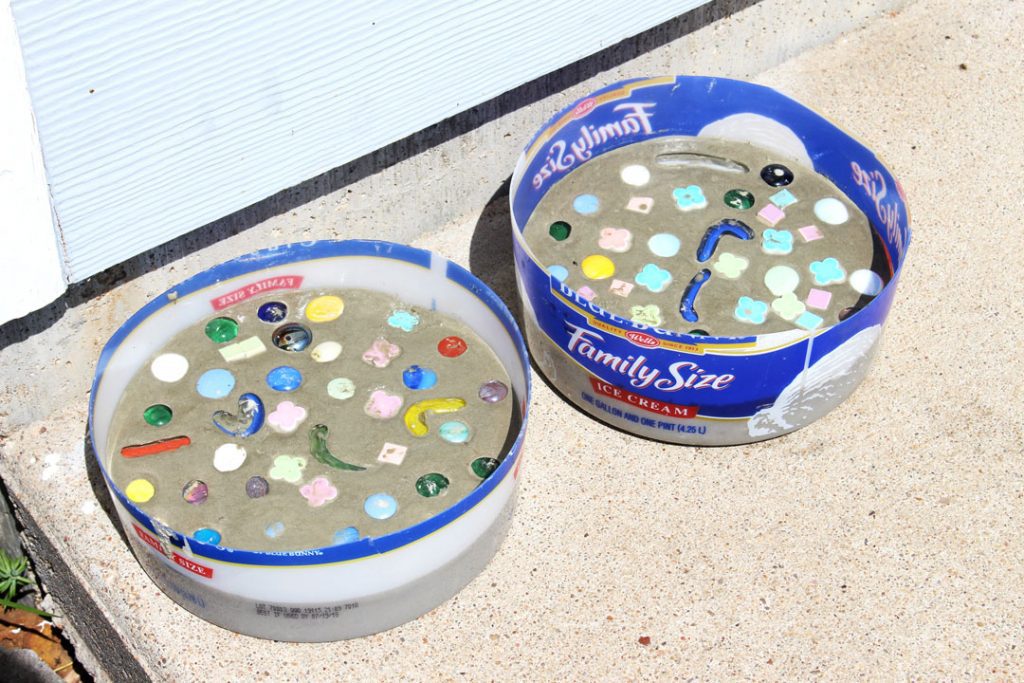
Decorate Your DIY Stepping Stones!

Press the pieces into the moist concrete in the pattern you had set out. Press them down so they are flush with the top of the concrete. 

Tip: Be sure all pieces of pottery being used are placed so there are no sharp edges sticking up that could cut bare feet.

Wait, wait, wait for them to cure...

Of course you have to let the Decorative Stepping Stone sit to dry and cure as directed on the bag. Oh, it is so hard to wait!!

These make a great craft for a birthday party or Vacation Bible School. Of course, they are a great gift for Dad on Father’s Day!

Photo credits: Bethanie Achenbach

Supplies for a Decorative Stepping Stone:

  • Plastic tray like is used under plants to keep water from leaking on the floor (in the size desired by you)
  • OR- cut the bottom out of a round ice cream bucket leaving about 2 inches on the sides.
  • Bag of concrete mix
  • Tub or bucket to mix up the concrete
  • Glass pebbles, tiles, sea shells
  • Old pottery to break into pieces
  • Trays or shallow boxes to put out the pebbles
  • Gloves to handle broken tile pieces
  • Vaseline

Enjoy!

Welcome to Nana’s! Where there’s fun things to do with your “grand” kids!

Come join the fun at www.WelcomeToNanas.com

More Arts & Crafts

  • Four multi colored sponge bombs in a blue bucket full of water outside.
    Epic DIY Sponge Bombs for Water Balloon Fights!
  • Three 4th of July firecracker treat boxes decorated with red white and blue paper and washi tape with some scraps of festive paper scattered around.
    Easy 4th of July Craft: Firecracker Treat Boxes!
  • A person. holding a milk jug windsock with a sunshine smiley face on it with many colorful strips of fabric hanging from the bottom.
    Make a Festive Milk Jug Windsock Craft
  • Red white and blue melted beads in the shape of a star sitting on a circular piece of wood next to a bowl of blue beads.
    DIY 4th of July Melted Beads Craft

Comments

  1. Suzette says

    March 27, 2022 at 2:51 pm

    Oh, I LOVE this idea! I will gather up the grandkids, the broken pieces of pottery I haven't been able to part with because of the memories they have held, and the various sea shells we've gathered over the years - and I will help my grandkids make their moms a stepping stone for Mother's Day!

    Thank you Nana! Thank you Shelly!

    Reply
  2. Deb says

    July 18, 2023 at 3:42 pm

    I was wondering g where the petroleum jelly is used. Is it for your hands or the tray?

    Reply

Leave a Reply Cancel reply

Your email address will not be published. Required fields are marked *

Recipe Rating


This site uses Akismet to reduce spam. Learn how your comment data is processed.

Hello there! I'm Shelly (Nana), an artist, previously homeschooling mother of 3, and now proud grandma (Nana) of 6. I love sharing artistically inspiring, hands-on crafts for kids of all ages. Let's go have some fun!

More about me →

Popular Crafts

  • Hand squeezing the a completed batch of light blue fluffy slime.
    Homemade Slime
  • Completed colorful tissue paper flowers, a purple and pink one resting on a glass cake stand with others underneath.
    How to Make Tissue Paper Flowers
  • Overhead views of two different sprouts growing in glass containers.
    How to Grow a Tree from a Pine Cone
  • A sunset picture created with sharpies and alcohol on canvas, surrounded by bright sharpie markers..
    Cool Sharpie and Alcohol Painting on Canvas

Footer

↑ back to top

Privacy Policy

As an Amazon Associate I earn from qualifying purchases.

Copyright © 2025 Brunch Pro on the Feast Plugin