
Milk Jug Halloween Decoration
This DIY Monster Milk Jug Halloween Decoration made me laugh out loud several times while I made it- a whimsical monster for sure!! I think you’ll get a chuckle too.
Your Monster Milk Jug Halloween Decoration can hold a candy or a glow stick for trick or treat fun. A cute, recycled milk jug craft.

Crafts to do with milk jugs
I love a craft that recycles, especially recycling a milk jug. Seems like they multiply in our recycle bin.
This is also a craft that recycles your extra craft supplies. You can use your extra scraps of felt or craft foam, beads, trims, acrylic paints, shells, etc., etc.! Pull out anything you would like to use up and see if it can be added to your Monster.
Watch the full length video tutorial
If you would like to watch a full length step by step video of making a Monster Milk Jug, check out this video: YouTube DIY Monster Milk Jug Halloween Decoration Full Length Tutorial.

Halloween milk jug options
The first thing to do on your DIY Monster Milk Jug Halloween Decoration is to imagine how you would like to use it. This will change the way you create it and the way you cut the milk jug.
Would you like a child to use it as a treat container to go trick or treating? Then cut your hole towards the top and use the handle to carry the milk jug. Then the candy can be dropped into the jug and not fall out.
Do you want to put it on your porch to hold a glow stick? Then perhaps you could cut out the mouth and maybe even some eye holes so the light will shine out more.
Maybe you would like to make yours so that trick or treaters can take candy from the monster’s mouth. Then cut the mouth hole large enough so they can get their hands through to reach the candy.
Is your decoration just to set in your house and get a chuckle? Then do whatever you would like!
Draw the monster face
OK, with your purpose in mind, let’s draw your monster face on the milk jug so you can cut holes in the jug.
On mine I wanted the handle to be a nose on the monster, so the handle was in the middle of the monster face and the mouth went below the handle. This worked well and made a very wide toothy grin.
You could use the “corner” of the jug opposite of the handle to be the center of the face or a flat side of the jug to be the face of your monster.
Take a couple minutes and imagine what would work best for your idea. Then draw on the parts of the face you want to cut out with a permanent marker. This will usually be the mouth and sometimes the eyes. It may also be a hole towards the top of the jug if it is to be used to hold candy for a child as they trick or treat.

Cut holes in the milk jug for your monster features
I cut the pour hole off the top of the milk jug. I didn’t want the top of the head to come to a point because I wanted to glue some “hair” on, sticking some of it down into the hole that was left. It worked well.
Once you have the face drawn on it’s time to cut it out.
It worked well to use a utility knife to cut the plastic. Milk jug plastic is not very thick so it’s pretty easy to cut.
Carefully poke the utility knife down into the plastic along the line you have drawn and then pull it back out again. Poke and pull up as you move down your permanent marker line.
I recommend this poke and pull up method rather than trying to pull the knife along the line in one swipe as it’s often hard to control a swipe. It can cut across the jug where you don’t want to cut.
Once you have the cutting started you can shift over to using a scissors if that is easier for you.
Note: This is a step that an adult will need to do for younger children.
Now the fun (and a chuckle) begins.
Milk Jug Monster features!
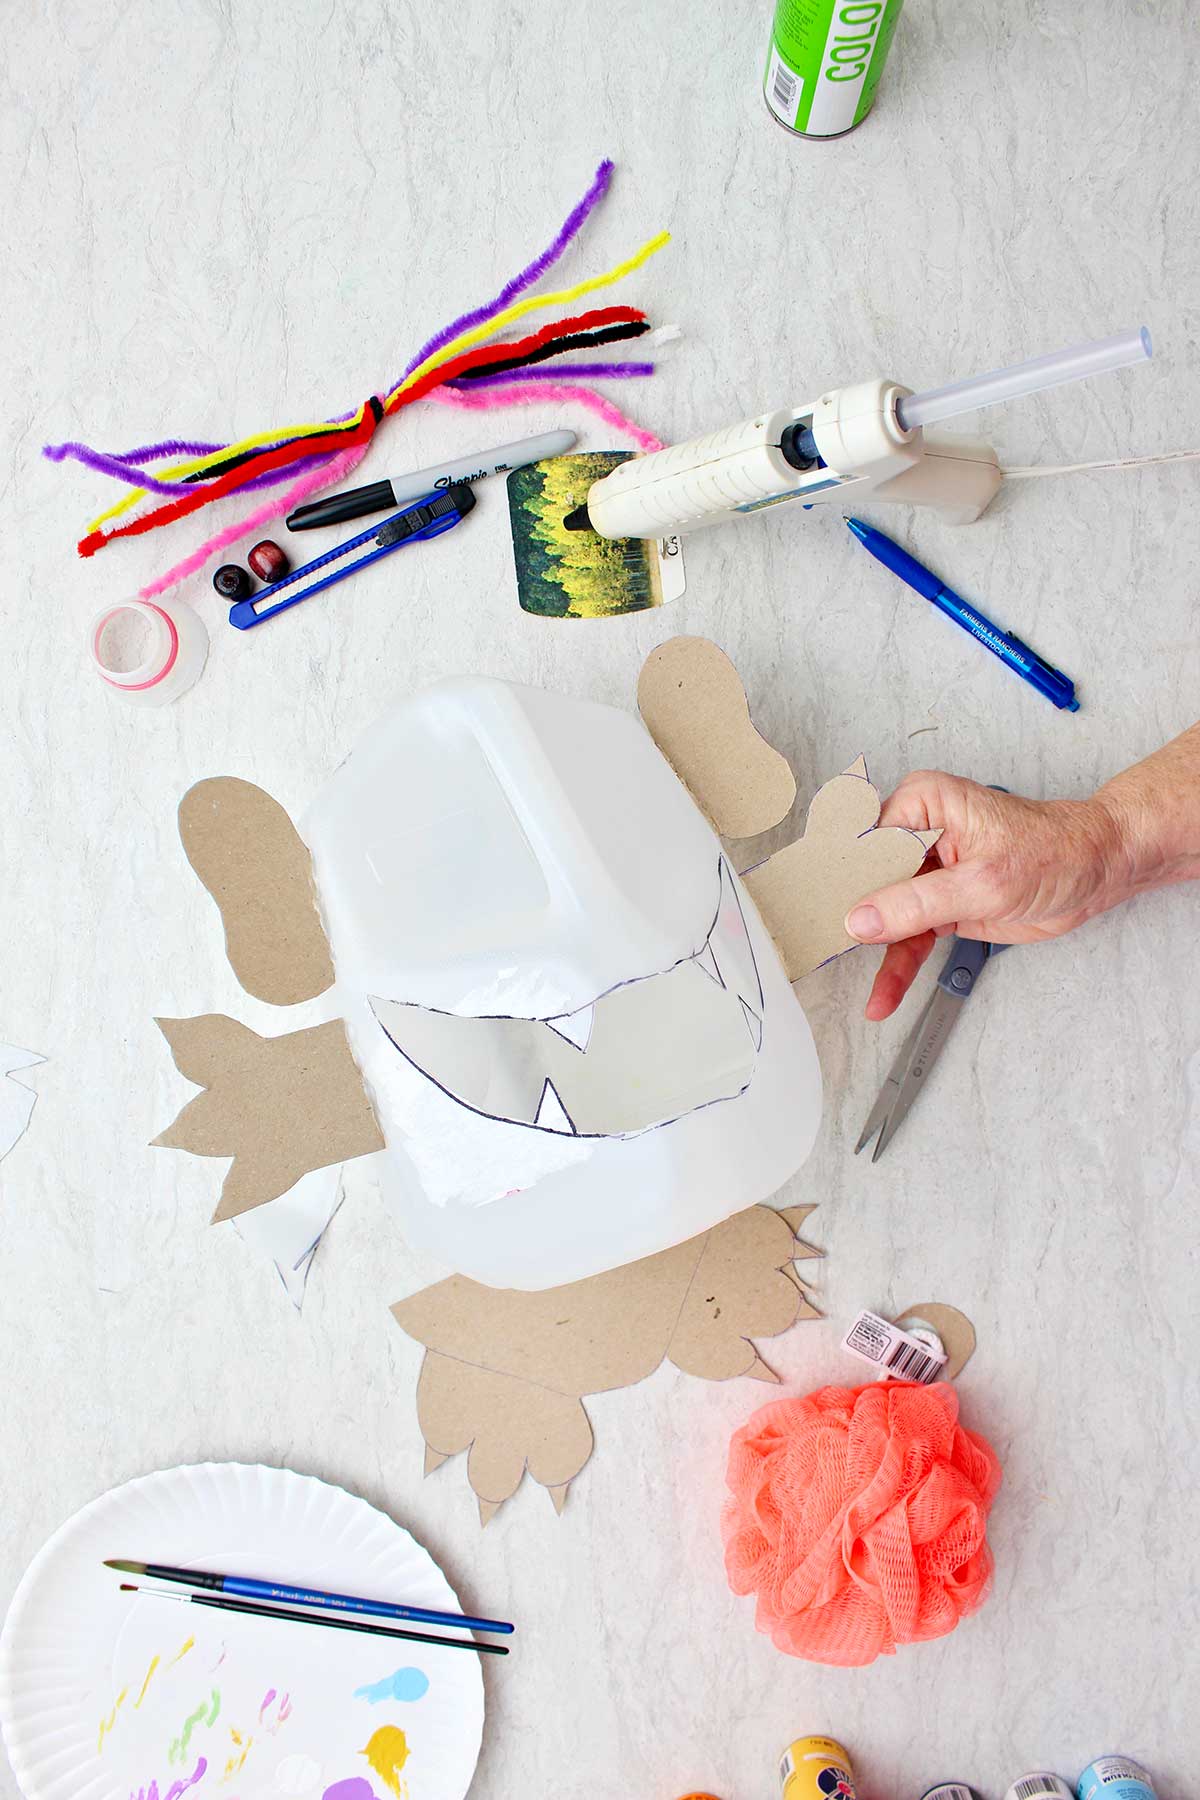
Use some lightweight cardboard to cut a nose, feet, hands/paws, ears, horns, or whatever else you would like to have stick out from your milk jug monster.
Leave a ½-¾-inch tab on the end of whatever you draw. This tab will be bent back and used to glue the cardboard piece onto the milk jug.
If the cardboard isn’t too heavy, cut two ears (for example) at a time so they are mirror images of each other. If it’s too heavy, cut one and then use that to trace a second one.
Bend the tab back on each cardboard piece. Use hot glue or E6000 glue on the tabs to attach these pieces to your milk jug monster.
Note: If you use the E6000 glue it takes longer to dry but may be more durable.
It’s already looking good, monstrously good!

Time to spray paint!
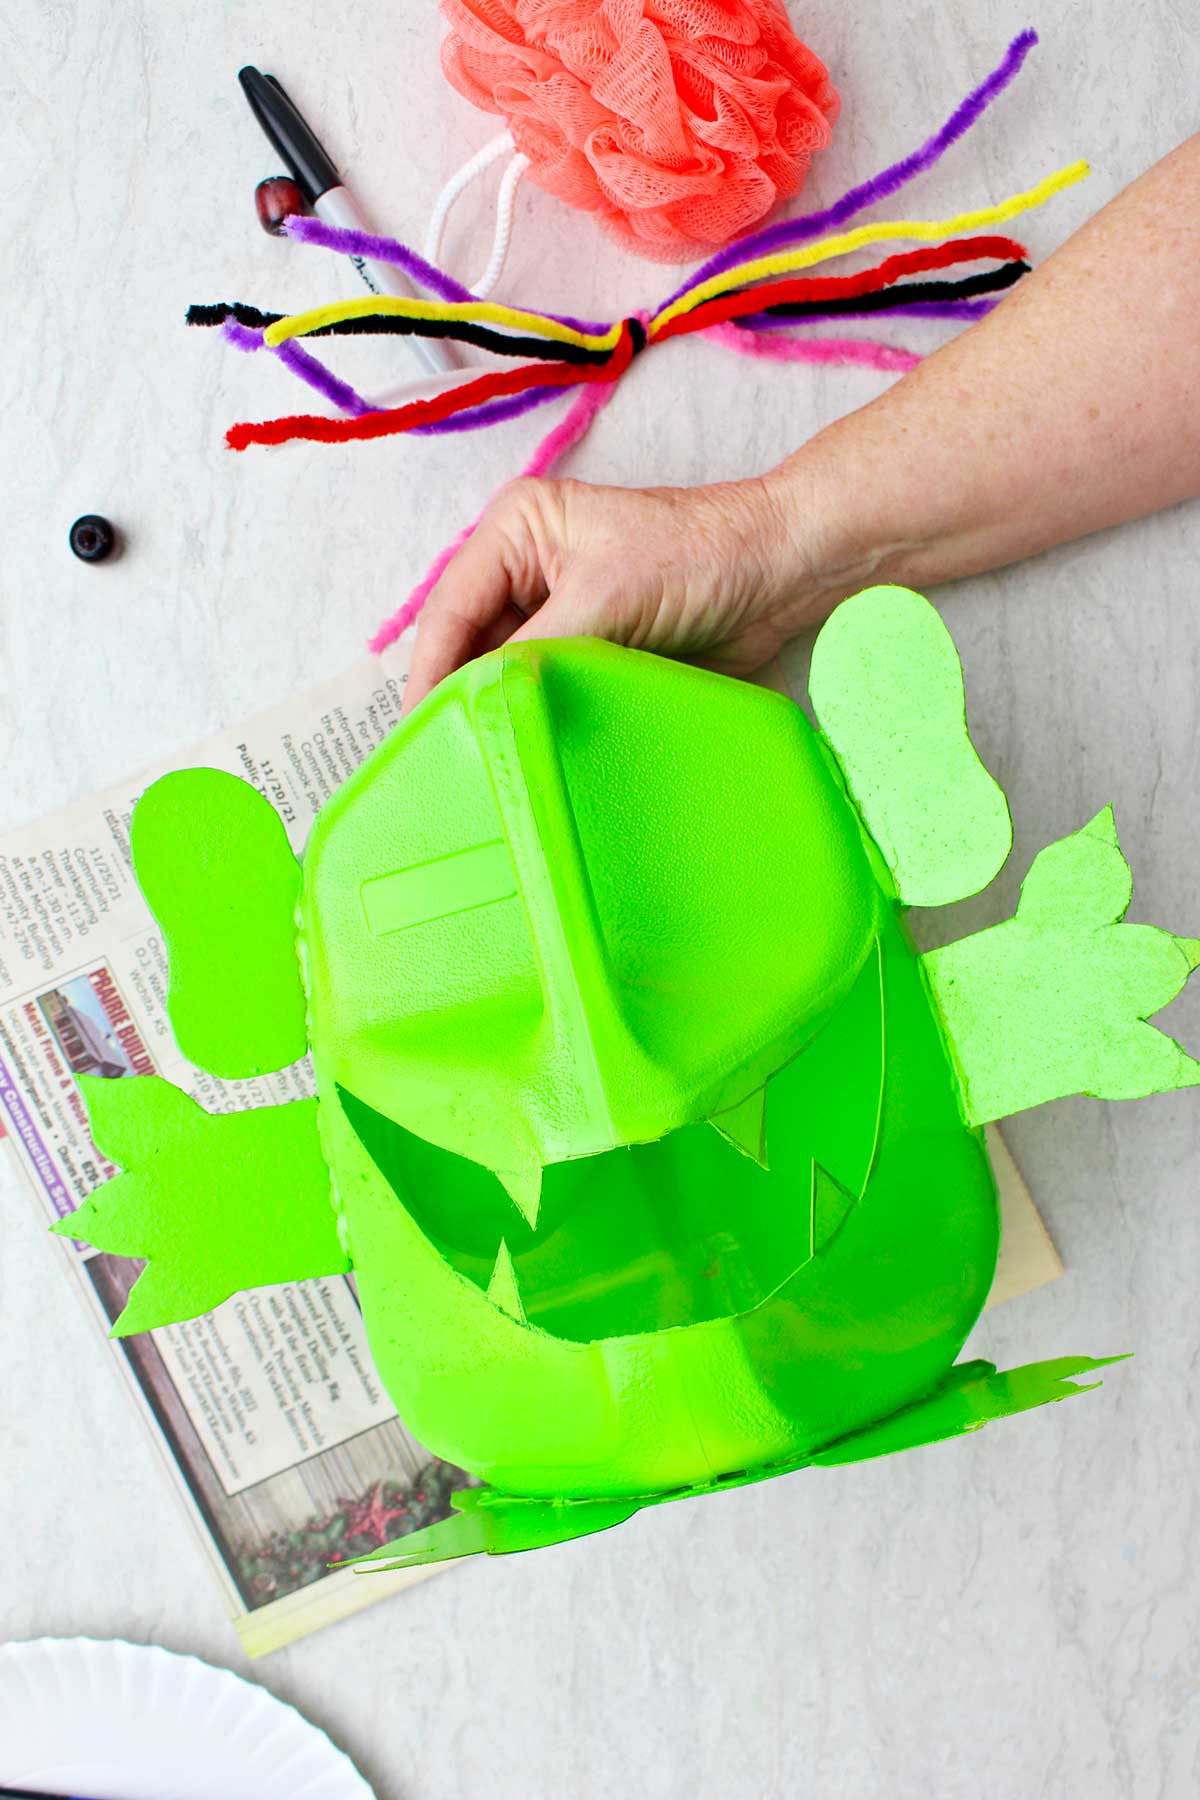
When the glue is dry, take your monster and your spray paint outside to spray paint. Even though you are outside I recommend placing newspaper or cardboard down. You don’t want the paint to get on the grass or sidewalk.
It’s also best to do this on a day that isn’t too windy. That isn’t easy to do if you live in Kansas!
Spray paint the front and the back of the monster according to the directions on the spray paint can. It took more than one coat to get good paint coverage on my monster.
After the paint dries your monster friend and you can go back inside for some fun final decorating.
Monster Milk Jug Halloween Decoration decorating!
So you will do some free-wheel decorating of your monster in this next step.
Take the craft supplies that you pulled out and think about how you can use them to make the milk jug monster decoration look as you would like.
Monster hair
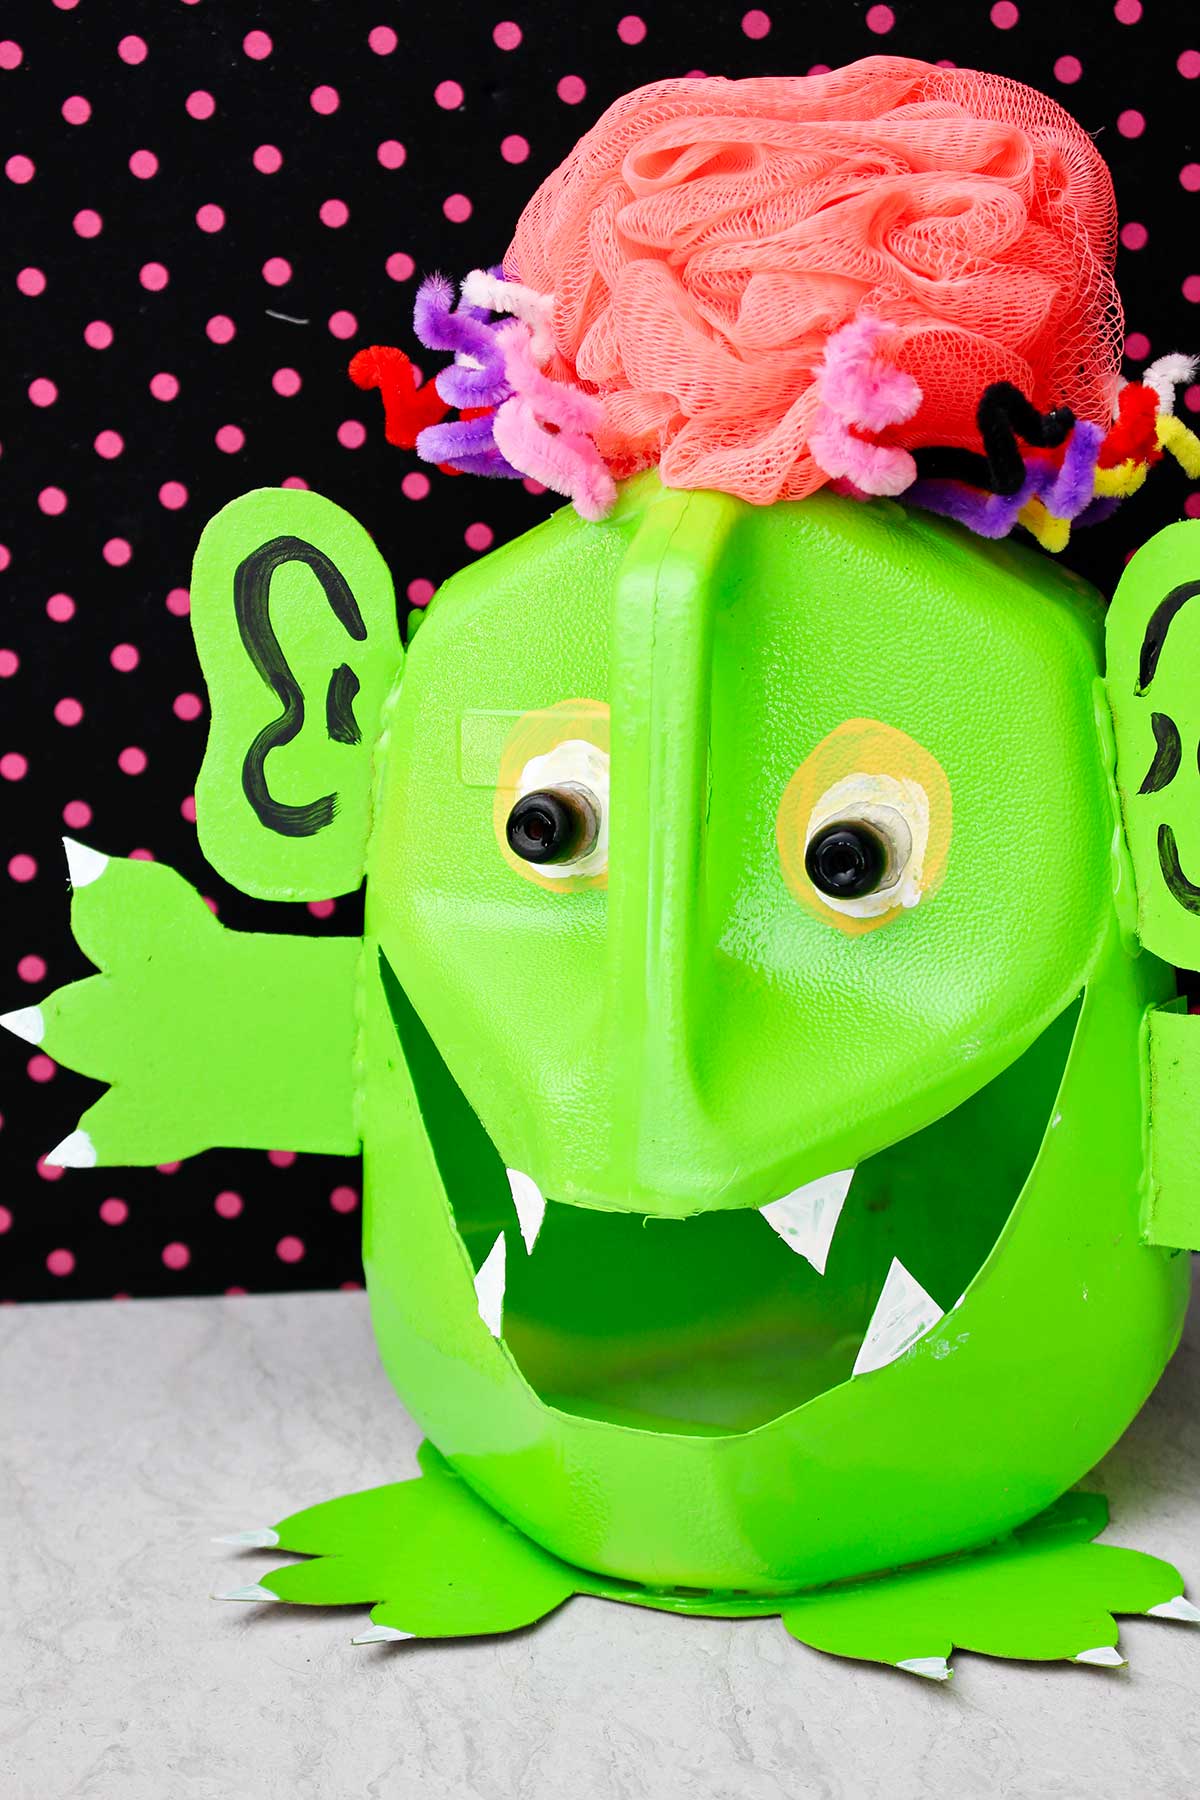
My first decoration was to hot glue some “hair” onto the top of the jug. The hair I chose was some pipe cleaners and a loofah/bath sponge.
I placed a ring of hot glue around the opening I’d cut in the top of the jug and placed the pipe cleaners across the opening first. Then I hot glued the loofah on over the pipe cleaners.
Note: Be careful not to push your fingers into the hot glue as you push the loofah down!
The pipe cleaners looked funky when they were twisted around the loofah.
Yarn could be a good option for hair. Especially if you have some left over from another project.
Monster face
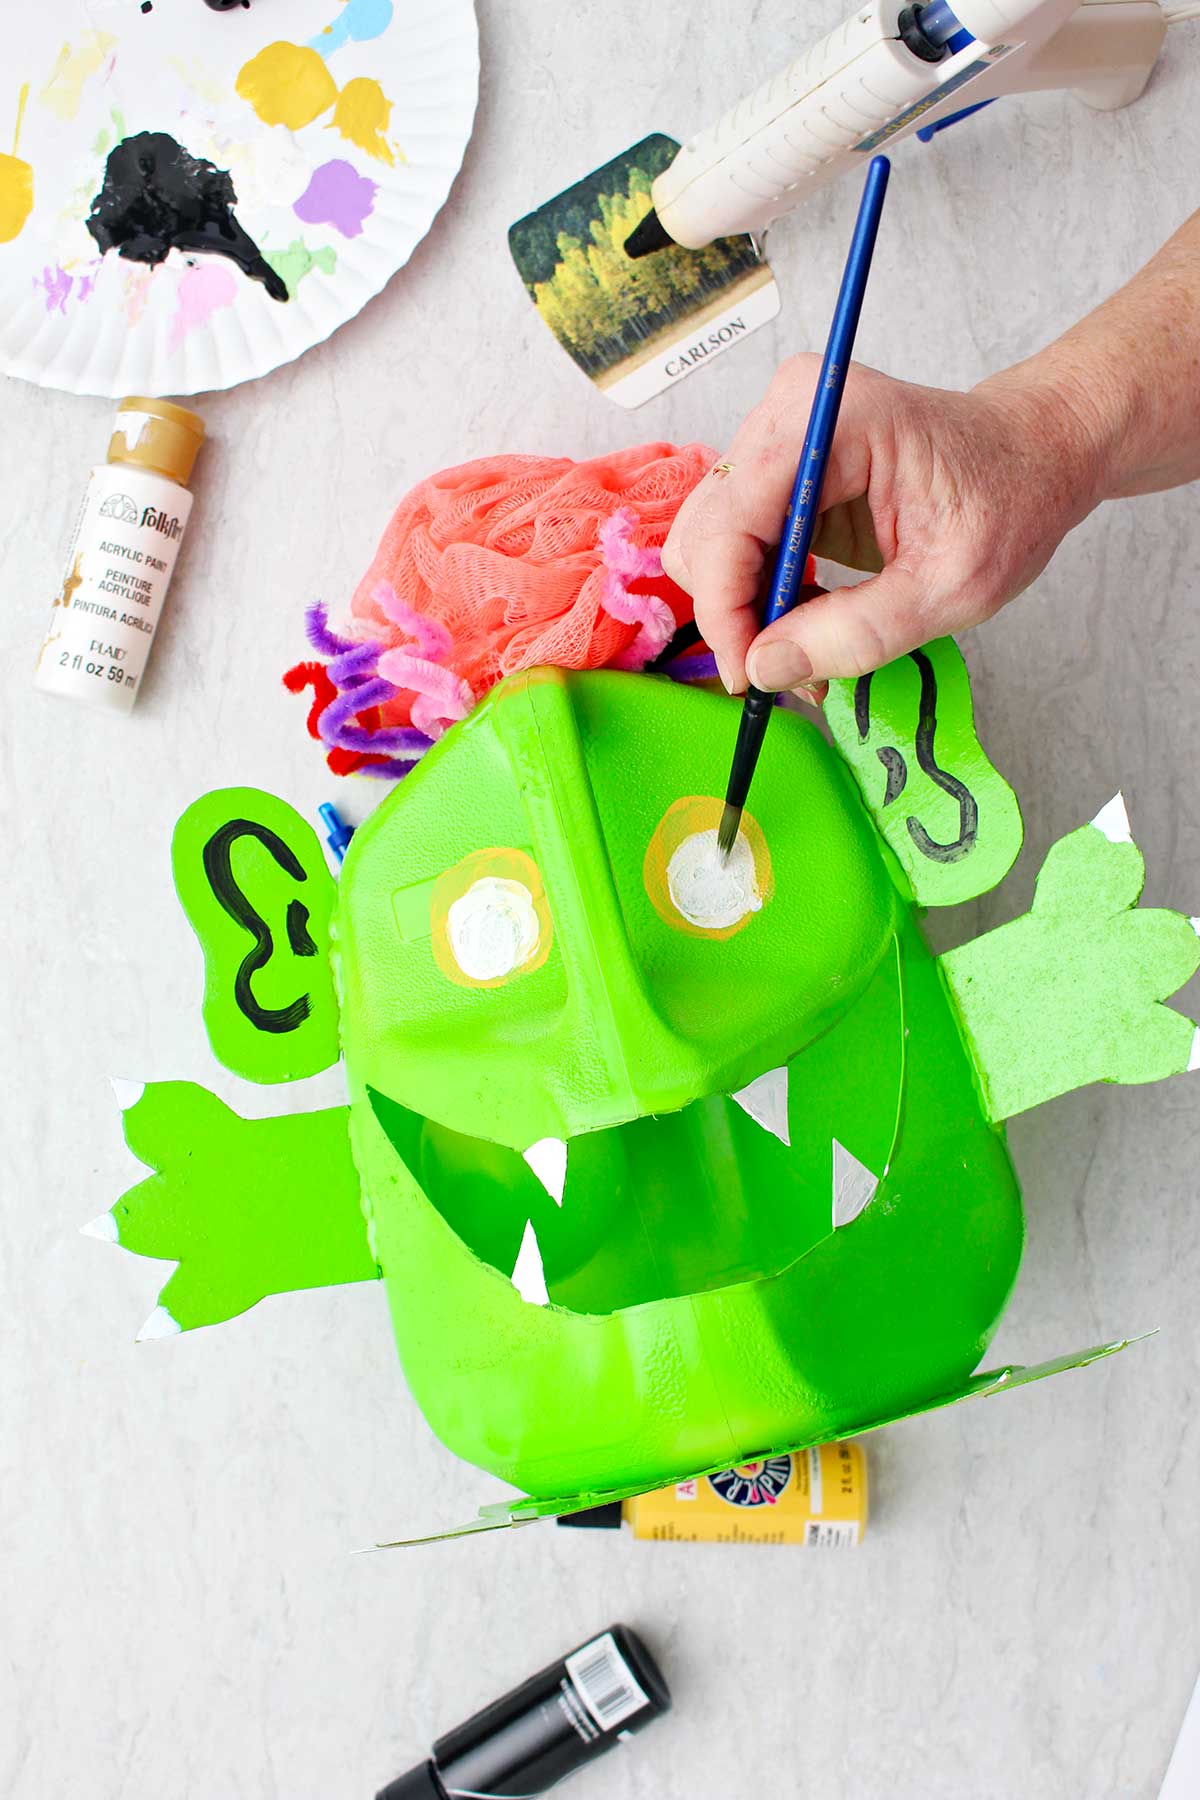
Next, how about the face?
I used acrylic craft paint to make eyes and some details on the ears and nails of the monster.
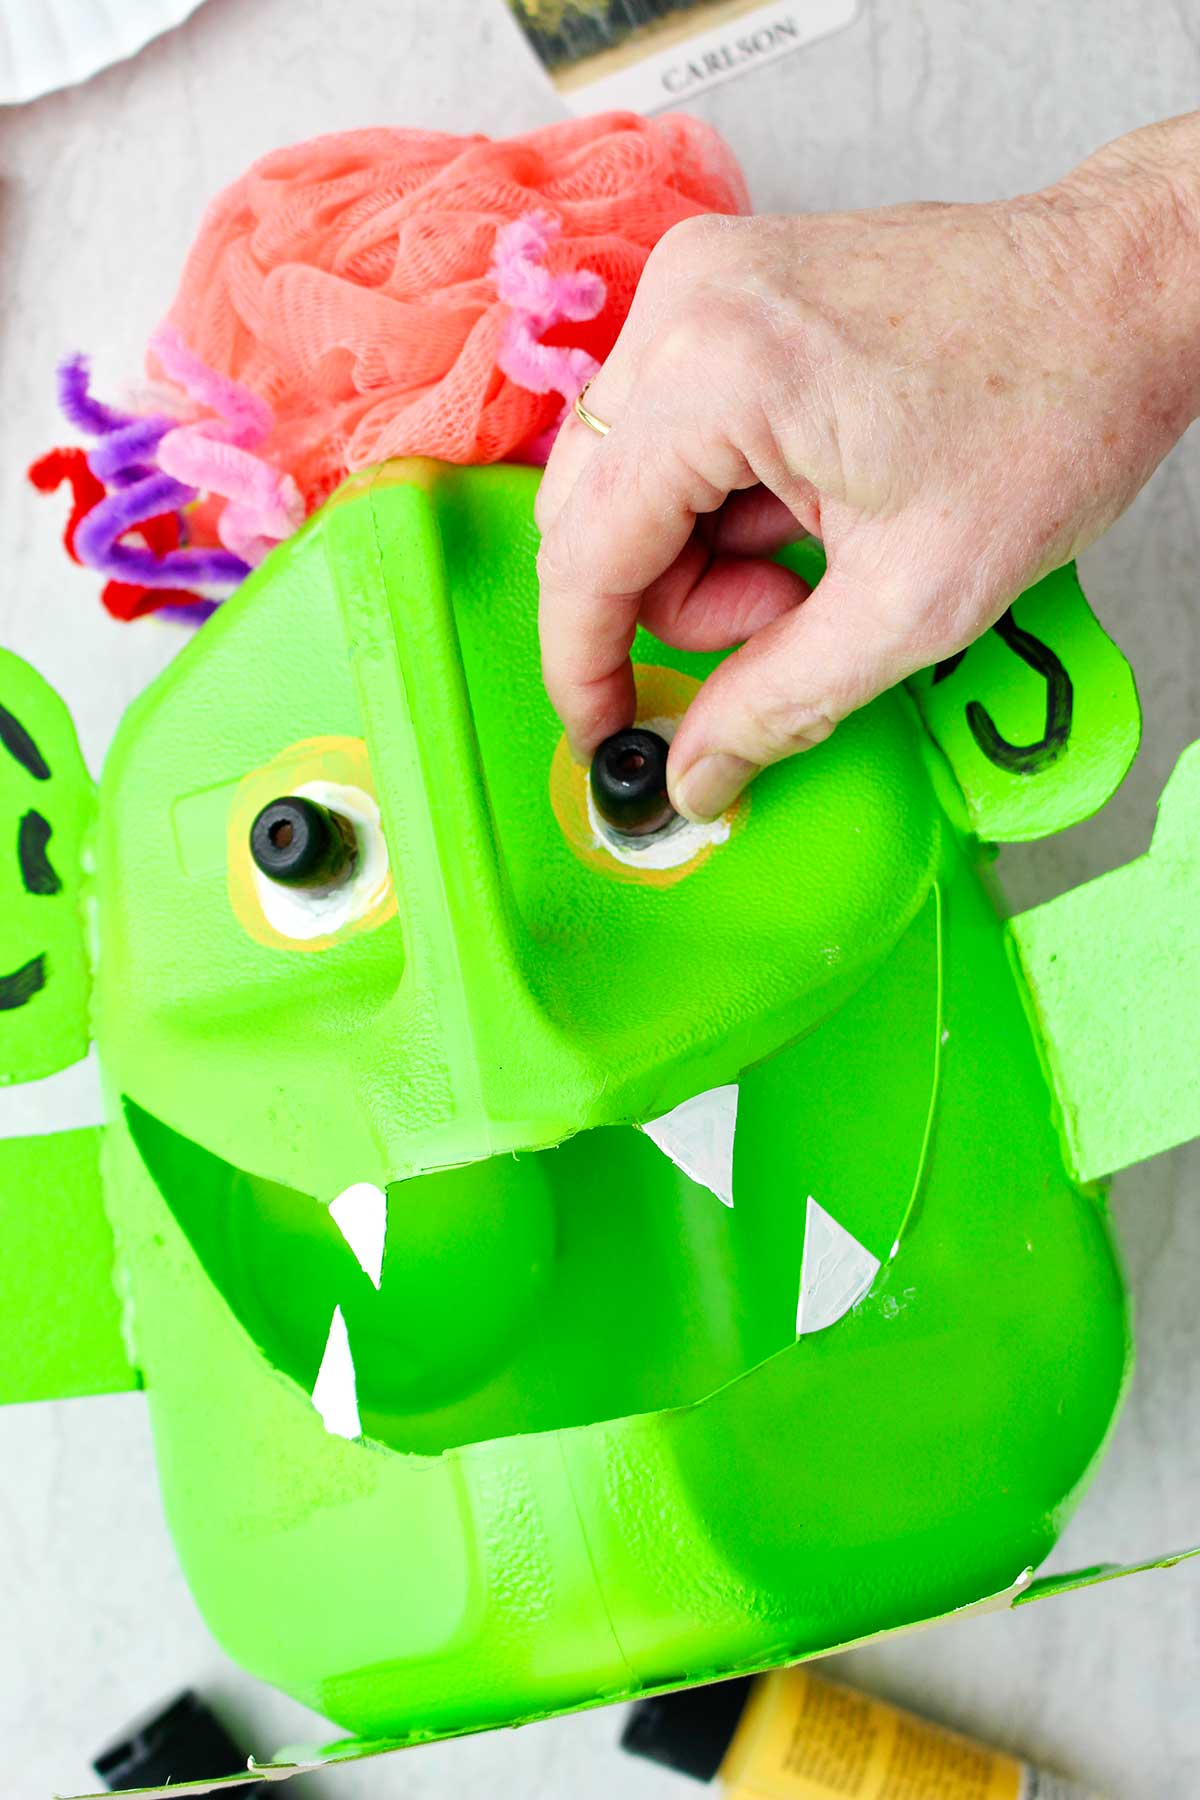
Then I hot glued big wooden beads in the center of the eye area.
I was planning to do more to the monster but felt that this was all it needed.
What would you like to add onto your monster? You can paint spots, stripes, eyes, or nails.
Glue on buttons, pony beads, add stickers or pieces of felt.

Crafts to make with milk jugs
I would love to see what you create for your DIY Monster Milk Jug Halloween Decoration! The sky is the limit! Post pictures of your monster.
I hope you have a happy and safe Halloween holiday if you live in the United States and enjoy this silly craft no matter where you live!
The spray paint linked is quick-dry and suggests about 20 minutes until it is dry to the touch.
That is completely up to you! You can use any extra craft items you have around to decorate - how about using some buttons, beads, fabric, or dry macaroni noodles?
Other Halloween crafts you may enjoy:
- 5 Monstrously Fun DIY Trick or Treat Ideas
- Mini Pumpkin Halloween Decorations
- Recycled Milk Jug Ghost Luminaries
Enjoy!
If you try this craft, let me know! Go ahead and leave a comment, rate it, and tag a photo with #WelcometoNanas wherever you post.
Come join the fun at https://welcometonanas.com
Supplies for DIY Monster Milk Jug Halloween Decoration
- Milk Jug- recycled yea!
- Utility Knife
- Scissors
- Permanent marker
- Cardboard
- Spray paint in color of your choice
- Acrylic craft paints
- Paint brush
- Hot glue gun
- Decorations- bath pouf (loofah), pipe cleaners, yarn, felt, pony beads, buttons, etc.

DIY Monster Milk Jug Halloween Decoration
Equipment
- Utility Knife
- Scissors
- Paint brush
- Hot glue gun
Items Required
- Milk Jug- recycled yea!
- Permanent marker
- Cardboard
- Spray paint in color of your choice
- Acrylic craft paints
- Decorations- bath pouf (loofah), pipe cleaners, yarn, felt, pony beads, buttons, etc.
Instructions
- draw your monster face on the milk jug so you can cut holes in the jug.On mine I wanted the handle to be a nose on the monster, so the handle was in the middle of the monster face and the mouth went below the handle. This worked well and made a very wide toothy grin.You could use the “corner” of the jug opposite of the handle to be the center of the face or a flat side of the jug to be the face of your monster.Take a couple minutes and imagine what would work best for your idea. Then draw on the parts of the face you want to cut out with a permanent marker. This will usually be the mouth and sometimes the eyes. It may also be a hole towards the top of the jug if it is to be used to hold candy for a child as they trick or treat.
- I cut the pour hole off the top of the milk jug. I didn’t want the top of the head to come to a point because I wanted to glue some “hair” on, sticking some of it down into the hole that was left. It worked well.Once you have the face drawn on it’s time to cut it out.It worked well to use a utility knife to cut the plastic. Milk jug plastic is not very thick so it’s pretty easy to cut. Note: This is a step that an adult will need to do for younger children.
- Use some lightweight cardboard to cut a nose, feet, hands/paws, ears, horns, or whatever else you would like to have stick out from your milk jug monster.Leave a ½-¾-inch tab on the end of whatever you draw. This tab will be bent back and used to glue the cardboard piece onto the milk jug.
- Bend the tab back on each cardboard piece. Use hot glue or E6000 glue on the tabs to attach these pieces to your milk jug monster. Note: If you use the E6000 glue it takes longer to dry but may be more durable.
- When the glue is dry, take your monster and your spray paint outside to spray paint. Even though you are outside I recommend placing newspaper or cardboard down. You don’t want the paint to get on the grass or sidewalk.Spray paint the front and the back of the monster according to the directions on the spray paint can. It took more than one coat to get good paint coverage on my monster.After the paint dries your monster friend and you can go back inside for some fun final decorating.
- Take the craft supplies that you pulled out and think about how you can use them to make the milk jug monster decoration look as you would like.My first decoration was to hot glue some “hair” onto the top of the jug. The hair I chose was some pipe cleaners and a loofah/bath sponge. I placed a ring of hot glue around the opening I’d cut in the top of the jug and placed the pipe cleaners across the opening first. Then I hot glued the loofah on over the pipe cleaners.
- Next, how about the face?I used acrylic craft paint to make eyes and some details on the ears and nails of the monster. Then I hot glued big wooden beads in the center of the eye area. I was planning to do more to the monster but felt that this was all it needed.What would you like to add onto your monster? You can paint spots, stripes, eyes, or nails.Glue on buttons, pony beads, add stickers or pieces of felt.
- I would love to see what you create for your DIY Monster Milk Jug Halloween Decoration! The sky is the limit! Post pictures of your monster.I hope you have a happy and safe Halloween holiday if you live in the United States and enjoy this silly craft no matter where you live!


Leave a Reply