Make a DIY Boondoggle Keychain for Father's Day
ke a DIY Boondoggle Keychain for Father’s Day. Full directions on post, video & plastic lacing help you to weave a gift anyone would love!!
Servings: 1 Boondoggle Keychain
Cost: $3
Equipment
- Ruler
- Scissors
Ingredients
- Plastic lacing
- Keychain ring or lanyard hooks
- Ruler
- Scissors
- OR a boondoggle string kit has plastic lacing and keychain rings in kit
Instructions
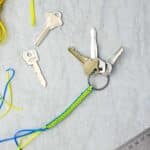
- To start your weaving, cut two strands of your boondoggle plastic lacing. Cut each strand 36 inches long in total length.It’s helpful to use two very different colors of plastic lacing, like yellow and blue or pink and blue. This makes it easy to see the weaving pattern as you are learning.
- String a keychain loop onto the laces at the halfway point.Lay the two laces so that they cross one another at that halfway point.Pick up the two crossed strings with the attached key ring. Make sure to keep the two strings crossed and perpendicular. See the pictures.
- First boondoggle square box stitchTake the lacing to the left and fold it directly over the top of the other lacing so that the two lacings of the same two color are side-by-side. Then pick up the lacing on the bottom and bring it straight up so that it is side-by-side by the other lacing of the same color.Be sure to keep everything straight as you do, which is kind of hard as you get started. It’ll get easier I promise!Take the lacing on your right-hand side (that hasn’t been folded yet) and fold it directly over. Now both ends of this color of lacing are going the opposite direction than they did before.Lastly, take the top lacing (that hasn’t been folded yet) and bring it down over the other lacings. But as you do, weave it by going over the first lacing and under the second lacing to bring it across.Take all of the lacings that are in their new positions (two in each hand) and pull so that they get tighter and tighter. You will see a little weaving cross form.As you pull the plastic lacings, they will kind of lock in place into almost a permanent fold position and stay tight. You don’t want the weaving to be loose. It’s going to be a tightly woven square that’s about a half an inch by a half an inch in size.The lacings up and down and side to side will be the same color as they were when you started.Tighten up your first box square
- Boondoggle square box stitch patternThe next set of steps will become the pattern of doing the rest of the DIY Boondoggle Keychain weaving.Take the lacing on the right and the lacing on the left and fold them up and over the first woven square so now they are going the opposite direction they were before.Now fold the top lacing down- but as you do so, go over the first lacing and then under the second and bring it into its new position.Then take the lacing from the bottom and fold it up- but as you do so, go over the first lacing and under the second lacing to bring it up to its new position.You will have woven another little square.Pull the lacings tight until they lock into place into a small woven square!
- Repeat the basic box pattern until your keychain is the length that you want it to be. The 36 inch plastic lacings you cut should be long enough to make a 3 to 4 inch long keychain. Weave until you get to the length that you want. But leave at least 3 inches of lacing loose on the end when you stop weaving.
- Finishing the DIY Boondoggle KeychainTo finish a DIY Boondoggle Keychain, there are several different techniques. Some people just tie the lacings together with knots. I’ll show you the way that I was taught way back in the day.Make one more of the box weaving pattern, but leave it loose.Take one lacing and bring it over the lacing next to it on the right. Then pull it up into the center of the woven square.Turn your keychain and do this with the next lacing to the right. Bring it up over the next lacing to the right and then pull it up into the center of the square.Repeat that with the last two lacings. Now all of your plastic lacings are coming out of the center of your woven square.This looks very messy! I know, but it will work.Pull the end of one lacing after another to tighten up this last finishing boondoggle knot.Pull the end tight and clip the laces about 2-3 inches long.
Video
Notes
Both reading the directions and seeing it on video will make it easier for you to follow!