How to Make an Agamograph 3D Picture
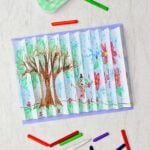
Learn How to Make an Agamograph. An accordion folded paper makes your pictures 3D. When you move side to side you see two different pictures!
Servings: 1 Agamograph
Cost: $2
Equipment
- none needed
Ingredients
- white cardstock, colored cardstock 2 sheets of white and 1 sheet of colored
- white copy paper 2 sheets
- Free Printable Agamograph Template to copy on white papers
- crayons, colored pencils, or markers
- Tacky Craft Glue and a glue stick
- Scissors, ruler, tape
Instructions
- Copy the Free Agamograph Printable Template onto the white copy paper and the white cardstock paper. OR- Lay out the white papers landscape view (horizontal). Make one-inch marks down both long sides of the paper and then use a ruler to connect these marks. Mark all four white papers in the same way.Then make a line ¾ inch from one long edge of each of the four papers.
- Draw a picture on each of the two pieces of copy paper. The pictures can be pictures that have something in common. Pictures like trees in different seasons, a worm then a butterfly, etc. Or the pictures can also be of two completely different subjects. Place the ¾ inch lined off area on the bottom of the drawing. Don’t draw in this ¾ inch area on the one edge of the paper.Completely color in each picture.
- Label each picture using a letter and number system for each strip of the picture. Write the labeling on the ¾ inch area of each strip.Label the first picture A1, A2, A3, and so on. Label the second picture B1, B2, B3, and so on.Cut the papers apart on the long lines and stack the strips in two piles to use later.
- Tape the two pieces of cardstock paper together on one end so it makes one long piece. Tape it on the back unlined side.Cut along the line that is ¾ inch from the edge down both papers and throw the small strip away.Fold the paper from one end to the other accordion style. Make the folds on the lines as accurately as possible with a good crease. Start by folding the first end to the back so you can easily see the line.
- Label each folded strip of the accordion fold cardstock paper. Start at the bottom left and move to the right. Use this pattern: A1, B1, A2, B2, A3, B3 all the way to A11, B11.Pick up strip A1, cut off the small, marked tab and glue it to the A1 position on the folded cardstock paper. Pick up strip B1, cut off the small, marked tab and glue it to the B1 position on the folded cardstock paper.Repeat this with all the pieces of paper from A2, B2 to A11, B11.
- You can leave your agamograph this way or mount it on another piece of cardstock. If you choose the later, complete the following steps.Apply Tacky Glue to each of the folded edges of the accordion folds on the back of the agamograph. Turn it over again and place it on top of the colored cardstock paper.You'll move the folds around until evenly spaced across the colored cardstock paper. Let this dry.Use tape to tape the ends of the accordion folded paper to the edge of the colored cardstock paper.Hold the agamograph and tilt it from side to side to see one picture and then the other.
Video
Notes
Tips and variation ideas are found on the post.