How to Draw a Cube
Learning How to draw a Cube step by step gives you the ability to begin drawing so many objects around you! Give drawing a go, you can do it!
Servings: 1 drawing
Cost: $1
Equipment
- none needed
Ingredients
- Paper or drawing pad
- Pencil
- Eraser or kneadable eraser
- Box, cube shaped object optional
Instructions
- We start by drawing a diamond shape.If it helps in drawing a diamond, draw two side by side dots that are about four inches apart.At the halfway point between those dots, draw two dots that are about 1 ½ or 2 inches apart. But the second set of two dots are above and below the imaginary line that runs between the first two dots you drew.Connect these four dots to make a diamond shape.This should create two sets of parallel lines. Go over your lines a bit until you are happy with the look of the diamond.
- Now draw three lines of equal length that go straight down from the lower three dots of the diamond shape.Making these three lines equal and parallel is one of the keys to learning to draw a cube!You can make the lines short or make them longer to make the size of the cube different.
- Now connect the bottom three ends of the three lines. This should create a set of two lines that are parallel to the bottom two lines of your diamond.See all the sets of parallel lines in your cube? Keep going over your lines until you are happy with how they look.
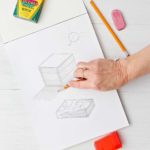
- It’s fun to practice drawing some designs on the cube shape that is drawn so it looks more like the object that is used as the model.
- Shading: Pretend that there is a light source to the upper right of your object. Imagine the light coming down on the cube.Add some shading to the side that is away from the light.Do this by tilting your pencil to the side and rubbing the side of the lead on the paper instead of the point.
- Also add some shading on the surface that is away from the light (imagine that your object is sitting on a table). This is the shadow that the object would cast on the surface when it blocks the light. The cast shadow is kind of shaped like the object.Do a bit of smudging with your finger and the shadow looks smoother and more blended.