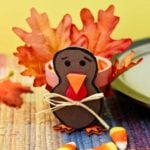
Easy flowerpot Turkey Thanksgiving Favors for the Table
Mini flowerpots become turkey Thanksgiving Favors for Table and hold candy for your guests. Make a larger one for a fun DIY turkey centerpiece!
Servings: 1 Flowerpot Turkey Thanksgiving Favor
Cost: $2
Equipment
- Hot glue gun and glue
- Scissors
Ingredients
- Mini flowerpots- about 2" tall
- Colored craft foam (brown, red, orange)
- Black permanent marker
- 4 artificial fall leaves
- Raffia- small piece (optional)
- Candy Corn or other type of candy
Instructions
- I used a black magic marker to draw the turkey’s body. You’ll note that it’s shaped like a peanut! The height of the body about is drawn to be ½ to ¾ an inch taller than the flowerpot so it’s about 2 ½ inches tall. I cut the Turkey body out along the outside edge of that black line so the black line remained on the foam. I thought it gave it kind of a crisper edged look.
- The beak of the turkey is a small triangle of orange craft foam. That’s easy to make!Before you cut out the wattle, here is a bit of info to help.When it’s glued together, the beak will sit on top of the red wattle. So the top edge of the wattle is the same as the top edge of the beak and it will be about a quarter inch longer than the beak so that you can see it. With that in mind, draw and cut out a little red wattle, or hanging down part, whatever you call it, out of red craft foam. It’s just a little U-shaped piece and doesn’t have to be particular symmetrical. Remember, it has a flat edge along the top edge the same size as the top of the beak and is to be about a quarter inch longer than the beak so that you can see it.
- I set the bottom of the mini flowerpot on top of the orange craft foam and drew a circle around it with a black pen. Move the flowerpot and draw on 2 chicken feet poking out on the edge of the circle (attached to the circle). I draw chicken feet with three pointed toes each, pretty simple. You could draw the feet like little round semi-circle shapes if you prefer that or if it’s easier for the younger kids to cut out. Cut out the round circle and feet all in one piece.
- So I started by laying out the red wattles, and then hot gluing the orange beaks on top of of them. Then I glued the red wattle and beak part on the center of the face of each turkey.
- I stopped and drew 2 little circle eyes on the face of the turkey above the beak. You can draw eyelashes on the eyes if you want to, but I went ahead and put eyebrows above the eyes.
- Finally, put a strip of hot glue up and down on the flowerpot, going directly up from the between the 2 feet. This glue will start at the bottom of the flowerpot and go all the way up to the rim. Gently press the turkey body onto that hot glue area. Whenever you’re using hot glue be very careful so that you don’t accidentally get any on your hands.
- Take your hot glue on the back of the turkey and put a strip of glue down the back of the flowerpot. Place your first leaf against the flowerpot in the position that you decided upon. My two larger leaves went side-by-side on the center back of the turkey. Note: Remember to glue your leaves on with the front part of the leaf facing the flowerpot. Continue gluing on the leaves on the back part of the turkey until all are glued in position. Let the glue cool.
- I added a little Raffia bow on the front of the turkey. You could use twine if you’d prefer. I thought it was kind of cute as it looked like he was dressing up for dinner. The bow is optional.
- When it’s time for your Thanksgiving meal, you can set your turkeys next to the plate and fill them with candy. This is a great thing to ask the kids to do!
Video
Notes
Note: Once you have one of each pattern piece drawn, cut it out and use it as a pattern to draw around it to make as many as needed.
