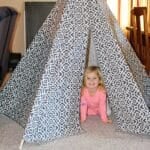
Easy DIY Teepee Tent for Kids
This Easy DIY Teepee Tent is one of those fun projects that will bring about hours and hours fun for kids! Follow the free pattern and step-by-step guide to sew a teepee-style tent that is perfect for a kids room, outdoor play place, or play room.
Servings: 1 Tent
Cost: $20
Equipment
- Drill
- Sewing machine
- Scissors
- Sharpie, Black
Ingredients
- DIY Kids Teepee Printable Pattern
- 6 ¾” dowels, 6 feet long
- 6 Chair leg tips in the ¾" size
- 4 ½ Yards 56-60” wide fabric (heavier weight) Use a fabric without a definite “one way design” or the design will be sideways on the tent.
- 3 Packages Double fold bias tape Coordinating color
- Thread Coordinating color
- Cord to tie dowels together
Instructions
- Start by laying your fabric out on the floor, wrong side up. Using the DIY Kids Teepee pattern found at this link, use a yard stick or measuring tape to draw the solid lines of the pattern onto the fabric. A Sharpie or a ball point pen works well for this step.
- The dotted lines on the pattern are there to give you center lines if that helps you draw the pattern more accurately on the fabric. Don’t cut on the dotted/dashed lines!!!
- Cut out the pieces on the solid lines you drew on the fabric. The 6 panel pieces are cut to be 7.5” at the top edge, 40” at bottom of each panel.
- On ONE panel piece only, cut a slit up the center of the panel from the bottom (wide edge) up about 38”. This will be the front panel door of the tent.
- Using a zig-zag stitch, sew bias tape around the side edges of this door slit.
- Pin the triangle panels together one at a time, WRONG sides together, with the wider edges together and the narrower edges together.
- Sew the panel pieces together, WRONG sides together, with a ⅜” seam. The wide edges will be around the bottom edge of the teepee when finished.
- After all of the panel pieces are sewn together, sew the 6th panel to the 1st panel in the same manner, WRONG sides together.
- Get out the bias tape and sew it around the top and around bottom edges of the teepee cover with a zig-zag stitch to finish the edges off so they don’t ravel.
- For this next step, turn the fabric inside out and sew along each of the vertical seam lines a second time. Sew the pieces together, now with the RIGHT sides together, with a 1 ½” seam. Your first seam will be inside of this seam. (Weird, I know!) This will make a tube seam for the dowels to fit through. These straight line tube seams will end up on the inside of the teepee.
- Drill holes in the dowels 9-10” from one end of each pole.Slip the dowel rods down the tube seams made at the seam of each panel. All of the ends of the dowels with the drilled holes should be at the TOP of the teepee when you are finished.
- Thread the cord through the holes in the dowels and leave the cord untied for now. Set the teepee up in the tent shape and spread out the rods.Adjust the cord at the top. Tie off the cord while the teepee is in its standing position so there is room for the dowels to spread as needed.
- Wrap some cord around where the dowels intersect if you want and double knot again. Cut off the extra cord.
- Tie knots in the ends of the cord so they don’t unravel. You can also wrap a small piece of tape around them, kind of like the tips of shoe strings.
- The last step is to slip the rubber chair leg tips on the bottom of each dowel rod so they don't scratch your floor!
Notes
*