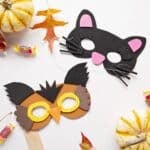
Easy DIY Animal Masks from Craft Foam
These cute DIY Animal Masks are an easy craft for kids that only requires a few supplies to make! Choose from 16 different animal ideas on the free template and guide and create a quick costume for Halloween, a birthday party, or imaginative play!
Servings: 1 Animal Mask
Cost: $3
Equipment
- TopElek Mini Glue Gun Kit with 30pcs Glue Sticks, High Temp
- Scissors
- Pen or pencil
- Hole punch
Ingredients
- 2 copies Nana's Easy DIY Animal Masks from Craft Foam Template and Guide
- Craft foam in various colors, depending on the chosen animal mask
- Elastic Cord for Masks, ⅛ inch Elastic (optional)
- 1 Jumbo Popsicle Sticks (optional)
Instructions
- Print out two copies of the mask pattern. You will use one for the mask and the other to cut pieces to make the animal mask you choose to create. You can copy the Easy DIY Animal Masks from Craft Foam link here.
- Cut a mask from the basic mask pattern out of the base color of the animal you have chosen to make.
- Draw the additional pieces for the animal mask on the second printed pattern.
- Cut these pieces out of the designated colors of craft foam. Set them on the base mask to make sure they fit well and look as you would like.
- Glue the additional pieces on the base mask using hot glue. Feel free to add extra touches of your own to the mask you are making!
- To wear your mask with an elastic band: Make a hole in the base mask on either side, about ½ inch from the edge. Use a heavy weight craft elastic to tie on one side of the mask, go around the back of the head and tie on the other side of the mask.
- To hold your mask: Staple a large popsicle stick to one side of the mask to hold the mask in front of your face.
Video
Notes
Note- I included an adult sized mask as well as a child’s sized mask. You may want one of your own you know.