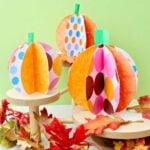
Easy 3D Paper Pumpkin Craft for Fall
The Easy 3D Paper Pumpkin Craft for Fall is great for kids, table decor, or place cards. Go get scrapbook paper, glue, and scissors and go have some fun!
Servings: 1 Paper Pumpkin
Cost: $1
Ingredients
- Free Pattern- at this link: The 3D Paper Pumpkin Free Pattern
- Scrapbook Paper in colors/patterns of your choice
- Green paper- Green paper for a stem
- Pencil-
- Glue- glue sticks or school glue
- Scissors
- Black permanent marker- (optional)
- Ruler- (optional)
- Bone folder- (optional)
- Cardstock paper- (optional)
Instructions
- Choose the scrapbook papers that you want to use for your pumpkin. You can use 1, 2, 4, or 8 different papers.
- Download and print the 3-D Paper Pumpkin Free Pattern at 100% the actual size. Carefully cut out the pattern circles in the size you would like to make (there are three sizes to choose from)
- Use the pattern to trace 8 circles on the papers you have chosen. I used 4 different papers and cut two of each pattern.
- Cut out the 8 paper pumpkin circles. Cut carefully on the lines so they will match well when glued together.
- Fold the circles in half with the pattern of the paper to the inside, matching the edges carefully. Use your finger, a pencil or a bone folder to make a nice, crisp fold. They look like tacos!
- Lay the circles in a line in the pattern you would like for the finished project. For this project we will call the circles #1-#8 in the order you set them out.
- Take the first circle and lay it in front of you with the straight edge to the right. Place glue on the outside of this folded half-circle (one side), covering the whole surface.Lay the second folded circle on top of the first, carefully matching the straight folded edges first and curved edges. Press the sections down for a few seconds so they are well glued together. Repeat this process with circle #3 and #4.
- Cut a stem from green paper (or color of choice) that is about ½ x 2 inches in size for the small pumpkin, ¾ x 2 inches for the medium pumpkin, and 1 x 2 inches for the large pumpkin.Glue the stem to circle #4 so that it is sticking up above the pumpkin by about an inch and the rest is half way on and half way off the straight edge. See the reference photo to make this clear.
- Continue to glue circles #5,6,7, and 8, one on top of the next as done before.Bring the unglued part of circle #1 around to the unglued section of circle #8 and glue them together, matching the edges as closely as possible.Let this dry for 15 minutes or so depending on what glue you use (it takes longer if using liquid glue). Then open the circle papers out flat so they are about the same amount of paper on each side and the stem is at the top.
- Cut off about a ¼ inch sliver along the bottom edge of the pumpkin (horizontal to the fold) so that the pumpkin is flat on the bottom and will stand up. You’ll only cut off a little right now, you can cut off more later if needed but you can’t put it back on!
- (optional) Write on one of the circles if desiring a message or name on the pumpkin. You can use my message if you want- “Happy FALL y’all!
- Fan out the 8 circles so that you have a 3D pumpkin. Set it up on the flat edge. Cut more off the bottom if needed for it to stand up well. Great joy- repeat and make more 3D paper pumpkins! Make a whole pumpkin family!!
Video
Notes
There are a lot of tips and variations on the post found at: https://welcometonanas.com/easy-3d-paper-pumpkin-craft-for-fall/