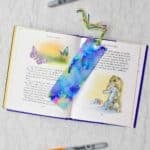
DIY Bookmarks Using Sharpie and Alcohol on Plastic
Colorful DIY bookmarks use the Sharpie and Alcohol technique on recycled milk jug plastic. Make cute gifts for students or yourself!
Servings: 1 Bookmark
Cost: $1
Equipment
- Scissors
- Ruler
- Small glass bowl
Ingredients
- A milk jug- time to recycle, yea!
- Exacto knife
- 91% Isopropyl Alcohol
- Permanent markers
- Eyedropper
- Clear acrylic spray finish
- Hole punch
- Embroidery floss
- Newspaper
Instructions
- Draw the bookmark shape on the flat side of a milk jug with a colored sharpie, about 1.5 inches wide by 5.5 inches long.Cut out the bookmark with an Exacto knife or scissors. Of course younger children will need help with this step and you are reminded to keep your fingers away from the knife.
- Color the surface of the bookmark with permanent markers. Use a simple design.
- Use the 91% isopropyl alcohol and put some into a small glass container. Pick some up with an eyedropper and carefully drop it on the surface.Let this dry and then you can always add some more drops if you feel like it needs some more swirling of colors. Let the alcohol dry. Dispose of extra alcohol.
- When the alcohol is completely dry, spray the bookmark with a clear acrylic spray in two or three light coats. It goes on like a mist and dries almost instantly. This is so the marker/alcohol doesn’t rub off on the book pages.
- Punch a hole in the top to add a tassel. Cut several strands of embroidery floss about 7-8 inches long.Take the floss as a group and double them over in half. Using the end that is doubled over, pull it through the hole leaving the cut ends on the other side of the bookmark. Pull the cut ends through the loop made by the folded end of the floss. Pull this up tight and there is your tassel! Cool, huh?
Video
Notes
I did get a bit too much alcohol and dabbed a bit of it off with a tip of a paper towel.