Cute Paper Plate Bunny Craft for Easter
This Cute Paper Plate Bunny Craft for Easter provides ideas for fast and easy crafts to make with kids. You can use them to hang on a garland, make a mask, or give as a card and spread Easter cheer!
Servings: 1 Paper Plate Bunny Craft
Cost: $1
Equipment
- none needed
Ingredients
- easter bunny craft(s) paper plate or dessert sized paper plate
- washable markers
- googly eyes
- large sized cotton balls
- pom-poms optional
- scrapbooking paper or construction paper
- Other supplies - Scissors, stapler, craft glue, jumbo craft stick (optional for mask), pipe cleaners (optional for whiskers)
Instructions
Easter bunny paper plate craft number one
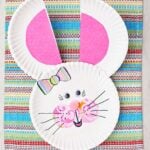
- One white paper plate will be used to be the face of the bunny. Make ears by cutting a second plate in half. Let the child choose whether they use washable markers to color the inside of the ears pink. Or if they cut a piece of pink paper and glue it onto the ears to make the inside of the ear.Then you’ll staple the ears to the top of the bunny face with the flat sides to the center.
Make the face of the bunny
- Cut two round circles from pink scrapbook paper using a cup to trace around. Place these side by side in the center of the plate as part of the nose of the bunny.Glue on a pom-pom or draw a triangle nose towards the top of those two circles. Then draw a small smile below the nose and draw a line down from the nose to the smile.Make eyes by gluing on large googly eyes or by drawing black circles with black dots inside. You can add eyelashes by drawing small lines from the sides of the eyes.
Bowtie on the bunny craft paper plate
- Make a bowtie or add a hair bow to your bunny. Make two triangle pieces of paper that are about 3 inches long and one and a half inches wide. Also cut a circle of paper that’s about 1 inch diameter.Glue the two triangles tip to tip onto the bunny at the chin for a bowtie or up on the top of the head for a hair bow. Glue the round circle at the center of those two triangles to complete the bow.
Bunny paper plate craft number two
- One dessert sized paper plate will be the body of the bunny. A second dessert sized paper plate will be the head of the bunny. A third plate will be the ears.Complete the face of the bunny or the head of the bunny in the same way that you did for bunny number one. If you’re using a smaller plate each of the pieces will be smaller, but the arrangement is still the same.Attach the head onto the body plate by stapling it together.Glue a cotton ball to the end of the second body plate for a tail.
Video
Notes
Link to a full length tutorial video as well as craft tips and variations are found in the post. Come join the fun!