How to Make Beautiful Pressed Flower Art
How To Make Pressed Flower Art lets you use the dried flowers you pressed to decorate cards, bookmarks & pictures for gifts or your home!
Cost: $10
Equipment
- Scissors
- Tweezers (optional- help pick up flowers)
Ingredients
- Pressed flowers
- Card stock- white or a color
- Clear Contact Paper
- Frame- double glass frame (no mat) in the size of your choice
- Colored Markers or Colored Pencils
- Glue
Instructions
- PROJECT 1- Pressed flower bookmark
- If you want a message or your name on your bookmark, write it on the paper with markers or colored pencils before placing the dried flowers.
- Attach your dried flowers to your bookmark with a very small spot of glue.
- Cut a piece of clear contact paper 2 ½ times the width of the bookmark and a bit longer. Take off the contact paper backing. Place the bookmark face down on the center of the sticky side of the contact paper. Wrap the extra contact paper on the sides around to the back of the bookmark. Trim the extra off each of the short bookmark ends.
- PROJECT 2- Pressed flower notecard
- Use the same steps as for the bookmark to decorate and finish the card. When putting on the clear contact paper though, just cut a piece slightly larger than the front of the card. Take off the paper backing and place the card face down on the sticky side of the contact paper. Trim off the extra.
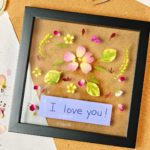
- PROJECT 3- Pressed flower frame diy- pressed flowers in glass
- Open the frame according to directions and slide the double panes of glass out. Clean the glass if needed.
- I cut a piece of cardstock in a rectangle and wrote my message on it. The paper was about 1.5 inches by 4 inches. This is optional of course, but it worked well. Write whatever you would like, a message, quote, or a name. Place this on the back glass where desired. Anchor with tape or spot of glue.
- Place the flowers around the message in an attractive arrangement. Anchor with a spot of glue.
- Place the second glass over the flowers and slide them back into the frame. Close the frame as shown in the instructions.
- Check out this post for 3 ways to make your own envelopes. It makes creating your own envelopes a cinch!