How to Make Nail Polish and Wire Flowers
This Learn How to Make Nail Polish and Wire Flowers Tutorial makes this craft a snap. Use them in gift wrapping or a floral arrangement.
Servings: 1 wire and nail polish flower decoration
Cost: $5
Equipment
- Needle nose pliers
- Wire clippers
Ingredients
- Light weight wire
- Nail polish in colors of choice
- Glittering nail polish
- Small beads
- River stones
- Wax paper, paper plate, or newspaper (table covering)
- Paper towels
- Needle nose pliers
- Wire clippers
Instructions
- The wire that I used was a lightweight 26-gauge wire. I’m sure it could be a little bit heavier than this, but this is what I had on hand to use. It did work well.Cut a piece of wire that’s about 15 inches long.If you would like to follow along as I make these flowers, here is the link to the full tutorial video: How to Make Wire and Nail Polish Flowers Full Length Video.
- Not quite halfway down your wire, start wrapping your lightweight wire around the pencil five times to make five petals.Twist the two wire ends together after making the five loops. These two wires will become the stem.You can twist them together using your fingers or a needle nosed plier as I do in the video.Slide the five loops off the end of the pencilThen run one of the wires through the five loops and alongside the first wire again. twist those two wires together again, one more time.This will hold the five loops together as one. So where you twisted the two wires, that spot will end up being the center of the flower.Then gently twist the two wires together all the way down to make the stem.
- Next go ahead and separate the five loops from one another equally in distance. This doesn’t look like a flower yet, but we’re going to put the fingernail polish on and then after it dries will bend them into a flower shape.I find it easiest to put the fingernail polish on when they’re equal distance apart like this.Personally, I choose to give each loop a small squeeze to make it a more oval shape instead of being completely round.
- The next step is putting on the fingernail polish. It’s a good idea to be working over wax paper or a paper plate or a piece of newspaper because it is quite possible that you’re going to drip some nail polish. I worked over a paper plate to save my work surface from hot pink nail polish. :-)Dip the nail polish brush into the polish and coat the wire of one loop with that fingernail polish. The next step is a little tricky. Note: And because of that, I do recommend this craft for a little bit older child if they’re doing it with you. It takes a bit of coordination and patience.I hold the two wires that are the stem in my hand and put on the fingernail polish. But it is also possible to stick the stem into a foam block and free up your second hand a bit more when you’re doing this step.Dip the nail polish brush back into the polish so that it is loaded. Place the brush flat against the wire loop so that it starts on one end and then draw it across the loop with the brush touching both pieces of wire at once. You move from one side of the petal to the other. The goal is to get the polish to make almost like a bubble across the petal. The video makes this pretty clear and I do say it takes some practice. Don’t be discouraged if you don't get it on the first attempt- just keep trying.
- To begin with the color is not very dark. We’re going to let this dry. Then we will come back and put on a second coat of polish.I did have a little foam block that came from doing a flower arrangement. I poked the wire stem in the foam to hold the flower so it could dry. It would also work to get a little jar of rice or something like that to stick the wire down into.
- I did go ahead and make some leaves for my flowers. Instead of five loops, I only made two loops of wire around the round pencil. And I did the exact same thing by twisting the wire together, pulling one wire through the loops, and then twisting the two wire ends together again.But instead of using hot pink nail polish, I used a green that I had. Technically it’s really more of a turquoise, but it did turn out well.
- Once the flower petals are dry, you can come back and do a second coat of polish to make the color more intense and solid looking.It also makes them stronger and less likely to break open.So you’re in the waiting game one more time as you let this dry again.
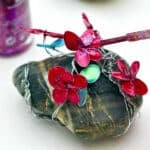
- When the petals are completely dry, then go ahead and gently twist the petals so that they look like a flower with a stem coming straight down from the back.If you have a second color of nail polish, like a glittery type now would be a good time to apply it or you could do it after you make your arrangement and they are in place like I did in the video. I liked the way a little glitter polish looked in the center of the flower.You will also see me gluing a small bead on the center of the flowers when I have the arrangement done. You could do that later or you can do it now for each of your small flowers. This is an optional step.Final touches
- I mentioned a few options on how to use them. As you can see I’m going to put mine on top of a small stone and use it as a decoration.To do this, make the flowers and leaves into a small bouquet.Twist all of the stems together fairly close to the flowers.The bouquet is placed against the top of the stone, and then each of the stems are brought around the stone in a different directions. I had seven stems with the five flowers and two sets leaves that I had made. So the wires were going in seven directions around the rock. Well that is in theory as a couple of them kind of scooted around together. :-).Then on the back of the stone, gather the wires up again and give them another twist.I used my needle nosed plier to get the wires to be a little tighter.Make a small bouquetBring wires to the backMy wires weren’t long enough to need to be clipped, but you could clip them at this point to whatever length you’d like. Tuck the ends into the twisted wire so they don’t poke you.I did not show this in the video, but I recommend taking a small circle of felt and gluing it to the bottom of the stone. So that the wires do not scratch any surface that you might set this upon.Set the stone down and look at your arrangement. Then bend the arrangement into a shape that is visually attractive. You can kind of move the flowers from side to side so that it makes a nice arrangement.