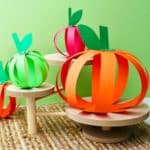
How to Make a Paper Strip Pumpkin Craft
This simple How to Make a Paper Strip Pumpkin Craft is great for all ages to make with available materials. Makes a nice gift or decoration!
Servings: 1 paper strip pumpkin
Cost: $1
Equipment
- Scissors
- Ruler (optional)
- Stapler
- Paper punch (optional)
Ingredients
- Cardstock paper in orange and green (red & yellow-green paper is optional)
- Glue stick
- Brass brads (optional)
Instructions
- We will start with a piece of 8 ½ x 11” orange card stock to make our large pumpkin. The card stock works better than construction paper for the bigger sized pumpkin. It holds it up better in the round shape, so it doesn’t flatten down.We’re going to need eight paper strips and they’re going to end up being about an inch wide each.First option for cutting: You can either use a ruler and draw lines and cut on those lines to make your paper strips or you can fold the paper to make creases that you can cut along to make your paper strips.You can use a ruler and draw lines that go up and down your page (portrait style) that are about an inch apart. Then cut on those lines. This is especially helpful for littles to cut their strips when they have lines to cut on. A paper strip pumpkin is a great learn to cut craft. The second option is to fold your paper in half hot dog style. Then cut on that fold line. Go ahead and fold each of those halves in half hotdog style and cut them both in half. That makes four strips. Then you’ll cut each of those strips in half as well which will make eight approximately 1-inch-wide strips.
- To make a larger pumpkin take four of those strips and then put them together into an X shape by just overlapping the end of each strip. You’ll glue together or staple together those four strips, one on top of the other- only overlapping them on the ends. Again it makes a giant X shape. Take the other four strips and do the same thing. I chose to staple mine together. It just seems to go together a little more easily. I have trouble getting the glue to stay put. Maybe it’s just that I’m not patient enough to let the glue dry well enough!
- Next you will overlap those 2X shapes one on top of the other, so that they make a giant star shape. So one X shape will be on top of the other and the strips on the second X will go in between the strips of the first X. So it looks like a giant octopus or spider with eight arms coming out of the center! Go ahead and staple the two Xs or glue them at the center to hold them in place. That center area is going to be the base of your pumpkin that you’re making. Set this star of paper strips to the side while we do this next step.
- Make the stem out of dark green cardstock paper. Draw with a pencil or a pen a stem that’s about 1 inch wide and about 3 inches long. Also draw a leaf that is attached to one side. Leave about ½ inch to ¾ inch of the stem below the leaf and the other couple inches above the leaf.The stem and leaf end up looking kind of like a wide flower stem with one leaf.You will cut this out all in one piece, so be sure to draw the end of your leaf so that it’s attached well to the stem of the pumpkin. Cut out the stem and leaf.
- Lay this to the side for a moment and take the orange star back up again to work on.Now, again, there’s two ways that you can make these strips have shape like a pumpkin. First option: Glue the paper strips together at the top of the pumpkin.Take the end of each strip up, overlap the end with the end of the other strips, and glue it so that when finished the paper strips will form another star shape on the top. You’ll have the base of the pumpkin at the bottom and then all of the strips will meet again at the top. You don’t fold any of the strips, you bring them up gently and overlap them so that they form the round shape of the pumpkin. So that’s the first way you can form your pumpkin is to glue them. You have to be patient and hold each of those strips well until the glue dries so that they don’t come apart again. When the ends are glued well, take the stem and glue it on the top of the paper strip pumpkin. Old over about ½ to ¾ inch on the bottom of the stem and glue that on the top star area of the pumpkin. Fold the stem up so it can be seen. Second option: So the way I like finishing the paper strip pumpkin is by using a brass brad.If you use the paper brad method, you’re going to need to punch a hole at the end of each of the orange paper strips. Pick up the stem that you made earlier and use the hole punch to make a hole in the stem below the leaf. The brad is going to go through that hole in the leaf first. Then you’re going to pick up one of the strips of paper from the pumpkin and bring it upwards Put the brad down through the strip. You will do this with each one of the strips, one after another in a circle around that star shape. So take strip number one- bring it up and bring the brad down through the hole in the end of it. Pick up the second strip and put the brass brad down through the hole in the second strip. Pick up the third strip, then the fourth. Repeat this all the way around with eight strips. So the brad will go down first through the leaf and then one after another through all eight paper strips.When done with all of the paper strips, turn the pumpkin over, kind of reach inside of it and open that brad. Push one arm of the brass brad to one side, then the other arm of the brad to the other side. That will hold the top of the pumpkin place.
- Finish the pumpkin by folding that stem upwards so that the part that is holding the brad together will be flat with the pumpkin and the stem will come straight up with the leaf out to the side.
- If you would like to walk through this craft with me step by step on video click on this link for a full length tutorial video: How to Make a Paper Strip Pumpkin Craft Full Length Tutorial.