How to Decoupage Flower Pots with Fabric (Easy Mother’s Day Gift!)
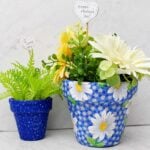
Mother’s Day is coming so let’s Decoupage Flower Pots with Fabric to give to mom! This easy craft for kids uses cute fabric to turn a simple flower pot into a thoughtful DIY gift.
Servings: 1 Decoupaged flower pot
Cost: $5
Equipment
- none needed
Ingredients
- Terra cotta flower pots I used a 4” and a 2” pot in the video
- clay pot sealer (optional)
- Cotton fabric or outdoor piece of fabric in a ½ yard or less amount
- Large piece of paper make a pattern out of paper
- Mod Podge
- larger paintbrush or a foam brush.
- acrylic craft paint (optional)
- Outdoor Mod Podge(optional)
- dowel rod or skewer (optional)
- wooden heart (optional)
- permanent marker(optional)
Instructions
- Seal the inside of the pots and saucers with clay pot sealer and let dry. This is optional but sealing allows you to put a potted plant in the decoupage pot. Let them dry for 24 hours or the amount of time listed in the directions.
- Use the terra cotta pot to make a pattern on the paper. Lay the pot on its side and roll it across the paper. See how it makes an arch shape?Draw around the top edge as you roll it on the paper. Then draw around the bottom edge as you roll it back across the paper. Be sure to have the clay pot roll completely around. Draw a line about 1 inch above and another line 1 inch below the two pot lines. Also add a bit extra to the end of the paper for overlap. This adds extra fabric to turn under the edges of the pot.
- Use the pattern to cut out the shape from the fabric. Try wrapping the fabric around the pot to make sure it is large enough.
- Cover the terracotta pot with a coat of Mod Podge. Then wrap the fabric around the pot. Smooth out any air bubbles and be sure to get the fabric to fit down under the lip of the pot.Where the fabric overlaps, trim this down if it is more than about an inch of overlap. Use more Mod Podge to get it to stay down.
- Put some Mod Podge on the top edge and inside the pot to about one inch down from the top. Tuck the top edge of the fabric down inside of the clay pot. Smooth it out as much as possible.Seal down the extra fabric under the bottom of the pot with Mod Podge. It helps to cut slits down into the fabric and then use Mod Podge to seal down the flaps of fabric.
- Allow the Mod Podge to completely dry. Then add an extra coat of Mod Podge over the entire pot surface.Use Outdoor Mod Podge as the finish coating to put the pot on a covered porch outside. This makes it water resistant (but not water proof).
- Add a potted flower, silk flowers, or candy.
- Paint a wooden craft heart white. Write a message on the heart for the person you'll give it to or for decoration.Glue the heart to a dowel rod or skewer. Break the dowel to the length that works in your your pot, so you can see it above the flowers or candy.Insert the dowel into the flowers.
Video
Notes
Craft tips and variations are on the post.
A link to a full length tutorial video are on the post.
