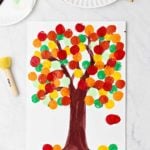
Easy Painted Fall Tree Craft
Make an Easy Painted Fall Tree Craft as the leaves fall. Simple paint dots on a trunk and branches make a beautiful picture.Full instructions, video and pictures at: https://welcometonanas.com/easy-painted-fall-tree-craft/
Servings: 1 painting
Cost: $2
Equipment
- Paint brush
Ingredients
- Acrylic craft paints in brown, red, orange, yellow, green and purple
- Round foam brush in ½ inch size
- Craft paper OR a canvas
- OR- Q-tips, a pencil with a full eraser on the end, or one piece of uncooked broccoli
Instructions
- Start the painting by drawing a simple trunk at the bottom center of your art paper. Where the trunk meets the edge of the paper, draw the trunk outwards a bit as if the roots are going into the ground. This makes the tree look strong and like it won’t fall over.Draw 2 or 3 large branches that come up out of the trunk, they start larger and taper off to a point. Then add smaller branches and twigs that come off these large branches. These also start larger and taper off to a point.
- Use the paint brush and use brown acrylic craft paint to paint the trunk and branches.
- Use the round sponge brush and dip it into one color of the paint, kind of tapping it into the paint so the sponge is covered but not dripping in paint.Touch the sponge down onto the paper in a variety of places over the branches and area of the tree that would have foliage.
- Use another round sponge brush in a second color and add dots in a variety of places over the branches and area of the tree that would have foliage. Or if you have one round sponge brush, rinse out your sponge and squeeze the extra water out then use in the next color.
- Repeat this process, making dots of color with each of your leaf colors of paint.Go back with any color you would like and fill in extra spaces to make the leaves on the tree look as full as you would like. It’s OK if the dots overlap each other a bit.
Video
Notes
Tip: My younger grandkids asked me to draw a trunk for them and then they filled it in with paint. This worked great and you might consider doing this for your littles.
Tip: It is easiest to have one sponge brush per color instead of rinsing the sponge and re-using it for each color. Kids will just start dipping into every color and then the colors get “muddy” and aren’t as vibrant. You can rinse them all at the end and reuse them!
Note: Check the post for other ways to make the dots of color if you don't have a round sponge brush.