Easy Mushroom Drawing (2 Ways)!
Kids can make this Easy Mushroom Drawing 2 Ways- 2D or 3D with shading. It is completed in minutes with an experienced teacher showing how! Draw on a cute mushroom face for extra fun.
Servings: 2 Mushroom drawings
Cost: $1
Equipment
- none needed
Ingredients
Instructions
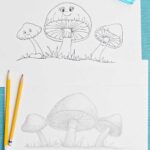
Easy 2D Mushroom Drawing- a cute easy mushroom drawing
- We will start by drawing the top (or the cap) of the mushroom. In the center of your drawing paper, draw an oval that goes horizontally from side to side (the underside of the mushroom). Then draw a line that makes a mound over the top of the oval, continues closely under the oval, and connects with the beginning of the line. This is the puffy top of the mushroom.
- We’ll make a stem by drawing two lines that start a close distance apart near the center of the oval. The lines go down and get wider apart (like a tree trunk). Draw an “upside down smile line” to connect the two lines at the top and a second line across the bottom which represents the ground.
- The stem has a “skirt” that is made with a wavy line about ¼ th the way down the stem with a few vertical lines on the skirt.
- The oval underside of the mushroom has “gill” lines that look like the spokes of a bicycle. They come out around the stem and radiate out to the outer edge of the oval. Draw these in on your picture.
- Make a few contour lines that are like small smile lines around the bottom of the mushroom cap to give the look of it being rounded (see picture).
- For finishing touches, extend the ground line to the left and to the right. Add some grass above the ground line with an up and down zig-zag line.
- A mushroom can be drawn that doesn’t show the underside. Start with a “smile” line that isn’t very curved. Draw the same mound line over the top but connect it on the left end of the smile line and the right end of the smile line. Draw the stem coming down from the center of the smile line. Finish as you did the other mushroom.
- Make this a cute mushroom drawing by drawing faces (arms, legs) on the mushrooms! Enjoy coloring your drawing in.
Easy 3D Mushroom Drawing with shading
- Draw the mushroom the same way as steps 1-5 in the 2D easy mushroom drawing instructions.
- We will have the light source of the picture coming down from the top right of the picture- as if the sun was there, shining down on the mushrooms you drew. Shade the edge of the mushroom cap with vertica “smile lines” that give the impression that the edge has a curved shape. Then shade the side of the cap that is farthest from the light source.
- Shade the stem. Shade the farthest edge of the stem from the light source. Even though it is under the cap, don’t darken it in completely.
- Add some lines and dots on the cap of the mushroom to give it a textured look. The surface of a mushroom isn’t smooth. Add a few lines to the stem as well as fiber lines.
- Shade the underside gills of the mushroom. Darken the spoke like gill lines and shade the area (it is the underneath side of the mushroom and gets less light). But don’t completely darken it in, you want to still see the gill lines.
- Blend the shaded areas you’ve drawn. Use your finger or a blending tool to make the shaded areas look more even and smooth.
- Extend the ground line under the mushroom, draw grass with a vertical zig-zag type line. I use the side of my pencil for this. Shade the grass and blend the shading.
- Make more mushrooms in the same manner to make a grouping. Use a variety of shapes in the mushroom caps and stems.
Video
Notes
Lots of tips and variation ideas as well as a link to the full length video are found on the post at: https://welcometonanas.com/easy-mushroom-drawing-2-ways/