Easy DIY Buttons Craft Project (Paint with Buttons)
This Easy DIY Buttons Craft Project allows kids of all ages to paint with buttons. Have great fun making whimsical pictures using buttons.
Servings: 1 Button craft on canvas
Cost: $7.50
Equipment
- Paint brushes
Ingredients
- 8x10" canvas board (or 8x10" stretched canvas or 8.5x11" cardstock)
- Glue (school glue or tacky glue)
- Paper and pencil to sketch and plan your design
- Buttons in colors needed for your picture
- Acrylic craft paints in colors similar to button colors for your picture
- Extra craft items to complete picture (felt, beads, etc)- optional
- Paint brushes
- Frame for 8x10" canvas (optional)
Instructions
- The first step is to think about what picture you would like to make out of buttons. You can make an any sort of picture, but it’s important to simplify the image so that it looks good made out of buttons.Make a simple sketch on paper of that object so it is mostly defined by the outline shape and some simple features.On your sketch you will want to make some notes about what colors of buttons you will use in each area of the object that you’re making. With these colors in mind you can look and see what buttons you have and what needs to be purchased.
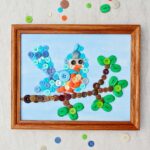
- In the video in the pictures, you will see that I used an 8 x 10" canvas board on which to make my picture. This slips nicely into an 8 x 10" frame if if you would like to hang yours up on the wall in a frame.It’s nice to cover your canvas with either paint or a decorative paper as a background.I chose to make a bluebird for this project. I want the background to look like a sky.So I chose to mix up a bit of light blue paint from white and blue acrylic craft paint. Then I painted the entire surface of the canvas board.Set the canvas aside to dry when finished with the background.
- While the canvas is drying, get out your sewing buttons and begin to separate out buttons in the colors that you chose for your picture. I emptied the purchased package of craft buttons into my collection of older buttons on the plate to fill out some extra color needs for the picture.
- When the paint on the background is dry, you will want to transfer your sketch onto your canvas.
- Next, I used some acrylic paints to paint in the bird figure that I had drawn.I tried to choose colors that were similar to what color buttons I was planning to put in that area. So I painted a blue in the blue area and an orange on the tummy of the bird for example.Paint each section of your drawing with a color that is close to the button color you’re wanting in that area.
- Once your painting is done and dry, you can begin placing buttons onto the picture. Choose an easy section to begin with. Put glue over the entire surface in the first area. I used Elmer’s glue, but it might be a good idea to try tacky glue to keep those buttons in place well while you are working.Begin putting the blue buttons on that area and try to fit them inside the painted areas on the bird.
- I chose to add a partial second layer of buttons over the top of the first. I let the first layer dry for a little while and then began to a few buttons over the top of the first layer. I didn’t do it over the entire surface, just in some areas.The eyes were made with two white buttons.Then on top of them were two small black buttons (third layer). They fit in on top of those white ones to make the pupils in the eyes. I thought that the eyes turned out really cute!
- I did not think that an orange round button would look good for the birds beak. So I found a small piece of orange felt in my craft supplies and cut two small triangles and glued them on as the birds beak.I just wanted to point out that you could add other materials onto your button picture if you wanted to. I used a little bit of felt. But you could also use: Little beads, Small pieces of jewelry, Pebbles, Seashells, A twig from the yard.
- It was fun to slip the picture into an 8 x 10" frame and see how it looked framed. I hope to hang this button bluebird picture up in the bedroom where the grandkids sleep when they visit!
Video
Notes
You can also use a stretched canvas or a piece of card stock paper. Of course the canvases will be more durable.