Easy Butterfly Drawing (2 Ways)!
Learn to make a Butterfly Drawing 2 Ways! Draw a 2D coloring book line drawing or a realistic 3D pencil sketch with shading. Draw any butterfly type and add color if you want.
Servings: 2 Butterfly Drawings
Cost: $1
Equipment
- none needed
Ingredients
- drawing paper or a sketch book
- a pencil or marker
- an eraser
- colored pencils or crayons (optional)
Instructions
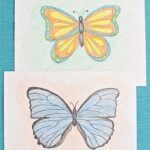
Butterfly drawing #1- A 2D butterfly (like a coloring book)
- In pencil draw a square the size of the butterfly you want to draw. Then draw a line that cuts it in half vertically and a second line that cuts it in half horizontally. This is a grid that will be where you draw your butterfly.
- In pencil or with a marker draw the body of the butterfly down the center line as shown in the photo and video. the body is a circle head and two oval sections below the head.
- The top wing is a modified rounded corner triangle drawn in the top right square of the grid. And a mirror image of that wing is drawn in the top left grid square. Do the best you can to imitate the first wing you drew but backwards. It helps to see this in the video.
- Draw the bottom sections of the wings- the first in the bottom right square of the grid. It is a teardrop shape. Make the mirror image of this wing section in the bottom left square of the grid. Imitate the other section but backwards.
- Decorate the wings. I added a border to each wing section and added squares and circles in the border. Then decorated the inner part of the wing with teardrop shapes. Whatever you do on one wing, do in reverse on the other wing. Have fun!
- Finish with details like antenna and a face.
Butterfly drawing #2- A 3D butterfly with shading
- Find a picture of a butterfly you would like to draw. I drew a blue morpho butterfly.
- Start with the four square grid (in pencil) like we did with butterfly drawing #1. Along the center line of the grid sketch the body of the butterfly.
- With a pencil draw the shape of the top right wing in the top right square of the grid. Imitate this shape in reverse in the top left square of the grid. Imitate the outline, the dips, the waves and curves so it looks like the butterfly in the picture. Repeat this wing shape in reverse the top left square of the grid.
- Repeat this with the bottom right and left lower wing sections.Begin to draw the pattern on the inside of the wings. Imitate what you see in the picture of the butterfly you’re using. Draw a border around the wing edges and the stained glass pattern in the center of the wings. Remember to repeat the pattern in reverse on the opposite side of the butterfly.
- Add finishing details like antenna and surface pattern on the butterfly.
- Shade in the butterfly. Tip your pencil over so that you are using the side of the lead to make marks on the paper. Look at your picture and shade the parts that are darkest first using firm pressure with the pencil as you draw. The center of the wings on mine were lighter and had texture so lighter pressure and some lines in that section helped achieve this effect.(optional) Instead of shading, use colored pencils on your butterfly.
Video
Notes
Tips, variations, and link to full length video can be found on the post: https://welcometonanas.com/how-to-draw-a-butterfly/